


 本文介绍了如何配置Android设备和开发环境以进行AR开发,特别是使用Sceneform框架。首先,配置虚拟设备和真机,确保支持ARCore和OpenGLES3.0。接着,配置开发环境,包括添加Sceneform的gradle插件和依赖,以及在manifest中声明权限。最后,展示了如何在项目中创建ArFragment,加载3D模型并实现在AR环境中显示。
Android AR开发实践之四:基于Sceneform的ARcore开发实例
Sceneform是google的ARCore开发团队提供的一个方便使用ARCore进行开发的框架,利用Sceneform,无需学习OpenGL即可轻松的在AR和非AR应用中渲染逼真的3D场景。
Sceneform提供了ArFragment来显示可以渲染虚拟物体的场景,以及相关的一些如模型导入、平面处理、材质自定义、手势控制等功能,可以方便快捷地开发ARCore的应用。
Sceneform SDK for Android如今已经在github上开源了,本文示例基于Sceneform SDK for Android 1.17.1
一、设备配置
1、配置虚拟设备
创建Android 虚拟设备,并进行如下选择:
- 选择 Pixel 2 硬件配置。
选择 API Level 29 : x86 : Android 10 (Google APIs) 系统映像。
确认后摄像头设置为:VirualScene
转到 Verify Configuration > Show Advanced Settings。
确保 Camera Back 已设为 VirtualScene。
最终的模拟器配置如下图所示:

确保模拟器已配置为使用最新版本的 OpenGL ES**
在正在运行的模拟器中,点击工具栏中的更多…
选择 Settings > Advanced > OpenGL ES API level > Renderer maximum (up to OpenGL ES 3.1)。
重新启动模拟器。 系统提示时,请不要保存当前状态。
模拟器重启后,在AndroidStudio的命令行模式下通过grep命令查看设备日志,检查是否用了 OpenGL ES 3.0版本:
adb logcat | grep eglMakeCurrent

//出现下面的logcat则说明OpenGL ES 3.0 启用正确
… …  …  … D EGL_emulation: eglMakeCurrent: 0xebe63540: ver 3 0 (tinfo 0xd104cb40)
- 安装ARCore到模拟器
下载Google_Play_Services_for_AR_1.22.0_x86_for_emulator.apk , 拖动到模拟器界面中,提示安装,继续即可。
2、配置真机
-
选择设备
目前,并不是所有的Android设备都支持ARCore,在中国,我们可以选用ARCore支持的设备
-
安装ARCore到设备中
如果设备已经安装了ARCore,需要升级到最新版本。如果设备中没有暗转ARCore,则需要在github下载安装最新的arcoreGoogle_Play_Services_for_AR_1.22.0.apk到设备。
二、开发环境配置
1、首先添加sceneform的gradle插件到工程配置中
在工程的build.gradle文件的dependencies闭包下添加classpath:
**classpath 'com.google.ar.sceneform:plugin:1.17.1'**
在app的build.gradle文件的plugins闭包下添加sceneform插件
**id 'com.google.ar.sceneform.plugin'**
该插件用来将object文件生成sceneform的sfb文件。
具体使用方法如下:
首先在app的build.gradle文件中添加生成配置选项,然后重新编译代码即可将obj文件生成sfb文件到指定的目录下
sceneform.asset('sampledata/sebastien.obj',
                                    // 'Source Asset Path' specified during
                                    // import. This will typically be the
                                    // app/sampledata folder since resources in
                                    // this file is not compiled into your
                                    // application
'default',                          // 'Material Path' specified during import.
'sampledata/sebastien.sfa',         // '.sfa Output Path' specified during import.
'src/main/res/raw/sebastien')       // '.sfb Output Path' specified during import.
2、在app的build.gradle文件中添加sceneform的依赖,并声明最小sdk版本
 // Provides ArFragment, and other Sceneform UX resources:
    implementation "com.google.ar.sceneform.ux:sceneform-ux:1.15.0"

    // Alternatively, use ArSceneView without the UX dependency.
    //implementation "com.google.ar.sceneform:core:1.15.0"
因为AR的最小sdk是24,所以要在app的build.gradle文件中申明最小sdk
defaultConfig {
		applicationId "com.google.ar.sceneform.samples.hellosceneform"

        // Sceneform requires minSdkVersion >= 24.
        minSdkVersion 24

        targetSdkVersion 28
        versionCode 1
        versionName "1.0"
    }
完整的app的build.gradle文件如下:
plugins {
    id 'com.android.application'
    id 'com.google.ar.sceneform.plugin'
}

android {
    compileSdkVersion 30
    buildToolsVersion "30.0.3"
    defaultConfig {
        applicationId "com.ytech.argenius"
        minSdkVersion 24
        targetSdkVersion 30
        versionCode 1
        versionName "1.0"

        testInstrumentationRunner "androidx.test.runner.AndroidJUnitRunner"
    }

    buildTypes {
        release {
            minifyEnabled false
            proguardFiles getDefaultProguardFile('proguard-android-optimize.txt'), 'proguard-rules.pro'
        }
    }
    compileOptions {
        sourceCompatibility JavaVersion.VERSION_1_8
        targetCompatibility JavaVersion.VERSION_1_8
    }
}

dependencies {
    implementation 'androidx.appcompat:appcompat:1.2.0'
    implementation 'com.google.android.material:material:1.2.1'
    implementation 'androidx.constraintlayout:constraintlayout:2.0.4'
    implementation 'androidx.navigation:navigation-fragment:2.3.2'
    implementation 'androidx.navigation:navigation-ui:2.3.2'
    implementation 'androidx.lifecycle:lifecycle-livedata-ktx:2.2.0'
    implementation 'androidx.lifecycle:lifecycle-viewmodel-ktx:2.2.0'
    testImplementation 'junit:junit:4.+'
    androidTestImplementation 'androidx.test.ext:junit:1.1.2'
    androidTestImplementation 'androidx.test.espresso:espresso-core:3.3.0'

    // Provides ArFragment, and other Sceneform UX resources:
    implementation "com.google.ar.sceneform.ux:sceneform-ux:1.17.1"

    // Alternatively, use ArSceneView without the UX dependency.
    //implementation "com.google.ar.sceneform:core:1.17.1"
}
完整的工程的build.gradle文件如下:
// Top-level build file where you can add configuration options common to all sub-projects/modules.
buildscript {
    repositories {
        google()
        jcenter()
        mavenLocal()
    }
    dependencies {
        classpath "com.android.tools.build:gradle:4.1.0"
        classpath 'com.google.ar.sceneform:plugin:1.15.0'

        // NOTE: Do not place your application dependencies here; they belong
        // in the individual module build.gradle files
    }
}

allprojects {
    repositories {
        google()
        jcenter()
        mavenLocal()
    }
}

task clean(type: Delete) {
    delete rootProject.buildDir
}
3、manifest文件配置权限申请
- arcore需要启动摄像头的权限
- arcore应用需要设备安装了Google play service for AR应用
- arcore应用opengl 3.0以上
因此需要在manifest文件中声明如下权限
<!-- Camera permission  -->
    <uses-permission android:name="android.permission.CAMERA" />

<!-- Sceneform requires OpenGLES 3.0 or later. -->
    <uses-feature android:glEsVersion="0x00030000" android:required="true" />

<!-- Indicates that this app requires Google Play Services for AR ("AR Required") and results in the app only being visible in the Google Play Store on devices that support ARCore. For an "AR Optional" app, remove this tag. -->
    <uses-feature android:name="android.hardware.camera.ar" android:required="true"/>
完整的android.manifest如下:
<?xml version="1.0" encoding="utf-8"?>
<manifest xmlns:android="http://schemas.android.com/apk/res/android"
    package="com.ytech.argenius">


    <uses-permission android:name="android.permission.CAMERA" />
    <!-- Sceneform requires OpenGLES 3.0 or later. -->
    <uses-feature android:glEsVersion="0x00030000" android:required="true" />
    <!-- Indicates that this app requires Google Play Services for AR ("AR Required") and results in
         the app only being visible in the Google Play Store on devices that support ARCore.
         For an "AR Optional" app, remove this tag. -->
    <uses-feature android:name="android.hardware.camera.ar" android:required="true"/>

    <application
        android:allowBackup="true"
        android:icon="@mipmap/ic_launcher"
        android:label="@string/app_name"
        android:roundIcon="@mipmap/ic_launcher_round"
        android:supportsRtl="true"
        android:theme="@style/Theme.ARGenius">

        <!-- Indicates that this app requires Google Play Services for AR ("AR Required") and causes
          the Google Play Store to download and intall Google Play Services for AR along with
          the app. For an "AR Optional" app, specify "optional" instead of "required". -->
        <meta-data android:name="com.google.ar.core" android:value="required" />

        <activity
            android:name=".MainActivity"
            android:label="@string/app_name"
            android:theme="@style/Theme.ARGenius.NoActionBar">
            <intent-filter>
                <action android:name="android.intent.action.MAIN" />

                <category android:name="android.intent.category.LAUNCHER" />
            </intent-filter>
        </activity>
    </application>

</manifest>
至此,开发环境的配置就完成了,下面我们可以开始ARCore的开发了。
三、开发基于Sceneform的ARCore应用
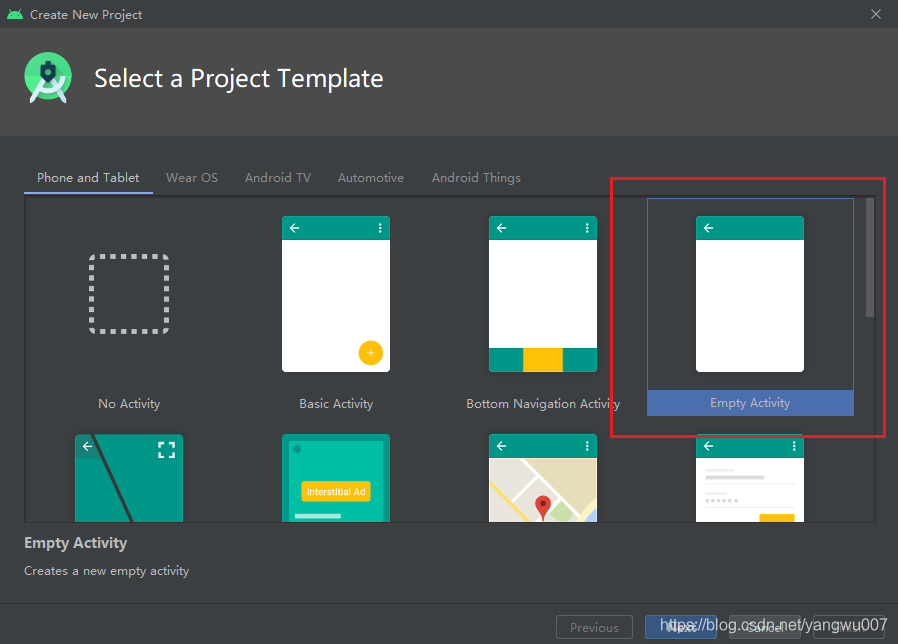
1、创建一个新的工程
在Android Studio中,创建一个Empty Activity的工程,记得targeting API设置为API level 24 或更新。

2、添加ArFragment到工程中
修改acitvity_mani.xml如下:
<FrameLayout xmlns:android="http://schemas.android.com/apk/res/android"
    xmlns:tools="http://schemas.android.com/tools"
    android:layout_width="match_parent"
    android:layout_height="match_parent"
    tools:context=".HelloSceneformActivity">

  <fragment android:name="com.google.ar.sceneform.ux.ArFragment"
      android:id="@+id/ux_fragment"
      android:layout_width="match_parent"
      android:layout_height="match_parent" />
</FrameLayout>
然后在mainactivity中添加如下代码:
private ArFragment arFragment;

  @Override
  @SuppressWarnings({"AndroidApiChecker", "FutureReturnValueIgnored"})
  // CompletableFuture requires api level 24
  // FutureReturnValueIgnored is not valid
  protected void onCreate(Bundle savedInstanceState) {
    super.onCreate(savedInstanceState);

    setContentView(R.layout.activity_ux);

    arFragment = (ArFragment) getSupportFragmentManager().findFragmentById(R.id.ux_fragment);
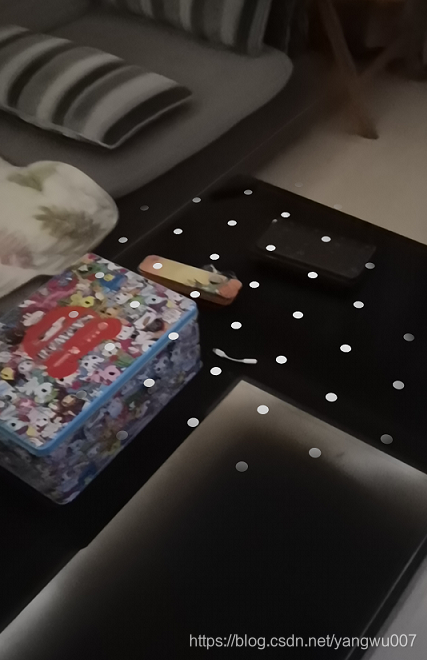
编译并运行程序,可以看到ARCore已经运行于ArFragment中了。下图即为ARCore在摄像头画面中检测出了平面,并标注出来。
3、实现增强现实功能
3.1 添加3d素材到工程中
我们可以在google的poly网站上得到大量免费的3d模型,Sceneform支持渲染OBJ,FBX,glTF格式的3d模型,我们只需要下载obj格式即可。(注意,下载的文件中包含有obj文件和mtl文件)
在工程的app目录下创建一个sampledata目录,将下载的obj文件和mtl文件放入到该目录中。
然后在app的build.gradle中添加3d模板的转换配置选项,然后重新编译代码,则插件会自动生成andy.sfb文件到src/main/res/raw目录之下。
注:sfb文件是sceneform的二进制文件,sfa文件是sfb文件的一个文本描述。
sceneform.asset('sampledata/models/andy.obj',
        'default',
        'sampledata/models/andy.sfa',
        'src/main/res/raw/andy')
3.2 添加虚拟物体到摄像头画面中
在MainActrivity中添加如下的代码:
protected void onCreate(Bundle savedInstanceState) {
    super.onCreate(savedInstanceState);

    setContentView(R.layout.activity_ux);
    arFragment = (ArFragment) getSupportFragmentManager().findFragmentById(R.id.ux_fragment);

    // When you build a Renderable, Sceneform loads its resources in the background while returning
    // a CompletableFuture. Call thenAccept(), handle(), or check isDone() before calling get().
    ModelRenderable.builder()
        .setSource(this, R.raw.andy)
        .build()
        .thenAccept(renderable -> andyRenderable = renderable)
        .exceptionally(
            throwable -> {
              Toast toast =
                  Toast.makeText(this, "Unable to load andy renderable", Toast.LENGTH_LONG);
              toast.setGravity(Gravity.CENTER, 0, 0);
              toast.show();
              return null;
            });

    arFragment.setOnTapArPlaneListener(
        (HitResult hitResult, Plane plane, MotionEvent motionEvent) -> {
          if (andyRenderable == null) {
            return;
          }

          // Create the Anchor.
          Anchor anchor = hitResult.createAnchor();
          AnchorNode anchorNode = new AnchorNode(anchor);
          anchorNode.setParent(arFragment.getArSceneView().getScene());

          // Create the transformable andy and add it to the anchor.
          TransformableNode andy = new TransformableNode(arFragment.getTransformationSystem());
          andy.setParent(anchorNode);
          andy.setRenderable(andyRenderable);
          andy.select();
        });
  }
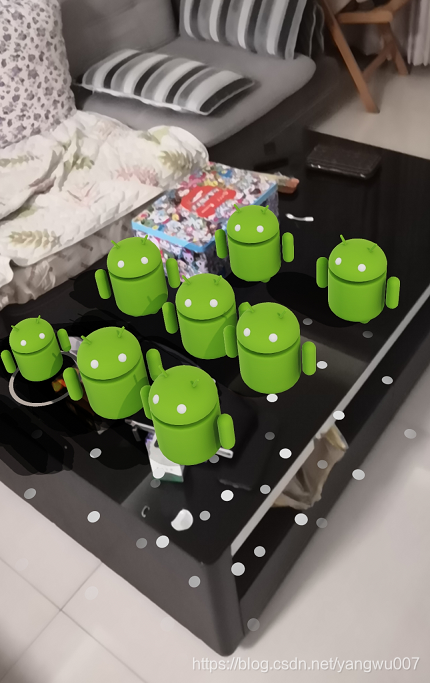
上述代码首先基于我们导入到工程中的3d素材,创建了一个ModelRenderable的对象,然后在arFragment检测到的平面的tap事件添加回调的lambda函数表达式:创建一个锚点,然后添加到anchorNode中,将创建的ModelRenderable对象添加到节点,并显示出来。
编译并执行代码,效果如下:
至此,我们已经实现了基于Scenefrom的ARcore简单开发,后续我们会继续实现ARCore的更多功能开发。
参考资料:


 1005
1005

 被折叠的 条评论
为什么被折叠?
被折叠的 条评论
为什么被折叠?
 到【灌水乐园】发言


