


1. Nginx servername匹配规则都有什么?
- 完整匹配
- 通配符匹配
- 正则匹配
正则匹配格式,必须以~开头,比如server_name ~^www\d+\.nzbc\.com$;。如果没有~开头,则Nginx会判定为完整匹配,在逻辑上,需要添加^和$锚定符号。正则匹配格式中.为正则元字符,需要通过反斜线进行转义,如果正在表达式中包含{},需要用双引号引用起来,避免报错。
2. 说说Nginx正向代理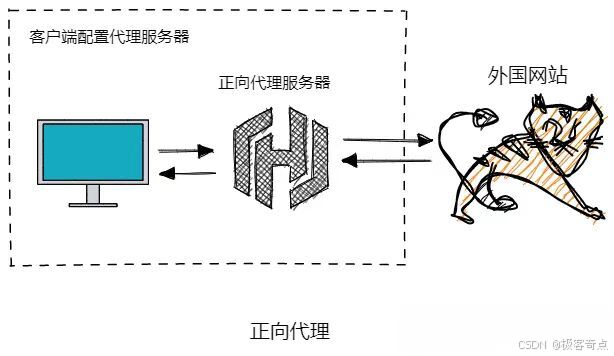
正向代理服务器一般位于用户和服务器之间,用户通过正向代理服务器访问应用服务器获取资源。
最常见的例子就是,我们访问一个外国网站,该网站无法在国内直接访问,但是可以通过代理服务器访问,也就是说,用户向正向代理服务器发送一个请求并指定目标,然后正向代理服务器向目标服务器(外国网站)转交请求并将获得的内容返回给用户。
正向代理服务器,代理的是客户端,去和服务端交互。
3. 说说Nginx反向代理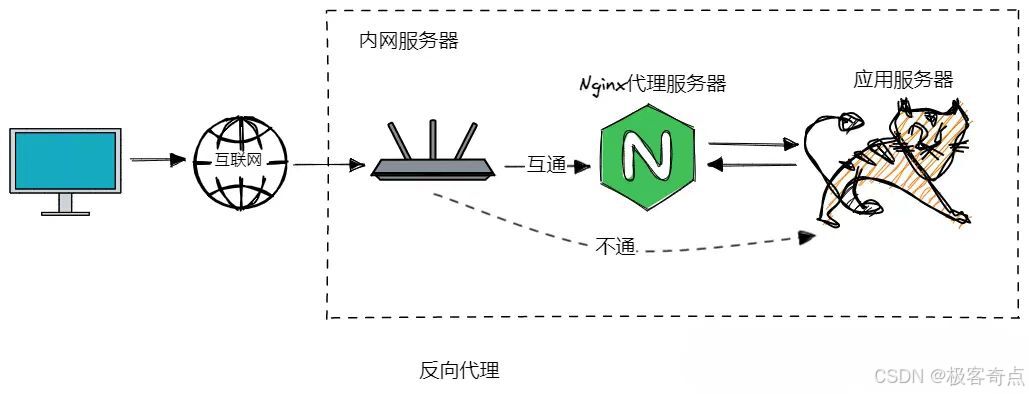
反向代理服务器一般位于用户和服务器之间,用户访问反向代理服务器获取应用服务器资源,用户不知道应用服务器的地址,是由代理服务器转发的,有降低网络和服务器的负载,提高访问效率的作用。
反向代理服务器,代理的是服务端,去和客户端交互。
Nginx就是一款高性能的反向代理服务器。
4. 说说LVS是什么?
先说结论,LVS解决了Nginx单机性能瓶颈的问题。
LVS主要用于多服务器负载均衡,工作在网络的第四层,可以实现高性能、高可用的服务器集群技术,采用同步请求转发的策略。
LVS支持的并发量要比Nginx高,可以配合keepalived使用,将Nginx作为LVS的节点机器,因为Nginx在网络的第七层,功能上肯定强于LVS。
用户通过Nginx访问应用服务器,应用服务器直接将数据返回给机房路由,返回时不走Nginx了,降低了Nginx的性能消耗。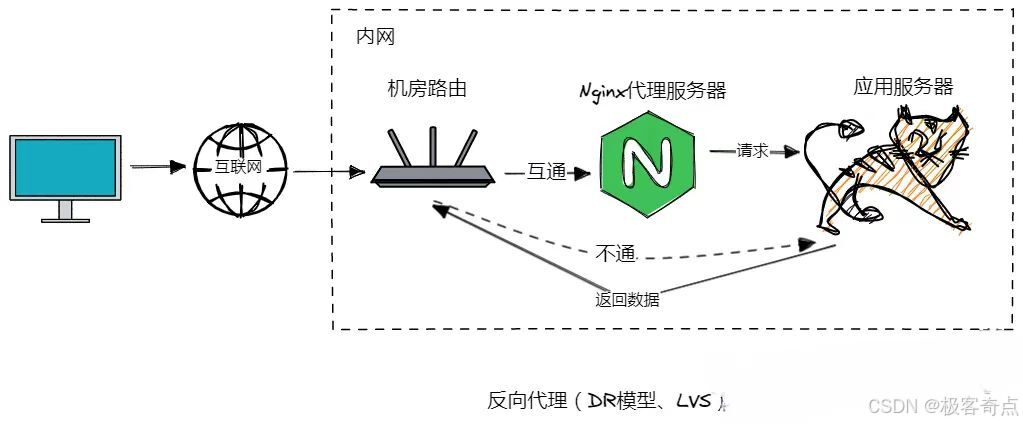
5. Nginx负载均衡策略都有什么?
轮询
默认使用轮询方式,逐一转发访问,这种情况适合无状态请求,会话无法保持,可以通过基于客户端实现会话保持。
会话保持方式:
(1)基于session实现:
session用于存储客户端用户信息,一般不在服务器存储session,可以通过SpringSession将session存储到一个Redis服务器中,再次访问时,可以到Redis服务器中获取session,实现session共享。
(2)基于cookie实现,无状态的会话保持方式:
客户端访问时,先到权限校验服务器校验权限,生成一个cookie,并进行加密,只有服务器能解密,客户端没密码无法解密,客户端携带此cookie再次访问应用服务器,应用服务器进行解密校验,完成无状态的会话保持。
权重
通过upstream进行权重的定义。
- weight:权重
- down:下线不用了
- backup:备用服务器
修改配置文件后,需要通过systemctl reload nginx命令重启Nginx。
nginx.conf配置如下
http{
 upstream httpnz {
  server 192.168.66.1 weight=1 down;
  server 192.168.66.2 weight=5 backup;
  server 192.168.66.3 weight=10;
 }
 server{
  listen 80;
  server_name nzbc;

  location / {
   proxy_pass http://httpnz;
  }

  error_page 500.html;
  location = /500.html{
   root html;
  }
 }
}
ip_hash
每个请求按访问ip的hash结果分配,映射到固定某一台的服务器,会导致负载均衡不平衡。
当此应用服务器宕机后,session会丢失,再次发起请求时,会重新固定访问另一台正常的应用服务器,并实现会话保持。
least_conn
最少连接访问。
url_hash
根据访问的url转发请求,定向流量转发。
每个请求按访问url的hash结果分配,映射到固定的某一台服务器,会话无法保持。
一般在获取本地资源时使用(且本地资源不在同一台服务器上),比如通过地址1获取图片资源、通过地址2获取pdf协议资源。
fair
根据服务器响应时间转发请求。
小结
最常用的负载均衡策略是配置权重,其它的形式,不是很常用。
ip_hash、least_conn、url_hash、fair,这几种形式无法实现动态Nginx上下线(新增或减少Nginx服务器),而且还会造成流量倾斜的问题,如果瞬时流量比较爆炸的时候,会将某个服务器直接干蹦。
6. 动静分离是什么?
动静分离的最终目的是将获取静态资源和动态资源分离开,提升服务器性能和高可用性。
配置静态资源,nginx.conf配置如下
http{
 upstream httpnz {
  server 192.168.66.1 weight=1 down;
  server 192.168.66.2 weight=5 backup;
  server 192.168.66.3 weight=10;
 }
 server{
  listen 80;
  server_name nzbc;

  location / {
   proxy_pass http://httpnz;
  }

  location ~*/(js/img/css) {
   root html;
   index index.html index.htm;
  }

  error_page 500 502 503 504 /50x.html;
  location = /50x.html{
   root html;
  }
 }
}
7. URLRewrite是什么?
URLRewrite是实现URL重写的关键指令,根据regex (正则表达式)部分内容,进行重定向。
flag标记说明:
- break,本条匹配完成后即终止;
- last,本条匹配完成后,继续向下匹配;
- redirect,返回302临时重定向;
- permanent,返回301永久重定向;
配置URLRewrite,nginx.conf配置如下
http{
 upstream httpnz {
  server 192.168.66.1 weight=1 down;
  server 192.168.66.2 weight=5 backup;
  server 192.168.66.3 weight=10;
 }
 server{
  listen 80;
  server_name nzbc;

  location / {
   rewrite ^/([0-9]+).html$ /index.jsp?pageNum=$1 break;
   proxy_pass http://httpnz;
  }

  location ~*/(js/img/css) {
   root html;
   index index.html index.htm;
  }

  error_page 500 502 503 504 /50x.html;
  location = /50x.html{
   root html;
  }
 }
}
8. Nginx如何实现URL重写
Nginx可以通过rewrite指令来实现URL重写。
基本语法:
rewrite regex replacement [flag];其中:
- regex: 用于匹配URI的正则表达式
- replacement: 替换后的URI
- flag: 可选参数,用于指定重写后的行为
9. Nginx的rewrite指令如何使用
示例1:将所有请求重定向到HTTPS
server {
    listen 80;
    server_name example.com;

    location / {
        rewrite ^/(.*)$ https://$server_name/$1 permanent;
    }
}
示例2:将/oldpath重写为/newpath
server {
    listen 80;
    server_name example.com;

    location / {
        rewrite ^/oldpath(.*)$ /newpath$1 last;
    }
}
示例3:去除URL中的.php后缀
server {
    listen 80;
    server_name example.com;

    location / {
        rewrite ^/(.*)\.php$ /$1 break;
    }
}
示例4:将请求/user/username重写为/profile.php?user=username
server {
    listen 80;
    server_name example.com;

    location / {
        rewrite ^/user/(.*)$ /profile.php?user=$1 last;
    }
}
示例5:使用try_files指令实现URL重写
有时候使用try_files指令可以更加简洁地实现类似的效果。例如,处理不存在的文件或目录,将请求转发到index.php:
server {
    listen 80;
    server_name example.com;

    location / {
        try_files $uri $uri/ /index.php?$query_string;
    }
}
注意事项
- URL重写在Nginx配置文件的顺序很重要。重写规则会按照配置的顺序依次执行。
- 复杂的重写规则需要测试,以确保不会引起循环重定向或其他意外行为。
- 使用正则表达式时要特别小心,确保匹配和替换符合预期。
10. 如何在Nginx中配置缓存
在Nginx中配置缓存可以通过以下几个步骤来实现。主要涉及缓存静态文件、反向代理缓存和设置缓存控制头等内容。
以下是一些常见的配置示例:
(1)配置静态文件缓存
Nginx可以缓存静态文件(如CSS、JS、图片等)以减少服务器负载并加快响应速度。
server {
    listen 80;
    server_name example.com;

    location / {
        root /path/to/your/static/files;
        expires 30d; # 缓存30天
    }
}
(2)配置反向代理缓存
反向代理缓存适用于缓存从后端服务器获取的内容。首先,需要定义一个缓存区域,然后在反向代理的配置中使用这个缓存区域。
定义缓存区域
http {
    proxy_cache_path /var/cache/nginx levels=1:2 keys_zone=my_cache:10m max_size=1g inactive=60m use_temp_path=off;

    server {
        listen 80;
        server_name example.com;

        location / {
            proxy_pass http://backend_server;
            proxy_cache my_cache;
            proxy_cache_valid 200 302 10m; # 对200和302响应缓存10分钟
            proxy_cache_valid 404 1m; # 对404响应缓存1分钟
            add_header X-Proxy-Cache $upstream_cache_status;
        }
    }
}
解释:
- proxy_cache_path: 定义缓存存储路径及其参数。
-
- /var/cache/nginx: 缓存存储目录。
- levels=1:2: 缓存目录的层级结构。
- keys_zone=my_cache:10m: 定义一个名为my_cache的共享内存区域,用于存储缓存键及其元数据,大小为10MB。
- max_size=1g: 最大缓存大小为1GB。
- inactive=60m: 在60分钟内未被访问的缓存将被删除。
- use_temp_path=off: 禁用临时路径。
- proxy_pass: 定义后端服务器的地址。
- proxy_cache: 启用缓存并指定缓存区域。
- proxy_cache_valid: 设置不同响应码的缓存时间。
- add_header X-Proxy-Cache $upstream_cache_status: 添加缓存状态头,以便调试。
(3)配置浏览器缓存控制头
为静态文件设置浏览器缓存控制头,可以减少客户端对服务器的请求次数。
server {
    listen 80;
    server_name example.com;

    location / {
        root /path/to/your/static/files;

        # 缓存控制头
        expires 30d;
        add_header Cache-Control "public, max-age=2592000";
    }
}
解释
- expires 30d: 让浏览器缓存内容30天。
- add_header Cache-Control "public, max-age=2592000": 添加Cache-Control头,max-age设置为2592000秒(30天)。
(4)结合ETag头与Last-Modified头
这两个头可以帮助浏览器判断内容是否更新,从而决定是否使用缓存。
server {
    listen 80;
    server_name example.com;

    location / {
        root /path/to/your/static/files;
        expires 30d;
        add_header Cache-Control "public, max-age=2592000";
        etag on;
        if_modified_since exact;
    }
}
解释
- etag on: 启用ETag头。
- if_modified_since exact: 使用精确的Last-Modified头。
总结
通过以上配置,您可以在Nginx中实现缓存静态文件、反向代理缓存以及设置浏览器缓存控制头。根据具体需求调整配置参数,可以优化服务器性能和用户体验。
11. Nginx的日志系统是如何工作的
Nginx的日志系统非常强大且灵活,它主要包括访问日志和错误日志两种。通过配置日志,可以帮助管理员监控服务器状态、排查故障和分析访问情况。
(1)访问日志
访问日志记录了客户端对Nginx服务器的每个请求。默认情况下,访问日志文件位于 /var/log/nginx/access.log。
配置示例:
http {
    log_format main '$remote_addr - $remote_user [$time_local] "$request" '
                      '$status $body_bytes_sent "$http_referer" '
                      '"$http_user_agent" "$http_x_forwarded_for"';

    access_log /var/log/nginx/access.log main;

    server {
        listen 80;
        server_name example.com;

        location / {
            root /path/to/your/static/files;
            index index.html;
        }
    }
}
解释:
- log_format: 定义日志格式。以上示例中,定义了一个名为 main 的日志格式。
-
- $remote_addr: 客户端IP地址。
- $remote_user: 客户端用户名(如果有)。
- $time_local: 请求时间和日期。
- $request: 请求的行(包含方法、URI和HTTP协议)。
- $status: 响应状态码。
- $body_bytes_sent: 发送给客户端的字节数,不包括响应头。
- $http_referer: 引荐页面。
- $http_user_agent: 客户端使用的User-Agent。
- $http_x_forwarded_for: 用于记录代理服务器转发的原始客户端IP地址。
- access_log: 指定访问日志文件及使用的日志格式。
(2)错误日志
错误日志记录了Nginx服务器运行时的错误、警告和诊断信息。默认情况下,错误日志文件位于 /var/log/nginx/error.log。
配置示例
http {
    error_log /var/log/nginx/error.log warn;

    server {
        listen 80;
        server_name example.com;

        location / {
            root /path/to/your/static/files;
            index index.html;
        }
    }
}
解释
- error_log: 指定错误日志文件及日志级别。日志级别可以是 debug, info, notice, warn, error, crit, alert, emerg。
- warn: 表示记录警告及更严重的日志信息。
(3)日志级别
Nginx支持以下日志级别:
- debug: 调试级别,记录最详细的调试信息。
- info: 信息级别,记录一般信息。
- notice: 注意级别,记录普通但重要的信息。
- warn: 警告级别,记录可能有问题的警告信息。
- error: 错误级别,记录错误信息。
- crit: 严重错误级别,记录需要立即处理的严重错误。
- alert: 警报级别,记录需要立即采取措施的严重问题。
- emerg: 紧急级别,记录系统不可用的紧急情况。
(4)自定义日志格式
可以根据需求自定义日志格式,以便记录更详细或特定的信息。
http {
    log_format custom '$remote_addr - $remote_user [$time_local] "$request" '
                      '$status $body_bytes_sent "$http_referer" '
                      '"$http_user_agent" "$request_time" "$upstream_response_time"';

    access_log /var/log/nginx/custom_access.log custom;

    server {
        listen 80;
        server_name example.com;

        location / {
            root /path/to/your/static/files;
            index index.html;
        }
    }
}
log_format custom: 定义一个名为 custom 的日志格式,增加了 upstream_response_time(上游服务器响应时间)。
(5)分割日志文件
为了更好地管理和分析日志,可以根据时间分割日志文件。例如,每天创建一个新的日志文件。
使用logrotate工具
创建一个配置文件 /etc/logrotate.d/nginx:
/var/log/nginx/*.log {
    daily
    missingok
    rotate 14
    compress
    delaycompress
    notifempty
    create 0640 www-data adm
    sharedscripts
    postrotate
        [ ! -f /var/run/nginx.pid ] || kill -USR1 `cat /var/run/nginx.pid`
    endscript
}
解释
- daily: 每天轮转日志。
- rotate 14: 保留14天的日志。
- compress: 压缩旧日志。
- delaycompress: 延迟压缩到下一个轮转周期。
- notifempty: 不轮转空文件。
- create: 使用指定的权限创建新的日志文件。
- postrotate: 在轮转后执行的脚本。
通过这些配置,Nginx的日志系统可以灵活地记录和管理服务器的运行信息,帮助管理员进行监控和维护。
12. 如何在Nginx中设置访问控制
在Nginx中设置访问控制可以通过多种方式来实现,主要包括基于IP地址的访问控制、HTTP基本认证、限制请求速率等。
(1)基于IP地址的访问控制
Nginx可以通过allow和deny指令来基于IP地址进行访问控制。
允许特定IP地址访问
server {
    listen 80;
    server_name example.com;

    location / {
        allow 192.168.1.1;  # 允许IP地址192.168.1.1访问
        deny all;  # 拒绝所有其他IP地址访问

        root /path/to/your/static/files;
        index index.html;
    }
}
允许特定IP段访问
server {
    listen 80;
    server_name example.com;

    location / {
        allow 192.168.1.0/24;  # 允许192.168.1.0/24网段的IP地址访问
        deny all;  # 拒绝所有其他IP地址访问

        root /path/to/your/static/files;
        index index.html;
    }
}
(2)HTTP基本认证
使用HTTP基本认证可以通过用户名和密码来保护某些资源。
创建密码文件
使用htpasswd工具创建密码文件:
htpasswd -c /etc/nginx/.htpasswd username配置HTTP基本认证
server {
    listen 80;
    server_name example.com;

    location /protected {
        auth_basic "Restricted Area";  # 认证提示信息
        auth_basic_user_file /etc/nginx/.htpasswd;  # 指定密码文件路径

        root /path/to/your/static/files;
        index index.html;
    }
}
(3)限制请求速率
Nginx可以通过limit_req模块限制请求速率,以防止DDoS攻击或滥用。
定义限速区域
http {
    limit_req_zone $binary_remote_addr zone=one:10m rate=1r/s;  # 每秒钟允许1个请求

    server {
        listen 80;
        server_name example.com;

        location / {
            limit_req zone=one burst=5 nodelay;  # 配置限速区域,允许突发5个请求

            root /path/to/your/static/files;
            index index.html;
        }
    }
}
解释
- limit_req_zone: 定义一个限速区域。
-
- $binary_remote_addr: 以客户端IP地址作为键。
- zone=one:10m: 名为one的共享内存区域,大小为10MB。
- rate=1r/s: 每秒允许1个请求。
- limit_req: 使用定义的限速区域。
-
- burst=5: 允许的突发请求数。
- nodelay: 超过限速时不延迟直接返回错误。
(4)基于地理位置的访问控制
Nginx可以使用ngx_http_geo_module模块根据地理位置进行访问控制。
配置GeoIP数据库
首先,需要下载并安装GeoIP数据库。例如,下载MaxMind GeoLite2数据库:
wget https://geolite.maxmind.com/download/geoip/database/GeoLite2-Country.tar.gz
tar -zxvf GeoLite2-Country.tar.gz -C /usr/share/GeoIP/
配置Nginx使用GeoIP
http {
    geoip_country /usr/share/GeoIP/GeoLite2-Country.mmdb;
    map $geoip_country_code $allowed_country {
        default no;
        US yes;
        CA yes;
    }

    server {
        listen 80;
        server_name example.com;

        location / {
            if ($allowed_country = no) {
                return 403;  # 禁止非允许国家的访问
            }

            root /path/to/your/static/files;
            index index.html;
        }
    }
}
解释
- geoip_country: 指定GeoIP数据库文件路径。
- map: 创建一个变量映射,用于根据国家代码决定是否允许访问。
-
- default no: 默认值为no。
- US yes, CA yes: 允许美国和加拿大的访问。
- if ($allowed_country = no): 检查是否允许访问,不允许则返回403状态码。
通过这些配置,您可以在Nginx中灵活地设置访问控制,以满足不同的安全和管理需求。
13. Nginx的模块化架构是怎样的?
(1)核心与模块
Nginx 的架构由核心 (core) 和模块 (modules) 组成。核心负责处理基本的框架和任务调度,模块则实现具体的功能,如 HTTP 请求处理、反向代理、负载均衡等。
(2)模块类型
Nginx 模块分为以下几种类型:
- 核心模块 (Core Modules): 提供基础功能和配置指令,如事件驱动机制和内存管理。
- 事件模块 (Event Modules): 处理事件驱动机制,如 epoll、kqueue 等,用于高并发连接处理。
- 阶段处理模块 (Phase Handler Modules): 处理 HTTP 请求的各个阶段,包括访问控制、重写、过滤等。
- 协议模块 (Protocol Modules): 支持不同协议,如 HTTP、HTTPS、Mail 等。
- 过滤模块 (Filter Modules): 修改或过滤 HTTP 响应内容,如 gzip 压缩、chunked 传输编码等。
- 上游模块 (Upstream Modules): 处理反向代理和负载均衡,将请求转发给后端服务器。
- 负载均衡模块 (Load Balancer Modules): 提供多种负载均衡策略,如轮询、最少连接、IP哈希等。
(3)模块加载
Nginx 模块在编译时或运行时动态加载。编译时加载的模块需要在编译 Nginx 时指定,运行时加载的模块可以通过配置文件动态添加。
(4)配置文件
Nginx 的配置文件是模块化的,每个模块都有自己的指令和配置段。通过配置文件,可以启用或禁用模块,并配置模块的具体参数。
(5)模块通信
各个模块之间通过核心进行通信,核心提供了一些接口和数据结构,供模块使用。模块之间通常是松耦合的,彼此独立运行。
(6)请求处理流程
Nginx 处理 HTTP 请求时,按照如下步骤进行:
- 接受请求:通过事件模块接受客户端请求。
- 选择处理阶段:根据请求的 URL 和方法,选择合适的阶段处理模块。
- 执行过滤器:通过过滤模块对请求和响应进行处理,如修改头部或内容。
- 发送响应:通过核心模块将响应发送回客户端。
(7)插件化开发
开发者可以根据需要编写自定义模块,Nginx 提供了丰富的 API 和文档支持模块开发。自定义模块可以扩展 Nginx 的功能,满足不同场景的需求。
通过这种模块化的设计,Nginx 能够在保持高性能和高并发处理能力的同时,具备极高的扩展性和灵活性。
14. 如何编写Nginx模块
编写 Nginx 模块涉及多个步骤,从设置开发环境到实现和测试模块。以下是编写 Nginx 模块的基本步骤和关键概念:
(1)设置开发环境
首先,你需要确保开发环境中安装了 Nginx 和必要的开发工具。
- 安装 Nginx 源码:从 Nginx 官网 下载 Nginx 源代码并解压。
- 安装开发工具:如 GCC 编译器和其他必需的库。
sudo apt-get update
sudo apt-get install build-essential libpcre3 libpcre3-dev zlib1g zlib1g-dev libssl-dev
(2)模块目录结构
创建一个目录来存放你的模块代码。模块通常包括一个 .c 文件和一个 config 文件。
mkdir my_module
cd my_module
touch ngx_http_my_module.c
touch config
(3)编写模块代码
在 ngx_http_my_module.c 文件中编写你的模块代码。
以下是一个简单的 "Hello World" 模块示例:
#include <ngx_config.h>
#include <ngx_core.h>
#include <ngx_http.h>

static char *ngx_http_my_module(ngx_conf_t *cf, ngx_command_t *cmd, void *conf);
static ngx_int_t ngx_http_my_module_handler(ngx_http_request_t *r);

static ngx_command_t ngx_http_my_module_commands[] = {
    { ngx_string("my_module"),
      NGX_HTTP_LOC_CONF|NGX_CONF_NOARGS,
      ngx_http_my_module,
      0,
      0,
      NULL },
    ngx_null_command
};

static ngx_http_module_t ngx_http_my_module_ctx = {
    NULL,                          /* preconfiguration */
    NULL,                          /* postconfiguration */

    NULL,                          /* create main configuration */
    NULL,                          /* init main configuration */

    NULL,                          /* create server configuration */
    NULL,                          /* merge server configuration */

    NULL,                          /* create location configuration */
    NULL                           /* merge location configuration */
};

ngx_module_t ngx_http_my_module = {
    NGX_MODULE_V1,
    &ngx_http_my_module_ctx,       /* module context */
    ngx_http_my_module_commands,   /* module directives */
    NGX_HTTP_MODULE,               /* module type */
    NULL,                          /* init master */
    NULL,                          /* init module */
    NULL,                          /* init process */
    NULL,                          /* init thread */
    NULL,                          /* exit thread */
    NULL,                          /* exit process */
    NULL,                          /* exit master */
    NGX_MODULE_V1_PADDING
};

static char *ngx_http_my_module(ngx_conf_t *cf, ngx_command_t *cmd, void *conf) {
    ngx_http_core_loc_conf_t *clcf;

    clcf = ngx_http_conf_get_module_loc_conf(cf, ngx_http_core_module);
    clcf->handler = ngx_http_my_module_handler;

    return NGX_CONF_OK;
}

static ngx_int_t ngx_http_my_module_handler(ngx_http_request_t *r) {
    ngx_buf_t    *b;
    ngx_chain_t   out;

    r->headers_out.content_type_len = sizeof("text/plain") - 1;
    r->headers_out.content_type = (u_char *) "text/plain";
    r->headers_out.status = NGX_HTTP_OK;
    r->headers_out.content_length_n = sizeof("Hello, world!") - 1;

    if (r->method != NGX_HTTP_GET) {
        return NGX_HTTP_NOT_ALLOWED;
    }

    b = ngx_pcalloc(r->pool, sizeof(ngx_buf_t));
    if (b == NULL) {
        return NGX_HTTP_INTERNAL_SERVER_ERROR;
    }

    out.buf = b;
    out.next = NULL;

    b->pos = (u_char *) "Hello, world!";
    b->last = b->pos + sizeof("Hello, world!") - 1;
    b->memory = 1;
    b->last_buf = 1;

    ngx_http_send_header(r);
    return ngx_http_output_filter(r, &out);
}
(4)配置文件
在 config 文件中添加以下内容,告诉 Nginx 如何编译你的模块:
ngx_addon_name=ngx_http_my_module
HTTP_MODULES="$HTTP_MODULES ngx_http_my_module"
NGX_ADDON_SRCS="$NGX_ADDON_SRCS $ngx_addon_dir/ngx_http_my_module.c"
(5)编译和安装 Nginx
返回到 Nginx 源代码目录,运行以下命令来编译和安装 Nginx,包括你的新模块:
./configure --add-module=/path/to/my_module
make
sudo make install
(6)配置 Nginx
编辑 Nginx 配置文件 nginx.conf,添加对新模块的配置:
http {
    server {
        listen 80;
        location /hello {
            my_module;
        }
    }
}
(7)测试模块
启动或重启 Nginx 服务器,然后访问 http://localhost/hello,应显示 "Hello, world!"。
(8)调试和优化
使用调试工具和日志文件调试和优化你的模块,以确保其稳定性和性能。
通过上述步骤,你可以编写、编译和部署一个基本的 Nginx 模块,并在此基础上进一步扩展和优化你的模块功能。
15. Nginx如何处理长连接和短连接
Nginx 处理长连接和短连接的方式主要通过 HTTP 协议的连接管理机制来实现。以下是关于 Nginx 如何处理长连接和短连接的详细说明:
(1)短连接(短时间连接)
短连接是一种在完成一次请求-响应之后立即关闭连接的连接方式。这通常用于简单的请求,尤其是在 HTTP/1.0 协议中。Nginx 处理短连接的方式如下:
- 接受请求:Nginx 接收到客户端的请求。
- 处理请求:Nginx 处理请求并生成响应。
- 发送响应:Nginx 将响应发送回客户端。
- 关闭连接:在发送完响应之后,Nginx 关闭连接。
在短连接模式下,每次请求和响应都需要建立和关闭一个 TCP 连接,这会带来一定的开销,特别是在高并发环境中。
(2)长连接(Keep-Alive 连接)
长连接(或称为 Keep-Alive 连接)允许一个 TCP 连接在多个请求和响应之间保持打开状态,从而减少连接的建立和关闭带来的开销。Nginx 处理长连接的方式如下:
- 接受请求:Nginx 接收到客户端的请求。
- 处理请求:Nginx 处理请求并生成响应。
- 发送响应:Nginx 将响应发送回客户端,并在响应头中包含 Connection: keep-alive。
- 保持连接:Nginx 保持连接打开状态,以便后续的请求能够复用该连接。
- 处理后续请求:客户端可以在同一连接上发送后续请求,Nginx 继续处理这些请求并返回响应。
- 关闭连接:如果连接超过了配置的超时时间(keepalive_timeout),或者客户端发送了 Connection: close 请求头,Nginx 将关闭连接。
(3)配置 Nginx 的长连接
Nginx 默认启用了长连接,可以通过配置文件进行优化和调整:
http {
    keepalive_timeout 65;          # 设置长连接超时时间
    keepalive_requests 100;        # 设置一个长连接上允许的最大请求数
    ...
    server {
        listen 80;
        ...
        location / {
            ...
        }
    }
}
keepalive_timeout:定义服务器在关闭长连接之前等待新请求的时间。默认是 75 秒,可以根据需要调整。keepalive_requests:定义一个长连接上允许的最大请求数。达到这个数目后,Nginx 会关闭连接。
(4)上游服务器的长连接
对于 Nginx 作为反向代理服务器与后端服务器(上游服务器)的连接,也可以使用长连接,以提高性能:
http {
    upstream backend {
        server backend1.example.com;
        server backend2.example.com;
        keepalive 16;              # 设置与上游服务器的长连接池大小
    }

    server {
        location / {
            proxy_pass http://backend;
            proxy_http_version 1.1;  # 使用 HTTP/1.1 协议,以支持长连接
            proxy_set_header Connection "";  # 清除请求头中的 Connection 字段
        }
    }
}
keepalive:定义 Nginx 与上游服务器之间的长连接池的大小。proxy_http_version 1.1:确保使用 HTTP/1.1 协议,以支持长连接。proxy_set_header Connection "":清除请求头中的 Connection 字段,防止其被设置为 close。
(5)总结
Nginx 通过短连接和长连接来高效处理客户端请求。短连接适用于简单、低频的请求,而长连接则适用于高并发、频繁请求的场景,减少了连接的建立和关闭带来的性能开销。通过适当配置,可以优化 Nginx 的连接管理,提高服务器性能。
16. 如何在Nginx中配置限速
在 Nginx 中配置限速(rate limiting)可以帮助防止单个客户端过度使用服务器资源,从而保护服务器免受恶意攻击和高流量影响。Nginx 提供了两种主要的限速机制:连接速率限制和请求速率限制。以下是详细的配置方法:
(1)连接速率限制
连接速率限制控制客户端新连接的速率,可以通过 limit_conn_zone 和 limit_conn 指令来配置。
配置示例:
http {
    # 定义共享内存区域,用于存储客户端连接计数
    limit_conn_zone $binary_remote_addr zone=addr:10m;

    server {
        listen 80;

        location / {
            # 限制每个客户端 IP 地址的并发连接数
            limit_conn addr 10;

            # 其他配置
            ...
        }
    }
}
limit_conn_zone:定义一个共享内存区域,用于存储连接计数。这里使用客户端的 IP 地址 $binary_remote_addr 作为键。limit_conn:限制每个客户端 IP 地址的并发连接数,此处限制为 10。
(2)请求速率限制
请求速率限制控制客户端发送请求的速率,可以通过 limit_req_zone 和 limit_req 指令来配置。
配置示例:
http {
    # 定义共享内存区域,用于存储请求计数
    limit_req_zone $binary_remote_addr zone=req_zone:10m rate=1r/s;

    server {
        listen 80;

        location / {
            # 使用定义的请求速率限制
            limit_req zone=req_zone burst=5 nodelay;

            # 其他配置
            ...
        }
    }
}
limit_req_zone:定义一个共享内存区域,用于存储请求计数。rate=1r/s 表示每秒允许一个请求。limit_req:应用请求速率限制。burst=5 表示允许突发的额外请求数(超出速率限制的请求),nodelay 表示不延迟超出速率的请求(如果指定,Nginx 会直接拒绝超出的请求)。
(3)综合配置示例
以下是一个更完整的配置示例,结合了连接速率限制和请求速率限制:
http {
    # 定义连接速率限制的共享内存区域
    limit_conn_zone $binary_remote_addr zone=addr:10m;

    # 定义请求速率限制的共享内存区域
    limit_req_zone $binary_remote_addr zone=req_zone:10m rate=1r/s;

    server {
        listen 80;

        location / {
            # 限制每个客户端 IP 地址的并发连接数
            limit_conn addr 10;

            # 使用定义的请求速率限制
            limit_req zone=req_zone burst=5 nodelay;

            # 配置日志格式以便更好地监控限速行为
            log_format main '$remote_addr - $remote_user [$time_local] "$request" '
                              '$status $body_bytes_sent "$http_referer" '
                              '"$http_user_agent" "$http_x_forwarded_for" '
                              '$request_time $upstream_response_time $pipe';

            access_log /var/log/nginx/access.log main;

            # 其他配置
            ...
        }
    }
}
注意事项
- 内存使用:共享内存区域的大小应根据客户端数量和需要存储的数据量进行调整。
- 日志监控:通过配置日志格式,可以更好地监控和分析限速行为。
- 性能影响:合理的限速配置可以保护服务器资源,但过低的限速可能会影响正常用户的访问体验,需要根据实际情况进行调整。
通过上述配置方法,你可以在 Nginx 中实现有效的限速策略,保护服务器资源并优化流量管理。
17. 如何在Nginx中配置限流
在 Nginx 中配置限流(rate limiting)可以帮助防止单个客户端过度使用服务器资源,从而保护服务器免受恶意攻击和高流量影响。限流主要包括请求速率限制和连接速率限制。
(1)请求速率限制
请求速率限制控制客户端发送请求的速率,可以通过 limit_req_zone 和 limit_req 指令来配置。
定义限流区域:
http {
    # 定义共享内存区域,用于存储请求计数
    limit_req_zone $binary_remote_addr zone=req_zone:10m rate=1r/s;

    server {
        listen 80;

        location / {
            # 使用定义的请求速率限制
            limit_req zone=req_zone burst=5 nodelay;

            # 其他配置
            ...
        }
    }
}
limit_req_zone:定义一个共享内存区域,用于存储请求计数。rate=1r/s 表示每秒允许一个请求。limit_req:应用请求速率限制。burst=5 表示允许突发的额外请求数,nodelay 表示立即拒绝超出速率的请求。
(2)连接速率限制
连接速率限制控制客户端新连接的速率,可以通过 limit_conn_zone 和 limit_conn 指令来配置。
定义连接速率限制区域
http {
    # 定义共享内存区域,用于存储客户端连接计数
    limit_conn_zone $binary_remote_addr zone=addr:10m;

    server {
        listen 80;

        location / {
            # 限制每个客户端 IP 地址的并发连接数
            limit_conn addr 10;

            # 其他配置
            ...
        }
    }
}
limit_conn_zone:定义一个共享内存区域,用于存储连接计数。使用客户端的 IP 地址 $binary_remote_addr 作为键。limit_conn:限制每个客户端 IP 地址的并发连接数,此处限制为 10。
以下是一个结合请求速率限制和连接速率限制的完整配置示例:
http {
    # 定义连接速率限制的共享内存区域
    limit_conn_zone $binary_remote_addr zone=addr:10m;

    # 定义请求速率限制的共享内存区域
    limit_req_zone $binary_remote_addr zone=req_zone:10m rate=1r/s;

    server {
        listen 80;

        location / {
            # 限制每个客户端 IP 地址的并发连接数
            limit_conn addr 10;

            # 使用定义的请求速率限制
            limit_req zone=req_zone burst=5 nodelay;

            # 配置日志格式以便更好地监控限速行为
            log_format main '$remote_addr - $remote_user [$time_local] "$request" '
                              '$status $body_bytes_sent "$http_referer" '
                              '"$http_user_agent" "$http_x_forwarded_for" '
                              '$request_time $upstream_response_time $pipe';

            access_log /var/log/nginx/access.log main;

            # 其他配置
            ...
        }
    }
}
注意事项
- 内存使用:共享内存区域的大小应根据客户端数量和需要存储的数据量进行调整。
- 日志监控:通过配置日志格式,可以更好地监控和分析限流行为。
- 性能影响:合理的限流配置可以保护服务器资源,但过低的限流可能会影响正常用户的访问体验,需要根据实际情况进行调整。
通过上述配置方法,你可以在 Nginx 中实现有效的限流策略,保护服务器资源并优化流量管理。
18. Nginx如何处理请求超时
Nginx 处理请求超时(request timeout)的方式通过配置相关指令来控制。超时参数可以用来设置客户端连接超时、请求处理超时以及与上游服务器的连接和响应超时。
(1)客户端连接超时
client_body_timeout 用于设置接收客户端请求主体的超时时间。如果客户端在指定时间内没有发送任何数据,Nginx 会关闭连接。
client_header_timeout 用于设置接收客户端请求头部的超时时间。如果客户端在指定时间内没有发送完整的请求头部,Nginx 会关闭连接。
keepalive_timeout 用于设置在长连接(keep-alive)模式下,服务器在关闭连接之前等待新的请求的时间。
(2)与上游服务器的连接和响应超时
proxy_connect_timeout 用于设置 Nginx 与上游服务器建立连接的超时时间。如果在指定时间内无法建立连接,Nginx 会返回错误。
proxy_send_timeout 用于设置 Nginx 向上游服务器发送请求的超时时间。如果在指定时间内没有成功发送请求数据,Nginx 会关闭连接。
proxy_read_timeout 用于设置 Nginx 从上游服务器接收响应的超时时间。如果在指定时间内没有收到响应数据,Nginx 会关闭连接。
(3)示例配置
http {
    # 客户端连接超时
    client_body_timeout 60s;
    client_header_timeout 60s;
    keepalive_timeout 65s;

    server {
        listen 80;

        location / {
            proxy_pass http://backend;

            # 与上游服务器的连接和响应超时
            proxy_connect_timeout 60s;
            proxy_send_timeout 60s;
            proxy_read_timeout 60s;

            # 其他配置
            ...
        }
    }
}
(4)其他相关指令
send_timeout 用于设置 Nginx 向客户端发送响应的超时时间。如果在指定时间内客户端没有接收响应数据,Nginx 会关闭连接。
lingering_timeout 用于设置 Nginx 在处理完请求后,等待客户端接收剩余数据的超时时间。
(5)总结
Nginx 通过配置多种超时参数,能够灵活地控制客户端连接、请求处理以及与上游服务器的交互过程中的超时行为。这些配置不仅可以提高服务器的性能和资源利用率,还能有效地保护服务器免受恶意攻击和资源滥用。
19. 如何在Nginx中配置错误页面
在 Nginx 中配置错误页面可以让服务器在发生错误时,向客户端返回自定义的错误页面。这不仅可以提升用户体验,还可以帮助用户理解发生了什么问题。
(1)配置自定义错误页面
需要创建自定义的错误页面,例如 404.html、500.html 等,然后将这些页面放在服务器的指定目录中。
(2)配置 Nginx 使用自定义错误页面
在 Nginx 的配置文件中,使用 error_page 指令来指定自定义错误页面的位置。
示例配置:
http {
    server {
        listen 80;
        server_name example.com;

        # 定义错误页面的位置
        location = /404.html {
            root /var/www/html;
        }

        location = /500.html {
            root /var/www/html;
        }

        # 配置错误页面
        error_page 404 /404.html;
        error_page 500 502 503 504 /500.html;

        location / {
            root /var/www/html;
            index index.html;
        }
    }
}
error_page 404 /404.html;:当发生 404 错误时,Nginx 将客户端重定向到 /404.html 页面。error_page 500 502 503 504 /500.html;:当发生 500、502、503 或 504 错误时,Nginx 将客户端重定向到 /500.html 页面。location = /404.html { root /var/www/html; }:指定自定义错误页面的位置。在这个例子中,错误页面存放在 /var/www/html 目录下。location / { root /var/www/html; index index.html; }:指定网站的根目录和默认首页。
(3)使用内部重定向
可以使用 internal 指令,使错误页面不对外公开,只能内部使用。
http {
    server {
        listen 80;
        server_name example.com;

        location / {
            root /var/www/html;
            index index.html;
        }

        location /custom_404.html {
            internal;
            root /var/www/html;
        }

        error_page 404 /custom_404.html;
    }
}
(4)使用变量
可以使用 Nginx 变量来动态处理错误页面。例如,根据客户端的语言设置返回不同的错误页面。
http {
    server {
        listen 80;
        server_name example.com;

        location / {
            root /var/www/html;
            index index.html;
        }

        location /error {
            root /var/www/html;
        }

        error_page 404 /error/$lang/404.html;
    }
}
(5)适用范围
自定义错误页面配置不仅适用于 HTTP 协议,还可以用于 HTTPS 以及其他服务(如邮件代理服务等),只需要在相应的 server 块中进行配置。
(6)配置示例
http {
    server {
        listen 80;
        server_name example.com;

        location / {
            root /var/www/html;
            index index.html;
        }

        location /404.html {
            root /var/www/errors;
            internal;
        }

        location /500.html {
            root /var/www/errors;
            internal;
        }

        error_page 404 /404.html;
        error_page 500 502 503 504 /500.html;

        # 防止错误页面重定向造成的无限循环
        location /custom_error_pages {
            root /var/www/html;
            internal;
        }
    }
}
(7)防止无限循环
为了防止在错误页面本身也发生错误时造成的无限循环,可以使用 internal 指令,使这些页面只在内部访问。
通过上述配置,你可以在 Nginx 中轻松配置自定义错误页面,从而提高用户体验和服务器的友好性。
20. Nginx如何与Tomcat配合工作
Nginx 与 Tomcat 的配合工作通常是通过 Nginx 作为反向代理服务器,将请求转发到后端的 Tomcat 服务器进行处理。这种配置可以利用 Nginx 的高并发处理能力以及静态资源处理性能,同时也可以利用 Tomcat 的动态内容生成能力。
(1)安装 Nginx 和 Tomcat
确保你已经安装了 Nginx 和 Tomcat。你可以从各自的官方网站下载并安装它们。
(2)配置 Tomcat
Tomcat 的默认端口是 8080。确保 Tomcat 正常运行并可以处理请求。你可以编辑 conf/server.xml 文件来修改端口或其他配置。
(3)配置 Nginx
编辑 Nginx 的配置文件(通常是 /etc/nginx/nginx.conf 或 /etc/nginx/conf.d/default.conf),将 Nginx 配置为反向代理服务器,将请求转发到 Tomcat。
http {
    upstream tomcat {
        server 127.0.0.1:8080;  # Tomcat 服务器地址和端口
    }

    server {
        listen 80;
        server_name example.com;

        location / {
            proxy_pass http://tomcat;
            proxy_set_header Host $host;
            proxy_set_header X-Real-IP $remote_addr;
            proxy_set_header X-Forwarded-For $proxy_add_x_forwarded_for;
            proxy_set_header X-Forwarded-Proto $scheme;
        }

        # 配置静态资源处理,减轻 Tomcat 的负载
        location /static/ {
            alias /path/to/static/files/;  # 静态文件目录
        }
    }
}
upstream tomcat: 定义一个上游服务器块,指定 Tomcat 服务器的地址和端口。server: 定义一个服务器块,监听 80 端口,并处理来自 example.com 的请求。location /: 使用 proxy_pass 指令将所有请求转发到 Tomcat。proxy_set_header 指令用于传递客户端的请求头信息到后端服务器。location /static/: 处理静态资源请求,直接由 Nginx 返回静态资源文件,减轻 Tomcat 的负载。
(4)启动和测试
启动或重启 Nginx 和 Tomcat 服务器,确保配置生效。
sudo systemctl restart nginx
sudo systemctl restart tomcat
访问 http://example.com,请求应该被 Nginx 接收并转发到 Tomcat 处理。
(5)SSL 配置(可选)
如果你需要使用 HTTPS,还需要配置 SSL 证书。
http {
    upstream tomcat {
        server 127.0.0.1:8080;
    }

    server {
        listen 443 ssl;
        server_name example.com;

        ssl_certificate /path/to/ssl/certificate.crt;
        ssl_certificate_key /path/to/ssl/certificate.key;

        location / {
            proxy_pass http://tomcat;
            proxy_set_header Host $host;
            proxy_set_header X-Real-IP $remote_addr;
            proxy_set_header X-Forwarded-For $proxy_add_x_forwarded_for;
            proxy_set_header X-Forwarded-Proto $scheme;
        }

        location /static/ {
            alias /path/to/static/files/;
        }
    }
}
(6)优化和其他配置
负载均衡: 如果有多个 Tomcat 实例,可以在 upstream 块中添加多个服务器,实现负载均衡。缓存: 可以使用 Nginx 的缓存功能来缓存静态资源或后端的动态内容,提高性能。
负载均衡示例:
http {
    upstream tomcat {
        server 127.0.0.1:8080;
        server 127.0.0.1:8081;
    }

    server {
        listen 80;
        server_name example.com;

        location / {
            proxy_pass http://tomcat;
            proxy_set_header Host $host;
            proxy_set_header X-Real-IP $remote_addr;
            proxy_set_header X-Forwarded-For $proxy_add_x_forwarded_for;
            proxy_set_header X-Forwarded-Proto $scheme;
        }

        location /static/ {
            alias /path/to/static/files/;
        }
    }
}
通过这些配置,Nginx 可以有效地与 Tomcat 配合工作,利用 Nginx 处理静态资源和负载均衡的能力,同时利用 Tomcat 处理动态内容,提高整体的性能和稳定性。
21. 如何在Nginx中配置WebSocket
在 Nginx 中配置 WebSocket 主要涉及配置反向代理,以正确处理 WebSocket 的连接升级。WebSocket 是一个通信协议,使用 HTTP 升级机制从 HTTP/1.1 升级到 WebSocket 协议。Nginx 需要正确处理这些升级请求并将它们转发到 WebSocket 服务器。
(1)基本反向代理配置
首先,确保 Nginx 已安装并运行。
(2)配置 Nginx 处理 WebSocket 升级
编辑 Nginx 配置文件(通常是 /etc/nginx/nginx.conf 或 /etc/nginx/conf.d/default.conf),配置反向代理以处理 WebSocket 连接。
http {
    upstream websocket {
        server 127.0.0.1:8080;  # WebSocket 服务器地址和端口
    }

    server {
        listen 80;
        server_name example.com;

        location /ws/ {
            proxy_pass http://websocket;
            proxy_http_version 1.1;
            proxy_set_header Upgrade $http_upgrade;
            proxy_set_header Connection "Upgrade";
            proxy_set_header Host $host;
            proxy_set_header X-Real-IP $remote_addr;
            proxy_set_header X-Forwarded-For $proxy_add_x_forwarded_for;
            proxy_set_header X-Forwarded-Proto $scheme;

            # 处理 WebSocket 连接的超时时间
            proxy_read_timeout 86400s;
            proxy_send_timeout 86400s;
        }

        # 其他配置
        location / {
            root /var/www/html;
            index index.html;
        }
    }
}
upstream websocket: 定义一个上游服务器块,指定 WebSocket 服务器的地址和端口。location /ws/: 定义一个位置块,处理以 /ws/ 开头的请求,将这些请求代理到 WebSocket 服务器。proxy_pass: 将请求转发到 upstream 定义的 WebSocket 服务器。proxy_http_version 1.1: 使用 HTTP/1.1 协议,以支持 WebSocket 升级。proxy_set_header Upgrade $http_upgrade: 将客户端请求头中的 Upgrade 字段传递给后端服务器。proxy_set_header Connection "Upgrade": 设置连接类型为 Upgrade。proxy_read_timeout 和 proxy_send_timeout: 设置 WebSocket 连接的超时时间。
(3)启动或重启 Nginx 服务器,确保配置生效。
sudo systemctl restart nginx访问 WebSocket 应用程序,确保 Nginx 能正确处理 WebSocket 升级并将请求转发到 WebSocket 服务器。
(4) SSL 配置(可选)
如果需要使用 HTTPS,还需要配置 SSL 证书。
http {
    upstream websocket {
        server 127.0.0.1:8080;
    }

    server {
        listen 443 ssl;
        server_name example.com;

        ssl_certificate /path/to/ssl/certificate.crt;
        ssl_certificate_key /path/to/ssl/certificate.key;

        location /ws/ {
            proxy_pass http://websocket;
            proxy_http_version 1.1;
            proxy_set_header Upgrade $http_upgrade;
            proxy_set_header Connection "Upgrade";
            proxy_set_header Host $host;
            proxy_set_header X-Real-IP $remote_addr;
            proxy_set_header X-Forwarded-For $proxy_add_x_forwarded_for;
            proxy_set_header X-Forwarded-Proto $scheme;

            proxy_read_timeout 86400s;
            proxy_send_timeout 86400s;
        }

        location / {
            root /var/www/html;
            index index.html;
        }
    }
}
(6)负载均衡 WebSocket 连接(可选)
如果有多个 WebSocket 服务器,可以使用 Nginx 的负载均衡功能。
负载均衡示例:
http {
    upstream websocket {
        server 127.0.0.1:8080;
        server 127.0.0.1:8081;
    }

    server {
        listen 80;
        server_name example.com;

        location /ws/ {
            proxy_pass http://websocket;
            proxy_http_version 1.1;
            proxy_set_header Upgrade $http_upgrade;
            proxy_set_header Connection "Upgrade";
            proxy_set_header Host $host;
            proxy_set_header X-Real-IP $remote_addr;
            proxy_set_header X-Forwarded-For $proxy_add_x_forwarded_for;
            proxy_set_header X-Forwarded-Proto $scheme;

            proxy_read_timeout 86400s;
            proxy_send_timeout 86400s;
        }

        location / {
            root /var/www/html;
            index index.html;
        }
    }
}
通过上述配置,Nginx 可以有效地处理 WebSocket 连接,支持连接升级,并将请求转发到后端 WebSocket 服务器,从而实现高效的 WebSocket 通信。
22. Nginx如何处理文件上传
Nginx 处理文件上传通常是通过反向代理将上传的文件请求转发到后端应用服务器进行处理。下面是详细的配置步骤,包括处理大文件上传的相关配置。
(1)基本配置
首先,确保 Nginx 已安装并运行。然后编辑 Nginx 的配置文件(通常是 /etc/nginx/nginx.conf 或 /etc/nginx/conf.d/default.conf),配置反向代理以处理文件上传请求。
http {
    server {
        listen 80;
        server_name example.com;

        location /upload {
            proxy_pass http://backend_server;
            proxy_set_header Host $host;
            proxy_set_header X-Real-IP $remote_addr;
            proxy_set_header X-Forwarded-For $proxy_add_x_forwarded_for;
            proxy_set_header X-Forwarded-Proto $scheme;

            # 上传文件大小限制
            client_max_body_size 100M;

            # 其他配置
            proxy_buffering off;
        }
    }
}
proxy_pass: 将请求转发到后端服务器处理文件上传。proxy_set_header: 设置请求头,传递客户端的真实 IP 地址等信息到后端服务器。client_max_body_size: 设置客户端请求体的最大大小,默认是 1M。这里设置为 100M。proxy_buffering off: 禁用代理缓冲区,直接将上传的文件流传递给后端服务器,这在处理大文件上传时非常有用。
(2)处理大文件上传
处理大文件上传时,除了 client_max_body_size,还需要配置一些其他参数,以确保上传过程顺利。
http {
    server {
        listen 80;
        server_name example.com;

        location /upload {
            proxy_pass http://backend_server;
            proxy_set_header Host $host;
            proxy_set_header X-Real-IP $remote_addr;
            proxy_set_header X-Forwarded-For $proxy_add_x_forwarded_for;
            proxy_set_header X-Forwarded-Proto $scheme;

            # 上传文件大小限制
            client_max_body_size 1G;

            # 禁用代理缓冲
            proxy_buffering off;

            # 增加超时时间
            client_body_timeout 60s;
            proxy_connect_timeout 60s;
            proxy_send_timeout 60s;
            proxy_read_timeout 60s;
        }

        # 处理静态文件的 location
        location / {
            root /var/www/html;
            index index.html;
        }
    }
}
client_body_timeout: 设置读取客户端请求体的超时时间。proxy_connect_timeout: 设置 Nginx 与后端服务器建立连接的超时时间。proxy_send_timeout: 设置 Nginx 向后端服务器发送请求的超时时间。proxy_read_timeout: 设置 Nginx 从后端服务器读取响应的超时时间。
(3)后端服务器配置
确保后端服务器(例如,Node.js、Django、Flask 等)能够正确处理文件上传请求,并且有相应的路由和逻辑来处理 /upload 请求。
const express = require('express');
const multer  = require('multer');
const app = express();
const upload = multer({ dest: 'uploads/' });

app.post('/upload', upload.single('file'), (req, res) => {
  res.send('File uploaded successfully');
});

app.listen(8080, () => {
  console.log('Server is listening on port 8080');
});
(4)测试配置
启动或重启 Nginx 服务器,确保配置生效:
sudo systemctl restart nginx然后使用工具(例如 curl 或 Postman)测试文件上传功能。
通过以上配置,Nginx 能够有效地处理文件上传请求,并将其转发到后端服务器进行处理。这样可以利用 Nginx 的高并发处理能力和后端服务器的业务逻辑处理能力,从而实现高效的文件上传服务。
23. 如何在Nginx中实现动静分离
在 Nginx 中实现动静分离(Separation of Dynamic and Static Content)可以提高服务器的性能和效率。动静分离的基本思想是将静态资源(如图像、CSS、JavaScript 文件等)和动态内容(如 PHP、Python、Java 等生成的内容)分开处理。Nginx 可以处理静态资源请求,而动态内容请求则转发给后端应用服务器进行处理。
(1)配置静态资源处理
首先,在 Nginx 的配置文件中,设置处理静态资源的规则。可以使用 location 指令来匹配特定的静态资源路径或文件类型,并直接由 Nginx 处理。
示例配置:
http {
    server {
        listen 80;
        server_name example.com;

        # 静态资源处理
        location /static/ {
            root /var/www/html;  # 静态文件所在目录
            access_log off;      # 关闭访问日志
            expires 30d;         # 设置缓存过期时间
        }

        location ~* \.(jpg|jpeg|png|gif|ico|css|js)$ {
            root /var/www/html;  # 静态文件所在目录
            access_log off;      # 关闭访问日志
            expires 30d;         # 设置缓存过期时间
        }

        # 动态请求转发到后端服务器
        location / {
            proxy_pass http://backend_server;  # 后端服务器地址
            proxy_set_header Host $host;
            proxy_set_header X-Real-IP $remote_addr;
            proxy_set_header X-Forwarded-For $proxy_add_x_forwarded_for;
            proxy_set_header X-Forwarded-Proto $scheme;
        }
    }
}
(2)配置动态请求处理
将动态请求转发到后端应用服务器进行处理,例如 PHP-FPM、Django、Flask、Node.js 等。
http {
    server {
        listen 80;
        server_name example.com;

        # 静态资源处理
        location /static/ {
            root /var/www/html;
            access_log off;
            expires 30d;
        }

        location ~* \.(jpg|jpeg|png|gif|ico|css|js)$ {
            root /var/www/html;
            access_log off;
            expires 30d;
        }

        # PHP 动态请求处理
        location ~ \.php$ {
            root /var/www/html;
            fastcgi_pass unix:/run/php/php7.4-fpm.sock;  # PHP-FPM socket 文件路径
            fastcgi_index index.php;
            fastcgi_param SCRIPT_FILENAME $document_root$fastcgi_script_name;
            include fastcgi_params;
        }

        # 其他动态请求转发到后端服务器
        location / {
            proxy_pass http://backend_server;
            proxy_set_header Host $host;
            proxy_set_header X-Real-IP $remote_addr;
            proxy_set_header X-Forwarded-For $proxy_add_x_forwarded_for;
            proxy_set_header X-Forwarded-Proto $scheme;
        }
    }
}
(3)优化配置
为了进一步优化性能,可以使用缓存、压缩等技术。
启用 Gzip 压缩:
http {
    gzip on;
    gzip_types text/plain text/css application/json application/javascript text/xml application/xml application/xml+rss text/javascript;
    gzip_proxied any;
    gzip_vary on;

    server {
        listen 80;
        server_name example.com;

        location /static/ {
            root /var/www/html;
            access_log off;
            expires 30d;
        }

        location ~* \.(jpg|jpeg|png|gif|ico|css|js)$ {
            root /var/www/html;
            access_log off;
            expires 30d;
        }

        location ~ \.php$ {
            root /var/www/html;
            fastcgi_pass unix:/run/php/php7.4-fpm.sock;
            fastcgi_index index.php;
            fastcgi_param SCRIPT_FILENAME $document_root$fastcgi_script_name;
            include fastcgi_params;
        }

        location / {
            proxy_pass http://backend_server;
            proxy_set_header Host $host;
            proxy_set_header X-Real-IP $remote_addr;
            proxy_set_header X-Forwarded-For $proxy_add_x_forwarded_for;
            proxy_set_header X-Forwarded-Proto $scheme;
        }
    }
}
(4)SSL 配置(可选)
如果需要使用 HTTPS,还需要配置 SSL 证书。
(5)启动和测试
sudo systemctl restart nginx访问网站,确保静态资源(如图片、CSS、JS)由 Nginx 直接处理,动态请求由后端应用服务器处理。
通过以上配置,Nginx 可以有效地实现动静分离,利用其高效处理静态资源的能力,同时将动态请求转发给后端服务器处理,从而提高整体性能和资源利用率。
24. Nginx如何实现跨域资源共享(CORS)
在 Nginx 中实现跨域资源共享(CORS,Cross-Origin Resource Sharing)涉及在响应头中添加适当的 CORS 头。CORS 允许浏览器从一个域访问另一个域的资源,是一种浏览器安全机制,用于允许或限制来自不同源的资源请求。
基本 CORS 配置
编辑 Nginx 的配置文件(通常是 /etc/nginx/nginx.conf 或 /etc/nginx/conf.d/default.conf),在适当的位置块(location block)中添加 CORS 头。
http {
    server {
        listen 80;
        server_name example.com;

        location / {
            root /var/www/html;
            index index.html;

            # 添加 CORS 头
            add_header 'Access-Control-Allow-Origin' '*';
            add_header 'Access-Control-Allow-Methods' 'GET, POST, OPTIONS';
            add_header 'Access-Control-Allow-Headers' 'Origin, X-Requested-With, Content-Type, Accept, Authorization';

            # 处理预检请求
            if ($request_method = 'OPTIONS') {
                add_header 'Access-Control-Allow-Origin' '*';
                add_header 'Access-Control-Allow-Methods' 'GET, POST, OPTIONS';
                add_header 'Access-Control-Allow-Headers' 'Origin, X-Requested-With, Content-Type, Accept, Authorization';
                add_header 'Access-Control-Max-Age' 1728000;
                add_header 'Content-Type' 'text/plain charset=UTF-8';
                add_header 'Content-Length' 0;
                return 204;
            }
        }
    }
}
add_header 'Access-Control-Allow-Origin' '': 允许所有域访问资源。可以将 '' 替换为特定的域名以限制访问。add_header 'Access-Control-Allow-Methods' 'GET, POST, OPTIONS': 允许的 HTTP 方法。add_header 'Access-Control-Allow-Headers' 'Origin, X-Requested-With, Content-Type, Accept, Authorization': 允许的自定义头部字段。处理预检请求: 对于预检请求(OPTIONS 请求),设置相应的 CORS 头,并返回 204 响应,指示预检请求成功且无需返回主体。
25. Nginx如何实现IP黑名单和白名单
在Nginx中,实现IP黑名单和白名单可以通过配置http、server、或者location块中的allow和deny指令来实现。
(1)配置IP黑名单
IP黑名单用于阻止特定IP地址访问您的服务器。
http {
    ...
    server {
        ...
        location / {
            # 禁止某些IP地址访问
            deny 192.168.1.1;
            deny 192.168.1.2;
            deny 10.0.0.0/8;

            # 允许所有其他IP地址访问
            allow all;
        }
    }
}
在上面的示例中,deny指令用于阻止指定的IP地址或IP段,allow all表示允许所有其他IP地址访问。
(2)配置IP白名单
IP白名单用于仅允许特定IP地址访问您的服务器。配置示例如下:
http {
    ...
    server {
        ...
        location / {
            # 允许某些IP地址访问
            allow 192.168.1.1;
            allow 192.168.1.2;
            allow 10.0.0.0/8;

            # 禁止所有其他IP地址访问
            deny all;
        }
    }
}
在上面的示例中,allow指令用于允许指定的IP地址或IP段,deny all表示禁止所有其他IP地址访问。
(3)结合使用IP黑名单和白名单
有时候,您可能需要结合使用黑名单和白名单。例如,您可能希望允许一个IP段中的大部分IP访问,但拒绝其中的几个特定IP。
http {
    ...
    server {
        ...
        location / {
            # 允许一个大的IP段访问
            allow 10.0.0.0/8;

            # 禁止其中几个特定IP地址访问
            deny 10.0.0.1;
            deny 10.0.0.2;

            # 禁止所有其他IP地址访问
            deny all;
        }
    }
}
在上面的示例中,Nginx将首先检查allow和deny指令的顺序,并根据第一个匹配的规则来决定是否允许访问。
(4)在不同级别配置
您可以在http、server、或者location块中配置allow和deny指令。具体配置级别取决于您希望限制访问的范围。例如,如果您希望全局配置,可以在http块中进行配置:
http {
    allow 192.168.1.0/24;
    deny all;

    server {
        ...
    }
}
(5)使用包含文件
对于大规模的IP列表,您可以使用包含文件来管理。例如,创建一个包含文件ip_blacklist.conf:
# ip_blacklist.conf
deny 192.168.1.1;
deny 192.168.1.2;
deny 10.0.0.0/8;
然后在您的主配置文件中引用它:
http {
    server {
        location / {
            include /path/to/ip_blacklist.conf;
            allow all;
        }
    }
}
通过以上配置,您可以灵活地管理Nginx服务器的IP访问控制。
26. Nginx的upstream指令有什么作用
upstream指令在Nginx中用于定义一组后端服务器,以实现负载均衡。通过upstream指令,您可以将客户端请求分配到多个后端服务器,提高应用的可用性和处理能力。
主要作用
- 负载均衡:将请求分配给多个后端服务器,平衡各个服务器的负载。
- 高可用性:如果某个后端服务器不可用,Nginx可以自动将请求转发到其他可用的后端服务器。
- 灵活性:支持多种负载均衡算法和健康检查机制,满足不同的应用需求。
Nginx支持多种负载均衡算法,可以在upstream指令中指定:
- 轮询(默认):按顺序逐个将请求分配给后端服务器。
- 权重:根据指定的权重分配请求。
- IP哈希:根据客户端IP地址的哈希值分配请求。
- 最少连接:将请求分配给当前活动连接最少的后端服务器。
- 一致性哈希:根据请求的某些特征(如URL或Cookie)进行一致性哈希分配。
27. 如何在Nginx中配置反向代理缓存
在Nginx中配置反向代理缓存可以显著提高性能和减少后端服务器的负载。
(1)配置缓存区域
首先,在http块中配置一个缓存区域。这个区域将用来存储缓存的数据。
http {
    # 定义缓存路径和参数
    proxy_cache_path /path/to/cache levels=1:2 keys_zone=my_cache:10m max_size=10g inactive=60m use_temp_path=off;

    server {
        listen 80;
        server_name example.com;

        location / {
            # 使用定义的缓存区域
            proxy_cache my_cache;
            proxy_cache_valid 200 302 10m;  # 对于200和302响应,缓存10分钟
            proxy_cache_valid 404 1m;       # 对于404响应,缓存1分钟

            # 设置缓存键(可选)
            proxy_cache_key "$scheme$request_method$host$request_uri";

            # 设置请求头(可选)
            proxy_set_header Host $host;
            proxy_set_header X-Real-IP $remote_addr;
            proxy_set_header X-Forwarded-For $proxy_add_x_forwarded_for;
            proxy_set_header X-Forwarded-Proto $scheme;

            # 配置后端服务器
            proxy_pass http://backend;
        }
    }
}
在proxy_cache_path指令中,可以设置以下参数:
path: 缓存存储的文件系统路径。levels: 指定缓存文件目录结构的层次(例如,levels=1:2表示两层目录结构)。keys_zone: 定义一个共享内存区域,用于存储缓存键及其元数据,my_cache是区域名称,10m表示分配的大小(10MB)。max_size: 缓存的最大大小(例如,10g表示10GB)。inactive: 数据在未被访问时的缓存过期时间(例如,60m表示60分钟)。use_temp_path: 是否使用临时路径(一般设置为off)。
(2)配置缓存策略
在location块中,可以配置具体的缓存策略:
proxy_cache: 指定要使用的缓存区域。proxy_cache_valid: 设置不同HTTP状态码的缓存时间。proxy_cache_key: 自定义缓存键,用于区分缓存项。proxy_set_header: 设置或修改传递给后端服务器的请求头。proxy_pass: 指定后端服务器地址。
28. Nginx如何处理SSL证书
在Nginx中配置SSL证书可以为您的网站启用HTTPS,以确保数据在客户端和服务器之间传输时的安全性。以下是详细的配置步骤,包括生成自签名证书、获取证书和配置Nginx以使用这些证书。
(1)生成自签名证书
如果您没有购买SSL证书,可以生成一个自签名证书用于测试。
# 生成私钥
openssl genpkey -algorithm RSA -out /etc/nginx/ssl/private.key

# 生成自签名证书
openssl req -new -x509 -key /etc/nginx/ssl/private.key -out /etc/nginx/ssl/certificate.crt -days 365
(2)获取证书
您可以从受信任的证书颁发机构(CA)购买SSL证书,也可以使用Let's Encrypt等免费服务。假设您已经获取了证书和私钥,放置在/etc/nginx/ssl/目录中。
- certificate.crt: 证书文件
- private.key: 私钥文件
(3)配置Nginx以使用SSL证书
编辑Nginx的配置文件以启用HTTPS。例如,编辑您的站点配置文件 /etc/nginx/sites-available/example.com 或主配置文件 /etc/nginx/nginx.conf:
server {
    listen 80;
    server_name example.com www.example.com;

    # 将HTTP请求重定向到HTTPS
    return 301 https://$host$request_uri;
}

server {
    listen 443 ssl;
    server_name example.com www.example.com;

    # SSL证书配置
    ssl_certificate /etc/nginx/ssl/certificate.crt;
    ssl_certificate_key /etc/nginx/ssl/private.key;

    # 推荐的SSL参数
    ssl_protocols TLSv1.2 TLSv1.3;
    ssl_ciphers HIGH:!aNULL:!MD5;
    ssl_prefer_server_ciphers on;
    ssl_session_cache shared:SSL:10m;
    ssl_session_timeout 10m;

    # 其他配置
    location / {
        root /var/www/html;
        index index.html index.htm;
    }
}
(4)配置强制HTTPS
为了确保所有请求都通过HTTPS,您可以在HTTP服务器块中添加重定向规则:
server {
    listen 80;
    server_name example.com www.example.com;

    # 重定向所有HTTP请求到HTTPS
    return 301 https://$host$request_uri;
}
(5)使用Let's Encrypt证书
Let's Encrypt提供免费的SSL证书。可以使用Certbot工具自动获取和配置证书。
# 安装Certbot
sudo apt-get update
sudo apt-get install certbot python3-certbot-nginx

# 获取证书并自动配置Nginx
sudo certbot --nginx -d example.com -d www.example.com
Certbot会自动修改您的Nginx配置文件以使用获取的SSL证书,并设置自动续期。
(6)测试配置
在配置完成后,测试Nginx配置以确保没有语法错误:
sudo nginx -t如果一切正常,重新加载Nginx以应用更改:
sudo systemctl reload nginx通过以上步骤,您可以成功在Nginx中配置SSL证书,从而启用HTTPS并增强网站的安全性。
29. 如何在Nginx中配置A/B测试
在Nginx中配置A/B测试可以通过编写自定义的Nginx配置来实现,将流量分配给不同的后端服务器或不同的内容。这通常涉及使用Nginx的split_clients模块或基于特定条件(如cookie、请求头等)进行流量分配。
方法1:使用split_clients模块
split_clients模块允许您将流量随机分配给不同的组。例如,将流量分配给两个不同的版本(A和B):
http {
    split_clients "${remote_addr}" $test_group {
        50%     A;
        50%     B;
    }

    server {
        listen 80;
        server_name example.com;

        location / {
            if ($test_group = A) {
                proxy_pass http://backend_a;
            }

            if ($test_group = B) {
                proxy_pass http://backend_b;
            }
        }
    }

    upstream backend_a {
        server backend1.example.com;
    }

    upstream backend_b {
        server backend2.example.com;
    }
}
在此配置中,split_clients指令将50%的流量分配给A组,另50%的流量分配给B组。然后,根据分配的组将请求转发到不同的后端服务器。
方法2:基于Cookie的A/B测试
可以使用Cookie来将用户固定到某个组,以确保用户在会话中保持一致的体验。
http {
    map $cookie_ab_test $test_group {
        "A" A;
        "B" B;
        default C;
    }

    split_clients "${remote_addr}" $new_test_group {
        50%     A;
        50%     B;
    }

    server {
        listen 80;
        server_name example.com;

        location / {
            if ($test_group = C) {
                add_header Set-Cookie "ab_test=$new_test_group; Path=/";
                set $test_group $new_test_group;
            }

            if ($test_group = A) {
                proxy_pass http://backend_a;
            }

            if ($test_group = B) {
                proxy_pass http://backend_b;
            }
        }
    }

    upstream backend_a {
        server backend1.example.com;
    }

    upstream backend_b {
        server backend2.example.com;
    }
}
在此配置中,首先检查是否存在ab_test Cookie,如果没有,则分配一个新组并设置Cookie。然后根据Cookie值将请求转发到相应的后端服务器。
方法3:基于特定请求头的A/B测试
可以根据特定的请求头(例如,用户代理或自定义头)来实现A/B测试:
http {
    map $http_user_agent $test_group {
        "~*chrome" A;
        "~*firefox" B;
        default C;
    }

    server {
        listen 80;
        server_name example.com;

        location / {
            if ($test_group = A) {
                proxy_pass http://backend_a;
            }

            if ($test_group = B) {
                proxy_pass http://backend_b;
            }

            if ($test_group = C) {
                proxy_pass http://backend_default;
            }
        }
    }

    upstream backend_a {
        server backend1.example.com;
    }

    upstream backend_b {
        server backend2.example.com;
    }

    upstream backend_default {
        server backend3.example.com;
    }
}
在此配置中,根据用户代理将请求分配到不同的后端服务器。
总结
通过上述几种方法,您可以在Nginx中灵活地配置A/B测试。根据需求,选择适合的方法进行配置,可以实现流量的有效分配和测试,帮助优化和改进您的应用。
30. Nginx的keepalive指令有什么作用
Nginx的keepalive指令用于管理和配置连接池,以保持后端服务器的持久连接。这有助于减少建立新连接的开销,从而提高性能和响应速度。以下是详细的解释和配置示例:
主要作用
- 减少连接开销:通过保持与后端服务器的持久连接,避免频繁建立和关闭连接所带来的开销。
- 提高性能:在高并发场景下,可以显著提高服务器的响应速度和吞吐量。
- 优化资源使用:更好地利用系统资源,减少CPU和内存的消耗。
(1)在upstream块中配置keepalive
可以在upstream块中配置keepalive指令,指定Nginx与后端服务器之间的持久连接数。
http {
    upstream backend {
        server backend1.example.com;
        server backend2.example.com;

        keepalive 32;
    }

    server {
        listen 80;
        server_name example.com;

        location / {
            proxy_pass http://backend;

            # 设置其他相关的proxy指令
            proxy_http_version 1.1;
            proxy_set_header Connection "";
        }
    }
}
在上述配置中:
upstream backend:定义后端服务器组。server backend1.example.com和server backend2.example.com:定义具体的后端服务器。keepalive 32:指定与后端服务器保持的最大持久连接数为32。
(2)设置相关的proxy指令
为了确保keepalive连接正常工作,还需要设置一些proxy指令:
proxy_http_version 1.1:指定HTTP版本为1.1,以支持持久连接。proxy_set_header Connection "":清除Connection头,以确保不会被设置为close,从而关闭连接。
详细配置解释
keepalive:指定Nginx与每个后端服务器之间保持的最大持久连接数。这个值应根据服务器的负载和并发请求量进行调整。proxy_http_version 1.1:HTTP 1.1默认支持持久连接,因此需要指定使用HTTP 1.1。proxy_set_header Connection "":确保不会发送Connection: close头,从而关闭连接。
在某些情况下,后端服务器可能不支持持久连接。在这种情况下,配置keepalive可能不会生效,您需要检查后端服务器的配置和日志,以确保其支持持久连接。
31. 如何在Nginx中配置子请求
在Nginx中,子请求是一种将一个客户端请求拆分成多个内部请求的技术,这些请求可以并行地处理并在需要时合并结果。子请求通常用于实现功能如SSI(服务器端包含)、缓存和代理等。
(1)使用include指令实现SSI
服务器端包含(SSI)是一种常见的使用子请求的方式。通过SSI,您可以在页面中插入其他页面的内容。
首先,确保在Nginx配置中启用SSI模块:
http {
    ssi on;

    server {
        listen 80;
        server_name example.com;

        location / {
            ssi on;
            root /var/www/html;
        }
    }
}
在HTML文件中使用SSI指令:
<!-- /var/www/html/index.html -->
<html>
<body>
    <h1>Welcome to my site</h1>
    <!--# include virtual="/footer.html" -->
</body>
</html>

<!-- /var/www/html/footer.html -->
<footer>
    <p>Footer content goes here</p>
</footer>
当客户端请求/index.html时,Nginx将自动包含/footer.html的内容作为子请求的一部分。
(2)使用proxy_pass指令实现代理子请求
Nginx的子请求功能也可以用于代理请求。在这个例子中,我们将一个请求拆分为多个代理请求,然后合并结果。
http {
    server {
        listen 80;
        server_name example.com;

        location / {
            set $backend "";

            # 子请求的第一个代理目标
            proxy_pass http://backend1.example.com;
            proxy_set_header Host $host;
            proxy_set_header X-Real-IP $remote_addr;
            proxy_set_header X-Forwarded-For $proxy_add_x_forwarded_for;
            proxy_set_header X-Forwarded-Proto $scheme;

            # 子请求的第二个代理目标
            error_page 418 = @second_backend;
        }

        location @second_backend {
            proxy_pass http://backend2.example.com;
            proxy_set_header Host $host;
            proxy_set_header X-Real-IP $remote_addr;
            proxy_set_header X-Forwarded-For $proxy_add_x_forwarded_for;
            proxy_set_header X-Forwarded-Proto $scheme;
        }
    }
}
在这个配置中,初始请求被代理到backend1,如果发生特定错误(例如返回HTTP 418),Nginx将触发另一个子请求到backend2。
(3)使用subrequests模块
Nginx的subrequests模块允许您以更细粒度的控制来处理子请求。下面是一个示例,展示如何在同一请求中发送多个子请求,并将结果合并到主请求中:
http {
    server {
        listen 80;
        server_name example.com;

        location / {
            # 主请求处理逻辑
            echo "Main Request\n";

            # 子请求
            echo_location_async /sub1;
            echo_location_async /sub2;
        }

        location /sub1 {
            echo "Subrequest 1\n";
        }

        location /sub2 {
            echo "Subrequest 2\n";
        }
    }
}
在这个例子中,echo_location_async指令(需要ngx_echo模块)用于发送异步子请求。Nginx将发送到/sub1和/sub2的子请求并将它们的结果合并到主请求中。
总结
Nginx的子请求功能提供了一种灵活的方法来处理复杂的请求逻辑,允许您拆分和合并请求内容。使用子请求可以实现包括SSI、负载均衡、缓存和代理等多种功能。根据您的具体需求,选择适合的子请求配置方式来优化Nginx服务器的性能和功能。
32. Nginx的proxy_pass指令如何使用
Nginx的proxy_pass指令用于将客户端请求转发到后端服务器或其他代理服务器。它是实现反向代理的核心指令之一。
proxy_pass指令通常在location块中使用,以指定将请求转发到哪个后端服务器。
http {
    server {
        listen 80;
        server_name example.com;

        location / {
            proxy_pass http://backend.example.com;
        }
    }
}
在这个示例中,所有到example.com的请求将被转发到backend.example.com。
(1)简单反向代理
将所有请求转发到单个后端服务器:
server {
    listen 80;
    server_name example.com;

    location / {
        proxy_pass http://backend.example.com;
    }
}
(2)代理到不同的路径
将请求的一部分路径转发到后端服务器的不同路径:
server {
    listen 80;
    server_name example.com;

    location /api/ {
        proxy_pass http://backend.example.com/api/;
    }
}
在这个示例中,请求到example.com/api/将被转发到backend.example.com/api/。
(3)代理到多个后端服务器(负载均衡)
使用upstream块定义后端服务器组,并进行负载均衡:
http {
    upstream backend {
        server backend1.example.com;
        server backend2.example.com;
    }

    server {
        listen 80;
        server_name example.com;

        location / {
            proxy_pass http://backend;
        }
    }
}
(4)保持客户端主机头
为了保持客户端请求的原始主机头,可以使用proxy_set_header指令:
server {
    listen 80;
    server_name example.com;

    location / {
        proxy_set_header Host $host;
        proxy_pass http://backend.example.com;
    }
}
(5)设置其他头信息
可以使用proxy_set_header指令设置其他头信息,例如客户端IP地址:
server {
    listen 80;
    server_name example.com;

    location / {
        proxy_set_header Host $host;
        proxy_set_header X-Real-IP $remote_addr;
        proxy_set_header X-Forwarded-For $proxy_add_x_forwarded_for;
        proxy_set_header X-Forwarded-Proto $scheme;
        proxy_pass http://backend.example.com;
    }
}
(6)处理WebSocket代理
代理WebSocket请求时,需要保留连接:
server {
    listen 80;
    server_name example.com;

    location / {
        proxy_pass http://backend.example.com;
        proxy_http_version 1.1;
        proxy_set_header Upgrade $http_upgrade;
        proxy_set_header Connection "upgrade";
    }
}
常见配置选项
proxy_pass: 指定后端服务器地址,可以是HTTP或HTTPS。proxy_set_header: 设置或修改传递给后端服务器的请求头。proxy_http_version: 指定使用的HTTP版本(通常为1.1)。proxy_redirect: 配置Nginx如何处理后端服务器的重定向。proxy_cache: 启用缓存,以提高性能。
33. 如何在Nginx中配置健康检查
在Nginx中配置健康检查可以确保后端服务器的可用性,并在服务器不可用时自动将流量切换到其他可用的服务器。这对于维持高可用性和提高服务稳定性非常重要。
(1)使用ngx_http_upstream_module的被动健康检查
Nginx内置的被动健康检查基于请求失败来自动将不可用的服务器标记为不可用。这种方法是默认启用的,您可以通过配置proxy_next_upstream等指令来增强其效果。
(2)使用ngx_http_upstream_check_module的主动健康检查
对于主动健康检查,您需要编译带有ngx_http_upstream_check_module模块的Nginx。这允许您主动定期检查后端服务器的健康状态。
编译Nginx并启用ngx_http_upstream_check_module
首先,下载并编译Nginx源代码与ngx_http_upstream_check_module模块:
# 安装必要的依赖
sudo apt-get update
sudo apt-get install build-essential libpcre3 libpcre3-dev zlib1g zlib1g-dev openssl libssl-dev

# 下载Nginx和模块源代码
cd /usr/local/src
sudo wget http://nginx.org/download/nginx-1.20.1.tar.gz
sudo tar -xzvf nginx-1.20.1.tar.gz
sudo git clone https://github.com/yaoweibin/nginx_upstream_check_module.git

# 打补丁并编译Nginx
cd nginx-1.20.1
sudo patch -p1 < ../nginx_upstream_check_module/check_1.20.1+.patch
sudo ./configure --add-module=../nginx_upstream_check_module --with-http_ssl_module
sudo make
sudo make install
配置主动健康检查
编译并安装Nginx之后,配置主动健康检查:
http {
    upstream backend {
        server backend1.example.com;
        server backend2.example.com;

        check interval=3000 rise=2 fall=5 timeout=1000;
    }

    server {
        listen 80;
        server_name example.com;

        location / {
            proxy_pass http://backend;
            proxy_set_header Host $host;
            proxy_set_header X-Real-IP $remote_addr;
            proxy_set_header X-Forwarded-For $proxy_add_x_forwarded_for;
            proxy_set_header X-Forwarded-Proto $scheme;
        }

        location /status {
            check_status;
            access_log off;
        }
    }
}
在这个配置中:
check interval=3000 rise=2 fall=5 timeout=1000;:定义健康检查的参数:interval=3000:每3000毫秒检查一次。rise=2:连续两次成功后认为服务器是健康的。fall=5:连续五次失败后认为服务器是不可用的。timeout=1000:健康检查的超时时间为1000毫秒。location /status { check_status; }:添加一个URL来查看健康检查的状态。
(3)使用ngx_http_healthcheck_module的主动健康检查(仅适用于商业版)
如果您使用的是Nginx Plus(Nginx的商业版),它内置了更强大的健康检查功能,可以更方便地配置主动健康检查。
(4)总结
通过合理配置健康检查,可以确保Nginx能够自动检测并处理后端服务器的健康状态,从而提高应用的可用性和稳定性。无论使用被动健康检查还是主动健康检查,都需要根据实际需求进行相应的配置和优化。
34. Nginx的worker_processes指令有什么作用
Nginx的worker_processes指令用于配置Nginx进程的数量,即工作进程(Worker Processes)的数量。这些工作进程负责处理客户端请求,是Nginx性能和并发能力的关键因素。
作用
- 并发处理能力:增加worker_processes的数量可以提升Nginx的并发处理能力。
- 多核利用:通过配置多个工作进程,可以充分利用多核CPU,提高服务器的整体性能。
- 负载均衡:在高负载环境下,多个工作进程可以更好地分担处理任务,防止单个进程成为瓶颈。
worker_processes指令通常在Nginx配置文件的全局块中配置(即nginx.conf文件的http块或最顶层)。
# nginx.conf
worker_processes auto;
在上述配置中,auto值让Nginx自动检测并使用可用的CPU核心数。您也可以手动设置具体的工作进程数量,例如:
worker_processes 4;在这个示例中,Nginx将启动4个工作进程。
35. Nginx的limit_conn指令如何使用
Nginx的limit_conn指令用于限制每个指定上下文中的并发连接数。这对于防止单个客户端过多占用服务器资源,从而影响其他客户端的访问是非常有用的。
(1)配置上下文
limit_conn指令通常与limit_conn_zone指令一起使用。limit_conn_zone指令定义了一个共享内存区域,用于存储并发连接的计数,而limit_conn指令则指定了限制的具体数量。
首先,在http块中配置limit_conn_zone指令:
http {
    # 定义一个共享内存区域,基于客户端IP地址限制连接数
    limit_conn_zone $binary_remote_addr zone=addr:10m;

    ...
}
在这个示例中,$binary_remote_addr变量表示客户端的IP地址,zone=addr:10m定义了一个名为addr的共享内存区域,大小为10MB。
然后,在需要限制并发连接数的上下文中使用limit_conn指令,例如在server块或location块中:
http {
    limit_conn_zone $binary_remote_addr zone=addr:10m;

    server {
        listen 80;
        server_name example.com;

        location / {
            limit_conn addr 10;

            proxy_pass http://backend;
            proxy_set_header Host $host;
            proxy_set_header X-Real-IP $remote_addr;
            proxy_set_header X-Forwarded-For $proxy_add_x_forwarded_for;
            proxy_set_header X-Forwarded-Proto $scheme;
        }
    }
}
在这个示例中,limit_conn addr 10指令表示每个客户端IP地址最多可以同时建立10个连接。
通过合理配置limit_conn和相关指令,可以有效地控制并发连接数和请求速率,保护服务器资源,防止单个客户端过度占用资源,确保系统的稳定性和性能。


 1241
1241

 被折叠的 条评论
为什么被折叠?
被折叠的 条评论
为什么被折叠?
 到【灌水乐园】发言


