


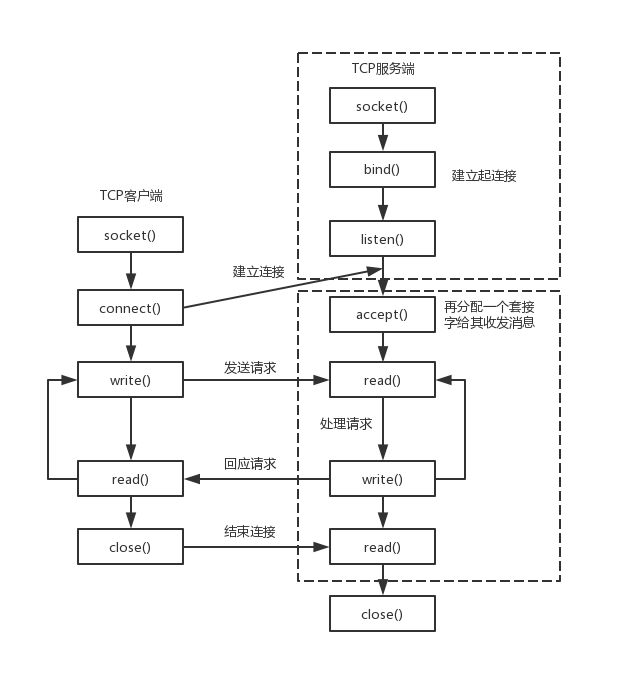
网络编程基本流程
网络编程的基本流程对于服务端是这样的
服务端
1)socket——创建socket对象。
2)bind——绑定本机ip+port。
3)listen——监听来电,若在监听到来电,则建立起连接。
4)accept——再创建一个socket对象给其收发消息。原因是现实中服务端都是面对多个客户端,那么为了区分各个客户端,则每个客户端都需再分配一个socket对象进行收发消息。
5)read、write——就是收发消息了。
对于客户端是这样的
客户端
1)socket——创建socket对象。
2)connect——根据服务端ip+port,发起连接请求。
3)write、read——建立连接后,就可发收消息了。
图示如下
终端节点的创建
所谓终端节点就是用来通信的端对端的节点,可以通过ip地址和端口构造,其的节点可以连接这个终端节点做通信.
如果我们是客户端,我们可以通过对端的ip和端口构造一个endpoint,用这个endpoint和其通信。
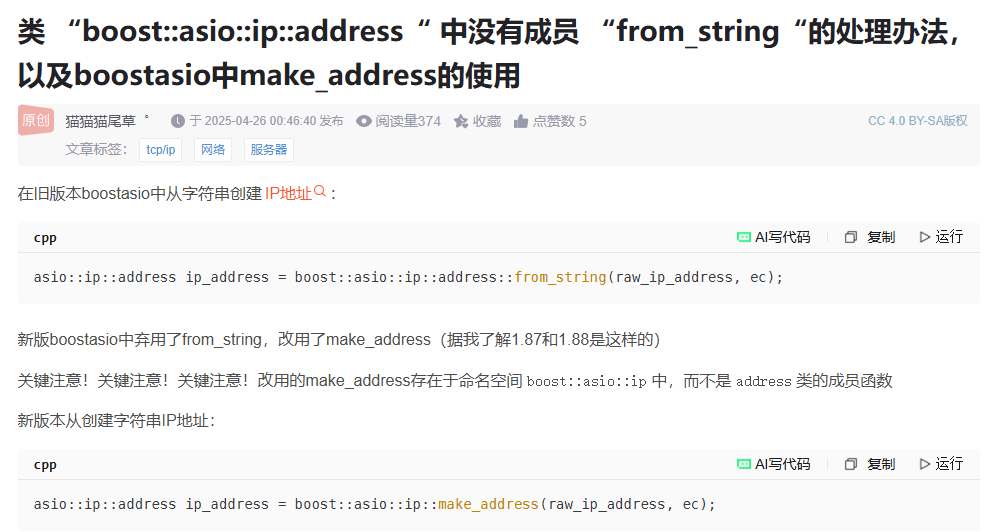
类"boost:asio:ip:address"没有成员"from_string”
int  client_end_point() {
    // Step 1. Assume that the client application has already
    // obtained the IP-address and the protocol port number.
    std::string raw_ip_address = "127.0.0.1";
    unsigned short port_num = 3333;
    // Used to store information about error that happens
    // while parsing the raw IP-address.
    boost::system::error_code ec;
    // Step 2. Using IP protocol version independent address
    // representation.
    asio::ip::address ip_address =
        asio::ip::address::from_string(raw_ip_address, ec);
    if (ec.value() != 0) {
        // Provided IP address is invalid. Breaking execution.
        std::cout
            << "Failed to parse the IP address. Error code = "
            << ec.value() << ". Message: " << ec.message();
        return ec.value();
    }
    // Step 3.
    asio::ip::tcp::endpoint ep(ip_address, port_num);
    // Step 4. The endpoint is ready and can be used to specify a
    // particular server in the network the client wants to
    // communicate with.
    return 0;
}
如果是服务端,则只需根据本地地址绑定就可以生成endpoint
nt  server_end_point(){
    // Step 1. Here we assume that the server application has
    //already obtained the protocol port number.
    unsigned short port_num = 3333;
    // Step 2. Create special object of asio::ip::address class
    // that specifies all IP-addresses available on the host. Note
    // that here we assume that server works over IPv6 protocol.
    asio::ip::address ip_address = asio::ip::address_v6::any();
    // Step 3.
    asio::ip::tcp::endpoint ep(ip_address, port_num);
    // Step 4. The endpoint is created and can be used to
    // specify the IP addresses and a port number on which
    // the server application wants to listen for incoming
    // connections.
    return 0;
}
创建socket
创建socket分为4步,创建上下文iocontext,选择协议,生成socket,打开socket。
int create_tcp_socket() {
    // Step 1. An instance of 'io_service' class is required by
            // socket constructor.
    asio::io_context  ios;
    // Step 2. Creating an object of 'tcp' class representing
    // a TCP protocol with IPv4 as underlying protocol.
    asio::ip::tcp protocol = asio::ip::tcp::v4();
    // Step 3. Instantiating an active TCP socket object.
    asio::ip::tcp::socket sock(ios);
    // Used to store information about error that happens
    // while opening the socket.
    boost::system::error_code ec;
    // Step 4. Opening the socket.
    sock.open(protocol, ec);
    if (ec.value() != 0) {
        // Failed to open the socket.
        std::cout
            << "Failed to open the socket! Error code = "
            << ec.value() << ". Message: " << ec.message();
        return ec.value();
    }
    return 0;
}
上述socket只是通信的socket,如果是服务端,我们还需要生成一个acceptor的socket,用来接收新的连接。
int  create_acceptor_socket() {
    // Step 1. An instance of 'io_service' class is required by
        // socket constructor.
    asio::io_context ios;
    // Step 2. Creating an object of 'tcp' class representing
            // a TCP protocol with IPv6 as underlying protocol.
    asio::ip::tcp protocol = asio::ip::tcp::v6();
    // Step 3. Instantiating an acceptor socket object.
    asio::ip::tcp::acceptor acceptor(ios);
    // Used to store information about error that happens
    // while opening the acceptor socket.
    boost::system::error_code ec;
    // Step 4. Opening the acceptor socket.
    acceptor.open(protocol, ec);
    if (ec.value() != 0) {
        // Failed to open the socket.
        std::cout
            << "Failed to open the acceptor socket!"
            << "Error code = "
            << ec.value() << ". Message: " << ec.message();
        return ec.value();
    }
    return 0;
}
绑定acceptor
对于acceptor类型的socket,服务器要将其绑定到指定的断点,所有连接这个端点的连接都可以被接收到。
int  bind_acceptor_socket() {
    // Step 1. Here we assume that the server application has
        // already obtained the protocol port number.
    unsigned short port_num = 3333;
    // Step 2. Creating an endpoint.
    asio::ip::tcp::endpoint ep(asio::ip::address_v4::any(),
        port_num);
    // Used by 'acceptor' class constructor.
    asio::io_context  ios;
    // Step 3. Creating and opening an acceptor socket.
    asio::ip::tcp::acceptor acceptor(ios, ep.protocol());
    boost::system::error_code ec;
    // Step 4. Binding the acceptor socket.
    acceptor.bind(ep, ec);
    // Handling errors if any.
    if (ec.value() != 0) {
        // Failed to bind the acceptor socket. Breaking
        // execution.
        std::cout << "Failed to bind the acceptor socket."
            << "Error code = " << ec.value() << ". Message: "
            << ec.message();
        return ec.value();
    }
    return 0;
}
连接指定的端点
作为客户端可以连接服务器指定的端点进行连接
int  connect_to_end() {
    // Step 1. Assume that the client application has already
            // obtained the IP address and protocol port number of the
            // target server.
    std::string raw_ip_address = "127.0.0.1";
    unsigned short port_num = 3333;
    try {
        // Step 2. Creating an endpoint designating
        // a target server application.
        asio::ip::tcp::endpoint
            ep(asio::ip::address::from_string(raw_ip_address),
                port_num);
        asio::io_context ios;
        // Step 3. Creating and opening a socket.
        asio::ip::tcp::socket sock(ios, ep.protocol());
        // Step 4. Connecting a socket.
        sock.connect(ep);
        // At this point socket 'sock' is connected to
        // the server application and can be used
        // to send data to or receive data from it.
    }
    // Overloads of asio::ip::address::from_string() and
    // asio::ip::tcp::socket::connect() used here throw
    // exceptions in case of error condition.
    catch (system::system_error& e) {
        std::cout << "Error occured! Error code = " << e.code()
            << ". Message: " << e.what();
        return e.code().value();
    }
}
域名
int dns_connect_to_end() {
    std::string host = "llfc.club";//域名
    std::string port_num = "3333";
    asio::io_context ioc;
    boost::asio::ip::tcp::resolver resolver(ioc);

    //asio::ip::tcp::resolver::query resolver_query(host,port_num,asio::ip::tcp::resolver::query::numeric_service);//DNS解析器
    try
    {
        auto endpoints = resolver.resolve(host, port_num);
        //创建socket并连接到对应的地址
        asio::ip::tcp::socket sock(ioc);
        asio::connect(sock, endpoints);
    }
    catch (system::system_error& e)
    {
        std::cout << "Error occured! Error code = " << e.code()
            << ". Message: " << e.what();
        return e.code().value();
    }
}
服务器接收连接
当有客户端连接时,服务器需要接收连接
int accept_new_connection(){
    // The size of the queue containing the pending connection
            // requests.
    const int BACKLOG_SIZE = 30;
    // Step 1. Here we assume that the server application has
    // already obtained the protocol port number.
    unsigned short port_num = 3333;
    // Step 2. Creating a server endpoint.
    asio::ip::tcp::endpoint ep(asio::ip::address_v4::any(),
        port_num);
    asio::io_context  ios;
    try {
        // Step 3. Instantiating and opening an acceptor socket.
        asio::ip::tcp::acceptor acceptor(ios, ep.protocol());
        // Step 4. Binding the acceptor socket to the
        // server endpint.
        acceptor.bind(ep);
        // Step 5. Starting to listen for incoming connection
        // requests.
        acceptor.listen(BACKLOG_SIZE);
        // Step 6. Creating an active socket.
        asio::ip::tcp::socket sock(ios);
        // Step 7. Processing the next connection request and
        // connecting the active socket to the client.
        acceptor.accept(sock);
        // At this point 'sock' socket is connected to
        //the client application and can be used to send data to
        // or receive data from it.
    }
    catch (system::system_error& e) {
        std::cout << "Error occured! Error code = " << e.code()
            << ". Message: " << e.what();
        return e.code().value();
    }
}
关于buffer
任何网络库都有提供buffer的数据结构,所谓buffer就是接收和发送数据时缓存数据的结构。
boost::asio提供了asio::mutable_buffer 和 asio::const_buffer这两个结构,他们是一段连续的空间,首字节存储了后续数据的长度。
asio::mutable_buffer用于写服务,asio::const_buffer用于读服务。但是这两个结构都没有被asio的api直接使用。
对于api的buffer参数,asio提出了MutableBufferSequence和ConstBufferSequence概念,他们是由多个asio::mutable_buffer和asio::const_buffer组成的。也就是说boost::asio为了节省空间,将一部分连续的空间组合起来,作为参数交给api使用。
我们可以理解为MutableBufferSequence的数据结构为std::vectorasio::mutable_buffer
结构如下
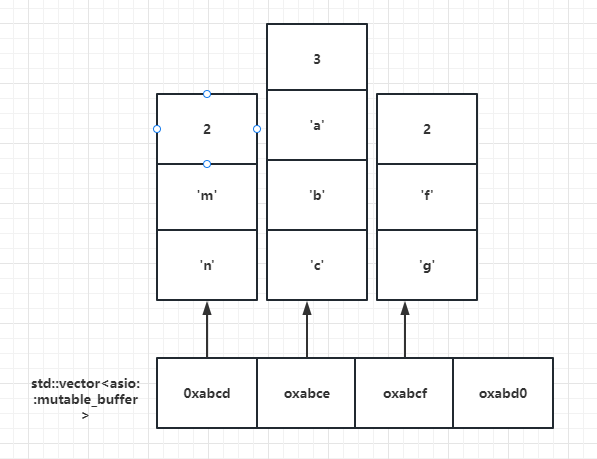
每隔vector存储的都是mutable_buffer的地址,每个mutable_buffer的第一个字节表示数据的长度,后面跟着数据内容。
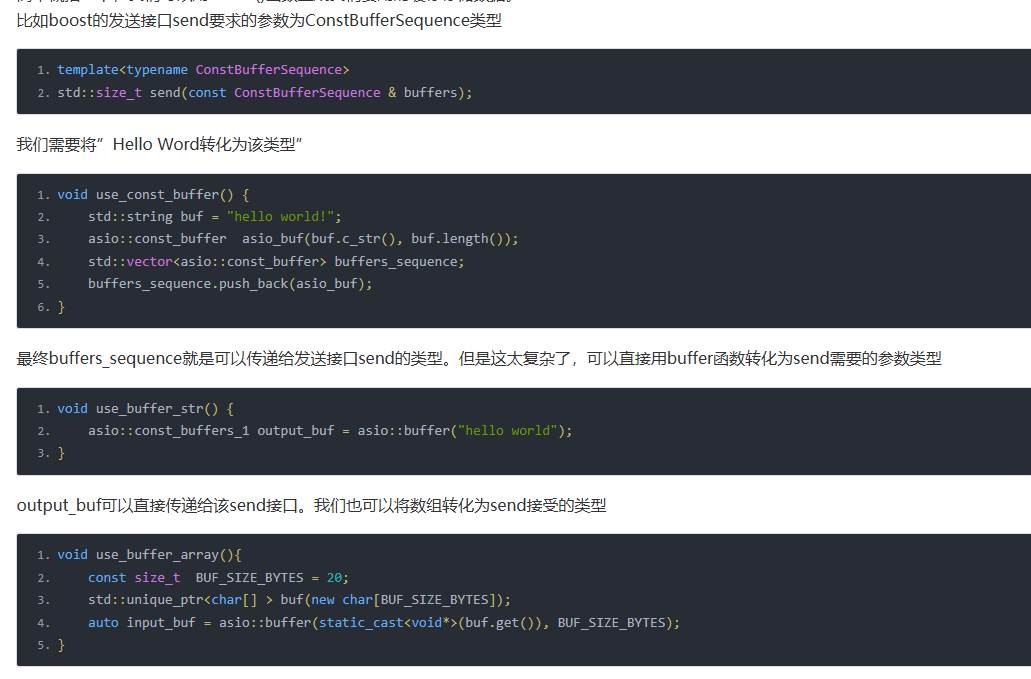
这么复杂的结构交给用户使用并不合适,所以asio提出了buffer()函数,该函数接收多种形式的字节流,该函数返回asio::mutable_buffers_1 o或者asio::const_buffers_1结构的对象。
如果传递给buffer()的参数是一个只读类型,则函数返回asio::const_buffers_1 类型对象。
如果传递给buffer()的参数是一个可写类型,则返回asio::mutable_buffers_1 类型对象。
asio::const_buffers_1和asio::mutable_buffers_1是asio::mutable_buffer和asio::const_buffer的适配器,提供了符合MutableBufferSequence和ConstBufferSequence概念的接口,所以他们可以作为boost::asio的api函数的参数使用。
简单概括一下,我们可以用buffer()函数生成我们要用的缓存存储数据。
比如boost的发送接口send要求的参数为ConstBufferSequence类型

void use_stream_buffer() {
    asio::streambuf buf;
    std::ostream output(&buf);
    // Writing the message to the stream-based buffer.
    output << "Message1\nMessage2";
    // Now we want to read all data from a streambuf
    // until '\n' delimiter.
    // Instantiate an input stream which uses our
    // stream buffer.
    std::istream input(&buf);
    // We'll read data into this string.
    std::string message1;
    std::getline(input, message1);
    // Now message1 string contains 'Message1'.
}


 306
306

 被折叠的 条评论
为什么被折叠?
被折叠的 条评论
为什么被折叠?
 到【灌水乐园】发言


