


 本文详细介绍如何在SpringBoot项目中整合Ehcache缓存,包括pom配置、ehcache.xml配置、yml配置、启动类注解、@Cacheable和@CacheEvict使用方法及测试案例。
Ehcache 很好用的一个缓存,无需客户端,可持久化存储到磁盘上。本文将展示一下springboot 如何整合 ehcache
1.pom配置
        <!-- 添加ehcache支持 -->
        <dependency>
            <groupId>org.springframework.boot</groupId>
            <artifactId>spring-boot-starter-cache</artifactId>
        </dependency>
        <!-- Ehcache 坐标 -->
        <dependency>
            <groupId>net.sf.ehcache</groupId>
            <artifactId>ehcache</artifactId>
        </dependency>
2.ehcache xml配置
此处可以配置多个 cache ,使用name 区分,各个配置什么意思,我这里不详说,感兴趣的请自行百度,此处我将 配置文件放在 resource 目录下
<ehcache xmlns:xsi="http://www.w3.org/2001/XMLSchema-instance" xsi:noNamespaceSchemaLocation="../config/ehcache.xsd">
    <diskStore path="java.io.tmpdir"/>
    <!--defaultCache:echcache 的默认缓存策略 -->
    <defaultCache
            maxElementsInMemory="10000"
            eternal="false"
            timeToIdleSeconds="120"
            timeToLiveSeconds="120"
            maxElementsOnDisk="10000000"
            diskExpiryThreadIntervalSeconds="120"
            memoryStoreEvictionPolicy="LRU">
        <persistence strategy="localTempSwap"/>
    </defaultCache>
    <!-- 自定义缓存策略 -->
    <cache name="msg"
           maxElementsInMemory="10000"
           eternal="false"
           timeToIdleSeconds="120"
           timeToLiveSeconds="120"
           maxElementsOnDisk="10000000"
           diskExpiryThreadIntervalSeconds="120"
           memoryStoreEvictionPolicy="LRU">
        <persistence strategy="localTempSwap"/>
    </cache>
</ehcache>
3.yml配置
spring:
  # ehcache 配置
  cache:
    ehcache:
      config: classpath:ehcache.xml
4.启动类配置
添加 @EnableCaching 开启缓存
/**
*	springboot 启动类
*/
@SpringBootApplication
@EnableCaching
public class Application {

    public static void main(String[] args) {
        SpringApplication.run(Application.class , args);
    }

}
5. @CacheEvict , @Cacheable
@Cacheable 标注于方法之上,表示这个方法返回值将被缓存起来。有个参数 value 里面可以指定使用哪个缓存策略。比如说上面我在 ehcache.xml 里面定义了 msg 这个策略,我这里使用 msg
@CacheEvict 也是标准与方法之上,标准什么时候缓存失效,以及失效策略,比如说,我insert 的时候就需要把 getAll 的缓存给删掉。有个 value 参数 和 @Cacheable 的value一样。
有个 key ,可以自定义,也可以使用默认的。自定义需要这样写 key = "#msg.userId"
有个删除策略,这里我使用全部删除,更新的时候。 allEntries = true
接下来看方法。
insertSelective @Override
@CacheEvict(value = {"msg"} , key = "" ,allEntries = true)
public int insertSelective(Msg msg) {
String id = UUID.randomUUID().toString();
msg.setId(id);
return msgMapper.insertSelective(msg);
}getAll @Override
@Cacheable(value = {"msg"})
public List<Msg> getAll() {
return msgMapper.selectAll();
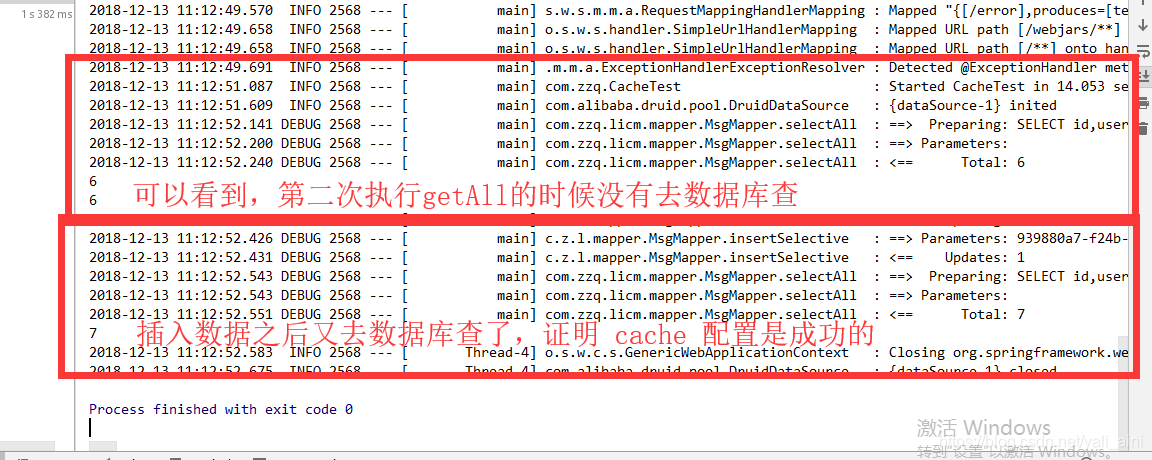
}6.测试
public class CacheTest extends BaseTest {

    @Autowired
    private MsgService msgService;

    @Test
    public void getAll(){
        List<Msg>  list = msgService.getAll();
        System.out.println(  list.size() );

        List<Msg>  list3 = msgService.getAll();
        System.out.println(  list3.size() );

        Msg msg = new Msg("zhangzq", "1", "学以取暖", new Date());
        msgService.insertSelective(msg);

        List<Msg>  list2 = msgService.getAll();
        System.out.println( list2.size() );

    }

}


@RunWith(SpringRunner.class)
@SpringBootTest(classes = {Application.class})
@WebAppConfiguration
public class BaseTest {
}
运行效果:
SpringBoot整合 Ehcache 的详细配置详解可以参考这篇文章: https://www.zhangshengrong.com/p/Mr1WygAZNG/


 2991
2991

 被折叠的 条评论
为什么被折叠?
被折叠的 条评论
为什么被折叠?
 到【灌水乐园】发言


