转载地址:https://www.cnblogs.com/richieyang/p/5002526.html
在上一篇”使用OAuth打造webapi认证服务供自己的客户端使用“的文章中我们实现了一个采用了OAuth流程3-密码模式(resource owner password credentials)的WebApi服务端。今天我们来实现一个js+html版本的客户端。
一、angular客户端
angular版本的客户端代码来自于http://bitoftech.net/2014/06/01/token-based-authentication-asp-net-web-api-2-owin-asp-net-identity/,接下来我们做个简单的梳理,方便大家在项目中使用。
1、新建一个angular module,我们使用ngRoute来实现一个单页面程序,LocalStorageModule用来在本地存放token信息,angular-loading-bar是一个页面加载用的进度条。
| 1 | var app = angular.module('AngularAuthApp', ['ngRoute', 'LocalStorageModule', 'angular-loading-bar']);
|
2、新建一个constant,angular中的constant可以注入到任意service和factory中,是存储全局变量的好帮手。
地址:http://localhost:56646/就是我们自己的webApi地址。
3、authService中定义了登录和登出逻辑,登录逻辑就是我们使用OAuth2.0中的流程3获取token的过程,一旦获得到token也就意味着我们登录成功了。
| 1 2 3 4 5 6 7 8 9 10 11 12 13 14 15 16 17 18 19 20 21 22 23 24 25 26 27 28 29 | var _login = function (loginData) {
var data = "grant_type=password&username=" + loginData.userName + "&password=" + loginData.password;
var deferred = $q.defer();
$http.post(serviceBase + 'token', data, { headers: { 'Content-Type': 'application/x-www-form-urlencoded' } }).success(function (response) {
if (loginData.useRefreshTokens) {
localStorageService.set('authorizationData', { token: response.access_token, userName: loginData.userName, refreshToken: response.refresh_token, useRefreshTokens: true });
}
else {
localStorageService.set('authorizationData', { token: response.access_token, userName: loginData.userName, refreshToken: "", useRefreshTokens: false });
}
_authentication.isAuth = true;
_authentication.userName = loginData.userName;
_authentication.useRefreshTokens = loginData.useRefreshTokens;
deferred.resolve(response);
}).error(function (err, status) {
_logOut();
deferred.reject(err);
});
return deferred.promise;
};
|
我们按照OAuth2.0中的流程3来Post数据,拿到token信息后保存在localStorageService。
3、启动AngularClient.Web项目尝试一下登录

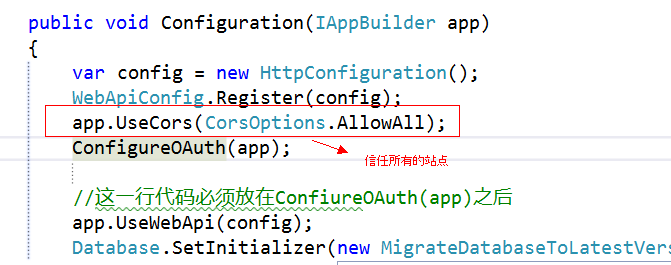
由于同源策略的原因,我们需要在WebApi服务端启用cors,打开Startup类配置cors:
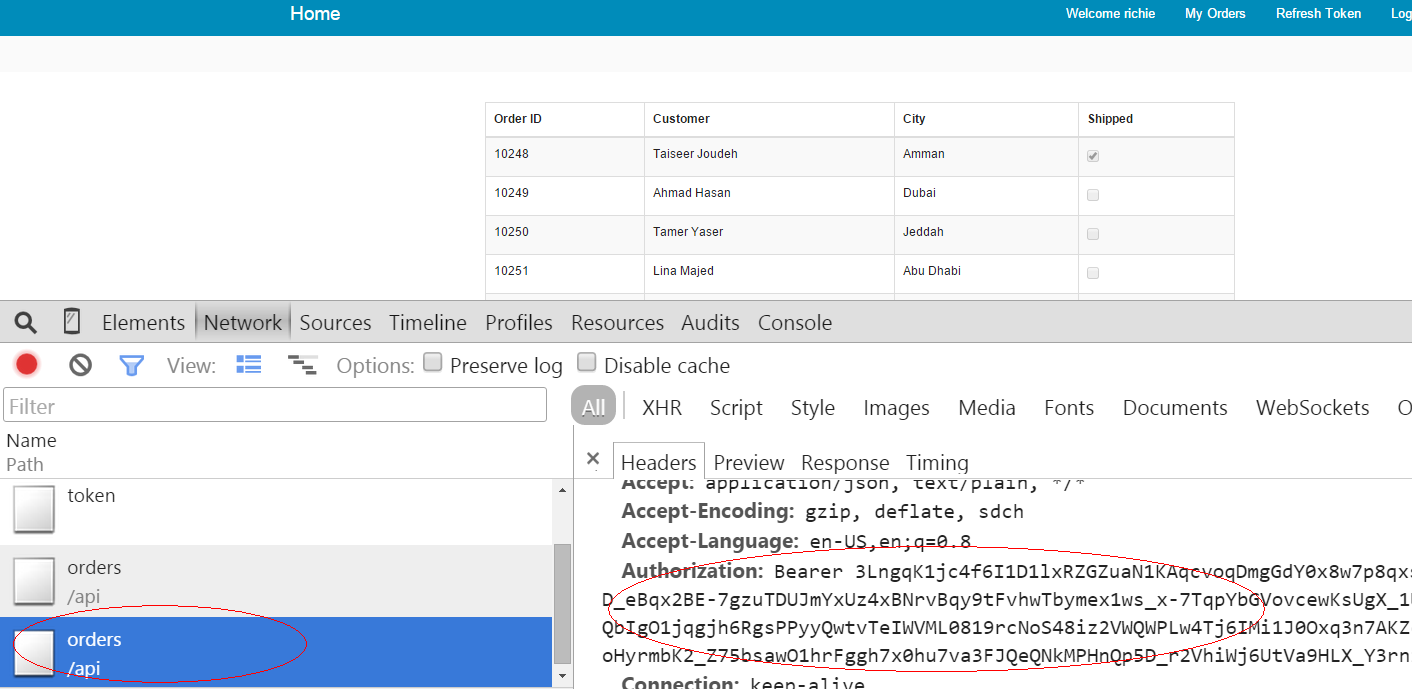
4、一旦登录成功意味着我们拿到了token,所以可以凭token访问受限的资源,例如http://localhost:56646/api/orders。只需要在每个请求头中加入Authorization:Bearer {{token}}即可。
我们可以使用angular的拦截功能,只需要在$http服务中拦截每个请求,在请求头中加入token即可。
| 1 2 3 | app.config(function ($httpProvider) {
$httpProvider.interceptors.push('authInterceptorService');
});
|
angular中的provider是可以配置的,正如上面的代码我们添加了一个authInterceptorService拦截服务。
拦截逻辑也很简单:如果在localStorageService中读到token,就添加一个header。
| 1 2 3 4 5 6 7 8 9 10 11 | var _request = function (config) {
config.headers = config.headers || {};
var authData = localStorageService.get('authorizationData');
if (authData) {
config.headers.Authorization = 'Bearer ' + authData.token;
}
return config;
}
|
5、再次登录,当登录成功后成功调用到了http://localhost:56646/api/orders服务
二、JQuery客户端
JQuery客户端的实现思路也差不多,首先发一个post请求获取token:
| 1 2 3 4 5 6 7 8 9 10 11 12 13 14 15 16 17 18 19 20 21 | var apiServiceBaseUri = 'http://localhost:56646/';
$('#login').click(function () {
var data = {
'grant_type': 'password',
'username': $('#userName').val(),
'password': $('#password').val()
};
$.ajax({
url: apiServiceBaseUri + 'token',
type: "POST",
data: data,
dataType: 'json',
success: function (data) {
$.cookie("token", data.access_token);
getOrders();
},
error: function (xmlHttpRequest) {
$("#message").html(xmlHttpRequest.responseJSON.error_description);
$("#message").show();
}
});
|
token一旦获取成功就保存在cookie中。接下来拿token去访问受限的服务:
| 1 2 3 4 5 6 7 8 9 10 11 12 13 | var getOrders = function () {
$.ajax({
beforeSend: function (xhr) {
xhr.setRequestHeader('Authorization', 'Bearer ' + $.cookie("token"));
},
url: apiServiceBaseUri + 'api/orders',
type: "GET",
dataType: 'json',
success: function (data) {
showOrderTable(data);
}
});
}
|
通过xhr.setRequestHeader('Authorization', 'Bearer ' + $.cookie("token")); 的方式将token添加到请求头,相对angular的拦截方案,此方案就显得比较繁琐了,每个http请求都得有添加此行代码。
所有代码同步更新在 https://git.oschina.net/richieyangs/OAuthPractice.git


 855
855

 被折叠的 条评论
为什么被折叠?
被折叠的 条评论
为什么被折叠?
 到【灌水乐园】发言


