


 本文详细介绍了如何安装和配置Nacos服务器,包括服务发现与消费、配置管理,以及Linux环境下Nacos的集群配置。从添加依赖、配置文件、注解到集群测试,覆盖了Nacos在Spring Cloud环境中的主要功能。此外,还涉及到单机模式下支持MySQL的配置和集群启动的验证。
目录
Linux服务器上Nacos的集群配置cluster.conf
安装Nacos服务器
下载软件包,然后sh startup.sh -m standalone即可
服务发现与消费
服务发现与消费-添加依赖
<dependency>
    <groupId>com.alibaba.cloud</groupId>
    <artifactId>spring-cloud-starter-alibaba-nacos-discovery</artifactId>
    <version>${latest.version}</version>
</dependency>注意:版本 2.1.x.RELEASE 对应的是 Spring Boot 2.1.x 版本。版本 2.0.x.RELEASE 对应的是 Spring Boot 2.0.x 版本,版本 1.5.x.RELEASE 对应的是 Spring Boot 1.5.x 版本。
该依赖对生产者和消费者都适用
更多版本对应关系参考:版本说明 Wiki
服务发现-配置文件
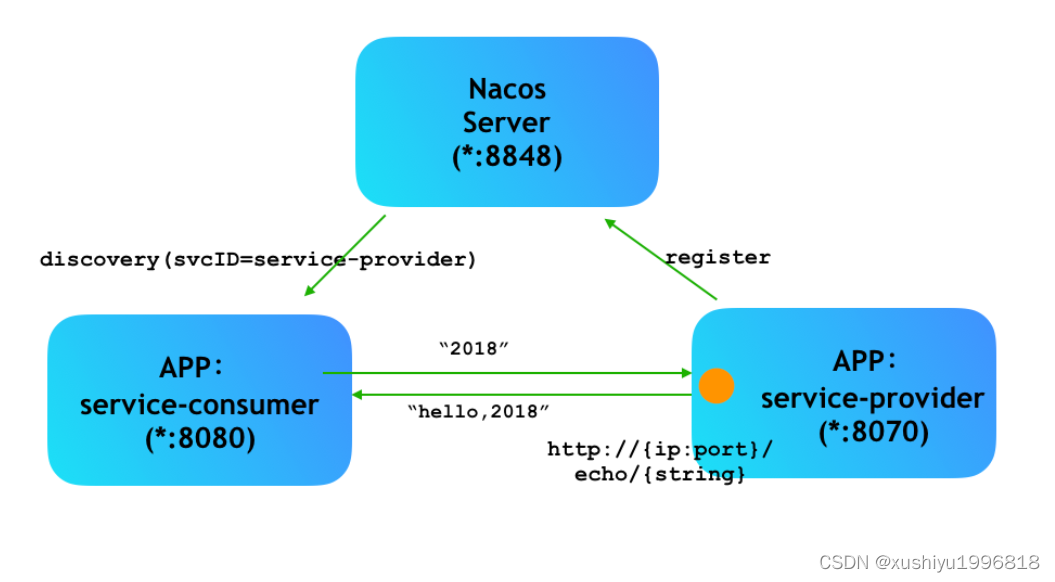
配置服务提供者,从而服务提供者可以通过 Nacos 的服务注册发现功能将其服务注册到 Nacos server 上。
在 application.properties 中配置 Nacos server 的地址:
server.port=8070
spring.application.name=service-provider

spring.cloud.nacos.discovery.server-addr=127.0.0.1:8848或者bootstrap.yaml 中配置 Nacos server 的地址和应用名
server:
  port:9001

spring:
  cloud:
    nacos:
      config:
        server-addr: 192.168.29.1:8848
        file-extension: yaml

  application:
    name: nacos-p
之所以需要配置 `spring.application.name` ,是因为它是构成 Nacos 配置管理 `dataId`字段的一部分。
在 Nacos Spring Cloud 中,`dataId` 的完整格式如下:
${prefix}-${spring.profiles.active}.${file-extension}
`prefix` 默认为 `spring.application.name` 的值,也可以通过配置项`spring.cloud.nacos.config.prefix`来配置。
`spring.profiles.active` 即为当前环境对应的 profile,详情可以参考 [Spring Boot文档](https://docs.spring.io/spring-boot/docs/current/reference/html/boot-features-profiles.html#boot-features-profiles)。 **注意:当 `spring.profiles.active` 为空时,对应的连接符 `-` 也将不存在,dataId 的拼接格式变成 `${prefix}.${file-extension}`
`file-exetension` 为配置内容的数据格式,可以通过配置项 `spring.cloud.nacos.config.file-extension` 来配置。目前只支持 `properties` 和 `yaml` 类型。
服务发现-注解
通过 Spring Cloud 原生注解 @EnableDiscoveryClient 开启服务注册发现功能:
@SpringBootApplication
@EnableDiscoveryClient
public class NacosProviderApplication {

	public static void main(String[] args) {
		SpringApplication.run(NacosProviderApplication.class, args);
	}

	@RestController
	class EchoController {
		@RequestMapping(value = "/echo/{string}", method = RequestMethod.GET)
		public String echo(@PathVariable String string) {
			return "Hello Nacos Discovery " + string;
		}
	}
}
服务发现-Controller
@RestController
@RefreshScope
public class MainController {

    @Value("${xxoo}")
    private String userName;

    @RequestMapping("/hello")
    public String hello() {
        return "hello+:" + userName;
    }
}
@RefreshScope注解能帮助我们做局部的参数刷新,但侵入性较强,需要开发阶段提前预知可能的刷新点,并且该注解底层是依赖于cglib进行代理
注意:服务启动前要先启动Nacos!!
服务消费-配置文件
在 application.properties 中配置 Nacos server 的地址:
server.port=8080
spring.application.name=service-consumer

spring.cloud.nacos.discovery.server-addr=127.0.0.1:8848
服务消费-注解与Ribbon消费代码
通过 Spring Cloud 原生注解 @EnableDiscoveryClient 开启服务注册发现功能。给 RestTemplate 实例添加 @LoadBalanced 注解,开启 @LoadBalanced 与 Ribbon 的集成:
@SpringBootApplication
@EnableDiscoveryClient
public class NacosConsume
最低0.47元/天 解锁文章


 被折叠的 条评论
为什么被折叠?
被折叠的 条评论
为什么被折叠?
 到【灌水乐园】发言


