


一 、 代码自动生成配置
Step1:添加依赖
配置pom.xml文件:
<?xml version="1.0" encoding="UTF-8"?>
<project xmlns="http://maven.apache.org/POM/4.0.0" xmlns:xsi="http://www.w3.org/2001/XMLSchema-instance"
         xsi:schemaLocation="http://maven.apache.org/POM/4.0.0 http://maven.apache.org/xsd/maven-4.0.0.xsd">
    <modelVersion>4.0.0</modelVersion>
    <parent>
        <groupId>org.springframework.boot</groupId>
        <artifactId>spring-boot-starter-parent</artifactId>
        <version>2.1.6.RELEASE</version>
        <relativePath/> <!-- lookup parent from repository -->
    </parent>
    <groupId>me.liangyating</groupId>
    <artifactId>generator</artifactId>
    <version>0.0.1-SNAPSHOT</version>
    <name>generator</name>
    <description>Demo project for Spring Boot</description>

    <properties>
        <project.build.sourceEncoding>UTF-8</project.build.sourceEncoding>
        <project.reporting.outputEncoding>UTF-8</project.reporting.outputEncoding>
        <java.version>1.8</java.version>
    </properties>

    <dependencies>
        <dependency>
            <groupId>org.springframework.boot</groupId>
            <artifactId>spring-boot-starter</artifactId>
        </dependency>

        <dependency>
            <groupId>org.springframework.boot</groupId>
            <artifactId>spring-boot-starter-test</artifactId>
            <scope>test</scope>
        </dependency>

        <dependency>
            <groupId>org.mybatis.spring.boot</groupId>
            <artifactId>mybatis-spring-boot-starter</artifactId>
            <version>1.3.2</version>
        </dependency>

        <dependency>
            <groupId>mysql</groupId>
            <artifactId>mysql-connector-java</artifactId>
            <version>8.0.11</version>
        </dependency>

        <dependency>
            <groupId>com.itfsw</groupId>
            <artifactId>mybatis-generator-plugin</artifactId>
            <version>1.3.5</version>
        </dependency>
    </dependencies>

    <build>
        <plugins>
            <plugin>
                <groupId>org.springframework.boot</groupId>
                <artifactId>spring-boot-maven-plugin</artifactId>
            </plugin>

            <plugin>
                <groupId>org.mybatis.generator</groupId>
                <artifactId>mybatis-generator-maven-plugin</artifactId>
                <version>1.3.7</version>
                <dependencies>
                    <dependency>
                        <groupId>mysql</groupId>
                        <artifactId>mysql-connector-java</artifactId>
                        <version>8.0.11</version>
                    </dependency>
                    <dependency>
                        <groupId>org.mybatis.generator</groupId>
                        <artifactId>mybatis-generator-core</artifactId>
                        <version>1.3.7</version>
                    </dependency>
                    <dependency>
                        <groupId>com.itfsw</groupId>
                        <artifactId>mybatis-generator-plugin</artifactId>
                        <version>1.3.5</version>
                    </dependency>
                </dependencies>
                <executions>
                    <execution>
                        <id>Generate MyBatis Artifacts</id>
                        <phase>package</phase>
                        <goals>
                            <goal>generate</goal>
                        </goals>
                    </execution>
                </executions>
                <configuration>
                    <!--允许移动生成的文件 -->
                    <verbose>true</verbose>
                    <!-- 是否覆盖 -->
                    <overwrite>true</overwrite>
                    <!-- 自动生成的配置 -->
                    <configurationFile>generatorConfig.xml</configurationFile>
                </configuration>
            </plugin>
        </plugins>
    </build>

</project>
Step2:添加配置文件
根据上面在pom里的配置,我们需要添加generatorConfig.xml在项目的根目录:
<?xml version="1.0" encoding="UTF-8"?>
<!DOCTYPE generatorConfiguration
PUBLIC "-//mybatis.org//DTD MyBatis Generator Configuration 1.0//EN"
"http://mybatis.org/dtd/mybatis-generator-config_1_0.dtd">
<generatorConfiguration>
<!--加载配置文件,为下面读取数据库信息准备-->
<properties resource="application.properties"/>
<!--defaultModelType="flat" 大数据字段,不分表 -->
<context id="mysqlgenerator" targetRuntime="MyBatis3" defaultModelType="flat">
<!--
解决 批量插入插件(BatchInsertPlugin)在mybatis3.5.0以下版本无法返回自增主键的问题
指定mybatis版本,让插件指定您所使用的mybatis版本生成对应代码
-->
<property name="mybatisVersion" value="3.4.0"/>
<property name="autoDelimitKeywords" value="true" />
<property name="beginningDelimiter" value="`" />
<property name="endingDelimiter" value="`" />
<property name="javaFileEncoding" value="utf-8" />
<plugin type="org.mybatis.generator.plugins.SerializablePlugin" />
<plugin type="org.mybatis.generator.plugins.ToStringPlugin" />
<!-- 查询单条数据插件 -->
<plugin type="com.itfsw.mybatis.generator.plugins.SelectOneByExamplePlugin"/>
<!-- MySQL分页插件 -->
<plugin type="com.itfsw.mybatis.generator.plugins.LimitPlugin"/>
<!-- 数据Model链式构建插件 -->
<plugin type="com.itfsw.mybatis.generator.plugins.ModelBuilderPlugin"/>
<!-- Example Criteria 增强插件 -->
<plugin type="com.itfsw.mybatis.generator.plugins.ExampleEnhancedPlugin"/>
<!-- Example 目标包修改插件 -->
<plugin type="com.itfsw.mybatis.generator.plugins.ExampleTargetPlugin">
<!-- 修改Example类生成到目标包下 -->
<property name="targetPackage" value="me.liangyating.mcqs.entity.example"/>
</plugin>
<!-- 批量插入插件 -->
<plugin type="com.itfsw.mybatis.generator.plugins.BatchInsertPlugin"/>
<!-- 数据Model属性对应Column获取插件 -->
<plugin type="com.itfsw.mybatis.generator.plugins.ModelColumnPlugin"/>
<!-- 存在即更新插件 -->
<plugin type="com.itfsw.mybatis.generator.plugins.UpsertPlugin"/>
<!-- 逻辑删除插件 -->
<plugin type="com.itfsw.mybatis.generator.plugins.LogicalDeletePlugin">
<!-- 这里配置的是全局逻辑删除列和逻辑删除值,当然在table中配置的值会覆盖该全局配置 -->
<!-- 逻辑删除列类型只能为数字、字符串或者布尔类型 -->
<property name="logicalDeleteColumn" value="del_flag"/>
<!-- 未设置该属性或者该属性的值为null或者NULL,逻辑删除时会把该字段置为NULL。 -->
<property name="logicalDeleteValue" value="1"/>
<!-- 逻辑删除-未删除值 -->
<property name="logicalUnDeleteValue" value="0"/>
</plugin>
<!-- 注释 -->
<commentGenerator >
<property name="suppressAllComments" value="false"/><!-- 是否取消注释 -->
<property name="suppressDate" value="true" /> <!-- 是否生成注释代时间戳-->
</commentGenerator>
<!--数据库链接地址账号密码-->
<jdbcConnection driverClass="${spring.datasource.driver-class-name}"
connectionURL="${spring.datasource.url}"
userId="${spring.datasource.username}"
password="${spring.datasource.password}">
</jdbcConnection>
<!-- 类型转换 -->
<javaTypeResolver>
<!-- 是否使用bigDecimal, false可自动转化以下类型(Long, Integer, Short, etc.) -->
<!-- <property name="forceBigDecimals" value="false"/>-->
<!--<property name="useJSR310Types" value="true"/>-->
</javaTypeResolver>
<!--生成Model类存放位置-->
<javaModelGenerator targetPackage="me.liangyating.mcqs.entity" targetProject="src/main/java">
<property name="enableSubPackages" value="true"/>
<property name="trimStrings" value="true"/>
</javaModelGenerator>
<!-- 生成mapxml文件 -->
<sqlMapGenerator targetPackage="mapper" targetProject="src/main/resources/mybatis" >
<property name="enableSubPackages" value="false" />
</sqlMapGenerator>
<!-- 生成mapxml对应client,也就是接口dao -->
<javaClientGenerator targetPackage="me.liangyating.mcqs.dao" targetProject="src/main/java" type="XMLMAPPER" >
<property name="enableSubPackages" value="false" />
</javaClientGenerator>
<table tableName="sys_user">
<generatedKey column="id" sqlStatement="MySql" identity="true" />
</table>
<!--<table tableName="tb">
<!– 这里可以单独表配置逻辑删除列和删除值,覆盖全局配置 –>
<property name="logicalDeleteColumn" value="del_flag"/>
<property name="logicalDeleteValue" value="1"/>
</table>-->
</context>
</generatorConfiguration>
Step3:配置全局属性文件
全局属性文件application.properties的配置,和Spring Boot增加MyBatis的配置是一样的,如果你的Spring Boot项目里面已经配置了MyBatis支持,请忽略此步骤。
# MyBatis 配置
spring.datasource.url=jdbc:mysql://localhost:3306/mcqs?characterEncoding=utf8&useSSL=false&serverTimezone=UTC&allowPublicKeyRetrieval=true
spring.datasource.username=root
spring.datasource.password=Qas919293
spring.datasource.driver-class-name=com.mysql.cj.jdbc.Driver
#mybatis.type-aliases-package=me.liangyating.mcqs.mapper
#mybatis.config-locations=classpath:mybatis/mybatis-config.xml
mybatis.mapper-locations=classpath:mybatis/mapper/*.xml
Step4:点击Maven生成代码
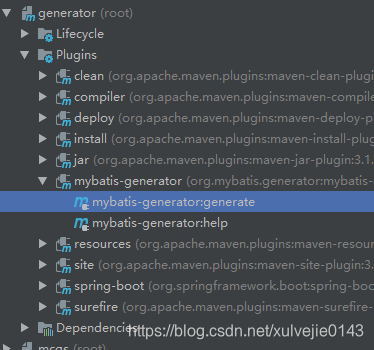
如果你使用的是IDEA,点击最右侧的Maven Projects => 点击mybatis-generator => 右键双击mybatis-generator:generate ,如下图所示:
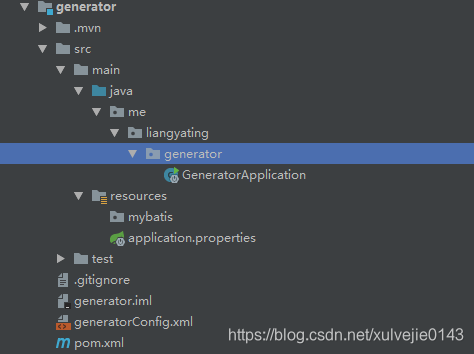
二、 项目整体结构
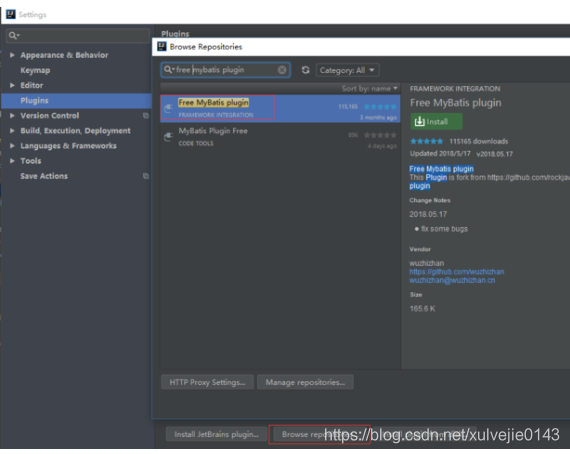
三 、安装IDEA插件
如果你使用的是 IDEA,那么强烈建议你安装一款免费的IDEA插件“Free MyBatis plugin”,可以实现dao到mapper xml对应方法的快速映射,点击任意一个快速调整到相应的方法,提高工作效率,效果如下图所示:
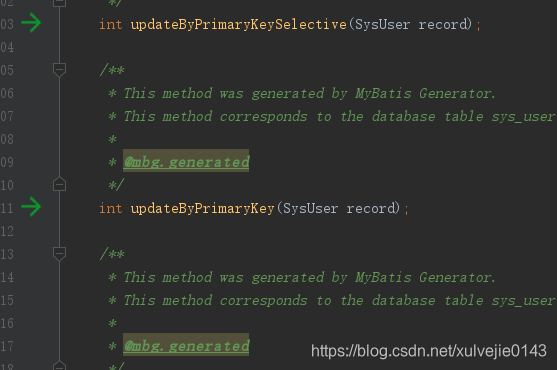
点击绿色的箭头直接跳转到了mapper xml对应的方法了,如下图所示:
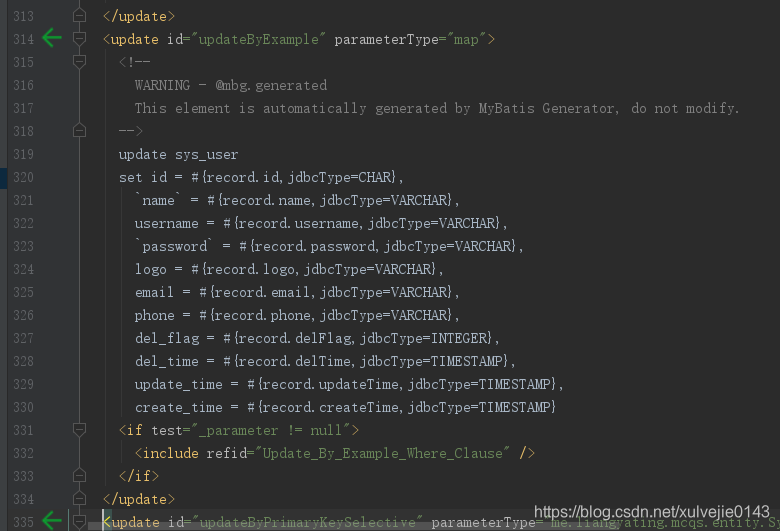
可以相互点击,进行对应的跳转。
安装步骤
- 点击菜单栏Flie => Settings
- 点击Browse repostitories…
- 输入“Free MyBatis plugin”查找插件
- 点击安装,重启IDEA
- 关键步骤的截图如下:
插件列表:- 查询单条数据插件(SelectOneByExamplePlugin)
- MySQL分页插件(LimitPlugin)
- 数据Model链式构建插件(ModelBuilderPlugin)
- Example Criteria 增强插件(ExampleEnhancedPlugin)
- Example 目标包修改插件(ExampleTargetPlugin)
- 批量插入插件(BatchInsertPlugin)
- 逻辑删除插件(LogicalDeletePlugin)
- 数据Model属性对应Column获取插件(ModelColumnPlugin)
- 存在即更新插件(UpsertPlugin)
1. 查询单条数据插件
使用:
public interface TbMapper {
    /**
     * This method was generated by MyBatis Generator.
     * This method corresponds to the database table tb
     *
     * @mbg.generated
     * @project https://github.com/itfsw/mybatis-generator-plugin
     */
    Tb selectOneByExample(TbExample example);

    /**
     * This method was generated by MyBatis Generator.
     * This method corresponds to the database table tb
     *
     * @mbg.generated
     * @project https://github.com/itfsw/mybatis-generator-plugin
     */
    // Model WithBLOBs 时才有
    TbWithBLOBs selectOneByExampleWithBLOBs(TbExample example);
}
2. MySQL分页插件
使用:
public class TbExample {
    /**
     * This field was generated by MyBatis Generator.
     * This field corresponds to the database table tb
     *
     * @mbg.generated
     * @project https://github.com/itfsw/mybatis-generator-plugin
     */
    protected Integer offset;

    /**
     * This field was generated by MyBatis Generator.
     * This field corresponds to the database table tb
     *
     * @mbg.generated
     * @project https://github.com/itfsw/mybatis-generator-plugin
     */
    protected Integer rows;

    /**
     * This method was generated by MyBatis Generator.
     * This method corresponds to the database table tb
     *
     * @mbg.generated
     * @project https://github.com/itfsw/mybatis-generator-plugin
     */
    public TbExample limit(Integer rows) {
        this.rows = rows;
        return this;
    }

    /**
     * This method was generated by MyBatis Generator.
     * This method corresponds to the database table tb
     *
     * @mbg.generated
     * @project https://github.com/itfsw/mybatis-generator-plugin
     */
    public TbExample limit(Integer offset, Integer rows) {
        this.offset = offset;
        this.rows = rows;
        return this;
    }

    /**
     * This method was generated by MyBatis Generator.
     * This method corresponds to the database table tb
     *
     * @mbg.generated
     * @project https://github.com/itfsw/mybatis-generator-plugin
     */
    public TbExample page(Integer page, Integer pageSize) {
        this.offset = page * pageSize;
        // !!! 如果配置了startPage且不为0
        // this.offset = (page - startPage) * pageSize;
        this.rows = pageSize;
        return this;
    }

    // offset 和 rows 的getter&setter

    // 修正了clear方法
    /**
     * This method was generated by MyBatis Generator.
     * This method corresponds to the database table tb
     *
     * @mbg.generated
     */
    public void clear() {
        oredCriteria.clear();
        orderByClause = null;
        distinct = false;
        rows = null;
        offset = null;
    }
}
public class Test {
    public static void main(String[] args) {
        this.tbMapper.selectByExample(
                new TbExample()
                .createCriteria()
                .andField1GreaterThan(1)
                .example()
                .limit(10)  // 查询前10条
                .limit(10, 10)  // 查询10~20条
                .page(1, 10)    // 查询第2页数据(每页10条)
        );
    }
}
3. 数据Model链式构建插件
这个是仿jquery的链式调用强化了表的Model的赋值操作。
使用:
public class Test {
    public static void main(String[] args) {
        // 直接new表Model的内部Builder类,赋值后调用build()方法返回对象
        Tb table = new Tb.Builder()
               .field1("xx")
               .field2("xx")
               .field3("xx")
               .field4("xx")
               .build();
        // 或者使用builder静态方法创建Builder
        Tb table = Tb.builder()
               .field1("xx")
               .field2("xx")
               .field3("xx")
               .field4("xx")
               .build();
    }
}
4. Example 增强插件(example,andIf,orderBy)
使用:
public class Test {
    public static void main(String[] args) {
        // -----------------------------------example-----------------------------------
        // 表Example.Criteria增加了工厂方法example()支持,使用后可链式构建查询条件使用example()返回Example对象
        this.tbMapper.selectByExample(
                new TbExample()
                .createCriteria()
                .andField1EqualTo(1)
                .andField2EqualTo("xxx")
                .example()
        );

        // ----------------- andIf (@Deprecated 尽量使用when代替)  ---------------------
        // Criteria增强了链式调用,现在一些按条件增加的查询条件不会打乱链式调用了
        // old
        TbExample oldEx = new TbExample();
        TbExample.Criteria criteria = oldEx
                .createCriteria()
                .andField1EqualTo(1)
                .andField2EqualTo("xxx");
        // 如果随机数大于0.5,附加Field3查询条件
        if (Math.random() > 0.5){
            criteria.andField3EqualTo(2)
                    .andField4EqualTo(new Date());
        }
        this.tbMapper.selectByExample(oldEx);

        // new
        this.tbMapper.selectByExample(
                new TbExample()
                .createCriteria()
                .andField1EqualTo(1)
                .andField2EqualTo("xxx")
                // 如果随机数大于0.5,附加Field3查询条件
                .andIf(Math.random() > 0.5, new TbExample.Criteria.ICriteriaAdd() {
                    @Override
                    public TbExample.Criteria add(TbExample.Criteria add) {
                        return add.andField3EqualTo(2)
                                .andField4EqualTo(new Date());
                    }
                })
                // 当然最简洁的写法是采用java8的Lambda表达式,当然你的项目是Java8+
                .andIf(Math.random() > 0.5, add -> add
                        .andField3EqualTo(2)
                        .andField4EqualTo(new Date())
                )
                .example()
        );

        // -----------------------------------when-----------------------------------
        this.tbMapper.selectByExample(
                TbExample.newAndCreateCriteria()
                // 如果随机数大于1,附加Field3查询条件
                .when(Math.random() > 1, new TbExample.ICriteriaWhen() {
                    @Override
                    public void criteria(TbExample.Criteria criteria) {
                        criteria.andField3EqualTo(2);
                    }
                })
                // 当然最简洁的写法是采用java8的Lambda表达式,当然你的项目是Java8+
                .when(Math.random() > 1, criteria -> criteria.andField3EqualTo(2))
                // 也支持 if else 这种写法
                .when(Math.random() > 1, criteria -> criteria.andField3EqualTo(2), criteria -> criteria.andField3EqualTo(3))
                .example()
                // example上也支持 when 方法
                .when(true, example -> example.orderBy("field1 DESC"))
        );

        // -----------------------------------orderBy-----------------------------------
        // old
        TbExample ex = new TbExample();
        ex.createCriteria().andField1GreaterThan(1);
        ex.setOrderByClause("field1 DESC");
        this.tbMapper.selectByExample(ex);

        // new
        this.tbMapper.selectByExample(
                new TbExample()
                .createCriteria()
                .andField1GreaterThan(1)
                .example()
                .orderBy("field1 DESC")
                // 这个配合数据Model属性对应Column获取插件(ModelColumnPlugin)使用
                .orderBy(Tb.Column.field1.asc(), Tb.Column.field3.desc())
        );

        // -----------------------------------column-----------------------------------
        this.tbMapper.selectByExample(
                new TbExample()
                .createCriteria()
                .andField1EqualToColumn(Tb.Column.field2)   // where field1 = field2
                .andField1NotEqualToColumn(Tb.Column.field2)    // where field1 <> field2
                .andField1GreaterThanColumn(Tb.Column.field2)   // where field1 > field2
                .andField1GreaterThanOrEqualToColumn(Tb.Column.field2)  // where field1 >= field2
                .andField1LessThanColumn(Tb.Column.field2)  // where field1 < field2
                .andField1LessThanOrEqualToColumn(Tb.Column.field2) // where field1 <= field2
                .example()
        );

        // ---------------------------- static createCriteria  -----------------------
        // simple
        this.tbMapper.selectByExample(
                new TbExample()
                .createCriteria()
                .example()
        );
        // new
        this.tbMapper.selectByExample(
                TbExample.newAndCreateCriteria()
                .example()
        );
    }
}
5. Example 目标包修改插件
Mybatis Generator 插件默认把Model类和Example类都生成到一个包下,这样该包下类就会很多不方便区分,该插件目的就是把Example类独立到一个新包下,方便查看。
插件:
<!-- Example 目标包修改插件 -->
<plugin type="com.itfsw.mybatis.generator.plugins.ExampleTargetPlugin">
    <!-- 修改Example类生成到目标包下 -->
    <property name="targetPackage" value="com.itfsw.mybatis.generator.dao.example"/>
</plugin>
6. 批量插入插件
使用:
public class Test {
    public static void main(String[] args) {
        // 构建插入数据
        List<Tb> list = new ArrayList<>();
        list.add(
                Tb.builder()
                .field1(0)
                .field2("xx0")
                .field3(0)
                .createTime(new Date())
                .build()
        );
        list.add(
                Tb.builder()
                .field1(1)
                .field2("xx1")
                .field3(1)
                .createTime(new Date())
                .build()
        );
        // 普通插入,插入所有列
        this.tbMapper.batchInsert(list);
        // !!!下面按需插入指定列(类似于insertSelective),需要数据Model属性对应Column获取插件(ModelColumnPlugin)插件
        this.tbMapper.batchInsertSelective(list, Tb.Column.field1, Tb.Column.field2, Tb.Column.field3, Tb.Column.createTime);
        // 或者排除某些列
        this.tbMapper.batchInsertSelective(list, Tb.Column.excludes(Tb.Column.id, Tb.Column.delFlag));
    }
}
7. 逻辑删除插件
使用:
public class Test {
    public static void main(String[] args) {
        // 1. 逻辑删除ByExample
        this.tbMapper.logicalDeleteByExample(
                new TbExample()
                .createCriteria()
                .andField1EqualTo(1)
                .example()
        );

        // 2. 逻辑删除ByPrimaryKey
        this.tbMapper.logicalDeleteByPrimaryKey(1L);

        // 3. 同时Example中提供了一个快捷方法来过滤逻辑删除数据
        this.tbMapper.selectByExample(
                new TbExample()
                .createCriteria()
                .andField1EqualTo(1)
                // 新增了一个andDeleted方法过滤逻辑删除数据
                .andLogicalDeleted(true)
                // 当然也可直接使用逻辑删除列的查询方法,我们数据Model中定义了一个逻辑删除常量DEL_FLAG
                .andDelFlagEqualTo(Tb.IS_DELETED)
                .example()
        );

        // 4. 逻辑删除和未删除常量
        Tb tb = Tb.builder()
                .delFlag(Tb.IS_DELETED)   // 删除
                .delFlag(Tb.NOT_DELETED)    // 未删除
                .build()
                .andLogicalDeleted(true);   // 也可以在这里使用true|false设置逻辑删除

        // 5. selectByPrimaryKeyWithLogicalDelete V1.0.18 版本增加
        // 因为之前觉得既然拿到了主键这种查询没有必要,但是实际使用中可能存在根据主键判断是否逻辑删除的情况,这种场景还是有用的
        this.tbMapper.selectByPrimaryKeyWithLogicalDelete(1, true);

        // 6. 使用逻辑删除枚举
        Tb tb = Tb.builder()
                .delFlag(Tb.DelFlag.IS_DELETED)   // 删除
                .delFlag(Tb.DelFlag.NOT_DELETED)    // 未删除
                .build()
                .andLogicalDeleted(true);   // 也可以在这里使用true|false设置逻辑删除
    }
}
8. 数据Model属性对应Column获取插件
使用:
public class Test {
    public static void main(String[] args) {
        // 1. 获取Model对应column
        String column = Tb.Column.createTime.value();

        // 2. 配合Example Criteria 增强插件(ExampleEnhancedPlugin)使用orderBy方法
        // old
        this.tbMapper.selectByExample(
                new TbExample()
                .createCriteria()
                .andField1GreaterThan(1)
                .example()
                .orderBy("field1 DESC, field3 ASC")
        );

        // better
        this.tbMapper.selectByExample(
                new TbExample()
                .createCriteria()
                .andField1GreaterThan(1)
                .example()
                .orderBy(Tb.Column.field1.desc(), Tb.Column.field3.asc())
        );

        // 3. 配合批量插入插件(BatchInsertPlugin)使用实现按需插入指定列
        List<Tb> list = new ArrayList<>();
        list.add(
                Tb.builder()
                .field1(0)
                .field2("xx0")
                .field3(0)
                .field4(new Date())
                .build()
        );
        list.add(
                Tb.builder()
                .field1(1)
                .field2("xx1")
                .field3(1)
                .field4(new Date())
                .build()
        );
        // 这个会插入表所有列
        this.tbMapper.batchInsert(list);
        // 下面按需插入指定列(类似于insertSelective)
        this.tbMapper.batchInsertSelective(list, Tb.Column.field1, Tb.Column.field2, Tb.Column.field3, Tb.Column.createTime);

        // 4. excludes 方法
        this.tbMapper.batchInsertSelective(list, Tb.Column.excludes(Tb.Column.id, Tb.Column.delFlag));
    }
}
9. 存在即更新插件
使用:
public class Test {
    public static void main(String[] args) {
        // 1. 未入库数据入库,执行insert
        Tb tb = Tb.builder()
                .field1(1)
                .field2("xx0")
                .delFlag(Tb.DEL_FLAG_ON)
                .build();
        int k0 = this.tbMapper.upsert(tb);
        // 2. 已入库数据再次入库,执行update(!!需要注意如触发update其返回的受影响行数为2)
        tb.setField2("xx1");
        int k1 = this.tbMapper.upsert(tb);

        // 3. 类似insertSelective实现选择入库
        Tb tb1 = Tb.builder()
                .field1(1)
                .field2("xx0")
                .build();
        int k2 = this.tbMapper.upsertSelective(tb1);
        tb1.setField2("xx1");
        int k3 = this.tbMapper.upsertSelective(tb1);

        // --------------------------------- allowMultiQueries=true ------------------------------
        // 4. 开启allowMultiQueries后增加upsertByExample,upsertByExampleSelective但强力建议不要使用(需保证团队没有使用statement提交sql,否则会存在sql注入风险)
        Tb tb2 = Tb.builder()
                .field1(1)
                .field2("xx0")
                .field3(1003)
                .delFlag(Tb.DEL_FLAG_ON)
                .build();
        int k4 = this.tbMapper.upsertByExample(tb2,
                new TbExample()
                        .createCriteria()
                        .andField3EqualTo(1003)
                        .example()
        );
        tb2.setField2("xx1");
        // !!! upsertByExample,upsertByExampleSelective触发更新时,更新条数返回是有问题的,这里只会返回0
        // 这是mybatis自身问题,也是不怎么建议开启allowMultiQueries功能原因之一
        int k5 = this.tbMapper.upsertByExample(tb2,
                new TbExample()
                        .createCriteria()
                        .andField3EqualTo(1003)
                        .example()
        );
        // upsertByExampleSelective 用法类似

        // 当Model WithBLOBs 存在时上述方法增加对应的 WithBLOBs 方法,举例如下:
        TbWithBLOBs tb3 = Tb.builder()
                            .field1(1)
                            .field2("xx0")
                            .delFlag(Tb.DEL_FLAG_ON)
                            .build();
        int k6 = this.tbMapper.upsertWithBLOBs(tb);

        // --------------------------------- allowBatchUpsert=true ------------------------------
        List<Tb> list = new ArrayList<>();
        list.add(
                Tb.builder()
                .field1(0)
                .field2("xx0")
                .field3(0)
                .field4(new Date())
                .build()
        );
        list.add(
                Tb.builder()
                .field1(1)
                .field2("xx1")
                .field3(1)
                .field4(new Date())
                .build()
        );
        this.tbMapper.batchUpsert(list);    // 对于BLOBs 有batchUpsertWithBLOBs方法
        this.tbMapper.batchUpsertSelective(list, Tb.Column.field1, Tb.Column.field2, Tb.Column.field3, Tb.Column.createTime);
        this.tbMapper.batchUpsertSelective(list, Tb.Column.excludes(Tb.Column.id, Tb.Column.delFlag)); // 排除某些列
    }
}


 1868
1868

 被折叠的 条评论
为什么被折叠?
被折叠的 条评论
为什么被折叠?
 到【灌水乐园】发言


