


 本文介绍了Sentinel的使用,包括下载与启动、流量控制(QPS、线程数、预热、排队等待)、降级(RT、异常比例、异常数)、热点key限流、系统规则、@SentinelResource注解的使用以及Sentinel与Ribbon、Feign的集成和规则持久化。通过实例展示了Sentinel如何实现服务保护和熔断。
一、下载
地址 Releases · alibaba/Sentinel · GitHub https://github.com/alibaba/Sentinel/releases
下载完成后启动cmd运行 java -jar +jar包即可运行
访问localhost:8080

表示运行成功
默认的账号密码都为sentinel
创建8401微服务
pom
<dependencies>
        <!-- SpringCloud ailibaba nacos-->
        <dependency>
            <groupId>com.alibaba.cloud</groupId>
            <artifactId>spring-cloud-starter-alibaba-nacos-discovery</artifactId>
        </dependency>
        <!-- SpringCloud ailibaba sentinel-datasource-nacos 持久化需要用到-->
        <dependency>
            <groupId>com.alibaba.csp</groupId>
            <artifactId>sentinel-datasource-nacos</artifactId>
        </dependency>
        <!-- SpringCloud ailibaba sentinel-->
        <dependency>
            <groupId>com.alibaba.cloud</groupId>
            <artifactId>spring-cloud-starter-alibaba-sentinel</artifactId>
        </dependency>
        <dependency>
            <groupId>org.springframework.cloud</groupId>
            <artifactId>spring-cloud-starter-openfeign</artifactId>
        </dependency>
        <dependency>
            <groupId>org.springframework.boot</groupId>
            <artifactId>spring-boot-starter-web</artifactId>
        </dependency>
        <!--监控-->
        <dependency>
            <groupId>org.springframework.boot</groupId>
            <artifactId>spring-boot-starter-actuator</artifactId>
        </dependency>
        <!--热部署-->
        <dependency>
            <groupId>org.springframework.boot</groupId>
            <artifactId>spring-boot-devtools</artifactId>
            <scope>runtime</scope>
            <optional>true</optional>
        </dependency>
        <dependency>
            <groupId>org.projectlombok</groupId>
            <artifactId>lombok</artifactId>
            <optional>true</optional>
        </dependency>
        <dependency>
            <groupId>org.springframework.boot</groupId>
            <artifactId>spring-boot-starter-test</artifactId>
            <scope>test</scope>
        </dependency>
    </dependencies>
yml
server:
port: 8401
spring:
application:
name: cloudalibaba-sentinal-service
cloud:
nacos:
discovery:
#Nacos服务注册中心地址(改成自己的服务器ip地址,本地用localhost)
server-addr: localhost:8848
sentinel:
transport:
#配置Sentin dashboard地址(改成自己的服务器ip地址,本地用localhost)
dashboard: localhost:8080
# 默认8719端口,假如被占用了会自动从8719端口+1进行扫描,直到找到未被占用的 端口
port: 8719
management:
endpoints:
web:
exposure:
include: '*'
主启动类
@EnableDiscoveryClient
@SpringBootApplication
public class MainApp8401 {

    public static void main(String[] args) {
        SpringApplication.run(MainApp8401.class, args);
    }
}
controller 略..
当启动8401时,此服务就被注册进了 sentinel中,因为sentinel为懒加载,所以当我们访问一处地址时,才会显示监测的内容!
二、流控
流控模式:
1、QPS直接失败
给某一请求创建流控


测试结果为 :当我们每一秒访问一次此请求,不会有任何报错,当访问速率超过每秒一次,那么将报错
2、线程数直接失败
将阈值类型设置为并发线程数

表示此请求在1s内只允许一个线程进入,超过也将会报错
3、流控关联
设置testA与testB关联
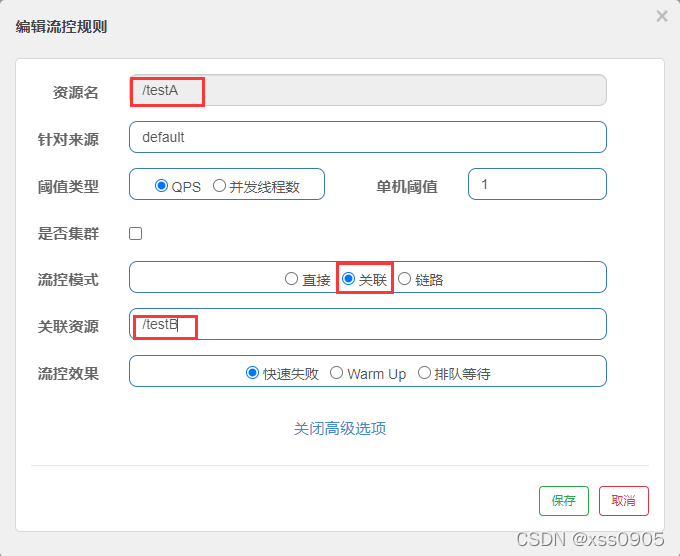
表示当发送请求testB时的速率超过每秒1次,那么testA就会报错!
流控效果:
4、预热
这次以testB为例,设置为预热模式
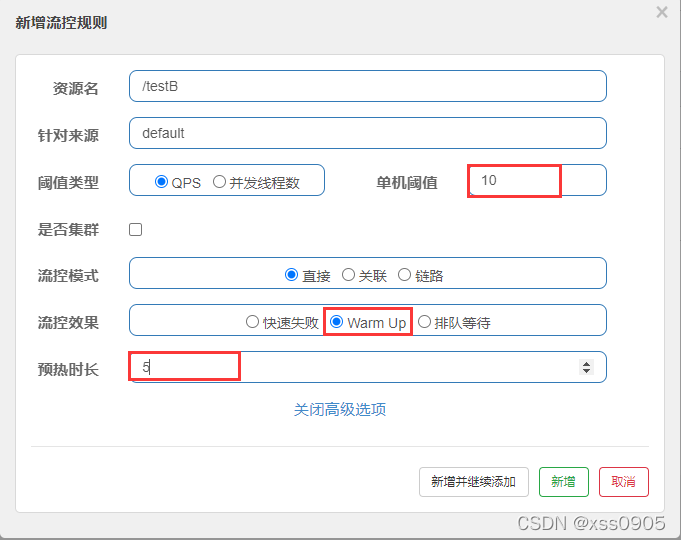
这样设置的意思为:
首先,存在一个冷加载因子(coldFactor)的参数,默认值为3,我们想要设置阈值为10,也就是说每秒最多承受10次的访问量,但是,我们需要一个预热的过程,设置的预热时长为5s,那么总结下来就是
系统初始化的阈值为 10(自己设置的最终阈值)/ 3(coldFactor)=3,即刚开始的阈值为3,等过了5秒后,逐渐变为10,达到最终的阈值10!
5、排队等待
还是以testB为例 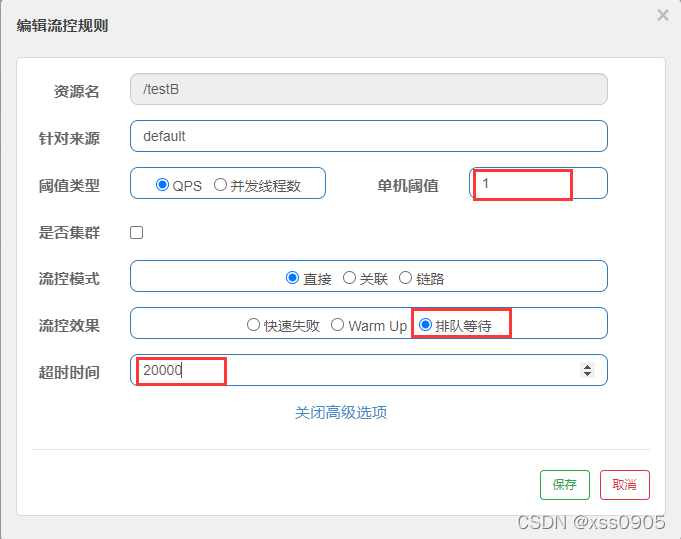
上图排队等待的意思为:一秒只能处理一次此请求,若超过此速率,则将排队等待,不会报错!
使用postman进行测试
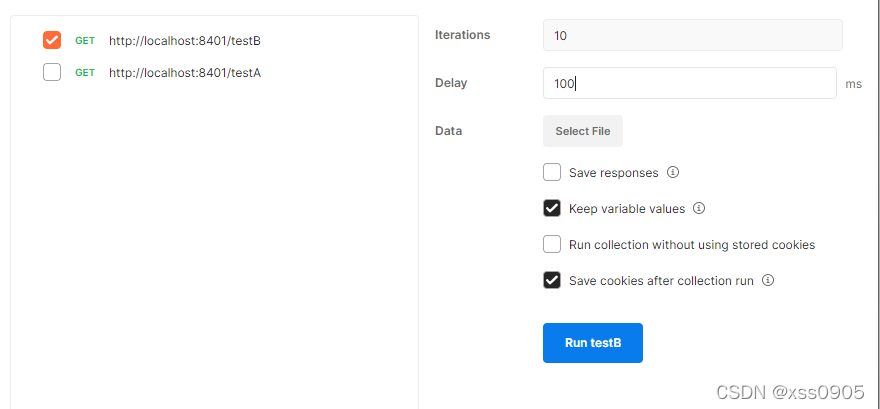
采用间隔0.1s发一次请求,空10次,也就是说1s接收10次请求,按道理来说是会报错,因为上面设置的阈值为1s1次,但是
并没有报错,因为采用了排队等待的效果,得以实现!
三、降级
1、RT 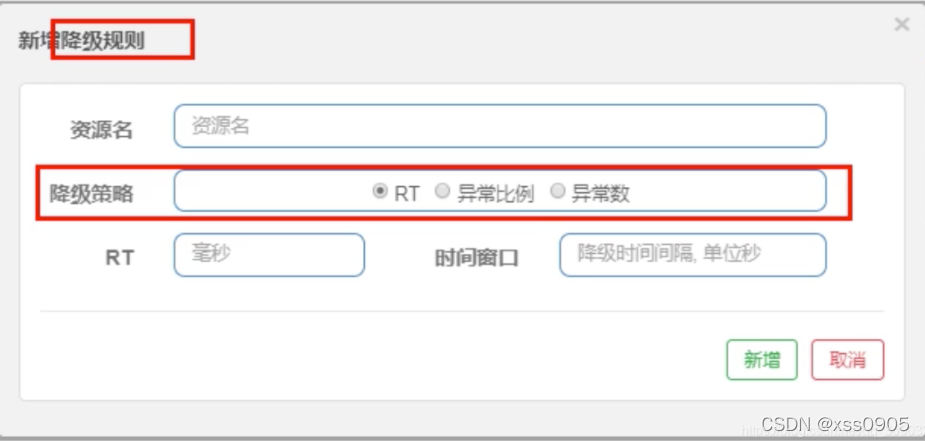
RT:平均响应时间
平均响应时间超过了阈值(自己设置的RT) 且 1s内请求数>=5,在未来 xx s(时间窗口,自己设置)的时间内,微服务不可用,
例: 设置RT为 200 ,时间窗口为1s
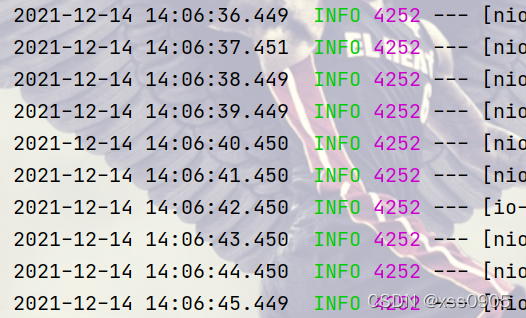
1秒内访问10次请求,每一次请求都延迟sleep1s,1s内访问10次>=1s内访问5次,并且每一次处理都超过了200ms,则在1s内不能访问次请求!
2、异常比例
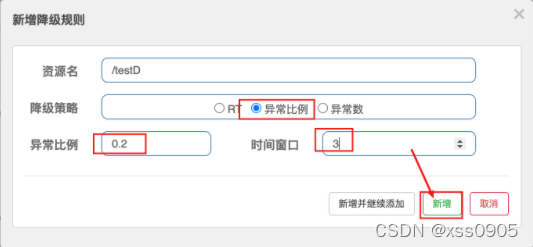
异常比例:如果此请求在访问时的异常比例超过了自己设置的异常比例(0.2=20%,1=100%),并且每秒访问次数要>=5,此时出发熔断,进入时间窗口期不处理请求,3秒后退出时间窗口期继续处理请求。
例:设置 异常比例为0.2 时间窗口为1
1s内访问10次请求, 请求中有 10/0 这样的代码,表示会100%报错,所以满足异常比例>0.2(20%) 访问次数>5/s,所以触发熔断请求,并且在1s内不处理请求,1s后急需处理
3、异常数
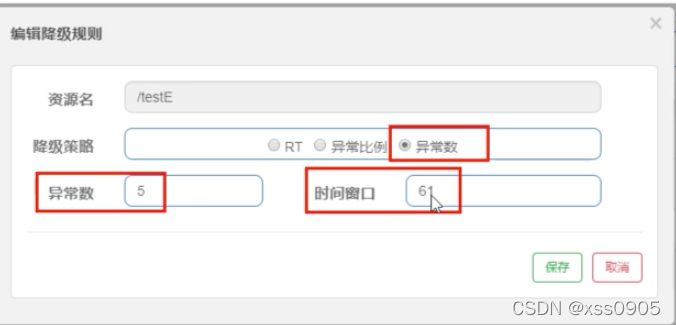
异常数:以上图为例,设置异常数为5,时间窗口为61s
例:当我们访问在1分钟之内访问一个请求时,如果它异常的次数超过了5,那么它就会熔断,并在61s内无法访问,61s后会重新恢复访问!
四、热点key限流
先在controller上新增两个方法
@GetMapping("/testHotKey")
    //value 为 在sentinel上的资源名, blockHandler为报错后执行的方法
    @SentinelResource(value = "testHotKey", blockHandler = "deal_testHotKey")
    public String testHotKey(@RequestParam(value = "p1", required = false)String p1,
                             @RequestParam(value = "p2", required = false)String p2) {
        return "----testHotKey";
    }

    //兜底方法
    public String deal_testHotKey(String p1, String p2, BlockException exception) {
        // sentinel的默认提示都是: Blocked by Sentinel (flow limiting)
        return "----deal_testHotKey, o(╥﹏╥)o";
    }
然后我们在sentinel中配置热点规则
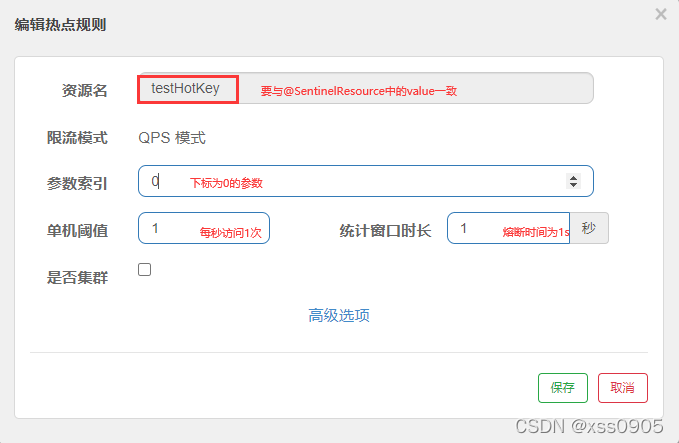
当我们配置完后,访问 testHotKey请求时,带上第一个参数进行访问也就是 testHotKey?p1=a
这时,若不超过每秒1次,会正确执行里面的代码,若超出了热点规则中的阈值,也就是每秒一次,那么方法会跑到 deal_testHotKey方法运行此方法内的代码,若不配置 blockHandler属性,则会报500错误!
配置参数例外项

这样配置的还是下标为0,也就是第一个参数的例外项,也就是说,当p1为5时,它的阈值为200,其余还为上面输入的1,只有5是例外!
发现问题:当我们在代码中输入错误的代码,比如:10/0,那么,sentinel并不会帮助我们走到我们的blockHandler属性对应的方法,而是会页面报错,因为是代码错误,sentinel并不会理睬!
五、系统规则
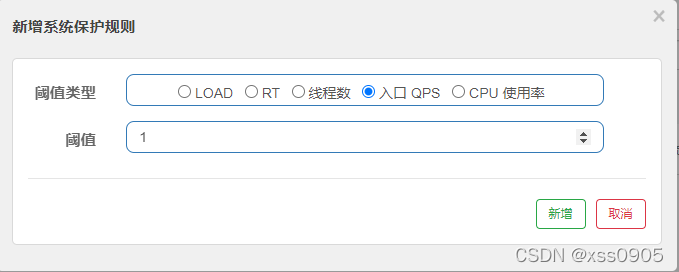
系统规则指的是配置一处,全局生效,假如配置了上图的配置,那么每一个请求的访问量在1次/s 以上时,都会熔断!
六、@SentinelResource
按资源名称配置
新建一个controller
@RestController
public class RateLimitController {

    @GetMapping("/byResource")
    @SentinelResource(value = "byResource",blockHandler = "handleException")
    public CommonResult byResource() {
        return  new CommonResult(200,"按照资源名称限流测试",new Payment(2020L,"serial001"));
    }

	//兜底方法
    public CommonResult handleException(BlockException exception) {
        return  new CommonResult(444,exception.getClass().getCanonicalName() + "\t 服务不可用");
    }
}
访问 /byResource 请求,会发现

我们配置没有/的流控,为1,超过每秒一次之后,会到我们配置的自定义方法中去(若配置的是带/的,则报系统自带的熔断错误)
按照url配置
此处就是按照请求地址配置,超过阈值报系统自带的错误
自定义配置
发现问题:每次都需要配置兜底类,太过于冗余
所以新建一个配置类
public class CustomerBlockHandler {

    public static CommonResult handlerException(BlockException exception) {
        return  new CommonResult(444,"按照客户自定义限流测试,Glogal handlerException ---- 1");
    }

    public static CommonResult handlerException2(BlockException exception) {
        return  new CommonResult(444,"按照客户自定义限流测试,Glogal handlerException ---- 2");
    }
}
在RateLimitController中新加一个请求,如下配置
@GetMapping("/rateLimit/customerBlockHandler")
//blockHandlerClass为兜底的类,blockHandler为兜底类的方法名
    @SentinelResource(value = "customerBlockHandler",
            blockHandlerClass = CustomerBlockHandler.class, blockHandler = "handlerException2")
    public CommonResult customerBlockHandler() {
        return  new CommonResult(200,"按照客户自定义限流测试",new Payment(2020L,"serial003"));
    }
重启后访问次请求(sentinel1.8版本之后,若url与资源地址不同,那么只会显示资源地址)
配置流控为1,那么当我们再次访问此请求的次数大于1次/1s时,就会跳转到我们自定义的兜底方法中去
七、sentinel集成Ribbon以及熔断
环境配置
新建 cloudalibaba-provider-payment9003
pom
<dependencies>
        <!-- SpringCloud ailibaba nacos-->
        <dependency>
            <groupId>com.alibaba.cloud</groupId>
            <artifactId>spring-cloud-starter-alibaba-nacos-discovery</artifactId>
        </dependency>
        <!-- SpringCloud ailibaba sentinel-->
        <dependency>
            <groupId>com.alibaba.cloud</groupId>
            <artifactId>spring-cloud-starter-alibaba-sentinel</artifactId>
        </dependency>
        <!-- 引用自己定义的api通用包,可以使用Payment支付Entity -->
        <dependency>
            <groupId>org.example</groupId>
            <artifactId>cloud-api-commons</artifactId>
            <version>1.0-SNAPSHOT</version>
        </dependency>
        <dependency>
            <groupId>org.springframework.cloud</groupId>
            <artifactId>spring-cloud-starter-openfeign</artifactId>
        </dependency>
        <dependency>
            <groupId>org.springframework.boot</groupId>
            <artifactId>spring-boot-starter-web</artifactId>
        </dependency>
        <!--监控-->
        <dependency>
            <groupId>org.springframework.boot</groupId>
            <artifactId>spring-boot-starter-actuator</artifactId>
        </dependency>
        <!--热部署-->
        <dependency>
            <groupId>org.springframework.boot</groupId>
            <artifactId>spring-boot-devtools</artifactId>
            <scope>runtime</scope>
            <optional>true</optional>
        </dependency>
        <dependency>
            <groupId>org.projectlombok</groupId>
            <artifactId>lombok</artifactId>
            <optional>true</optional>
        </dependency>
        <dependency>
            <groupId>org.springframework.boot</groupId>
            <artifactId>spring-boot-starter-test</artifactId>
            <scope>test</scope>
        </dependency>
    </dependencies>
yml
server:
  port: 9003

spring:
  application:
    name: nacos-payment-provider
  cloud:
    nacos:
      discovery:
        server-addr: localhost:8848  #nacos

management:
  endpoints:
    web:
      exposure:
        include: '*'
主启动类
@SpringBootApplication
@EnableDiscoveryClient
public class PaymentMain9003 {

    public static void main(String[] args) {
        SpringApplication.run(PaymentMain9003.class,args);
    }
}
controller
@RestController
public class PaymentController {

    @Value("${server.port}")    //spring的注解
    private  String serverPort;

    public static HashMap<Long, Payment> map = new HashMap<>();
    static {
        map.put(1L,new Payment(1L,"1111"));
        map.put(2L,new Payment(2L,"2222"));
        map.put(3L,new Payment(3L,"3333"));
    }


    @GetMapping(value = "/paymentSQL/{id}")
    public CommonResult<Payment> paymentSQL(@PathVariable("id") Long id) {
        Payment payment = map.get(id);
        CommonResult<Payment> result = new CommonResult<>(200,"from mysql,serverPort: " + serverPort,payment);
        return result;
    }
}
9004同理
创建消费者84
pom
<dependencies>
        <!-- SpringCloud ailibaba nacos-->
        <dependency>
            <groupId>com.alibaba.cloud</groupId>
            <artifactId>spring-cloud-starter-alibaba-nacos-discovery</artifactId>
        </dependency>
        <!-- SpringCloud ailibaba sentinel-->
        <dependency>
            <groupId>com.alibaba.cloud</groupId>
            <artifactId>spring-cloud-starter-alibaba-sentinel</artifactId>
        </dependency>
        <!-- 引用自己定义的api通用包,可以使用Payment支付Entity -->
        <dependency>
            <groupId>org.example</groupId>
            <artifactId>cloud-api-commons</artifactId>
            <version>1.0-SNAPSHOT</version>
        </dependency>
        <dependency>
            <groupId>org.springframework.cloud</groupId>
            <artifactId>spring-cloud-starter-openfeign</artifactId>
        </dependency>
        <dependency>
            <groupId>org.springframework.boot</groupId>
            <artifactId>spring-boot-starter-web</artifactId>
        </dependency>
        <!--监控-->
        <dependency>
            <groupId>org.springframework.boot</groupId>
            <artifactId>spring-boot-starter-actuator</artifactId>
        </dependency>
        <!--热部署-->
        <dependency>
            <groupId>org.springframework.boot</groupId>
            <artifactId>spring-boot-devtools</artifactId>
            <scope>runtime</scope>
            <optional>true</optional>
        </dependency>
        <dependency>
            <groupId>org.projectlombok</groupId>
            <artifactId>lombok</artifactId>
            <optional>true</optional>
        </dependency>
        <dependency>
            <groupId>org.springframework.boot</groupId>
            <artifactId>spring-boot-starter-test</artifactId>
            <scope>test</scope>
        </dependency>
    </dependencies>
yml
server:
  port: 84

spring:
  application:
    name: nacos-order-consumer
  cloud:
    nacos:
      discovery:
        server-addr: localhost:8848  #nacos
    sentinel:
      transport:
        dashboard: localhost:8080    #sentinel
        port: 8719

#消费者将去访问的微服务名称
server-url:
  nacos-user-service: http://nacos-payment-provider

#激活Sentinel对Feign的支持
feign:
  sentinel:
    enabled: true
主启动类
@EnableDiscoveryClient
@SpringBootApplication
@EnableFeignClients
public class OrderMain84 {

    public static void main(String[] args) {
        SpringApplication.run(OrderMain84.class,args);
    }
}
config
@Configuration
public class ApplicationContextConfig {

    @Bean
    @LoadBalanced
    public RestTemplate getRestTemplate() {
        return new RestTemplate();
    }
}
controller
@RestController
@Slf4j
public class CircleBreakerController {

    public static  final  String SERVICE_URL = "http://nacos-payment-provider";

    @Resource
    private RestTemplate restTemplate;

    @RequestMapping("/consumer/fallback/{id}")
    @SentinelResource(value = "fallback")   //没有配置
    public CommonResult<Payment> fallback(@PathVariable Long id) {
        CommonResult<Payment> result = restTemplate.getForObject(
                SERVICE_URL + "/paymentSQL/" + id,CommonResult.class,id);

        if(id == 4){
            throw new IllegalArgumentException("IllegalArgument,非法参数异常...");
        }else if(result.getData() == null) {
            throw new NullPointerException("NullPointerException,该ID没有对应记录,空指针异常");
        }

        return  result;
    }

}
启动 84,9003,9004(前提是nacos与sentinel也启动)
启动完成后,访问 /consumer/fallback/ 地址,实现了负载均衡的效果
至此,环境搭建成功!
当我们访问 /consumer/fallback/4时,由于代码内部要求输入4时会报异常,由于是代码内部异常,所以我们可以使用 fallback来定义一个兜底方法,使得代码内部异常时会走fallback对应的方法
@SentinelResource(value = "fallback",fallback = "handlerFallback") //负责业务异常注:fallback:运行时异常,blockHandler:配置违规
@SentinelResource(value = "fallback", blockHandler = "blockHandler") //只配置blockHandler(只负责sentinel控制台配置违规)当只配置blockHandler时,为达到我们配置的标准时,还是会包错误页面,一旦达到了我们的标准,就直接会跑我们blockhandler指定的方法
若fallback与blockHandler都配置,blockHandler配置为qps 1次/s
那么当我们访问 /consumer/fallback/4 的次数超过了 1次/s,也就是说运行时报错,违规配置也满足,那么,会优先走blockHandler的方法,也就是blockHandler优先级高于fallback
忽略属性
@SentinelResource(value = "fallback",
            fallback ="handlerFallback",
            blockHandler = "blockHandler",
            exceptionsToIgnore = {IllegalArgumentException.class})
    //如果出现exceptionsToIgnore中的异常,不运行fallback兜底方法。
八、sentinel集成Fegin以及熔断
pom yml 主启动类 在前面都已经添加!
只需添加Service层
//value为 nacos上注册的name fallback为兜底类
@FeignClient(value = "nacos-payment-provider",fallback = PaymentFallbackService.class)
public interface PaymentService {

    //GetMapping为 nacos-payment-provider 上的请求地址
    @GetMapping(value = "/paymentSQL/{id}")
    public CommonResult<Payment> paymentSQL(@PathVariable("id") Long id);

}
@Component
public class PaymentFallbackService implements PaymentService{
@Override
public CommonResult<Payment> paymentSQL(Long id) {
return new CommonResult<>(444,"服务降级返回,---PaymentFallbackService",new Payment(id,"ErrorSerial"));
}
}controller添加
@Resource
    private PaymentService paymentService;


@GetMapping(value = "/consumer/paymentSQL/{id}")
    public CommonResult< Payment > paymentSQL(@PathVariable("id") Long id){
        return paymentService.paymentSQL(id);
    }
当84访问 /consumer/paymentSQL/{id}时,就会找到启动的9003或9004进行访问,当9003和9004都没有启动时,那么就会走到兜底方法,也就是 PaymentFallbackService类
九、持久化
sentinel每次重启时,上面的服务都会消失不见,所以我们需要进行持久化操作
pom
	<!--之前添加了-->
    <!-- SpringCloud ailibaba sentinel-datasource-nacos 持久化需要用到-->
    <dependency>
        <groupId>com.alibaba.csp</groupId>
        <artifactId>sentinel-datasource-nacos</artifactId>
    </dependency>
yml
server:
port: 8401
spring:
application:
name: cloudalibaba-sentinal-service
cloud:
nacos:
discovery:
#Nacos服务注册中心地址(改成自己的服务器ip地址,本地用localhost)
server-addr: localhost:8848
sentinel:
transport:
#配置Sentin dashboard地址(改成自己的服务器ip地址,本地用localhost)
dashboard: localhost:8080
# 默认8719端口,假如被占用了会自动从8719端口+1进行扫描,直到找到未被占用的 端口
port: 8719
datasource:
ds1:
nacos:
server-addr: localhost:8848 #nacos
dataId: ${spring.application.name}
groupId: DEFAULT_GROUP
data-type: json
rule-type: flow
management:
endpoints:
web:
exposure:
include: '*'
feign:
sentinel:
enabled: true #激活Sentinel 对Feign的支持
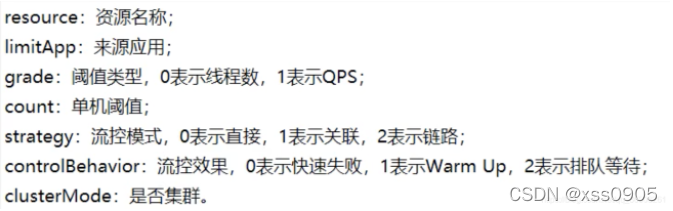
在nacos中新建配置
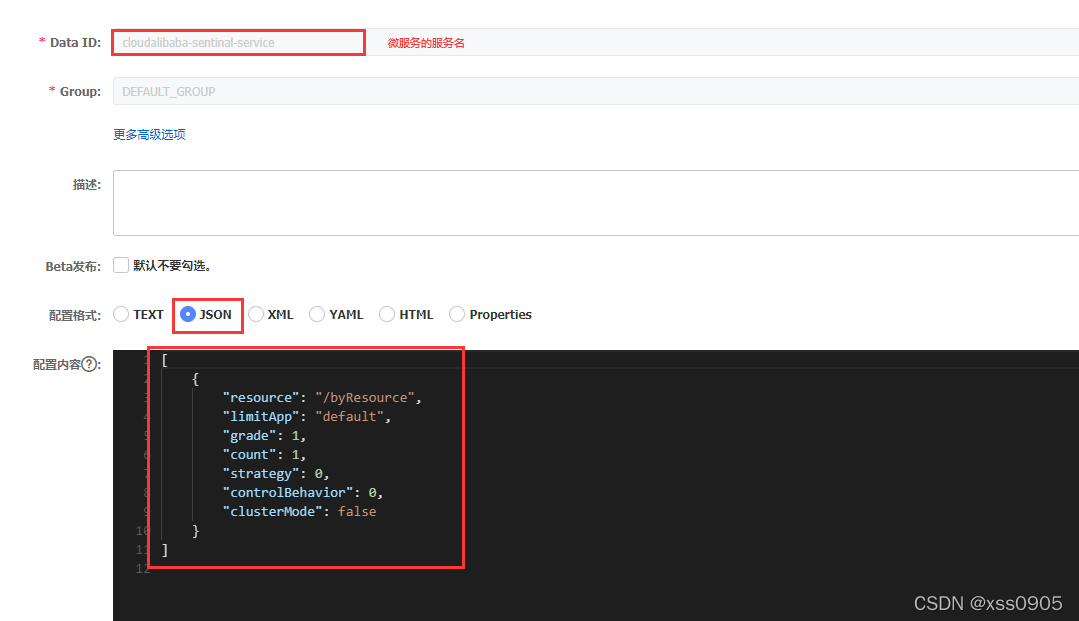
添加的规则为
添加完成后
再重新访问就持久化成功!


 85万+
85万+

 被折叠的 条评论
为什么被折叠?
被折叠的 条评论
为什么被折叠?
 到【灌水乐园】发言


