


 本文详细介绍了在SpringBoot中,前后端分离后如何使用Ajax进行数据交互,包括非JSON非表单、JSON非表单、非JSON表单、JSON表单的情况,并展示了后端接收不同类型数据的方法,如String、Pojo类、Map和List<Map>等。
1 前言
上一篇写了一个整合SpringBoot和MyBatis(含逆向工程)的项目
这一篇介绍一下前后端分离后如何进行数据交互
2 前端发往后端
前后端分离以后,多用ajax方式进行前后端数据交互。
前端发往后端,涉及前端的ajax书写和后端的接收。
2.1 非json 非表单
2.1.1 ajax书写
		<!-- 前端发往后端 -->
		<!-- 非Json 非表单 -->
		var data={"hello":$('#data1').html(),"hello1":"data2"}; //$('#data1').html()=data1
		$.ajax({
			type: 'POST',
			url: 'NoJsonNoForm',
			data:data,
			success: function(res) {
				console.log(res);
			},
			error: function(res) {
				console.log("fail");
			},
		})
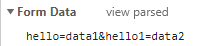
最终请求时的request会转化成
2.1.2 后端接收
	@RequestMapping("/NoJsonNoForm")
	@ResponseBody
	public String NoJsonNoForm(String hello,String hello1) {
		System.out.println(hello);
		System.out.println(hello1);
		return "1";
	}
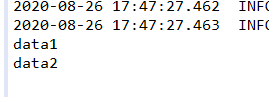
后端接收要注意参数名,结果如下
2.2 json 非表单
2.2.1 ajax书写
		<!-- Json 非表单 -->
		var data={"hello":$('#data1').html(),"hello1":"data2"}; //$('#data1').html()=data1
		$.ajax({
			type: 'POST',
			url: 'WithJsonNoForm',
			contentType:'application/json;charset=utf-8',
			data:JSON.stringify(data),
			success: function(res) {
				console.log(res);
			},
			error: function(res) {
				console.log("fail");
			},
		})
2.2.2 后端接收
	@RequestMapping("/WithJsonNoForm")
	@ResponseBody
	public String WithJsonNoForm(@RequestBody String hi,String hello1) {
		System.out.println(hi);
		System.out.println(hello1);
		return "1";
	}
结果如下

可以看出数据全部填入第一个参数,事实上把hi改成其它东西也会是这样的输出。
2.3 非json 表单
2.3.1 表单
		<form id="form1">
			<input type="text" name="username" />
			<input type="text" name="age" />
			<input type="button" value="提交" onclick="subForm()" />
		</form>
2.3.2 ajax
		function subForm(){
			$.ajax({
				type: 'POST',
				url: 'NoJsonWithForm',
				data:$('#form1').serialize(),
				success: function(res) {
					console.log(res);
				},
				error: function(res) {
					console.log("fail");
				},
			})

		}
2.3.3 后台
	@RequestMapping("/NoJsonWithForm")
	@ResponseBody
	public String NoJsonWithForm(String username,String age) {
		System.out.println(username);
		System.out.println(age);
		return "1";
	}
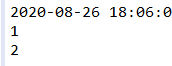
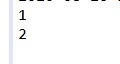
测试

运行结果
其实非Json的表单和非Json的普通数据差不多,就是需要注意表单的name属性要和后台的参数名对应
2.4 json表单
此处的表单使用的是2.3的表单,不再赘述
2.4.1 ajax
function subForm(){
			$.ajax({
				type: 'POST',
				url: 'WithJsonWithForm',
				contentType:'application/json;charset=utf-8',
				data:JSON.stringify($('#form1').serializeObject()),
				success: function(res) {
					console.log(res);
				},
				error: function(res) {
					console.log("fail");
				},
			})

		}
		jQuery.prototype.serializeObject=function(){
		    var obj=new Object();
		    $.each(this.serializeArray(),function(index,param){
		        if(!(param.name in obj)){
		            obj[param.name]=param.value;
		        }
		    });
		    return obj;
		};
这里要注意的是对$(#form1).serialize()的返回值调用JSON.stringify不能将其转换成json型的数据,这里我去网上找了一个方法,顺便贴在这里了。
2.4.2 后台接收
	@RequestMapping("/WithJsonWithForm")
	@ResponseBody
	public String WithJsonWithForm(@RequestBody String formData) {
		System.out.println(formData);
		return "1";
	}
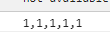
同样输入1和2,结果如下

2.4.3 使用pojo类接收
当表单的name值与pojo类的属性对应时,可以使用pojo类来接收
	@RequestMapping("/WithJsonWithForm")
	@ResponseBody
	public String WithJsonWithForm(@RequestBody User user) {
		System.out.println(user.getId());
		System.out.println(user.getUsername());
		System.out.println(user.getAge());
		return "1";
	}
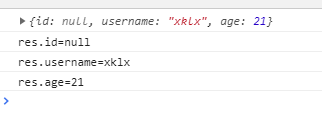
运行结果
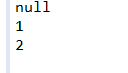
表单没有id所以值为空,其它两个都赋值了。
2.4.4 使用Map接收
也可以通过map接收,后台代码
	@RequestMapping("/WithJsonWithForm")
	@ResponseBody
	public String WithJsonWithForm(@RequestBody Map<String, String> map) {
		System.out.println(map.get("username"));
		System.out.println(map.get("age"));
		return "1";
	}
运行结果
3 后端发往前端
一定要加上@ResponseBody,不然会404的。
3.1 String型
String型前文一直都有在用,返回String型之后可以在前端进行字符串拆分,注意此时ajax的dataType不进行设置,不然会失败的
3.1.1 ajax
			$.ajax({
				type: 'POST',
				url: 'WithJsonWithForm',
				contentType:'application/json;charset=utf-8',
				data:JSON.stringify({"a":"a"}),
				success: function(res) {
					console.log(res);
				},
				error: function(res) {
					console.log("fail");
				},
			})
3.1.2 后端
	@RequestMapping("/WithJsonWithForm")
	@ResponseBody
	public String WithJsonWithForm(@RequestBody Map<String, String> map) {
		return "1,1,1,1,1";
	}
结果
3.2 pojo类
也可以传递pojo类,当查询出单条记录时可以直接传。
3.2.1 ajax
$.ajax({
				type: 'POST',
				url: 'WithJsonWithForm',
				contentType:'application/json;charset=utf-8',
				data:JSON.stringify({"a":"a"}),
				success: function(res) {
					console.log(res);
					console.log("res.id="+res.id);
					console.log("res.username="+res.username);
					console.log("res.age="+res.age);
				},
				error: function(res) {
					console.log("fail");
				},
			})
3.2.2 后端
	@RequestMapping("/WithJsonWithForm")
	@ResponseBody
	public User WithJsonWithForm(@RequestBody Map<String, String> map) {
		User user=new User();
		user.setUsername("xklx");
		user.setAge(21);
		return user;
	}
运行结果
3.3 Map<>
也可以使用Map传递,当查出记录同时想要附带一些内容时可用
3.3.1 ajax
$.ajax({
				type: 'POST',
				url: 'WithJsonWithForm',
				contentType:'application/json;charset=utf-8',
				data:JSON.stringify({"a":"a"}),
				success: function(res) {
					console.log(res);
					console.log("res.d1="+res.d1);
					console.log("res.d2="+res.d2);
				},
				error: function(res) {
					console.log("fail");
				},
			})
3.3.2 后端
	@RequestMapping("/WithJsonWithForm")
	@ResponseBody
	public Map<String, String> WithJsonWithForm(@RequestBody Map<String, String> map) {
		Map<String, String> map2 = new HashMap<String, String>();
		map2.put("d1", "hello");
		map2.put("d2", "world");
		return map2;
	}
运行结果
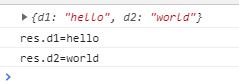
3.4 List<Map<>>
也可以使用List<Map<>>嵌套,当查出多条记录时可用。
3.4.1 ajax
		$.ajax({
				type: 'POST',
				url: 'WithJsonWithForm',
				contentType:'application/json;charset=utf-8',
				data:JSON.stringify({"a":"a"}),
				success: function(res) {
					for(var i=0;i<res.length;i++){
						console.log("this is "+i);
						console.log("res.d1="+res[i].d1);
						console.log("res.d2="+res[i].d2);

					}
				},
				error: function(res) {
					console.log("fail");
				},
			})
3.4.2 后端
	@RequestMapping("/WithJsonWithForm")
	@ResponseBody
	public List<Map<String, String>> WithJsonWithForm(@RequestBody Map<String, String> map) {
		List<Map<String, String>> lists=new ArrayList<Map<String,String>>();

		Map<String, String> map2 = new HashMap<String, String>();
		map2.put("d1", "hello");
		map2.put("d2", "world");
		lists.add(map2);

		Map<String, String> map3 = new HashMap<String, String>();
		map3.put("d1", "spring");
		map3.put("d2", "boot");
		lists.add(map3);

		return lists;
	}
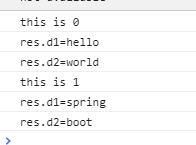
运行结果


 5225
5225

 被折叠的 条评论
为什么被折叠?
被折叠的 条评论
为什么被折叠?
 到【灌水乐园】发言


