


 本文介绍在Centos7系统下部署Mysql5.7.31主从复制的详细过程。包括环境描述、Master数据库操作、从服务器slave配置、其他配置及故障排除等内容。通过在主库添加数据,验证从库是否同步,以确认主从复制功能是否有效。
Centos7下部署Mysql5.7.31主从复制
一、环境描述
系统:Centos7.8.2003
主Mysql服务器:192.168.6.101
从Mysql服务器:192.168.6.102
Mysql版本:5.7.31
防火墙、selinux:防火墙关闭或放行数据库端口,selinux设置为disabled
二、Master数据库操作
①、修改mysql配置
[mysqld]
log-bin=mysql-bin #开启二进制日志
server-id=11 #设置server-id
重启mysql服务
②、创建用于同步的用户账号
mysql> CREATE USER 'testrepl'@'192.168.6.102' IDENTIFIED BY '123456';
Query OK, 0 rows affected (0.01 sec)

mysql> GRANT REPLICATION SLAVE ON *.* TO 'testrepl'@'192.168.6.102';
Query OK, 0 rows affected (0.00 sec)

mysql> flush privileges;
Query OK, 0 rows affected (0.00 sec)
③、查看master状态,记录二进制文件名(binlog.000005)和位置(771)
mysql> SHOW MASTER STATUS;
+---------------+----------+--------------+------------------+-------------------+
| File          | Position | Binlog_Do_DB | Binlog_Ignore_DB | Executed_Gtid_Set |
+---------------+----------+--------------+------------------+-------------------+
| binlog.000005 |      771 |              |                  |                   |
+---------------+----------+--------------+------------------+-------------------+
1 row in set (0.00 sec)
三、从服务器slave配置
①、修改mysql配置
[mysqld]
server-id=22 #设置server-id,必须唯一
②、重启mysql,打开mysql会话,执行同步SQL语句(需要主服务器主机名,登陆凭据,二进制文件的名称和位置),端口没有单引号!
mysql> CHANGE MASTER TO
    -> MASTER_HOST='192.168.6.101',
    -> MASTER_PORT=3301,
    -> MASTER_USER='testrepl',
    -> MASTER_PASSWORD='123456',
    -> MASTER_LOG_FILE='binlog.000005',
    -> MASTER_LOG_POS=771;
Query OK, 0 rows affected, 2 warnings (0.00 sec)
③、启动slave同步进程,如配置错误可stop slave;同步进程,再次执行第②步然后在start slave接口。
mysql>start slave;
④、查看slave状态
mysql> show slave status \G;
*************************** 1. row ***************************
               Slave_IO_State: Waiting for master to send event
                  Master_Host: 192.168.6.101
                  Master_User: testrepl
                  Master_Port: 3301
                Connect_Retry: 60
              Master_Log_File: binlog.000005
          Read_Master_Log_Pos: 1396
               Relay_Log_File: server2-relay-bin.000002
                Relay_Log_Pos: 942
        Relay_Master_Log_File: binlog.000005
             Slave_IO_Running: Yes
            Slave_SQL_Running: Yes
              Replicate_Do_DB:
          Replicate_Ignore_DB:
           Replicate_Do_Table:
       Replicate_Ignore_Table:
      Replicate_Wild_Do_Table:
  Replicate_Wild_Ignore_Table:
                   Last_Errno: 0
                   Last_Error:
                 Skip_Counter: 0
          Exec_Master_Log_Pos: 1396
              Relay_Log_Space: 1151
              Until_Condition: None
当Slave_IO_Running和Slave_SQL_Running都为YES的时候就表示主从同步设置成功了。接下来就可以进行一些验证了,比如在主master数据库的test数据库的一张表中插入一条数据,在slave的test库的相同数据表中查看是否有新增的数据即可验证主从复制功能是否有效,还可以关闭slave(mysql>stop slave;),然后再修改master,看slave是否也相应修改(停止slave后,master的修改不会同步到slave),就可以完成主从复制功能的验证了。
再次查看Master服务器状态:
四、其他配置
master开启二进制日志后默认记录所有库所有表的操作,可以通过配置来指定只记录指定的数据库甚至指定的表的操作,具体在mysql配置文件的[mysqld]可添加修改如下选项:
# 不同步哪些数据库
binlog-ignore-db = mysql
binlog-ignore-db = test
binlog-ignore-db = information_schema

# 只同步哪些数据库,除此之外,其他不同步
binlog-do-db = game
如之前查看master状态时就可以看到只记录了test库,忽略了manual和mysql库。
五、故障排除
①、Slave_IO_Running:一直处于:Connecting状态
mysql> show slave status\G;
*************************** 1. row ***************************
               Slave_IO_State: Connecting to master
                  Master_Host: 192.168.6.101
                  Master_User: repl
                  Master_Port: 3306
                Connect_Retry: 60
              Master_Log_File: mysql-bin.000005
          Read_Master_Log_Pos: 771
               Relay_Log_File: server2-relay-bin.000001
                Relay_Log_Pos: 4
        Relay_Master_Log_File: mysql-bin.000005
             Slave_IO_Running: Connecting
            Slave_SQL_Running: Yes
              Replicate_Do_DB:
          Replicate_Ignore_DB:
           Replicate_Do_Table:
       Replicate_Ignore_Table:
      Replicate_Wild_Do_Table:
  Replicate_Wild_Ignore_Table:
                   Last_Errno: 0
                   Last_Error:
                 Skip_Counter: 0
          Exec_Master_Log_Pos: 771
              Relay_Log_Space: 154
              Until_Condition: None
               Until_Log_File:
                Until_Log_Pos: 0
           Master_SSL_Allowed: No
           Master_SSL_CA_File:
           Master_SSL_CA_Path:
              Master_SSL_Cert:
            Master_SSL_Cipher:
               Master_SSL_Key:
        Seconds_Behind_Master: NULL
Master_SSL_Verify_Server_Cert: No
                Last_IO_Errno: 2003
                Last_IO_Error: error connecting to master 'repl@192.168.6.101:3306' - retry-time: 60  retries: 3
查看从数据库日志一直都是这个错
2020-12-28T09:04:13.165805Z 5 [ERROR] Slave I/O for channel '': error connecting to master 'repl@192.168.6.101:3306' - retry-time: 60  retries: 2, Error_code: 2003
2020-12-28T09:05:13.166464Z 5 [ERROR] Slave I/O for channel '': error connecting to master 'repl@192.168.6.101:3306' - retry-time: 60  retries: 3, Error_code: 2003
2020-12-28T09:06:13.167181Z 5 [ERROR] Slave I/O for channel '': error connecting to master 'repl@192.168.6.101:3306' - retry-time: 60  retries: 4, Error_code: 2003
2020-12-28T09:07:13.167896Z 5 [ERROR] Slave I/O for channel '': error connecting to master 'repl@192.168.6.101:3306' - retry-time: 60  retries: 5, Error_code: 2003
2020-12-28T09:08:13.168506Z 5 [ERROR] Slave I/O for channel '': error connecting to master 'repl@192.168.6.101:3306' - retry-time: 60  retries: 6, Error_code: 2003
由于主、从数据库防火墙和selinux都是关闭的,所以排除网络原因。
且在从机上可以使用repl复制用户登录主服务器
[root@server2 ~]# /usr/local/mysql/bin/mysql -urepl -p -h 192.168.6.101 -P 3301
Enter password:
Welcome to the MySQL monitor.  Commands end with ; or \g.
Your MySQL connection id is 12
Server version: 5.7.31-log MySQL Community Server (GPL)

Copyright (c) 2000, 2020, Oracle and/or its affiliates. All rights reserved.

Oracle is a registered trademark of Oracle Corporation and/or its
affiliates. Other names may be trademarks of their respective
owners.

Type 'help;' or '\h' for help. Type '\c' to clear the current input statement.

mysql> show databases;
+--------------------+
| Database           |
+--------------------+
| information_schema |
+--------------------+
1 row in set (0.00 sec)
问题原因是:
配置从服务器时命令行未指定主mysql端口导致,重新配置slave信息后如下图所示!
mysql> show slave status \G;
*************************** 1. row ***************************
               Slave_IO_State: Waiting for master to send event
                  Master_Host: 192.168.6.101
                  Master_User: testrepl
                  Master_Port: 3301
                Connect_Retry: 60
              Master_Log_File: binlog.000005
          Read_Master_Log_Pos: 1396
               Relay_Log_File: server2-relay-bin.000002
                Relay_Log_Pos: 942
        Relay_Master_Log_File: binlog.000005
             Slave_IO_Running: Yes
            Slave_SQL_Running: Yes
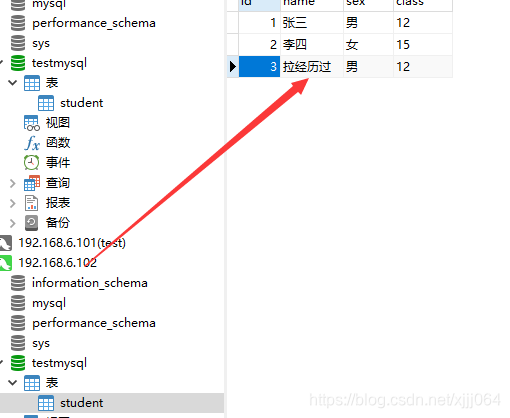
六、测试在主库添加数据,然后看看从库是否同步过来!
主库添加一条数据
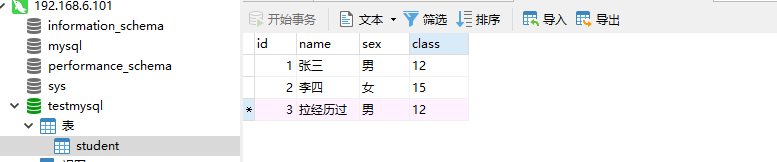
从库查看数据已复制过来!


 278
278

 被折叠的 条评论
为什么被折叠?
被折叠的 条评论
为什么被折叠?
 到【灌水乐园】发言


