


 本文通过坦克大战游戏实例,讲解了设计模式中的抽象工厂模式。为了实现不同类型的坦克及其功能,文章详细介绍了IAFunction与IBFunction接口的区别及如何通过适配器模式解决接口不兼容的问题。
1.概要
接口适配,更具体机时样参数相同,名称不同的接口适配。
2.内容
当前:抽象工厂
需求:坦克大战
创建两种坦克
| 坦克类型 | 射程 | 速度 |
| b70 | 70米 | 时/70公里 |
| b50 | 50米 | 时/70公里 |
类图
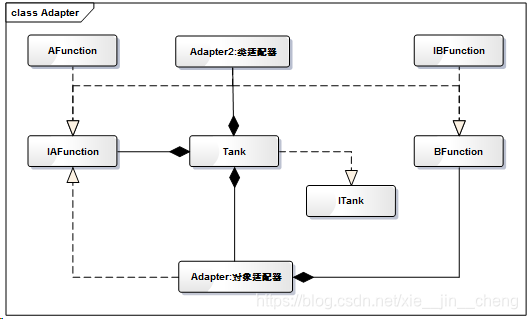
设计说明
两个机能 1.IAFunction 2.IBFunction。他们实现的接口不同,但实现的机能是一样的,execute和operation
坦克本来是使用IAFunction接口实现机能。
但是因为在装载的时候发现IAFunction接口的机能不够用了,只能装载IBFunction接口的机能。
这时候就创建了适配器,来实现坦克对IBFunction机能的装载。
代码
interface IAFunction{
void execute();
}
interface ITank{
void execute();
void setmAFunction(IAFunction mAFunction);
}
interface IBFunction{
void operation();
}
class AFunction implements IAFunction{
public void execute() {
System.out.println("AFunction:炮弹发射");
}
}
class BFunction implements IBFunction{
public void operation() {
System.out.println("BFunction:炮弹发射");
}
}
class Tank implements ITank{
IAFunction mAFunction;
public void setmAFunction(IAFunction mAFunction) {
this.mAFunction = mAFunction;
}
public void execute() {
mAFunction.execute();
}
}
class Adapter implements IAFunction{
IBFunction mBFunction;
public Adapter(IBFunction fun) {
mBFunction = fun;
}
public void execute() {
mBFunction.operation();
}
}
class Adapter2 extends BFunction implements IAFunction{
public void execute() {
operation();
}
}
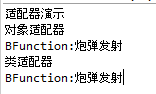
public class Client {
public static void main(String[] args) {
System.out.println("适配器演示");
ITank tank = new Tank();
//“建好了坦克本来打算装载IAFunction接口”
//“但是发现IAFunction接口的发射器没有了”
//“只有IBFunction接口的发射器
IBFunction ibfun = new BFunction();
//“怎么办,只有做实验适配器了,转载”
//“做个适配器装载IBFunction接口的发射器”
///*“1对象适配器”*///////////////////////
System.out.println("对象适配器");
IAFunction adapter = new Adapter(ibfun);
tank.setmAFunction(adapter);
tank.execute();
///*“类适配器”*///////////////////////
System.out.println("类适配器");
Adapter2 adapter2 = new Adapter2();
tank.setmAFunction(adapter);
tank.execute();
}
}
运行结果
3.关联链接
4.关联知识
1.适配器模式
适配器模式(Adapter Pattern)是一种结构型设计模式,它允许将一个类的接口转换成客户端所期望的另一种接口,使原本由于接口不兼容而无法一起工作的类能够协同工作。以下是关于适配器模式的详细解释:
一、定义
适配器模式的核心思想是通过创建一个中间层(适配器),将不兼容的接口进行转换,使得原本无法直接调用的类能够一起工作。这种模式在软件开发中非常有用,尤其是在处理遗留代码、集成第三方库或不同框架之间的交互时。
二、结构
适配器模式通常涉及以下三个主要角色:
- 目标接口(Target):定义了客户端期望的接口,客户端通过该接口与适配器进行交互。
- 适配者类(Adaptee):实现了需要适配的功能,但其接口与客户端期望的接口不兼容。
- 适配器类(Adapter):实现了目标接口,并通过组合或继承的方式调用适配者类中的方法,从而将适配者类的接口转换成目标接口。
适配器模式有两种常见的实现方式:
- 类适配器模式:适配器通过继承适配者类来实现目标接口。这种方式在支持多重继承的编程语言(如C++)中较为常见,但在Java等单继承语言中受到一定限制。
- 对象适配器模式:适配器通过持有适配者类的一个实例来工作,并在目标接口的实现中调用适配者类的方法。这种方式更加灵活,是适配器模式在Java等语言中常用的实现方式。
三、使用场景
适配器模式通常适用于以下场景:
- 接口不兼容:当需要使用一个已经存在的类,但其接口与客户端期望的接口不兼容时,可以通过适配器模式进行转换。
- 代码复用:希望创建一个可以复用的类,该类可以与其他不相关的类或不可预见的类协同工作。
- 避免子类化:当需要使用一些已经存在的子类,但不可能对每一个都进行子类化以匹配它们的接口时,适配器模式提供了一种更灵活的解决方案。
四、示例
以下是一个简单的对象适配器模式的示例:
1. 目标接口(Target)
interface Bird {
    void chirp();
}
2. 适配者类(Adaptee)
class Duck {
    public void quack() {
        System.out.println("Duck quacks!");
    }
}
3. 适配器类(Adapter)
class Duck {
    public void quack() {
        System.out.println("Duck quacks!");
    }
}
4. 客户端代码
public class AdapterPatternTest {
    public static void main(String[] args) {
        Duck duck = new Duck();
        Bird duckAdapter = new DuckAdapter(duck);
        duckAdapter.chirp(); // 输出:Duck quacks!
    }
}在这个示例中,DuckAdapter持有一个Duck实例,并在chirp方法中调用Duck的quack方法,从而将Duck类的接口转换成Bird类的接口。客户端通过Bird接口与DuckAdapter进行交互,无需知道Duck类的具体实现细节。
五、优缺点
优点:
- 提高代码灵活性:适配器模式允许新类的引入而不需要更改现有代码,使扩展变得更加简单。
- 实现接口兼容:通过适配器,可以使不兼容的接口配合工作,从而使得不同系统之间的交互变得可能。
- 解耦:客户端代码无需知道被适配的类的具体类型,可以通过统一的接口进行调用,提高了代码的可维护性。
缺点:
- 增加系统复杂性:引入适配器类可能会增加系统的复杂性,尤其是在频繁调用适配器方法的场景下。
- 性能开销:适配器模式在某些情况下可能会引入额外的性能开销。
六、总结
适配器模式是一种强大的设计模式,它通过创建一个中间层(适配器)来解决接口不兼容的问题,使得原本无法一起工作的类能够协同工作。在实际开发中,适配器模式被广泛应用于处理遗留代码、集成第三方库或不同框架之间的交互等场景。通过合理使用适配器模式,可以提高代码的灵活性、可维护性和可扩展性。
2.结构型设计模式
结构型设计模式详解
结构型设计模式是软件设计中处理类与对象组合的核心手段,旨在通过灵活的结构设计提升系统的可维护性、扩展性和复用性。以下是关键模式及其应用场景的深度解析:
一、核心分类与设计原则
- 两种类型:
- 类结构型模式:通过继承组合接口或实现(如适配器类的继承)。
- 对象结构型模式:通过对象关联实现功能(如桥接模式中的抽象与实现分离)。
- 设计原则:优先使用对象组合(而非继承),符合“合成复用原则”,避免类膨胀。
二、7大经典模式与场景
| 模式名称 | 核心思想 | 典型场景 | 类比案例 |
|---|---|---|---|
| 适配器模式 | 接口转换,兼容不兼容类 | 第三方库集成、旧系统改造 | 两孔插头转三孔插板 |
| 桥接模式 | 分离抽象与实现,支持多维扩展 | 跨平台开发、多维度变化系统 | 毛笔+颜料盒替代36支蜡笔 |
| 组合模式 | 树形结构统一处理部分与整体 | 文件系统、菜单层级 | 文件夹与文件的递归操作 |
| 装饰模式 | 动态扩展对象功能 | UI组件增强、日志附加 | 房子装修逐步添加吊灯和壁画 |
| 外观模式 | 简化子系统复杂接口 | 封装底层API、库集成 | 装机公司代理配件选择与组装 |
| 享元模式 | 共享细粒度对象减少内存 | 文本编辑器、游戏对象池 | 字符串共享重复字符实例 |
| 代理模式 | 控制对象访问,增加间接层 | 远程方法调用、权限控制 | 代购中介处理跨境购物 |
三、模式深度解析
- 适配器模式
- 场景:当现有类的接口不符合需求时(如调用第三方API)。
- 优势:解耦目标类与适配者类,符合开闭原则。
- 代码示例:
// 目标接口
interface MediaPlayer { void play(String filename); }
// 适配者类(第三方库)
class ExternalAudioPlayer { void playAudio(String filename) { ... } }
// 适配器类
class AudioPlayerAdapter implements MediaPlayer {
    private ExternalAudioPlayer player;
    public void play(String filename) { player.playAudio(filename); }
}
- 桥接模式
- 场景:系统存在多个独立变化的维度(如形状与颜色)。
- 优势:避免类爆炸,提高扩展性。
- 代码示例:
interface Color { void applyColor(); }
class Red implements Color { public void applyColor() { ... } }
abstract class Shape { protected Color color; public Shape(Color c) { color = c; } }
class Circle extends Shape { public void draw() { color.applyColor(); } }
// 使用:Shape circle = new Circle(new Red());
- 装饰模式
- 场景:动态添加功能,避免子类膨胀(如Java I/O流)。
- 优势:灵活组合功能,符合单一职责原则。
- 代码示例:
interface Component { void operation(); }
class ConcreteComponent implements Component { public void operation() { ... } }
abstract class Decorator implements Component {
    protected Component component;
    public void operation() { component.operation(); }
}
class LoggingDecorator extends Decorator {
    public void operation() {
        System.out.println("Logging");
        super.operation();
    }
}
四、应用场景对比
| 模式 | 适用场景关键词 | 不适用场景 |
|---|---|---|
| 适配器 | 接口不兼容、遗留系统集成 | 系统设计阶段可避免的问题 |
| 桥接 | 多维度独立变化(如跨平台UI) | 单一维度变化 |
| 组合 | 树形结构、递归处理 | 线性结构或简单列表 |
| 装饰 | 动态扩展功能、避免子类爆炸 | 功能需静态编译时确定 |
| 外观 | 复杂子系统简化、分层架构入口 | 简单系统或无需封装的情况 |
| 享元 | 大量重复对象、内存敏感场景 | 对象状态差异大 |
| 代理 | 访问控制、延迟加载、远程调用 | 直接访问无额外逻辑的场景 |
五、设计原则总结
- 优先使用对象组合:通过关联关系(如桥接、装饰)替代继承,提高灵活性。
- 开闭原则:对扩展开放,对修改关闭(如适配器新增功能无需修改原有代码)。
- 接口隔离:避免臃肿接口(如外观模式提供简化接口)。
- 单一职责:每个类/对象专注于单一功能(如装饰器仅负责扩展特定功能)。
通过合理选择结构型模式,可以显著减少代码冗余,提升系统的可扩展性和可维护性。实际应用中需结合具体场景权衡模式的选择,避免过度设计。
3.结构型设计模式应用举例
结构型设计模式应用实例详解
结构型设计模式通过灵活的对象组合解决了复杂系统的扩展性和维护性问题。以下是7种经典模式的实际应用场景与代码示例,涵盖软件开发、系统架构和日常生活中的典型用例:
1. 适配器模式(Adapter Pattern)
场景:接口不兼容的类协同工作
实例:充电器转换电压
// 被适配类(220V交流电)
class Voltage220V {
    public int output220V() { return 220; }
}

// 目标接口(5V直流电)
interface IVoltage5V { int output5V(); }

// 适配器类
class VoltageAdapter implements IVoltage5V {
    private Voltage220V voltage220V;
    public VoltageAdapter(Voltage220V v) { this.voltage220V = v; }
    public int output5V() { return voltage220V.output220V() / 44; }
}

// 使用:Phone使用5V适配器充电
IVoltage5V adapter = new VoltageAdapter(new Voltage220V());
phone.charge(adapter);
2. 桥接模式(Bridge Pattern)
场景:多维度独立变化的系统
实例:跨平台文件处理
// 抽象:文件系统接口
interface FileSystem { void write(String content); }

// 实现:不同操作系统
class WindowsFS implements FileSystem {
    public void write(String content) { /* 写入Windows文件 */ }
}

class LinuxFS implements FileSystem {
    public void write(String content) { /* 写入Linux文件 */ }
}

// 抽象:文件操作
abstract class FileHandler {
    protected FileSystem fs;
    public FileHandler(FileSystem fs) { this.fs = fs; }
    abstract void save();
}

// 扩展:加密文件操作
class EncryptedFileHandler extends FileHandler {
    public void save() {
        String encrypted = encrypt("data");
        fs.write(encrypted);
    }
}

// 使用:跨平台加密保存
FileHandler handler = new EncryptedFileHandler(new LinuxFS());
handler.save();
3. 组合模式(Composite Pattern)
场景:树形结构递归处理
实例:公司组织结构管理
// 抽象组件
abstract class Employee {
    protected String name;
    public Employee(String name) { this.name = name; }
    public abstract void print();
}

// 叶子节点:普通员工
class Developer extends Employee {
    public Developer(String name) { super(name); }
    public void print() { System.out.println("员工: " + name); }
}

// 组合节点:部门
class Department extends Employee {
    private List<Employee> staff = new ArrayList<>();
    public Department(String name) { super(name); }
    public void add(Employee e) { staff.add(e); }
    public void print() {
        System.out.println("部门: " + name);
        staff.forEach(Employee::print);
    }
}

// 使用:构建公司结构
Department company = new Department("总公司");
company.add(new Department("研发部"));
company.add(new Developer("张三"));
company.print();
4. 装饰模式(Decorator Pattern)
场景:动态扩展对象功能
实例:咖啡订单系统
// 抽象组件:饮料
interface Beverage { String getDescription(); double cost(); }

// 具体组件:咖啡
class Coffee implements Beverage {
    public String getDescription() { return "咖啡"; }
    public double cost() { return 1.0; }
}

// 抽象装饰器
abstract class BeverageDecorator implements Beverage {
    protected Beverage decoratedBeverage;
    public BeverageDecorator(Beverage beverage) {
        this.decoratedBeverage = beverage;
    }
    public String getDescription() { return decoratedBeverage.getDescription(); }
    public double cost() { return decoratedBeverage.cost(); }
}

// 具体装饰器:加糖
class SugarDecorator extends BeverageDecorator {
    public SugarDecorator(Beverage beverage) { super(beverage); }
    public String getDescription() {
        return super.getDescription() + ", 加糖";
    }
    public double cost() { return super.cost() + 0.3; }
}

// 使用:定制咖啡
Beverage coffee = new Coffee();
coffee = new SugarDecorator(coffee);
coffee = new MilkDecorator(coffee); // 假设有MilkDecorator
System.out.println(coffee.getDescription() + ": $" + coffee.cost());
5. 外观模式(Facade Pattern)
场景:简化复杂子系统
实例:智能家居控制
// 子系统:灯光、空调、音响
class Light { public void on() { /* 开灯 */ } }
class AC { public void cool() { /* 制冷 */ } }
class Speaker { public void play() { /* 播放音乐 */ } }

// 外观类:场景模式
class SmartHomeFacade {
    private Light light;
    private AC ac;
    private Speaker speaker;

    public void movieMode() {
        light.on();
        ac.cool();
        speaker.play();
    }
}

// 使用:一键启动观影模式
SmartHomeFacade home = new SmartHomeFacade();
home.movieMode();
6. 享元模式(Flyweight Pattern)
场景:共享细粒度对象
实例:游戏角色管理
// 享元工厂
class CharacterFactory {
    private static Map<String, Character> pool = new HashMap<>();

    public static Character getCharacter(String type) {
        if (!pool.containsKey(type)) {
            pool.put(type, new Character(type));
        }
        return pool.get(type);
    }
}

// 享元类:角色模型
class Character {
    private String model; // 共享的不变属性(如骨骼动画)
    private String texture; // 可变属性(通过装饰器扩展)

    public Character(String model) { this.model = model; }
    public void setTexture(String texture) { this.texture = texture; }
}

// 使用:共享角色模型
Character warrior = CharacterFactory.getCharacter("Warrior");
warrior.setTexture("铁甲");
7. 代理模式(Proxy Pattern)
场景:访问控制或延迟加载
实例:图片懒加载
// 抽象主题:图片
interface Image { void display(); }

// 真实主题:高清图片
class HighResImage implements Image {
    private String filename;
    public HighResImage(String filename) {
        this.filename = filename;
        loadFromDisk(); // 耗时操作
    }
    public void display() { System.out.println("显示图片: " + filename); }
    private void loadFromDisk() { /* 加载图片 */ }
}

// 代理主题:占位图
class ImageProxy implements Image {
    private String filename;
    private HighResImage realImage;

    public ImageProxy(String filename) { this.filename = filename; }

    public void display() {
        if (realImage == null) {
            realImage = new HighResImage(filename);
        }
        realImage.display();
    }
}

// 使用:滚动到可视区域再加载
Image image = new ImageProxy("landscape.jpg");
image.display(); // 首次调用加载真实图片
模式选择决策树
- 接口不匹配 → 适配器模式
- 多维度独立变化 → 桥接模式
- 树形结构操作 → 组合模式
- 动态扩展功能 → 装饰模式
- 简化复杂接口 → 外观模式
- 大量重复对象 → 享元模式
- 访问控制/延迟加载 → 代理模式
通过结合具体场景与模式特性,可以设计出高内聚、低耦合的系统架构。


 164
164

 被折叠的 条评论
为什么被折叠?
被折叠的 条评论
为什么被折叠?
 到【灌水乐园】发言


