


1.概要
 // 创建一个水平布局,并添加自定义控件
    QHBoxLayout *hLayout = new QHBoxLayout();
    hLayout->addWidget(button1);
 QGridLayout *gridLayout = new QGridLayout();
    //gridLayout->addLayout(hLayout, 0, 0, 1, 2); // 水平布局占据第一行,跨越两列
    QWidget *hBoxContainer = new QWidget(&window);
    hBoxContainer->setLayout(hLayout);
    gridLayout->addWidget(hBoxContainer);
2.内容
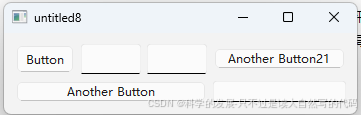
1.qt 自定义的按钮和自定义的单行输入框,设置最小的宽度值,是通常控件的三分之一;并将一个自定义的按钮和两个自定义输入框放在一个水平布局中,在将这个水平布局的控件放在一个两行两列的网格布局中;
在 Qt 中,你可以使用自定义的按钮和单行输入框,并将它们添加到布局中以满足你的需求。下面是一个示例代码,展示了如何实现这些功能:
- 创建一个自定义按钮和自定义单行输入框,并设置它们的最小宽度为通常控件的三分之一。
- 将一个自定义按钮和两个自定义输入框放在一个水平布局中。
- 将这个水平布局的控件放在一个两行两列的网格布局中。
以下是示例代码:
#include <QApplication>
#include <QWidget>
#include <QPushButton>
#include <QLineEdit>
#include <QHBoxLayout>
#include <QGridLayout>

class CustomButton : public QPushButton {
public:
    CustomButton(const QString &text, QWidget *parent = nullptr)
        : QPushButton(text, parent) {
        //setMinimumWidth(maximumWidth() / 3);
        setMaximumSize(60,30);
        setMinimumSize(60,30);
    }
};

class CustomLineEdit : public QLineEdit {
public:
    CustomLineEdit(QWidget *parent = nullptr)
        : QLineEdit(parent) {
        //setMinimumWidth(maximumWidth() / 3);
        setMaximumSize(60,30);
        setMinimumSize(60,30);
    }
};

int main(int argc, char *argv[]) {
    QApplication app(argc, argv);

    QWidget window;

    // 创建自定义控件
    CustomButton *button1 = new CustomButton("Button");
    CustomLineEdit *lineEdit1 = new CustomLineEdit();
    CustomLineEdit *lineEdit2 = new CustomLineEdit();

    // 创建一个水平布局,并添加自定义控件
    QHBoxLayout *hLayout = new QHBoxLayout();
    hLayout->addWidget(button1);
    hLayout->addWidget(lineEdit1);
    hLayout->addWidget(lineEdit2);
    //hLayout->setParent(0);
    hLayout->setContentsMargins(0, 0, 0, 0);

    // 创建一个网格布局
    QGridLayout *gridLayout = new QGridLayout();
    //gridLayout->addLayout(hLayout, 0, 0, 1, 2); // 水平布局占据第一行,跨越两列
    QWidget *hBoxContainer = new QWidget(&window);
    hBoxContainer->setLayout(hLayout);
    gridLayout->addWidget(hBoxContainer);

    QPushButton *button21 = new QPushButton("Another Button21");
    gridLayout->addWidget(button21, 0, 1);

    // 可以在网格布局中添加其他控件或布局
    // 例如,添加另外一些占位控件
    QPushButton *button2 = new QPushButton("Another Button");
    QLineEdit *lineEdit3 = new QLineEdit();
    gridLayout->addWidget(button2, 1, 0);
    gridLayout->addWidget(lineEdit3, 1, 1);

    // 将网格布局设置为主窗口的布局
    window.setLayout(gridLayout);

    window.show();

    return app.exec();
}
解释
- CustomButton 和 CustomLineEdit:
- 继承自
QPushButton和QLineEdit,并在构造函数中设置最小宽度为控件默认宽度的三分之一。
- 继承自
- QHBoxLayout:
- 创建一个水平布局
hLayout,并将自定义按钮和两个自定义输入框添加到其中。
- 创建一个水平布局
- QGridLayout:
- 创建一个网格布局
gridLayout,并将水平布局hLayout添加到网格布局的第一行,跨越两列。 - 为了展示网格布局的其他单元格,添加了另一个按钮和输入框到网格布局的第二行。
- 创建一个网格布局
- 设置窗口布局:
- 将网格布局设置为主窗口
window的布局。
- 将网格布局设置为主窗口
运行此代码后,你将看到一个包含自定义按钮和输入框的窗口,按照你指定的布局排列。
3.关联调查
1.void setSpacing(int spacing)
setSpacing(int spacing) 这个方法的功能是设置间距(spacing)。在这个上下文中,“间距”通常指的是两个元素之间的空间或距离,比如在用户界面设计中,可能是控件之间的间隔,或者在文本排版中,可能是行与行之间的间隔。
参数 spacing 是一个整数(int),表示要设置的间距的具体数值。这个数值的单位取决于具体的实现环境,可能是像素、点、毫米等。
简单来说,当你调用 setSpacing(int spacing) 方法时,你就是在告诉程序:“请将相关的间距设置为这个具体的数值”。这个方法的具体效果取决于它被用在哪个对象或环境中。例如,在排版软件中,它可能用来调整段落之间的间距;在图形用户界面(GUI)设计中,它可能用来调整按钮、文本框等控件之间的间距。
在编程实践中,使用这样的方法可以让开发者更加灵活地控制界面或布局的外观,从而提升用户体验。
2.setContentsMargins
setContentsMargins是Qt框架中的一个方法,主要用于设置控件的内边距(margins)。以下是关于setContentsMargins的详细解析:
函数原型
- 基本原型:
void QLayout::setContentsMargins(int left, int top, int right, int bottom) - 另一种形式:
setContentsMargins(QMargins margins)
其中,left、top、right、bottom分别表示左、上、右、下四个方向的内边距值,这些值以像素为单位。而QMargins margins是一个对象,用于指定左、上、右、下四个方向的边距值。
功能与作用
- 定义内边距:在Qt中,内容边距指的是控件内部内容与控件边界之间的空白区域。通过设置内容边距,可以控制和调整控件内部内容的位置和对齐方式。
- 布局与美化:
setContentsMargins函数允许开发者根据界面设计需求,灵活地调整控件的内边距,从而实现更美观、更合理的界面布局。
使用示例
以下是一个简单的使用示例,展示如何使用setContentsMargins函数来设置QWidget对象的内容边距:
#include <QApplication>
#include <QWidget>
#include <QVBoxLayout>
#include <QPushButton>

int main(int argc, char *argv[])
{
    QApplication app(argc, argv);

    QWidget window;
    QVBoxLayout *layout = new QVBoxLayout(&window);

    QPushButton *button = new QPushButton("Click Me", &window);

    // 设置按钮的内容边距为10像素(左、上、右、下)
    layout->setContentsMargins(10, 10, 10, 10);

    layout->addWidget(button);

    window.setLayout(layout);
    window.show();

    return app.exec();
}
在这个示例中,我们创建了一个QWidget对象作为主窗口,并在其中添加了一个垂直布局(QVBoxLayout)。然后,我们在布局上调用setContentsMargins函数,将布局的内容边距设置为10像素。最后,我们将一个按钮添加到布局中,并显示主窗口。
注意事项
- 负数边距:虽然通常使用正数来设置边距,但Qt也允许使用负数边距。使用负数边距时,控件的内容会覆盖到控件边界之外,这可能会导致一些不可预测的布局效果。
- 布局管理器:
setContentsMargins函数通常与布局管理器一起使用,因为布局管理器负责控件的布局和排列。不同的布局管理器(如QHBoxLayout、QVBoxLayout和QGridLayout)可能会有不同的布局效果。 - 顺序影响:在Qt中,
setMargin和setContentsMargins的设置顺序可能会影响最终的布局效果。因此,在设置这些属性时,需要注意它们的设置顺序。
总的来说,setContentsMargins是Qt框架中一个非常实用的函数,它允许开发者灵活地调整控件的内边距,从而实现更美观、更合理的界面布局。
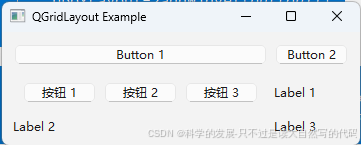
3.qt c++ QGridLayout布局举例
当然!以下是一个使用 QGridLayout 布局的简单示例,展示了如何在 Qt 中使用 C++ 创建一个带有按钮和标签的网格布局。
首先,确保你已经安装并配置好了 Qt 开发环境。然后,创建一个新的 Qt Widgets Application 项目,并在主窗口类中修改代码如下:
#include <QApplication>
#include <QWidget>
#include <QGridLayout>
#include <QPushButton>
#include <QLabel>

class MainWindow : public QWidget {
public:
    MainWindow(QWidget *parent = nullptr) : QWidget(parent) {
        QGridLayout *layout = new QGridLayout(this);

        // 创建一些按钮和标签
        QPushButton *button1 = new QPushButton("Button 1", this);
        QPushButton *button2 = new QPushButton("Button 2", this);
        //QPushButton *button3 = new QPushButton("Button 3", this);
        QLabel *label1 = new QLabel("Label 1", this);
        QLabel *label2 = new QLabel("Label 2", this);
        QLabel *label3 = new QLabel("Label 3", this);

        // 将控件添加到网格布局中
        layout->addWidget(button1, 0, 0); // button1 在第1行第1列
        layout->addWidget(button2, 0, 1); // button2 在第1行第2列


        //layout->addWidget(button3, 1, 0); // button3 在第2行第1列
        // 创建一个 QHBoxLayout
        QHBoxLayout *hBoxLayout = new QHBoxLayout;

        // 在水平布局中添加三个 QPushButton
        QPushButton *button11 = new QPushButton("按钮 1");
        QPushButton *button21 = new QPushButton("按钮 2");
        QPushButton *button31 = new QPushButton("按钮 3");
        hBoxLayout->addWidget(button11);
        hBoxLayout->addWidget(button21);
        hBoxLayout->addWidget(button31);

        // 使用一个 QWidget 包裹 QHBoxLayout,然后添加到网格布局的 (1, 0) 位置
        QWidget *hBoxContainer = new QWidget;
        hBoxContainer->setLayout(hBoxLayout);
        layout->addWidget(hBoxContainer, 1, 0);


        layout->addWidget(label1, 1, 1);  // label1 在第2行第2列
        layout->addWidget(label2, 2, 0);  // label2 在第3行第1列
        layout->addWidget(label3, 2, 1);  // label3 在第3行第2列

        setLayout(layout);
        setWindowTitle("QGridLayout Example");
    }
};

int main(int argc, char *argv[]) {
    QApplication app(argc, argv);

    MainWindow window;
    window.show();

    return app.exec();
}
运行结果
代码说明
- 包含头文件:
#include <QApplication>#include <QWidget>#include <QGridLayout>#include <QPushButton>#include <QLabel>
- 创建
MainWindow类:- 继承自
QWidget - 在构造函数中创建一个
QGridLayout对象 - 创建一些
QPushButton和QLabel对象
- 继承自
- 将控件添加到布局中:
- 使用
layout->addWidget(widget, row, column)方法将控件添加到指定的行和列
- 使用
- 设置主窗口的布局:
- 调用
setLayout(layout)将QGridLayout设置为窗口的布局
- 调用
- 在
main函数中:- 创建
QApplication对象 - 创建并显示
MainWindow对象
- 创建
运行程序
编译并运行这个程序,你会看到一个包含按钮和标签的网格布局窗口。
扩展
你可以根据需要添加更多的控件,或者调整行和列的位置来创建更复杂的布局。QGridLayout 非常适合用于需要精确控制控件位置的布局场景。
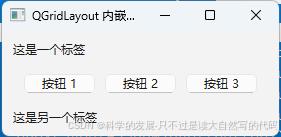
4.c++ QGridLayout布局内嵌套QHBoxLayout布局应用举例
当然!以下是一个使用 QGridLayout 内嵌套 QHBoxLayout 布局的 C++ 示例。这个示例展示了如何在一个网格布局中嵌套一个水平布局。
#include <QApplication>
#include <QWidget>
#include <QGridLayout>
#include <QHBoxLayout>
#include <QPushButton>
#include <QLabel>

int main(int argc, char *argv[]) {
    QApplication app(argc, argv);

    // 创建主窗口部件
    QWidget window;
    window.setWindowTitle("QGridLayout 内嵌套 QHBoxLayout 示例");

    // 创建 QGridLayout
    QGridLayout *gridLayout = new QGridLayout;

    // 在网格布局的 (0, 0) 位置添加一个 QLabel
    QLabel *label = new QLabel("这是一个标签");
    gridLayout->addWidget(label, 0, 0);

    // 创建一个 QHBoxLayout
    QHBoxLayout *hBoxLayout = new QHBoxLayout;

    // 在水平布局中添加三个 QPushButton
    QPushButton *button1 = new QPushButton("按钮 1");
    QPushButton *button2 = new QPushButton("按钮 2");
    QPushButton *button3 = new QPushButton("按钮 3");
    hBoxLayout->addWidget(button1);
    hBoxLayout->addWidget(button2);
    hBoxLayout->addWidget(button3);

    // 使用一个 QWidget 包裹 QHBoxLayout,然后添加到网格布局的 (1, 0) 位置
    QWidget *hBoxContainer = new QWidget;
    hBoxContainer->setLayout(hBoxLayout);
    gridLayout->addWidget(hBoxContainer, 1, 0);

    // 在网格布局的 (2, 0) 位置添加另一个 QLabel
    QLabel *anotherLabel = new QLabel("这是另一个标签");
    gridLayout->addWidget(anotherLabel, 2, 0);

    // 设置窗口的布局
    window.setLayout(gridLayout);

    // 显示窗口
    window.show();

    return app.exec();
}
运行结果
代码解释
- QApplication: 创建一个应用程序实例。
- QWidget: 创建一个主窗口部件,并设置窗口标题。
- QGridLayout: 创建一个网格布局管理器。
- QLabel: 创建一个标签,并将其添加到网格布局的 (0, 0) 位置。
- QHBoxLayout: 创建一个水平布局管理器。
- QPushButton: 创建三个按钮,并将它们添加到水平布局中。
- QWidget (hBoxContainer): 创建一个 QWidget,将其布局设置为 QHBoxLayout,然后将这个 QWidget 添加到网格布局的 (1, 0) 位置。这一步是关键,因为 QGridLayout 不能直接添加布局,必须通过一个 QWidget 间接添加。
- 另一个 QLabel: 创建另一个标签,并将其添加到网格布局的 (2, 0) 位置。
- setLayout: 将网格布局设置为窗口的布局。
- show: 显示窗口。
通过这个示例,你可以看到如何在 QGridLayout 中嵌套 QHBoxLayout,从而实现更复杂的布局需求。


 1980
1980

 被折叠的 条评论
为什么被折叠?
被折叠的 条评论
为什么被折叠?
 到【灌水乐园】发言


