


邊實驗邊分析 - Android Foreground Service的使用
一、簡述
我們都知道,在Android8.0之前,我們可以使用StartService啓動另一個獨立運行的Service程序,這個Service程序不會因爲調起它的程序停止了而停止運行,而是會一直運行著,除非用戶主動將其關閉或是被系統kill掉才會停止運行。
然而在Android8.0開始,Google對這一行爲做了限制,這個限制叫做Background Execution Limits,詳細的可以看Google官方文檔(https://developer.android.com/about/versions/oreo/background)
簡單來説,Google禁止了直接使用StartService來啓動另一個未在前臺運行的Service程序,而需要采用StartForegroundService方法來啓動,并且在該啓動方式中,增加了各種限制來增加Service的啓動和運行的控制。所以針對這些限制,我們在開發中需要做出什麽應對措施呢?我這邊做了一些測試,以下的示例均是在Android 9.0上做的測試,這邊和大家一起分析學習一下。
二、Android LowMemoryKiller 介紹
在分析這一問題之前,我們需要瞭解一個知識點,即Android的内存管理機制。
可以參考這篇文章的内容:Android LowMemoryKiller 介紹.裏面有關於ADJ值得説明,以及如何查看ADJ值得方法,如果你不瞭解,建議可以先看一下。
三、startService方法的調用行爲測試
我們先來研究一下startService的啓動方式
我們首先創建一個Project,然後創建一個Foreground Service,代碼如下
class ForegroundService: Service() {
    override fun onBind(p0: Intent?): IBinder? {
        Log.d("ForegroundService", "onBind")
        return null
    }

    override fun onCreate() {
        super.onCreate()
        Log.d("ForegroundService", "onCreate")

    }

    override fun onDestroy() {
        super.onDestroy()
        Log.d("ForegroundService", "onDestroy")
    }
}
給Service增加獨立進程
別忘了在Manifest裏面注冊
<application
    android:allowBackup="true"
    android:icon="@mipmap/ic_launcher"
    android:label="@string/app_name"
    android:roundIcon="@mipmap/ic_launcher_round"
    android:supportsRtl="true"
    android:theme="@style/AppTheme">
    <activity android:name=".MainActivity">
        <intent-filter>
            <action android:name="android.intent.action.MAIN" />

            <category android:name="android.intent.category.LAUNCHER" />
        </intent-filter>
    </activity>

    <service android:name=".ForegroundService"
    	android:process=":remote"
        >
        <intent-filter>
            <action android:name="com.karl.android.foregroundService" />
        </intent-filter>
    </service>

</application>
這裏我們給service加一個單獨進程來運行,增加process參數,至於爲什麽增加該參數,因爲如果不加的話,其實service運行的進程和APP運行的進程是一樣的,所以查看ADJ的話,就是APP的ADJ,區分不出來service自己獨有的ADJ,大家可以自己嘗試一下。
然後我們在MainActivity裏面去調用該Service
class MainActivity : AppCompatActivity() {
    internal var myBinder: IBinder? = null
    private lateinit var conn : ServiceConnection
    override fun onCreate(savedInstanceState: Bundle?) {
        super.onCreate(savedInstanceState)
        setContentView(R.layout.activity_main)

        btnStartService.setOnClickListener {
                val intent = Intent()
                intent.setClassName("com.karl.android.foregroundservice", "com.castles.android.foregroundservice.ForegroundService")
                startService(intent)
        }
        btnBindService.setOnClickListener{
            if(!::conn.isInitialized){
                conn = MyConnection()
                val intent = Intent()
                intent.action = "com.karl.android.foregroundService"
                intent.setClassName("com.karl.android.foregroundservice", "com.castles.android.foregroundservice.ForegroundService")
                bindService(intent, conn, Context.BIND_AUTO_CREATE)
            }
        }
    }

    override fun onDestroy() {
        super.onDestroy()
        Log.d("MainActivity", "onDestroy")
        if(::conn.isInitialized){
            unbindService(conn)
        }
    }

    //自定义ServiceConnection
    internal inner class MyConnection : ServiceConnection {
        override fun onServiceDisconnected(p0: ComponentName?) {
        }


        override fun onServiceConnected(p0: ComponentName?, p1: IBinder?) {
            myBinder = p1
        }
    }
}
這裏我們會分別使用bind和start的方式來調起Service
先使用startService的方式
這時候,從日志可以看到,我們的service起來了

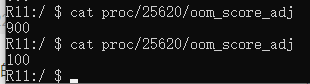
查看ADJ為500,即屬於Service分類,很符合,這時候我們將我們的程序按返回或者按Home,再次查看ADJ,你會發現,現在變爲了800

即B_Service,解釋爲老舊的service,從ADJ看就知道,這個service的優先級不高哈
,而如果我們再等待一會時間,你會發現,ADJ最終會變爲900,不幸的進入了Cache,這時候就算你重新進入你的APP,Service的ADJ也不會提升了,除非你再次調用StartService,大家不妨試一下。
接下來我們使用bind Service的方式,查看ADJ,你會發現ADJ變爲了100
這簡直就是突飛猛進了啊,這樣的ADJ也説明了,我們這個Service變爲了一個很重要的存在,LMK殺手不會把它當成目標了,這也很好理解,畢竟我們有一個交互界面和用戶正在交互著,而托這個交互界面的福,我們bind的Service自然而然地也需要始終保持存在才對。接下來我們把我們的APP再次按Home按鈕,讓其回到launcher界面,你會發現,ADJ變爲了700

再次進入APP,又變爲了100,而按下返回按鈕,你會發現其ADJ直接變成了900,這也説得通,因爲我們與用戶交互的Activity都退出了,自然而然地,也就不需要我們的Service了,所以直接進入了Cache,雖然Service還沒有退出,不過也半死不活了。
有些朋友其實可以發現,就是我們上面的程序中,變爲ADJ 900后,就算你再次進入你的APP,與用戶有了交互的Activity,我們的Service的ADJ也不會變低了,除非你再次調用bind或startService,才能再次激活它。
獨立Service APP的調用行爲分析
分析到這裏,你可能會問:“你説的這種情況屬於從自己的APP中調起Service,我在實際中可能會有另一個單獨的Service 程序來處理任務,而不是在自身APP中注冊的Service”,沒錯,現在我們就來分析一下這種情況。想要實現這種方式的調用的話:
首先我們需要將上述APP的Manifest中,唯一的Launcher Activity去掉,使他變爲沒有入口Activity,注意,這樣安裝的時候,有些手機上還會提示有風險哦。修改后的AndroidManifest為這樣:
<application
    android:allowBackup="true"
    android:icon="@mipmap/ic_launcher"
    android:label="@string/app_name"
    android:roundIcon="@mipmap/ic_launcher_round"
    android:supportsRtl="true"
    android:theme="@style/AppTheme">
    <service android:name=".ForegroundService"
    	android:process=":remote"
        >
        <intent-filter>
            <action android:name="com.karl.android.foregroundService" />
        </intent-filter>
    </service>

</application>
這時候我們新建一個TestForeground APP,在MainActivity中調用這個Service,一樣我們會用start和bind的方式來調用,代碼如下:
class MainActivity : AppCompatActivity() {
    internal var myBinder: IBinder? = null
    private lateinit var conn : ServiceConnection
    override fun onCreate(savedInstanceState: Bundle?) {
        super.onCreate(savedInstanceState)
        setContentView(R.layout.activity_main)

        btnStartService.setOnClickListener {
			Intent().apply {
                   component = ComponentName("com.karl.android.foregroundservice", "com.castles.android.foregroundservice.ForegroundService")
                   startService(this)
            }
        }
        btnBindService.setOnClickListener{
            if(!::conn.isInitialized){
                Log.d("MainActivity", "btnBindService")
                conn = MyConnection()
                Intent().apply {
                    component = ComponentName("com.karl.android.foregroundservice", "com.castles.android.foregroundservice.ForegroundService")
                    bindService(this, conn, Context.BIND_AUTO_CREATE)
                }
            }
        }
    }

    override fun onDestroy() {
        super.onDestroy()
        Log.d("MainActivity", "onDestroy")
        if(::conn.isInitialized){
            unbindService(conn)
        }
    }

    internal inner class MyConnection : ServiceConnection {
        override fun onServiceDisconnected(p0: ComponentName?) {
        }


        override fun onServiceConnected(p0: ComponentName?, p1: IBinder?) {
            myBinder = p1
        }
    }
}
注意,這裏我們先還是使用startService來啓動,這時候,你會發現,程序直接crash了,查看日志
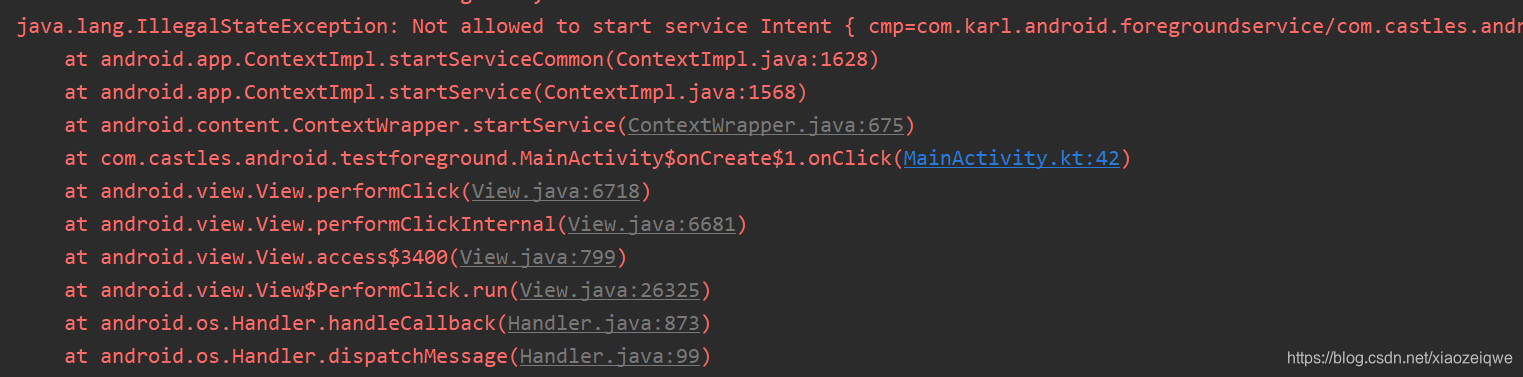
意思貌似是説,我們的程序沒有運行在後臺的權限,這就是Android的一個限制。
在解決這個問題之前,我們先要瞭解到一個知識點,就是如何區分是前臺的APP還是後臺的APP呢?
區分以限制Service為目的的後臺APP和前臺APP
那麽,説到前臺APP和後臺APP,大家應該都有一定的瞭解,但是這裏提到的前臺和後臺其實是專指在當下環境下用來限制Service行爲的一種區分,和正常我們理解的前臺後臺還是有區別的,Google文檔上的解釋為:

大家可以把它理解爲我在需要啓動Service的時候才需要知道的一種APP的前後臺狀態,它與我們經常理解的内存管理中的前臺後臺概念是不一樣的。
那麽哪些情況下會屬於在前臺的情況呢?Google同樣給出了判斷依據,其中只要有一條滿足,則為前臺APP:
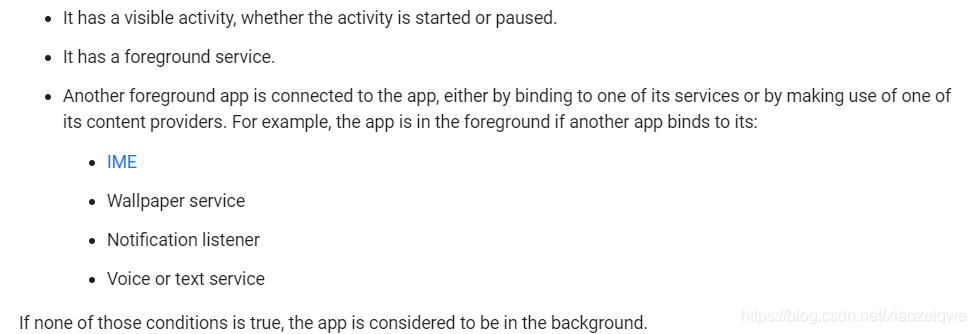
從這裏可以看出來,第一條中説明了,只要有一個可見APP,不管是started還是paused狀態,其都代表是一個前臺APP,然而我們的Service程序第一條和第二條我們都沒有滿足,所以我們想要直接調起我們的Service是行不通的,所以這邊報錯是理所應當的,那麽在這裏,你自己可以試一下,如果我們將ForegroundService先使用帶Activity的方式讓其起來后,你再調用startService,你會發現,不會報錯了,這也印證了這一限制。
那麽爲了想要測試該行為,我們還能夠繼續進行下去嗎?辦法還是有的,你可以去APP裏面先把它的後臺運行權限以及自動啓動和允許自動啓動打開。
我這邊試了二種手機的打開方式:
華爲手機需要在應用管理-》應用耗電管理裏面,點選應用設置為手動管理,打開允許自動啓動和允許關聯啓動和後臺運行。
OPPO手機需要在應用管理中點選應用,打開允許其他應用自動啓動和允許自動啓動,耗電保護-》打開允許後臺運行。
(注意:如果你使用的是Google系統的手機,比如我在模擬器Nexus5X上試驗下來的結果顯示,默認其對於background程序的限制是放開的,但是你直接調用的話,也是會報錯的,所以在Google系統上還是不能這樣來處理,大家也可以試一下看看。)
這樣,我們的程序就可以在某些手機上正常的使用startService進行調用了,這時候再次調用,你會發現正常運行了,然而這種方式還有一個巨大問題,就是在你按返回鍵或者是按Home建回到Launcher的時候,service直接就停止了,畢竟人家骨子裏還是不支持你在後臺運行的,再次試了一下bindService的方式,也是半斤八兩,雖然按Home鍵會堅挺一會,查看ADJ為900而已啦。。。
四、startForegroundService方法的調用行爲測試
所以上述的做法,在Android 8.0以後是行不通的了,那麽我們要怎麽辦呢?對了,這時候該使用startForegroundService了,修改一下調用代碼:
Intent().apply {
   component = ComponentName("com.karl.android.foregroundservice", "com.castles.android.foregroundservice.ForegroundService")
//                   startService(this)
   ContextCompat.startForegroundService(this@MainActivity, this)
}
這次再試一下,你會發現,我們的service也可以起來,但是好景不長,等了5秒後,竟然又給我報錯了,
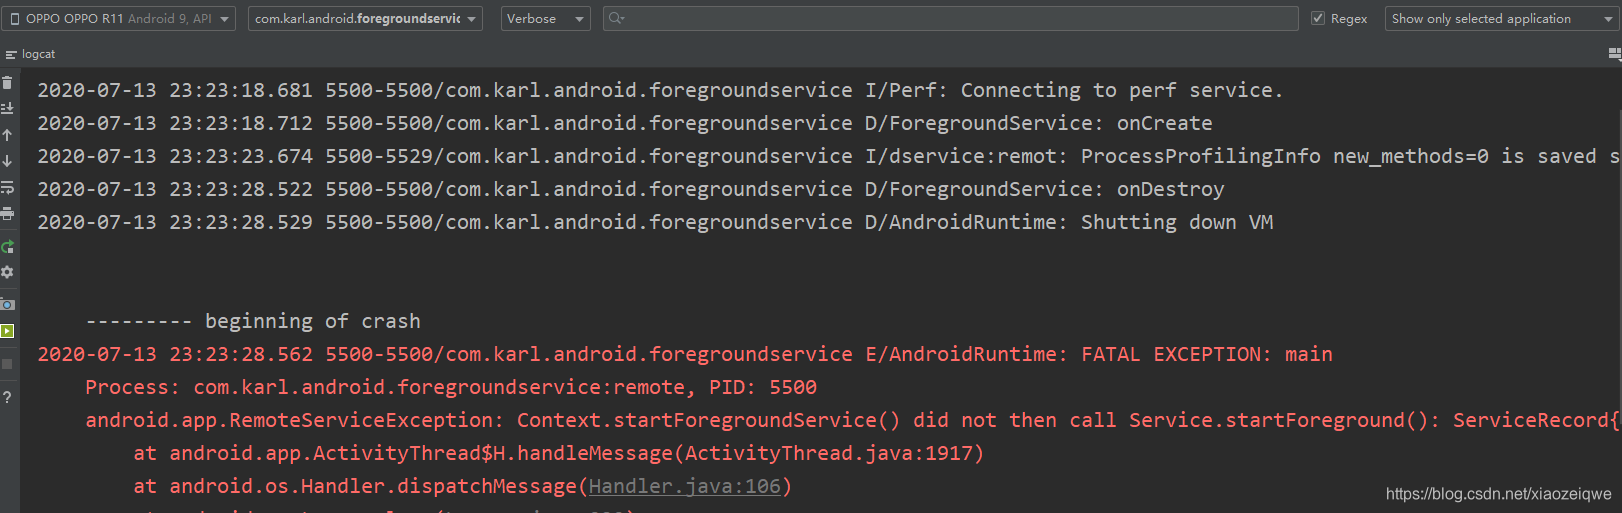
錯誤消息很明顯,告訴我們,你調用了startForegroundService方法來啓動Service,但是你沒有調用startForeground方法來設置service,這就是Android最新版本對前臺Service做的限制,所以我們來解決一下這個問題,在ForgroundService APP的Service的onCreate方法中,加入一個startForeground方法的調用
override fun onCreate() {
        super.onCreate()
        Log.d("ForegroundService", "onCreate")
        val notification = createNotification()
        startForeground(1, notification)
    }
注意,這裏的Id和notification為必須的,這也是Android的規定,如果使用startForeground,必須給他設置一個id和Notification對象,并且,如果是Android O版本,還需要給這個Notification對象設置一個Channel,這就設置一下:
private fun createNotification(): Notification {
        val notificationChannelId = "FOREGROUND SERVICE CHANNEL"
        // depending on the Android API that we're dealing with we will have
        // to use a specific method to create the notification
        if (Build.VERSION.SDK_INT >= Build.VERSION_CODES.O) {

            val notificationManager = getSystemService(Context.NOTIFICATION_SERVICE) as NotificationManager
            val channel = NotificationChannel(
                notificationChannelId,
                "Endless Service notifications channel",
                NotificationManager.IMPORTANCE_HIGH
            ).apply {
//                description = "Endless Service channel"
//                enableLights(true)
//                lightColor = Color.RED
//                enableVibration(true)
//                vibrationPattern = longArrayOf(100, 200, 300, 400, 500, 400, 300, 200, 400)
            }
            notificationManager.createNotificationChannel(channel)
        }

//        val pendingIntent: PendingIntent = Intent(this, MainActivity::class.java).let { notificationIntent ->
//            PendingIntent.getActivity(this, 0, notificationIntent, 0)
//        }

        val builder: Notification.Builder = if (Build.VERSION.SDK_INT >= Build.VERSION_CODES.O) Notification.Builder(
            this,
            notificationChannelId
        ) else Notification.Builder(this)

        return builder
//            .setContentTitle("Endless Service")
//            .setContentText("This is your favorite endless service working")
//            .setContentIntent(pendingIntent)
//            .setSmallIcon(R.mipmap.ic_launcher)
//            .setTicker("Ticker text")
//            .setPriority(Notification.PRIORITY_HIGH) // for under android 26 compatibility
            .build()
    }
其中注釋部分大家可以自行嘗試,沒有的話,也是沒關係的。
注意:這邊存在一個比較坑的問題,在實踐過程中發現,在我的Android 6.0的設備上,如果我的app只有一個service的情況下,Manifest裏面我可以選擇不給這個app設置icon,這時候,在將這個service設置為前臺service的時候,是會報錯的,所以要格外注意。
好了,再讓我們來試一下,調用startForegroundService,service正常啓動,等待數分鐘后,一切正常,查看ADJ為200

這時候,我們不管是返回還是回到桌面亦或者把TestForeground APP進程手動幹掉,都能保持200的ADJ,簡直炸裂,而且我有測試過,這個程序基本上你不主動去使用内存優化的程序,一個晚上你看電影玩游戲,都是不會被Kill掉的。我們再試一下bind的方式,你會發現,他的ADJ為100,這和我們之前測試的情況很像,只不過,在你按Home回到桌面的時候,這時候其ADJ為200,而不是之前的700,按返回還是會變回900,而直接幹掉TestForeground APP進程,也會停止ForegroundService。但是如果你使用過startForegroundService調啓過,那在上述行爲下,ADJ再變也只會變爲200,不會變爲700或是900了。
所以,必定對該行爲進行限制,試想一下,如果大家都能使用獨立的前臺Service APP來運行自己的任務,而且這個任務又這麽頑固的話,那會造成手機的内存消耗過快而得不到合理的清理的情況發生,所以我們得用另外一種方式去做才行。
將Service再次回歸到APP中
那麽我們既然不能獨立的一個service運行,但我們還是可以像我在第三章節的演示程序中那樣,在APP中注冊一個Service去執行一些後臺任務,這樣我們甚至都不需要去打開自動啓動以及關聯啓動選項,我們在第三章節中的前半部分也沒有去在意這個地方不是嗎?
將Manifest中的Activity先釋放,我們現在只運行這個Foreground Service程序,並將MainActivity中調用的方法改爲使用startForegroundService的方式:
btnStartService.setOnClickListener {
   val intent = Intent()
   intent.setClassName("com.karl.android.foregroundservice", "com.castles.android.foregroundservice.ForegroundService")
// startService(intent)
   ContextCompat.startForegroundService(this@MainActivity, intent)
}
這樣,儅你的主程序退出的時候,service也會一起跟著退出,如果主程序在後臺運行的話,能保證service被系統殺掉的概率變低,因爲查看service的ADJ為200。
我們還能將之前在service注冊的地方的process屬性去除,即把service與主程序的進程運行在一起,我們來試一下
按下Start按鈕,service啓動,查看ADJ為0,將程序切到launcher,再次查看,你會發現,ADJ為50?

你肯定會説:“這個50我對應不到上面說的分類啊?”,是的,這個沒有完全對應,但是我想,他應該表示的是一種範圍值,其分類應該也是FOREGROUND_APP_ADJ一層的吧,可以使用dumpsys meminfo進行查看。
我們過一會兒再次查看,這個時候ADJ變爲了200,注意,是200,而不是之前第三章節中的700啊,那麽它竟然改變了我們原有APP這一行爲下的ADJ,太棒了,這樣一來,其實也間接的降低了我們程序的被殺死的概率咯。
這時候不管你是退出程序還是返回Home,都不會停止該service了,除非你把整個進程手動幹掉,那麽他還是會和service一起死掉的。
另外,還記不記得在第三章節的示例中,我們有提到,如果你使用的是Google的原生系統,你可以嘗試一下使用startForegroundService來調起另一個未在運行的Service APP的這種方式,你會發現,其實是可以調起的,所以如果你像我們公司一樣,使用的是自己Build的Firmware,那麽可以采納使用這種調起方式去做,這樣可以保證能夠調起你的Service,并且可以使Service不會因爲你的調起的APP的進程的關閉而被關閉。
五、總結
最後,通過上面的試驗,我們知道了startService在新的Firmware中是如何被限制的,并且知道了startForegroundService的用法,以及一些特殊場景下的使用手法,這些限制都説明了Google越來越看重用戶體驗了,畢竟用戶至上!!!


 2223
2223

 被折叠的 条评论
为什么被折叠?
被折叠的 条评论
为什么被折叠?
 到【灌水乐园】发言


