 通过Python自动配置交换机网络设置


 本文档详述了如何配置交换机SW1,包括设置IP、VLAN、SSH服务以及用户权限,并展示了使用Python的paramiko库通过SSH远程执行配置交换机的命令,实现了自动化网络配置。
拓扑搭建:
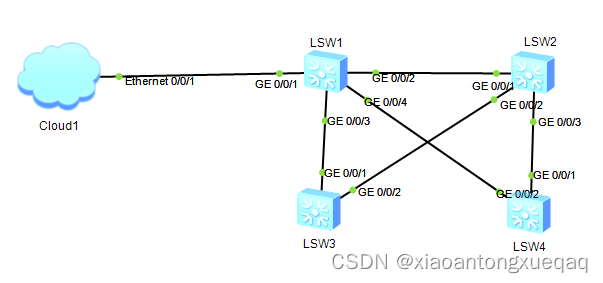
环境搭建:
注意这里的云连接的是19.1这个网段,所以交换机SW1也要配置到同一个网段
sw1:
配置IP,划分vlan:
[sw1]vl 100
[sw1]int vlan 100
[sw1-Vlanif100]ip add 192.168.19.10 24
[sw1]int g0/0/1
[sw1-GigabitEthernet0/0/1]po li ac
[sw1-GigabitEthernet0/0/1]po de vl 100交换机部署ssh:
[sw1]stelnet server enable # 启动ssh服务的远程登录功能
[sw1]ssh user zhangxiong # 新建SSH用户
[sw1]ssh user zhangxiong authentication-type password # 配置ssh用户密码认证方式
[sw1]ssh user zhangxiong service-type stelnet # 配置ssh用户的服务方式为远程登录
# 开放 vty 端口,能被远程登录
# 开放 编号为 0 1 2 3 4 的 vty端口,同时支持五个远程用户连接
# 认证模式为 aaa---> authentication 认证(谁能登录进来)
# ---> authorizathon 授权(谁进来能干什么)
# ---> according 审计(谁进来干了什么)[sw1]user-interface vty 0 4
[sw1]authentication-mode aaa
[sw1]protocol inbound ssh # 登入协议为ssh
# 三A认证配置
[sw1]aaa
[sw1-aaa]local-user zhangxiong password cipher huawei@123 # 配置本地账号的登录口令
[sw1-aaa]local-user zhangxiong privilege level 15 # 配置账号登录后的管理级别,15最高
[sw1-aaa]local-user zhangxiong service-type ssh # 配置本地用户的接入类型
这时基础配置就完成了,主要是在sw1上开启了ssh服务并配置了账号和密码验证,然后配置远程登录,从而可以实现用python进行连接sw1。接下来开始正题:
python代码:
import paramiko
import time

# 1.创建客户端对象
ssh = paramiko.SSHClient()
ssh.set_missing_host_key_policy(paramiko.AutoAddPolicy())

# 使用客户端,导入参数
ssh.connect(hostname="192.168.19.10", username="zhangxiong",
                                      password="huawei@123")

command = ssh.invoke_shell()  # 创建一个命令对象 ,调用shell


"""
读取当前目录的SW1.txt文件,然后将文件中每行的命令编码后发送到终端
"""
with open('SW1.txt', 'r', encoding='utf-8') as f:
    while True:
        content = f.readline()  # 将读取到的文件,按行,存储为一个列表
        if not content:
            break
        command.send(content.encode())

print("please wait ....")
time.sleep(5)  # 发送完命令,需要一个延时,等待设备 将回显值回传,等待时间不能太短
output = command.recv(65535)  # 接收服务器的返回数据
print(output.decode())  # 将接收的数据解码

ssh.close()
sw1.txt文件:
system-view
#
sysname SW1
#
vlan batch 10 to 14 21 to 23 100 to 101
#
stp instance 1 root primary
stp instance 2 root secondary
#
stp region-configuration
 region-name school
 instance 1 vlan 11 to 14
 instance 2 vlan 21 to 23
 instance 3 vlan 100
 active region-configuration
#
interface Vlanif10
 ip address 192.168.10.253 255.255.255.0
#
interface Vlanif11
 ip address 192.168.11.253 255.255.255.0
 vrrp vrid 11 virtual-ip 192.168.11.254
 vrrp vrid 11 priority 120
 vrrp vrid 11 preempt-mode timer delay 30
#
interface Vlanif12
 ip address 192.168.12.253 255.255.255.0
 vrrp vrid 12 virtual-ip 192.168.12.254
 vrrp vrid 12 priority 120
 vrrp vrid 12 preempt-mode timer delay 30
#
interface Vlanif13
 ip address 192.168.13.253 255.255.255.0
 vrrp vrid 13 virtual-ip 192.168.13.254
 vrrp vrid 13 priority 120
 vrrp vrid 13 preempt-mode timer delay 30
#
interface Vlanif14
 ip address 192.168.14.253 255.255.255.0
 vrrp vrid 14 virtual-ip 192.168.14.254
 vrrp vrid 14 priority 120
 vrrp vrid 14 preempt-mode timer delay 30
#
interface Vlanif21
 ip address 192.168.21.253 255.255.255.0
 vrrp vrid 21 virtual-ip 192.168.21.254
#
interface Vlanif22
 ip address 192.168.22.253 255.255.255.0
 vrrp vrid 22 virtual-ip 192.168.22.254
#
interface Vlanif23
 ip address 192.168.23.253 255.255.255.0
 vrrp vrid 23 virtual-ip 192.168.23.254
#
interface Vlanif100
 ip address 192.168.19.10 255.255.255.0
#
interface Eth-Trunk1
 port link-type trunk
 port trunk allow-pass vlan 11 to 14 21 to 23
 mode lacp-static
#
interface GigabitEthernet0/0/1
 port link-type trunk
 port trunk allow-pass vlan 10 100 to 101
#
interface GigabitEthernet0/0/2
 eth-trunk 1
#
interface GigabitEthernet0/0/3
 eth-trunk 1
#
interface GigabitEthernet0/0/4
 port link-type trunk
 port trunk allow-pass vlan 11 100
#
interface GigabitEthernet0/0/5
 port link-type trunk
 port trunk allow-pass vlan 12 100
#
interface GigabitEthernet0/0/6
 port link-type trunk
 port trunk allow-pass vlan 13 100
#
interface GigabitEthernet0/0/7
 port link-type trunk
 port trunk allow-pass vlan 14 100
#
interface GigabitEthernet0/0/8
 port link-type trunk
 port trunk allow-pass vlan 21 100
#
interface GigabitEthernet0/0/9
 port link-type trunk
 port trunk allow-pass vlan 22 100
#
interface GigabitEthernet0/0/10
 port link-type trunk
 port trunk allow-pass vlan 23 100
#
interface GigabitEthernet0/0/11
 port link-type trunk
 port trunk allow-pass vlan 100 to 101
#
ospf 1 router-id 192.168.100.10
 area 0.0.0.0
  network 192.168.10.0 0.0.0.255
 area 0.0.0.1
  network 192.168.11.0 0.0.0.255
  network 192.168.12.0 0.0.0.255
  network 192.168.13.0 0.0.0.255
  network 192.168.14.0 0.0.0.255
  network 192.168.21.0 0.0.0.255
  network 192.168.22.0 0.0.0.255
  network 192.168.23.0 0.0.0.255
在sw1上打开终端,执行dis cu 查看配置可以看到sw1.txt配置文档配置过的命令


 1311
1311


 到【灌水乐园】发言


