


 本文详细介绍如何使用Arduino和ESP8266模块搭建客户端,包括配置开发环境、编程、编译下载及运行测试。文章还提供了服务器端代码示例,帮助读者实现完整的访问功能。
使用arduino + 正点原子ESP8266 搭建客户端
第一步 – 搭建arduino IDE ESP8266 开发环境
- 打开 arduino IDE -> 文件 -> 首选项 -> 附加开发板管理器网址 填写 如下URL
http://arduino.esp8266.com/stable/package_esp8266com_index.json - 重启arduino IDE -> 打开工具 -> 选择开发板 -> 选择第一项开发板管理器打开
- 等待下载管理器 注:如果下载出错,多试几次,我就是第二次才成功的
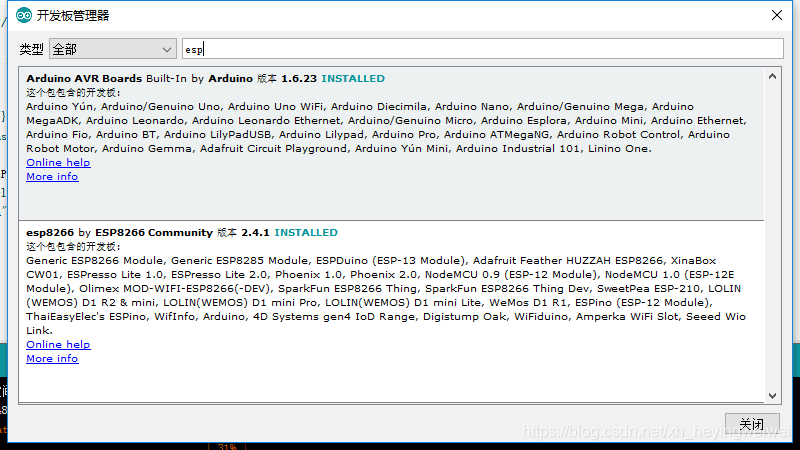
- 下载完成后,重启arduino IDE
第二步 – 选择开发板开始编程
- 打开工具选项 -> 选择开发板 -> 找到Generic ESP8266 Module
- 配置ESP8266的参数 端口要选择开发板连接的端口
- 下面就可以开始编程了
#include <ESP8266WiFi.h>

const char* ssid = "you AP name";
const char* password = "AP password";
const char* host = "server host";
String path = "/SpringMvcDemo/index.jsp";//file path
String postPath = "/SpringMvcDemo/login";// post adrress

void setup() {

  Serial.begin(115200);
  delay(10);
  Serial.print("Connecting to ");
  Serial.println(ssid);
  WiFi.begin(ssid, password);
  while(WiFi.status() != WL_CONNECTED){// wait wifi model connecting
    delay(500);
    Serial.print(".");
  }
  Serial.println("WiFi connected");
  Serial.println("IP address: " + WiFi.localIP());

}

void loop() {

  Serial.print("connecting to ");
  Serial.println(host);
  WiFiClient client;
  const int httpPort = 8080;
  if (!client.connect(host, httpPort)) {
     Serial.println("connection failed");
     return;
    }

  client.print(String("GET ") + path + " HTTP/1.1\r\n" +
  "Host: " + host + "\r\n" +
  "Connection: keep-alive\r\n\r\n");//Http Get request
  Serial.print(String("GET ") + path + " HTTP/1.1\r\n" +
  "Host: " + host + "\r\n" +
  "Connection: keep-alive\r\n\r\n");//Http Get request
  delay(500); // wait for server to respond

  String data = (String)"{\"heartbeat\":\"60\"}";//json data
  String postData = (String) "username=xuhe&password=123456";//body data
  int length = postData.length();
  String postRequest =(String)("POST ") + postPath + " HTTP/1.1\r\n" +
      "Content-Type: application/x-www-form-urlencoded;charset=utf-8\r\n" +
      "Host: " + host + ":" + httpPort + "\r\n" +
      "Content-Length: " + length + "\r\n" +
      "Connection: Keep Alive\r\n\r\n" +
      postData+"\r\n";
  Serial.println(postRequest);
  client.print(postRequest);
  delay(500);
  // read response
  String section="header";
  while(client.available()){
    String line = client.readStringUntil('\r');
    Serial.print(line);    // we'll parse the HTML body here
  }
    Serial.print("closing connection. ");
}
第三步 – 编译下载
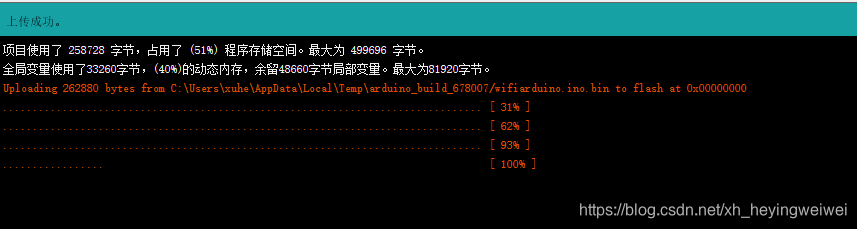
这一步有时候会出现同步下载到esp的异常,我是因为之前开发板的参数配置不匹配,所以出现错误,还有一个可能就是串口通信引进接错。
arduino 0 -> RX 接 ESP8266 RXD
arduino 1 -> TX 接 ESP8266 TXD
arduino 3.3V 接 ESP8266 VCC
arduino GND 接 ESP8266 GND
其他引脚可以悬空
如果想要实现完整访问功能,还需要服务器的搭建。
我是用IDEA写了一个简单的SpringMvc web 应用,部署在本地tomcat。
在后面我会把主要代码贴一下,具体我就不细讲了。
注意一点是计算机和ESP8266要处在同一个局域网,当然你也可以部署到云服务器上,通过公网访问。
第四步 – 运行测试
有一点要注意:运行过程中,ESP8266需要重启一下,很简单,就是给rst引脚一个低电平。
- arduino IDE 串口信息
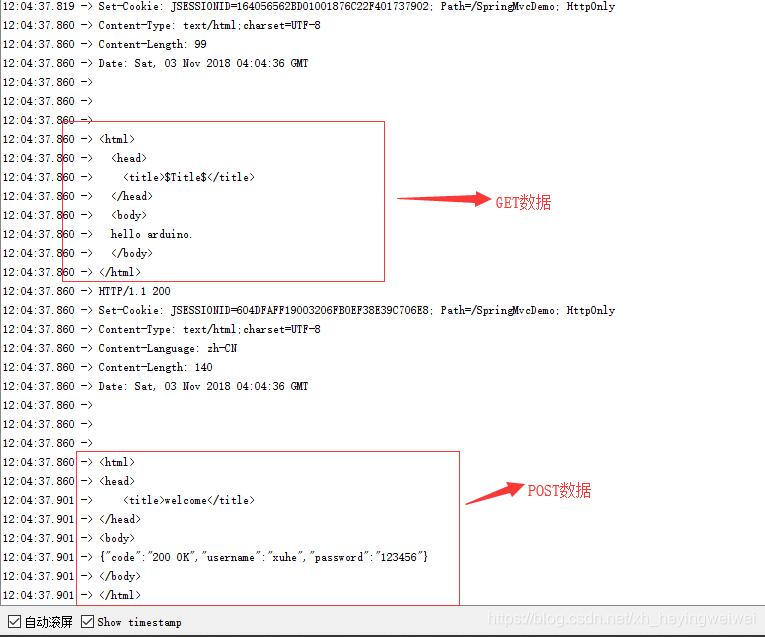
- IDEA 接收到请求
附 服务器端主要代码
- controller
package controller;
import org.springframework.stereotype.Controller;
import org.springframework.ui.ModelMap;
import org.springframework.web.bind.annotation.RequestMapping;
import org.springframework.web.bind.annotation.RequestMethod;
@Controller
public class LoginController {
@RequestMapping(value = "/login",method = RequestMethod.POST)
public String login(String username, String password, ModelMap model){
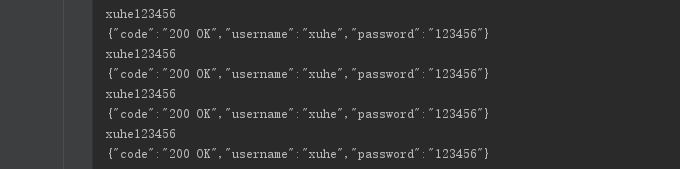
System.out.println(username + password);
model.addAttribute("username",username);
model.addAttribute("password",password);
model.addAttribute("jsonStr",getJsonStr(username,password));
System.out.println(getJsonStr(username,password));
return "success";
}
private Object getJsonStr(String username, String password) {
return "{\"code\":\"200 OK\",\"username\":\"" + username + "\",\"password\":\"" + password + "\"}";
}
}
- success.jsp
<%@ page contentType="text/html;charset=UTF-8" %>
<html>
<head>
    <title>welcome</title>
</head>
<body>
${jsonStr}
</body>
</html>


 1779
1779

 被折叠的 条评论
为什么被折叠?
被折叠的 条评论
为什么被折叠?
 到【灌水乐园】发言


