


重点配置(配置及取消):
编辑SSH配置文件
sudo vim /etc/ssh/sshd_config
确保以下行被设置为 yes
ChallengeResponseAuthentication yes
UsePAM yes
若想取消,设置为:no
最后,重启sshd服务。
刨根问底:
1.同步Linux服务器时钟
同步linux时钟,默认动态验证码在30秒内有效,由于客户端和服务器可能会存在时间差,建议先同步时钟,防止和手机时间存在时间差导致无法登录
[root@knode1 ~]# ntpdate pool.ntp.org
5 Dec 23:00:32 ntpdate[6583]: step time server 84.16.73.33 offset -9.050575 sec
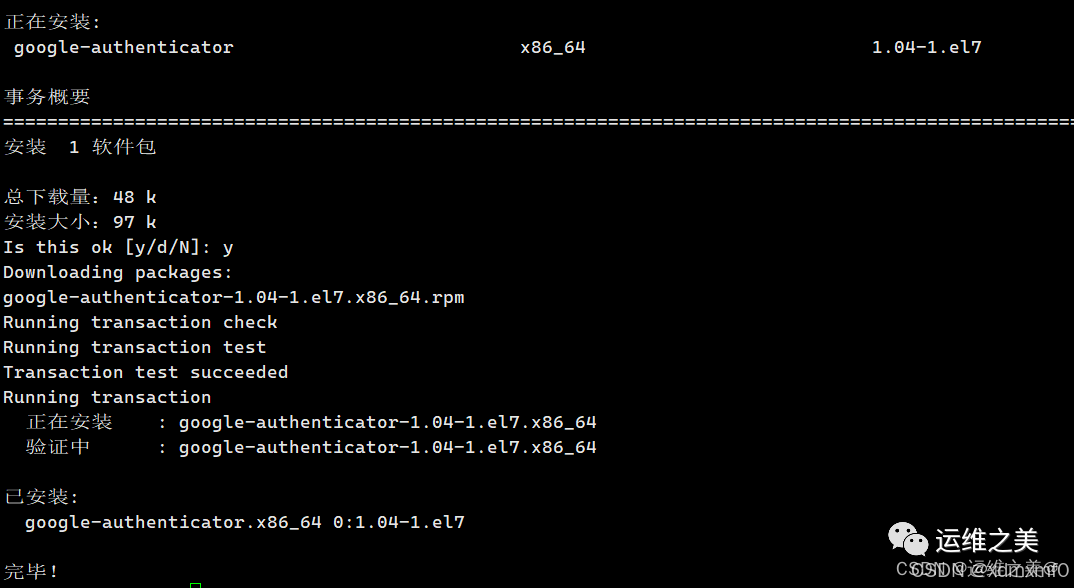
2.Linux主机安装Google Authenticator
本文使用Centos7系统实验,在终端执行以下命令,为你的Linux系统安装Google Authenticator插件
yum -y install epel-release # CentOS/RHEL sudo yum install google-authenticator # CentOS/RHEL
3.修改SSH配置
编辑SSH配置文件
sudo vi /etc/ssh/sshd_config
确保以下行被设置为 yes
ChallengeResponseAuthentication yes
UsePAM yes
保存并退出
4.Google Authenticator初始化
执行以下命令初始配置,为指定用户启动Google Authenticator的配置
[root@cxsdn ~]# google-authenticator Do you want authentication tokens to be time-based (y/n) y Warning: pasting the following URL into your browser exposes the OTP secret to Google: https://www.google.com/chart?chs=200x200&chld=M|0&cht=qr&chl=otpauth://totp/root@knode1%3Fsecret%3D55624OUOSZPCU5XZP64KSX2BKE%26issuer%3Dknode1 Your new secret key is: 55624OUOSZPCU5XZP64KSX2BKE #google身份验证上添加的key Your verification code is 340500 Your emergency scratch codes are: 41836466 27541454 93396333 53788584 26617777 Do you want me to update your "/root/.google_authenticator" file? (y/n) y Do you want to disallow multiple uses of the same authentication token? This restricts you to one login about every 30s, but it increases your chances to notice or even prevent man-in-the-middle attacks (y/n) y By default, a new token is generated every 30 seconds by the mobile app. #默认30s过期 In order to compensate for possible time-skew between the client and the server, we allow an extra token before and after the current time. This allows for a time skew of up to 30 seconds between authentication server and client. If you experience problems with poor time synchronization, you can increase the window from its default size of 3 permitted codes (one previous code, the current code, the next code) to 17 permitted codes (the 8 previous codes, the current code, and the 8 next codes). This will permit for a time skew of up to 4 minutes between client and server. Do you want to do so? (y/n) y If the computer that you are logging into isn't hardened against brute-force login attempts, you can enable rate-limiting for the authentication module. By default, this limits attackers to no more than 3 login attempts every 30s. Do you want to enable rate-limiting? (y/n) y
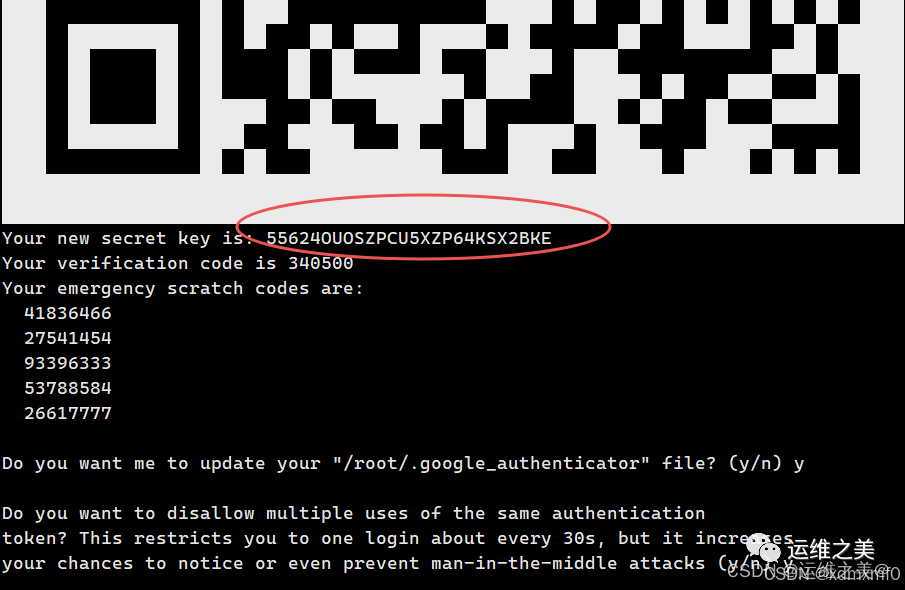
根据提示回答问题,最终将生成一个二维码和一组备用验证码,记住上面的key,当然也可以使用google身份验证扫码添加
5.调整PAM模块
编辑PAM配置文件,引入Google Authenticator模块vi编辑/etc/pam.d/sshd配置,在文件末尾添加以下行
auth required pam_google_authenticator.so
保存并退出
6.重启SSH服务
为了让新配置生效,别忘了重新启动SSH服务
systemctl restart sshd # CentOS/RHEL
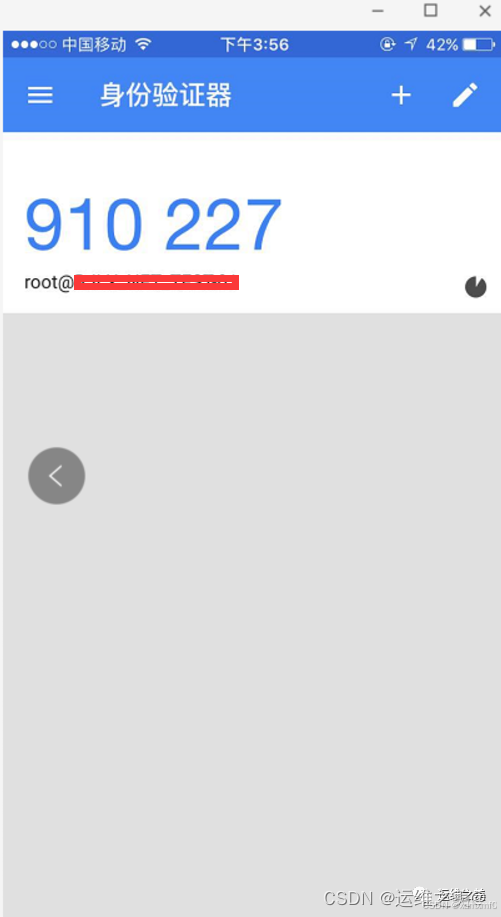
7.安装google身份验证
应用商店下载并安装Google Authenticator或类似的身份验证应用,然后配置Authenticator App,打开应用,选择添加新的身份验证令牌。使用步骤4生成的二维码扫描或手动输入密钥

添加成功后,此验证码会动态刷新
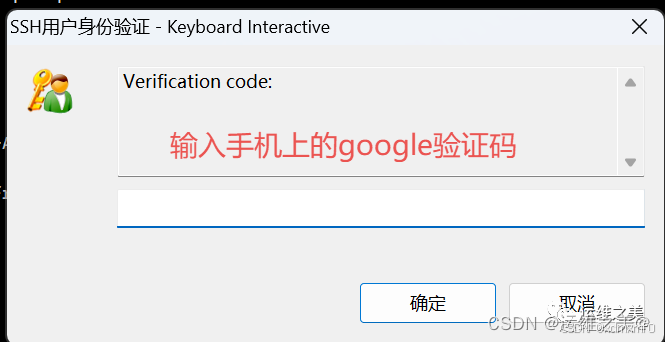
8.登录验证
通过以上的步骤,你已成功为Linux SSH添加了Google Authenticator双因素认证,后续除了输入用户密码外,还需要输入动态码进行验证
xshell登录验证
终端登录
[root@cxsdn .ssh]# ssh root@10.178.18.55 Password: Verification code: Last login: Tue Dec 5 23:33:20 2023 from 10.178.18.55
通过上面可以看到无论是使用终端软件还是命令行,都加上了动态码


 202
202

 被折叠的 条评论
为什么被折叠?
被折叠的 条评论
为什么被折叠?
 到【灌水乐园】发言


