


目录
1、svn的安装及配置
1.1 svn服务端的安装
svn安装命令:yum install -y subversion
1.2 创建项目版本库
mkdir -p /data/svn/test
svnadmin create /data/svn/test/
1.3 配置svn
svn版本库的配置文件有三个:authz(权限控制文件),passwd(用户名密码文件),svnserve.conf(svn服务配置文件)
在passwd配置文件中添加一个用户用于后面jenkins使用:
[users]
# harry = harryssecret
# sally = sallyssecret
test=test
在authz配置文件中赋予该用户名权限:
[/]
test = rw
svnserve.conf配置文件中打开anon-access的注释,并设置成none
[general]
### The anon-access and auth-access options control access to the
### repository for unauthenticated (a.k.a. anonymous) users and
### authenticated users, respectively.
### Valid values are "write", "read", and "none".
### Setting the value to "none" prohibits both reading and writing;
### "read" allows read-only access, and "write" allows complete
### read/write access to the repository.
### The sample settings below are the defaults and specify that anonymous
### users have read-only access to the repository, while authenticated
### users have read and write access to the repository.
anon-access = none
auth-access = write
2、tomcat的配置
jenkins需要把打包的war包部署在tomcat在webapps下,需要tomcat服务器的用户名密码:
修改tomcat 的配置文件tomcat-users.xml:
<role rolename="manager-gui"/>
<role rolename="manager-script"/>
<role rolename="manager-jmx"/>
<role rolename="manager-status"/>
<user username="jenkins" password="111111" roles="manager-gui,manager-script,manager-jmx,manager-status"/>
3、maven的安装
maven的下载地址:https://downloads.apache.org/maven/maven-3/3.6.3/binaries/apache-maven-3.6.3-bin.tar.gz
下载好后,解压出来,然后配置/etc/profile环境变量:
export M2_HOME=/home/apache-maven-3.6.3
export PATH=$PATH:$JAVA_HOME/bin:$M2_HOME/bin
4、jenkins的安装
4.1 jenkins的安装
jenkins war包下载地址:http://mirrors.jenkins.io/war-stable/latest/jenkins.war
下载好后,把war包放在tomcat的webapps目录下,然后启动tomcat,访问http://192.168.50.154:8080/jenkins/
4.2 jenkins的全局工具配置
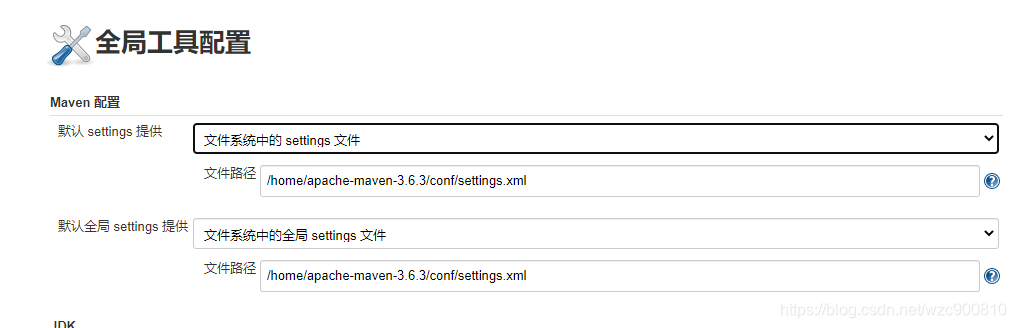
4.2.1 修改maven配置:
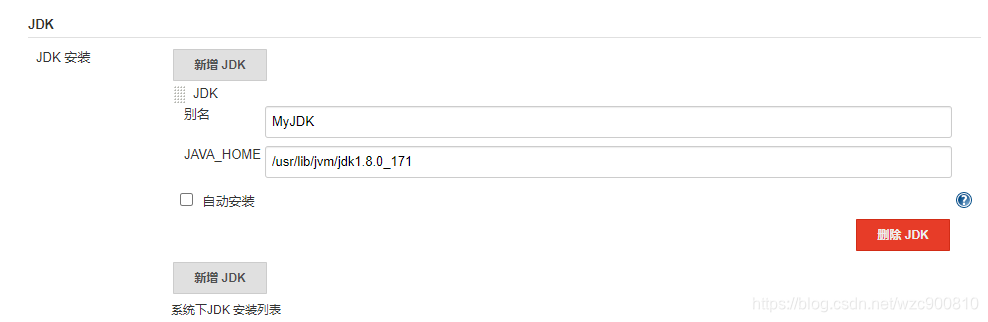
4.2.2 添加jdk:
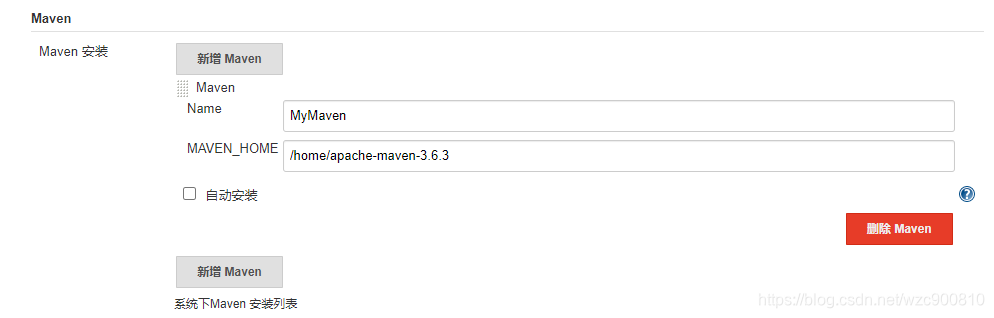
4.2.3 添加maven:
4.3 jenkins的插件
安装subversion plug-in和 deploy to container plugin两个插件用于svn的访问和war包的部署
4.4 jenkins新建任务并配置自动部署到tomcat
选择“构建一个自由风格的软件项目”
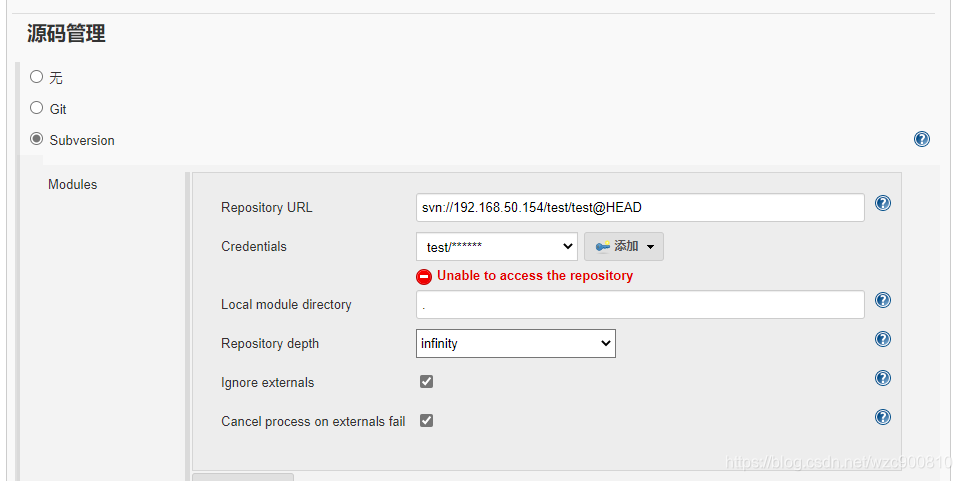
4.4.1 源码管理配置
4.4.2 构建
选择“调用顶层Maven目标”
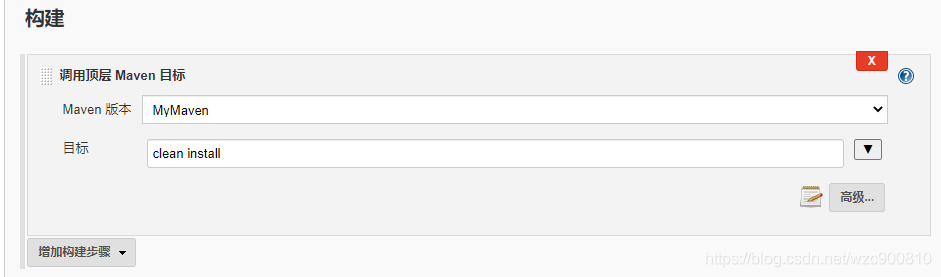
到此既可以手动执行构建任务部署到tomcat
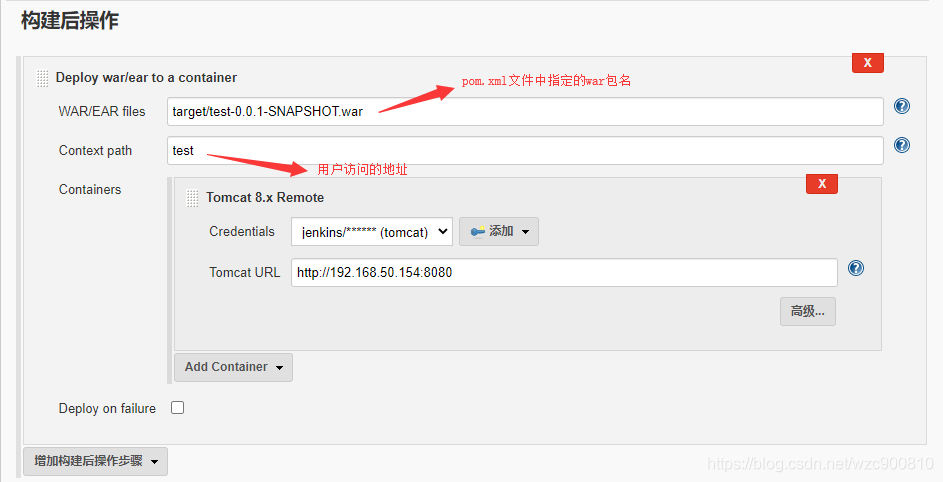
4.4.3 构建后操作
选择“Deploy war/ear to a container”
4.4.4 构建触发器
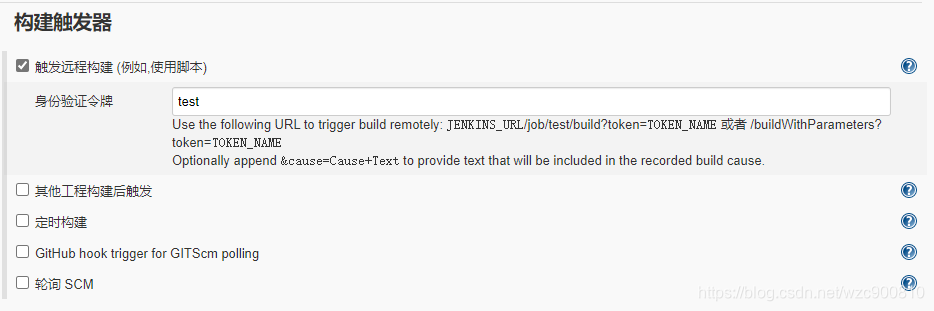
TOKEN_NAME就是需要设置的身份验证令牌
配置好后,访问http://192.168.50.154:8080/jenkins/job/test/build?token=test就可以触发构建任务
4.4.5 编辑svn钩子程序
钩子程序配置文件:/data/svn/test/hooks/post-commit
# REPOS="$1"
# REV="$2"# mailer.py commit "$REPOS" "$REV" /path/to/mailer.conf
curl -X post -v -u admin:7f50e5f7503b47329ded196102124c7f http://192.168.50.154:8080/jenkins/job/test/build?token=test
到此代码提交jenkins运行构建任务自动打包war自动部署到tomcat就全部完成了


 被折叠的 条评论
为什么被折叠?
被折叠的 条评论
为什么被折叠?
 到【灌水乐园】发言


