


Spring教程
Spring简介
主要作用于业务层,用于对业务层与其他层之间的解耦。
Spring的优点
- 方便解耦,简化开发(IOC/DI):Spring就是一个大工厂,可以将所有对象创建和依赖的关系维护,交给Spring管理。
- AOP编程的支持:Spring提供面向切面编程,可以方便的实现对程序进行权限拦截、运行监控等功能。
- 声明式事务的支持:只需要通过配置就可以完成对事务的管理,而无需手动编程。
- 方便程序的测试:Spring对Junit5支持,可以通过注解方便的测试Spring程序。
- 方便集成各种优秀框架:Spring不排斥各种优秀的开源框架,其内部提供了对各种优秀框架的直接支持(如:Struts、Hibernate、MyBatis等)。
- 降低JavaEE API的使用难度:Spring对JavaEE开发中非常难用的一些API(JDBC、JavaMail、远程调用等),都提供了封装,使这些API应用难度大大降低。
核心的理念:不要重复创造轮子。
核心概念:控制反转(依赖注入),aop(面向切面编程),声明式事务(aop的典型应用)
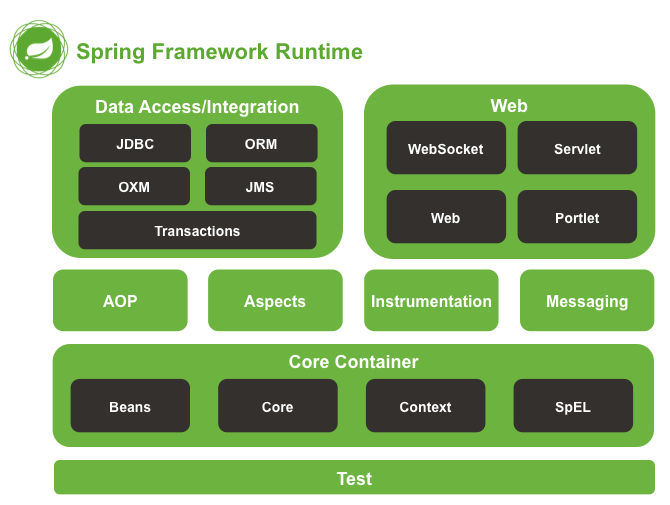
Spring体系结构
现在的spring一共集成了有20几个模块。
IoC/DI:控制反转/依赖注入
控制反转是一种通过描述(XML或注解)并使用第三方(spring)来创建对象的方式就称之为控制反转。使用控制反转最大的优势是为了解耦。
martin.fowler:软件设计大师。
spring:XML实现
入门案例
1、引入spring-context依赖
	<dependencies>
        <!--1、引入spring核心容器相关依赖-->
        <dependency>
            <groupId>org.springframework</groupId>
            <artifactId>spring-context</artifactId>
            <version>5.3.9</version>
        </dependency>
        <dependency>
            <groupId>org.projectlombok</groupId>
            <artifactId>lombok</artifactId>
            <version>1.18.18</version>
        </dependency>
    </dependencies>
2、编写spring配置文件
<!--
    2、将某个类型的对象交给spring管理

    id:用于指定从spring容器中获取对象的标识
    class:spring在创建对象时使用的类型

    -->
    <bean id="userDao" class="com.woniuxy.dao.UserDaoImpl"/>

    <bean id="userService" class="com.woniuxy.service.UserServiceImpl">
        <property name="message" value="今天天气不错"/>
        <!--引入一个在容器中注册过的bean,该属性的取值为在容器中注册过的bean的id属性值-->
        <property name="userDaoImpl" ref="userDao"/>
    </bean>
3、创建容器,从容器中获取将由spring创建的对象
package com.woniuxy.test;

import com.woniuxy.model.User;
import com.woniuxy.service.UserServiceImpl;
import org.springframework.context.support.ClassPathXmlApplicationContext;

public class Test {
    public static void main(String[] args) {
        //控制反转:将对象的创建权力由第二方(程序员)交给第三方(spring),
        // 第三方(spring)会基于某些描述信息(XML或注解)来创建对应的对象

        //3、创建spring容器,从容器中将创建的对象取出来使用。
        ClassPathXmlApplicationContext context =
                new ClassPathXmlApplicationContext("applicationContext.xml");
        //从容器中获取spring创建的对象
        UserServiceImpl userService = (UserServiceImpl) context.getBean("userService");

        userService.speak();

    }
}
自定义IoC框架理解IoC/DI
XML
BeanDefinition
package com.woniuxy.ioc.definition;

import lombok.Data;

import java.util.List;

/**
 * 用于封装bean标签内部信息(包含了属性和子标签的信息)
 */
@Data
public class BeanDefinition {
    private String id;
    private String className;
    private List<PropertyDefinition> propertyDefinitions;
}
PropertyDefinition
package com.woniuxy.ioc.definition;

import lombok.Data;

/**
 * 用于封装所有property标签的信息
 */
@Data
public class PropertyDefinition {
    private String name;
    private String value;
    private String ref;
}
ApplicationContext
public interface ApplicationContext {
    Object getBean(String key);
    void setBean(String key,Object value);
}
ClasspathXmlApplicationContext
package com.woniuxy.ioc.container;

import com.woniuxy.ioc.container.ApplicationContext;
import com.woniuxy.ioc.factory.BeanFactory;

import java.util.HashMap;
import java.util.Map;

/**
 * spring的ioc容器:读取配置文件生成的
 */
public class ClasspathXmlApplicationContext implements ApplicationContext {
    //创建保存对象的容器,使用hashMap,可以基于键值对进行操作。
    private Map<String,Object> container=new HashMap();

    public ClasspathXmlApplicationContext(String configFile){
       	BeanFactory beanFactory = new BeanFactory(this,configFile);
        //创建对象并保存到容器中
        beanFactory.createBean();
        //给容器中保存的对象的属性进行赋值
        beanFactory.injection();
    }

    /**
     * 该方法用于从容器中将对应的对象取出来
     * @param key  bean标签的id值
     * @return
     */
    public Object getBean(String key){
        return container.get(key);
    }

    /**
     * 该方法用于将某个对象保存到容器中
     * @param key bean标签的id值
     * @param value 创建的对象
     */
    public void setBean(String key,Object value){
        container.put(key,value);
    }

}
BeanFactory
package com.woniuxy.ioc.factory;

import com.woniuxy.ioc.container.ApplicationContext;
import com.woniuxy.ioc.container.ClasspathXmlApplicationContext;
import com.woniuxy.ioc.definition.BeanDefinition;
import com.woniuxy.ioc.definition.PropertyDefinition;
import org.dom4j.Document;
import org.dom4j.DocumentException;
import org.dom4j.Element;
import org.dom4j.io.SAXReader;

import java.lang.reflect.Field;
import java.net.URL;
import java.util.ArrayList;
import java.util.List;

/**
 * 用于读取配置文件或扫描对应的注解,完成对象的初始化,并保存到容器中。
 */
public class BeanFactory {

    private  List<BeanDefinition> beanDefinitions=new ArrayList<>();

    private ApplicationContext applicationContext;

    /**
     * 解析了xml,并将xml中配置的内容保存到beanDefinition中
     * @param configFile
     */
    public BeanFactory(ApplicationContext applicationContext,String configFile){
        this.applicationContext=applicationContext;
        String path = this.getClass().getResource("/").toString();
        path=path.substring(path.indexOf("/")+1);
        Document document = null;
        try {
            document = new SAXReader().read(path + configFile);
            //获取根元素  :<beans>
            Element root = document.getRootElement();
            //获取根元素下的所有bean子元素
            List<Element> beanElements = root.elements("bean");
            //遍历bean元素
            beanElements.forEach(beanElement->{
                //获取bean元素上的id属性值
                String id = beanElement.attributeValue("id");
                //获取bean元素上的class属性值
                String className = beanElement.attributeValue("class");
                //创建BeanDefinition对象保存bean标签的属性
                BeanDefinition beanDefinition = new BeanDefinition();
                beanDefinition.setId(id);
                beanDefinition.setClassName(className);
                //获取bean元素下的所有property子元素的集合
                List<Element> propertyElements = beanElement.elements("property");
                //判断property元素的集合是否为空
                if (propertyElements.size()>0) {
                    //创建保存propertyDefinition的集合
                    ArrayList<PropertyDefinition> propertyDefinitions = new ArrayList<>();
                    //不为空时,需要将property元素的属性值封装到PropertyDefinition对象中
                    propertyElements.forEach(propertyElement->{
                        PropertyDefinition propertyDefinition = new PropertyDefinition();
                        //将name属性值保存到propertyDefinition对象中
                        String name = propertyElement.attributeValue("name");
                        propertyDefinition.setName(name);
                        String value = propertyElement.attributeValue("value");
                        //由于value属性和ref属性不能同时在一个property标签中存在,
                        // 所以应该判断value值是否为空,如果为空,则应该获取ref属性的值
                        if (null == value) {
                            String ref = propertyElement.attributeValue("ref");
                            propertyDefinition.setRef(ref);
                        }else{
                            propertyDefinition.setValue(value);
                        }
                        //将生成的propertyDefinition对象保存到集合中
                        propertyDefinitions.add(propertyDefinition);
                        //将保存了所有property元素信息的集合保存到beanDefinition对象中
                        beanDefinition.setPropertyDefinitions(propertyDefinitions);

                    });
                }
                //将所有的beanDefinition保存到集合中
                beanDefinitions.add(beanDefinition);
            });

        } catch (DocumentException e) {
            e.printStackTrace();
        }
    }

    /**
     * 该方法用于将读取的xml信息转换为对象,并将之保存到spring容器。
     */
    public void createBean(){
        beanDefinitions.forEach(beanDefinition -> {
            System.out.println(beanDefinition);
            //获取了要保存到容器中的key
            String id = beanDefinition.getId();
            //获取了要创建的对象的类型
            String className = beanDefinition.getClassName();

            try {
                Class<?> clazz = Class.forName(className);
                //创建对象
                Object object = clazz.newInstance();
                //将创建的对象保存到容器对象中
                applicationContext.setBean(id,object);

            } catch (ClassNotFoundException e) {
                e.printStackTrace();
            } catch (IllegalAccessException e) {
                e.printStackTrace();
            } catch (InstantiationException e) {
                e.printStackTrace();
            }
        });
    }

    /**
     * 该方法用于给bean的property元素赋值
     */
    public void injection(){

        beanDefinitions.forEach(beanDefinition -> {
            String id = beanDefinition.getId();
            //从容器中获取到保存的对象
            Object bean = applicationContext.getBean(id);
            String className = beanDefinition.getClassName();
            //获取beanDefinition中保存的property元素的集合
            List<PropertyDefinition> propertyDefinitions = beanDefinition.getPropertyDefinitions();
            //判断该集合是否为空,为空表示bean标签下没有property子标签,
            // 不为空表示有property子标签,则需要进行赋值操作
            if (null!=propertyDefinitions) {
                try {
                    Class<?> clazz = Class.forName(className);
                    propertyDefinitions.forEach(propertyDefinition -> {
                        String name = propertyDefinition.getName();
                        try {
                            Field field = clazz.getDeclaredField(name);
                            field.setAccessible(true);
                            String value = propertyDefinition.getValue();
                            if (null==value) {
                                //表示当前property标签设置的是ref属性
                                String ref = propertyDefinition.getRef();
                                Object refObject = applicationContext.getBean(ref);
                                field.set(bean,refObject);
                            }else{
                                field.set(bean,value);
                            }
                        } catch (NoSuchFieldException e) {
                            e.printStackTrace();
                        } catch (IllegalAccessException e) {
                            e.printStackTrace();
                        }
                    });
                } catch (ClassNotFoundException e) {
                    e.printStackTrace();
                }
            }
        });
    }

}
UserDaoImpl
public class UserDaoImpl {
    public void say(){
        System.out.println("hello spring!!! userDaoImpl");
    }
}
UserServiceImpl
@Data
public class UserServiceImpl {
    private String message;
    private UserDaoImpl userDaoImpl;

    public void speak(){
        System.out.println("hello spring!!! userServiceImpl"+":"+message);
        userDaoImpl.say();
    }
}
applicationContext.xml
<?xml version="1.0" encoding="UTF-8" ?>
<beans>
    <bean id="userDao" class="com.woniuxy.dao.UserDaoImpl"/>
    <bean id="userService" class="com.woniuxy.service.UserServiceImpl">
        <property name="message" value="今天天气真不错"/>
        <property name="userDaoImpl" ref="userDao"/>
    </bean>
</beans>
注解
BeanFactory
package com.woniuxy.ioc.factory;

import com.woniuxy.ioc.annotation.Component;
import com.woniuxy.ioc.annotation.ComponentScan;
import com.woniuxy.ioc.annotation.Resource;
import com.woniuxy.ioc.annotation.Value;
import com.woniuxy.ioc.container.ApplicationContext;
import com.woniuxy.ioc.container.ClasspathXmlApplicationContext;
import com.woniuxy.ioc.definition.BeanDefinition;
import com.woniuxy.ioc.definition.PropertyDefinition;
import org.dom4j.Document;
import org.dom4j.DocumentException;
import org.dom4j.Element;
import org.dom4j.io.SAXReader;

import java.io.File;
import java.lang.annotation.Annotation;
import java.lang.reflect.Field;
import java.net.URL;
import java.util.ArrayList;
import java.util.List;

/**
 * 用于读取配置文件或扫描对应的注解,完成对象的初始化,并保存到容器中。
 */
public class BeanFactory {

    private  List<BeanDefinition> beanDefinitions=new ArrayList<>();

    private ApplicationContext applicationContext;


    /**
     * 读取配置类,生成ioc容器
     * @param applicationContext
     * @param clazz
     */
    public BeanFactory(ApplicationContext applicationContext,Class clazz){
        this.applicationContext=applicationContext;
        String path=this.getClass().getResource("/").getPath().substring(1).replace("/",File.separator);

        if (clazz.isAnnotationPresent(ComponentScan.class)) {
            ComponentScan componentScan = (ComponentScan) clazz.getAnnotation(ComponentScan.class);
            String[] basePackages = componentScan.basePackages();
            for (String basePackage : basePackages) {
                File file = new File(path + basePackage.replace(".",File.separator));
                loopDirectory(path,file);
            }

        }

    }

    /**
     * 递归遍历目录
     */
    public void loopDirectory(String path,File file){
        if (file.isDirectory()) {
            File[] childrenFiles = file.listFiles();
            if (null != childrenFiles) {
                for (File childrenFile : childrenFiles) {
                    loopDirectory(path,childrenFile);
                }
            }
        }else{
            if (file.getPath().endsWith(".class")) {
                BeanDefinition beanDefinition = new BeanDefinition();
                String className = file.getPath().replace(".class", "")
                        .replace(path, "")
                        .replace(File.separator, ".");

                beanDefinition.setClassName(className);
                try {
                    Class<?> clazz = Class.forName(className);
                    String id=null;
                    if (clazz.isAnnotationPresent(Component.class)) {
                        Component component = clazz.getAnnotation(Component.class);
                        String value = component.value();
                        if (null != value&&!"".equals(value)) {
                            id=value;
                        }else{
                            String simpleName = clazz.getSimpleName();
                            id=simpleName.substring(0,1).toLowerCase()+simpleName.substring(1);
//                            System.out.println(id);
                        }
                        beanDefinition.setId(id);
                    }
                    Field[] fields = clazz.getDeclaredFields();
                    List<PropertyDefinition> propertyDefinitions = new ArrayList<>();
                    if (fields.length>0) {
                        for (Field field : fields) {
                            PropertyDefinition propertyDefinition = new PropertyDefinition();
                            String name = field.getName();
                            propertyDefinition.setName(name);
                            if (field.isAnnotationPresent(Value.class)) {
                                Value valueAnnotation = field.getAnnotation(Value.class);
                                String valueAttribute = valueAnnotation.value();
                                propertyDefinition.setValue(valueAttribute);
                            }else if (field.isAnnotationPresent(Resource.class)){
                                Resource resource = field.getAnnotation(Resource.class);
                                String resourceValue = resource.value();
                                if (null==resourceValue||"".equals(resourceValue)) {
                                    propertyDefinition.setRef(name);
                                }else{
                                    propertyDefinition.setRef(resourceValue);
                                }
                            }
                            propertyDefinitions.add(propertyDefinition);
                        }
                        beanDefinition.setPropertyDefinitions(propertyDefinitions);
                    }
                    beanDefinitions.add(beanDefinition);
                } catch (ClassNotFoundException e) {
                    e.printStackTrace();
                }
            }
        }
    }

    /**
     * 解析了xml,并将xml中配置的内容保存到beanDefinition中
     * @param configFile
     */
    public BeanFactory(ApplicationContext applicationContext,String configFile){
        this.applicationContext=applicationContext;
        String path = this.getClass().getResource("/").toString();
        path=path.substring(path.indexOf("/")+1);
        Document document = null;
        try {
            document = new SAXReader().read(path + configFile);
            //获取根元素  :<beans>
            Element root = document.getRootElement();
            //获取根元素下的所有bean子元素
            List<Element> beanElements = root.elements("bean");
            //遍历bean元素
            beanElements.forEach(beanElement->{
                //获取bean元素上的id属性值
                String id = beanElement.attributeValue("id");
                //获取bean元素上的class属性值
                String className = beanElement.attributeValue("class");
                //创建BeanDefinition对象保存bean标签的属性
                BeanDefinition beanDefinition = new BeanDefinition();
                beanDefinition.setId(id);
                beanDefinition.setClassName(className);
                //获取bean元素下的所有property子元素的集合
                List<Element> propertyElements = beanElement.elements("property");
                //判断property元素的集合是否为空
                if (propertyElements.size()>0) {
                    //创建保存propertyDefinition的集合
                    ArrayList<PropertyDefinition> propertyDefinitions = new ArrayList<>();
                    //不为空时,需要将property元素的属性值封装到PropertyDefinition对象中
                    propertyElements.forEach(propertyElement->{
                        PropertyDefinition propertyDefinition = new PropertyDefinition();
                        //将name属性值保存到propertyDefinition对象中
                        String name = propertyElement.attributeValue("name");
                        propertyDefinition.setName(name);

                        String value = propertyElement.attributeValue("value");
                        //由于value属性和ref属性不能同时在一个property标签中存在,
                        // 所以应该判断value值是否为空,如果为空,则应该获取ref属性的值
                        if (null == value) {
                            String ref = propertyElement.attributeValue("ref");
                            propertyDefinition.setRef(ref);
                        }else{
                            propertyDefinition.setValue(value);
                        }
                        //将生成的propertyDefinition对象保存到集合中
                        propertyDefinitions.add(propertyDefinition);
                        //将保存了所有property元素信息的集合保存到beanDefinition对象中
                        beanDefinition.setPropertyDefinitions(propertyDefinitions);

                    });
                }
                //将所有的beanDefinition保存到集合中
                beanDefinitions.add(beanDefinition);
            });

        } catch (DocumentException e) {
            e.printStackTrace();
        }
    }

    /**
     * 该方法用于将读取的xml信息转换为对象,并将之保存到spring容器。
     */
    public void createBean(){
        beanDefinitions.forEach(beanDefinition -> {
            //获取了要保存到容器中的key
            String id = beanDefinition.getId();
            //获取了要创建的对象的类型
            String className = beanDefinition.getClassName();
            try {
                Class<?> clazz = Class.forName(className);
                //创建对象
                Object object = clazz.newInstance();
                //将创建的对象保存到容器对象中
                applicationContext.setBean(id,object);

            } catch (ClassNotFoundException e) {
                e.printStackTrace();
            } catch (IllegalAccessException e) {
                e.printStackTrace();
            } catch (InstantiationException e) {
                e.printStackTrace();
            }
        });
    }

    /**
     * 该方法用于给bean的property元素赋值
     */
    public void injection(){
        //遍历所有的bean标签属性,主要是判断bean标签下有没有property子标签,
        // 如果有则需要给property标签所对应的属性进行赋值
        beanDefinitions.forEach(beanDefinition -> {
            //获取bean的id,用于从容器中找到有属性需要赋值的对象
            String id = beanDefinition.getId();
            //从容器中获取到保存的对象
            Object bean = applicationContext.getBean(id);
            //获取字节码对象,通过字节码对象去根据property标签的name属性值找到对应的属性对象(Field)
            String className = beanDefinition.getClassName();
            //获取beanDefinition中保存的property元素的集合
            List<PropertyDefinition> propertyDefinitions = beanDefinition.getPropertyDefinitions();
            //判断该集合是否为空,为空表示bean标签下没有property子标签,
            // 不为空表示有property子标签,则需要进行赋值操作
            if (null!=propertyDefinitions) {
                try {
                    Class<?> clazz = Class.forName(className);
                    propertyDefinitions.forEach(propertyDefinition -> {
                        //获取property标签的name属性值
                        String name = propertyDefinition.getName();
                        try {
                            //使用字节码对象根据name属性值获取对应的属性对象
                            Field field = clazz.getDeclaredField(name);
                            field.setAccessible(true);
                            //获取value值,该对象为空,则表示设置的是ref属性,
                            // 不为空表示设置的是value属性,可直接将value赋给属性对象
                            String value = propertyDefinition.getValue();
                            if (null==value) {
                                //表示当前property标签设置的是ref属性
                                String ref = propertyDefinition.getRef();
                                //ref引用的是在容器中注册过的bean的id值,
                                // 可直接基于ref的值从容器中将要被赋值的对象拿出来,
                                // 并将其赋值给property标签对应的属性对象
                                Object refObject = applicationContext.getBean(ref);
                                field.set(bean,refObject);
                            }else{
                                field.set(bean,value);
                            }
                        } catch (NoSuchFieldException e) {
                            e.printStackTrace();
                        } catch (IllegalAccessException e) {
                            e.printStackTrace();
                        }
                    });
                } catch (ClassNotFoundException e) {
                    e.printStackTrace();
                }
            }
        });
    }

}
自定义注解
@Target(ElementType.TYPE)
@Retention(RetentionPolicy.RUNTIME)
public @interface Component {
    String value() default "";
}


@Target(ElementType.TYPE)
@Retention(RetentionPolicy.RUNTIME)
public @interface ComponentScan {
    String[] basePackages();
}


@Target(ElementType.FIELD)
@Retention(RetentionPolicy.RUNTIME)
public @interface Resource {
    String value() default "";
}


@Target(ElementType.FIELD)
@Retention(RetentionPolicy.RUNTIME)
public @interface Value {
    String value();
}
配置类
@ComponentScan(basePackages = {"com.woniuxy.dao","com.woniuxy.service"})
public class AppConfig {
}
dao
@Component
public class UserDaoImpl {
    public void say(){
        System.out.println("hello spring!!! userDaoImpl");
    }
}
service
@Component
@Data
public class UserServiceImpl {
    @Value("今天心情不美丽")
    private String message;
    @Resource
    private UserDaoImpl userDaoImpl;

    public void speak(){
        System.out.println("hello spring!!! userServiceImpl"+":"+message);
        userDaoImpl.say();
    }
}
测试类
public class Test {
    public static void main(String[] args) {
        AnnotationConfigApplicationContext context = new AnnotationConfigApplicationContext(AppConfig.class);
        UserServiceImpl userServiceImpl = (UserServiceImpl) context.getBean("userServiceImpl");
        userServiceImpl.speak();
    }
}
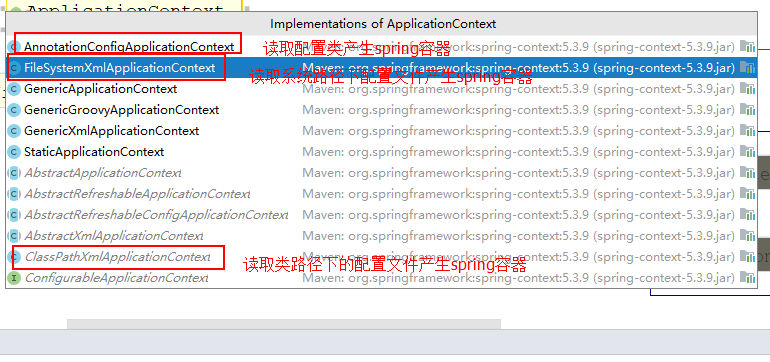
获取spring容器的三种方式
beanFactory创建的容器与applicationContext创建的容器的区别
BeanFactory:是一个bean工厂,是spring顶层接口,使用该接口对应的实现类也可以产生spring容器,特点是:产生的容器中的对象不管是否是单例,永远都是延迟加载的。
ApplicationContext:产生spring容器的接口,它是BeanFactory的子接口,功能比BeanFactory更强大。特点是:比BeanFactory更智能,会基于当前容器中的对象是否是单例,来决定加载策略。单例:立即加载,多例:延迟加载
常用:
ClasspathXmlApplicationContext:读取类路径下的XML配置文件产生spring容器
FileSystemXmlApplicationContext:读取文件系统路径下的XML配置文件产生spring容器
AnnotationConfigApplicationContext:读取配置类产生spring容器
一般不建议使用FileSystemXmlApplicationContext,因为如果配置文件所在的目录,当前用户没有操作权限,就会导致读取不到配置文件而出错。
创建对象的三种方式
1.使用构造方法创建
使用无参构造方法。
2.使用工厂创建:
一般是在项目中使用了第三方的组件,组件中的某些类型只提供了工厂模式进行创建时,就需要使用工厂创建的方式。
2.1 使用实例工厂创建
/**
 * 产生员工对象的工厂,基于不同的选择会生成不同的员工
 */
public class EmployeeFactory {

    public Employee getEmp(int choice){
        switch (choice) {
            case 1:
                return new Driver();
            case 2:
                return new Teacher();
            default:
                return null;
        }
    }
}
    <!--实例工厂-->
        <!--
               EmployeeFactory empFactory=new EmployeeFactory();
        -->
<!--    <bean id="employeeFactory" class="com.woniuxy.model.EmployeeFactory"/>-->
        <!--
                    empFactory.getEmp(2);
            -->
<!--    <bean id="employee" factory-bean="employeeFactory" factory-method="getEmp">-->
<!--        <constructor-arg name="choice" value="2"/>-->
<!--    </bean>-->
2.2使用静态工厂创建
/**
 * 产生员工对象的工厂,基于不同的选择会生成不同的员工
 */
public class EmployeeFactory {

    public static Employee getEmp(int choice){
        switch (choice) {
            case 1:
                return new Driver();
            case 2:
                return new Teacher();
            default:
                return null;
        }
    }
}
<!--静态工厂-->
    <!--
               EmployeeFactory.getEmp(1);
        -->
    <bean id="employee" class="com.woniuxy.model.EmployeeFactory" factory-method="getEmp">
        <constructor-arg name="choice" value="1"/>
    </bean>
spring依赖注入的三种方式
1.构造器注入
@AllArgsConstructor//全参构造
@NoArgsConstructor//无参构造
public class User {
    private String username;
    private Integer age;
    private String password;
    private Integer count;
}
<!--    <bean id="user" class="com.woniuxy.model.User">-->
        <!--
            <constructor-arg/>:作用是给构造方法的参数注入值
            属性:
            name:  指向构造方法的参数名称
            value: 注入的值
            type:  指向构造方法的形参类型   不常用
            index: 指向构造方法的形参位置   不常用
            ref:   指向一个在容器中注册过的Bean的id
        -->
<!--        <constructor-arg index="0" value="tom" />-->
<!--        <constructor-arg index="1" value="111"/>-->
<!--        <constructor-arg index="3" value="5" />-->
<!--        <constructor-arg index="2" value="33" />-->
<!--    </bean>-->
2.setter注入
@Data
public class User {
    private String username;
    private Integer age;
    private String password;
    private Integer count;
}
<!--
    setter注入:对应的类型必须要有setter方法
    属性:
    name:  指向setter方法的set关键字后的单词的首字母小写部分
    value: 赋的值
    ref:   指向一个在容器中注册过的Bean的id
    -->
    <bean id="user" class="com.woniuxy.model.User">
        <property name="username" value="tom"/>
        <property name="password" value="111"/>
        <property name="age" value="25"/>
        <property name="count" value="6"/>
    </bean>
3.接口注入(了解即可)
spring依赖注入的三种类型
1.基本数据类型、String
在或标签中,直接使用value属性即可把对应的值注入进来。
2.在容器中注册过的bean
在或标签中,直接使用ref属性即可把对应的值注入进来。
3.复杂类型(集合类型)
@Data
@AllArgsConstructor//全参构造
@NoArgsConstructor//无参构造
public class User {
    private String username;
    private Integer age;
    private String password;
    private Integer count;
    private Teacher teacher;
    private List<Teacher> teachers;
    private Map<String,Teacher> teacherMap;
    private Properties properties;
}
<bean id="user" class="com.woniuxy.model.User">
        <property name="username" value="tom"/>
        <property name="password" value="111"/>
        <property name="age" value="25"/>
        <property name="count" value="6"/>
        <property name="teacher" ref="teacher"/>
        <property name="teachers">
            <!--
                list:集合
                set:集合
                array:数组
                map:map
                props: properties
            -->
            <array>
                <bean class="com.woniuxy.model.Teacher">
                    <property name="name" value="jacky"/>
                </bean>
                <bean class="com.woniuxy.model.Teacher">
                    <property name="name" value="rose"/>
                </bean>
                <bean class="com.woniuxy.model.Teacher">
                    <property name="name" value="amy"/>
                </bean>
            </array>
        </property>
        <property name="teacherMap">
            <map>
                <entry key="math">
                    <bean class="com.woniuxy.model.Teacher">
                        <property name="name" value="张三"/>
                    </bean>
                </entry>
                <entry key="java">
                    <bean class="com.woniuxy.model.Teacher">
                        <property name="name" value="李四"/>
                    </bean>
                </entry>
            </map>
        </property>
        <property name="properties">
            <props>
                <prop key="a">1</prop>
                <prop key="b">2</prop>
                <prop key="c">3</prop>
            </props>
        </property>
    </bean>
FactoryBean
一个使用了工厂模式和装饰模式的bean,使用该bean可以去产生一个bean出来。
实现一个FactoryBean接口,该接口有一个泛型,通过该泛型可以指定该factoryBean可以生成的bean的类型。
package com.woniuxy.model;

import org.springframework.beans.factory.FactoryBean;

/**
 * 实现FactoryBean接口,并指定对应的泛型,则可以通过该FactoryBean对象来获取泛型的对象
 */
public class UserFactoryBean implements FactoryBean<User> {
    /**
     * 该方法用于产生一个对象,就是泛型的类型的对象
     * @return
     * @throws Exception
     */
    @Override
    public User getObject() throws Exception {
        return new User("tom","111");
    }

    /**
     * 返回生成的对象的类型
     * @return
     */
    @Override
    public Class<?> getObjectType() {
        return User.class;
    }

    /**
     * 通过该factoryBean生成的对象,注册到spring容器中后,这个对象是否是单例的,true 单例  false 多例
     * @return
     */
    @Override
    public boolean isSingleton() {
        return true;
    }


}
<bean id="user" class="com.woniuxy.model.UserFactoryBean"></bean>
//        Object user = context.getBean("user");
//        System.out.println(user);
//
//        Object userFactoryBean = context.getBean("&user");
//        System.out.println(userFactoryBean);
spring提供的FactoryBean
 <!--
        spring提供了一部分定制好的factoryBean以供我们使用
        list  set  map  properties
    -->

    <bean id="list" class="org.springframework.beans.factory.config.ListFactoryBean">
        <!--targetListClass:用于指定集合的类型-->
        <property name="targetListClass" value="java.util.ArrayList"/>
        <!--sourceList:用于指定集合的内容-->
        <property name="sourceList">
            <list>
                <value>1</value>
                <value>2</value>
                <value>3</value>
            </list>
        </property>
    </bean>

    <!--mapFactoryBean-->
    <bean id="map" class="org.springframework.beans.factory.config.MapFactoryBean">
        <property name="targetMapClass" value="java.util.HashMap"/>
        <property name="sourceMap">
            <map>
                <entry key="a" value="1"/>
                <entry key="b" value="2"/>
                <entry key="c" value="3"/>
            </map>
        </property>
    </bean>
	<!--可以使用PropertiesFactoryBean去加载类路径下的properties文件内容-->
    <bean id="properties" class="org.springframework.beans.factory.config.PropertiesFactoryBean">
        <property name="location" value="classpath:jdbc.properties"/>
    </bean>
		ArrayList list = context.getBean("list", ArrayList.class);
        System.out.println(list);

        HashMap map = context.getBean("map", HashMap.class);
        System.out.println(map);

        Properties properties = context.getBean("properties", Properties.class);
        System.out.println(properties);
        System.out.println(properties.getProperty("jdbc.driver"));
BeanFactory与FactoryBean的区别
BeanFactory是ioc容器的顶层接口,是一个bean工厂,用于生产和管理Bean.
FactoryBean是一个bean,只是使用工厂模式和装饰模式,可以通过该对象来生成其泛型的对象。
命名空间
1.util
可以使用util命名空间来完成集合类型的数据注册到容器中。
引入命名空间:
在标签中加入:xmlns:util=“http://www.springframework.org/schema/util”
在标签的xsi:schemaLocation属性值中加入:
http://www.springframework.org/schema/util
http://www.springframework.org/schema/util/spring-util.xsd
此后就可以使用util命名空间提供的对应标签来完成集合类型数据的注册。
    <!--
    引入spring的util命名空间后,就可以使用该命名空间下的一些标签,
    主要是使用其来完成集合在容器中注册
    util:list
    util:map
    util:set...
    -->
    <util:list id="list">
<!--        <list>-->
            <value>1</value>
            <value>2</value>
            <value>3</value>
<!--        </list>-->
    </util:list>
Object list = context.getBean("list");
        System.out.println(list);
2.p
可以引入p命名空间,该命名空间可以代替setter注入时的
在标签中加入:xmlns:p=“http://www.springframework.org/schema/p”
<bean id="user" class="com.woniuxy.model.User" p:username="tom" p:password="111"/>
Object user = context.getBean("user");
System.out.println(user);
3.c
可以引入c命名空间,该命名空间可以代替构造注入时的
在标签中加入:xmlns:c=“http://www.springframework.org/schema/c”
<bean id="user" class="com.woniuxy.model.User" c:username="tom" c:password="111"/>
Object user = context.getBean("user");
System.out.println(user);
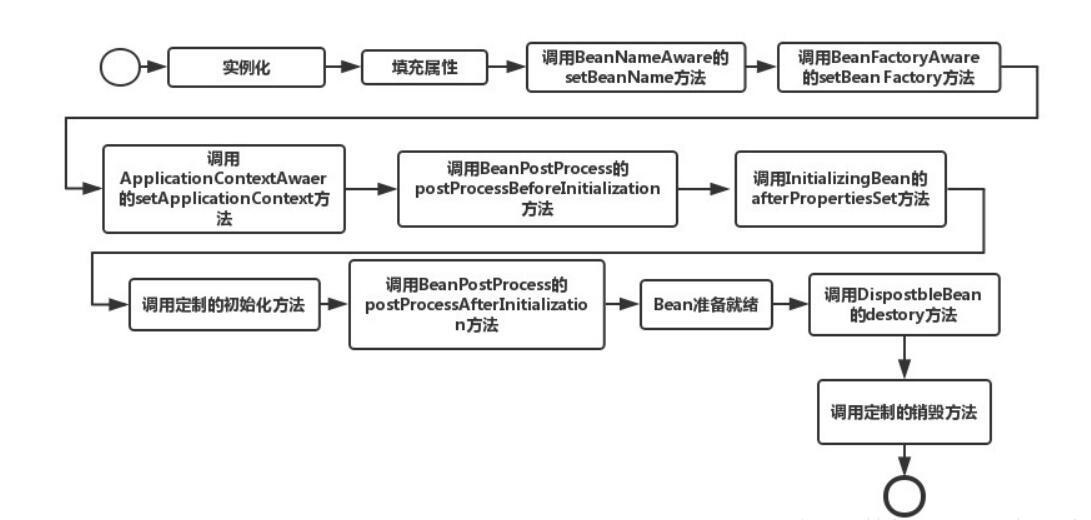
bean的生命周期
bean的生命周期图示
面试相关:
面试时有些人会被问到Spring中Bean的生命周期,其实也就是考察一下对Spring是否熟悉,一般在工作中基本上用不到其中的内容。
1、实例化一个Bean(也就是我们常说的new);
2、按照Spring上下文对实例化的Bean进行配置(也就是IOC注入);
3、如果这个Bean已经实现了BeanNameAware接口,会调用它实现的setBeanName(String)方法,此处传递的就是Spring配置文件中Bean的id值;
4、如果这个Bean已经实现了BeanFactoryAware接口,会调用它实现的setBeanFactory(),setBeanFactory(BeanFactory)传递的是Spring工厂自身(可以用这个方式来获取其它Bean,只需在Spring配置文件中配置一个普通的Bean就可以);
5、如果这个Bean已经实现了ApplicationContextAware接口,会调用setApplicationContext(ApplicationContext)方法,传入Spring上下文(同样这个方式也可以实现步骤4的内容,但比4更好,因为ApplicationContext是BeanFactory的子接口,有更多的实现方法);
6、如果这个Bean关联了BeanPostProcessor接口,将会调用postProcessBeforeInitialization(Object obj, String s)方法,BeanPostProcessor经常被用作是Bean内容的更改,并且由于这个是在Bean初始化结束时调用那个的方法,也可以被应用于内存或缓存技术;
7、如果Bean在Spring配置文件中配置了init-method属性会自动调用其配置的初始化方法;
8、如果这个Bean关联了BeanPostProcessor接口,将会调用postProcessAfterInitialization(Object obj, String s)方法;
以上工作完成以后就可以应用这个Bean了,那这个Bean是一个Singleton的,所以一般情况下我们调用同一个id的Bean会是在内容地址相同的实例,当然在Spring配置文件中也可以配置非Singleton。
9、当Bean不再需要时,会经过清理阶段,如果Bean实现了DisposableBean这个接口,会调用那个其实现的destroy()方法;
10、如果这个Bean的Spring配置中配置了destroy-method属性,会自动调用其配置的销毁方法。
以上10步骤可以作为面试或者笔试的模板,另外我们这里描述的是应用Spring上下文(applicationContext)Bean的生命周期,如果应用Spring的工厂(BeanFactory)的话,去掉第5步即可。
Spring Bean 的生命周期在整个 Spring 中占有很重要的位置,根据bean的作用域不同,其生命周期也是不相同的。
bean的作用域
通过标签的scope属性,可以设置当前对象是否是单例的。
scope的取值
singleton:单例 随容器生,随容器死
prototype:多例 生死与容器的生死无关,创建是在使用到该对象时才会创建,消亡在垃圾回收时才会消亡。
request:web项目中才会存在,每个请求都会生成一个新的实例
session:web项目中才会存在,每个session都会生成一个新的实例
globalSession:集群环境下才存在,也是每个session会生成一个新的实例
package com.woniuxy.model;

import lombok.AllArgsConstructor;
import lombok.Data;
import lombok.NoArgsConstructor;

import java.util.List;
import java.util.Map;
import java.util.Properties;

@Data
@AllArgsConstructor//全参构造
@NoArgsConstructor//无参构造
public class User {
    private String username;
    private String password;

    private Teacher teacher;

    public void init(){
        System.out.println("user init...");
    }


    public void destroy(){
        System.out.println("user destroy...");
    }

}
<bean id="user" class="com.woniuxy.model.User"
          scope="singleton" init-method="init" destroy-method="destroy"
          p:username="tom" p:password="111"
    />
package com.woniuxy.test;

import com.woniuxy.model.Employee;
import com.woniuxy.model.User;
import org.springframework.context.ApplicationContext;
import org.springframework.context.support.ClassPathXmlApplicationContext;
import org.springframework.context.support.FileSystemXmlApplicationContext;

import java.util.ArrayList;
import java.util.HashMap;
import java.util.Properties;

public class Test {
    public static void main(String[] args) throws InterruptedException {
        ClassPathXmlApplicationContext context =
                new ClassPathXmlApplicationContext("applicationContext4.xml");
        System.out.println("================");
        Thread.sleep(3000);
//        for (int i = 0; i < 5; i++) {
//            System.out.println(context.getBean("user"));
//        }
        Object user = context.getBean("user");

        Thread.sleep(3000);
        context.close();//关闭容器

    }
}
自动装配
在标签有一个autowire属性,该属性的取值有:
自动装配:autowire
no :默认值,表示不使用自动装配
default :使用上级标签的自动装配策略
constructor :根据构造方法的形参类型进行装配,其实本质上也是使用的byType
byName :  根据bean标签的id值进行注入,要求对应类型的属性名称与在容器中注册过的bean的id值相匹配
byType :  根据类型进行注入
<?xml version="1.0" encoding="UTF-8"?>
<beans xmlns="http://www.springframework.org/schema/beans"
       xmlns:xsi="http://www.w3.org/2001/XMLSchema-instance"
       xmlns:util="http://www.springframework.org/schema/util"
       xmlns:p="http://www.springframework.org/schema/p"
       xmlns:c="http://www.springframework.org/schema/c"
       xsi:schemaLocation="http://www.springframework.org/schema/beans
       http://www.springframework.org/schema/beans/spring-beans.xsd
       http://www.springframework.org/schema/util
       http://www.springframework.org/schema/util/spring-util.xsd
" default-autowire="byType">

    <!--scope属性用于指定当前的bean是否是单例的,默认就是单例的。-->

    <!--
        自动装配:autowire
        no :默认值,表示不使用自动装配
        default :使用上级标签的自动装配策略
        constructor :根据构造方法的形参类型进行装配,其实本质上也是使用的byType
        byName :  根据bean标签的id值进行注入,要求对应类型的属性名称与在容器中注册过的bean的id值相匹配
        byType :  根据类型进行注入
    -->
    <bean id="user" class="com.woniuxy.model.User"
          scope="singleton" init-method="init" destroy-method="destroy"
          autowire="default" p:username="tom" p:password="111"
    />

    <bean id="teacher1" class="com.woniuxy.model.Teacher" p:name="jack"/>

    <!--
    autowire-candidate="false"
    使用byType进行自动装配时,如果找到了多个相同类型,
    此时bean标签上配置了autowire-candidate="false"的bean将会被排除
    -->
    <bean id="teacher2" class="com.woniuxy.model.Teacher" p:name="jacky" autowire-candidate="false"/>

</beans>
package com.woniuxy.model;

import lombok.AllArgsConstructor;
import lombok.Data;
import lombok.NoArgsConstructor;

import java.util.List;
import java.util.Map;
import java.util.Properties;

@Data
@AllArgsConstructor//全参构造
@NoArgsConstructor//无参构造
public class User {
    private String username;
    private String password;

    private Teacher teacher;

    public void init(){
        System.out.println("user init...");
    }


    public void destroy(){
        System.out.println("user destroy...");
    }

}
spring:注解实现
创建对象
@Component:不需要语义描述的类上
@Service:出现在service层的实现类上
@Repository:出现在dao层的实现类上
@Controller:放在控制器的类上
注入数据
1.基本类型和String
@Value
2.在容器中注册过的bean
自动装配:
@Autowired :byType
@Resource :先byName,如果byName没找到,再使用byType
3.复杂类型(集合类型)
控制作用域
@Scope:用于控制对象是否是单例的。相当于bean标签上的scope属性
生命周期相关
@PostConstruct :相当于bean标签上的init-method属性
@PreDestroy :相当于bean标签上的destroy-method属性
使用注解替换核心配置文件
@Configuration
@ComponentScan
@Bean
| 注解 | 所处位置 | 作用 |
|---|---|---|
| @Componet | 不需要语义的类上 | 将当前类的对象注册到容器中,如果不指定名称,则以类的首字母小写作为id |
| @Service | 业务层实现类上 | 同上 |
| @Repository | 数据访问层实现类上 | 同上 |
| @Controller | 控制层类上 | 同上 |
| @Value | 基本类型或String类型的属性上 | 将注解指定的值注入到属性中 |
| @Resource | 引用数据类型的属性上 | 自动装配,如果没有指定值,则使用属性名作为id去容器中查找,如果基于属性名没找到,则会使用属性类型到容器中进行查找 |
| @Autowired | 引用数据类型的属性上 | 自动装配,会基于属性类型去容器中查找 |
| @Scope | 类上 | 用于指定对应类型的bean的作用域(单例?多例?) |
| @PostConstructor | 类的自定义初始化方法上 | 相当于bean标签的init-method |
| @PreDestroy | 类的自定义销毁的方法上 | 相当于bean标签的destroy-method |
| @ComponentScan | 配置类上 | 指定扫描哪些包下的注解 |
| @Configuration | 配置类上 | 表示被注解的是一个配置类 |
| @Bean | 配置类的方法上 | 将方法的返回值注册到容器中,如果不指定值,则以方法名作为id |
| @Import | 主配置类上 | 用于引入子配置类,参数是子配置类的字节码对象 |
| @PropertySource | 配置类上 | 用于加载properties文件 |
| @Primary | 类上 | 指定自动装配时,如果出现了多个相同类型的对象,优先注入被@Primary注解的类型 |
| @Qualifier | 要自动装配的属性上 | 选择性的装配一个在容器中注册过的bean,参数为bean的id值 |
AOP
面向切面编程(aspect Oriented Programming)。
作用:通过预编译和运行期的动态代理,在不修改程序源代码的情况下,统一动态的给程序添加新的功能。

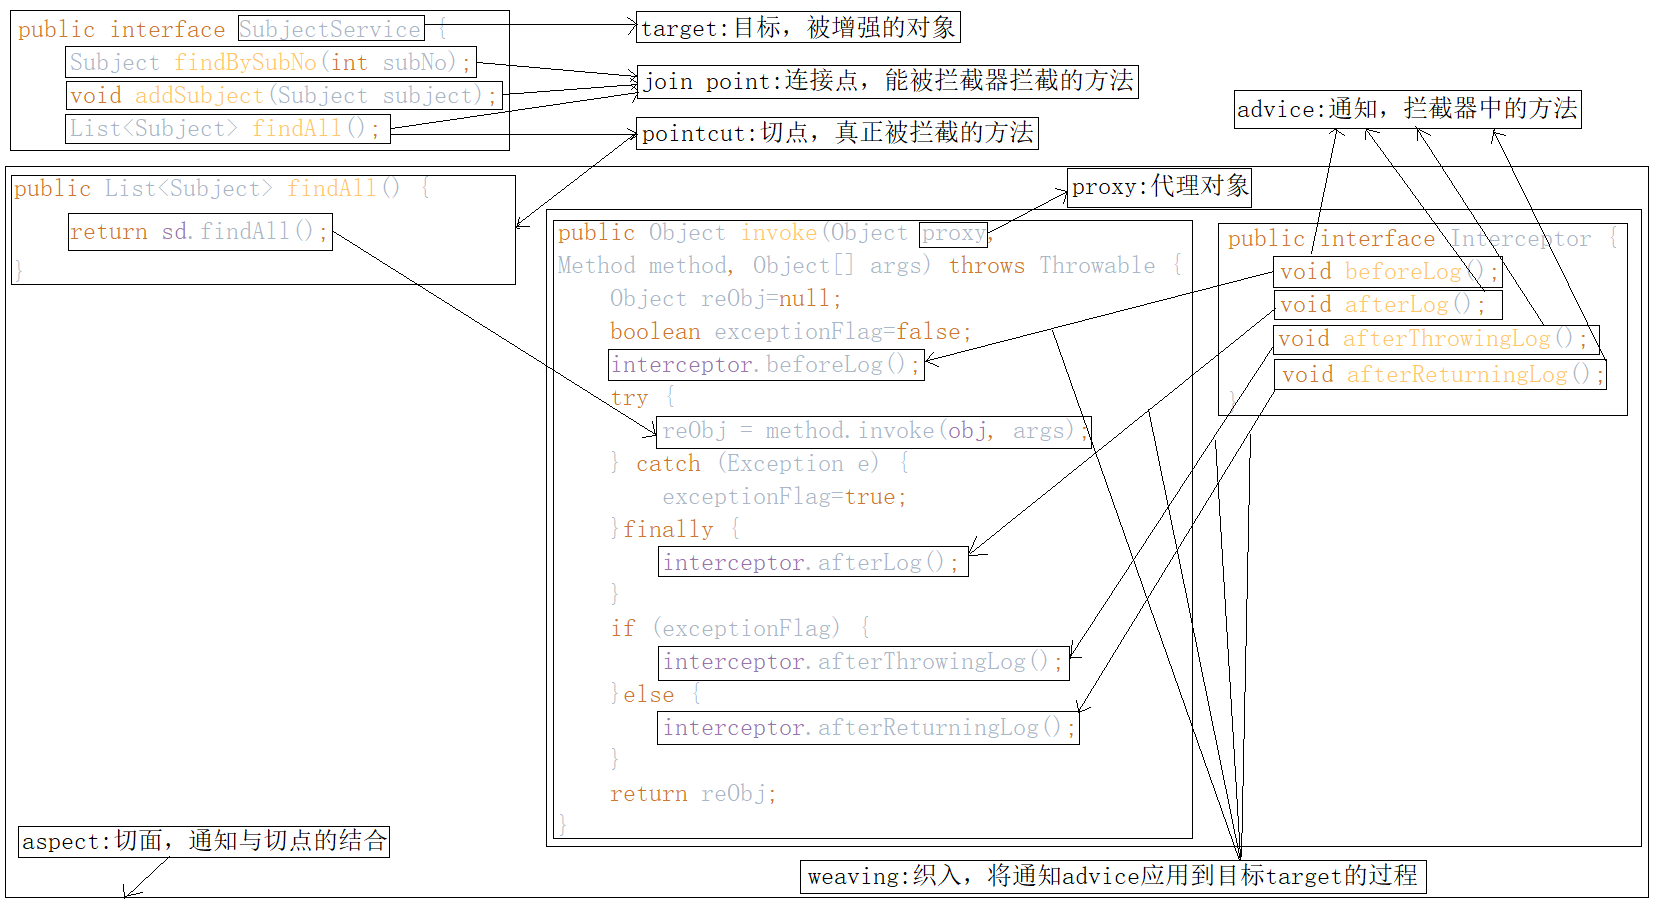
AOP术语
通知(增强):5种
前置通知:在真实对象方法执行之前执行的方法
返回通知:在真实对象方法正常执行完成之后执行的方法
异常通知:在真实对象方法执行过程中抛出异常之后执行的方法
最终通知(后置通知):真实对象方法执行过程中不管是否抛出异常,都会执行的方法
环绕通知:在环绕通知内,可以执行前置、返回、异常、最终通知的功能。
织入:把通知应用到真实对象方法执行的过程的动作,就称之为织入。
连接点:能够被通知进行增强的业务层方法,就是连接点。Join point
切入点:真正被通知做了增强的业务层方法,就是切入点。
切入点一定是连接点,连接点不一定是切入点。
切入点表达式:用于从连接点中将切入点筛选出来。
切面:通知与切入点的组合。
XML开发spring AOP
1、导入依赖:spring-aop aspectjweaver
<dependencies>
        <dependency>
            <groupId>org.springframework</groupId>
            <artifactId>spring-context</artifactId>
            <version>5.2.5.RELEASE</version>
        </dependency>

        <!--
        1、导入依赖:spring项目中要使用aop功能,必须导入spring-aop、aspectjweaver两个依赖
        aspectjweaver用于解析切入点表达式
        -->
        <dependency>
            <groupId>org.aspectj</groupId>
            <artifactId>aspectjweaver</artifactId>
            <version>1.9.6</version>
        </dependency>
    </dependencies>
2、编写配置文件
<?xml version="1.0" encoding="UTF-8"?>
<beans xmlns="http://www.springframework.org/schema/beans"
       xmlns:xsi="http://www.w3.org/2001/XMLSchema-instance"
       xmlns:aop="http://www.springframework.org/schema/aop"
       xsi:schemaLocation="http://www.springframework.org/schema/beans
       http://www.springframework.org/schema/beans/spring-beans.xsd
       http://www.springframework.org/schema/aop
       https://www.springframework.org/schema/aop/spring-aop.xsd">
    <!--配置业务层-->
    <bean id="userService" class="com.woniuxy.service.impl.UserServiceImpl"/>


    <!--配置通知类-->
    <bean id="transactionManager" class="com.woniuxy.utils.TransactionManager"/>

    <!--配置aop-->
    <!--2、导入aop命名空间-->
    <!--3、配置aop-->
    <aop:config>
        <!--
        配置切入点
        expression属性用于配置切入点表达式
        切入点表达式:其实就是一个方法的声明
        访问修饰符 返回值 方法名(参数列表)
        -->
        <aop:pointcut id="pt" expression="execution(* com.woniuxy.service.impl.*.*(..))"/>
        <!--
        配置切面
        ref:引入通知类
        -->
        <aop:aspect ref="transactionManager">
            <aop:before method="begin" pointcut-ref="pt"/>
            <aop:after-returning method="commit" pointcut-ref="pt"/>
            <aop:after-throwing method="rollback" pointcut-ref="pt"/>
            <aop:after method="close" pointcut-ref="pt"/>
        </aop:aspect>
    </aop:config>

</beans>
3、通知类
package com.woniuxy.utils;

public class TransactionManager {

    /**
     * 开启事务
     * 前置通知
     */
    public static void begin(){
        System.out.println("事务开启");
    }

    /**
     * 提交事务
     * 返回通知
     */
    public static void commit(){
        System.out.println("事务提交");
    }

    /**
     * 回滚事务
     * 异常通知
     */
    public static void rollback(){
        System.out.println("事务回滚");
    }

    /**
     * 释放资源
     * 最终通知
     */
    public static void close(){
        System.out.println("释放资源");
    }
}
4、测试
public class Test {
    public static void main(String[] args) {
        ClassPathXmlApplicationContext context = new ClassPathXmlApplicationContext("applicationContext.xml");
        UserService userService = context.getBean("userService", UserService.class);
        userService.add();
        userService.update();
        userService.delete();
    }
}
注解开发spring AOP
本质上就是将配置文件中的内容转成注解的实现。
业务层
package com.woniuxy.service.impl;

import com.woniuxy.service.UserService;
import org.springframework.stereotype.Service;

@Service("userService")
public class UserServiceImpl implements UserService {
    //public void com.woniuxy.service.impl.UserServiceImpl.add(参数列表)
    //  void com.woniuxy.service.impl.UserServiceImpl.add(参数列表)  :因为业务层方法都是public的,所以访问修饰符可以省略不写
    // * com.woniuxy.service.impl.UserServiceImpl.add(参数列表)   :第一个*表示方法返回值可以是任意类型
    // * com.woniuxy.service.impl.*.add(参数列表)     :第二个*表示匹配所有的业务层实现类
    // * com.woniuxy.service.impl.*.*(参数列表)       :第三个*表示匹配所有方法
    // * com.woniuxy.service.impl.*.*(..)           :  ..表示任意个数的任意类型的参数
    // * *..*.*(..)   虽然可以用,但是不要这么写
    @Override
    public void add() {
        System.out.println("执行新增");
    }

    @Override
    public void update() {
        System.out.println("执行修改");
    }

    @Override
    public void delete() {
        System.out.println("执行删除");
    }
}
通知类
package com.woniuxy.utils;

import org.aspectj.lang.annotation.*;
import org.springframework.stereotype.Component;

@Component
@Aspect//被它注解的类就是一个切面类
public class TransactionManager {

    @Pointcut("execution(* com.woniuxy.service.impl.*.*(..))")
    public void pt(){}


    /**
     * 开启事务
     * 前置通知
     */
    @Before("pt()")
    public static void begin(){
        System.out.println("事务开启");
    }

    /**
     * 提交事务
     * 返回通知
     */
    @AfterReturning("pt()")
    public static void commit(){
        System.out.println("事务提交");
    }

    /**
     * 回滚事务
     * 异常通知
     */
    @AfterThrowing("pt()")
    public static void rollback(){
        System.out.println("事务回滚");
    }

    /**
     * 释放资源
     * 最终通知
     */
    @After("pt()")
    public static void close(){
        System.out.println("释放资源");
    }
}
配置类
@Configuration
@ComponentScan({"com.woniuxy"})
@EnableAspectJAutoProxy//开启aspectj自动代理
public class AppConfig {
}
测试
public class Test {
    public static void main(String[] args) {
        AnnotationConfigApplicationContext context = new AnnotationConfigApplicationContext(AppConfig.class);
        UserService userService = context.getBean("userService", UserService.class);
        userService.add();
        userService.update();
        userService.delete();
    }
}
案例:
编程式事务处理----xml实现
dao层
package com.woniuxy.dao.impl;

import com.woniuxy.dao.AccountDao;
import com.woniuxy.model.Account;
import com.woniuxy.utils.ConnectionUtil;
import lombok.Data;
import org.springframework.stereotype.Repository;

import javax.annotation.Resource;
import java.sql.Connection;
import java.sql.PreparedStatement;
import java.sql.ResultSet;
import java.sql.SQLException;


@Data
public class AccountDaoImpl implements AccountDao {


    private ConnectionUtil connectionUtil;

    @Override
    public Account findByUserName(String username) {
        Account account = new Account();

        try {
            Connection connection = connectionUtil.getConnection();

            PreparedStatement ps = connection.prepareStatement("select * from account where username=?");

            ps.setObject(1,username);

            ResultSet resultSet = ps.executeQuery();

            while (resultSet.next()) {
                account.setId(resultSet.getInt("id"));
                account.setUsername(resultSet.getString("username"));
                account.setBalance(resultSet.getDouble("balance"));
            }

        } catch (SQLException e) {
            e.printStackTrace();
        }


        return account;
    }

    @Override
    public Integer updateAccount(Account account) {

        try {
            Connection connection = connectionUtil.getConnection();

            PreparedStatement ps = connection.prepareStatement("update account set balance=? where username=?");

            ps.setObject(1,account.getBalance());
            ps.setObject(2,account.getUsername());

            return ps.executeUpdate();

        } catch (SQLException e) {
            e.printStackTrace();
            return -1;
        }
    }
}
service层
package com.woniuxy.service.impl;

import com.woniuxy.dao.AccountDao;
import com.woniuxy.model.Account;
import com.woniuxy.service.AccountService;
import lombok.Data;
import org.springframework.stereotype.Service;

import javax.annotation.Resource;


@Data
public class AccountServiceImpl implements AccountService {


    private AccountDao accountDao;

    @Override
    public void transfer(String source, String target, Double money) {
        Account sourceAccount = accountDao.findByUserName(source);
        Account targetAccount = accountDao.findByUserName(target);
        if (sourceAccount.getBalance() > money) {
            sourceAccount.setBalance(sourceAccount.getBalance()-money);
            targetAccount.setBalance(targetAccount.getBalance()+money);

            accountDao.updateAccount(sourceAccount);
//            System.out.println(1/0);
            accountDao.updateAccount(targetAccount);

        }else{
            throw new RuntimeException("余额不足");
        }
    }
}
model层
@Data
public class Account {
    private Integer id;
    private String username;
    private Double balance;
}
ConnectionUtil
package com.woniuxy.utils;

import lombok.Data;
import org.springframework.stereotype.Component;

import javax.annotation.Resource;
import javax.sql.DataSource;
import java.sql.Connection;
import java.sql.SQLException;

@Data
public class ConnectionUtil {
    private ThreadLocal<Connection> threadLocal=new ThreadLocal();


    private DataSource dataSource;

    /**
     * 提供数据库连接的方法
     * @return
     */
    public Connection getConnection(){
        Connection connection = threadLocal.get();
        if (null == connection) {
            //创建数据库连接,并将之绑定到threadLocal上
            try {
                connection = dataSource.getConnection();
                threadLocal.set(connection);
                return threadLocal.get();
            } catch (SQLException e) {
                e.printStackTrace();
                throw new RuntimeException("获取数据库连接失败");
            }
        }else{
            return connection;
        }
    }

    /**
    * 该方法用于释放资源
    */
    public void close(){
        try {
            threadLocal.get().close();//关闭连接,返回给连接池
            threadLocal.remove();//从threadLocal对象上将绑定的数据库连接对象给移除掉
        } catch (SQLException e) {
            e.printStackTrace();
        }
    }


}
TransactionManager
package com.woniuxy.utils;

import lombok.Data;
import org.springframework.stereotype.Component;

import javax.annotation.Resource;
import java.sql.SQLException;

@Data
public class TransactionManager {

    private ConnectionUtil connectionUtil;

    /**
     * 开启事务
     * 前置通知
     */
    public  void begin(){
        try {
            connectionUtil.getConnection().setAutoCommit(false);//开启事务
        } catch (SQLException e) {
            e.printStackTrace();
        }
    }

    /**
     * 提交事务
     * 返回通知
     */
    public  void commit(){
        try {
            connectionUtil.getConnection().commit();//提交事务
        } catch (SQLException e) {
            e.printStackTrace();
        }
    }

    /**
     * 回滚事务
     * 异常通知
     */
    public  void rollback(){
        try {
            connectionUtil.getConnection().rollback();//回滚事务
        } catch (SQLException e) {
            e.printStackTrace();
        }
    }

    /**
     * 释放资源
     * 最终通知
     */
    public  void close(){
        connectionUtil.close();
    }

}
核心配置文件
<?xml version="1.0" encoding="UTF-8"?>
<beans xmlns="http://www.springframework.org/schema/beans"
xmlns:xsi="http://www.w3.org/2001/XMLSchema-instance" xmlns:aop="http://www.springframework.org/schema/aop"
xmlns:context="http://www.springframework.org/schema/context"
xsi:schemaLocation="http://www.springframework.org/schema/beans http://www.springframework.org/schema/beans/spring-beans.xsd http://www.springframework.org/schema/aop https://www.springframework.org/schema/aop/spring-aop.xsd http://www.springframework.org/schema/context https://www.springframework.org/schema/context/spring-context.xsd">
<!--配置数据源-->
<bean id="dataSource" class="com.alibaba.druid.pool.DruidDataSource">
<property name="driverClassName" value="com.mysql.jdbc.Driver"/>
<property name="url" value="jdbc:mysql:///bank?characterEncoding=utf-8&useSSL=false"/>
<property name="username" value="root"/>
<property name="password" value="root"/>
</bean>
<!--配置提供数据库连接的类-->
<bean id="connectionUtil" class="com.woniuxy.utils.ConnectionUtil">
<property name="dataSource" ref="dataSource"/>
</bean>
<!--配置数据访问层-->
<bean id="accountDao" class="com.woniuxy.dao.impl.AccountDaoImpl">
<property name="connectionUtil" ref="connectionUtil"/>
</bean>
<!--配置业务层-->
<bean id="accountService" class="com.woniuxy.service.impl.AccountServiceImpl">
<property name="accountDao" ref="accountDao"/>
</bean>
<!--配置通知类-->
<bean id="transactionManager" class="com.woniuxy.utils.TransactionManager">
<property name="connectionUtil" ref="connectionUtil"/>
</bean>
<!--配置aop-->
<aop:config>
<!--配置切入点-->
<aop:pointcut id="pt" expression="execution(* com.woniuxy.service.impl.*.*(..))"/>
<!--配置切面-->
<aop:aspect ref="transactionManager">
<aop:before method="begin" pointcut-ref="pt"/>
<aop:after-returning method="commit" pointcut-ref="pt"/>
<aop:after-throwing method="rollback" pointcut-ref="pt"/>
<aop:after method="close" pointcut-ref="pt"/>
</aop:aspect>
</aop:config>
</beans>
测试
public class Test {
    public static void main(String[] args) {
        ClassPathXmlApplicationContext context = new ClassPathXmlApplicationContext("applicationContext.xml");
        AccountService accountService = context.getBean("accountService", AccountService.class);
        accountService.transfer("tom","jack",1000.00);
    }
}
编程式事务处理—注解实现
将xml实现中的内容转移到注解即可实现功能。
配置类
package com.woniuxy.config;

import com.alibaba.druid.pool.DruidDataSource;
import org.springframework.beans.factory.annotation.Value;
import org.springframework.context.annotation.*;

import javax.sql.DataSource;
import javax.xml.crypto.Data;

@Configuration
@ComponentScan({"com.woniuxy"})
@EnableAspectJAutoProxy
@PropertySource(value = "classpath:jdbc.properties",ignoreResourceNotFound = true)
public class AppConfig {
    @Value("${jdbc.driver}")
    private String driver;
    @Value("${jdbc.url}")
    private String url;
    @Value("${jdbc.username}")
    private String username;
    @Value("${jdbc.password}")
    private String password;


    @Bean
    public DataSource dataSource(){
        DruidDataSource dataSource = new DruidDataSource();
        dataSource.setDriverClassName(driver);
        dataSource.setUrl(url);
        dataSource.setUsername(username);
        dataSource.setPassword(password);
        return dataSource;
    }


}
通知类
package com.woniuxy.utils;

import lombok.Data;
import org.aspectj.lang.ProceedingJoinPoint;
import org.aspectj.lang.annotation.*;
import org.springframework.stereotype.Component;

import javax.annotation.Resource;
import java.sql.SQLException;

@Data
@Component
@Aspect
public class TransactionManager {

    @Resource
    private ConnectionUtil connectionUtil;

    @Pointcut("execution(* com.woniuxy.service.impl.*.*(..))")
    public void pt(){}

    /**
     * 开启事务
     * 前置通知
     */
//    @Before("pt()")
    public  void begin(){
        try {
            connectionUtil.getConnection().setAutoCommit(false);//开启事务
        } catch (SQLException e) {
            e.printStackTrace();
        }
    }

    /**
     * 提交事务
     * 返回通知
     */
//    @AfterReturning("pt()")
    public  void commit(){
        try {
            connectionUtil.getConnection().commit();//提交事务
        } catch (SQLException e) {
            e.printStackTrace();
        }
    }

    /**
     * 回滚事务
     * 异常通知
     */
//    @AfterThrowing("pt()")
    public  void rollback(){
        try {
            connectionUtil.getConnection().rollback();//回滚事务
        } catch (SQLException e) {
            e.printStackTrace();
        }
    }

    /**
     * 释放资源
     * 最终通知
     */
//    @After("pt()")
    public  void close(){
        connectionUtil.close();
    }


    /**
     * 使用环绕通知解决spring5.2.7以下版本注解实现aop带来的bug
     * bug:5.2.7以下版本,使用注解实现aop时,通知执行顺序为: 前置->最终->返回或异常
     * 注意:使用了环绕通知,其他通知的注解应被注释,不能同时使用
     * @param pjp
     * @return
     */
    @Around("pt()")
    public Object around(ProceedingJoinPoint pjp){

        Object returnValue = null;

        Object[] args = pjp.getArgs();//获取了真实对象方法的参数列表
        //开启事务
        begin();
        try {
            returnValue = pjp.proceed(args);//相当于执行了真实对象的方法  method.invoke()
            //提交事务
            commit();
        } catch (Throwable throwable) {
            throwable.printStackTrace();
            //回滚事务
            rollback();
        } finally {
            //释放资源
            close();
        }

        return returnValue;
    }


}
获取连接的工具类
package com.woniuxy.utils;

import lombok.Data;
import org.springframework.stereotype.Component;

import javax.annotation.Resource;
import javax.sql.DataSource;
import java.sql.Connection;
import java.sql.SQLException;

@Component
@Data
public class ConnectionUtil {
    private ThreadLocal<Connection> threadLocal=new ThreadLocal();

    @Resource
    private DataSource dataSource;

    /**
     * 提供数据库连接的方法
     * @return
     */
    public Connection getConnection(){
        Connection connection = threadLocal.get();
        if (null == connection) {
            //创建数据库连接,并将之绑定到threadLocal上
            try {
                connection = dataSource.getConnection();
                threadLocal.set(connection);
                return threadLocal.get();
            } catch (SQLException e) {
                e.printStackTrace();
                throw new RuntimeException("获取数据库连接失败");
            }
        }else{
            return connection;
        }
    }

    public void close(){
        try {
            threadLocal.get().close();//关闭连接,返回给连接池
            threadLocal.remove();//从threadLocal对象上将绑定的数据库连接对象给移除掉
        } catch (SQLException e) {
            e.printStackTrace();
        }
    }


}
数据访问层
package com.woniuxy.dao.impl;

import com.woniuxy.dao.AccountDao;
import com.woniuxy.model.Account;
import com.woniuxy.utils.ConnectionUtil;
import lombok.Data;
import org.springframework.stereotype.Repository;

import javax.annotation.Resource;
import java.sql.Connection;
import java.sql.PreparedStatement;
import java.sql.ResultSet;
import java.sql.SQLException;


@Repository("accountDao")
@Data
public class AccountDaoImpl implements AccountDao {

    @Resource
    private ConnectionUtil connectionUtil;

    @Override
    public Account findByUserName(String username) {
        Account account = new Account();

        try {
            Connection connection = connectionUtil.getConnection();

            PreparedStatement ps = connection.prepareStatement("select * from account where username=?");

            ps.setObject(1,username);

            ResultSet resultSet = ps.executeQuery();

            while (resultSet.next()) {
                account.setId(resultSet.getInt("id"));
                account.setUsername(resultSet.getString("username"));
                account.setBalance(resultSet.getDouble("balance"));
            }

        } catch (SQLException e) {
            e.printStackTrace();
        }


        return account;
    }

    @Override
    public Integer updateAccount(Account account) {

        try {
            Connection connection = connectionUtil.getConnection();

            PreparedStatement ps = connection.prepareStatement("update account set balance=? where username=?");

            ps.setObject(1,account.getBalance());
            ps.setObject(2,account.getUsername());

            return ps.executeUpdate();

        } catch (SQLException e) {
            e.printStackTrace();
            return -1;
        }
    }
}
业务层
package com.woniuxy.service.impl;

import com.woniuxy.dao.AccountDao;
import com.woniuxy.model.Account;
import com.woniuxy.service.AccountService;
import lombok.Data;
import org.springframework.stereotype.Service;

import javax.annotation.Resource;


@Service("accountService")
@Data
public class AccountServiceImpl implements AccountService {

    @Resource
    private AccountDao accountDao;

    @Override
    public void transfer(String source, String target, Double money) {
        Account sourceAccount = accountDao.findByUserName(source);
        Account targetAccount = accountDao.findByUserName(target);
        if (sourceAccount.getBalance() > money) {
            sourceAccount.setBalance(sourceAccount.getBalance()-money);
            targetAccount.setBalance(targetAccount.getBalance()+money);

            accountDao.updateAccount(sourceAccount);
//            System.out.println(1/0);
            accountDao.updateAccount(targetAccount);

        }else{
            throw new RuntimeException("余额不足");
        }
    }
}
测试
public class Test {
    public static void main(String[] args) {
        AnnotationConfigApplicationContext context = new AnnotationConfigApplicationContext(AppConfig.class);
        AccountService accountService = context.getBean("accountService", AccountService.class);
        accountService.transfer("tom","jack",1000.00);
    }
}
配置文件如何加载properties文件
jdbc.properties
jdbc.driver=com.mysql.jdbc.Driver
jdbc.url=jdbc:mysql:///bank?characterEncoding=utf-8&useSSL=false
jdbc.username=root
jdbc.password=root
配置文件
<?xml version="1.0" encoding="UTF-8"?>
<beans xmlns="http://www.springframework.org/schema/beans"
       xmlns:xsi="http://www.w3.org/2001/XMLSchema-instance" xmlns:aop="http://www.springframework.org/schema/aop"
       xmlns:context="http://www.springframework.org/schema/context"
       xsi:schemaLocation="http://www.springframework.org/schema/beans http://www.springframework.org/schema/beans/spring-beans.xsd http://www.springframework.org/schema/aop https://www.springframework.org/schema/aop/spring-aop.xsd http://www.springframework.org/schema/context https://www.springframework.org/schema/context/spring-context.xsd">

    <!--将jdbc.properties文件加载到容器中-->
    <context:property-placeholder location="classpath:jdbc.properties"/>

    <!--配置数据源-->
    <bean id="dataSource" class="com.alibaba.druid.pool.DruidDataSource">
        <property name="driverClassName" value="${jdbc.driver}"/>
        <property name="url" value="${jdbc.url}"/>
        <property name="username" value="${jdbc.username}"/>
        <property name="password" value="${jdbc.password}"/>
    </bean>

    ......
</beans>
注意:加载properties文件时,properties文件中的key必须要带前缀,否则会出错。前缀是什么不要紧,但一定要有。
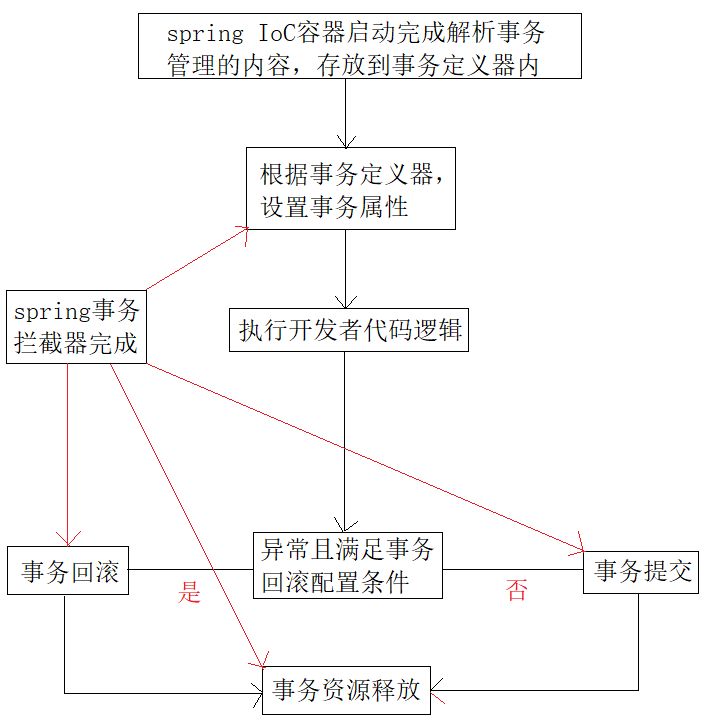
声明式事务(作用于业务层)
spring提供了一个接口(platformTransactionManager),用于完成声明式事务的处理。
platformTransactionManager接口下有两个常见的实现类:DataSourceTransactionManager和HibernateTransactionManager(专供hibernate框架使用)。
spring认为开启事务和释放资源是公共操作,因此直接封装了这两步操作。真正需要我们操作的,其实就只有commit和rollback操作。
要使用声明式事务,必须导入两个依赖:spring-jdbc、 spring-tx
spring声明式事务(XML)
1、引入依赖
<?xml version="1.0" encoding="UTF-8"?>
<project xmlns="http://maven.apache.org/POM/4.0.0"
         xmlns:xsi="http://www.w3.org/2001/XMLSchema-instance"
         xsi:schemaLocation="http://maven.apache.org/POM/4.0.0 http://maven.apache.org/xsd/maven-4.0.0.xsd">
    <modelVersion>4.0.0</modelVersion>

    <groupId>com.woniuxy</groupId>
    <artifactId>20211012</artifactId>
    <version>1.0-SNAPSHOT</version>


    <dependencies>
        <dependency>
            <groupId>org.springframework</groupId>
            <artifactId>spring-context</artifactId>
            <version>5.2.8.RELEASE</version>
        </dependency>

        <dependency>
            <groupId>org.aspectj</groupId>
            <artifactId>aspectjweaver</artifactId>
            <version>1.9.6</version>
        </dependency>

        <dependency>
            <groupId>org.projectlombok</groupId>
            <artifactId>lombok</artifactId>
            <version>1.18.18</version>
        </dependency>

        <dependency>
            <groupId>com.alibaba</groupId>
            <artifactId>druid</artifactId>
            <version>1.1.22</version>
        </dependency>

        <dependency>
            <groupId>mysql</groupId>
            <artifactId>mysql-connector-java</artifactId>
            <version>5.1.45</version>
        </dependency>

        <!--导入spring-jdbc依赖,原因是声明式事务要使用DataSourceTransactionManager类在jdbc包中,
        与此同时,spring-jdbc要依赖于srping-tx模块,maven会自动将其引入到项目中-->
        <dependency>
            <groupId>org.springframework</groupId>
            <artifactId>spring-jdbc</artifactId>
            <version>5.2.8.RELEASE</version>
        </dependency>

    </dependencies>


</project>
2、编写配置
<?xml version="1.0" encoding="UTF-8"?>
<beans xmlns="http://www.springframework.org/schema/beans"
       xmlns:xsi="http://www.w3.org/2001/XMLSchema-instance" xmlns:aop="http://www.springframework.org/schema/aop"
       xmlns:context="http://www.springframework.org/schema/context" xmlns:tx="http://www.springframework.org/schema/tx"
       xsi:schemaLocation="http://www.springframework.org/schema/beans
       http://www.springframework.org/schema/beans/spring-beans.xsd
       http://www.springframework.org/schema/aop
       https://www.springframework.org/schema/aop/spring-aop.xsd
       http://www.springframework.org/schema/context
       https://www.springframework.org/schema/context/spring-context.xsd http://www.springframework.org/schema/tx http://www.springframework.org/schema/tx/spring-tx.xsd">

    <!--将jdbc.properties文件加载到容器中-->
    <context:property-placeholder location="classpath:jdbc.properties"/>

    <!--配置数据源-->
    <bean id="dataSource" class="com.alibaba.druid.pool.DruidDataSource">
        <property name="driverClassName" value="${a.driver}"/>
        <property name="url" value="${a.url}"/>
        <property name="username" value="${a.username}"/>
        <property name="password" value="${a.password}"/>
    </bean>

    <!--配置jdbcTemplate:用于执行SQL语句-->
    <bean id="jdbcTemplate" class="org.springframework.jdbc.core.JdbcTemplate">
        <property name="dataSource" ref="dataSource"/>
    </bean>

    <!--配置数据访问层-->
    <bean id="accountDao" class="com.woniuxy.dao.impl.AccountDaoImpl">
        <property name="jdbcTemplate" ref="jdbcTemplate"/>
    </bean>

    <!--配置业务层-->
    <bean id="accountService" class="com.woniuxy.service.impl.AccountServiceImpl">
        <property name="accountDao" ref="accountDao"/>
    </bean>

    <!--配置声明式事务-->
    <!--1、配置事务管理器-->
    <bean id="transactionManager" class="org.springframework.jdbc.datasource.DataSourceTransactionManager">
        <property name="dataSource" ref="dataSource"/>
    </bean>

    <!--2、配置事务通知-->
    <tx:advice id="txAdvice" transaction-manager="transactionManager">
        <!--配置事务属性-->
        <tx:attributes>
            <!--
            配置事务行为
            name:切入点表达式所匹配到的业务层方法名称   可以使用*号进行通配  直接使用*号表示所有的方法
            isolation:设定事务隔离级别,用于保证数据的完整性。
				DEFAULT,默认使用数据库的事务隔离级别
				READ_UNCOMMITTED,可读取未提交数据,有可能出现脏读、不可重复读、幻读
				READ_COMMITTED,可读取已提交数据,有可能出现不可重复读、幻读
				REPEATABLE_READ,读取的数据表被加行锁,有可能出现幻读
				SERIALIZABLE,读取的数据表加表锁,安全程度最高
			propagation:当被事务控制的业务方法进行相互调用时,设定事务的传播行为。
				REQUIRED,默认,之前的操作中有事务时加入该事务,没有事务时创建一个事务(增删改);
				SUPPORTS,之前的操作中有事务时加入该事务,没有事务时不使用事务(查询)
				MANDATORY,必须在事务内部执行,没有事务就报异常
				REQUIRES_NEW,将原有事务挂起,新建一个事务执行自己的操作,两个事务之间没有关联
				NOT_SUPPORTED,必须在非事务内部执行,如果有事务存在,将事务挂起,执行自己的操作
				NEVER,不能在事务内部执行,有事务就报异常
				NESTED,之前的操作有事务时,创建一个嵌套事务,两个事务之间会产生关联
			read-only:设定事务是否只读。默认false,读写(增删改),true,只读(查询)
			timeout:设定事务的超时时间,默认-1,永不超时,设定数值时,以秒为单位计算
 			no-rollback-for:
				设定一个异常,事务执行过程中出现该异常时不回滚,其它异常会回滚,不设默认全回滚
			rollback-for:
				设定一个异常,事务执行过程中出现该异常时回滚,其它异常不会回滚,不设默认全回滚
				建议手动抛异常时设定该属性
            -->
            <tx:method name="*" propagation="REQUIRED" read-only="false"/>
            <tx:method name="find*" propagation="SUPPORTS" read-only="true"/>
        </tx:attributes>
    </tx:advice>

    <!--3、配置aop-->
    <aop:config>
        <aop:pointcut id="pt" expression="execution(* com.woniuxy.service.impl.*.*(..))"/>
        <aop:advisor advice-ref="txAdvice" pointcut-ref="pt"/>
    </aop:config>


    <!--
        声明式事务的实现步骤:
        1、导入相关依赖:spring-jdbc  spring-tx
        2、在配置文件中进行相关配置
        2.1 配置jdbcTemplate:用于执行sql语句
        2.2 配置事务管理器: DataSourceTransactionManager  要引用数据源
        2.3 配置事务通知:
            <tx:advice id  transaction-manager="事务管理器的id">
                <tx:attributes>
                    <tx:method name="*" propagation="required" read-only="false"/>
                    <tx:method name="find*" propagation="supports" read-only="true"/>

        2.4 配置aop
        <aop:config>
            <aop:pointcut id expression=""/>
            <aop:advisor advice-ref="事务通知的id" pointcut-ref="切入点的id"/>
    -->


</beans>
数据访问层
package com.woniuxy.dao.impl;

import com.woniuxy.dao.AccountDao;
import com.woniuxy.model.Account;
import lombok.Data;
import org.springframework.jdbc.core.BeanPropertyRowMapper;
import org.springframework.jdbc.core.JdbcTemplate;
import org.springframework.stereotype.Repository;

import javax.annotation.Resource;


@Data
public class AccountDaoImpl implements AccountDao {

    private JdbcTemplate jdbcTemplate;

    @Override
    public Account findByUserName(String username) {
        //queryForObject(String sql, RowMapper<T> rowMapper, @Nullable Object... args)
        //sql:要执行的sql语句
        //RowMapper:将查询结果映射成某个类型的对象,使用接口的实现类BeanPropertyRowMapper
        //args:填充sql语句中的?占位符
        Account account = jdbcTemplate.queryForObject("select * from account where username=?",
                new BeanPropertyRowMapper<Account>(Account.class),
                username);
        return account;
    }

    @Override
    public Integer updateAccount(Account account) {
        //update(String sql, @Nullable Object... args)
        //sql:要执行的sql语句
        //args:填充sql语句中的?占位符
        int i = jdbcTemplate.update("update account set balance=? where username=?",
                account.getBalance(), account.getUsername());
        return i;
    }
}
spring声明式事务(注解)
@EnableTransactionManagement:写在配置类上的,用于开启spring对注解事务的支持
@Transactional:写业务层实现类上或者业务层实现类的方法上,用于标记对应类中的方法是否需要事务处理
配置类
package com.woniuxy.config;

import com.alibaba.druid.pool.DruidDataSource;
import org.springframework.beans.factory.annotation.Value;
import org.springframework.context.annotation.Bean;
import org.springframework.context.annotation.ComponentScan;
import org.springframework.context.annotation.Configuration;
import org.springframework.context.annotation.PropertySource;
import org.springframework.jdbc.core.JdbcTemplate;
import org.springframework.jdbc.datasource.DataSourceTransactionManager;
import org.springframework.transaction.annotation.EnableTransactionManagement;

import javax.sql.DataSource;

@Configuration
@ComponentScan({"com.woniuxy"})
@EnableTransactionManagement
@PropertySource(value = "classpath:jdbc.properties",ignoreResourceNotFound = true)
public class AppConfig {
    @Value("${jdbc.driver}")
    private String driver;
    @Value("${jdbc.url}")
    private String url;
    @Value("${jdbc.username}")
    private String username;
    @Value("${jdbc.password}")
    private String password;

    @Bean
    public DataSource dataSource(){
        DruidDataSource dataSource = new DruidDataSource();
        dataSource.setDriverClassName(driver);
        dataSource.setUrl(url);
        dataSource.setUsername(username);
        dataSource.setPassword(password);
        return dataSource;
    }

    @Bean
    public JdbcTemplate jdbcTemplate(DataSource dataSource){
        JdbcTemplate jdbcTemplate = new JdbcTemplate();
        jdbcTemplate.setDataSource(dataSource);
        return jdbcTemplate;
    }

    @Bean
    public DataSourceTransactionManager dataSourceTransactionManager(DataSource dataSource){
        DataSourceTransactionManager dataSourceTransactionManager = new DataSourceTransactionManager();
        dataSourceTransactionManager.setDataSource(dataSource);
        return dataSourceTransactionManager;
    }

}
业务层实现类
package com.woniuxy.service.impl;

import com.woniuxy.dao.AccountDao;
import com.woniuxy.model.Account;
import com.woniuxy.service.AccountService;
import lombok.Data;
import org.springframework.stereotype.Service;
import org.springframework.transaction.annotation.Propagation;
import org.springframework.transaction.annotation.Transactional;

import javax.annotation.Resource;


@Service("accountService")
@Data
@Transactional//该注解如果加在类上,表示类中所有方法都会需要事务的支持
public class AccountServiceImpl implements AccountService {

    @Resource
    private AccountDao accountDao;

    @Override
    public void transfer(String source, String target, Double money) {
        Account sourceAccount = accountDao.findByUserName(source);
        Account targetAccount = accountDao.findByUserName(target);
        if (sourceAccount.getBalance() > money) {
            sourceAccount.setBalance(sourceAccount.getBalance()-money);
            targetAccount.setBalance(targetAccount.getBalance()+money);

            accountDao.updateAccount(sourceAccount);
            System.out.println(1/0);
            accountDao.updateAccount(targetAccount);

        }else{
            throw new RuntimeException("余额不足");
        }
    }


    @Override
    @Transactional(propagation = Propagation.SUPPORTS,readOnly = true)//指定被注解的方法使用不同的事务策略
    public void find(String source, String target, Double money) {
        Account sourceAccount = accountDao.findByUserName(source);
        Account targetAccount = accountDao.findByUserName(target);
        if (sourceAccount.getBalance() > money) {
            sourceAccount.setBalance(sourceAccount.getBalance()-money);
            targetAccount.setBalance(targetAccount.getBalance()+money);

            accountDao.updateAccount(sourceAccount);
            System.out.println(1/0);
            accountDao.updateAccount(targetAccount);

        }else{
            throw new RuntimeException("余额不足");
        }
    }


}
spring整合mybatis
整合时,需要单独引入一个依赖:mybatis-spring,mybatis社区提供了该依赖。
整合之前,需要保证spring的环境是正常的,也要保证mybatis环境是正常的。
整合时,主要是要将mybatis的配置文件中的内容转移到spring配置文件中来。
mybatis配置文件
<?xml version="1.0" encoding="UTF-8"?>
<!DOCTYPE configuration
        PUBLIC "-//mybatis.org//DTD config 3.0//EN"
        "http://mybatis.org/dtd/mybatis-3-config.dtd">
<configuration>
    <!-- 配置项目开发期间的运行环境,指定事务处理方式和数据库连接信息,环境可以配置多个。
 		<environments>标签的default属性指向哪个<environment>标签的id属性,哪个环境就被使用。
	-->
    <environments default="mysql">
        <environment id="mysql">
            <!-- 配置事务管理器 -->
            <transactionManager type="JDBC"/>
            <!-- 配置数据源,<dataSource>的type属性可取值:POOLED、UNPOOLED、JNDI
 				POOLED:使用连接池
				UNPOOLED:不使用连接池
				JNDI:使用JNDI
			-->
            <dataSource type="POOLED">
                <property name="driver" value="com.mysql.jdbc.Driver"/>
                <property name="url" value="jdbc:mysql:///bank?characterEncoding=UTF-8"/>
                <property name="username" value="root"/>
                <property name="password" value="root"/>
            </dataSource>
        </environment>
    </environments>
    <!-- 配置映射器路径 -->
    <mappers>
        <!-- 常见第一种引入映射器XML,通过文件路径引入
		<mapper resource="com/wsjy/mapper/StudentMapper.xml"/>-->
        <!-- 常见第二种引入映射器接口,通过包名引入,将对应包下的所有映射器接口都引入 -->
        <package name="com.woniuxy.transfer.mapper"/>
        <!-- 常见第三种引入某个具体的映射器接口,通过类注册引入,使用类的全限定名
		<mapper class="com.wsjy.mapper.StudentMapper"/>-->
    </mappers>
</configuration>
上述配置文件中,标签主要用于提供数据源,在spring项目中可以使用sqlsessionFactoryBean来将对应环境配置到spring环境中。sqlsessionFactoryBean是由mybatis-spring项目提供,可以直接在spring配置文件中使用bean标签的形式将其配置进来。数据源datasource可以使用容器中配置的druid数据源来替换。
	<bean id="dataSource" class="com.alibaba.druid.pool.DruidDataSource">
        <property name="driverClassName" value="com.mysql.jdbc.Driver"/>
        <property name="url" value="jdbc:mysql:///bank?useSSL=false"/>
        <property name="username" value="root"/>
        <property name="password" value="root"/>
    </bean>

    <!--
    sqlsessionFactoryBean
    相当于把mybatis配置文件中运行环境给配置进来了。
    -->
    <bean id="sqlSessionFactory" class="org.mybatis.spring.SqlSessionFactoryBean">
        <property name="dataSource" ref="dataSource"/>
    </bean>
mybatis配置文件中的主要用于指定扫描的包,在spring项目中可以使用mapperScannerConfigurer来替换掉这部分内容。
	<!--
    mapperScannerConfigurer
    相当于mybatis配置文件中的扫描包的部分配置进来了,
    容器启动时,mapperScannerConfigurer就会去扫描对应的包下的接口,生成其代理对象,并注册到容器中。
    -->
    <bean id="mapperScannerConfigurer" class="org.mybatis.spring.mapper.MapperScannerConfigurer">
        <property name="basePackage" value="com.woniuxy.mapper"/>
    </bean>
需要注意的是,spring项目中如果要进行数据库操作,需要使用spring-jdbc包的依赖。因此做整合时,该依赖也必须导入项目中。
整合案例1(xml实现):
1、导入依赖
<dependencies>

        <dependency>
            <groupId>org.springframework</groupId>
            <artifactId>spring-context</artifactId>
            <version>5.2.8.RELEASE</version>
        </dependency>

        <dependency>
            <groupId>com.alibaba</groupId>
            <artifactId>druid</artifactId>
            <version>1.2.3</version>
        </dependency>

        <dependency>
            <groupId>mysql</groupId>
            <artifactId>mysql-connector-java</artifactId>
            <version>5.1.45</version>
        </dependency>

        <dependency>
            <groupId>org.mybatis</groupId>
            <artifactId>mybatis</artifactId>
            <version>3.4.6</version>
        </dependency>

        <!--提供对数据库操作的支持-->
        <dependency>
            <groupId>org.springframework</groupId>
            <artifactId>spring-jdbc</artifactId>
            <version>5.2.8.RELEASE</version>
        </dependency>

        <dependency>
            <groupId>org.projectlombok</groupId>
            <artifactId>lombok</artifactId>
            <version>1.18.18</version>
        </dependency>

        <!--该依赖由mybatis提供,用于spring整合mybatis-->
        <dependency>
            <groupId>org.mybatis</groupId>
            <artifactId>mybatis-spring</artifactId>
            <version>1.3.2</version>
        </dependency>


    </dependencies>
2、编写配置文件
<?xml version="1.0" encoding="UTF-8"?>
<beans xmlns="http://www.springframework.org/schema/beans"
       xmlns:xsi="http://www.w3.org/2001/XMLSchema-instance"
       xsi:schemaLocation="http://www.springframework.org/schema/beans http://www.springframework.org/schema/beans/spring-beans.xsd">
    <!--配置业务层-->
    <bean id="userService" class="com.woniuxy.service.impl.UserServiceImpl">
        <property name="userMapper" ref="userMapper"/>
    </bean>

	<!--配置数据源-->
    <bean id="dataSource" class="com.alibaba.druid.pool.DruidDataSource">
        <property name="driverClassName" value="com.mysql.jdbc.Driver"/>
        <property name="url" value="jdbc:mysql:///bank?useSSL=false"/>
        <property name="username" value="root"/>
        <property name="password" value="root"/>
    </bean>

    <!--
    sqlsessionFactoryBean
    相当于把mybatis配置文件中运行环境给配置进来了。
    -->
    <bean id="sqlSessionFactory" class="org.mybatis.spring.SqlSessionFactoryBean">
        <property name="dataSource" ref="dataSource"/>
    </bean>

    <!--
    mapperScannerConfigurer
    相当于mybatis配置文件中的扫描包的部分配置进来了,
    容器启动时,mapperScannerConfigurer就会去扫描对应的包下的接口,生成其代理对象,并注册到容器中。
    -->
    <bean id="mapperScannerConfigurer" class="org.mybatis.spring.mapper.MapperScannerConfigurer">
        <property name="basePackage" value="com.woniuxy.mapper"/>
    </bean>


</beans>
3、编写各层的类和接口
数据访问层(mybatis实现)
public interface UserMapper {

    @Select("select * from t_user where username=#{username}")
    User findByUserName(String username);
}
业务层
@Data
public class UserServiceImpl implements UserService {

    private UserMapper userMapper;
    @Override
    public User findByUserName(String username) {
        return userMapper.findByUserName(username);
    }
}
实体类
@Data
public class User {
    private Integer id;
    private String username;
    private String password;
}
测试类
public class Test {
    public static void main(String[] args) throws IOException {
        ClassPathXmlApplicationContext context = new ClassPathXmlApplicationContext("applicationContext.xml");
        UserService userService = context.getBean("userService", UserService.class);
        User tom = userService.findByUserName("tom");
        System.out.println(tom);
    }
}
整合案例2(注解实现)
使用注解来完成整合过程,其实就是将xml配置文件中的内容转移成注解的实现。因此,只需要在配置类中使用@Bean注解将数据源,sqlsessionFactoryBean,mapperScannerConfigurer注册到容器中即可。
配置类
package com.woniuxy.config;

import com.alibaba.druid.pool.DruidDataSource;
import org.mybatis.spring.SqlSessionFactoryBean;
import org.mybatis.spring.mapper.MapperScannerConfigurer;
import org.springframework.context.annotation.Bean;
import org.springframework.context.annotation.ComponentScan;
import org.springframework.context.annotation.Configuration;

import javax.sql.DataSource;

@Configuration
@ComponentScan({"com.woniuxy"})
public class AppConfig {

    @Bean
    public DataSource dataSource(){
        DruidDataSource dataSource = new DruidDataSource();
        dataSource.setDriverClassName("com.mysql.jdbc.Driver");
        dataSource.setUrl("jdbc:mysql:///bank?useSSL=false");
        dataSource.setUsername("root");
        dataSource.setPassword("root");
        return dataSource;
    }

    @Bean
    public SqlSessionFactoryBean sqlSessionFactoryBean(DataSource dataSource){
        SqlSessionFactoryBean sqlSessionFactoryBean = new SqlSessionFactoryBean();
        sqlSessionFactoryBean.setDataSource(dataSource);
        return sqlSessionFactoryBean;
    }

    @Bean
    public MapperScannerConfigurer mapperScannerConfigurer(){
        MapperScannerConfigurer mapperScannerConfigurer = new MapperScannerConfigurer();
        mapperScannerConfigurer.setBasePackage("com.woniuxy.mapper");
        return mapperScannerConfigurer;
    }


}
业务层实现类
package com.woniuxy.service.impl;

import com.woniuxy.mapper.UserMapper;
import com.woniuxy.model.User;
import com.woniuxy.service.UserService;
import lombok.Data;
import org.springframework.stereotype.Service;

import javax.annotation.Resource;

@Data
@Service("userService")
public class UserServiceImpl implements UserService {

    @Resource
    private UserMapper userMapper;
    @Override
    public User findByUserName(String username) {
        return userMapper.findByUserName(username);
    }

}
测试类
public class Test {
    public static void main(String[] args) throws IOException {
        AnnotationConfigApplicationContext context = new AnnotationConfigApplicationContext(AppConfig.class);
        UserService userService = context.getBean("userService", UserService.class);
        User tom = userService.findByUserName("tom");
        System.out.println(tom);
    }
}
@Override
public User findByUserName(String username) {
    return userMapper.findByUserName(username);
}
}
实体类

```java
@Data
public class User {
    private Integer id;
    private String username;
    private String password;
}
测试类
public class Test {
    public static void main(String[] args) throws IOException {
        ClassPathXmlApplicationContext context = new ClassPathXmlApplicationContext("applicationContext.xml");
        UserService userService = context.getBean("userService", UserService.class);
        User tom = userService.findByUserName("tom");
        System.out.println(tom);
    }
}
整合案例2(注解实现)
使用注解来完成整合过程,其实就是将xml配置文件中的内容转移成注解的实现。因此,只需要在配置类中使用@Bean注解将数据源,sqlsessionFactoryBean,mapperScannerConfigurer注册到容器中即可。
配置类
package com.woniuxy.config;

import com.alibaba.druid.pool.DruidDataSource;
import org.mybatis.spring.SqlSessionFactoryBean;
import org.mybatis.spring.mapper.MapperScannerConfigurer;
import org.springframework.context.annotation.Bean;
import org.springframework.context.annotation.ComponentScan;
import org.springframework.context.annotation.Configuration;

import javax.sql.DataSource;

@Configuration
@ComponentScan({"com.woniuxy"})
public class AppConfig {

    @Bean
    public DataSource dataSource(){
        DruidDataSource dataSource = new DruidDataSource();
        dataSource.setDriverClassName("com.mysql.jdbc.Driver");
        dataSource.setUrl("jdbc:mysql:///bank?useSSL=false");
        dataSource.setUsername("root");
        dataSource.setPassword("root");
        return dataSource;
    }

    @Bean
    public SqlSessionFactoryBean sqlSessionFactoryBean(DataSource dataSource){
        SqlSessionFactoryBean sqlSessionFactoryBean = new SqlSessionFactoryBean();
        sqlSessionFactoryBean.setDataSource(dataSource);
        return sqlSessionFactoryBean;
    }

    @Bean
    public MapperScannerConfigurer mapperScannerConfigurer(){
        MapperScannerConfigurer mapperScannerConfigurer = new MapperScannerConfigurer();
        mapperScannerConfigurer.setBasePackage("com.woniuxy.mapper");
        return mapperScannerConfigurer;
    }


}
业务层实现类
package com.woniuxy.service.impl;

import com.woniuxy.mapper.UserMapper;
import com.woniuxy.model.User;
import com.woniuxy.service.UserService;
import lombok.Data;
import org.springframework.stereotype.Service;

import javax.annotation.Resource;

@Data
@Service("userService")
public class UserServiceImpl implements UserService {

    @Resource
    private UserMapper userMapper;
    @Override
    public User findByUserName(String username) {
        return userMapper.findByUserName(username);
    }

}
测试类
public class Test {
    public static void main(String[] args) throws IOException {
        AnnotationConfigApplicationContext context = new AnnotationConfigApplicationContext(AppConfig.class);
        UserService userService = context.getBean("userService", UserService.class);
        User tom = userService.findByUserName("tom");
        System.out.println(tom);
    }
}


 1904
1904

 被折叠的 条评论
为什么被折叠?
被折叠的 条评论
为什么被折叠?
 到【灌水乐园】发言


