


 本文详细介绍了如何在Spring Boot项目中整合MyBatis框架,包括Maven依赖配置、数据源设置、MyBatis配置、Mapper接口定义、Service实现及Controller开发,提供了一个完整的示例来展示如何进行数据库操作。
1、使用starter, maven仓库地址:
http://mvnrepository.com/artifact/org.mybatis.spring.boot/mybatis-spring-boot-starter
2、加入依赖(可以用 http://start.spring.io/ 下载)
<properties>
	<java.version>1.8</java.version>
	<mysql.version>5.1.6</mysql.version>
</properties>

<dependencies>
	<!--web-->
	<dependency>
		<groupId>org.springframework.boot</groupId>
		<artifactId>spring-boot-starter-web</artifactId>
	</dependency>
	<!--test-->
	<dependency>
		<groupId>org.springframework.boot</groupId>
		<artifactId>spring-boot-starter-test</artifactId>
		<scope>test</scope>
	</dependency>
	<!--引入starter-->
	<dependency>
		<groupId>org.mybatis.spring.boot</groupId>
		<artifactId>mybatis-spring-boot-starter</artifactId>
		<version>2.1.0</version>
	</dependency>

	<!-- MySQL的JDBC驱动包	-->
	<dependency>
		<groupId>mysql</groupId>
		<artifactId>mysql-connector-java</artifactId>
		<version>${mysql.version}</version>
	</dependency>

	<!-- 引入阿里巴巴数据源。默认的数据源 (com.zaxxer.hikari.HikariDataSource) -->
	<dependency>
		<groupId>com.alibaba</groupId>
		<artifactId>druid</artifactId>
		<version>1.1.6</version>
	</dependency>

	<dependency>
		<groupId>org.springframework.boot</groupId>
		<artifactId>spring-boot-devtools</artifactId>
		<optional>true</optional>
	</dependency>

</dependencies>
3、加入配置文件
	#mybatis.type-aliases-package=cn.fbiao.base_project.domain
	#可以自动识别
	spring.datasource.driver-class-name =com.mysql.jdbc.Driver

	spring.datasource.url=jdbc:mysql://localhost:3306/basepro?useUnicode=true&characterEncoding=utf-8
	spring.datasource.username =root
	spring.datasource.password =root
	#如果不使用默认的数据源 (com.zaxxer.hikari.HikariDataSource),切换数据源,把下面注掉就可以了
	spring.datasource.type =com.alibaba.druid.pool.DruidDataSource
	#开启控制台打印sql
	mybatis.configuration.log-impl=org.apache.ibatis.logging.stdout.StdOutImpl
加载配置,注入到sqlSessionFactory等都是springBoot帮我们完成

4、启动类增加mapper扫描
@MapperScan("com.mybatis.basepro.mapper")
5、开发mapper
参考语法
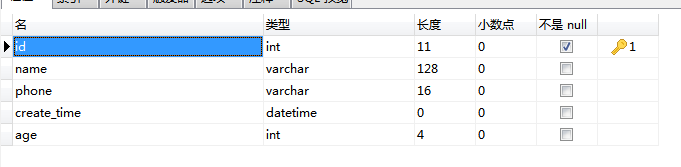
建表
CREATE TABLE `user` (
  `id` int(11) unsigned NOT NULL AUTO_INCREMENT,
  `name` varchar(128) DEFAULT NULL COMMENT '名称',
  `phone` varchar(16) DEFAULT NULL COMMENT '用户手机号',
  `create_time` datetime DEFAULT NULL COMMENT '创建时间',
  `age` int(4) DEFAULT NULL COMMENT '年龄',
  PRIMARY KEY (`id`)
) ENGINE=InnoDB AUTO_INCREMENT=18 DEFAULT CHARSET=utf8;
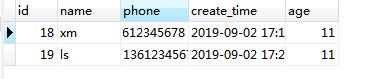
技巧:保存对象,获取数据库自增id
@Options(useGeneratedKeys=true, keyProperty=“id”, keyColumn=“id”)
import org.apache.ibatis.annotations.Insert;
import org.apache.ibatis.annotations.Options;

//这里不需要添加注解,因为@MapperScan("com.mybatis.basepro.mapper")已经扫描
public interface UserMapper {
	//推荐使用#{}取值(预编译 “?”),不要用${},因为${}是拼接,存在sql注入的风险
	 @Insert("INSERT INTO user(name,phone,create_time,age) VALUES(#{name}, #{phone}, #{createTime},#{age})")
	 @Options(useGeneratedKeys=true, keyProperty="id", keyColumn="id")   //keyProperty java对象的属性;keyColumn表示数据库的字段
	 int insert(User user);
}
6、开发service
public interface UserService {
    int add(User user);
}
@Service
public class UserServiceImpl implements UserService {
    @Autowired
    private UserMapper userMapper;
    @Override
    public int add(User user) {
        userMapper.insert(user);
        return user.getId();
    }
}
7、开发controller
@RestController
@RequestMapping("/user")
public class UserController {
@Autowired
private UserService userService;
/**
* 功能描述: user 保存接口
* @return
*/
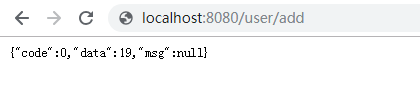
@GetMapping("add")
public Object add(){
User user = new User();
user.setAge(11);
user.setCreateTime(new Date());
user.setName("xm");
user.setPhone("13612345678");
int id = userService.add(user);
return JsonData.buildSuccess(id);
}
}


 5419
5419

 被折叠的 条评论
为什么被折叠?
被折叠的 条评论
为什么被折叠?
 到【灌水乐园】发言


