


我想您一定曾经很好奇几个问题
那就是 Flink 程序启动的时候究竟发生了什么?我们将用户程序提交上去之后它又是如何调用它的?
本文就是为了解决您的这些疑惑
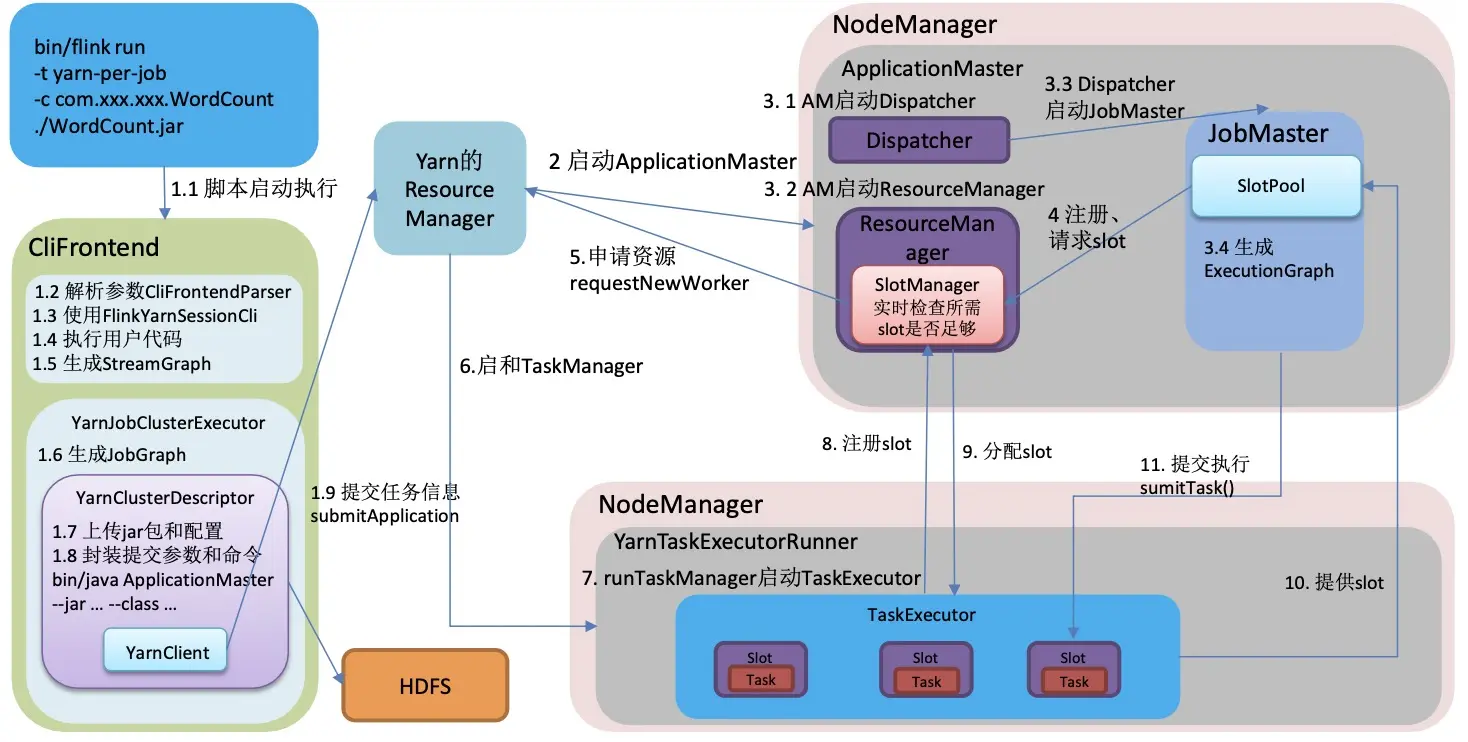
在 Yarn 下 per-job 模式提交流程如下图
程序起点
- flink\bin\flink
=> exec $JAVA_RUN J V M A R G S " JVM_ARGS " JVMARGS"{log_setting[@]}" -classpath “manglePathList "$CC_CLASSPATH:$INTERNAL_HADOOP_CLASSPATHS"” org.apache.flink.client.cli.CliFrontend “$@” - flink/bin/config.sh(相关环境配置都在这里)
=> JAVA_RUN=java
=> JVM_ARGS=“” => # Use conf/flink-conf.yaml
=>INTERNAL_HADOOP_CLASSPATHS=“ H A D O O P C L A S S P A T H : {HADOOP_CLASSPATH}: HADOOPCLASSPATH:{HADOOP_CO NF_DIR}😒{YARN_CONF_DIR}” - 执行 java -cp 就会开启 JVM 虚拟机,在虚拟机上开启 CliFrontend 进程,然后开始执行 main 方法
说明:java -cp 和 -classpath 一样,是指定类运行所依赖其他类的路径
java -cp => 开启 JVM 虚拟机 => 开启 Process(CliFrontend) => 程序入口 CliFrontend.main - Flink 提交任务的入口类为 CliFrontend,找到这个类的 main 方法:
CliFrontend.java
/**
* Submits the job based on the arguments.
*
* 根据参数提交程序
*/
public static void main(final String[] args) {
    EnvironmentInformation.logEnvironmentInfo(LOG, "Command Line Client", args);

    // 1. find the configuration directory
    // 获取 Flink 的 conf 目录的路径
    final String configurationDirectory = getConfigurationDirectoryFromEnv();

    // 2. load the global configuration
    // 根据 conf 路径,加载配置
    final Configuration configuration =
            GlobalConfiguration.loadConfiguration(configurationDirectory);

    // 3. load the custom command lines
    // 封装命令行接口,按顺序 Generic、Yarn、Default
    final List<CustomCommandLine> customCommandLines =
            loadCustomCommandLines(configuration, configurationDirectory);

    int retCode = 31;
    try {
        final CliFrontend cli = new CliFrontend(configuration, customCommandLines);

        SecurityUtils.install(new SecurityConfiguration(cli.configuration));
        retCode = SecurityUtils.getInstalledContext().runSecured(() -> cli.parseAndRun(args));
    } catch (Throwable t) {
        final Throwable strippedThrowable =
                ExceptionUtils.stripException(t, UndeclaredThrowableException.class);
        LOG.error("Fatal error while running command line interface.", strippedThrowable);
        strippedThrowable.printStackTrace();
    } finally {
        System.exit(retCode);
    }
}
程序入口
retCode = SecurityUtils.getInstalledContext().runSecured(() -> cli.parseAndRun(args));
通过 cli.parseAndRun 解析参数。我们来看 parseAndRun 源码
public int parseAndRun(String[] args) {

    // check for action
    if (args.length < 1) {
        CliFrontendParser.printHelp(customCommandLines);
        System.out.println("Please specify an action.");
        return 1;
    }

    // get action
    String action = args[0];

    // remove action from parameters
    final String[] params = Arrays.copyOfRange(args, 1, args.length);

    try {
        // do action
        switch (action) {
            case ACTION_RUN:
                run(params);
                return 0;
            case ACTION_RUN_APPLICATION:
                runApplication(params);
                return 0;
            case ACTION_LIST:
                list(params);
                return 0;
            case ACTION_INFO:
                info(params);
                return 0;
            case ACTION_CANCEL:
                cancel(params);
                return 0;
            case ACTION_STOP:
                stop(params);
                return 0;
            case ACTION_SAVEPOINT:
                savepoint(params);
                return 0;
            case "-h":
            case "--help":
                CliFrontendParser.printHelp(customCommandLines);
                return 0;
            case "-v":
            case "--version":
                String version = EnvironmentInformation.getVersion();
                String commitID = EnvironmentInformation.getRevisionInformation().commitId;
                System.out.print("Version: " + version);
                System.out.println(
                        commitID.equals(EnvironmentInformation.UNKNOWN)
                                ? ""
                                : ", Commit ID: " + commitID);
                return 0;
            default:
                System.out.printf("\"%s\" is not a valid action.\n", action);
                System.out.println();
                System.out.println(
                        "Valid actions are \"run\", \"run-application\", \"list\", \"info\", \"savepoint\", \"stop\", or \"cancel\".");
                System.out.println();
                System.out.println(
                        "Specify the version option (-v or --version) to print Flink version.");
                System.out.println();
                System.out.println(
                        "Specify the help option (-h or --help) to get help on the command.");
                return 1;
        }
    } catch (CliArgsException ce) {
        return handleArgException(ce);
    } catch (ProgramParametrizationException ppe) {
        return handleParametrizationException(ppe);
    } catch (ProgramMissingJobException pmje) {
        return handleMissingJobException();
    } catch (Exception e) {
        return handleError(e);
    }
}
可以看到,程序中通过 switch 处理各个输入参数,其中,ACTION_RUN 即参数 “run” 表示启动程序,调用了
方法 run(String[] args)。
我们接着往下看
解析输入参数
protected void run(String[] args) throws Exception {
    LOG.info("Running 'run' command.");

    // 获取默认的运行参数
    final Options commandOptions = CliFrontendParser.getRunCommandOptions();
    // 解析参数,返回 commandLine
    final CommandLine commandLine = getCommandLine(commandOptions, args, true);

    // evaluate help flag
    if (commandLine.hasOption(HELP_OPTION.getOpt())) {
        CliFrontendParser.printHelpForRun(customCommandLines);
        return;
    }

    final CustomCommandLine activeCommandLine =
            validateAndGetActiveCommandLine(checkNotNull(commandLine));

    final ProgramOptions programOptions = ProgramOptions.create(commandLine);

    final List<URL> jobJars = getJobJarAndDependencies(programOptions);

    final Configuration effectiveConfiguration =
            getEffectiveConfiguration(activeCommandLine, commandLine, programOptions, jobJars);

    LOG.debug("Effective executor configuration: {}", effectiveConfiguration);

    try (PackagedProgram program = getPackagedProgram(programOptions, effectiveConfiguration)) {
        executeProgram(effectiveConfiguration, program);
    }
}
run 方法就是启动程序的核心方法
该方法先是获取默认的运行参数,然后通过 getCommandLine 方法解析参数,返回命令行,下面我们继续看它是如何解析输入参数的
public CommandLine getCommandLine(
        final Options commandOptions, final String[] args, final boolean stopAtNonOptions)
        throws CliArgsException {
    final Options commandLineOptions =
            CliFrontendParser.mergeOptions(commandOptions, customCommandLineOptions);
    return CliFrontendParser.parse(commandLineOptions, args, stopAtNonOptions);
}
该方法中由 CliFrontendParser.parse 解析,我们继续看
CliFrontendParser.java
public class CliFrontendParser {

    // 选项列表
    static final Option HELP_OPTION =
            new Option(
                    "h",
                    "help",
                    false,
                    "Show the help message for the CLI Frontend or the action.");

    static final Option JAR_OPTION = new Option("j", "jarfile", true, "Flink program JAR file.");

    static final Option CLASS_OPTION =
            new Option(
                    "c",
                    "class",
                    true,
                    "Class with the program entry point (\"main()\" method). Only needed if the "
                            + "JAR file does not specify the class in its manifest.");
    ...
}
由源码注释可知 CliFrontendParser 类是一个简单的命令行解析器,我们看 parse 方法
public static CommandLine parse(Options options, String[] args, boolean stopAtNonOptions)
            throws CliArgsException {
    final DefaultParser parser = new DefaultParser();

    try {
        return parser.parse(options, args, stopAtNonOptions);
    } catch (ParseException e) {
        throw new CliArgsException(e.getMessage());
    }
}
该方法是调用 DefaultParser 的 parse 方法进行解析,我们继续读
DefaultParser.java
public CommandLine parse(Options options, String[] arguments, Properties properties, boolean
stopAtNonOption) throws ParseException {
    ... ...
    if (arguments != null) {
        for (String argument : arguments) {
            handleToken(argument);
        }
    }
    ... ...
}

private void handleToken(String token) throws ParseException {
    currentToken = token;

    if (skipParsing) {
        cmd.addArg(token);
    }
    else if ("--".equals(token)) {
        skipParsing = true;
    }
    else if (currentOption != null && currentOption.acceptsArg() && isArgument(token)) {
        // 添加参数值
        currentOption.addValueForProcessing(Util.stripLeadingAndTrailingQuotes(token));
    }
    else if (token.startsWith("--")){
        // 解析 --形式的参数名
        handleLongOption(token);
    }
    else if (token.startsWith("-") && !"-".equals(token)){
        // 解析 -形式的参数名
        handleShortAndLongOption(token);
    } else {
        handleUnknownToken(token);
    }

    if (currentOption != null && !currentOption.acceptsArg()) {
        currentOption = null;
    }
}

private void handleLongOption(String token) throws ParseException {
    if (token.indexOf('=') == -1) {
        //解析 –L、-L、--l、-l 形式的参数(不包含=)
        handleLongOptionWithoutEqual(token); }
    else {
        // 解析 --L=V、-L=V、--l=V、-l=V 形式的参数(包含=)
        handleLongOptionWithEqual(token);
    }
}
各种情况的解析,逻辑大体相同:去除 - 或 – 前缀,校验参数,以其中一个为例
private void handleLongOptionWithoutEqual(String token) throws ParseException {
    // 校验参数是否合法
    List<String> matchingOpts = options.getMatchingOptions(token);
    if (matchingOpts.isEmpty()) {
        handleUnknownToken(currentToken);
    }
    else if (matchingOpts.size() > 1) {
        throw new AmbiguousOptionException(token, matchingOpts);
    }
    else {
        // 参数添加到执行命令
        handleOption(options.getOption(matchingOpts.get(0)));
    }
}
我们再看是如何校验参数的
Options.java
public List<String> getMatchingOptions(String opt) {
    // 去除 - 或 -- 前缀
    opt = Util.stripLeadingHyphens(opt);
    List<String> matchingOpts = new ArrayList<String>();
    // for a perfect match return the single option only
    if (longOpts.keySet().contains(opt)) {
        return Collections.singletonList(opt);
    }
    for (String longOpt : longOpts.keySet()) {
        if (longOpt.startsWith(opt)) {
            matchingOpts.add(longOpt);
        }
    }
    return matchingOpts;
}
这里就印证了前文所言校验过程,接下来我们谈谈 main 方法中不同类型客户端的创建
选择哪种类型的客户端
在 main 方法中,final List customCommandLines = loadCustomCommandLines(configuration, configurationDirectory) 完成了对命令行接口的封装,依次添加了 Generic、Yarn 和 Default 三种命令行客户端(后面根据 isActive() 按顺序选择),下面的 loadCustomCommandLines 源码可以很好地证实这一点
public static List<CustomCommandLine> loadCustomCommandLines(
        Configuration configuration, String configurationDirectory) {
    List<CustomCommandLine> customCommandLines = new ArrayList<>();
    customCommandLines.add(new GenericCLI(configuration, configurationDirectory));

    //	Command line interface of the YARN session, with a special initialization here
    //	to prefix all options with y/yarn.
    final String flinkYarnSessionCLI = "org.apache.flink.yarn.cli.FlinkYarnSessionCli";
    try {
        customCommandLines.add(
                loadCustomCommandLine(
                        flinkYarnSessionCLI,
                        configuration,
                        configurationDirectory,
                        "y",
                        "yarn"));
    } catch (NoClassDefFoundError | Exception e) {
        final String errorYarnSessionCLI = "org.apache.flink.yarn.cli.FallbackYarnSessionCli";
        try {
            LOG.info("Loading FallbackYarnSessionCli");
            customCommandLines.add(loadCustomCommandLine(errorYarnSessionCLI, configuration));
        } catch (Exception exception) {
            LOG.warn("Could not load CLI class {}.", flinkYarnSessionCLI, e);
        }
    }

    //	Tips: DefaultCLI must be added at last, because getActiveCustomCommandLine(..) will get
    // the
    //	      active CustomCommandLine in order and DefaultCLI isActive always return true.
    customCommandLines.add(new DefaultCLI());

    return customCommandLines;
}
在完成了三种客户端的加载后,接下来在 run 方法中进行客户端的选择
protected void run(String args) throws Exception {
    ... ...
    final CustomCommandLine activeCommandLine = validateAndGetActiveCommandLine(checkNotNull(commandLine));
    ... ...
}
接下来我们进入 validateAndGetActiveCommandLine 查看客户端是如何选择的
public CustomCommandLine validateAndGetActiveCommandLine(CommandLine commandLine) {
    LOG.debug("Custom commandlines: {}", customCommandLines);
    for (CustomCommandLine cli : customCommandLines) {
        LOG.debug(
                "Checking custom commandline {}, isActive: {}", cli, cli.isActive(commandLine));
        // 在 FlinkYarnSessionCli 为 active 时优先返回 FlinkYarnSessionCli
        // 对于 DefaultCli,它的 isActive 方法总是返回 true
        if (cli.isActive(commandLine)) {
            return cli;
        }
    }
    throw new IllegalStateException("No valid command-line found.");
}
validateAndGetActiveCommandLine 通过 isActive 进行判断是否是 Yarn 环境,从而返回对应的 CustomCommandLines
我们看一下 Yarn 客户端 isActive 的判断逻辑
CustomCommandLine 是一个接口,通过其继承关系,我们找到 FlinkYarnSessionCli 类
继承关系如下:
FlinkYarnSessionCli -> AbstractYarnCli -> AbstractCustomCommandLine ->(implements) CustomCommandLine
FlinkYarnSessionCli.java
public boolean isActive(CommandLine commandLine) {
    if (!super.isActive(commandLine)) {
        return (isYarnPropertiesFileMode(commandLine)
                && yarnApplicationIdFromYarnProperties != null);
    }
    return true;
}
发现它还是使用的父类的 isActive 方法,那么我们再回到上一级的该方法
AbstractYarnCli.java
public boolean isActive(CommandLine commandLine) {
    final String jobManagerOption = commandLine.getOptionValue(addressOption.getOpt(), null);
    // 是否指定为 per-job 模式,即指定"-m yarn-cluster"; ID = "yarn-cluster"
    final boolean yarnJobManager = ID.equals(jobManagerOption);
    // 是否存在 flink 在 yarn 的 appID,即 yarn-session 模式是否启动
    final boolean hasYarnAppId =
            commandLine.hasOption(applicationId.getOpt())
                    || configuration.getOptional(YarnConfigOptions.APPLICATION_ID).isPresent();
    // executor 的名字为 "yarn-session" 或 "yarn-per-job"
    final boolean hasYarnExecutor =
            YarnSessionClusterExecutor.NAME.equalsIgnoreCase(
                            configuration.get(DeploymentOptions.TARGET))
                    || YarnJobClusterExecutor.NAME.equalsIgnoreCase(
                            configuration.get(DeploymentOptions.TARGET));
    return hasYarnExecutor || yarnJobManager || hasYarnAppId;
}
这里就很清楚了,该方法是通过判断命令行中是否指定了 per-job 模式或 yarn-session 已启动或 executor 的名字为 yarn-session / yarn-per-job,满足其中任意一条即认为是 yarn 模式,启动 yarn 客户端。
至此,客户端选择完毕
获取有效配置
run 方法在完成了客户端的选择后,接下来通过 getEffectiveConfiguration 方法实现了有效配置的获取
CliFrontend.java
protected void run(String[] args) throws Exception {
    ... ...
    final Configuration effectiveConfiguration = getEffectiveConfiguration(activeCommandLine, commandLine, programOptions, jobJars);
    ... ...
}
接下来一起看一下 getEffectiveConfiguration 源码
private <T> Configuration getEffectiveConfiguration(
        final CustomCommandLine activeCustomCommandLine,
        final CommandLine commandLine,
        final ProgramOptions programOptions,
        final List<T> jobJars)
        throws FlinkException {

    final Configuration effectiveConfiguration =
            getEffectiveConfiguration(activeCustomCommandLine, commandLine);

    final ExecutionConfigAccessor executionParameters =
            ExecutionConfigAccessor.fromProgramOptions(
                    checkNotNull(programOptions), checkNotNull(jobJars));

    executionParameters.applyToConfiguration(effectiveConfiguration);

    LOG.debug(
            "Effective configuration after Flink conf, custom commandline, and program options: {}",
            effectiveConfiguration);
    return effectiveConfiguration;
}

private <T> Configuration getEffectiveConfiguration(
        final CustomCommandLine activeCustomCommandLine, final CommandLine commandLine)
        throws FlinkException {

    final Configuration effectiveConfiguration = new Configuration(configuration);

    final Configuration commandLineConfiguration =
            checkNotNull(activeCustomCommandLine).toConfiguration(commandLine);

    effectiveConfiguration.addAll(commandLineConfiguration);

    return effectiveConfiguration;
}
其中,核心方法是 toConfiguration,该方法是 CustomCommandLine 接口的方法,按前文所述,我们前往 FlinkYarnSessionCli 类寻找答案
FlinkYarnSessionCli.java
public Configuration toConfiguration(CommandLine commandLine) throws FlinkException {
    // we ignore the addressOption because it can only contain "yarn-cluster"
    final Configuration effectiveConfiguration = new Configuration();

    applyDescriptorOptionToConfig(commandLine, effectiveConfiguration);

    final ApplicationId applicationId = getApplicationId(commandLine);
    if (applicationId != null) {
        final String zooKeeperNamespace;
        if (commandLine.hasOption(zookeeperNamespace.getOpt())) {
            zooKeeperNamespace = commandLine.getOptionValue(zookeeperNamespace.getOpt());
        } else {
            zooKeeperNamespace =
                    effectiveConfiguration.getString(HA_CLUSTER_ID, applicationId.toString());
        }

        // HA_CLUSTER_ID
        effectiveConfiguration.setString(HA_CLUSTER_ID, zooKeeperNamespace);
        // APPLICATION_ID
        effectiveConfiguration.setString(
                YarnConfigOptions.APPLICATION_ID, ConverterUtils.toString(applicationId));
        // TARGET 就是 execution.target,目标执行器
        // 决定后面什么类型的执行器提交任务:yarn-session、yarn-per-job
        effectiveConfiguration.setString(
                DeploymentOptions.TARGET, YarnSessionClusterExecutor.NAME);
    } else {
        effectiveConfiguration.setString(DeploymentOptions.TARGET, YarnJobClusterExecutor.NAME);
    }

    if (commandLine.hasOption(jmMemory.getOpt())) {
        String jmMemoryVal = commandLine.getOptionValue(jmMemory.getOpt());
        if (!MemorySize.MemoryUnit.hasUnit(jmMemoryVal)) {
            jmMemoryVal += "m";
        }
        effectiveConfiguration.set(
                JobManagerOptions.TOTAL_PROCESS_MEMORY, MemorySize.parse(jmMemoryVal));
    }

    if (commandLine.hasOption(tmMemory.getOpt())) {
        String tmMemoryVal = commandLine.getOptionValue(tmMemory.getOpt());
        if (!MemorySize.MemoryUnit.hasUnit(tmMemoryVal)) {
            tmMemoryVal += "m";
        }
        effectiveConfiguration.set(
                TaskManagerOptions.TOTAL_PROCESS_MEMORY, MemorySize.parse(tmMemoryVal));
    }

    if (commandLine.hasOption(slots.getOpt())) {
        effectiveConfiguration.setInteger(
                TaskManagerOptions.NUM_TASK_SLOTS,
                Integer.parseInt(commandLine.getOptionValue(slots.getOpt())));
    }

    dynamicPropertiesEncoded = encodeDynamicProperties(commandLine);
    if (!dynamicPropertiesEncoded.isEmpty()) {
        Map<String, String> dynProperties = getDynamicProperties(dynamicPropertiesEncoded);
        for (Map.Entry<String, String> dynProperty : dynProperties.entrySet()) {
            effectiveConfiguration.setString(dynProperty.getKey(), dynProperty.getValue());
        }
    }

    if (isYarnPropertiesFileMode(commandLine)) {
        return applyYarnProperties(effectiveConfiguration);
    } else {
        return effectiveConfiguration;
    }
}
至此我们终于找到了实现获取有效配置的核心方法,在该方法中获取了如 HA_CLUSTER_ID、APPLICATION_ID、目标执行器、JobManager 的 TOTAL_PROCESS_MEMORY、TaskManager 的 TOTAL_PROCESS_MEMORY、NUM_TASK_SLOTS 等核心配置参数
调用用户代码的 main 方法
接下来我们再次回到 run 方法,来看获取配置之后的事:调用用户代码的 main 方法
CliFrontend.java
protected void run(String[] args) throws Exception {
    ... ...
    executeProgram(effectiveConfiguration, program);
    ... ...
}
我们继续看 executeProgram 方法
protected void executeProgram(final Configuration configuration, final PackagedProgram program)
        throws ProgramInvocationException {
    ClientUtils.executeProgram(
            new DefaultExecutorServiceLoader(), configuration, program, false, false);
}
ClientUtils.java
public static void executeProgram(
        PipelineExecutorServiceLoader executorServiceLoader,
        Configuration configuration,
        PackagedProgram program,
        boolean enforceSingleJobExecution,
        boolean suppressSysout)
        throws ProgramInvocationException {
    checkNotNull(executorServiceLoader);
    final ClassLoader userCodeClassLoader = program.getUserCodeClassLoader();
    final ClassLoader contextClassLoader = Thread.currentThread().getContextClassLoader();
    try {
        // 设置当前的 classloader 为用户代码的 classloader
        Thread.currentThread().setContextClassLoader(userCodeClassLoader);

        LOG.info(
                "Starting program (detached: {})",
                !configuration.getBoolean(DeploymentOptions.ATTACHED));
        // 用户代码中的 getExecutionEnvironment 会返回该 Environment
        ContextEnvironment.setAsContext(
                executorServiceLoader,
                configuration,
                userCodeClassLoader,
                enforceSingleJobExecution,
                suppressSysout);

        StreamContextEnvironment.setAsContext(
                executorServiceLoader,
                configuration,
                userCodeClassLoader,
                enforceSingleJobExecution,
                suppressSysout);

        try {
            // 调用用户代码的 main 方法
            program.invokeInteractiveModeForExecution();
        } finally {
            ContextEnvironment.unsetAsContext();
            StreamContextEnvironment.unsetAsContext();
        }
    } finally {
        Thread.currentThread().setContextClassLoader(contextClassLoader);
    }
}
该方法设置了类加载器又设置了执行环境,最后通过反射机制调用了用户代码的 main 方法。
我们继续看 invokeInteractiveModeForExecution 方法
PackagedProgram.java
public void invokeInteractiveModeForExecution() throws ProgramInvocationException {
    FlinkSecurityManager.monitorUserSystemExitForCurrentThread();
    try {
        callMainMethod(mainClass, args);
    } finally {
        FlinkSecurityManager.unmonitorUserSystemExitForCurrentThread();
    }
}

private static void callMainMethod(Class<?> entryClass, String[] args)
            throws ProgramInvocationException {
    Method mainMethod;
    if (!Modifier.isPublic(entryClass.getModifiers())) {
        throw new ProgramInvocationException(
                "The class " + entryClass.getName() + " must be public.");
    }

    try {
        // 反射获取 main 方法
        mainMethod = entryClass.getMethod("main", String[].class);
    } catch (NoSuchMethodException e) {
        throw new ProgramInvocationException(
                "The class " + entryClass.getName() + " has no main(String[]) method.");
    } catch (Throwable t) {
        throw new ProgramInvocationException(
                "Could not look up the main(String[]) method from the class "
                        + entryClass.getName()
                        + ": "
                        + t.getMessage(),
                t);
    }

    if (!Modifier.isStatic(mainMethod.getModifiers())) {
        throw new ProgramInvocationException(
                "The class " + entryClass.getName() + " declares a non-static main method.");
    }
    if (!Modifier.isPublic(mainMethod.getModifiers())) {
        throw new ProgramInvocationException(
                "The class " + entryClass.getName() + " declares a non-public main method.");
    }

    try {
        // 反射调用 main 方法
        mainMethod.invoke(null, (Object) args);
    } catch (IllegalArgumentException e) {
        throw new ProgramInvocationException(
                "Could not invoke the main method, arguments are not matching.", e);
    } catch (IllegalAccessException e) {
        throw new ProgramInvocationException(
                "Access to the main method was denied: " + e.getMessage(), e);
    } catch (InvocationTargetException e) {
        Throwable exceptionInMethod = e.getTargetException();
        if (exceptionInMethod instanceof Error) {
            throw (Error) exceptionInMethod;
        } else if (exceptionInMethod instanceof ProgramParametrizationException) {
            throw (ProgramParametrizationException) exceptionInMethod;
        } else if (exceptionInMethod instanceof ProgramInvocationException) {
            throw (ProgramInvocationException) exceptionInMethod;
        } else {
            throw new ProgramInvocationException(
                    "The main method caused an error: " + exceptionInMethod.getMessage(),
                    exceptionInMethod);
        }
    } catch (Throwable t) {
        throw new ProgramInvocationException(
                "An error occurred while invoking the program's main method: " + t.getMessage(),
                t);
    }
}
到这里我们终于找到了调用用户程序 main 方法的位置,通过反射机制获取并调用。
至此,我们阅读完了 Flink 程序启动的核心方法 run,下面总结一下
run 方法总结:
- 获取默认的运行参数
- 解析默认和输入参数
- 客户端选择
- 获取有效配置
- 反射调用用户程序的 main 方法


 被折叠的 条评论
为什么被折叠?
被折叠的 条评论
为什么被折叠?
 到【灌水乐园】发言


