


1.Spring框架是什么?
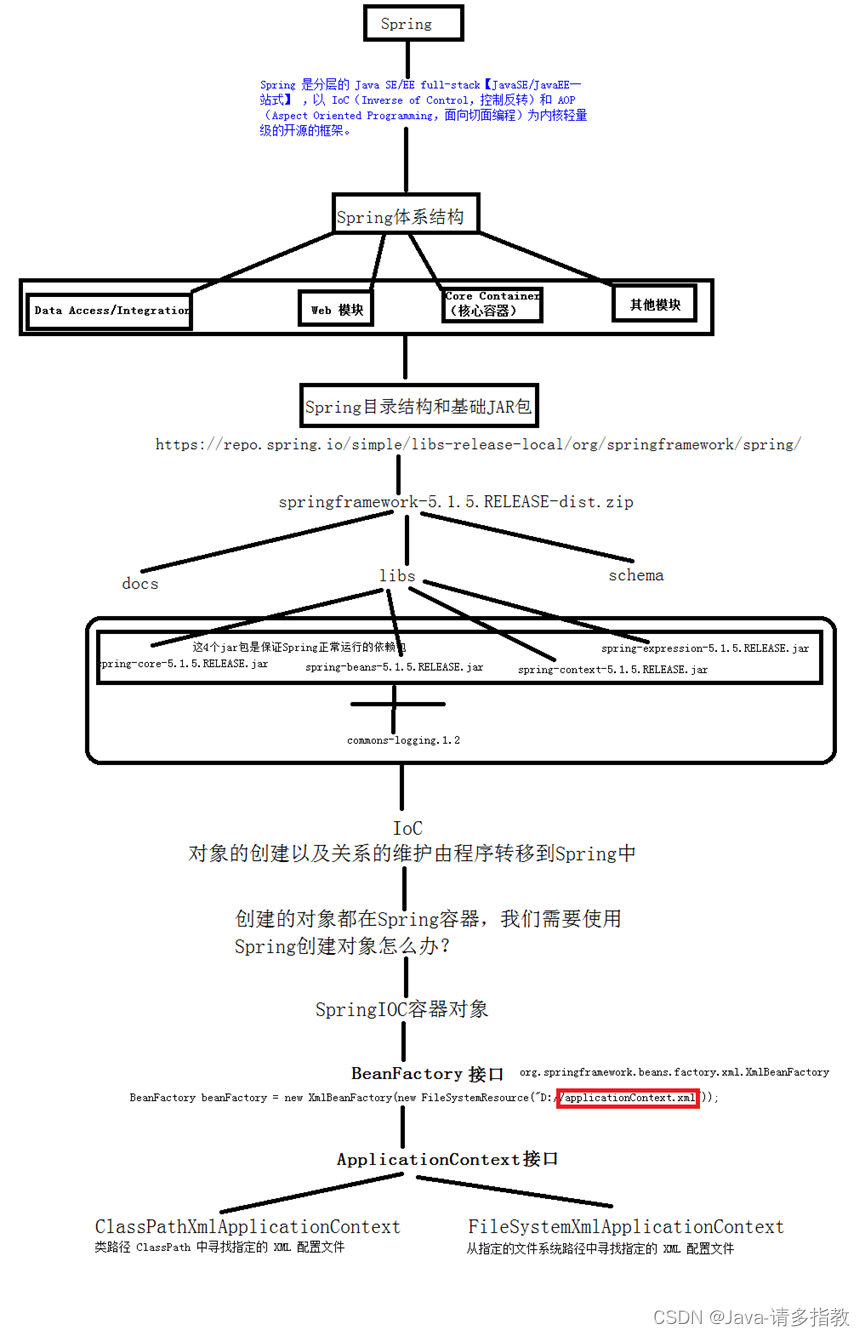
Spring是以IoC(Inverse of Control,控制反转)和 AOP(Aspect Oriented Programming,面向切面编程)为内核,包含了开发java程序所需的各种技术的轻量级开源容器框架。
1.1 spring框架好处
Spring 具有简单、可测试和松耦合等特点,不仅可以用于服务器端的开发,也可以应用于任何 Java 应用的开发中。Spring 框架的主要优点具体如下。
1)方便解耦,简化开发
Spring 就是一个大工厂,可以将所有对象的创建和依赖关系的维护交给 Spring 管理。
2)方便集成各种优秀框架
Spring 不排斥各种优秀的开源框架,其内部提供了对各种优秀框架(如 Struts2、Hibernate、MyBatis 等)的直接支持。
3)降低 Java EE API 的使用难度
Spring 对 Java EE 开发中非常难用的一些 API(JDBC、JavaMail、远程调用等)都提供了封装,使这些 API 应用的难度大大降低。
4)方便程序的测试
Spring 支持 JUnit4,可以通过注解方便地测试 Spring 程序。
5)AOP 编程的支持
Spring 提供面向切面编程,可以方便地实现对程序进行权限拦截和运行监控等功能。
6)声明式事务的支持
只需要通过配置就可以完成对事务的管理,而无须手动编程。
1.2 Spring体系结构详解
Spring 框架采用分层架构,根据不同的功能被划分成了多个模块,这些模块大体可分为 Data Access/Integration、Web、AOP、Aspects、Messaging、Instrumentation、Core Container 和 Test,如图 所示。
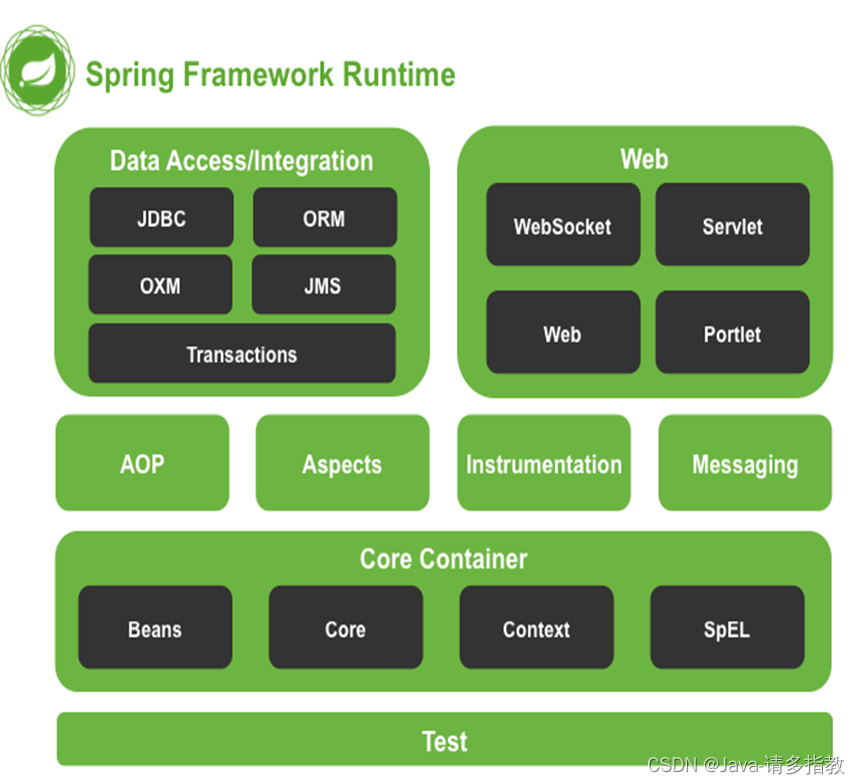
1.Data Access/Integration
数据访问/集成层包括 JDBC、ORM、OXM、JMS 和 Transactions 模块
JDBC 模块:提供了一个 JDBC 的抽象层,大幅度减少了在开发过程中对数据库操作的编码
ORM 模块:对流行的对象关系映射 API,包括 JPA、JDO、Hibernate 和 MyBatis 提供了的集成层
OXM 模块:提供了一个支持对象/XML 映射的抽象层实现,如 JAXB、Castor、XMLBeans、JiBX 和 XStream。
JMS 模块:指 Java 消息服务,包含的功能为生产和消费的信息。
Transactions 事务模块:支持编程和声明式事务管理实现特殊接口类,并为所有的 POJO。
2.Web 模块
Spring 的 Web 层包括 Web、Servlet、Struts 和 Portlet 组件
Web 模块:提供了基本的 Web 开发集成特性,例如多文件上传功能、使用的 Servlet 监听器的 IoC 容器初始化以及 Web 应用上下文。
Servlet模块:包括 Spring 模型—视图—控制器(MVC)实现 Web 应用程序。
Struts 模块:包含支持类内的 Spring 应用程序,集成了经典的 Struts Web 层。
Portlet 模块:提供了在 Portlet 环境中使用 MVC实现,类似 Web-Servlet 模块的功能。
3.AOP模块
Spring的其他模块还有 AOP、Aspects、Instrumentation
AOP 模块:提供了面向切面编程实现,允许定义方法拦截器和切入点,将代码按照功能进行分离,以降低耦合性。
Aspects 模块:提供与 AspectJ 的集成,是一个功能强大且成熟的面向切面编程(AOP)框架。
Instrumentation 模块:提供了类工具的支持和类加载器的实现,可以在特定的应用服务器中使用。
4.Core Container(核心容器)
Spring 的核心容器是其他模块建立的基础
Beans 模块:提供了 BeanFactory,是工厂模式的经典实现,Spring 将管理对象称为 Bean。[Spring将被管理的元素都称之为Bean【组件】]
Core 核心模块:提供了 Spring 框架的基本组成部分,包括 IoC【控制反转】 和 DI【依赖注入】 功能。
Context 上下文模块:建立在核心和 Beans 模块的基础之上,它是访问定义和配置任何对象的媒介。ApplicationContext 接口是上下文模块的焦点。
Expression Language 模块:是运行时查询和操作对象图的强大的表达式语言。
5.Test模块
支持 Spring 组件,使用 JUnit 或 TestNG 框架的测试。
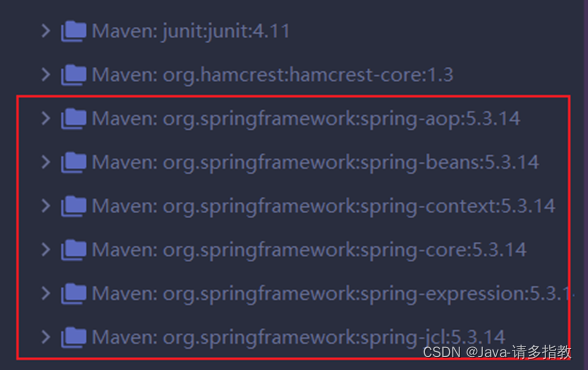
2.Spring框架依赖包
<!-- https://mvnrepository.com/artifact/org.springframework/spring-context -->
<dependency>
<groupId>org.springframework</groupId>
<artifactId>spring-context</artifactId>
<version>5.3.14</version>
</dependency>
</dependencies>
导入后,ideal会自动下载其他必备依赖
3.完成简单的spring程序
1.完成导入依赖
2.创建一个java类
package com.weiwei.springdemo1;
public class StudentBean {
public void testStudent(){
System.out.println("Student的实例方法");
}
}
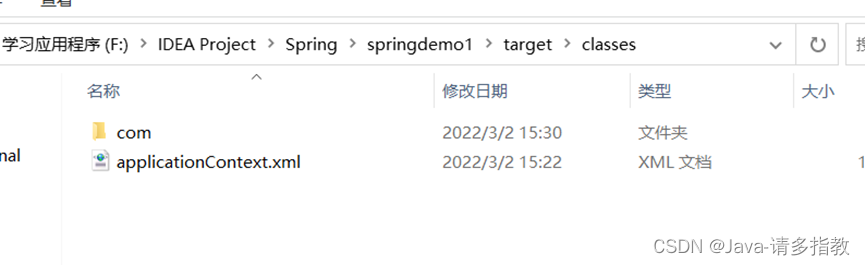
3.在resources下创建applicationContext.xml【Spring核心配置文件】
<?xml version="1.0" encoding="UTF-8"?>
<beans xmlns="http://www.springframework.org/schema/beans"
xmlns:xsi="http://www.w3.org/2001/XMLSchema-instance"
xsi:schemaLocation="http://www.springframework.org/schema/beans
http://www.springframework.org/schema/beans/spring-beans.xsd">
<bean id="stu" class="com.weiwei.springdemo1.StudentBean"/>
</beans>
解释说明:
1.beans---根元素
【在Spring中,Spring认为所有的java元素[类,接口...]对于Spring来说都是一个javabean】
在Spring中配置大部分元素都是bean,包含bean元素的根元素就是beans。
2.bean
<bean id="stu" class="com.weiwei.springdemo1.StudentBean"/>
等价于 StudentBean stu=new StudentBean(); 创建StudentBean类的对象
告诉Spring框架/容器创建一个StudentBean类的对象
id="stu"---对象名称 class="com.weiwei.springdemo1.StudentBean"---被创建对象的java类
4.测试类
public class App {
public static void main( String[] args ) {
//根据applicationContext.xml的配置创建Sring容器对象
ApplicationContext applicationContext=new ClassPathXmlApplicationContext("applicationContext.xml");
//从Spring容器对象中得到创建好的java类对象
StudentBean studentBean = applicationContext.getBean("stu", StudentBean.class);
//使用从Spring容器中得到的对象,调用实例方法,证明Spring确实创建好了对象
studentBean.testStudent();
}
}
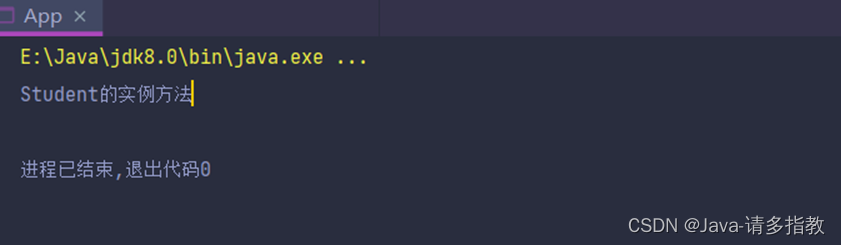
总结:我们在使用某一个java类的时候不会在自己new对象了,而是由Spring去给我们创建和维护对象。
3.Spring容器对象
3.1 BeanFactory
BeanFactory是基础类型的Spring容器。
BeanFactory 就是一个管理 Bean 的工厂,它主要负责初始化各种 Bean,并调用它们的生命周期方法。
BeanFactory 接口有多个实现类,最常见的是 org.springframework.beans.factory.xml.XmlBeanFactory,
它是根据 XML 配置文件中的定义装配 Bean 的。现在被标注已过时,不推荐使用。
BeanFactory beanFactory = new XmlBeanFactory(new FileSystemResource("F:\\IDEA Project\\Spring\\springdemo1\\src\\main\\resources\\applicationContext.xml"));
StudentBean studentBean = beanFactory.getBean("stu", StudentBean.class);
studentBean.testStudent();

3.2 ApplicationContext
ApplicationContext 是 BeanFactory 的子接口
不仅提供了 BeanFactory 的所有功能,还添加了对 i18n(国际化)、资源访问、事件传播等方面的良好支持。
ApplicationContext 接口有两个常用的实现类。
(1)ClassPathXmlApplicationContext类
该类从类路径【resources目录】ClassPath 中寻找指定的 XML 配置文件,找到并装载完成 ApplicationContext 的实例化工作。
ApplicationContext applicationContext=new ClassPathXmlApplicationContext("applicationContext.xml");
StudentBean studentBean = applicationContext.getBean("stu", StudentBean.class);
studentBean.testStudent();
(2)FileSystemXmlApplicationContext类
该类从指定的文件系统路径中寻找指定的 XML 配置文件,找到并装载完成 ApplicationContext 的实例化工作。
ApplicationContext applicationContext=new FileSystemXmlApplicationContext("F:\\IDEA Project\\Spring\\springdemo1\\src\\main\\resources\\applicationContext.xml");
StudentBean studentBean = applicationContext.getBean("stu", StudentBean.class);
studentBean.testStudent();
通常在Java项目中,会采用通过 ClassPathXmlApplicationContext 类实例化 ApplicationContext 容器的方式。
在 Web 项目中,ApplicationContext容器的实例化工作会交由Web服务器完成。
Web 服务器实例化 ApplicationContext 容器通常使用基于ContextLoaderListener 实现的方式
在 web.xml 中添加如下代码:
<!--指定Spring配置文件的位置,有多个配置文件时,以逗号分隔-->
<context-param>
<param-name>contextConfigLocation</param-name>
<!--spring将加载spring目录下的applicationContext.xml文件-->
<param-value>
classpath:applicationContext.xml
</param-value>
</context-param>
<!--指定以ContextLoaderListener方式启动Spring容器-->
<listener>
<listener-class>
org.springframework.web.context.ContextLoaderListener
</listener-class>
</listener>
4.区别
4.1 BeanFactory与ApplicationContext 的区别
通常情况,BeanFactory 的实现是使用懒加载的方式,这意味着 beans 只有在我们通过 getBean() 方法直接调用它们时才进行实例化实现 。BeanFactory 最常用的 API 是 XMLBeanFactory。
ApplicationContext它继承了 BeanFactory 接口,所以 ApplicationContext 包含 BeanFactory 的所有功能以及更多功能!它的主要功能是支持大型的业务应用的创建特性:
- Bean instantiation/wiring
- Bean 的实例化/串联
- 自动的 BeanPostProcessor 注册
- 自动的 BeanFactoryPostProcessor 注册
- 方便的 MessageSource 访问(i18n)
- ApplicationEvent 的发布
与 BeanFactory 懒加载的方式不同,它是预加载,所以,每一个 bean 都在ApplicationContext 启动之后实例化。
总结:ApplicationContext 包含 BeanFactory 的所有特性,通常推荐使用前者。但是也有一些限制情形,比如移动应用内存消耗比较严苛,在那些情景中,使用更轻量级的 BeanFactory 是更合理的。然而,在大多数企业级的应用中,ApplicationContext 是你的首选。
4.2 ClassPathXmlApplicationContext类与FileSystemXmlApplicationContext类区别
ClassPathXmlApplicationContext 默认会去 classPath 路径下找。classPath 路径指的就是编译后的 classes 目录。
 一:ClassPathXmlApplicationContext
1.没有前缀:默认为项目的classpath下相对路径
ApplicationContext applicationContext = new ClassPathXmlApplicationContext("applicationContext.xml");
2.前缀classpath:表示的是项目的classpath下相对路径
ApplicationContext applicationContext = new ClassPathXmlApplicationContext("classpath: applicationContext.xml");
3.使用前缀file 表示的是文件的绝对路径
ApplicationContext applicationContext = new ClassPathXmlApplicationContext("file: F:\\IDEA Project\\Spring\\springdemo1\\src\\main\\resources\\applicationContext ");
二:FileSystemXmlApplicationContext
1.默认为项目工作路径 即项目的根目录
ApplicationContext applicationContext = new FileSystemXmlApplicationContext("src\\main\\resources\\applicationContext.xml");
2.前缀classpath:表示的是项目的classpath下相对路径
ApplicationContext applicationContext = new FileSystemXmlApplicationContext("classpath: applicationContext.xml");
3.使用前缀file 表示的是文件的绝对路径
ApplicationContext appCt2 = new FileSystemXmlApplicationContext("file: F:\\IDEA Project\\Spring\\springdemo1\\src\\main\\resources\\applicationContext .xml");
ApplicationContext appCt2 = new FileSystemXmlApplicationContext("F:\\IDEA Project\\Spring\\springdemo1\\src\\main\\resources\\applicationContext.xml");


 被折叠的 条评论
为什么被折叠?
被折叠的 条评论
为什么被折叠?
 到【灌水乐园】发言


