


 本文介绍了如何在Springboot项目中集成Swagger,包括其作用、前后端分离的原理,以及如何解决集成难题。通过Swagger生成实时更新的API文档,并演示了如何配置不同环境下的Swagger显示。
前言:
本笔记仅做学习与复习使用,不存在刻意抄袭。
给各位学友强烈推荐《遇见狂神说》他的整套Java学习路线使我获益匪浅!!!
如果你也是狂神的小迷弟,可以加我好友一起探讨学习。
目录
Swagger
1.学习目标:
-
了解Swagger的作用和概念
-
了解前后端分离
-
在springboot中集成Swagger
Swagger简介
前后端分离:Vue+Springboot
后端时代:
前端只用管理静态页面,将整个html交给后端;后端的模板引擎JSP, 后端 是主力。
前后端分离时代:
-
后端:后端控制层,服务层,数据访问层
-
前端:前端控制层,视图层
-
前端可以伪造后端的数据,通过json跟后端进行交互。现在已经不需要后端,前端工程依然可以运行起来。
-
-
前后端交互方式:API接口
-
前后端相对独立,松耦合
-
前后端甚至可以部署到不同的服务器上面
产生的问题:
-
前后端集成联调,前端人员和后端人员无法做到及时协商以便尽快解决问题,最终将导致问题集中爆发;简单来讲,也就是前端不知道后端将提供给前端的接口名字以及后端将传送给前端的数据以及数据类型。。
解决方案:
-
首先应该指定计划,实时更新后端提供给前端的最新API,来降低集成的风险。
-
比如早些年,会指定word计划文档
-
前后端分离:
-
前端测试后端的接口:postman
-
后端提供接口,需要实时更新最新的消息以及改动
-
不太方便:这样需要特定去下载安装postman
-
Swagger:
-
是世界上最流行的API框架
-
RestFull Api文档在线自动生成工具==》Api文档与API接口定义同步更新
-
直接运行,可以在线测试API接口
-
支持多种语言:java , Php
在项目中使用swagger需要导入架包springbox
-
swagger2
-
ui
Springboot集成swagger
在IDEA里面新建一个sprongboot----web项目
导入相关依赖:
<?xml version="1.0" encoding="UTF-8"?>
<project xmlns="http://maven.apache.org/POM/4.0.0" xmlns:xsi="http://www.w3.org/2001/XMLSchema-instance"
         xsi:schemaLocation="http://maven.apache.org/POM/4.0.0 https://maven.apache.org/xsd/maven-4.0.0.xsd">
    <modelVersion>4.0.0</modelVersion>
    <parent>
        <groupId>org.springframework.boot</groupId>
        <artifactId>spring-boot-starter-parent</artifactId>
        <version>2.5.5</version>
        <relativePath/> <!-- lookup parent from repository -->
    </parent>
    <groupId>com.libing</groupId>
    <artifactId>swagger-dome</artifactId>
    <version>0.0.1-SNAPSHOT</version>
    <name>swagger-dome</name>
    <description>Demo project for Spring Boot</description>
    <properties>
        <java.version>1.8</java.version>
    </properties>
    <dependencies>
        <dependency>
            <groupId>org.springframework.boot</groupId>
            <artifactId>spring-boot-starter-web</artifactId>
        </dependency>

        <dependency>
            <groupId>org.springframework.boot</groupId>
            <artifactId>spring-boot-starter-test</artifactId>
            <scope>test</scope>
        </dependency>


        <!--swagger2和ui的依赖-->
        <dependency>
            <groupId>io.springfox</groupId>
            <artifactId>springfox-swagger2</artifactId>
            <version>2.9.2</version>
        </dependency>
        <dependency>
            <groupId>io.springfox</groupId>
            <artifactId>springfox-swagger-ui</artifactId>
            <version>2.9.2</version>
        </dependency>
    </dependencies>

    <build>
        <plugins>
            <plugin>
                <groupId>org.springframework.boot</groupId>
                <artifactId>spring-boot-maven-plugin</artifactId>
            </plugin>
        </plugins>
    </build>

</project>
创建SwaggerConfig配置类
package com.libing.config;
import org.springframework.context.annotation.Bean;
import org.springframework.context.annotation.Configuration;
import org.springframework.core.env.Environment;
import org.springframework.core.env.Profiles;
import springfox.documentation.builders.PathSelectors;
import springfox.documentation.builders.RequestHandlerSelectors;
import springfox.documentation.service.ApiInfo;
import springfox.documentation.service.Contact;
import springfox.documentation.spi.DocumentationType;
import springfox.documentation.spring.web.plugins.Docket;
import springfox.documentation.swagger2.annotations.EnableSwagger2;
import java.util.ArrayList;
/**
* @author liar
*/
//开启swagger
@Configuration
@EnableSwagger2
public class SwaggerConfig {
//作者信息
public static final Contact DEFAULT_CONTACT = new Contact("liar", "https://blog.libing.com/", "719167291@qq.com");
@Bean
public Docket docket1(){//配置1个名字为A的分组
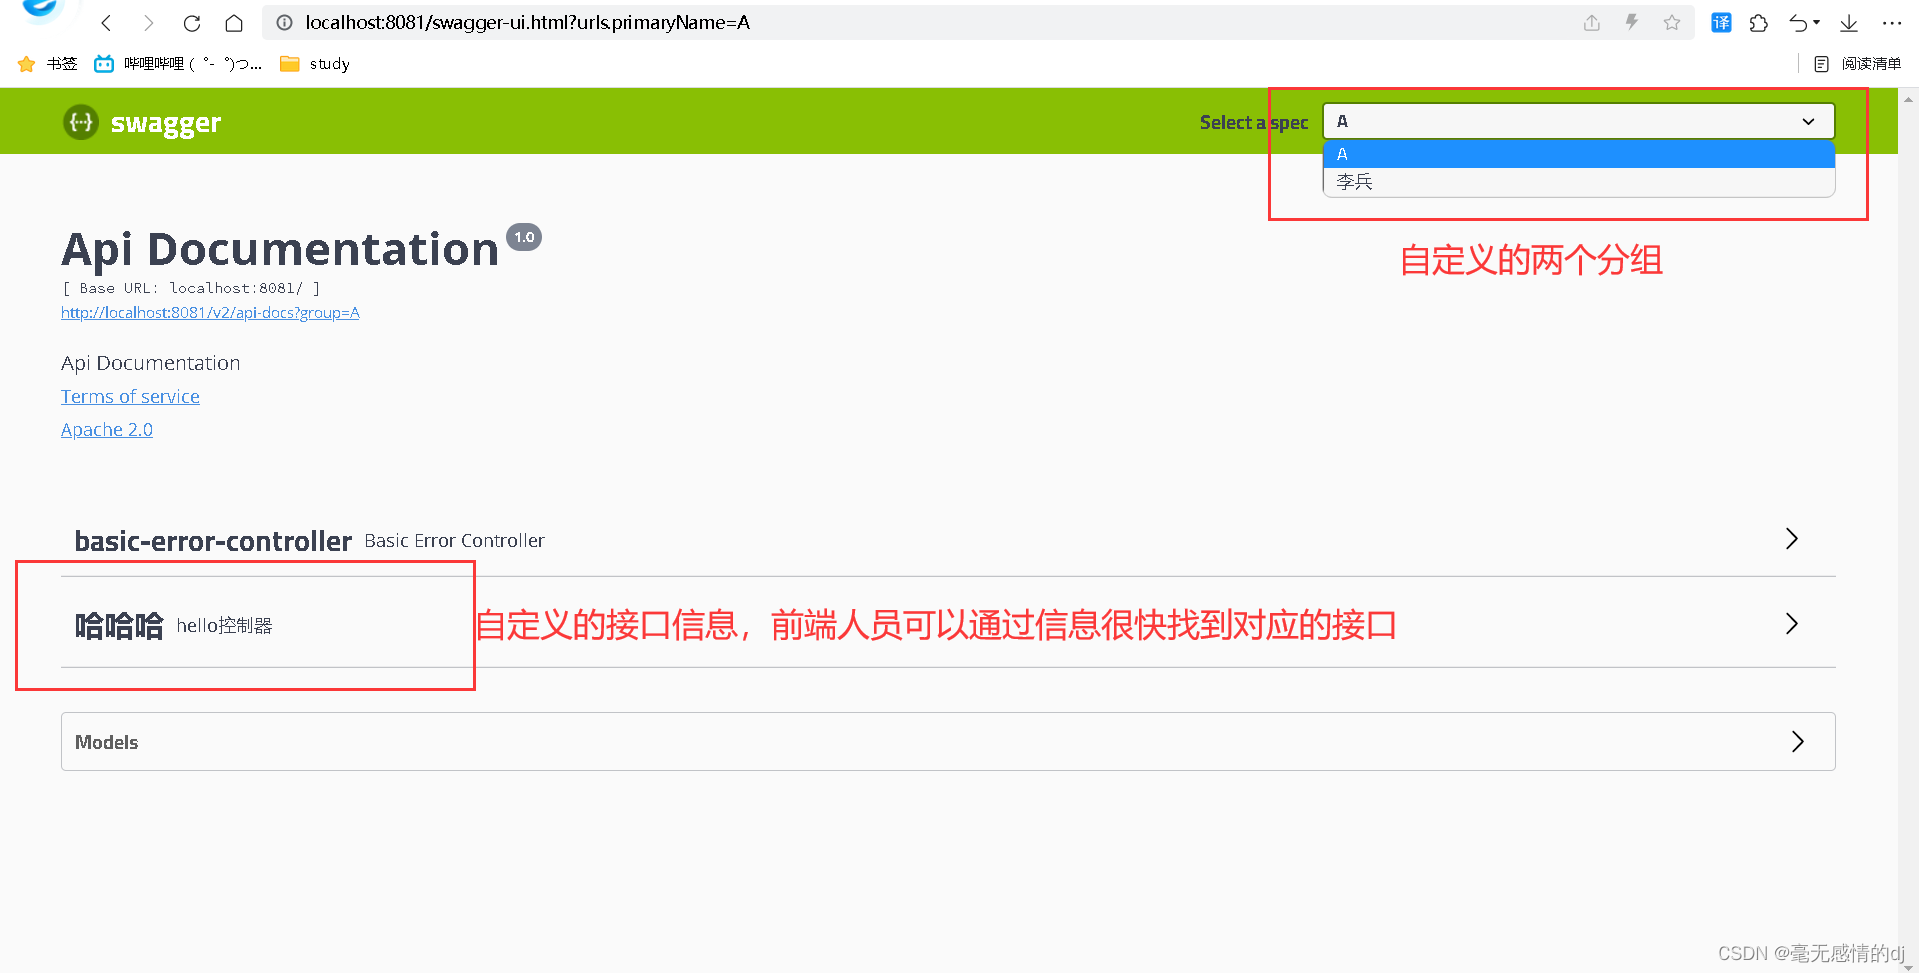
return new Docket(DocumentationType.SWAGGER_2).groupName("A");
}
//配置swagger的bean实例
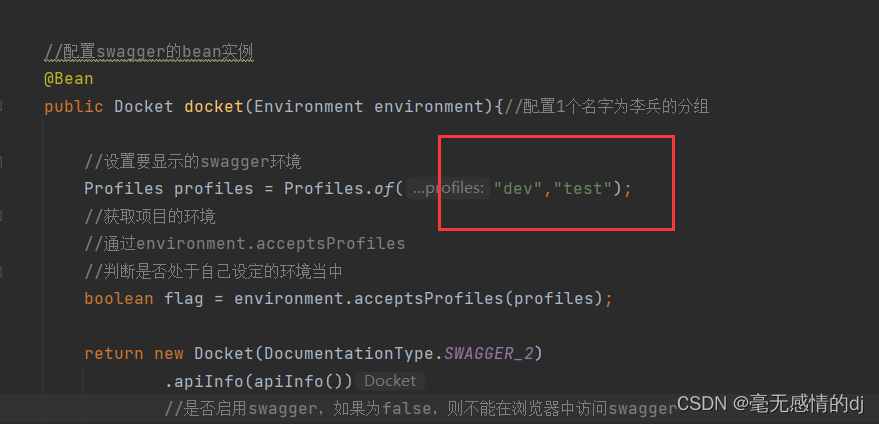
@Bean
public Docket docket(Environment environment){//配置1个名字为李兵的分组
//设置要显示的swagger环境
Profiles profiles = Profiles.of("dev","test");
//获取项目的环境
//通过environment.acceptsProfiles
//判断是否处于自己设定的环境当中
boolean flag = environment.acceptsProfiles(profiles);
return new Docket(DocumentationType.SWAGGER_2)
.apiInfo(apiInfo())
//是否启用swagger,如果为false,则不能在浏览器中访问swagger
.groupName("李兵")
.enable(flag)
.select()
//RequestHandlerSelectors 配置要扫描接口的方式
//basePackage:指定要扫描的包
//any():扫描全部
//none():不扫描
//withClassAnnotation:扫描类上的注解
//withMethodAnnotation:扫描方法上的注解
.apis(RequestHandlerSelectors.basePackage("com.libing.controller"))
//paths():过滤
//.paths(PathSelectors.ant("/libing/*"))
.build();
}
//配置swagger信息=apiInfo
private ApiInfo apiInfo(){
return new ApiInfo(
"李兵的 SwaggerAPI文档",
"世界那么大,一不小心错过了,就很难再见了",
"1.0",
"urn:tos",
DEFAULT_CONTACT,
"Apache 2.0",
"http://www.apache.org/licenses/LICENSE-2.0",
new ArrayList());
}
}
编写实体类
package com.libing.pojo;
import io.swagger.annotations.ApiModel;
import io.swagger.annotations.ApiModelProperty;
/**
* @author liar
*/
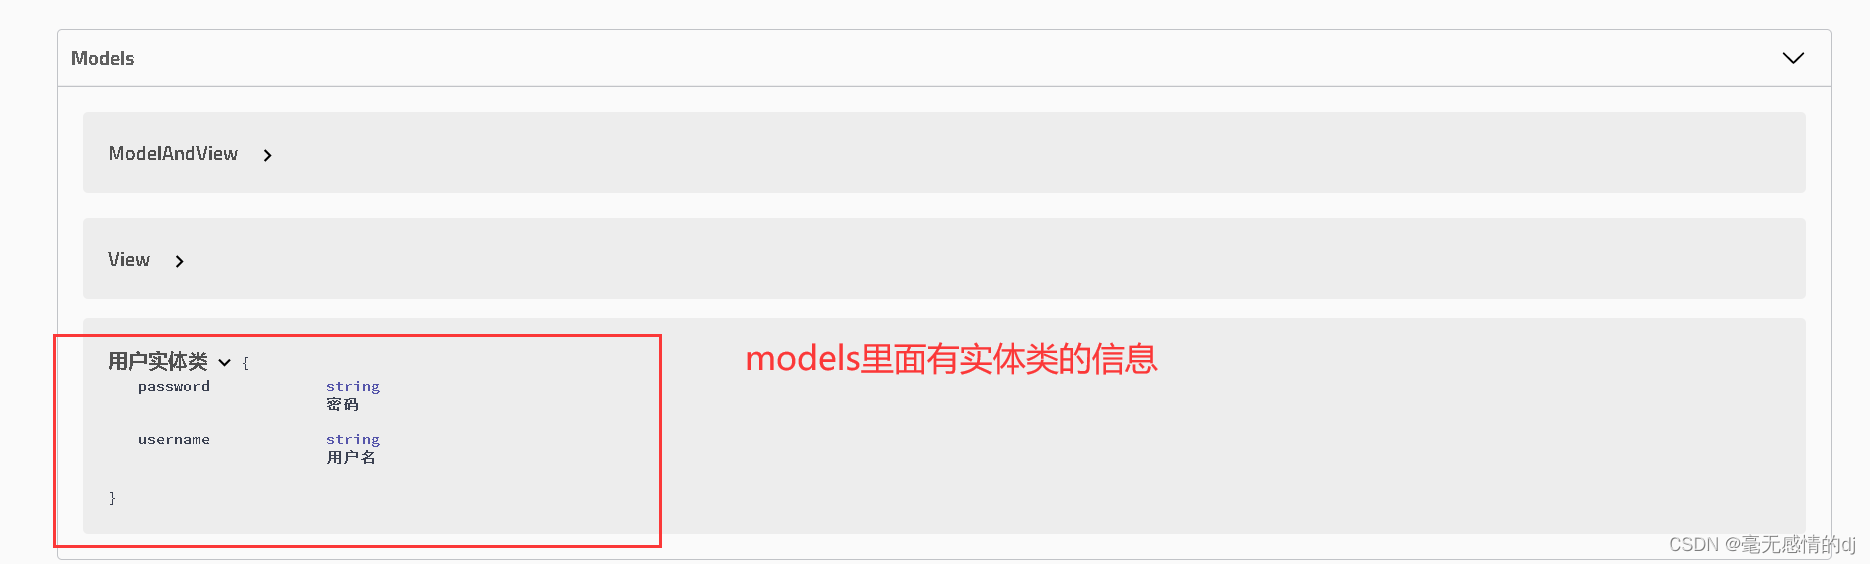
@ApiModel("用户实体类")
public class User {
@ApiModelProperty("用户名")
public String username;
@ApiModelProperty("密码")
public String password;
}
编写控制器controller
package com.libing.controller;

import com.libing.pojo.User;
import io.swagger.annotations.Api;
import io.swagger.annotations.ApiOperation;
import org.springframework.stereotype.Controller;
import org.springframework.web.bind.annotation.GetMapping;
import org.springframework.web.bind.annotation.PostMapping;
import org.springframework.web.bind.annotation.RequestMapping;
import org.springframework.web.bind.annotation.RestController;

/**
 * @author liar
 */
@Api( tags = "哈哈哈",description = "hello控制器")
@RestController
public class HelloController {

    @ApiOperation("hello控制")
    @GetMapping(value = "/hello")
    public String hello(){
        return "hello";
    }

    //只要我们的接口中返回值存在实体类,他就会被扫描的swagger中
    @PostMapping(value = "/user")
    public User user(){
        return new User();
    }

}
运行项目,访问swagger-ui.html
到这,其实会发现swagger非常简单,但是要强调一点:
swagger只能在开发环境使用,你不会希望你的客户看到swagger页面吧。
所以我们再配置:
application.properties
spring.profiles.active=dev #声明现在使用dev环境
spring.mvc.pathmatch.matching-strategy=ant_path_matcher
application-dev.properties
server.port=8081
application-pro.properties
server.port=8082
结合配置类中写的条件
当项目要上线时我们只需要将
application.properties中
spring.profiles.active=dev
#改为
spring.profiles.active=pro
我们重启项目

可以看到已经是 pro环境了,我们再访问swagger页面
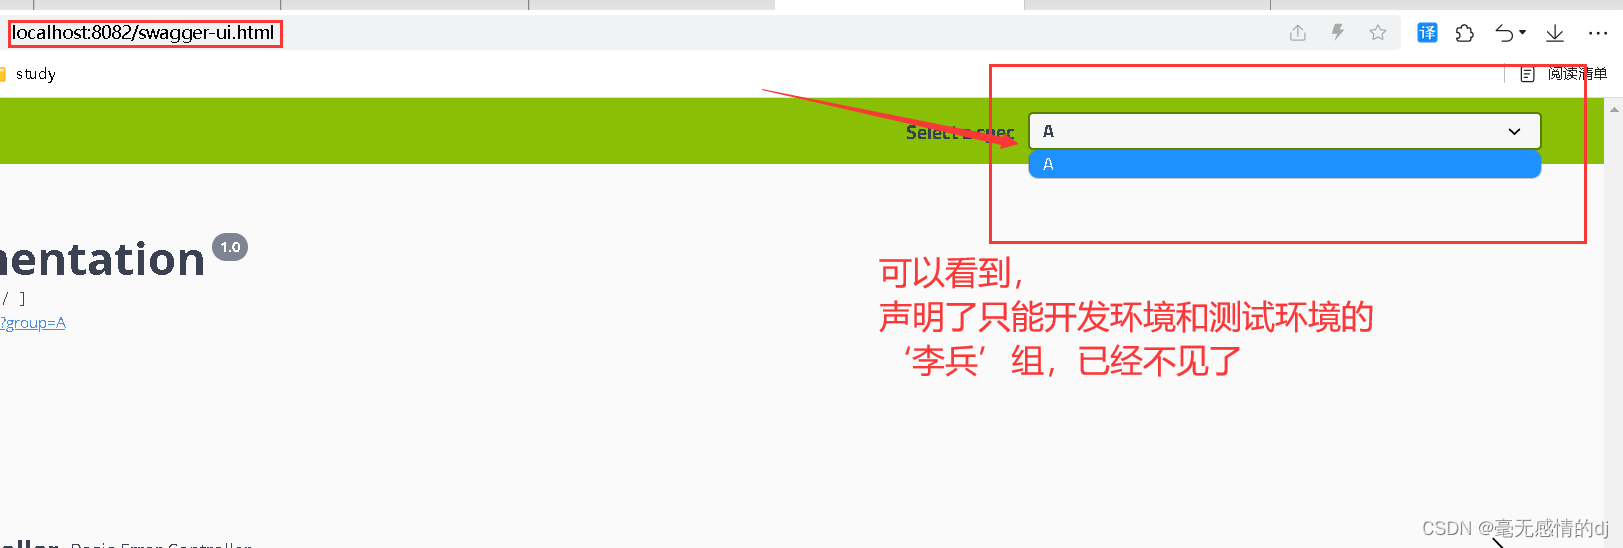
那如果我们把A组也声明为开发或者测试环境呢
    @Bean
    public Docket docket1(Environment environment){//配置1个名字为A的分组
        Profiles profiles = Profiles.of("dev","test");
        boolean flag = environment.acceptsProfiles(profiles);
        return new Docket(DocumentationType.SWAGGER_2).groupName("A").enable(flag);
    }
我们将A组的配置文件改一下,再访问swagger页面:
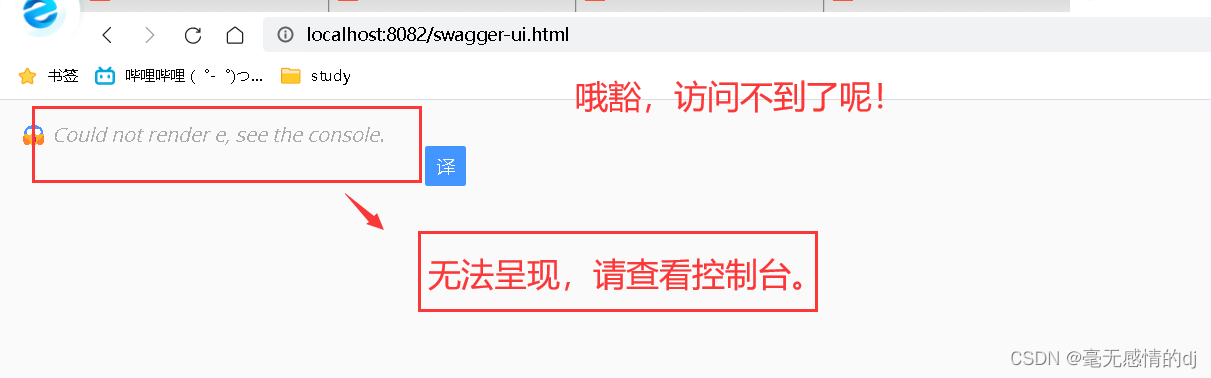
这样就能实现,在项目发布以后,不能访问swagger页面了。
总结:
-
我们可以通过Swagger给一些比较难以理解的属性或者接口,增加注释信息
-
接口文档实时更新
-
可以在线测试
-
是一个非常优秀的工具,几乎所有大公司都使用
-
注意点:在正式发布的时候,关闭swagger.出于安全考虑,节省内存。
到此就结束了,再次声明,此文,只作本人复习使用。如有侵权,请联系我,将妥善处理。
邮箱:719167291@qq.com


 被折叠的 条评论
为什么被折叠?
被折叠的 条评论
为什么被折叠?
 到【灌水乐园】发言


