


 本文介绍了静态网站生成器的概念,特别是重点讲解了基于Node.js和Vue.js的Gridsome。内容涵盖Gridsome的安装、页面及路由创建、Collections管理、数据获取、与Strapi集成以及环境变量配置和自动化部署。
什么是静态网站生成器
静态网站生成器是使用一系列配置、模板以及数据、生成静态HTML文件及相关资源的工具,也叫预渲染。生成的网站不需要服务器 ,只要放到支持静态资源的 Web Server 或 CDN 上即可运行。
静态网站的好处
- 省钱:不需要专业的服务器,只要托管静态文件的空间即可
- 快速:不需要经过后端服务器处理,只传输内容
- 安全:没有后端程序的执行,更安全
常见的静态网站生成器
- Jekyll(Ruby)
- Hexo(Node)
- Hugo(Golang)
- Gatsby(Node/React)
- Gridsome(Node/Vue)
Gridsome 的使用
-
全局安装Gridsome
-
运行命令gridsome create projectName 创建项目
-
yarn 安装依赖。
依赖安装时可能出现下面的错误,原因是由于网络限制有一些资源没有下载下来,使用可以翻墙的VPN即可解决这个问题。

-
yarn develop 开发环境下启动项目
项目启动之后能看到如下信息,8080端口是开发页面的访问地址,而___explore则是graphql数据查询工具界面。

Gridsome页面及路由
页面
gridesome的页面有两种生成方式:
-
在/src/pages/文件夹中创建页面组件文件,gridsome的文件系统会自动读取该文件夹中的文件作为页面,并自动生成路由,以文件名为路由。访问根路由时会访问Index.vue页面。

-
在gridsome.server.js中通过createPage方法创建页面。

-
页面的meta信息,在组件的metaInfo属性中配置
<template>
  <Layout>
    <h1>About us</h1>
    <p>Lorem ipsum dolor sit amet, consectetur adipisicing elit. Error doloremque omnis animi, eligendi magni a voluptatum, vitae, consequuntur rerum illum odit fugit assumenda rem dolores inventore iste reprehenderit maxime! Iusto.</p>
  </Layout>
</template>

<script>
export default {
  metaInfo: {
    title: 'About us'
  }
}
</script>
动态路由
-
通过文件系统实现,在文件名中通过"[params]"的方式来定义路由参数,文件系统会自动识别,并生成响应的路由。

-
在gridsome.server.js中通过createPage方法定义动态路由,可以通过()来使用正则表达式限定路由参数。
// gridsome.server.js
module.exports = function (api) {
  api.createPages(({ createPage }) => {
    createPage({
      path: '/user/:id(\\d+)',
      component: './src/templates/User.vue'
    })
  })
}
Gridsome Collections
Collections时gridsome管理的数据状态的方式。Collections的使用包括数据的获取和在组件中的应用。
-
数据的获取:通过在gridsome.server.js的api.loadSource中定义Collection,并向collection中添加数据。 gridsome.server.js在打包之前会执行,并将数据注入到页面,然后根据数据生成静态页面
// gridsome.server.js const axios = require('axios') module.exports = function (api) { api.loadSource(async ({ addCollection }) => { // Use the Data Store API here: https://gridsome.org/docs/data-store-api/ const collection = addCollection('Post') // 添加集合 const { data } = await axios.get('http://jsonplaceholder.typicode.com/posts') for (const item of data) { // 项集合中填充数据 collection.addNode({ id: item.id, title: item.title, content: item.body }) } }) } -
在组件中使用collection,需要在组件中增加
<page-query>,并将查询语句写在标签中,可以预先在___explore页面编写查询结果。girdsome回想vue实例注入$page计算属性,然后通过$page属性来访问cllection。<template> <Layout> <div> <ul> <li v-for="p in $page.posts.edges" :key="p.node.id" > <g-link :to="p.node.path">{{ p.node.title }}</g-link> </li> </ul> </div> </Layout> </template> <script> export default { name: 'Post2Page', metaInfo: { title: 'post 2' } } </script> <page-query> query{ posts: allPost { edges { node{ id, title, path, content } } } } </page-query> <style> </style>
Collocation模板
Collection模板用于展示列表条目的
-
模板的定义:两种方法定义collection模板
-
在src/templates/{Collection}.vue定义collection展示模板

-
通过gridsome.config.js的templates配置,属性名必须是已经定义的collect名。
module.exports = {
  siteName: '', // title的公共部分
  plugins: [],
  templates: {
    Post: ['/post/:id'],
  }
}
可以为一个collect定义多个templates
// gridsome.config.js
module.exports = {
  templates: {
    Product: [
      {
        path: '/product/:slug',
        component: './src/templates/Product.vue'
      },
      {
        name: 'reviews',
        path: '/product/:slug/reviews',
        component: './src/templates/ProductReviews.vue'
      }
    ]
  }
}
-
-
模板中数据的使用,需要先在
<page-query>中查询collection,然后通过$page计算属性来使用collection。<template> <Layout> <div> <h1>{{ $page.post.title }}</h1> <p> {{ $page.post.content }} </p> </div> </Layout> </template> <script> export default { } </script> <page-query> query($id: ID!) { post(id: $id) { id, title, content, } } </page-query> <style> </style>
Gridsome 获取系统文件数据
系统文件数据的获取需要通过gridsome的插件来完成。首先需要通过@gridsome/source-filesystem插件来帮助读取数据文件,将文件转化为js模块。然后再根据文件类型使用对应的插件转换。以.md文件为例,需要使用@gridsome/transformer-remark插件来对.md文件模块进行处理。
-
安装插件
-
在gridsome.config.js中配置插件
module.exports = { siteName: '', plugins: [ { use: '@gridsome/source-filesystem', options: { typeName: 'Posts', path: './data/*.md', remark: { } } } ], transformers: { remark: { // global remark options } } } -
插件配置完成之后,启动项目,将添加以配置的typeName为名的collection。然后就可以在页面中使用collect数据了。
使用Strapi管理数据
Strapi是一款数据管理工具,支持PostgreSQL、MySQL、SQLite、MongoDB等多种数据存储方式。
Strapi的部署
-
首先使用命令行创建Strapi项目
yarn create strapi-app my-project --quickstart -
修改/config/database.js中的数据库配置,改成自己的数据库配置,并添加对应的数据库插件。默认为SQLite的配置。以mysql为例,需要修改配置,并按照mysql插件。
// config/database.js
module.exports = ({ env }) => ({
  defaultConnection: 'default',
  connections: {
    default: {
      connector: 'bookshelf',
      settings: {
        client: 'mysql',
        host: env('DATABASE_HOST', 'localhost'),
        port: env.int('DATABASE_PORT', 3306),
        database: env('DATABASE_NAME', 'blog'),
        username: env('DATABASE_USERNAME', 'root'),
        password: env('DATABASE_PASSWORD', '****',
      },
      options: {},
    },
  },
});
- 将代码提交到git仓库,然后在服务器上clone仓库中的代码。
- 在服务器上启动项目即可,如果能成功访问启动后提供的页面地址,表示部署成功。
- 使用pm2来启动项目,防止服务器命令行占用。
Girdsome连接strapi数据
添加插件@gridsome/source-strapi,并在gridsome.config.js中配置插件即可。
module.exports = {
  siteName: '吴绍清',
  plugins: [
    {
      use: '@gridsome/source-strapi',
      options: {
        apiURL: process.env.GRIDSOME_API_URL, // 连接地址
        queryLimit: 1000, // Defaults to 100
        contentTypes: ['blog', 'tag'], // 查询的content类型
        singleTypes: ['general'],
        plural: true, // pluralizes names of Content Types in API
        // Possibility to login with a Strapi user, when content types are not publicly available (optional).
        // loginData: {
        //   identifier: '',
        //   password: '',
        // },
      }
    }
  ],
  templates: {
    StrapiBlog: [
      {
        path: '/post/:id',
        component: './src/templates/Post.vue'
      }
    ]
  },
  transformers: {
    remark: {
      // global remark options
    }
  }
}
Gridsome环境变量配置
根目录下创建.env.production和.env.development文件,分别对应生成环境和开发环境的环境变量

GridSome 项目自动化部署
自动化部署的实现有多种方式,这里介绍使用vercel如何来实现。
-
首先在vercel中创建一个项目,然后在项目的settings中生成一个Deploy Hooks。

-
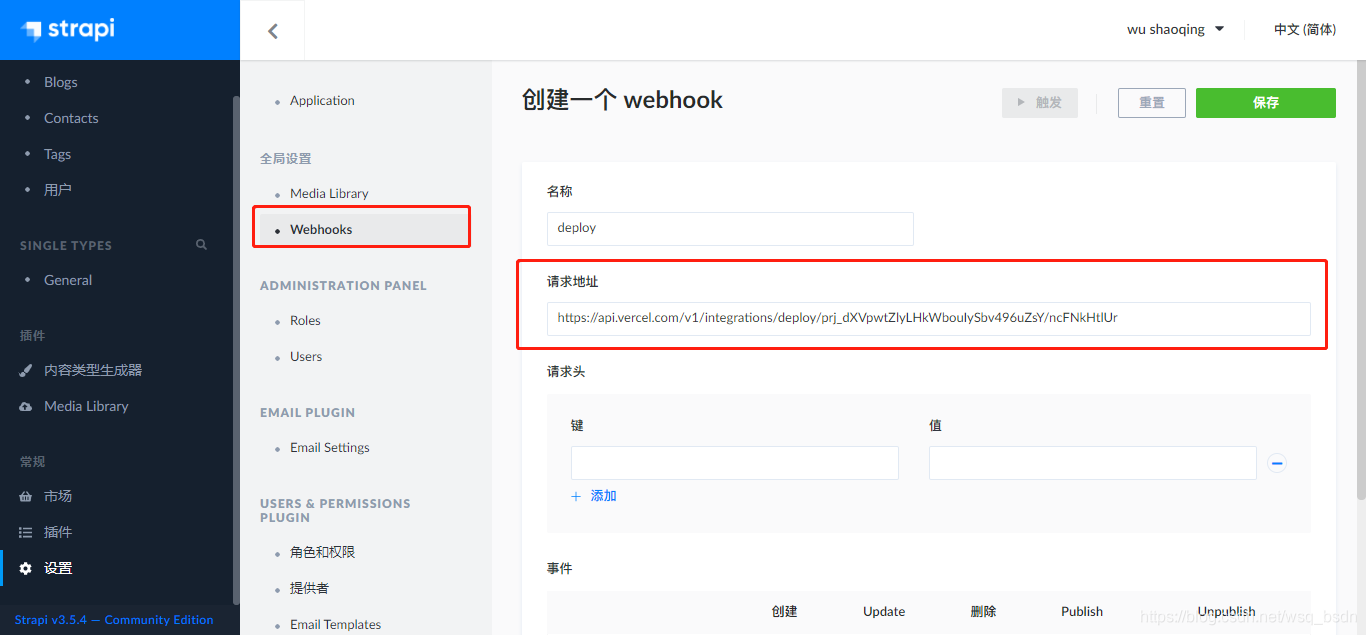
在Strapi的 setting 中创建一个webhook,并将Deploy Hook地址填充到请求地址里。当Strapi中的数据改变时,将会触发Vercel中的自动构建。
-
在github仓库的setting中,创建webhook,并将Deploy Hooks地址填充到payload URL 中。当发生git提交时,会触发vercel自动构建。


 1415
1415

 被折叠的 条评论
为什么被折叠?
被折叠的 条评论
为什么被折叠?
 到【灌水乐园】发言


