


 本文详细介绍了如何利用SpringBoot进行项目搭建,配置日志、数据库、热部署,以及集成Mybatis-Plus、Swagger和热门接口开发。涵盖编码设置、Maven配置、数据库操作、接口设计与测试等关键步骤。
一、开发环境准备
开发工具:idea
jdk版本:1.8.0_301
框架:SpringBoot
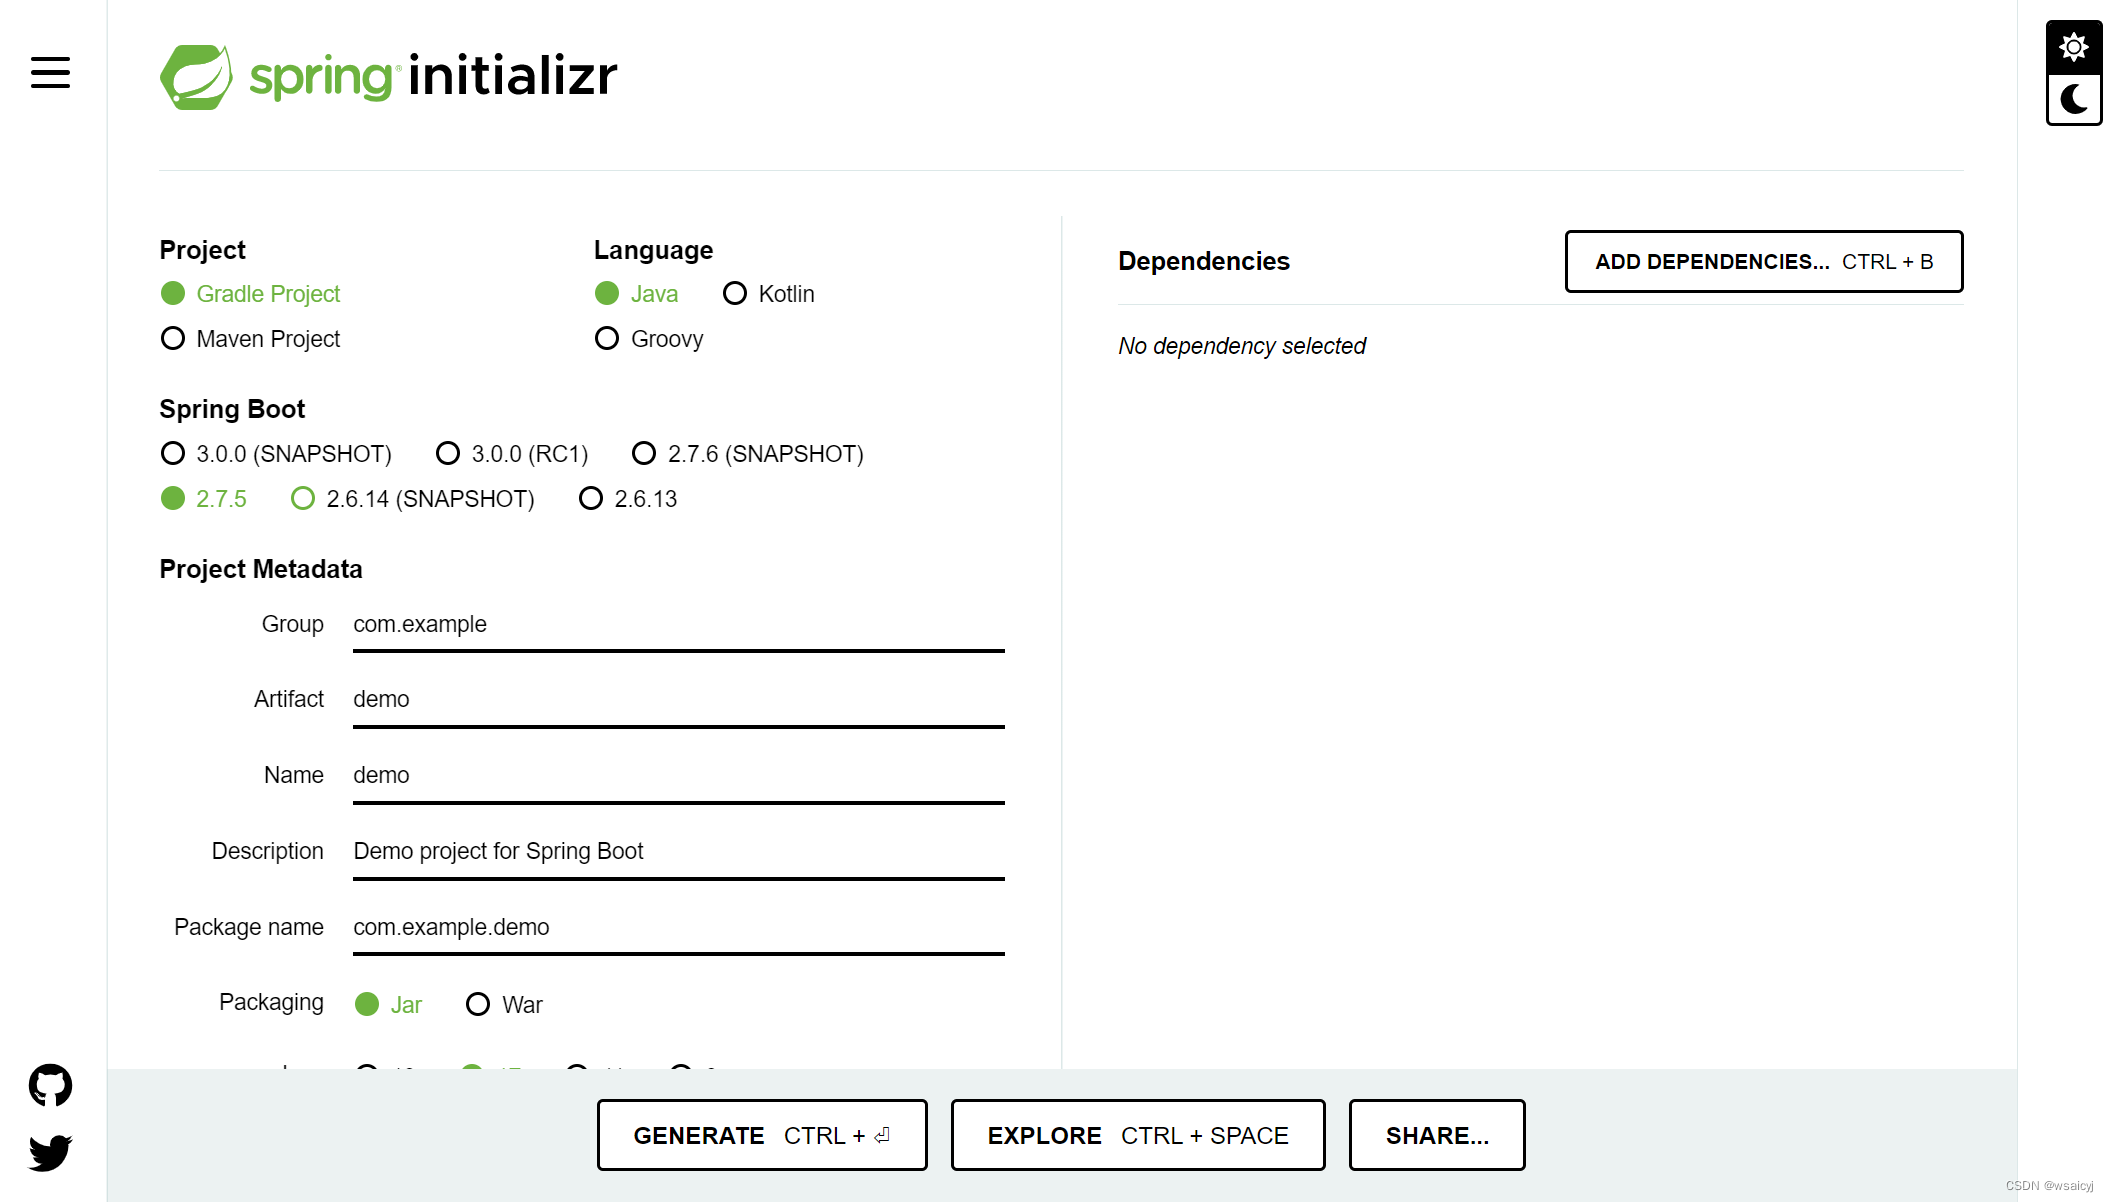
二、SpringBoot项目搭建
1.搭建SpringBoot项目
搭建SpringBoot项目的两种方式:
-
在ide上新建SpringBoot项目
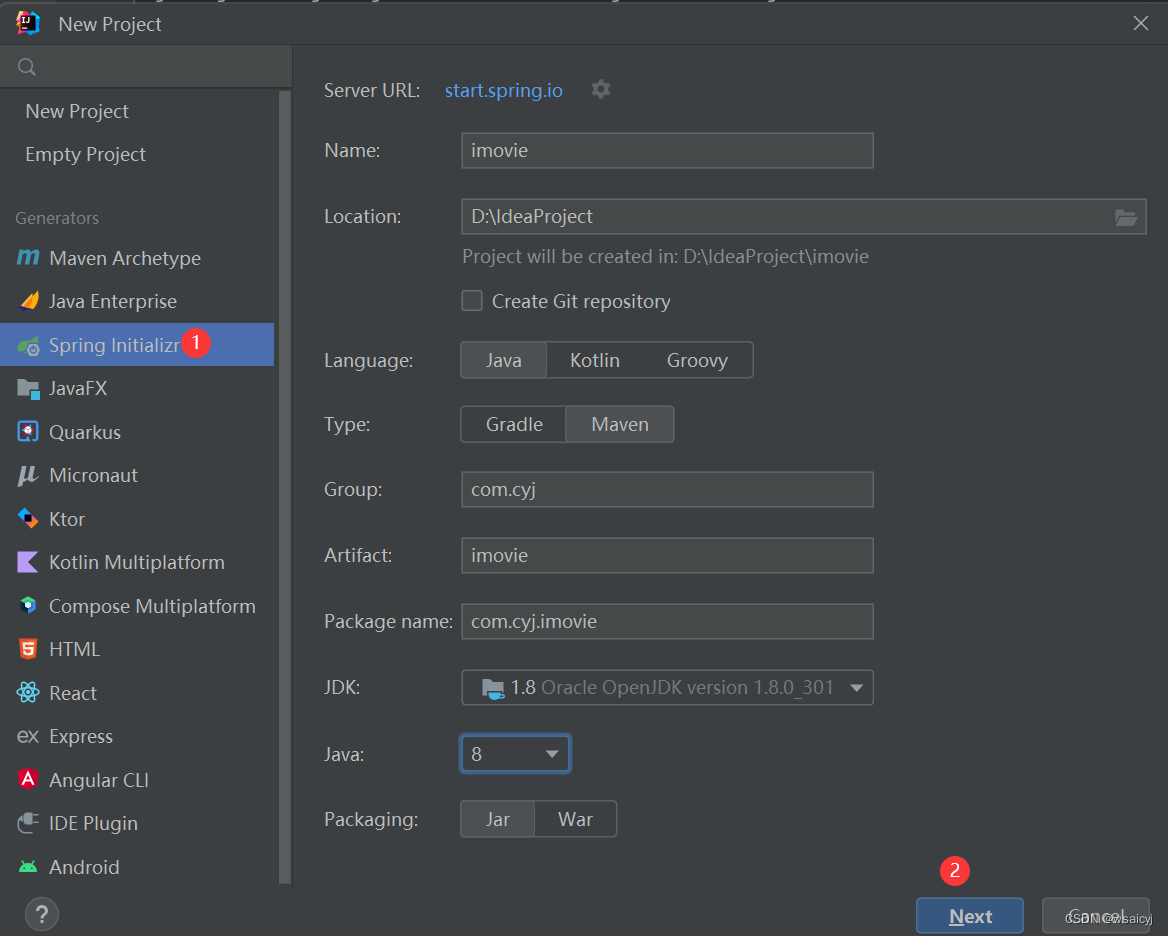
-
在SpringBoot官网下载源码,然后解压导入
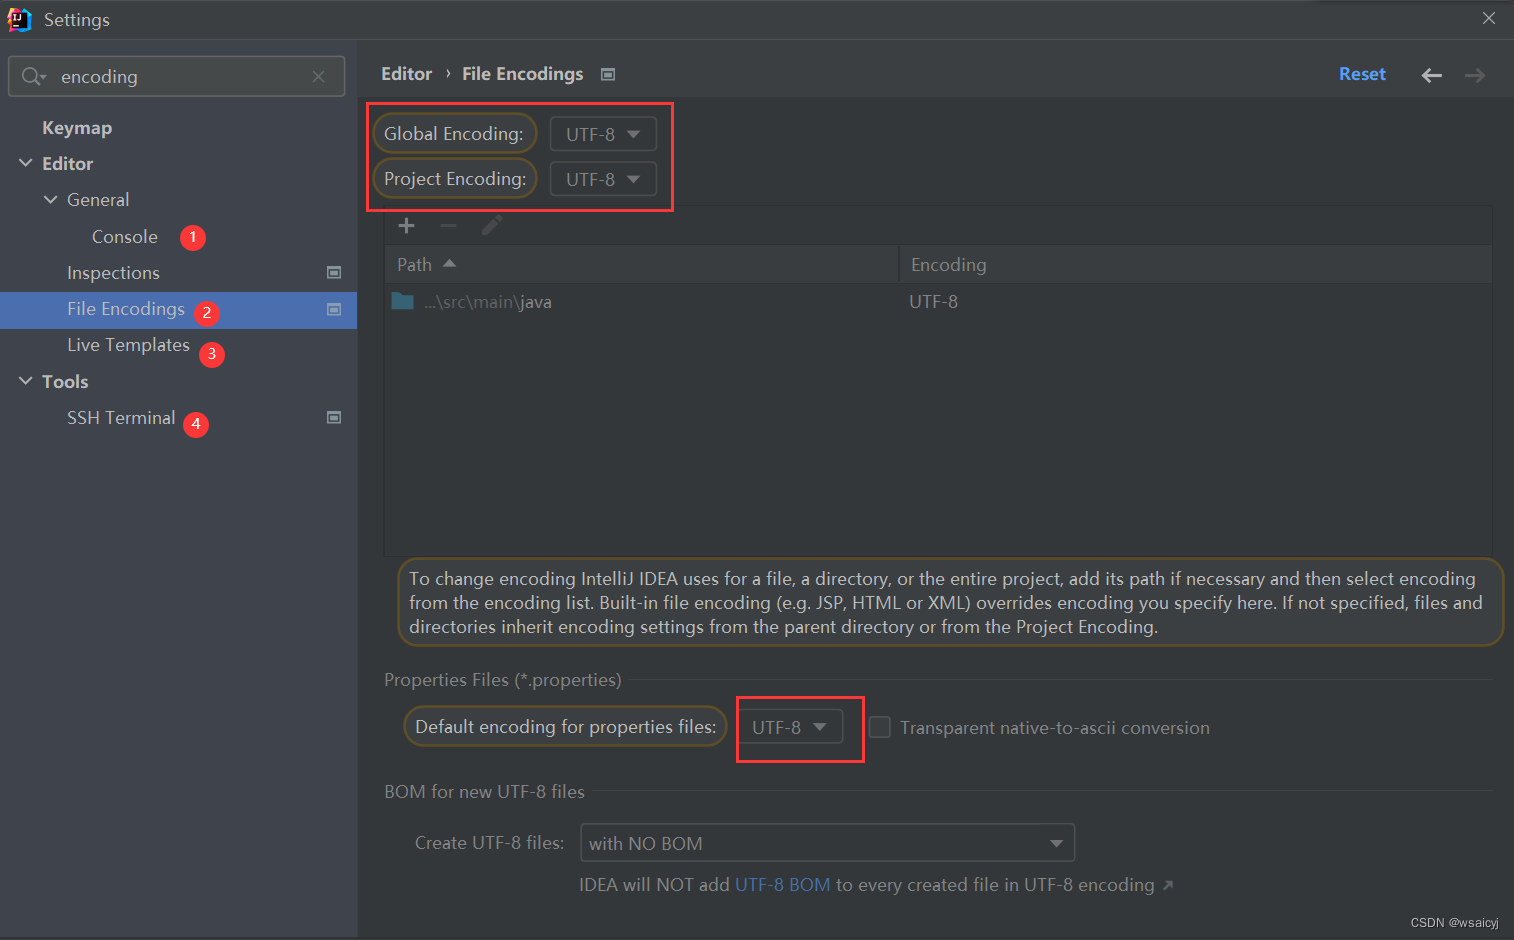
2.项目初始配置
2.1项目编码设置
- 打开idea设置界面,输入encoding,将相关编码改为UTF-8
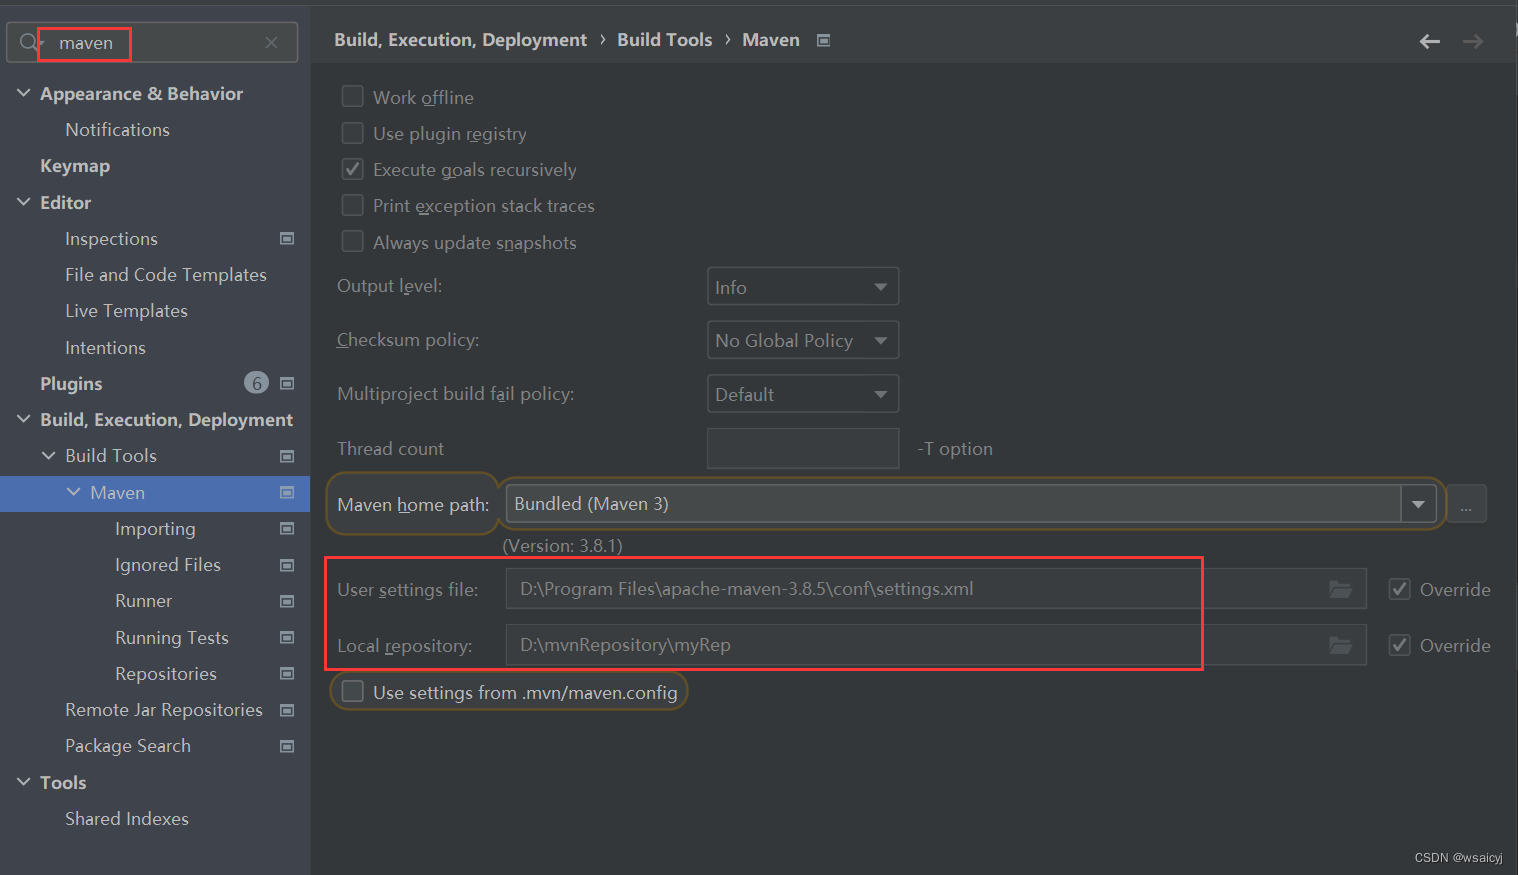
2.2 Maven配置
2.3 git配置
- 可以通过.gitignore来忽略文件,本地工作空间相关的文件不要提交,比如:.idea, target, *.iml
- 在远程仓库上创建一个新项目,将本地项目关联到远程仓库
git remote add origin XXXXXX
git push -u origin "master"
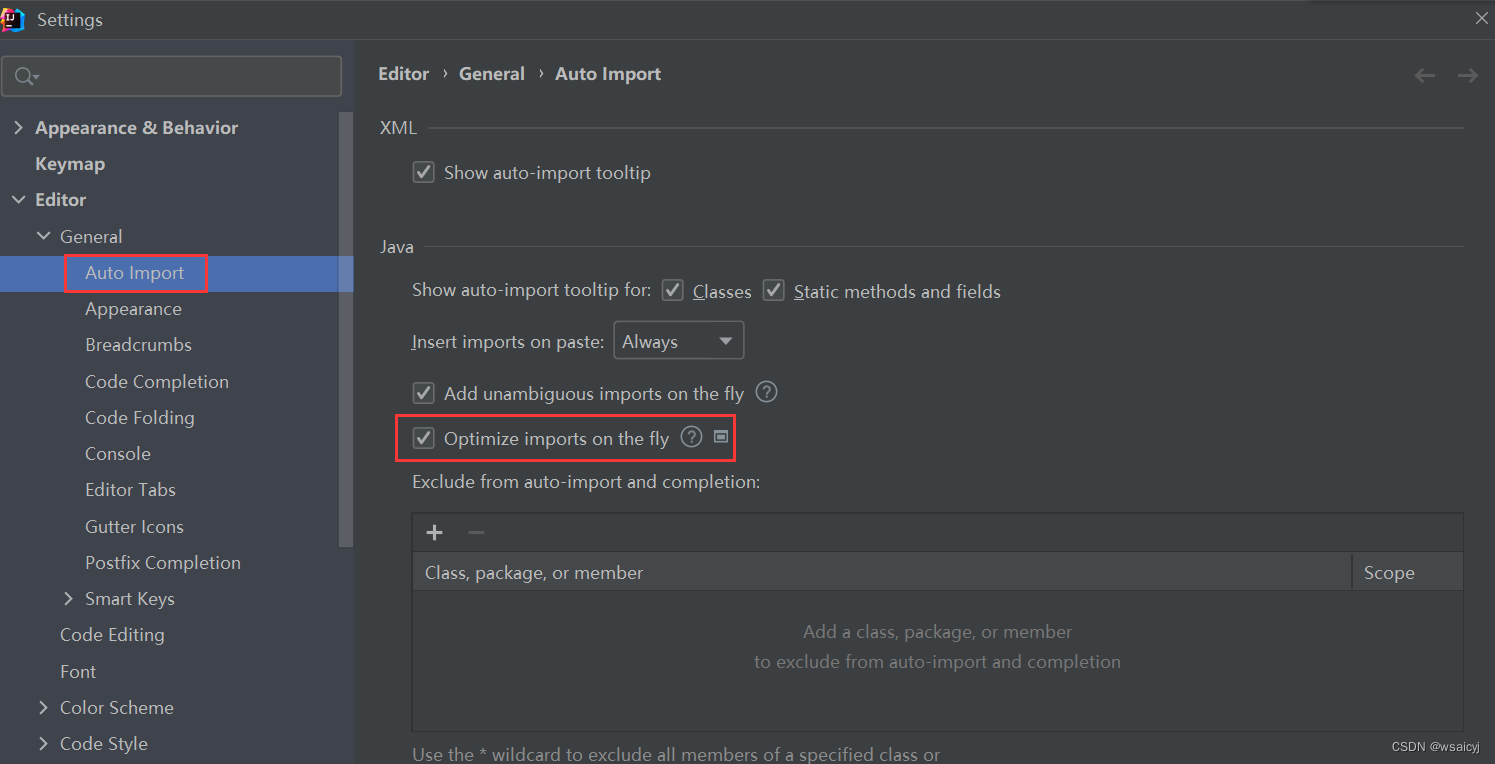
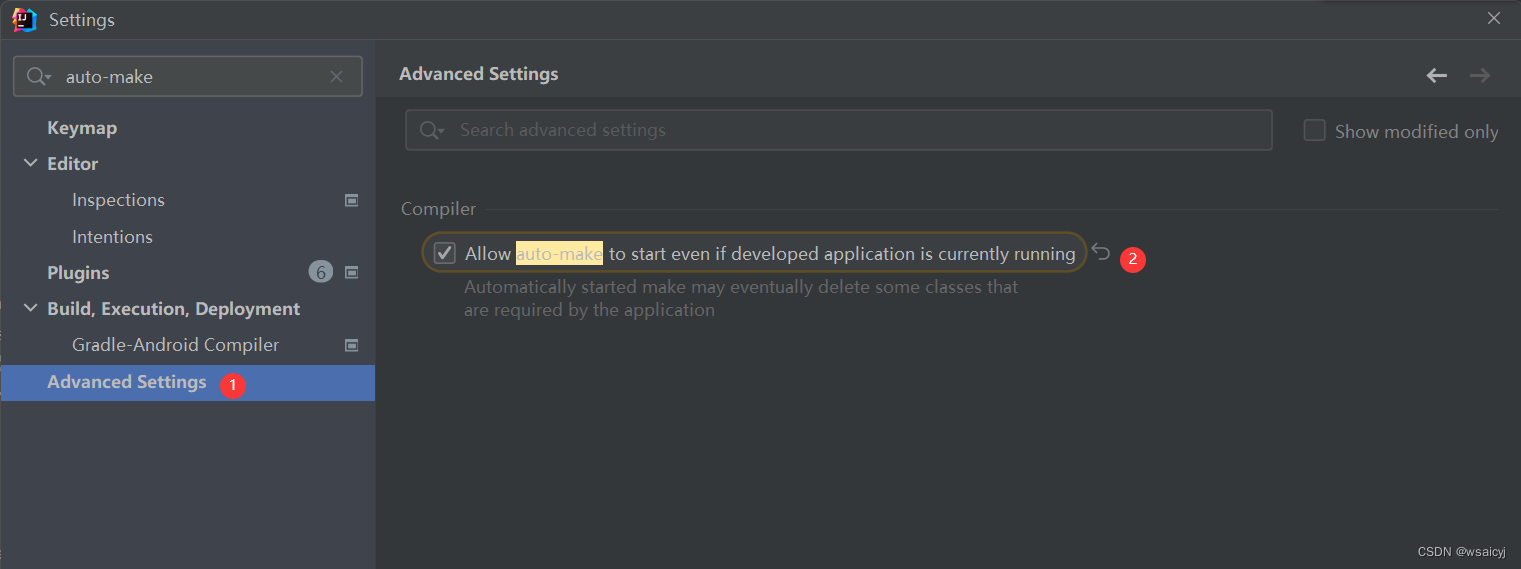
2.4自动删除没用的包
3.启动日志优化
3.1 修改日志格式
- 在resources目录下增加logback-spring.xml文件
- logback 5个日志级别:TRACE < DEBUG < INFO < WARN < ERROR
<?xml version="1.0" encoding="UTF-8"?>
<configuration>
    <!-- 修改一下路径-->
    <property name="PATH" value="./log"></property>

    <appender name="STDOUT" class="ch.qos.logback.core.ConsoleAppender">
        <encoder>
            <!--            <Pattern>%d{yyyy-MM-dd HH:mm:ss.SSS} %highlight(%-5level) %blue(%-50logger{50}:%-4line) %thread %msg%n</Pattern>-->
            <Pattern>%d{ss.SSS} %highlight(%-5level) %blue(%-30logger{30}:%-4line) %thread %msg%n</Pattern>
        </encoder>
    </appender>

    <appender name="TRACE_FILE" class="ch.qos.logback.core.rolling.RollingFileAppender">
        <file>${PATH}/trace.log</file>
        <rollingPolicy class="ch.qos.logback.core.rolling.TimeBasedRollingPolicy">
            <FileNamePattern>${PATH}/trace.%d{yyyy-MM-dd}.%i.log</FileNamePattern>
            <timeBasedFileNamingAndTriggeringPolicy class="ch.qos.logback.core.rolling.SizeAndTimeBasedFNATP">
                <maxFileSize>10MB</maxFileSize>
            </timeBasedFileNamingAndTriggeringPolicy>
        </rollingPolicy>
        <layout>
            <pattern>%d{yyyy-MM-dd HH:mm:ss.SSS} %-5level %-50logger{50}:%-4line %green(%-18X{LOG_ID}) %msg%n</pattern>
        </layout>
    </appender>

    <appender name="ERROR_FILE" class="ch.qos.logback.core.rolling.RollingFileAppender">
        <file>${PATH}/error.log</file>
        <rollingPolicy class="ch.qos.logback.core.rolling.TimeBasedRollingPolicy">
            <FileNamePattern>${PATH}/error.%d{yyyy-MM-dd}.%i.log</FileNamePattern>
            <timeBasedFileNamingAndTriggeringPolicy class="ch.qos.logback.core.rolling.SizeAndTimeBasedFNATP">
                <maxFileSize>10MB</maxFileSize>
            </timeBasedFileNamingAndTriggeringPolicy>
        </rollingPolicy>
        <layout>
            <pattern>%d{yyyy-MM-dd HH:mm:ss.SSS} %-5level %-50logger{50}:%-4line %green(%-18X{LOG_ID}) %msg%n</pattern>
        </layout>
        <filter class="ch.qos.logback.classic.filter.LevelFilter">
            <level>ERROR</level>
            <onMatch>ACCEPT</onMatch>
            <onMismatch>DENY</onMismatch>
        </filter>
    </appender>

    <root level="ERROR">
        <appender-ref ref="ERROR_FILE" />
    </root>

    <root level="TRACE">
        <appender-ref ref="TRACE_FILE" />
    </root>

    <root level="INFO">
        <appender-ref ref="STDOUT" />
    </root>
</configuration>
3.2 增加启动信息
在启动入口文件(XXApplication)增加启动信息
@SpringBootApplication
public class ImovieApplication {

    private static final Logger logger = LoggerFactory.getLogger(ImovieApplication.class);

    public static void main(String[] args) {
//        SpringApplication.run(ImovieApplication.class, args);
        SpringApplication app = new SpringApplication(ImovieApplication.class);
        Environment env =app.run(args).getEnvironment();
        logger.info("服务启动成功!");
        logger.info("地址:\thttp://127.0.0.1:{}",env.getProperty("server.port"));
    }
}
3.3 修改启动图案
在resources目录下增加banner.txt文件
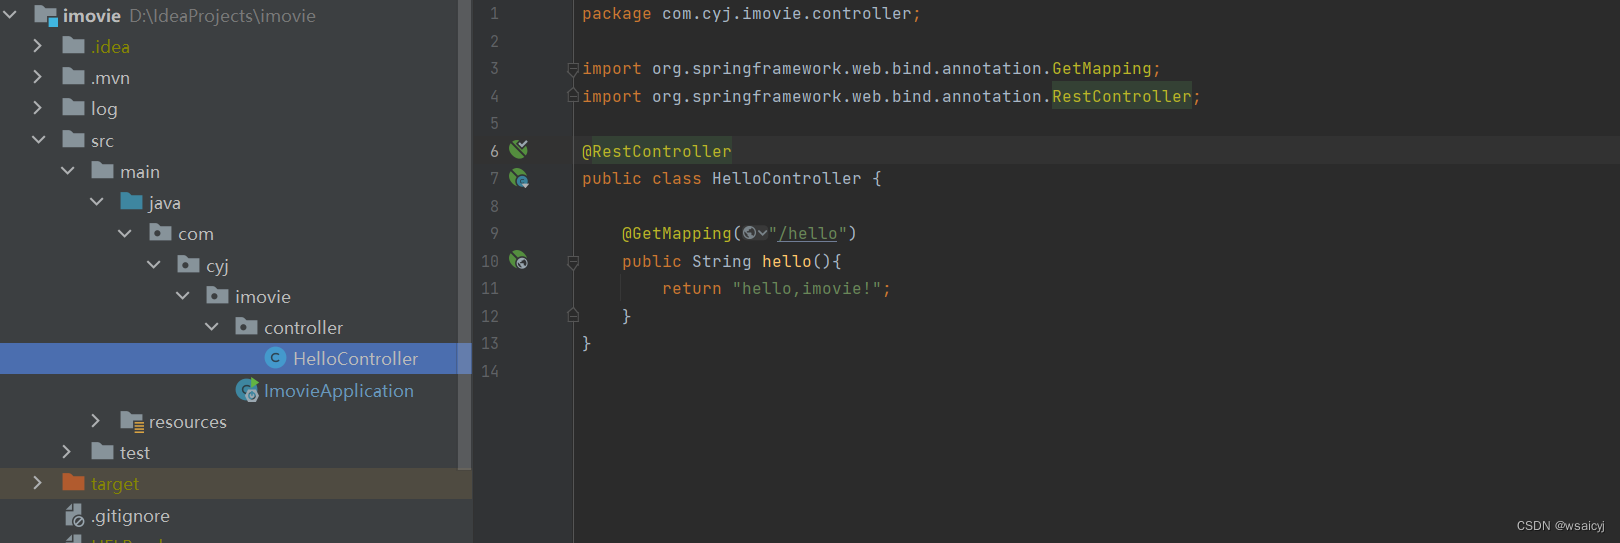
4.开发Hello World接口
- 在项目下创建controller层,用于定义接口,是请求的入口
- 新建HelloController文件
- 在启动类里添加@ComponentScan注解,用于管理类
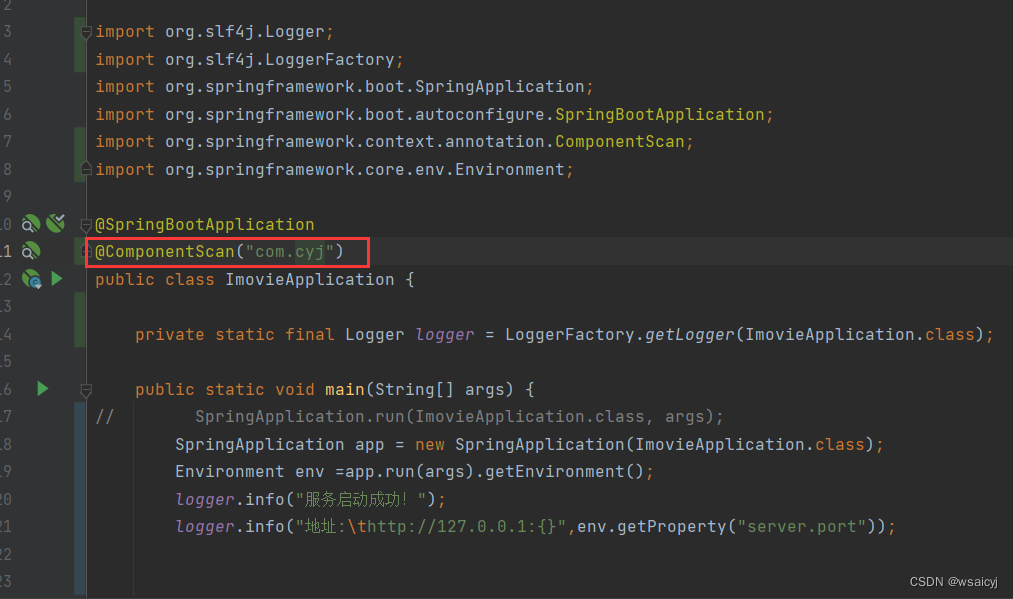
知识点总结: - @ComponentScan:配置要交给Spring管理的类路径
SpringBootApplication注解包含了@ComponentScan注解
如果启动类和其它类所在的包没有包含关系的话,需要加@ComponentScan注解 - controller层用于定义接口,是请求的入口
- @RestController注解用于声明返回文本数据,一般返回JSON
@Controller注解用于声明返回界面
@RestController = @Controller + @ResponseBody - 常见的HTTP请求:GET、POST、PUT、DELETE,对应的注解:GetMapping、PostMapping、PutMapping、DeleteMapping
5.配置文件
pringBoot会自动识别以下配置文件:application.properties、application.yml
6.热部署
- 引入依赖包
<dependency>
    <groupId>org.springframework.boot</groupId>
    <artifactId>spring-boot-devtools</artifactId>
</dependency>
- 在idea上开启静态自动编译
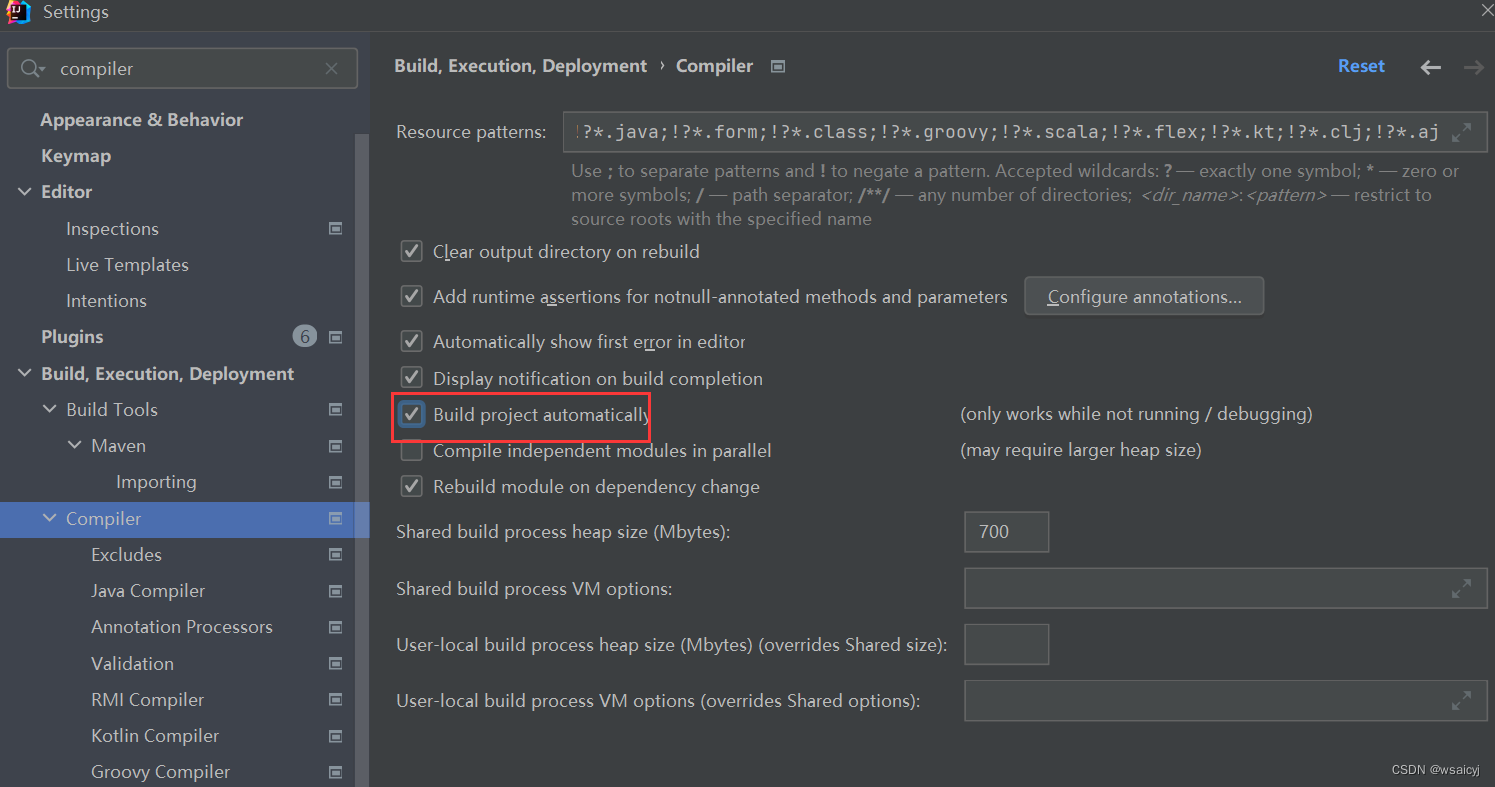
- 开启动态自动编译(idea2021版本)
三、完善后端架构
3.1 准备数据库
-- 电影表
drop table if exists `t_movie`;
create table `t_movie` (
                           `id` bigint not null comment '电影id',
                           `name` varchar(64) comment '电影名',
                           `description` varchar(250) comment '电影简介'
)engine=innodb default charset=utf8mb4 comment '电影表';

insert into `t_movie`(id,name,description) values (1, '寒战','《寒战》是银都机构有限公司、万诱引力丁有限公司、安乐影片有限公司联合出品的动作电影,由梁乐民、陆剑青执导,郭富城、梁家辉、杨采妮领衔主演');
insert into `t_movie`(id,name,description) values (2, '你的婚礼','《你的婚礼》是由韩天执导,许光汉、章若楠领衔主演,丁冠森、晏紫东、郭丞、王莎莎主演,梁靖康,刘迅特别出演的青春爱情片,于2021年4月30日在中国大陆上映');
insert into `t_movie`(id,name,description) values (3, '无限战争','《复仇者联盟3:无限战争》是由漫威电影制作的的科幻片。该片由安东尼·罗素、乔·罗素执导,小罗伯特·唐尼、乔什·布洛林、克里斯·埃文斯、克里斯·海姆斯沃斯、斯嘉丽·约翰逊、马克·鲁法洛等主演,于2018年4月27日在美国上映,2018年5月11日在中国大陆上映。');


-- 轮播图
drop table if exists `t_carousel`;
create table `t_carousel`(
                             `id` bigint not null comment '轮播图id',
                             `movie_id` bigint not null comment '电影id',
                             `image` varchar(256) comment '轮播图url',
                             `sort` int comment '排序',
                             `isShow` int comment '是否显示1:显示 0:不显示'
)engine=innodb default charset=utf8mb4 comment '轮播图';

insert into `t_carousel` values (1,1,'寒战.png',1,1);
insert into `t_carousel` values (2,2,'你的婚礼.png',2,1);
insert into `t_carousel` values (3,3,'无限战争.png',3,1);
3.2 集成持久层框架Mybatis-plus
1.引入相关依赖包
<!-- mybatis-plus-->
<dependency>
    <groupId>com.baomidou</groupId>
    <artifactId>mybatis-plus</artifactId>
    <version>3.5.2</version>
</dependency>

<!--mybatis-plus启动器-->
<dependency>
    <groupId>com.baomidou</groupId>
    <artifactId>mybatis-plus-boot-starter</artifactId>
    <version>3.5.2</version>
</dependency>

<!-- lombok-->
<dependency>
    <groupId>org.projectlombok</groupId>
    <artifactId>lombok</artifactId>
</dependency>

<!--mysql数据库驱动-->
<dependency>
    <groupId>mysql</groupId>
    <artifactId>mysql-connector-java</artifactId>
    <version>8.0.31</version>
</dependency>
3.3 集成Mybatis-plus官方代码生成器
1.引入相关依赖负
<!-- mybatis-plus代码生成器 -->
<dependency>
    <groupId>com.baomidou</groupId>
    <artifactId>mybatis-plus-generator</artifactId>
    <version>3.5.2</version>
</dependency>

<!-- mybatis-plus代码生成模板 -->
<dependency>
    <groupId>org.freemarker</groupId>
    <artifactId>freemarker</artifactId>
</dependency>
3.4 集成Swagger
1.相入相关依赖包
<!--swagger相关依赖包-->
<dependency>
   <groupId>io.springfox</groupId>
   <artifactId>springfox-swagger2</artifactId>
   <version>3.0.0</version>
</dependency>

<dependency>
   <groupId>io.springfox</groupId>
   <artifactId>springfox-swagger-ui</artifactId>
   <version>3.0.0</version>
</dependency>
- 添加配置类
@Configuration
@EnableSwagger2
@Configuration
@EnableSwagger2
public class SwaggerConfig {
@Bean
public Docket desertsApi(){
return new Docket(DocumentationType.SWAGGER_2)
.apiInfo(apiInfo())
.select()
.apis(RequestHandlerSelectors.basePackage("com.imovie.controller"))
.paths(PathSelectors.any())
.build();
}
private ApiInfo apiInfo(){
Contact contact = new Contact("Aaron_chan", "https://blog.youkuaiyun.com/wsaicyj", "wsaicyj@qq.com");
return new ApiInfoBuilder()
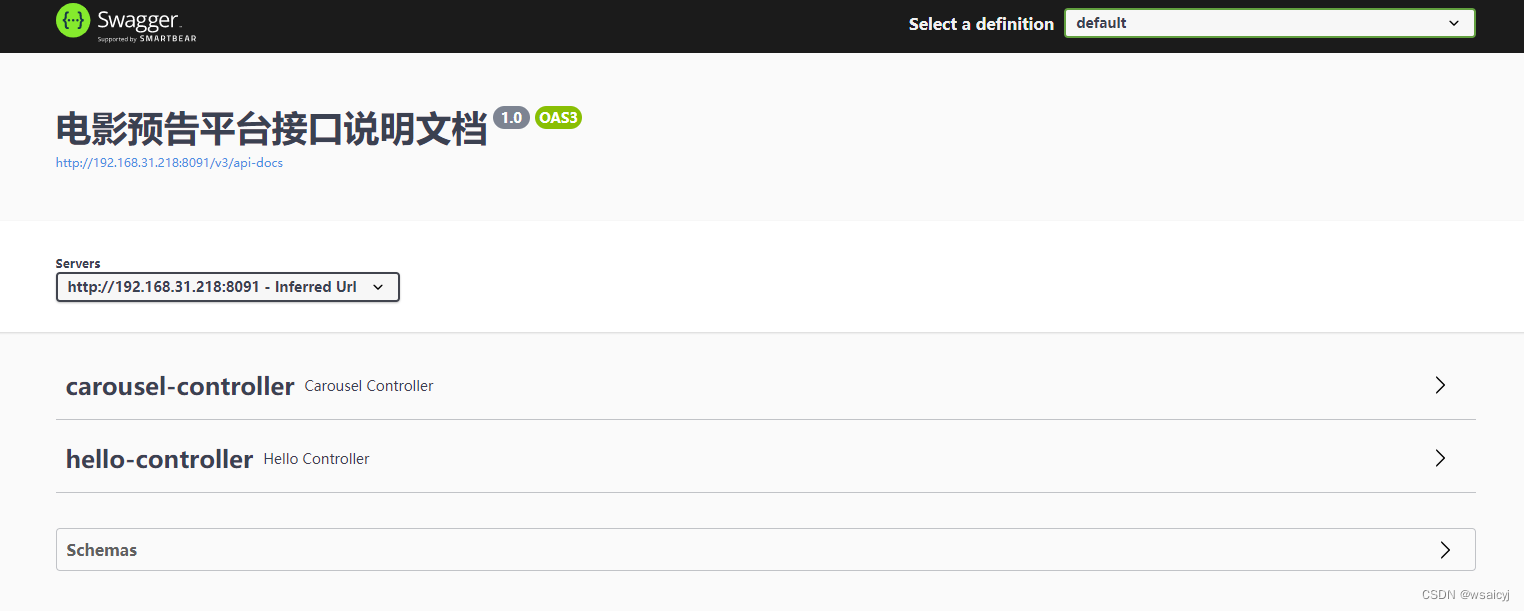
.title("电影预告平台接口说明文档")
.description("电影预告平台相关接口")
.version("1.0")
.contact(contact)
.build();
}
}
- swagger访问地址:http://ip:端口/swagger-ui/index.html
3.5 集成swagger-bootstrap-ui
1.引入相关依赖包
<dependency>
   <groupId>com.github.xiaoymin</groupId>
   <artifactId>swagger-bootstrap-ui</artifactId>
   <version>1.9.6</version>
</dependency>
2.新增配置类
@SpringBootApplication
@ConditionalOnClass(SpringfoxWebMvcConfiguration.class)
public class BootStrapUiConfig implements WebMvcConfigurer {

    @Override
    public void addResourceHandlers(ResourceHandlerRegistry registry) {
        registry.addResourceHandler("doc.html").addResourceLocations("classpath:/META-INF/resources/");
        registry.addResourceHandler("/webjars/**").addResourceLocations("classpath:/META-INF/resources/webjars/");
    }
}
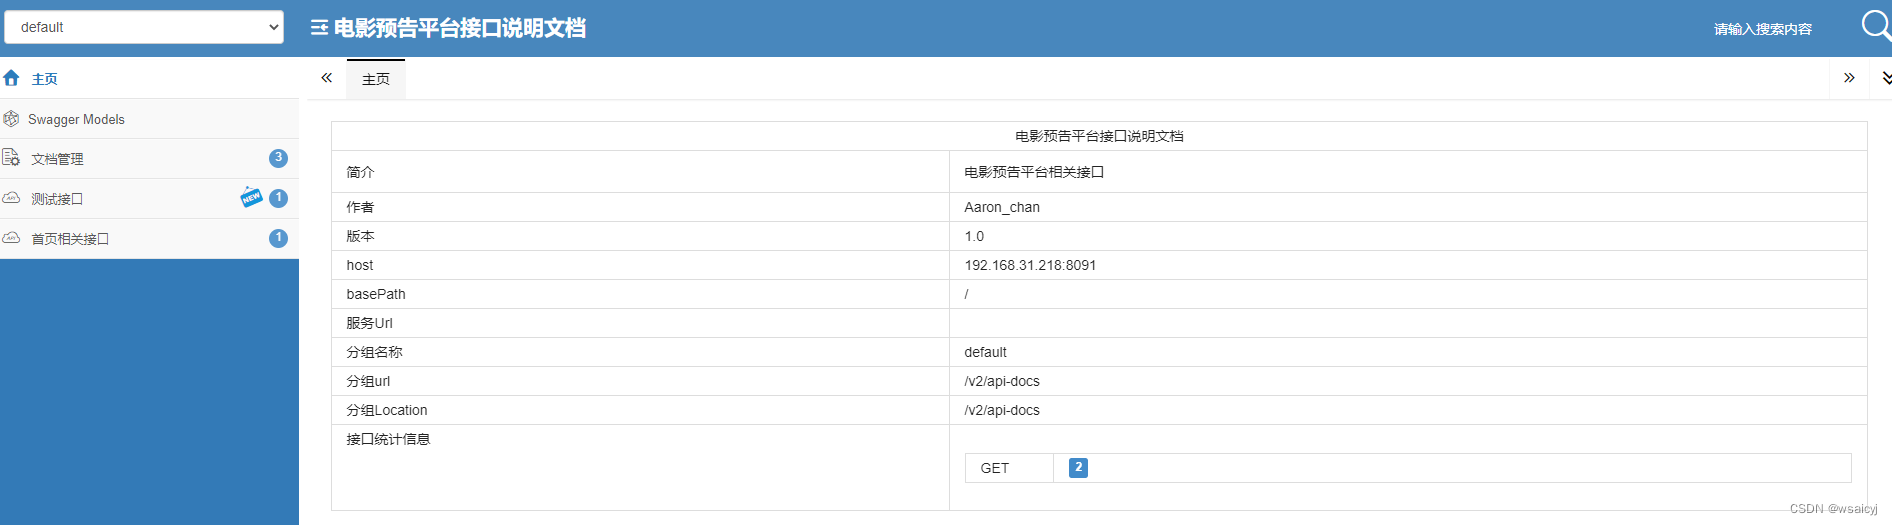
3.访问地址:http://id:端口/doc.html
四、接口开发
4.1 首页轮播图接口开发
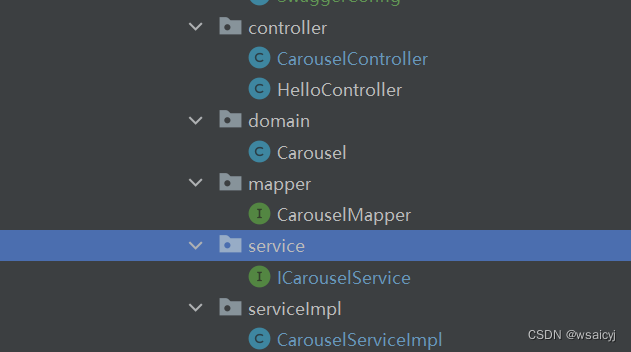
1.通过代码生成器生成controller、mapper、domain的代码
2.增加公用的返回类CommonResp
@Data
public class CommonResp<T> {

    //返回响应码,默认200
    private Integer status = 200;

    //返回消息
    private String message;

    //返回泛型数据,自定义类型
    private T content;
}
在controller使用公共响应方法
  @GetMapping("/list")
    @ApiOperation("查询全部的轮播图")
    public CommonResp list(){
        CommonResp<List<Carousel>> resp = new CommonResp<>();
        List<Carousel> carousels = carouselService.carouselList();
        resp.setContent(carousels);
        return resp;
    }
4.2 封装请求参数和返回参数
1.封装请求参数
创建req目录,新增CarouselReq类
@Data
public class CarouselReq implements Serializable {

    private static final long serialVersionUID = 1L;

    @ApiModelProperty("电影id")
    @TableField("movie_id")
    private Long movieId;

}
2.封装返回参数
创建resp目录,新增CarouselResp类
@Data
public class CarouselResp implements Serializable {

    private static final long serialVersionUID = 1L;

    @ApiModelProperty("轮播图id")
    @TableField("id")
    private Long id;

    @ApiModelProperty("电影id")
    @TableField("movie_id")
    private Long movieId;

    @ApiModelProperty("轮播图url")
    @TableField("image")
    private String image;

    @ApiModelProperty("排序")
    @TableField("sort")
    private Integer sort;

    @ApiModelProperty("是否显示1:显示 0:不显示")
    @TableField("isShow")
    private Integer isShow;

}
3.在service层新增一个根据电影id查询接口
public interface ICarouselService extends IService<Carousel> {

    //查询全部的轮播图
    List<Carousel> carouselList();

    //根据电影ID查询轮播图
    List<CarouselResp> selByMovieId(CarouselReq carouselReq);

}
4.实现接口
 @Override
    public List<CarouselResp> selByMovieId(CarouselReq carouselReq) {
        QueryWrapper<Carousel> queryWrapper = new QueryWrapper<>();
        queryWrapper.like("movie_id", carouselReq.getMovieId());

        List<Carousel> carouselList = carouselMapper.selectList(queryWrapper);

        List<CarouselResp> carouselRespList = new ArrayList<>();
        for (Carousel carousel : carouselList){
            CarouselResp carouselResp = new CarouselResp();
            BeanUtils.copyProperties(carousel, carouselResp);
            carouselRespList.add(carouselResp);
        }


        return carouselRespList;
    }
5.在controller请求接口
    @GetMapping("/selByMovieId")
    @ApiOperation("根据电影id查询轮播图")
    public CommonResp selByMovieId(CarouselReq carouselReq){
        CommonResp<List<CarouselResp>> resp = new CommonResp<>();
        List<CarouselResp> carouselRespList = carouselService.selByMovieId(carouselReq);
        resp.setContent(carouselRespList);
        resp.setMessage("成功");
        return resp;
    }
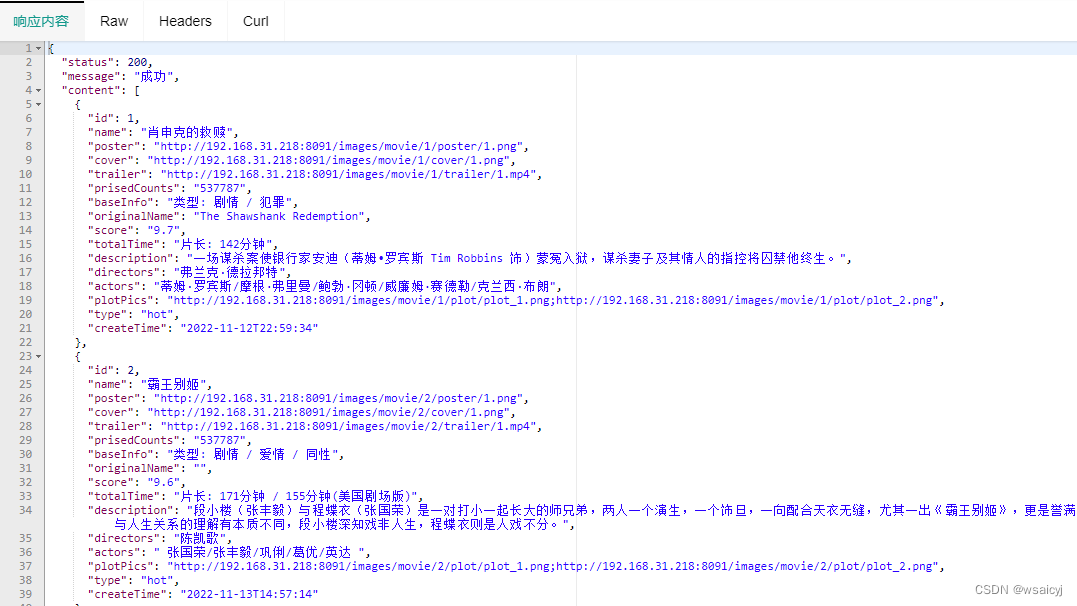
4.2 热门电影接口开发
- 使用代码生成器生成controller、domain、mapper、service、serviceImpl相关代码
- 实现热门电影接口
  @ApiOperation("查询热门电影/预告片")
  @GetMapping("/selByType/{type}")
  public CommonResp selByType(@ApiParam @PathVariable("type") String type){
      CommonResp<List<MovieResp>> resp = new CommonResp<>();
      List<MovieResp> movieRespList = movieService.movieList(type);

      resp.setMessage("成功");
      resp.setContent(movieRespList);

      return resp;

  }
4.3 猜你喜欢接口开发
- 实现猜你喜欢接口
@Override
public List<MovieResp> guessLike() {
    List<Movie> movieList = movieMapper.selectList(null);

    return getMovieResps(movieList);
}


 579
579

 被折叠的 条评论
为什么被折叠?
被折叠的 条评论
为什么被折叠?
 到【灌水乐园】发言


