


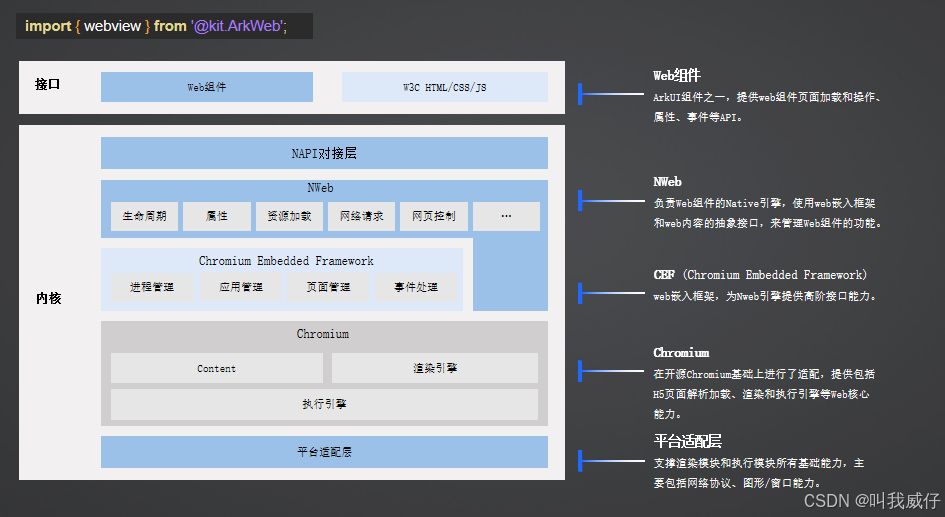
显示网页内容,提供加载、交互、调试等能力,实现移动端H5混合开发
- 加载:网页、离线页、html文本
- 交互:设置页面深色模式,新窗口中打开,位置权限管理,Cookie管理,使用JS脚本
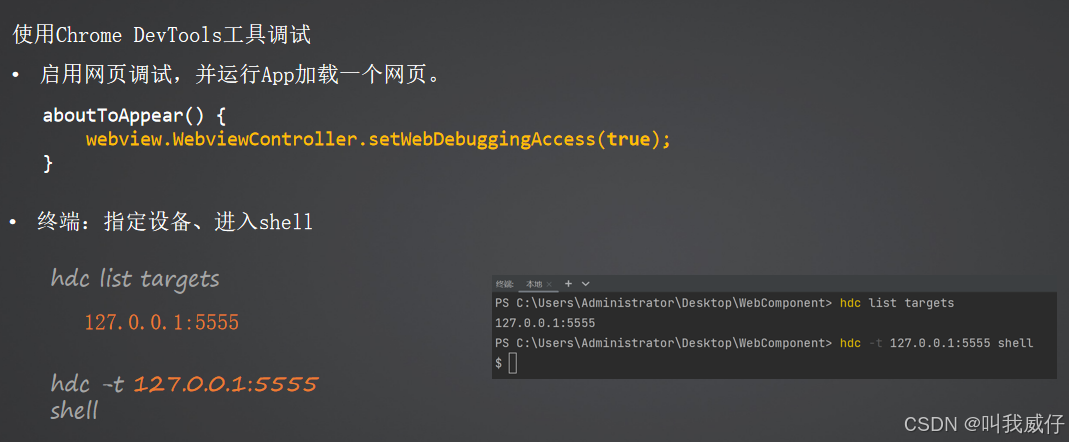
- 调试:使用Devtools工具调试网页
网页加载:loadUrl
webviewController = new webview.WebviewController()
Button().onClick(() => {
this.webviewController.loadUrl('www.bing.com’)
})
Web({ src: 'www.example.com', controller: this.webviewController})
本地页面
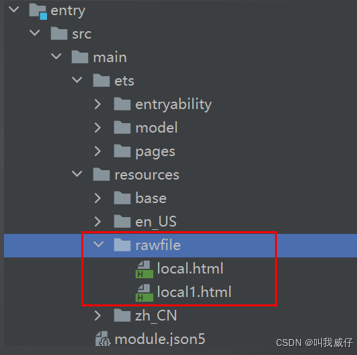
this.webviewController.loadUrl($rawfile("local1.html"))

// 通过$rawfile加载本地文件
Web({ src: $rawfile("local.html"), controller: this.webviewController })
加载HTML片段:loadData
this.controller.loadData(
  "<html><body bgcolor=\"white\">Source:<pre>source</pre></body></html>",
  "text/html",
   "UTF-8")
forward()、backward() 前进/后退
if (this.webviewController.accessBackward()) {
    this.webviewController.backward()
}
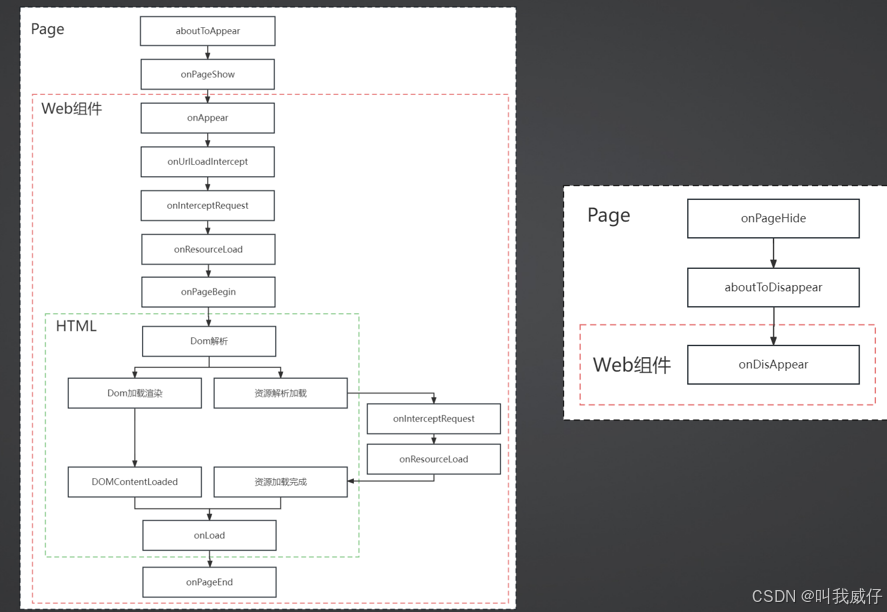
当点击网页链接需要跳转到应用内其他页面时,可用onLoadIntercept()
route.html
<!-- route.html -->
<!DOCTYPE html>
<html>
<body>
  <div>
      <a href=“native://pages/Profile”>我的</a>
   </div>
</body>
</html>
首页Index.ets
struct WebComponent {
  webviewController = new webview.WebviewController();

  build() {
    Column() {
      Web({ src: $rawfile('route.html'), controller: this.webviewController })
        .onLoadIntercept((event) => {
          if (event) {
            let url: string = event.data.toString();
            if (url.indexOf('native://') === 0) {

	   router.pushUrl({ url:url.substring(9) })
              return true;
            }
          }
          return false;
        })
    }
  }
}
Profile.ets
@Entry
@Component
struct Profile {
  …
}
可实现跳转到其他应用
@Entry
@Component
struct WebComponent {
  webviewController = new webview.WebviewController();

  build() {
    Column() {
      Web({ src: $rawfile('call.html'), controller: this.webviewController})
        .onLoadIntercept((event) => {
          if (event) {
            let url: string = event.data.toString();
            // 判断链接是否为拨号链接
            if (url.indexOf('tel://') === 0) {
              // 跳转拨号界面
              call.makeCall(url.substring(6), (err) => {
                ...
              });
              return true;
            }
          }
          return false;
        })
    }
  }
}
页面call.html
<!-- call.html -->
<!DOCTYPE html>
<html>
<body>
  <div>
    <a href="tel://13912345678">拨打电话</a>
  </div>
</body>
</html>
可通过runJavaScript()方法调用网页中的JavaScript相关函数。
将ArkTS代码注册到网页中,使用javaScriptProxy() 或 registerJavaScriptProxy() 在网页中调用。
通过runJavaScript()方法调用
<!-- index.html -->
<!DOCTYPE html>
<html>
<body>
<script>
    function htmlTest() {
        console.info('JavaScript Hello World! ');
    }
</script>
</body>
</html>
@Entry
@Component
struct WebComponent {
  webviewController = new webview.WebviewController();

  build() {
    Column() {
      Button('runJavaScript')
        .onClick(() => {
           this.webviewController.runJavaScript('htmlTest()');
        })
      Web({ src: $rawfile('index.html'), controller: this.webviewController})
    }
  }
}
将ArkTS代码注册到网页后,使用注册对象名就可以调用ArkTS函数
两种方式:
- 在Web组件初始化时使用javaScriptProxy()
- 在Web组件初始化后使用registerJavaScriptProxy()
函数传参支持类型:
- Array
- 不带Function的Dictionary
- 调用网页的Callback
- 调用网页Object里的Function
- 网页调用应用Object里的Function
- 支持Promise
<!-- index.html -->
<!DOCTYPE html>
<html>
<body>
<button type="button" onclick="callArkTS()">Click Me!</button>
<p id="demo"></p>
<script>
    function callArkTS() {
        let str = testObjName.test();
        document.getElementById("demo").innerHTML = str;
        console.info('ArkTS Hello World! :' + str);
    }
</script>
</body>
</html>
1、网页使用注册对象名,调用应用的函数。
2、在Web组件初始化使用javaScriptProxy()接口。
3、该方法在Web API中。
class TestClass {
  constructor() {
  }

  test(): string {
    return 'ArkTS Hello World!';
  }
}

@Entry
@Component
struct WebComponent {
  webviewController = new webview.WebviewController();
  // 声明需要注册的对象
  @State testObj: TestClass = new TestClass();

  build() {
    Column() {
      // web组件加载本地index.html页面
      Web({ src: $rawfile('index.html'), controller: this.webviewController})
        // 将对象注入到web端
        .javaScriptProxy({
          object: this.testObj,
          name: "testObjName",
          methodList: ["test"],
          controller: this.webviewController
        })
    }
  }
}
1、在Web组件初始化完成后,使用registerJavaScriptProxy()接口。
2、使用registerJavaScriptProxy()接口注册方法时,注册后需调用refresh()接口生效。
<!-- index.html -->
<!DOCTYPE html>
<html>
<body>
<button type="button" onclick="callArkTS()">Click Me!</button>
<p id="demo"></p>
<script>
    function callArkTS() {
        let str = testObjName.test();
        document.getElementById("demo").innerHTML = str;
        console.info('ArkTS Hello World! :' + str);
    }
</script>
</body>
</html>
class TestClass {
  constructor() {
  }

  test(): string {
    return "ArkUI Web Component";
  }

  toString(): void {
    console.log('Web Component toString');
  }
}
webviewController = new webview.WebviewController();
@State testObj: testClass = new TestClass();

this.webviewController.refresh();
this.webviewController.registerJavaScriptProxy(this.testObj, "testObjName", ["test", "toString"]);

Web({ src: $rawfile('index.html'), controller: this.webviewController })
函数传参支持一些复杂类型
Array
test(): Array<Number>{
  return [1, 2, 3, 4]
}
不带Function的Dictionary
test(): student {
  let st: student = {name:"jeck", age:"12"}
  return st
}
调用网页的Callback
test(param: Function): void {
  param("call callback");
}
调用网页Object里的Function
test(param: ESObject): void {
  param.hello("call obj func");
}
调用ArkTS的Object里的Function
test(): ESObject {
  return this.ObjReturn
}
支持Promise
test(): Promise<string> {
  let p: Promise<string> = new Promise();
  return p;
}
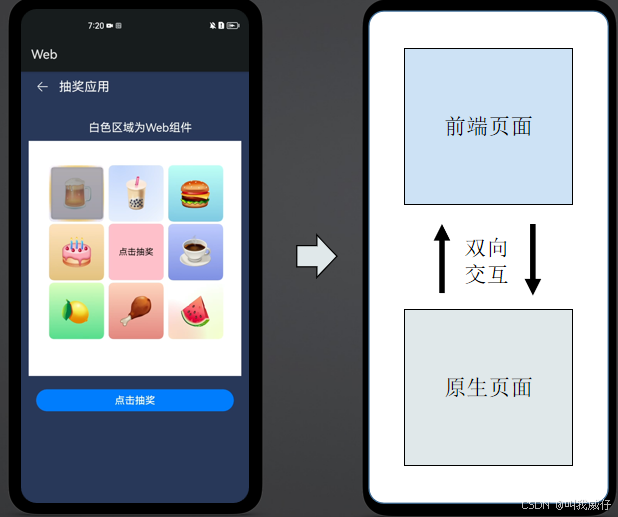
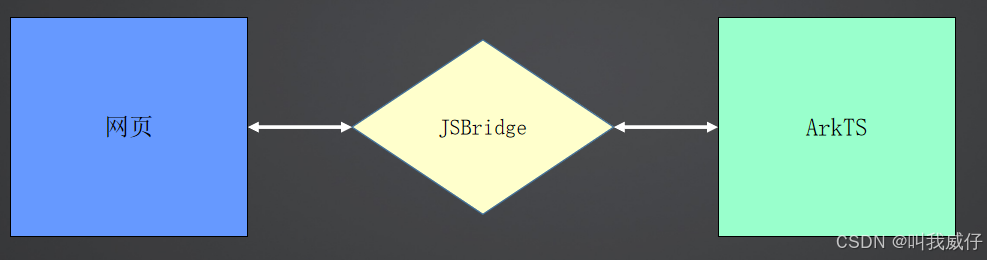
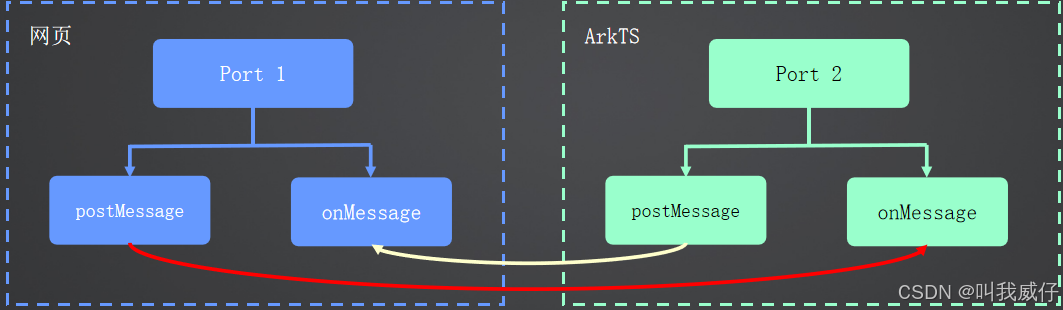
建立数据通道
可以用createWebMessagePorts()创建消息端口来实现两端通信
- JSBridge
- 函数的相互调用,不需要一直保持通道。
- WebMessagePorts
- 建立通道,实时监听,持续消耗资源。
- 对于有双向通信需求的场景,数据实时更新,聊天应用,大文件等更稳定。
自定义请求响应(拦截)
      Web({ src: $rawfile('index.html'), controller: this.controller })
        .onInterceptRequest((event) => {
          if (event) {
	 if (event.request.getRequestUrl() !== 'https://www.example.com/test.html') {
              return null;
            }
          }
          // 构造响应数据
          this.responseResource.setResponseData(this.webData)
          this.responseResource.setResponseEncoding('utf-8')
          this.responseResource.setResponseMimeType('text/html')
          this.responseResource.setResponseCode(200)
          this.responseResource.setReasonMessage('OK')
          return this.responseResource
        })
@State webData: string = '<!DOCTYPE html>\n' +
  '<html>\n'+
  '<head>\n'+
  '<title>intercept test</title>\n'+
  '</head>\n'+
  '<body>\n'+
  '<h1>intercept ok</h1>\n'+
  '</body>\n'+
  '</html>'
缓存管理在移动应用中起着重要的作用。
-
提升性能:将已访问过的页面、资源等保存在本地,下次加载同样内容直接从本地缓存获取。
-
离线访问:无网也可访问之前看过的页面或资源。
-
节省流量:减少联网依赖,对于网络条件差或流量限制下很重要。
cacheMode()配置缓存:
- Default : 优先使用未过期的缓存,否则从网络获取
- None : 加载资源使用cache,如果缓存中无该资源则从网络中获取
- Online : 在线模式
- Only :离线模式
struct WebComponent {
  @State mode: CacheMode = CacheMode.None;
  controller = new webview.WebviewController
  build() {
    Column() {
      Button('removeCache')
        .onClick(() => {
          try {
            // 设置为true同时清除内存和文件缓存,false只清除内存缓存
            this.controller.removeCache(true);
          } catch (error) {
            …
          }
        })
      Web({ src: 'www.example.com', controller: this.controller })
        .cacheMode(this.mode)
    }
  }
}
DOM Storage(页面级存储)
-
Session Storage:Session Storage是一种临时的存储机制,存储的数据与会话(session)的生命周期相关联。它只在当前会话期间有效,当会话结束(浏览器关闭)时,Session Storage中的数据会被自动释放。这意味着在同一个会话期间,数据可以在不同的页面间进行共享和传递。
-
Local Storage:Local Storage是一种持久化的存储机制,它允许将数据存储在浏览器的文件系统中的应用目录下,数据不会因会话结束而消失。Local Storage中的数据可以长期保存,甚至在用户关闭浏览器后再次打开时仍然可用。
无痕浏览。此模式下cookies、 缓存等不会保存在本地。
@Entry
@Component
struct WebComponent {
 controller = new web_webview.WebviewController()
 build() {
   Column() {
     Web({ src: 'www.example.com', controller: this.controller, incognitoMode: true })


      Button('isIncognitoMode')
        .onClick(() => {
            ...
            let result = this.controller.isIncognitoMode();
            ...
        })
   }
 }
}
预解析和预连接
1)可通过prepareForPageLoad()来预解析或者预连接将要加载的页面。
在Web组件的onAppear中对要加载的页面进行预连接。
      Web({ src: 'https://111.com/', controller: this.webviewController})
        .onAppear(() => {
            // 第二个参数为true代表要进行预连接,如果为false该接口只会对网址进行dns预解析
            // 第三个参数为要预连接socket的个数。最多允许6个。
	    webview.WebviewController.prepareForPageLoad('https://111.com/', true, 2);
        })
2)也可通过initializeBrowserEngine()提前初始化内核。这种方式适合提前对首页进行预解析、预连接。
webview.WebviewController.initializeWebEngine();
webview.WebviewController.prepareForPageLoad("https://111.com/", true, 2);
如果未来要访问的页面可预见,不妨使用prefetchPage()预加载
- 只预先下载页面资源,不执行JavaScript代码
struct WebComponent {
  webviewController = new webview.WebviewController()
  build() {
    Column() {
      Web({ src: 'https://111.com', controller: this.webviewController})
        .onPageEnd(() => {
            // 上一个页面加载完成后,预加载下一个
            this.webviewController.prefetchPage('https://222.com');
        })
    }
  }
}
1、文件上传
可以使用onShowFileSelector()接口来处理前端页面文件上传的请求
2、下载
通过WebDownloadDelegate来监听页面触发的下载任务,将下载的进度通知给应用,包括下载进度、下载速度、下载错误码等。
3、设置深色模式
darkMode()可以配置不同的深色模式:
WebDarkMode.Off 关闭
WebDarkMode.On 开启并跟随网页
WebDarkMode.Auto 开启并跟随系统
4、管理位置权限
可以通过onGeolocationShow()对某个网站进行位置权限管理。Web组件根据接口响应结果,决定是否赋予前端页面权限。
5、UserAgent字段设置
告诉服务器请求的来源和客户端的基本特性,以便提供适配的内容或服务
setCustomUserAgent:自定义
getUserAgent:获取当前默认
getCustomUserAgent:获取自定义


 2609
2609

 被折叠的 条评论
为什么被折叠?
被折叠的 条评论
为什么被折叠?
 到【灌水乐园】发言


