


先决条件
了解什么是增强现实 (AR)、虚拟现实 (VR) 和混合现实 (MR),Marker-based AR 和 Marker-less AR 之间的区别:https://arshren.medium.com/all-you-want-to-know-about-augmented-reality-1d5a8cd08977
基于标记的增强现实
基于标记的 AR,也称为图像识别 AR,使用对象或基准标记作为参考来确定相机的位置或方向。
基于位置的 AR 通过扫描像 ArUco 标记这样的标记来工作。ArUco 标记检测触发增强体验以定位对象、文本、视频或动画以显示在设备上。
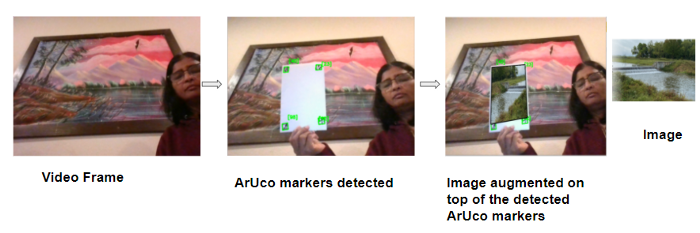
在这个例子中,我们将编写一个简单的代码,借助 ArUco 标记来增强视频流上的图像。
ArUco 标记
ArUco(Augmented Reality University of Cordoba) 由 S.Garrido-Jurado 等人于 2014 年在他们的工作“自动生成和检测遮挡下高度可靠的基准标记”(https://www.researchgate.net/publication/260251570_Automatic_generation_and_detection_of_highly_reliable_fiducial_markers_under_occlusion)中开发。
ArUco 标记是用于相机姿态估计的基准方形标记。当在视频中检测到 ArUco 标记时,你可以在检测到的标记上增加数字内容,例如图像。

尺寸为 6X6 的 ArUco 标记
ArUco 标记是一种合成方形标记,内部的二进制矩阵包含在带有唯一标识符的宽黑色边框内。在 ArUco 标记中, 黑色表示1,白色表示0。
标记大小决定了内部二进制矩阵的大小。ArUco 标记中的奇数块代表奇偶校验位,标记中的偶数方块代表数据位。
黑色边框便于在图像内快速检测,二进制矩阵允许对其进行识别。
ArUco 标记帮助相机了解角度、高度和深度,并在计算机视觉、机器人和增强现实中得到应用。
ArUco 标记由预定义的字典组成,涵盖一系列不同的字典大小和标记大小。要生成 ArUco 标记,你需要指定:
字典大小:是字典中标记的数量
指示位数的标记大小
上面的 ArUco 标记来自 100 个标记的字典,标记大小为 6X6 二进制矩阵。
此示例将使用计算机的默认摄像头捕捉视频,然后从 6x6x100 字典中引入 4 个 ArUco 标记。一旦检测到 ArUco 标记,就在检测到的 ArUco 标记上增加图像。
在此处阅读如何使用 OpenCV 读取、写入和显示视频:https://arshren.medium.com/read-and-write-videos-using-opencv-7f92548afcba
导入所需的库
import numpy as np
import cv2
import imutils
检测图像中的 ArUco 标记
要检测图像中的 ArUco 标记,
分析图像以找到作为标记候选的正方形形状。
检测到候选后,验证其内部编码以确保它们是 ArUco 标记。
在 OpenCV 中,ArUco 标记字典遵循命名约定cv2.aruco.DICT_NxN_M,其中 N 是二进制矩阵的大小,代表标记的大小,M 是字典中 ArUco 标记的数量。
要检测 ArUco 标记,请将 BGR 图像转换为灰度图像,以便于检测。getattr()用于访问 ArUco 标记中键属性的值以加载 ArUco 字典。
检测在detectMarkers()函数中执行,其中输入参数是包含 ArUco 标记的图像,ArUco 字典对象,在我们的例子中是 6x6x100 和 DetectorParameters(). detectMarkers()函数返回四个角的向量、它们的 id 以及检测到但不符合 ArUco 编码的任何矩形。
def findArucoMarkers(img, markerSize = 6, totalMarkers=250, draw=True):
    gray = cv2.cvtColor(img, cv2.COLOR_BGR2GRAY)
    key = getattr(cv2.aruco, f'DICT_{markerSize}X{markerSize}_{totalMarkers}')

    #Load the dictionary that was used to generate the markers.
    arucoDict = cv2.aruco.Dictionary_get(key)

    # Initialize the detector parameters using default values
    arucoParam = cv2.aruco.DetectorParameters_create()

    # Detect the markers
    bboxs, ids, rejected = cv2.aruco.detectMarkers(gray, arucoDict, parameters = arucoParam)
    return bboxs, ids
通过将源图像叠加在视频顶部来应用增强现实。
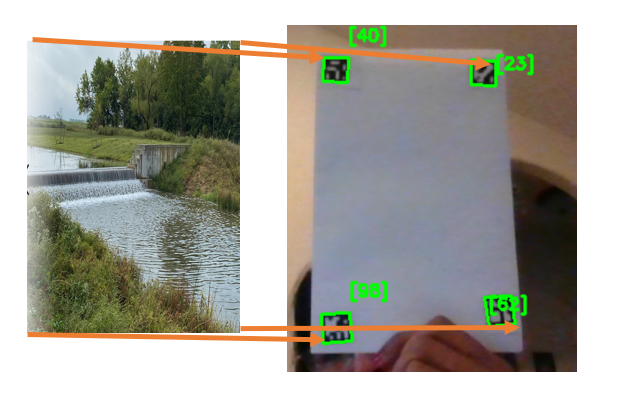
开始使用计算机的默认摄像头捕捉视频,并读取要叠加在 ArUco 标记上的图像。
检测视频帧中的 ArUco 标记并找到每个 ArUco 标记的所有四个角的位置。计算视频帧和将要叠加的图像之间的单应性。
单应性是一个图像中的点到另一图像中的对应点的变换映射。
OpenCV 的findHomography()计算图像和视频帧点之间的单应性函数 h 以扭曲图像以适应视频帧。然后对扭曲的图像进行屏蔽并复制到视频帧上。
import numpy as np
import cv2
import imutils

# function to detect ArUco Markers
def findArucoMarkers(img, markerSize = 6, totalMarkers=250, draw=True):
    gray = cv2.cvtColor(img, cv2.COLOR_BGR2GRAY)
    key = getattr(cv2.aruco, f'DICT_{markerSize}X{markerSize}_{totalMarkers}')


    #Load the dictionary that was used to generate the markers.
    arucoDict = cv2.aruco.Dictionary_get(key)

    # Initialize the detector parameters using default values
    arucoParam = cv2.aruco.DetectorParameters_create()

    # Detect the markers
    bboxs, ids, rejected = cv2.aruco.detectMarkers(gray, arucoDict, parameters = arucoParam)
    return bboxs, ids

# Superimposing the image on the aruco markers detected in the video
imgH=480
imgW=640

video = cv2. VideoCapture(0)

ret, video_frame=video.read()
image = cv2.imread(r'nature.png')
image = cv2.resize(image, (imgH, imgW))

while(video.isOpened()):
    if ret==True:
        refPts=[]
        #Detect the Aruco markers on the video frame
        arucofound =findArucoMarkers(video_frame, totalMarkers=100)
        h, w = video_frame.shape[:2]

        # if the aruco markers are detected
        if  len(arucofound[0])!=0:

                for Corner, id in zip(arucofound[0], arucofound[1]):

                    corners = Corner.reshape((4, 2))
                    (topLeft, topRight, bottomRight, bottomLeft) = corners
                    topRight = (int(topRight[0]), int(topRight[1]))
                    bottomRight = (int(bottomRight[0]), int(bottomRight[1]))
                    bottomLeft = (int(bottomLeft[0]), int(bottomLeft[1]))
                    topLeft = (int(topLeft[0]), int(topLeft[1]))
                    # draw lines around the marker and display the marker id
                    cv2.line(video_frame, topLeft, topRight, (0, 255, 0), 2)
                    cv2.line(video_frame, topRight, bottomRight, (0, 255, 0), 2)
                    cv2.line(video_frame, bottomRight, bottomLeft, (0, 255, 0), 2)
                    cv2.line(video_frame, bottomLeft, topLeft, (0, 255, 0), 2)
                    cv2.putText(video_frame, str(id),(topLeft[0], topLeft[1] - 15), cv2.FONT_HERSHEY_SIMPLEX,0.5, (0, 255, 0), 2)
                    corner = np.squeeze(Corner)
                    refPts.append(corner)

                    # only when all the 4 markes are detected in the image
                    if len(refPts)==4:
                        ( refPtBR, refPtTR,refPtBL, refPtTL) = refPts
                        video_pt = np.array([  refPtTL[3], refPtBL[3],refPtBR[2], refPtTR[3]])

                        # grab the spatial dimensions of the  image and define the
                        # transform matrix for the image in
                        #top-left, top-right,bottom-right, and bottom-left order
                        image_pt = np.float32([[0,0], [h,0], [h,w], [0,w]])

                        # compute the homography matrix between the image and the video frame
                        matrix, _ = cv2.findHomography( image_pt, video_pt)

                        #warp the  image to video frame based on the homography
                        warped  = cv2.warpPerspective(image, matrix, (video_frame.shape[1], video_frame.shape[0]))

                        #Create a mask representing region to
                        #copy from the warped image into the video frame.
                        mask = np.zeros((imgH, imgW), dtype="uint8")
                        cv2.fillConvexPoly(mask, video_pt.astype("int32"), (255, 255, 255),cv2.LINE_AA)

                        # give the source image a black border
                        # surrounding it when applied to the source image,
                        #you can apply a dilation operation
                        rect = cv2.getStructuringElement(cv2.MORPH_RECT, (3, 3))
                        mask = cv2.dilate(mask, rect, iterations=2)

                        # Copy the mask with the three channel version by stacking it depth-wise,
                        # This will allow copying the warped source image into the input image
                        maskScaled = mask.copy() / 255.0
                        maskScaled = np.dstack([maskScaled] * 3)

                        # Copy the masked warped image into the video frame by
                        # (1) multiplying the warped image and masked together,
                        # (2) multiplying the Video frame with the mask
                        # (3) adding the resulting images
                        warpedMultiplied = cv2.multiply(warped.astype("float"), maskScaled)
                        imageMultiplied = cv2.multiply(video_frame.astype(float), 1.0 - maskScaled)
                        #imgout = video frame multipled with mask
                        #        + warped image multipled with mask
                        output = cv2.add(warpedMultiplied, imageMultiplied)
                        output = output.astype("uint8")
                        cv2.imshow("output", output)

    ret, video_frame=video.read()
    key = cv2.waitKey(20)
    # if key q is pressed then break
    if key == 113:
        break

#finally destroy/close all open windows
video.release()
cv2.destroyAllWindows()
最终输出会将图像映射到视频中检测到的 ArUco 标记的顶部。
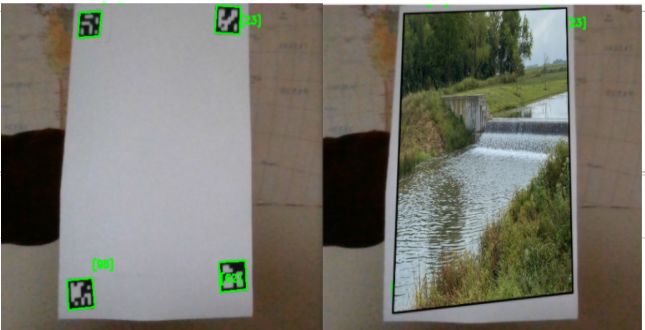
使用 ArUco 标记的增强现实
此处提供代码:https://github.com/arshren/AR_Aruco
参考:
https://docs.opencv.org/4.x/d5/dae/tutorial_aruco_detection.html
https://machinelearningknowledge.ai/augmented-reality-using-aruco-marker-detection-with-python-opencv/
https://learnopencv.com/augmented-reality-using-aruco-markers-in-opencv-c-python/
☆ END ☆
如果看到这里,说明你喜欢这篇文章,请转发、点赞。微信搜索「uncle_pn」,欢迎添加小编微信「 woshicver」,每日朋友圈更新一篇高质量博文。
↓扫描二维码添加小编↓


 1896
1896

 被折叠的 条评论
为什么被折叠?
被折叠的 条评论
为什么被折叠?
 到【灌水乐园】发言


