


 本文对Android开发中Activity的setContentView进行源码分析。从getDelegate委托方式实现布局显示入手,探究create方法创建被委托对象,深入分析ensureSubDecor等方法,最终总结出Activity生成PhoneWindow、DecorView对象,AppCompatDelegateImpl生成ViewGroup对象并塞入DecorView的过程。
前言
鉴于最近接触UI会比较多。先对次做一个初步的了解,以便能快速融入项目。学一个东西我比较喜欢从熟悉的入手,那Activity应该是Android开发中最熟悉的东西了。无论是对于View学习还是Dialog等的理解,Activity的结构熟悉都极有好处。本文只是做一个初步的了解。
源码分析
先从Activity最常用的setContentView入手:
@Override
public void setContentView(@LayoutRes int layoutResID) {
    getDelegate().setContentView(layoutResID);
}
这边getDelegate()采用了委托的方式来实现布局的显示。
/**
* @return The {@link AppCompatDelegate} being used by this Activity.
*/
@NonNull
public AppCompatDelegate getDelegate() {
    if (mDelegate == null) {
        mDelegate = AppCompatDelegate.create(this, this);
    }
    return mDelegate;
}
如注释所说的该方法获取一个AppCompatDelegate对象给Activity使用。接下来看看create方法是怎么创建被委托对象的:
@NonNull
public static AppCompatDelegate create(@NonNull Activity activity,
     @Nullable AppCompatCallback callback) {
     return new AppCompatDelegateImpl(activity, callback);
}
也就是将本Activity委托给AppCompatDelegateImpl,然后创建对象来实现布局的显示。
为什么这样子做呢?我的想法是由于布局显示有着共同的写法,那还不如写个实现类。然后比如说Dialog,Fragment,Activity这些委托给AppCompatDelegateImpl统一进行处理显示布局等。
至此得到了个AppCompatDelegateImpl对象,所以真正实现的地方就在AppCompatDelegateImpl里了。
@Override
    public void setContentView(int resId) {
        ensureSubDecor();
        ViewGroup contentParent = mSubDecor.findViewById(android.R.id.content);
        contentParent.removeAllViews();
        LayoutInflater.from(mContext).inflate(resId, contentParent);
        mAppCompatWindowCallback.getWrapped().onContentChanged();
    }
mSubDecor这个先不管,就认为是某个ViewGroup,那么android.R.id.content就是真正显示布局的地方。contentParent先是移除所有的布局,再把要设置的布局显示出来。
接下来看看ensureSubDecor()方法:
private void ensureSubDecor() {
        if (!mSubDecorInstalled) {
            mSubDecor = createSubDecor();
		   mSubDecorInstalled = true;
            。。。
        }
    }
就是说mSubDecor是通过createSubDecor()来创建的,这个方法是重头戏来着:
private ViewGroup createSubDecor() {
        。。。

        // Now let's make sure that the Window has installed its decor by retrieving it
        ensureWindow();//步骤1
        mWindow.getDecorView();

        final LayoutInflater inflater = LayoutInflater.from(mContext);
        ViewGroup subDecor = null;


        if (!mWindowNoTitle) {
            if (mIsFloating) {
                // If we're floating, inflate the dialog title decor
                subDecor = (ViewGroup) inflater.inflate(
                        R.layout.abc_dialog_title_material, null);

                // Floating windows can never have an action bar, reset the flags
                mHasActionBar = mOverlayActionBar = false;
            } else if (mHasActionBar) {
                /**
                 * This needs some explanation. As we can not use the android:theme attribute
                 * pre-L, we emulate it by manually creating a LayoutInflater using a
                 * ContextThemeWrapper pointing to actionBarTheme.
                 */
                TypedValue outValue = new TypedValue();
                mContext.getTheme().resolveAttribute(R.attr.actionBarTheme, outValue, true);

                Context themedContext;
                if (outValue.resourceId != 0) {
                    themedContext = new ContextThemeWrapper(mContext, outValue.resourceId);
                } else {
                    themedContext = mContext;
                }

                // Now inflate the view using the themed context and set it as the content view
                subDecor = (ViewGroup) LayoutInflater.from(themedContext)
                        .inflate(R.layout.abc_screen_toolbar, null);

                mDecorContentParent = (DecorContentParent) subDecor
                        .findViewById(R.id.decor_content_parent);
                mDecorContentParent.setWindowCallback(getWindowCallback());

                /**
                 * Propagate features to DecorContentParent
                 */
                if (mOverlayActionBar) {
                    mDecorContentParent.initFeature(FEATURE_SUPPORT_ACTION_BAR_OVERLAY);
                }
                if (mFeatureProgress) {
                    mDecorContentParent.initFeature(Window.FEATURE_PROGRESS);
                }
                if (mFeatureIndeterminateProgress) {
                    mDecorContentParent.initFeature(Window.FEATURE_INDETERMINATE_PROGRESS);
                }
            }
        } else {
            if (mOverlayActionMode) {
                subDecor = (ViewGroup) inflater.inflate(
                        R.layout.abc_screen_simple_overlay_action_mode, null);
            } else {
                subDecor = (ViewGroup) inflater.inflate(R.layout.abc_screen_simple, null);
            }
        }

        。。。

        final ContentFrameLayout contentView = (ContentFrameLayout) subDecor.findViewById(
                R.id.action_bar_activity_content);

        final ViewGroup windowContentView = (ViewGroup) mWindow.findViewById(android.R.id.content);
        if (windowContentView != null) {
            // There might be Views already added to the Window's content view so we need to
            // migrate them to our content view
            while (windowContentView.getChildCount() > 0) {
                final View child = windowContentView.getChildAt(0);
                windowContentView.removeViewAt(0);
                contentView.addView(child);
            }

            // Change our content FrameLayout to use the android.R.id.content id.
            // Useful for fragments.
            windowContentView.setId(View.NO_ID);
            contentView.setId(android.R.id.content);

            // The decorContent may have a foreground drawable set (windowContentOverlay).
            // Remove this as we handle it ourselves
            if (windowContentView instanceof FrameLayout) {
                ((FrameLayout) windowContentView).setForeground(null);
            }
        }

        // Now set the Window's content view with the decor
        mWindow.setContentView(subDecor);
    	。。。

        return subDecor;
    }
首先看下步骤1,ensureWindow方法:
private void ensureWindow() {
        // We lazily fetch the Window for Activities, to allow DayNight to apply in
        // attachBaseContext
        if (mWindow == null && mHost instanceof Activity) {
            attachToWindow(((Activity) mHost).getWindow());
        }
        if (mWindow == null) {
            throw new IllegalStateException("We have not been given a Window");
        }
    }
他是获取当前activity的window对象赋值给mWindow,再深入看看getWindow做了些什么:
public Window getWindow() {
   return mWindow;
}

final void attach(Context context, ActivityThread aThread,
            Instrumentation instr, IBinder token, int ident,
            Application application, Intent intent, ActivityInfo info,
            CharSequence title, Activity parent, String id,
            NonConfigurationInstances lastNonConfigurationInstances,
            Configuration config, String referrer, IVoiceInteractor voiceInteractor,
            Window window, ActivityConfigCallback activityConfigCallback, IBinder assistToken) {
        attachBaseContext(context);

        mWindow = new PhoneWindow(this, window, activityConfigCallback);

    。。。
}
可以看到mWindow是一个PhoneWindow对象,至此我们得到了一个PhoneWindow对象。再返回到createSubDecor方法,此时会调用mWindow.getDecorView()方法接下来看看里面做了什么:
@Override
    public final View getDecorView() {
        if (mDecor == null || mForceDecorInstall) {
            installDecor();
        }
        return mDecor;
    }
那么接下来重点看看installDecor这个方法:
private void installDecor() {
        mForceDecorInstall = false;
        if (mDecor == null) {
            mDecor = generateDecor(-1);//步骤1
            mDecor.setDescendantFocusability(ViewGroup.FOCUS_AFTER_DESCENDANTS);
            mDecor.setIsRootNamespace(true);
            if (!mInvalidatePanelMenuPosted && mInvalidatePanelMenuFeatures != 0) {
                mDecor.postOnAnimation(mInvalidatePanelMenuRunnable);
            }
        } else {
            mDecor.setWindow(this);
        }
        if (mContentParent == null) {
            mContentParent = generateLayout(mDecor);//步骤2
        。。。
        }
其中步骤1是生成一个DecorView对象,而步骤二是由DecorView对象对象生成mContentParent对象。记住这个对象。
现在又回到之前的createSubDecor方法
ViewGroup subDecor = null;
        if (!mWindowNoTitle) {
            if (mIsFloating) {
                // If we're floating, inflate the dialog title decor
                subDecor = (ViewGroup) inflater.inflate(
                        R.layout.abc_dialog_title_material, null);
                        。。。

                            final ContentFrameLayout contentView = (ContentFrameLayout) subDecor.findViewById(
                R.id.action_bar_activity_content);

        final ViewGroup windowContentView = (ViewGroup) mWindow.findViewById(android.R.id.content);
        if (windowContentView != null) {
            // There might be Views already added to the Window's content view so we need to
            // migrate them to our content view
            while (windowContentView.getChildCount() > 0) {
                final View child = windowContentView.getChildAt(0);
                windowContentView.removeViewAt(0);
                contentView.addView(child);//步骤2
            }

            // Change our content FrameLayout to use the android.R.id.content id.
            // Useful for fragments.
            windowContentView.setId(View.NO_ID);
            contentView.setId(android.R.id.content);

            // The decorContent may have a foreground drawable set (windowContentOverlay).
            // Remove this as we handle it ourselves
            if (windowContentView instanceof FrameLayout) {
                ((FrameLayout) windowContentView).setForeground(null);
            }
        }

        // Now set the Window's content view with the decor
        mWindow.setContentView(subDecor);//步骤3
先利用R.layout.abc_dialog_title_material生成subDecor对象.
步骤2 获取 mWindow 中id为content的view,遍历之后都塞入contentView中也就是subDecor中专门用来显示内容的区域并将该区域的id改为android.R.id.content。
步骤3:接下来调用setContentView将subDecor塞入PhoneWindow中,看看PhoneWindow中的setContentView方法:
@Override
    public void setContentView(View view) {
        setContentView(view, new ViewGroup.LayoutParams(MATCH_PARENT, MATCH_PARENT));
    }

    @Override
    public void setContentView(View view, ViewGroup.LayoutParams params) {
        // Note: FEATURE_CONTENT_TRANSITIONS may be set in the process of installing the window
        // decor, when theme attributes and the like are crystalized. Do not check the feature
        // before this happens.
        if (mContentParent == null) {
            installDecor();
        } else if (!hasFeature(FEATURE_CONTENT_TRANSITIONS)) {
            mContentParent.removeAllViews();
        }

        if (hasFeature(FEATURE_CONTENT_TRANSITIONS)) {
            view.setLayoutParams(params);
            final Scene newScene = new Scene(mContentParent, view);
            transitionTo(newScene);
        } else {
            mContentParent.addView(view, params);//步骤1
        }
        mContentParent.requestApplyInsets();
        final Callback cb = getCallback();
        if (cb != null && !isDestroyed()) {
            cb.onContentChanged();
        }
        mContentParentExplicitlySet = true;
    }
关键看步骤1这个地方,也就是说将传进来的subDecor塞入mContentParent中,而mContentParent正是之前generateLayout(mDecor)生成的ViewGroup。
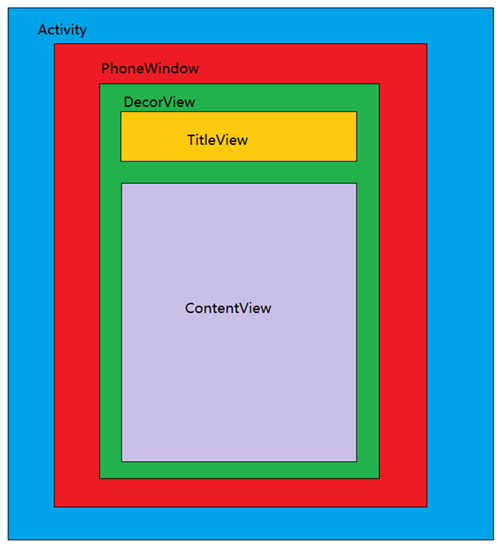
至此分析完毕,总结一下。
首先Activity生成PhoneWindow对象,该对象中又生成DecorView对象。然后在AppCompatDelegateImpl中根据传入的LayoutID生成ViewGroup对象塞入DecorView对象中去
如下图所示:


 5858
5858

 被折叠的 条评论
为什么被折叠?
被折叠的 条评论
为什么被折叠?
 到【灌水乐园】发言


