


目录
1,实现整合的流程图
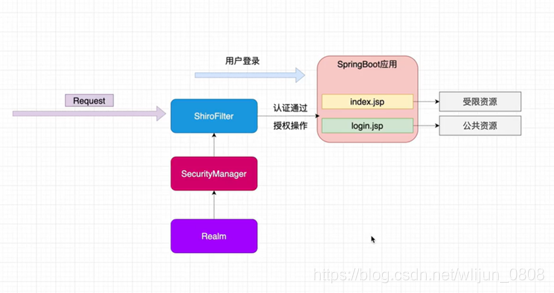
Tips:
在springboot应用中,我们要把资源分为受限资源和公共资源。
当有请求进来的时候,先被我们配置好的shiroFilter所拦截,shiroFilter调用securityManager对该请求进行认证和授权,通过认证和授权之后,再进行一系列操作。
2,代码实现过程
1)创建springboot项目
2)引入jsp文件解析的依赖。
<dependency>
            <groupId>org.apache.tomcat.embed</groupId>
            <artifactId>tomcat-embed-jasper</artifactId>
            <version>9.0.40</version>
        </dependency>
        <dependency>
            <groupId>jstl</groupId>
            <artifactId>jstl</artifactId>
            <version>1.2</version>
        </dependency>
3)创建jsp文件。
register.jsp:
<%@page contentType="text/html; UTF-8" pageEncoding="utf-8" isELIgnored="false" %>
<!DOCTYPE html>
<html lang="en">
<head>
    <meta charset="UTF-8">
    <title>Title</title>
</head>
<body>
<h1>用户注册</h1>
<form action="${pageContext.request.contextPath}/user/register" method="post">
    用户名:<input type="text" name="username"><br>
    密码:<input type="text" name="password"> <br>
    <input type="submit" value="立即注册">
</form>
</body>
</html>
login.jsp
<%@page contentType="text/html; UTF-8" pageEncoding="utf-8" isELIgnored="false" %>
<!DOCTYPE html>
<html lang="en">
<head>
    <meta charset="UTF-8">
    <title>Title</title>
</head>
<body>
<h1>用户登录</h1>
<form action="${pageContext.request.contextPath}/user/login" method="post">
    用户名:<input type="text" name="username"><br>
    密码:<input type="text" name="password"> <br>
    <input type="submit" value="登录">
</form>
</body>
</html>
index.jsp
<%@page contentType="text/html; UTF-8" pageEncoding="utf-8" isELIgnored="false" %>
<%--引用shiro的标签--%>
<%@taglib prefix="shiro" uri="http://shiro.apache.org/tags" %>
<!DOCTYPE html>
<html lang="en">
<head>
    <meta charset="UTF-8">
    <title>Title</title>
</head>
<body>
<h1>系统用户</h1>
<%--    设置多个用户--%>
    <shiro:hasAnyRoles name="admin,user">
        <li><a href="href">用户管理</a>
            <ul>
                <li><a href="">添加</a></li>
                <li><a href="">删除</a></li>
               <li><a href="">修改</a></li>
              <li><a href="">查询</a></li>
            </ul>
        </li>
       <li><a href="href">商品管理</a></li>

    <a href="${pageContext.request.contextPath}/user/logout">退出登录</a>
</ul>
</body>
</html>
4)在springboot的配置文件中配置jsp以及数据库等相关内容。
exclude = {DataSourceAutoConfiguration.class}
server.port=8080
server.servlet.context-path=/shiro
spring.application.name==shiro
spring.mvc.view.prefix=/
spring.mvc.view.suffix=.jsp

spring.datasource.type=com.alibaba.druid.pool.DruidDataSource
spring.datasource.driver-class-name=com.mysql.jdbc.Driver
spring.datasource.url=jdbc:mysql://localhost:3306/shirodb?characterEncoding=UTF-8
spring.datasource.username=root
spring.datasource.password=root

mybatis.type-aliases-package=shiro.demo.entity
mybatis.mapper-locations=classpath:Mapper/*.xml
#开启驼峰设置
mybatis.mybatis.configuration.map-underscore-to-camel-case=true
5)引入shiro环境,添加依赖。
<!-- 引入springboot-shiro的依赖 -->
        <dependency>
            <groupId>org.apache.shiro</groupId>
            <artifactId>shiro-spring-boot-starter</artifactId>
            <version>1.5.3</version>
        </dependency>
6)配置shiro的配置类shiroConfig
- 在配置类中添加了shiroFilterFatoryBean方法,负责拦截所有请求的。
- 创建安全管理器配置webSecurityMananger
- 创建并且配置自定义realm
package shirothymeleaf.springboot_shiro_thymeleaf.Config;


import at.pollux.thymeleaf.shiro.dialect.ShiroDialect;
import org.apache.shiro.authc.credential.HashedCredentialsMatcher;
import org.apache.shiro.realm.Realm;
import org.apache.shiro.spring.web.ShiroFilterFactoryBean;
import org.apache.shiro.web.mgt.DefaultWebSecurityManager;
import org.springframework.beans.factory.annotation.Qualifier;
import org.springframework.context.annotation.Bean;
import org.springframework.context.annotation.Configuration;
import shirothymeleaf.springboot_shiro_thymeleaf.Cache.RedisCacheManager;
import shirothymeleaf.springboot_shiro_thymeleaf.Realm.CustomerRealm;


import java.util.HashMap;
import java.util.Map;

//这是用来整合shiro框架相关的配置类
@Configuration
public class shiroConfig {
//    1,创建shiroFilter,负责拦截所有请求的
    @Bean
    public ShiroFilterFactoryBean getShiroFilterFactoryBean(DefaultWebSecurityManager defaultWebSecurityManager){
        ShiroFilterFactoryBean shiroFilterFactoryBean = new ShiroFilterFactoryBean();
//        给filter设置安全管理器
        shiroFilterFactoryBean.setSecurityManager(defaultWebSecurityManager);
    return shiroFilterFactoryBean;
    }
//    2,创建安全管理器
    @Bean
    public DefaultWebSecurityManager getDefaultWebSecurityManager(@Qualifier("getRealm") Realm realm){
        DefaultWebSecurityManager defaultWebSecurityManager = new DefaultWebSecurityManager();
//        给安全管理器设置realm
        defaultWebSecurityManager.setRealm(realm);
        return defaultWebSecurityManager;
    }

//    3,创建自定义realm
    @Bean
    public Realm getRealm(){
        CustomerRealm customerRealm = new CustomerRealm();
//      因为这里我们使用MD5+salt+hash的密码进行匹配的,所以我们要更改一下默认的密码匹配器
        HashedCredentialsMatcher hashedCredentialsMatcher = new HashedCredentialsMatcher();
//        设置加密算法为MD5
        hashedCredentialsMatcher.setHashAlgorithmName("MD5");
//        设置散列次数
        hashedCredentialsMatcher.setHashIterations(1024);
        customerRealm.setCredentialsMatcher(hashedCredentialsMatcher);
        return customerRealm;
    }

}
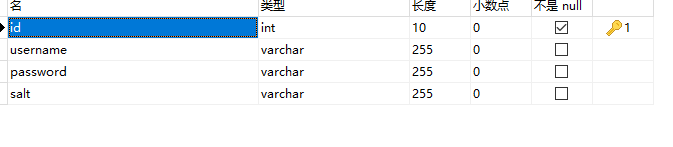
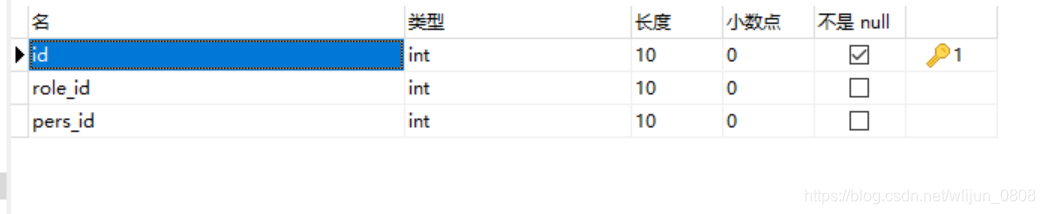
7)数据库创建表
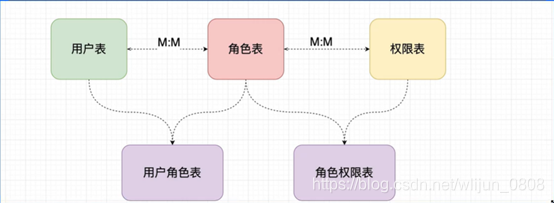
t-user:存放用户信息的表
t_role:存放角色的表

t_pers:存放权限的表

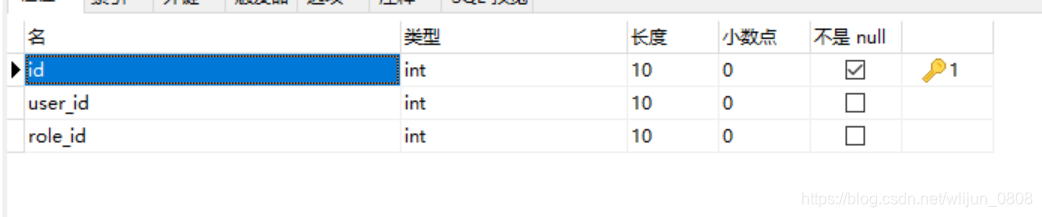
t_user_role:用户和角色的映射表
t_role_pers:角色和权限的映射表
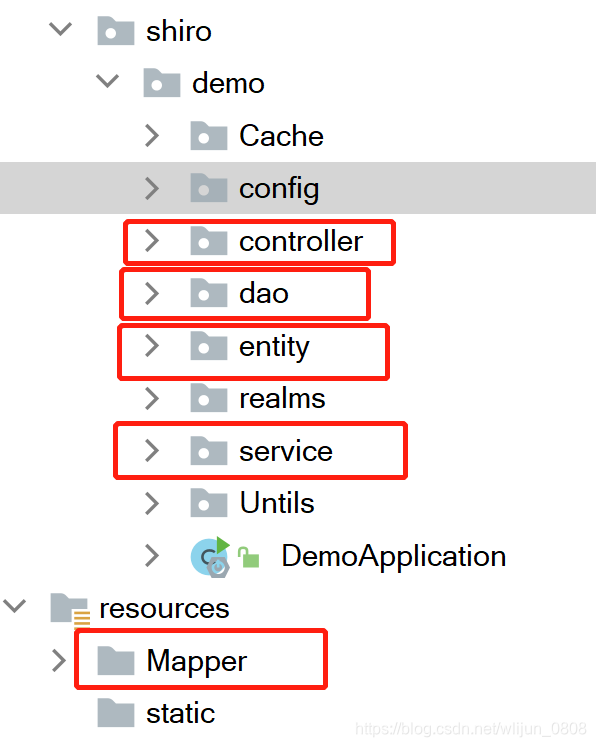
8)创建springboot各层的包和类


 被折叠的 条评论
为什么被折叠?
被折叠的 条评论
为什么被折叠?
 到【灌水乐园】发言


