


 本文介绍了如何使用SpringBoot创建一个项目,配置数据库连接、Thymeleaf模板引擎,编写Controller处理请求,以及在Thymeleaf中使用条件语句和数据绑定。
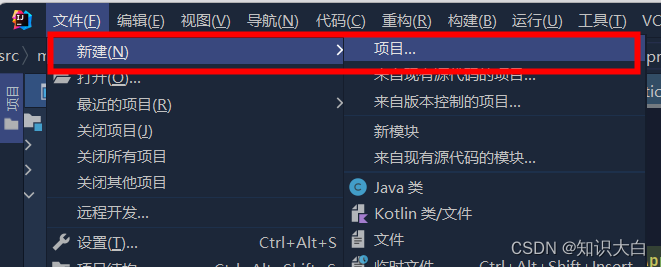
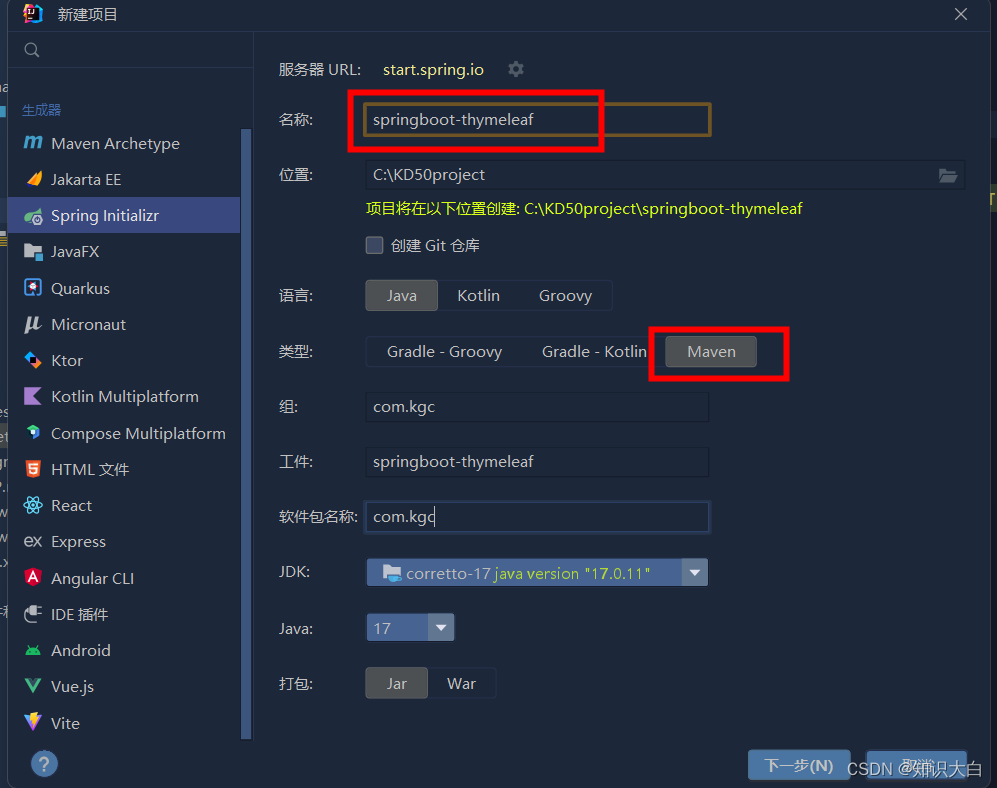
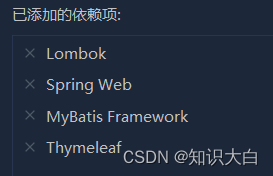
1.创建工程
<?xml version="1.0" encoding="UTF-8"?>
<project xmlns="http://maven.apache.org/POM/4.0.0" xmlns:xsi="http://www.w3.org/2001/XMLSchema-instance"
         xsi:schemaLocation="http://maven.apache.org/POM/4.0.0 https://maven.apache.org/xsd/maven-4.0.0.xsd">
    <modelVersion>4.0.0</modelVersion>
    <parent>
        <groupId>org.springframework.boot</groupId>
        <artifactId>spring-boot-starter-parent</artifactId>
        <version>2.3.12.RELEASE</version>
        <relativePath/> <!-- lookup parent from repository -->
    </parent>
    <groupId>com.kgc</groupId>
    <artifactId>springboot-thymeleaf</artifactId>
    <version>0.0.1-SNAPSHOT</version>
    <name>springboot-thymeleaf</name>
    <description>springboot-thymeleaf</description>
    <properties>
        <java.version>1.8</java.version>
    </properties>
    <dependencies>
        <dependency>
            <groupId>org.springframework.boot</groupId>
            <artifactId>spring-boot-starter-thymeleaf</artifactId>
        </dependency>
        <dependency>
            <groupId>org.springframework.boot</groupId>
            <artifactId>spring-boot-starter-web</artifactId>
        </dependency>
        <dependency>
            <groupId>org.mybatis.spring.boot</groupId>
            <artifactId>mybatis-spring-boot-starter</artifactId>
            <version>2.2.2</version>
        </dependency>

        <dependency>
            <groupId>org.projectlombok</groupId>
            <artifactId>lombok</artifactId>
            <optional>true</optional>
        </dependency>
        <dependency>
            <groupId>org.springframework.boot</groupId>
            <artifactId>spring-boot-starter-test</artifactId>
            <scope>test</scope>
        </dependency>
        <dependency>
            <groupId>org.mybatis.spring.boot</groupId>
            <artifactId>mybatis-spring-boot-starter-test</artifactId>
            <version>2.2.2</version>
            <scope>test</scope>
        </dependency>
        <dependency>
            <groupId>mysql</groupId>
            <artifactId>mysql-connector-java</artifactId>
            <version>5.1.47</version>
        </dependency>

    </dependencies>

    <build>
        <plugins>
            <plugin>
                <groupId>org.springframework.boot</groupId>
                <artifactId>spring-boot-maven-plugin</artifactId>
                <configuration>
                    <excludes>
                        <exclude>
                            <groupId>org.projectlombok</groupId>
                            <artifactId>lombok</artifactId>
                        </exclude>
                    </excludes>
                </configuration>
            </plugin>
        </plugins>
    </build>

</project>
不需要加注解
2.在application.yml中加配置
#访问端口号
server:
  port: 7777

spring:
  datasource:
    driver-class-name: com.mysql.jdbc.Driver
    url: jdbc:mysql://localhost:3306/smbms?useUnicode=true&characterEncoding=utf-8&useSSL=false&serverTimezone=Asia/Shanghai
    username:
    password:

# thymeleaf 页面的缓存开关,默认 true 开启缓存
# 建议在开发阶段关闭 thymeleaf 页面缓存,目的实时看到页面
  thymeleaf:
    cache: false

  mybatis:
    mapper-locations: classpath:mapper/*.xml
3.创建 controller
@Controller
public class IndexController {

    @RequestMapping("/index")
    public String index(Model model){

        model.addAttribute("a","hello,springboot");

        //存入对象
        User user = new User();
        user.setId(1);
        user.setUsername("admin");
        user.setPassword("123456");
        user.setAddress("北京市");
        model.addAttribute("user",user);
        return "index";
    }
}
4.创建一个index.xml
<!DOCTYPE html>
<html lang="en" xmlns:th="http://www.thymeleaf.org">
<head>
    <meta charset="UTF-8">
    <title>Title</title>
</head>
<body>
<h1>测试成功</h1>
<hr>
<h1 th:text="采用text标签+ ${a}"></h1>

<h1 th:text="${user}"></h1>
效果:展示的是user对象
user后面的其他属性为null,是因为在 controller 里没有传值

展示user里的属性
<div th:object="${user}">
    <h1 >id =<span th:text="${user.id}"></span></h1>
    <h1 >username =<span th:text="${user.username}"></span></h1>
    <h1 >password =<span th:text="${user.password}"></span></h1>
    <h1 >address =<span th:text="${user.address}"></span></h1>
</div>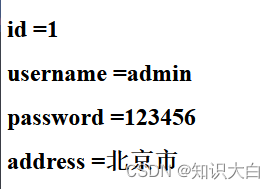
5.使用list
controller
@Controller
public class IndexController {

    @RequestMapping("/index")
    public String index(Model model){

        //存入对象
        User user = new User();
        user.setId(1);
        user.setUsername("admin");
        user.setPassword("123456");
        user.setAddress("北京市");
        model.addAttribute("user",user);

        //存入list
        User user1 = new User();
        user1.setId(2);
        user1.setUsername("张三");
        user1.setPassword("000000");
        user1.setAddress("郑州市");

        User user2 = new User();
        user2.setId(3);
        user2.setUsername("慕容复");
        user2.setPassword("777777");
        user2.setAddress("南京市");

        User user3 = new User();
        user3.setId(4);
        user3.setUsername("上官宏");
        user3.setPassword("999999");
        user3.setAddress("苏州");

        List<User> userList =new ArrayList<>();
        userList.add(user1);
        userList.add(user2);
        userList.add(user3);
        model.addAttribute("userList",userList);
        return "index";
    }
}
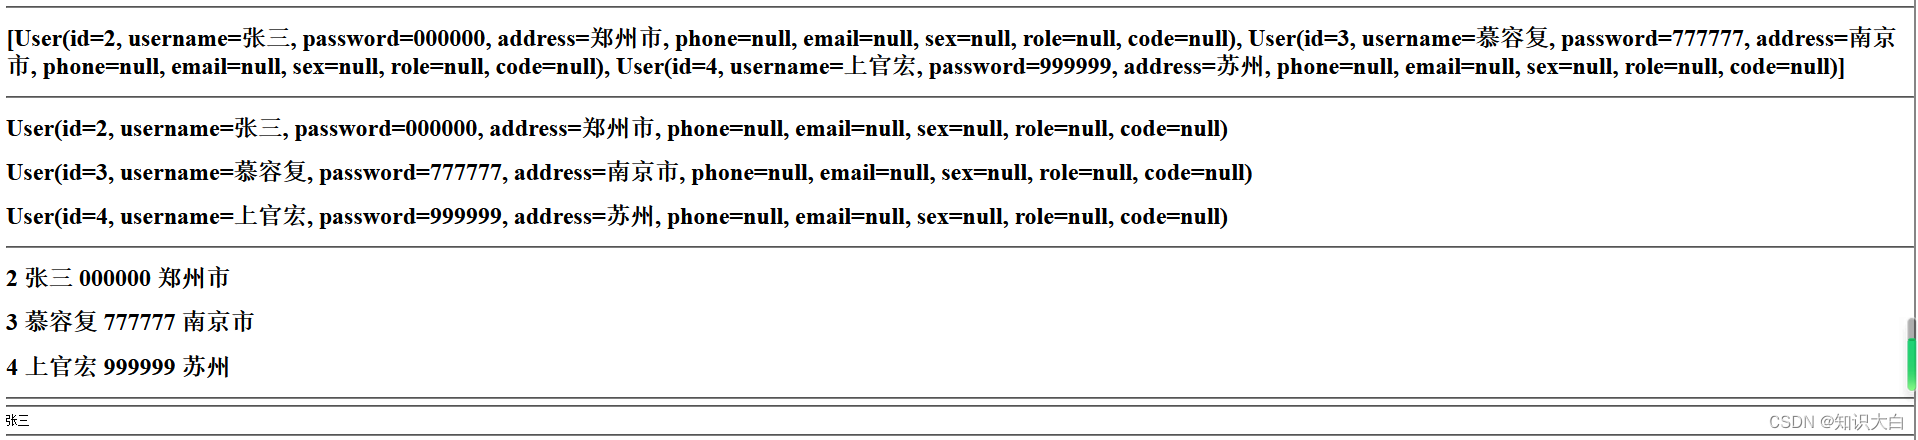
进行遍历
<!--遍历list-->
<h1 th:text="${userList}"></h1>
<hr>
<h1 th:each="user:${userList}" th:text="${user}"></h1>
<hr>

<h1 th:each="user:${userList}">
    <a th:text="${user.id}"/>
    <a th:text="${user.username}"/>
    <a th:text="${user.password}"/>
    <a th:text="${user.address}"/>
</h1>
<hr>
<hr>
<!--循环集合中的某一项-->
<tr th:each="user : ${userList}">
    <td th:if="${user.id == 2}" th:text="${user.username}"></td>
</tr>
结果
6.跳转到另一个页面
在 controller 中在写一个方法
@RequestMapping("/test")
    public String test(){
        return "test";
    }
使用超链接的方式跳转
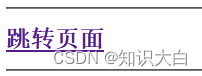
<!--跳转另一个页面-->
<h1>
    <a th:href="@{/test}">跳转页面</a>
</h1>
另一个test.xml
<!DOCTYPE html>
<html lang="en" xmlns:th="http://www.thymeleaf.org">
<head>
    <meta charset="UTF-8">
    <title>Title</title>
</head>
<body>

<h1>Hello,World!</h1>

</body>
</html>
运行后会出现一个 跳转页面 的字样,点击就会跳转,并显示另一个页面的内容
7.判断
controller
@Controller
public class IndexController {

    @RequestMapping("/index")
    public String index(Model model){
        int c = 2;
        model.addAttribute("msg",c);

        return "index";
    }
}
xml
<!--判断-->
<div th:if="${msg>2}">
    <h1>c>2</h1>
</div>
<div th:unless="${msg>2}"><!--取反-->
    <h1>c<=2</h1>
</div>
因为规定 c 为2,所以最终输出结果为:c<=2


 589
589

 被折叠的 条评论
为什么被折叠?
被折叠的 条评论
为什么被折叠?
 到【灌水乐园】发言


