


 本文介绍了如何使用OpenCV实现基本的鼠标操作,包括鼠标事件回调函数、画线和ROI提取。同时,展示了在图像上显示文本和创建按钮的方法,如drawString函数和drawButton函数的使用,以及相关参数的详细说明。
(1) 基本的鼠标 按钮操作
转载学习
https://blog.youkuaiyun.com/NCHFGFB/article/details/51516030https://blog.youkuaiyun.com/shyn02588/article/details/44151481
 ①鼠标事件
回调函数
CV_EXPORTS void setMouseCallback(const string& winname, MouseCallback onMouse, void* userdata = 0);
const string& winname,windows视窗名称,对名为winname的视窗进行鼠标监控。
MouseCallback onMouse,鼠标响应处理函数,监听鼠标的点击,移动,松开,判断鼠标的操作类型,并进行响应的函数处理。
void* userdata = 0 鼠标响应处理函数的ID,与鼠标相应处理函数相匹配就行,暂时只用到默认为0的情况。
鼠标响应函数
void on_mouse(int event,int x,int y,int flags,void *ustc)x,y代表相应位置
鼠标位于窗口的(x,y)坐标位置,窗口左上角默认为原点,向右为x轴,向下为y轴。
event事件:
enum
{
    CV_EVENT_MOUSEMOVE      =0,   //鼠标移动
    CV_EVENT_LBUTTONDOWN    =1,   //按下左键
    CV_EVENT_RBUTTONDOWN    =2,   //按下右键
    CV_EVENT_MBUTTONDOWN    =3,   //按下中键
    CV_EVENT_LBUTTONUP      =4,   //放开左键
    CV_EVENT_RBUTTONUP      =5,   //放开右键
    CV_EVENT_MBUTTONUP      =6,   //放开中键
    CV_EVENT_LBUTTONDBLCLK  =7,   //左键双击
    CV_EVENT_RBUTTONDBLCLK  =8,   //右键双击
    CV_EVENT_MBUTTONDBLCLK  =9,   //中键双击
    CV_EVENT_MOUSEWHEEL     =10,  //滚轮滚动
    CV_EVENT_MOUSEHWHEEL    =11   //横向滚轮滚动
};
flags,代表鼠标的拖拽事件
enum
{
    CV_EVENT_FLAG_LBUTTON   =1,   //左键拖拽
    CV_EVENT_FLAG_RBUTTON   =2,   //右键拖拽
    CV_EVENT_FLAG_MBUTTON   =4,   //中键拖拽
    CV_EVENT_FLAG_CTRLKEY   =8,   //按住CTRL拖拽
    CV_EVENT_FLAG_SHIFTKEY  =16,  //按住Shift拖拽
    CV_EVENT_FLAG_ALTKEY    =32   //按住ALT拖拽
};
实例 简单画图和ROI提取
画线
#include <iostream>
#include <opencv2/core/core.hpp>
#include <opencv2/highgui/highgui.hpp>
#include <stdio.h>
using namespace cv;
using namespace std;


    Mat src(500,500,CV_8UC3,Scalar(255,255,255));

    bool down = false;
    Point prept = Point(0, 0);
	Point curpt = prept;
void on_mouse(int event, int x, int y, int flags, void* ustc)
{


    if (event == CV_EVENT_LBUTTONDOWN)    //右键按下
    {
        prept = Point(x, y);
        down = true;
    }
    else if (event == CV_EVENT_LBUTTONUP)     //右键放开
        down = false;


    if (down ==true&&event == CV_EVENT_MOUSEMOVE)    //右键按下且鼠标移动
    {
        curpt = cvPoint(x, y);
        line(src, prept, curpt, Scalar(255, 0, 0), 5);
        waitKey(5);        //可以解决画图时卡顿的问题
        imshow("src", src);
        prept = curpt;
    }
	    else if (event == CV_EVENT_RBUTTONUP)
    {


        imwrite("1.jpg",src);//加了用来截图

    }
}


int main()
{

    cvNamedWindow("src");
    cvSetMouseCallback("src", on_mouse, 0);


    imshow("src", src);
    cvWaitKey(0);
    cvDestroyAllWindows();
    return 0;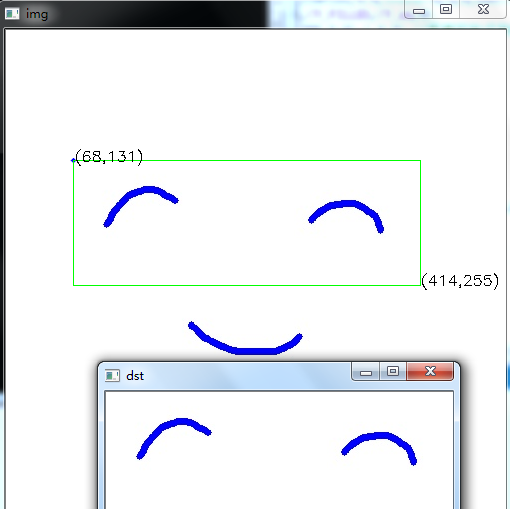
}②ROI提取
#include <iostream>
#include <opencv2/core/core.hpp>
#include <opencv2/highgui/highgui.hpp>
#include <stdio.h>
using namespace cv;
using namespace std;
Mat org,dst,img,tmp;
void on_mouse(int event,int x,int y,int flags,void *ustc)//event鼠标事件代号,x,y鼠标坐标,flags拖拽和键盘操作的代号
{
static Point pre_pt = (-1,-1);//初始坐标
static Point cur_pt = (-1,-1);//实时坐标
char temp[16];
if (event == CV_EVENT_LBUTTONDOWN)//左键按下,读取初始坐标,并在图像上该点处划圆
{
org.copyTo(img);//将原始图片复制到img中
sprintf(temp,"(%d,%d)",x,y);
pre_pt = Point(x,y);
putText(img,temp,pre_pt,FONT_HERSHEY_SIMPLEX,0.5,Scalar(0,0,0,255),1,8);//在窗口上显示坐标
circle(img,pre_pt,2,Scalar(255,0,0,0),CV_FILLED,CV_AA,0);//划圆
imshow("img",img);
}
else if (event == CV_EVENT_MOUSEMOVE && !(flags & CV_EVENT_FLAG_LBUTTON))//左键没有按下的情况下鼠标移动的处理函数
{
img.copyTo(tmp);//将img复制到临时图像tmp上,用于显示实时坐标
sprintf(temp,"(%d,%d)",x,y);
cur_pt = Point(x,y);
putText(tmp,temp,cur_pt,FONT_HERSHEY_SIMPLEX,0.5,Scalar(0,0,0,255));//只是实时显示鼠标移动的坐标
imshow("img",tmp);
}
else if (event == CV_EVENT_MOUSEMOVE && (flags & CV_EVENT_FLAG_LBUTTON))//左键按下时,鼠标移动,则在图像上划矩形
{
img.copyTo(tmp);
sprintf(temp,"(%d,%d)",x,y);
cur_pt = Point(x,y);
putText(tmp,temp,cur_pt,FONT_HERSHEY_SIMPLEX,0.5,Scalar(0,0,0,255));
rectangle(tmp,pre_pt,cur_pt,Scalar(0,255,0,0),1,8,0);//在临时图像上实时显示鼠标拖动时形成的矩形
imshow("img",tmp);
}
else if (event == CV_EVENT_LBUTTONUP)//左键松开,将在图像上划矩形
{
org.copyTo(img);
sprintf(temp,"(%d,%d)",x,y);
cur_pt = Point(x,y);
putText(img,temp,cur_pt,FONT_HERSHEY_SIMPLEX,0.5,Scalar(0,0,0,255));
circle(img,pre_pt,2,Scalar(255,0,0,0),CV_FILLED,CV_AA,0);
rectangle(img,pre_pt,cur_pt,Scalar(0,255,0,0),1,8,0);//根据初始点和结束点,将矩形画到img上
imshow("img",img);
img.copyTo(tmp);
//截取矩形包围的图像,并保存到dst中
int width = abs(pre_pt.x - cur_pt.x);
int height = abs(pre_pt.y - cur_pt.y);
if (width == 0 || height == 0)
{
printf("width == 0 || height == 0");
return;
}
dst = org(Rect(min(cur_pt.x,pre_pt.x),min(cur_pt.y,pre_pt.y),width,height));
namedWindow("dst");
imshow("dst",dst);
waitKey(0);
}
}
void main()
{
org = imread("1.jpg");
org.copyTo(img);
org.copyTo(tmp);
namedWindow("img");//定义一个img窗口
setMouseCallback("img",on_mouse,0);//调用回调函数
imshow("img",img);
waitKey();
} 
(2)按钮
在图像上显示文本(draw text)和创建按钮(draw button)
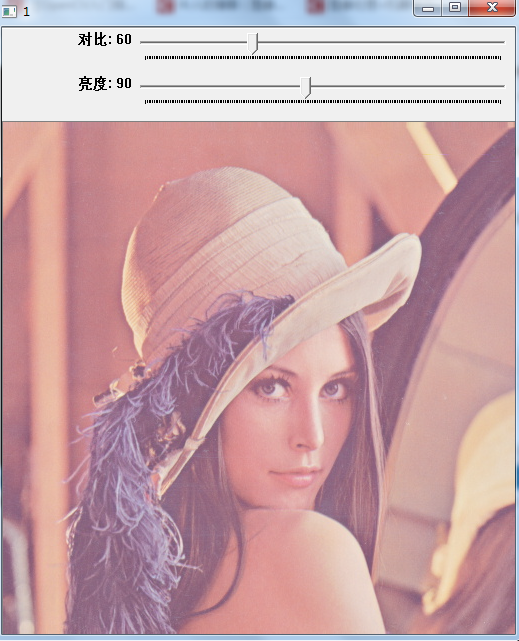
TrackBar
#include <iostream>
#include <opencv2/core/core.hpp>
#include <opencv2/highgui/highgui.hpp>
#include <stdio.h>
using namespace cv;
using namespace std;

int contrast,bright;
Mat img,src;

 void ContrastAndBright(int,void* )
{

	for(int y=0;y<img.rows;y++)
	{
		cout<<'c'<<endl;
		for(int x=0;x<img.cols;x++)
		{
			for(int c=0;c<3;c++)
			{
				src.at<Vec3b>(y,x)[c]=saturate_cast<uchar>((contrast*0.01)*(img.at<Vec3b>(y,x)[c])+bright);

			}

			}
	}

	imshow("1",src);


}


int main()
{

    img=imread("d://zc//tp//lena.jpg");
	src=Mat::zeros(img.size(),img.type());

	cout<<src.rows<<endl<<endl;
	contrast=100;
	bright=10;
	namedWindow("1",1);

	createTrackbar("对比","1",&contrast,200,ContrastAndBright);
	createTrackbar("亮度","1",&bright,200,ContrastAndBright);


    ContrastAndBright(contrast,0);

	ContrastAndBright(bright,0);

	while(char(waitKey(1))!='q'){}
	return 0;


}

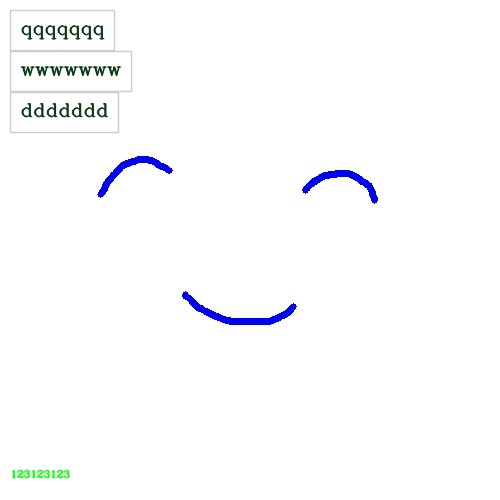
1、drawString()函数封装了opencv的putText函数和getTextSize函数,使得画显示文本更加安全,可靠。
函数接口:
- Rect drawString(Mat img, string text, Point coord, Scalar color, float fontScale = 0.6f, int thickness = 1, int fontFace = FONT_HERSHEY_COMPLEX)
1、img,画布
2、text,要显示的文本信息
3、coord要显示文本的坐标位置。例如Point(20,20),x,y均为正数,则从偏离左上角高20宽20像素开始画文本
Point(20,-10),x为正数,y为负数,则从偏离左20,底10,开始画文本。对于Point(-20,10),Point(-20,-20)类似。
4、fontScale,字体的缩放大小,当文本信息过多一行不能显示,则可以缩小字体
5、thickness,为字体粗细
6、fontFace,字体类型
2、Rect drawButton(Mat img, string text, Point coord, int minWidth = 0)
#include <iostream>
#include <opencv2/core/core.hpp>
#include <opencv2/highgui/highgui.hpp>
#include <stdio.h>
using namespace cv;
using namespace std;
Rect drawString(Mat img, string text, Point coord, Scalar color, float fontScale = 0.6f, int thickness = 1, int fontFace = FONT_HERSHEY_COMPLEX)
{
//获取文本大小和基线
int baseline=0;
Size textSize = getTextSize(text, fontFace, fontScale, thickness, &baseline);
baseline += thickness;
// 为左/右或上/下调整校正坐标
if (coord.y >= 0) {
//图像左上角的文本的左上角的坐标,因此按行向下移动
coord.y += textSize.height;
}
else {
//图像左下角的文本的左下角的坐标,因此从底部上来
coord.y += img.rows - baseline + 1;
}
// 如果希望变成右侧调整
if (coord.x < 0) {
coord.x += img.cols - textSize.width + 1;
}
// 获取文本的边界矩形
Rect boundingRect = Rect(coord.x, coord.y - textSize.height, textSize.width, baseline + textSize.height);
// 画出平滑的文本
putText(img, text, coord, fontFace, fontScale, color, thickness, CV_AA);
//让用户知道文本的多大,以防他们想安排些事情
return boundingRect;
}
Rect drawButton(Mat img, string text, Point coord, int minWidth = 0)
{
int B = 10;
Point textCoord = Point(coord.x + B, coord.y + B);
// 获取文本边界矩形
Rect rcText = drawString(img, text, textCoord, CV_RGB(0,0,0));
// 在文本周围画一个填充的矩形
Rect rcButton = Rect(rcText.x - B, rcText.y - B, rcText.width + 2*B, rcText.height + 2*B);
// 设置按钮的最小宽度
if (rcButton.width < minWidth)
rcButton.width = minWidth;
// 创建一个半透膜的白色矩形
Mat matButton = img(rcButton);
matButton += CV_RGB(90, 90, 90);
//画一个非透明的白色边界
rectangle(img, rcButton, CV_RGB(200,200,200), 1, CV_AA);
//使用抗锯齿,画一个实际用来显示的文本
drawString(img, text, textCoord, CV_RGB(10,55,20));
return rcButton;
}
int main(int argc,char **argv)
{
Mat img=imread("1.jpg");
const int b=10;
string str="123123123";
string b_name1="qqqqqqq";
string b_name2="wwwwwww";
string b_name3="ddddddd";
Rect b_seat1;
Rect b_seat2;
Rect b_seat3;
drawString(img,str,Point(10,-20),Scalar(0,255,0),0.33f,1,3);//在底上20处,右10处,画文本
b_seat1=drawButton(img,b_name1,Point(b,b),0);
b_seat2=drawButton(img,b_name2,Point(b_seat1.x,b_seat1.height+b),b_seat1.width);
b_seat3=drawButton(img,b_name3,Point(b_seat2.x,b_seat2.height+b_seat2.y),b_seat1.width);
imshow("lena.jpg",img);
imwrite("2.jpg",img);
waitKey();
} 


 4万+
4万+

 被折叠的 条评论
为什么被折叠?
被折叠的 条评论
为什么被折叠?
 到【灌水乐园】发言


