


Flume的安装及使用
文章目录
flume简介:
flume是一个分布式、可靠、和高可用的海量日志采集、聚合和传输的系统。支持在日志系统中定制各类数据发送方,用于收集数据;同时,Flume提供对数据进行简单处理,并写到各种数据接受方(比如文本、HDFS、Hbase等)的能力 。flume的数据流由事件(Event)贯穿始终。事件是Flume的基本数据单位,它携带日志数据(字节数组形式)并且携带有头信息,这些Event由Agent外部的Source生成,当Source捕获事件后会进行特定的格式化,然后Source会把事件推入(单个或多个)Channel中。你可以把Channel看作是一个缓冲区,它将保存事件直到Sink处理完该事件。Sink负责持久化日志或者把事件推向另一个Source。
Flume 运行的核心是 Agent。Flume以agent为最小的独立运行单位。一个agent就是一个JVM。它是一个完整的数据收集工具,含有三个核心组件,分别是source、 channel、 sink。通过这些组件, Event 可以从一个地方流向另一个地方
Flume的安装
1、上传至虚拟机,并解压
tar -zxvf apache-flume-1.9.0-bin.tar.gz -C /usr/local/soft/
在环境变量中增加如下命令,可以使用 soft 快速切换到 /usr/local/soft
alias soft=‘cd /usr/local/soft/’
2、重命名目录,并配置环境变量
mv apache-flume-1.9.0-bin/ flume-1.9.0
vim /etc/profile

#FLUME_HOME
export FLUME_HOME=/usr/local/soft/flume-1.9.0/
export PATH=$PATH:$FLUME_HOME/bin

source /etc/profile
3、查看flume版本
flume-ng version
[root@master soft]# flume-ng version
Flume 1.9.0
Source code repository: https://git-wip-us.apache.org/repos/asf/flume.git
Revision: d4fcab4f501d41597bc616921329a4339f73585e
Compiled by fszabo on Mon Dec 17 20:45:25 CET 2018
From source with checksum 35db629a3bda49d23e9b3690c80737f9
[root@master soft]#
4、测试flume
监控netcat端口
-
监控端口,将数据打印至控制台
# a1表示 agent名称,具体定义在启动命令中 -n 参数中
# r1表示a1中的source名称
a1.sources = r1
# k1表示a1的sink名称
a1.sinks = k1
# c1表示a1中的channel名称
a1.channels = c1

# 表示a1的输入源类型为netcat端口类型
a1.sources.r1.type = netcat

# 表示a1的监听主机
a1.sources.r1.bind = localhost
# 表示a1的监听端口号
a1.sources.r1.port = 6666

# 表示a1的sinkc输出的目的地是控制台的logger类型
a1.sinks.k1.type = logger

# 表示channel类型是memory内存类型
a1.channels.c1.type = memory

# 表示a1的channel总容量为1000event
a1.channels.c1.capacity=1000
# 表示a1的channel传输时收集到100条event以后再去提交事务
a1.channels.c1.transactionCapacity = 100

# 表示将r1和c1连接起来
a1.sources.r1.channels = c1

# 表示将K1 和 c1 连接起来
a1.sinks.k1.channel=c1
启动命令
cd $FLUME_HOME flume-ng agent -c conf/ -n a1 -f job/flume-netcat-logger.conf -Dflume.root.logger=INFO,console 参数说明:
-c 表示配置文件存储在conf目录中
-n 表示agent起名为a1
-f 表示flume启动读取的配置文件
-Dflume.root.logger=INFO,console 表示flume运行时动态修改flume.root.logger参数属性值,并将控制台日志打印级别设置为INFO级别 ,日志级别包括: log、info、warn、 error
spooldir
-
监控一个目录,将数据打印出来
- 配置文件
# 首先先给agent起一个名字 叫a1 # 分别给source channel sink取名字 a1.sources = r1 a1.channels = c1 a1.sinks = k1 # 分别对source、channel、sink进行配置 # 配置source # 将source的类型指定为 spooldir 用于监听一个目录下文件的变化 # 因为每个组件可能会出现相同的属性名称,所以在对每个组件进行配置的时候 # 需要加上 agent的名字.sources.组件的名字.属性 = 属性值 a1.sources.r1.type = spooldir a1.sources.r1.spoolDir = /root/data/ a1.sources.r1.fileSuffix = .ok a1.sources.r1.fileHeader = true # 给r1这个souces配置一个拦截器并取名为 i1 a1.sources.r1.interceptors = i1 # 将拦截器i1的类型设置为timestamp 会将处理数据的时间以毫秒的格式插入event的header中 # a1.sources.r1.interceptors.i1.type = timestamp # 将拦截器i1的类型设置为regex_filter 会根据正则表达式过滤数据 a1.sources.r1.interceptors.i1.type = regex_filter # 配置正则表达式 a1.sources.r1.interceptors.i1.regex = [0-9]+ # excludeEvents = true 表示将匹配到的过滤,未匹配到的放行(输出,false则相反) a1.sources.r1.interceptors.i1.excludeEvents = true # 配置sink # 使用logger作为sink组件,可以将收集到数据直接打印到控制台 a1.sinks.k1.type = logger # 配置channel # 将channel的类型设置为memory,表示将event缓存在内存中 a1.channels.c1.type = memory # 组装 # 将sources的channels属性指定为c1 a1.sources.r1.channels = c1 # 将sinks的channel属性指定为c1 a1.sinks.k1.channel = c1- 启动agent
flume-ng agent -n a1 -f ./spoolingtest.conf -Dflume.root.logger=DEBUG,console- 新建/root/data目录
mkdir /root/data- 在/root/data/目录下新建文件,输入内容,观察flume进程打印的日志
# 随意在a.txt中加入一些内容
vim /root/data/a.txt
5、flume的使用
spoolingToHDFS.conf
- 配置文件
# a表示给agent命名为a
# 给source组件命名为r1
a.sources = r1
# 给sink组件命名为k1
a.sinks = k1
# 给channel组件命名为c1
a.channels = c1

#指定spooldir的属性
a.sources.r1.type = spooldir
a.sources.r1.spoolDir = /root/data
a.sources.r1.fileHeader = true
a.sources.r1.interceptors = i1
a.sources.r1.interceptors.i1.type = timestamp

#指定sink的类型
a.sinks.k1.type = hdfs
a.sinks.k1.hdfs.path = /flume/data/dir1
# 指定文件名前缀
a.sinks.k1.hdfs.filePrefix = student
# 指定达到多少数据量写一次文件 单位:bytes
a.sinks.k1.hdfs.rollSize = 102400
# 指定多少条写一次文件
a.sinks.k1.hdfs.rollCount = 1000
# 指定文件类型为 流 来什么输出什么
a.sinks.k1.hdfs.fileType = DataStream
# 指定文件输出格式 为text
a.sinks.k1.hdfs.writeFormat = text
# 指定文件名后缀
a.sinks.k1.hdfs.fileSuffix = .txt

#指定channel
a.channels.c1.type = memory
a.channels.c1.capacity = 1000
# 表示sink每次会从channel里取多少数据
a.channels.c1.transactionCapacity = 100
# 组装
a.sources.r1.channels = c1
a.sinks.k1.channel = c1
- 在 /root/data/目录下准备数据
The Zen of Python, by Tim Peters

Beautiful is better than ugly.
Explicit is better than implicit.
Simple is better than complex.
Complex is better than complicated.
Flat is better than nested.
Sparse is better than dense.
Readability counts.
Special cases aren't special enough to break the rules.
Although practicality beats purity.
Errors should never pass silently.
Unless explicitly silenced.
In the face of ambiguity, refuse the temptation to guess.
There should be one-- and preferably only one --obvious way to do it.
Although that way may not be obvious at first unless you're Dutch.
Now is better than never.
Although never is often better than *right* now.
If the implementation is hard to explain, it's a bad idea.
If the implementation is easy to explain, it may be a good idea.
Namespaces are one honking great idea -- let's do more of those!
- 启动agent
flume-ng agent -n a -f ./spoolingToHDFS.conf -Dflume.root.logger=DEBUG,console
- 打印
[root@master data]# hdfs dfs -cat /flume/data/dir1/student.1650545624048.txt
hbaseLogToHDFS
- 配置文件
# a表示给agent命名为a
# 给source组件命名为r1
a.sources = r1
# 给sink组件命名为k1
a.sinks = k1
# 给channel组件命名为c1
a.channels = c1
#指定exec的属性
a.sources.r1.type = exec
a.sources.r1.command = tail -f /usr/local/soft/hbase-1.4.6/logs/hbase-root-master-master.log
#指定sink的类型
a.sinks.k1.type = hdfs
a.sinks.k1.hdfs.path = /flume/data/dir2
# 指定文件名前缀
a.sinks.k1.hdfs.filePrefix = hbaselog
# 指定达到多少数据量写一次文件 单位:bytes
a.sinks.k1.hdfs.rollSize = 102400
# 指定多少条写一次文件
a.sinks.k1.hdfs.rollCount = 1000
# 指定文件类型为 流 来什么输出什么
a.sinks.k1.hdfs.fileType = DataStream
# 指定文件输出格式 为text
a.sinks.k1.hdfs.writeFormat = text
# 指定文件名后缀
a.sinks.k1.hdfs.fileSuffix = .txt

#指定channel
a.channels.c1.type = memory
a.channels.c1.capacity = 1000
# 表示sink每次会从channel里取多少数据
a.channels.c1.transactionCapacity = 100
# 组装
a.sources.r1.channels = c1
a.sinks.k1.channel = c1
hbaselogToHBase
- 在hbase中创建log表
create 'log','cf1'
- 配置文件
# a表示给agent命名为a
# 给source组件命名为r1
a.sources = r1
# 给sink组件命名为k1
a.sinks = k1
# 给channel组件命名为c1
a.channels = c1
#指定exec的属性
a.sources.r1.type = exec
a.sources.r1.command = cat /usr/local/soft/hbase-1.4.6/logs/hbase-root-master-master.log
#指定sink的类型
a.sinks.k1.type = hbase
a.sinks.k1.table = log
a.sinks.k1.columnFamily = cf1

#指定channel
a.channels.c1.type = memory
a.channels.c1.capacity = 100000
# 表示sink每次会从channel里取多少数据
a.channels.c1.transactionCapacity = 100
# 组装
a.sources.r1.channels = c1
a.sinks.k1.channel = c1
netcatLogger
监听telnet端口
- 安装telnet
yum install telnet
- 配置文件
# a表示给agent命名为a
# 给source组件命名为r1
a.sources = r1
# 给sink组件命名为k1
a.sinks = k1
# 给channel组件命名为c1
a.channels = c1
#指定netcat的属性
a.sources.r1.type = netcat
a.sources.r1.bind = 0.0.0.0
a.sources.r1.port = 8888

#指定sink的类型
a.sinks.k1.type = logger
#指定channel
a.channels.c1.type = memory
a.channels.c1.capacity = 1000
# 表示sink每次会从channel里取多少数据
a.channels.c1.transactionCapacity = 100
# 组装
a.sources.r1.channels = c1
a.sinks.k1.channel = c1
-
启动
- 先启动agent
flume-ng agent -n a -f ./netcatToLogger.conf -Dflume.root.logger=DEBUG,console- 在启动telnet
telnet master 8888
httpToLogger
- 配置文件
# a表示给agent命名为a
# 给source组件命名为r1
a.sources = r1
# 给sink组件命名为k1
a.sinks = k1
# 给channel组件命名为c1
a.channels = c1
#指定http的属性
a.sources.r1.type = http
a.sources.r1.port = 6666

#指定sink的类型
a.sinks.k1.type = logger
#指定channel
a.channels.c1.type = memory
a.channels.c1.capacity = 1000
# 表示sink每次会从channel里取多少数据
a.channels.c1.transactionCapacity = 100
# 组装
a.sources.r1.channels = c1
a.sinks.k1.channel = c1
-
启动
启动之前查看端口是否被占用
netstat -nplt | grep 6666没有输出则表示没有
- 先启动agent
flume-ng agent -n a -f ./httpToLogger.conf -Dflume.root.logger=DEBUG,console- 再使用curl发起一个http请求
curl -X POST -d '[{ "headers" :{"a" : "a1","b" : "b1"},"body" : "hello~http~flume~"},{ "headers" :{"a2" : "a11","b2" : "b11"},"body" : "hello~http~flume2~"}]' http://master:6666
exec source 监控文件
-
配置文件
# Name the components on this agent a2.sources = r2 a2.sinks = k2 a2.channels = c2 # Describe/configure the source a2.sources.r2.type = exec a2.sources.r2.command = tail -F /usr/local/soft/hive-3.1.2/log/hive.log # Describe the sink a2.sinks.k2.type = hdfs a2.sinks.k2.hdfs.path = /flume/hivelog/%Y%m%d/%H #上传文件的前缀 a2.sinks.k2.hdfs.filePrefix = logs- #是否按照时间滚动文件夹 a2.sinks.k2.hdfs.round = true #多少时间单位创建一个新的文件夹 a2.sinks.k2.hdfs.roundValue = 1 #重新定义时间单位 a2.sinks.k2.hdfs.roundUnit = hour #是否使用本地时间戳 a2.sinks.k2.hdfs.useLocalTimeStamp = true #积攒多少个Event才flush到HDFS一次 a2.sinks.k2.hdfs.batchSize = 100 #设置文件类型,可支持压缩 a2.sinks.k2.hdfs.fileType = DataStream #多久生成一个新的文件 a2.sinks.k2.hdfs.rollInterval = 60 #设置每个文件的滚动大小 a2.sinks.k2.hdfs.rollSize = 134217700 #文件的滚动与Event数量无关 a2.sinks.k2.hdfs.rollCount = 0 a2.channels.c2.type = memory a2.channels.c2.capacity = 1000 a2.channels.c2.transactionCapacity = 100 a2.sources.r2.channels = c2 a2.sinks.k2.channel = c2 -
启动
启动flume
bin/flume-ng agent --conf conf/ --name a2 --conf-file job/flume-file-hdfs.conf启动hive,之后查看HDFS
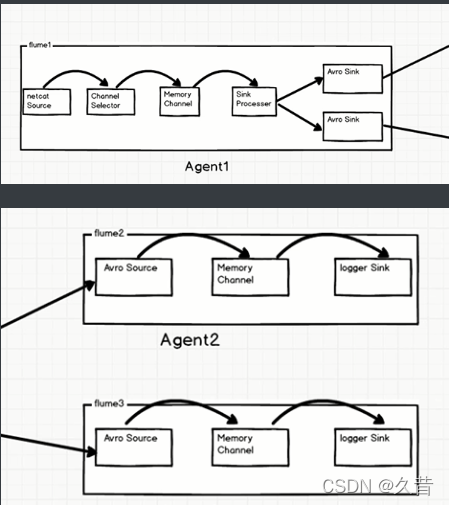
6、单数据源多输出
Flume1监控文件内容变动,将监控到的内容分别给到flume2和flume3,flume2将内容写到HDFS,Flume3将数据写到本地文件系统
-
配置文件
#flume1.conf #Named a1.sources = r1 a1.channels = c1 c2 a1.sinks = k1 k2 #Source a1.sources.r1.type = exec a1.sources.r1.command=tail -f /usr/local/soft/flume_exec/flume_file.log #channel selector a1.sources.r1.selector.type = replicating #Channel a1.channels.c1.type = memory a1.channels.c1.capacity = 10000 a1.channels.c1.transactionCapacity = 100 a1.channels.c2.type = memory a1.channels.c2.capacity = 10000 a1.channels.c2.transactionCapacity = 100 #Sink a1.sinks.k1.type = avro a1.sinks.k1.hostname = localhost a1.sinks.k1.port = 7777 a1.sinks.k2.type = avro a1.sinks.k2.hostname = localhost a1.sinks.k2.port = 8888 #Bind a1.sources.r1.channels = c1 c2 a1.sinks.k1.channel = c1 a1.sinks.k2.channel = c2 #flume2.conf a2.sources = r1 a2.channels = c1 a2.sinks = k1 #Source a2.sources.r1.type = avro a2.sources.r1.bind = localhost a2.sources.r1.port = 7777 #Channel a2.channels.c1.type = memory a2.channels.c1.capacity = 10000 a2.channels.c1.transactionCapacity = 100 #Sink a2.sinks.k1.type = hdfs a2.sinks.k1.hdfs.path = /flume/avro/%Y%m%d/%H a2.sinks.k1.hdfs.filePrefix = logs- a2.sinks.k1.hdfs.round = true a2.sinks.k1.hdfs.roundValue = 24 a2.sinks.k1.hdfs.roundUnit = hour a2.sinks.k1.hdfs.useLocalTimeStamp = true a2.sinks.k1.hdfs.batchSize = 100 a2.sinks.k1.hdfs.fileType = DataStream a2.sinks.k1.hdfs.rollInterval = 60 a2.sinks.k1.hdfs.rollSize = 134217700 a2.sinks.k1.hdfs.rollCount = 0 #Bind a2.sources.r1.channels = c1 a2.sinks.k1.channel = c1 #flume3.conf #Named a3.sources = r1 a3.channels = c1 a3.sinks = k1 #Source a3.sources.r1.type = avro a3.sources.r1.bind = localhost a3.sources.r1.port = 8888 #Channel a3.channels.c1.type = memory a3.channels.c1.capacity = 10000 a3.channels.c1.transactionCapacity = 100 #Sink a3.sinks.k1.type = file_roll a3.sinks.k1.sink.directory = /usr/local/soft/flume-1.9.0/job/fileroll #Bind a3.sources.r1.channels = c1 a3.sinks.k1.channel = c1 -
启动
flume-ng agent -c $FLUME_HOME/conf -f $FLUME_HOME/jobs/replicating/flume3.conf -n a3 -Dflume.root.logger=INFO,console

flume-ng agent -c $FLUME_HOME/conf -f $FLUME_HOME/jobs/replicating/flume2.conf -n a2 -Dflume.root.logger=INFO,console

flume-ng agent -c $FLUME_HOME/conf -f $FLUME_HOME/jobs/replicating/flume1.conf -n a1 -Dflume.root.logger=INFO,console
flume-ng agent -c ./conf -f ./job/flume3.conf -n a3 -Dflume.root.logger=INFO,console flume-ng agent -c ./conf -f ./job/flume2.conf -n a2 -Dflume.root.logger=INFO,console flume-ng agent -c ./conf -f ./job/flume1.conf -n a1 -Dflume.root.logger=INFO,console
负载均衡
实现:
Flume1监控端口数据, 将监控到的内容通过轮询或者随机的方式给到Flume2 和Flume3 ,
Flume2将内容打印到控制台
Flume3将内容打印到控制台
# flume1

a1.sources = r1
a1.sinks = k1 k2
a1.channels = c1

a1.sources.r1.type = netcat
a1.sources.r1.bind = localhost
a1.sources.r1.port = 6666
a1.sources.r1.selector.type = replicating

a1.channels.c1.type = memory
a1.channels.c1.capacity=1000
a1.channels.c1.transactionCapacity = 100

# 将sink加入sink组中
a1.sinkgroups = g1
a1.sinkgroups.g1.sinks = k1 k2
# 设置类型为负载均衡
a1.sinkgroups.g1.processor.type = load_balance

# 如果失败的写入会呈指数级后退。 -- 如果设置为TRUE  那么每次失败的avro sink 的等待时间会增加 最大是maxTimeOut
a1.sinkgroups.g1.processor.backoff = true
# 随机
# a1.sinkgroups.g1.processor.selector = random
# 轮询 不是根据数据来均匀分配 而是根据 下游sinks 的时间来
a1.sinkgroups.g1.processor.selector = round_robin

a1.sinkgroups.g1.processor.selector.maxTimeOut = 30000

a1.sinks.k1.type = avro
a1.sinks.k1.hostname = localhost
a1.sinks.k1.port = 7777

a1.sinks.k2.type = avro
a1.sinks.k2.hostname = localhost
a1.sinks.k2.port = 8888

a1.sinks.k1.channel = c1
a1.sinks.k2.channel = c1
a1.sources.r1.channels = c1

# flume2
a2.sources=r1
a2.sinks=k1
a2.channels=c1

a2.sources.r1.type=avro
a2.sources.r1.bind=localhost
a2.sources.r1.port=7777

a2.sinks.k1.type=logger

a2.channels.c1.type = memory
a2.channels.c1.capacity=1000
a2.channels.c1.transactionCapacity = 100

a2.sources.r1.channels = c1
a2.sinks.k1.channel = c1

# flume3
a3.sources = r1
a3.sinks = k1
a3.channels = c1

a3.sources.r1.type = avro
a3.sources.r1.bind = localhost
a3.sources.r1.port = 8888

a3.sinks.k1.type = logger

a3.channels.c1.type = memory
a3.channels.c1.capacity=1000
a3.channels.c1.transactionCapacity = 100

a3.sources.r1.channels = c1
a3.sinks.k1.channel = c1
启动命令:
flume-ng agent -c ./conf -f ./job/loadbalancing/flume3.conf -n a3 -Dflume.root.logger=INFO,console

flume-ng agent -c ./conf -f ./job/loadbalancing/flume2.conf -n a2 -Dflume.root.logger=INFO,console

flume-ng agent -c ./conf -f ./job/loadbalancing/flume1.conf -n a1 -Dflume.root.logger=INFO,console
测试:
[root@master ~]# nc localhost 6666
hello
OK
1
OK
2
OK
故障转移
Flume1监控端口数据, 将监控到的内容发送给Active的Sink.
Flume2将内容打印到控制台
Flume3将内容打印到控制台
# Flume1
a1.sources = r1
a1.sinks = k1 k2
a1.channels = c1


a1.sources.r1.type = netcat
a1.sources.r1.bind = localhost
a1.sources.r1.port = 6666
a1.sources.r1.selector.type = replicating


a1.channels.c1.type = memory
a1.channels.c1.capacity=1000
a1.channels.c1.transactionCapacity = 100


# 设置 Sink Processer
# 设置sink组为g1
a1.sinkgroups = g1
# 将k1和k2加入g1
a1.sinkgroups.g1.sinks = k1 k2
# 设置Processer类型为 failover 故障转移
a1.sinkgroups.g1.processor.type = failover
# 设置k1的优先级为 5
a1.sinkgroups.g1.processor.priority.k1 = 5
# 设置k2的优先级为 10 优先级高先接受数据
a1.sinkgroups.g1.processor.priority.k2 = 10


a1.sinks.k1.type = avro
a1.sinks.k1.hostname = localhost
a1.sinks.k1.port = 7777

a1.sinks.k2.type = avro
a1.sinks.k2.hostname = localhost
a1.sinks.k2.port = 8888


a1.sinks.k1.channel = c1
a1.sinks.k2.channel = c1

a1.sources.r1.channels = c1


# flume2
a2.sources = r1
a2.sinks = k1
a2.channels = c1

a2.sources.r1.type = avro
a2.sources.r1.bind = localhost
a2.sources.r1.port = 7777

a2.sinks.k1.type = logger

a2.channels.c1.type = memory
a2.channels.c1.capacity=1000
a2.channels.c1.transactionCapacity = 100


a2.sources.r1.channels = c1
a2.sinks.k1.channel = c1


# flume3
a3.sources = r1
a3.sinks = k1
a3.channels = c1

a3.sources.r1.type = avro
a3.sources.r1.bind = localhost
a3.sources.r1.port = 8888

a3.sinks.k1.type = logger

a3.channels.c1.type = memory
a3.channels.c1.capacity=1000
a3.channels.c1.transactionCapacity = 100

a3.sources.r1.channels = c1
a3.sinks.k1.channel = c1
启动命令
flume-ng agent -c ./conf -f ./job/failover/flume3.conf -n a3 -Dflume.root.logger=INFO,console

flume-ng agent -c ./conf -f ./job/failover/flume2.conf -n a2 -Dflume.root.logger=INFO,console

flume-ng agent -c ./conf -f ./job/failover/flume1.conf -n a1 -Dflume.root.logger=INFO,console
测试:
[root@master ~]# nc localhost 6666
hello
OK
ff
OK
dd
OK
dd
OK
发现都在flume3中
现在退出flume3,即flume3挂了,再添加数据,发现都在flume2中
聚合
Flume1 监控文件内容Flume2 监控端口数据, FLume1 和Flume2将监控到数据发往Flume3,
Flume3 将内容打印到控制台
# flume1
a1.sources = r2
a1.sinks = k2
a1.channels = c2

# Describe/configure the source
a1.sources.r2.type = exec
a1.sources.r2.command = tail -f /usr/local/soft/hadoop-2.7.6/logs/yarn-root-nodemanager-node1.log

a1.channels.c2.type = memory
a1.channels.c2.capacity=1000
a1.channels.c2.transactionCapacity = 100

a1.sinks.k2.type = avro
a1.sinks.k2.hostname = master
a1.sinks.k2.port = 7777

a1.sources.r2.channels = c2
a1.sinks.k2.channel = c2


# flume2

a2.sources = r1
a2.sinks = k1
a2.channels = c1

a2.sources.r1.type = netcat
a2.sources.r1.bind = localhost
a2.sources.r1.port = 6666

a2.channels.c1.type = memory
a2.channels.c1.capacity=1000
a2.channels.c1.transactionCapacity = 100

a2.sinks.k1.type = avro
a2.sinks.k1.hostname = master
a2.sinks.k1.port = 7777


a2.sources.r1.channels = c1
a2.sinks.k1.channel = c1

# flume3

a3.sources = r1
a3.sinks = k1
a3.channels = c1

a3.sources.r1.type = avro
a3.sources.r1.bind = master
a3.sources.r1.port = 7777

a3.channels.c1.type = memory
a3.channels.c1.capacity=1000
a3.channels.c1.transactionCapacity = 100

a3.sinks.k1.type = logger

a3.sources.r1.channels = c1
a3.sinks.k1.channel = c1
 scp -r /usr/local/soft/flume-1.9.0 node1:/usr/local/soft
 scp -r /usr/local/soft/flume-1.9.0 node2:/usr/local/soft
启动命令:启动顺序:3、1、2
flume-ng agent -c ./conf -f ./job/collertor/flume3.conf -n a3 -Dflume.root.logger=INFO,console

flume-ng agent -c ./conf -f ./job/collector/flume2.conf -n a2 -Dflume.root.logger=INFO,console

flume-ng agent -c ./conf -f ./job/collector/flume1.conf -n a1 -Dflume.root.logger=INFO,console
测试:
在node1上输入以下内容,master可监听
echo hello >> /usr/local/soft/hadoop-2.7.6/logs/yarn-root-nodemanager-node1.log
在node2上输入以下内容,master可监听
[root@node2 ~]# nc localhost 6666
1
OK
2
OK
3
OK
4


 438
438

 被折叠的 条评论
为什么被折叠?
被折叠的 条评论
为什么被折叠?
 到【灌水乐园】发言


