


1.
运行环境:
| 主机 | 主机名 | 系统 | 服务 |
| 192.168.32.168 |
Server-Web
|
Linux
|
Web
|
| 192.168.32.169 |
Server-NFS-
DNS
|
Linux
|
NFS/DNS
|
2.
基础配置
配置主机名,静态
IP
地址
开启防火墙并配置
部分开启
SElinux
并配置
服务器之间使用同
ntp.aliyun.com
进行时间同步
服务器之间实现
SSH
免密登录
3.
业务需求
Server-NFS-DNS
主机配置
NFS
服务器,将博客网站资源
文件共享给
Server-web
主机,
Server-NFS-DNS
主机配
置
DNS
Server-web
主机配置
web
服务,通过域名
www.openla
b.com
可以访问

4.
准备工作
4.1.
恢复快照
4.2.
配置静态
IP
到自建的博客网站
# 在192.168.32.168中配置
[root@server ~]# nmcli c modify ens33
ipv4.method manual ipv4.addresses
'192.168.32.168/24' ipv4.gateway
'192.168.32.2' ipv4.dns '114.114.114.114'
[root@server ~]# nmcli c reload
[root@server ~]# nmcli c up ens33
# 在192.168.32.169中配置
[root@node ~]# nmcli c modify ens33 ipv4.method manual ipv4.addresses '192.168.32.169/24' ipv4.gateway '192.168.32.2' ipv4.dns '114.114.114.114'
[root@node ~]# nmcli c reload
[root@node ~]# nmcli c up ens33
4.3.
修改主机名及
hosts
映射
#在192.168.32.168中配置
[root@server ~]# hostnamectl set-hostname
Server-Web
[root@server ~]# vim /etc/hosts
127.0.0.1 Server-Web
192.168.32.168 Server-Web
192.168.32.169 Server-NFS-DNS
[root@server ~]# reboot
#在192.168.32.169中配置
[root@node1 ~]# hostnamectl set-hostname
Server-NFS-DNS
[root@node1 ~]# vim /etc/hosts
127.0.0.1 Server-NFS-DNS
192.168.32.168 Server-Web
192.168.32.169 Server-NFS-DNS
[root@node1 ~]# reboot
4.4.
开启防火墙:
# 给两台机子都操作
systemctl start firewalld
systemctl enable firewalld
4.5.
时间同步
server ntp.aliyun.com iburst
#
第三行更改
[root@server-web ~]# vim /etc/chrony.conf
[root@server-web ~]# chronyc sources -v

  .-- Source mode  '^' = server, '=' = peer, '#' = local clock.
 / .- Source state '*' = current best, '+' = combined, '-' = not combined,
| /             'x' = may be in error, '~' = too variable, '?' = unusable.
||                                                 .- xxxx [ yyyy ] +/- zzzz
||      Reachability register (octal) -.           |  xxxx = adjusted offset,
||      Log2(Polling interval) --.      |          |  yyyy = measured offset,
||                                \     |          |  zzzz = estimated error.
||                                 |    |           \
MS Name/IP address         Stratum Poll Reach LastRx Last sample
===============================================================================
^? tick.ntp.infomaniak.ch        1   7   104   402    -23ms[  -23ms] +/-   97ms
^? time.cloudflare.com           3   7   360   408   +297ms[ +297ms] +/-  404ms
^- 111.230.189.174               2   7   360   382  +1245us[+1245us] +/-   47ms
^* time.neu.edu.cn               1   6   340   411    -22us[  +82us] +/-   16ms
[root@server-web ~]# timedatectl status
               Local time: 二 2024-04-16 10:53:38 CST
           Universal time: 二 2024-04-16 02:53:38 UTC
                 RTC time: 二 2024-04-16 02:53:39
                Time zone: Asia/Shanghai (CST, +0800)
System clock synchronized: yes
              NTP service: active
          RTC in local TZ: no
[root@server-NFS-DNS ~]# vim /etc/chrony.conf
[root@server-NFS-DNS ~]# chronyc sources -v

  .-- Source mode  '^' = server, '=' = peer, '#' = local clock.
 / .- Source state '*' = current best, '+' = combined, '-' = not combined,
| /             'x' = may be in error, '~' = too variable, '?' = unusable.
||                                                 .- xxxx [ yyyy ] +/- zzzz
||      Reachability register (octal) -.           |  xxxx = adjusted offset,
||      Log2(Polling interval) --.      |          |  yyyy = measured offset,
||                                \     |          |  zzzz = estimated error.
||                                 |    |           \
MS Name/IP address         Stratum Poll Reach LastRx Last sample
===============================================================================
^? dns1.synet.edu.cn             0   8     0     -     +0ns[   +0ns] +/-    0ns
^? 111.230.189.174               0   8     0     -     +0ns[   +0ns] +/-    0ns
^? time.cloudflare.com           0   8     0     -     +0ns[   +0ns] +/-    0ns
^? time.cloudflare.com           0   8     0     -     +0ns[   +0ns] +/-    0ns
^? tock.ntp.infomaniak.ch        0   8     0     -     +0ns[   +0ns] +/-    0ns
^? 139.199.215.251               0   8     0     -     +0ns[   +0ns] +/-    0ns
^? 119.28.183.184                0   8     0     -     +0ns[   +0ns] +/-    0ns
^? tick.ntp.infomaniak.ch        0   8     0     -     +0ns[   +0ns] +/-    0ns
[root@server-NFS-DNS ~]# timedatectl status
               Local time: 二 2024-04-16 10:55:04 CST
           Universal time: 二 2024-04-16 02:55:04 UTC
                 RTC time: 二 2024-04-16 02:55:05
                Time zone: Asia/Shanghai (CST, +0800)
System clock synchronized: no
              NTP service: active
          RTC in local TZ: no
4.6.
配置免密
ssh
登录
[root@server-web ~]# ssh-keygen -t rsa
Generating public/private rsa key pair.
Enter file in which to save the key (/root/.ssh/id_rsa):
Created directory '/root/.ssh'.
Enter passphrase (empty for no passphrase):
Enter same passphrase again:
Your identification has been saved in /root/.ssh/id_rsa
Your public key has been saved in /root/.ssh/id_rsa.pub
The key fingerprint is:
SHA256:gwhs8NuQ9gkY0amYuptD0vYZfy92UV3dSr7Q3sTzp+w root@server-web
The key's randomart image is:
+---[RSA 3072]----+
|+o .            o|
| *o.          . +|
|ooX          = + |
|+o B o .    o =.o|
|... = . S  . o +o|
|o.o .    ..   o +|
|oo . +     . . ..|
|o.  o . + .   o  |
|oo     o +.  .E  |
+----[SHA256]-----+
[root@server-web ~]# ssh-copy-id 192.168.32.169
/usr/bin/ssh-copy-id: INFO: Source of key(s) to be installed: "/root/.ssh/id_rsa.pub"
The authenticity of host '192.168.32.169 (192.168.32.169)' can't be established.
ED25519 key fingerprint is SHA256:AMFEfs6vkiPeS7J5lUowpOS/BN6cTPTmLTgd6aH8QIE.
This key is not known by any other names
Are you sure you want to continue connecting (yes/no/[fingerprint])? yes
/usr/bin/ssh-copy-id: INFO: attempting to log in with the new key(s), to filter out any that are already installed
/usr/bin/ssh-copy-id: INFO: 1 key(s) remain to be installed -- if you are prompted now it is to install the new keys

Authorized users only. All activities may be monitored and reported.
root@192.168.32.169's password:
Permission denied, please try again.
root@192.168.32.169's password:
Permission denied, please try again.
root@192.168.32.169's password:

Number of key(s) added: 1

Now try logging into the machine, with:   "ssh '192.168.32.169'"
and check to make sure that only the key(s) you wanted were added.

[root@server-web ~]# ssh 192.168.32.169

Authorized users only. All activities may be monitored and reported.

Authorized users only. All activities may be monitored and reported.
Last failed login: Tue Apr 16 10:59:57 CST 2024 from 192.168.32.168 on ssh:notty
There was 1 failed login attempt since the last successful login.
Last login: Tue Apr 16 10:47:26 2024 from 192.168.32.1


Welcome to 5.10.0-182.0.0.95.oe2203sp3.x86_64

System information as of time: 	2024年 04月 16日 星期二 11:00:19 CST

System load: 	0.02
Processes: 	192
Memory used: 	12.7%
Swap used: 	0%
Usage On: 	12%
IP address: 	192.168.32.169
Users online: 	2
[root@server-NFS-DNS ~]# ssh-keygen -t rsa
Generating public/private rsa key pair.
Enter file in which to save the key (/root/.ssh/id_rsa):
Enter passphrase (empty for no passphrase):
Enter same passphrase again:
Your identification has been saved in /root/.ssh/id_rsa
Your public key has been saved in /root/.ssh/id_rsa.pub
The key fingerprint is:
SHA256:/v1IxMIQn0zRP12f7QPi0lu28uVblxMgtNJn1dllTQA root@server-NFS-DNS
The key's randomart image is:
+---[RSA 3072]----+
|        . o+E..+X|
|         =o.o .o=|
|        ..++ = .=|
|         o.o+.+.+|
|        S = + .+ |
|       . . = o .+|
|        . . = .++|
|         . = oo +|
|          . =o.o.|
+----[SHA256]-----+
[root@server-NFS-DNS ~]# ssh-copy-id 192.168.32.168
/usr/bin/ssh-copy-id: INFO: Source of key(s) to be installed: "/root/.ssh/id_rsa.pub"
The authenticity of host '192.168.32.168 (192.168.32.168)' can't be established.
ED25519 key fingerprint is SHA256:AMFEfs6vkiPeS7J5lUowpOS/BN6cTPTmLTgd6aH8QIE.
This key is not known by any other names
Are you sure you want to continue connecting (yes/no/[fingerprint])? yes
/usr/bin/ssh-copy-id: INFO: attempting to log in with the new key(s), to filter out any that are already installed
/usr/bin/ssh-copy-id: INFO: 1 key(s) remain to be installed -- if you are prompted now it is to install the new keys

Authorized users only. All activities may be monitored and reported.
root@192.168.32.168's password:

Number of key(s) added: 1

Now try logging into the machine, with:   "ssh '192.168.32.168'"
and check to make sure that only the key(s) you wanted were added.

[root@server-NFS-DNS ~]# ssh 192.168.32.168

Authorized users only. All activities may be monitored and reported.

Authorized users only. All activities may be monitored and reported.
Last login: Tue Apr 16 10:44:19 2024 from 192.168.32.1


Welcome to 5.10.0-182.0.0.95.oe2203sp3.x86_64

System information as of time: 	2024年 04月 16日 星期二 11:01:20 CST

System load: 	0.02
Processes: 	194
Memory used: 	12.1%
Swap used: 	0%
Usage On: 	12%
IP address: 	192.168.32.168
Users online: 	2
5.
环境搭建
5.1. Server-web
端安装
LNMP
环境软件
[root@Server-Web ~]# yum install nginx
mariadb-server php* -y
5.2. Server-NFS-DNS
端上传博客软件
网址:
https://cn.wordpress.org/
,下载后为
zip
压缩
文件
将
wordpress
上传到
192.168.32.169
(
Server-NFS-
DNS
)端的
/
目录下
解压缩
[root@server-NFS-DNS ~]# cd /
[root@server-NFS-DNS /]# unzip wordpress-6.1-zh_CN.zip
[root@server-NFS-DNS /]# cd wordpress
[root@server-NFS-DNS wordpress]# ls
5.3. Server-NFS-DNS
端设置
NFS
共享
目的:将
Server-NFS-DNS
端的
/wordpress
目录共享给
192.168.32.168
(
Server-Web
)
[root@server-NFS-DNS wordpress]# yum install rpcbind -y
[root@server-NFS-DNS wordpress]# yum install nfs-utils -y
[root@server-NFS-DNS wordpress]# cd ~
[root@server-NFS-DNS ~]# vim /etc/exports
[root@server-NFS-DNS ~]# chmod -Rf 777  /wordpress
[root@server-NFS-DNS ~]# firewall-cmd --permanent   --zone public   --add-service=rpc-bind
success
[root@server-NFS-DNS ~]# firewall-cmd --permanent   --zone public   --add-service=nfssuccess
[root@server-NFS-DNS ~]# firewall-cmd --reload
success
[root@server-NFS-DNS ~]# systemctl start rpcbind
[root@server-NFS-DNS ~]# systemctl start nfs-server
#
编辑配置文件
/wordpress
192
.168.32.168(rw,sync,all_squash)
5.4. Server-web
设置
5.4.1.
挂载远程共享目录
[root@server-web ~]# yum install rpcbind -y
[root@server-web ~]# yum install nfs-utils -y
[root@server-web ~]# showmount -e 192.168.32.169
Export list for 192.168.32.169:
/wordpress 192.168.32.168
[root@server-web ~]# mkdir /wp
[root@server-web ~]# mount -t nfs
[root@server-web ~]# mount -t nfs 192.168.32.169:/wordpress /wp
[root@server-web ~]# cd /wp
[root@server-web wp]# ls
5.4.2. nginx
设置
[root@server-web wp]# cd ~
[root@server-web ~]# firewall-cmd --permanent  --zone public  --add-service=http
success
[root@server-web ~]# firewall-cmd --reload
success
[root@server-web ~]# vim /etc/nginx/nginx.conf
root /wp;(编辑配置文件)
5.4.3.
修改
wordpress
配置文件
[root@server-web ~]# cd /wp
[root@server-web wp]# cp wp-config-sample.php wp-config.php
[root@server-web wp]# vim wp-config.php
define(
'DB_NAME'
,
'wordpress'
);
#WordPress 数据库的名称
define(
'DB_USER'
,
'test1'
);
#MySQL
数据库用户名
define(
'DB_PASSWORD'
,
'123456'
);
#MySQL数据库密码
5.4.4.
启动数据库
[root@server-web wp]# cd ~
[root@server-web ~]# systemctl start mariadb
5.4.5.
在数据库中创建数据库和用户
MariaDB [(none)]> create database wordpress;
Query OK, 1 row affected (0.000 sec)

MariaDB [(none)]> create user 'test1'@'localhost' identified by '123456';
Query OK, 0 rows affected (0.002 sec)

MariaDB [(none)]> grant all on wordpress.* to 'test1'@'localhost';
Query OK, 0 rows affected (0.001 sec)

MariaDB [(none)]> exit
5.4.6.
重启数据库和
http
[root@Server-Web ~]# systemctl restart
mariadb
[root@Server-Web ~]# systemctl restart nginx
5.5.
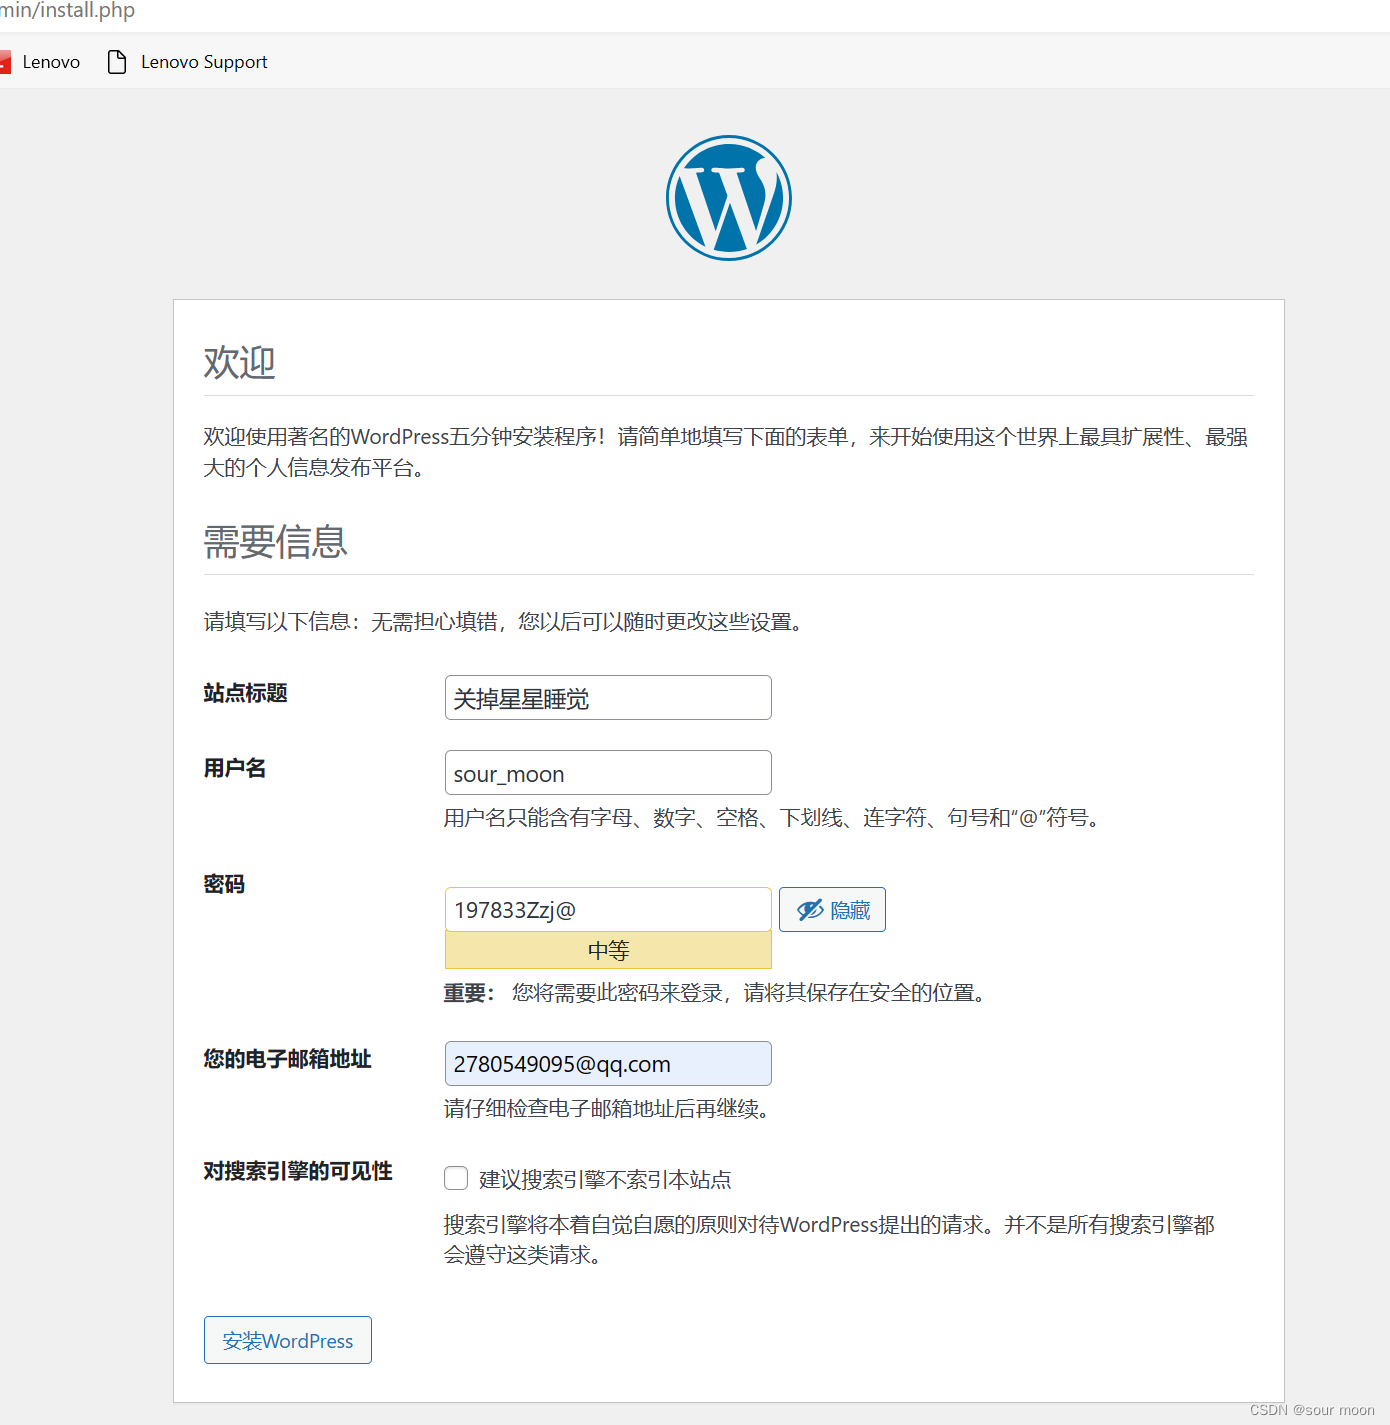
测试
在
windows
端输入
192.168.32.168
继续完成
wordpress
配置
(
邮箱必须设置
)
5.6.
在
Server-NFS-DNS
端配置
DNS
原则:
www.openlab.com
正向解析为
192.168.32.168
安装
[root@Server-NFS-DNS ~]# cd ~
[root@Server-NFS-DNS ~]# yum install bind -y
[root@Server-NFS-DNS ~]# firewall-cmd --permanent --zone public --add-service=dns
[root@Server-NFS-DNS ~]# firewall-cmd --reload
[root@Server-NFS-DNS ~]# systemctl start named
编辑主配置文件
[root@Server-NFS-DNS ~]# vim /etc/named.conf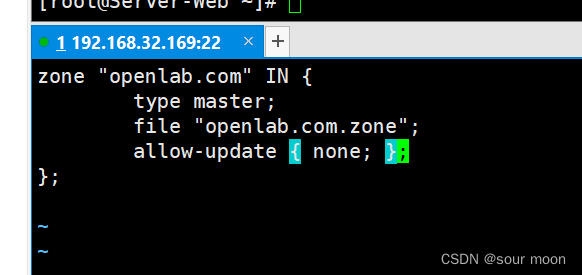
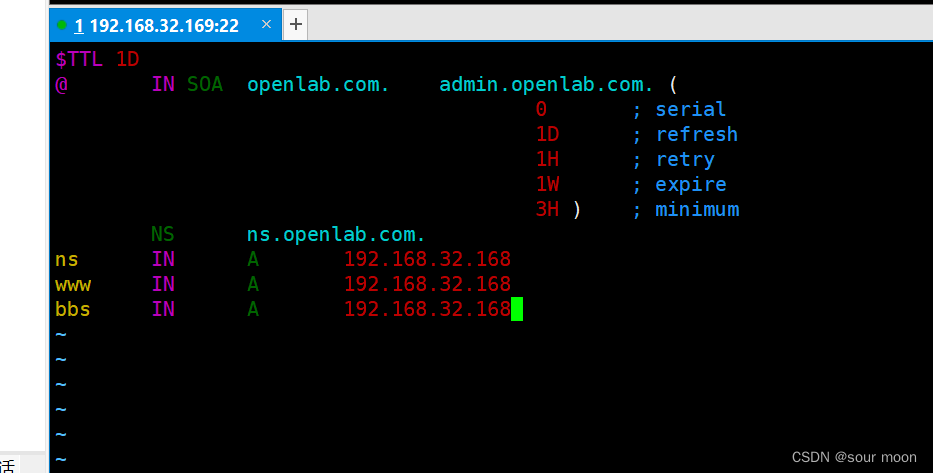
修改区域配置文件,清空添加:
启动服务:
[root@Server-NFS-DNS named]# systemctl restart named
测试:
将
Server-Web
端的
DNS
改为
192.168.48.131
后并输入
w
ww.openlab.com
域名访问


 2万+
2万+

 被折叠的 条评论
为什么被折叠?
被折叠的 条评论
为什么被折叠?
 到【灌水乐园】发言


