Unbuntu22.04安装Verilator --5.008

本文介绍了如何通过Git下载并安装Verilator的特定版本5.008,包括必要的依赖安装、编译和验证版本。在编译过程中遇到的帮助手册生成错误可以通过安装help2man来解决。此外,文章还提到了C++示例和可能遇到的不同于4.210版本的报错情况。

摘要生成于 C知道 ,由 DeepSeek-R1 满血版支持, 前往体验 >

1、前言

一生一芯预学习中需要安装5.008版本Verilator,通过git方式下载所需要版本。

2、步骤

1、Verilator官网中找到Git Quick Install;
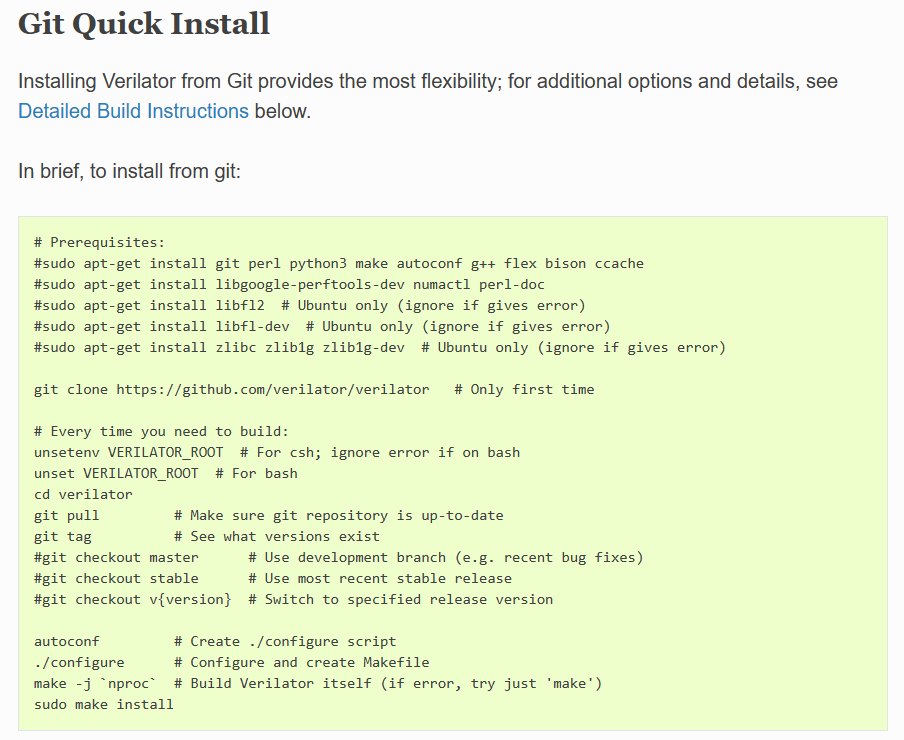
代码:

# Prerequisites:

sudo apt-get install git perl python3 make autoconf g++ flex bison ccache

sudo apt-get install libgoogle-perftools-dev numactl perl-doc

sudo apt-get install libfl2 # Ubuntu only (ignore if gives error)

sudo apt-get install libfl-dev # Ubuntu only (ignore if gives error)

sudo apt-get install zlibc zlib1g zlib1g-dev # Ubuntu only (ignore if gives error)

git clone https://github.com/verilator/verilator ### Only first time

# Every time you need to build:

unsetenv VERILATOR_ROOT # For csh; ignore error if on bash

unset VERILATOR_ROOT # For bash

cd verilator

git pull # Make sure git repository is up-to-date

git tag # See what versions exist

#git checkout master # Use development branch (e.g. recent bug fixes)

#git checkout stable # Use most recent stable release

git checkout v5.008 # Switch to specified release version

autoconf # Create ./configure script

./configure # Configure and create Makefile

make -j `nproc` # Build Verilator itself (if error, try just 'make')

sudo make install

3 、查看版本

@ysyx:~/verilator$ verilator --version

Verilator 5.008 2023-03-04 rev v5.008

4、C++例子

C++例子 官方步骤非常详细。

5、编译可能出现与4.210不同的报错

make: help2man: no such file or directory make: *** [makefile:191: verilator_gantt.1] error 127

解决办法:

sudo apt-get install help2man

### 部署 DeepSeek-R1-7B 模型并实现远程访问 #### 准备工作 在 Ubuntu 22.04 上部署 DeepSeek-R1-7B 模型前,需确保系统已更新至最新状态,并安装必要的依赖项。可以通过以下命令完成环境准备: ```bash sudo apt update && sudo apt upgrade -y ``` #### 安装 Git LFS 和克隆模型仓库 由于 DeepSeek-R1-7B 是大型模型文件,推荐使用 Git Large File Storage (LFS) 来管理其下载过程[^3]。 执行以下命令来安装 Git LFS 并克隆模型仓库: ```bash curl -s https://packagecloud.io/install/repositories/github/git-lfs/script.deb.sh | sudo bash sudo apt-get install git-lfs git lfs install git clone https://www.modelscope.cn/deepseek-ai/DeepSeek-R1-Distill-Qwen-7B.git cd DeepSeek-R1-Distill-Qwen-7B git lfs pull ``` 上述操作会将模型文件拉取到本地目录中。 #### 使用 Ollama 运行模型 Ollama 提供了一种简单的方式来加载和运行大语言模型。按照以下步骤启动 DeepSeek-R1-7B: 1. **验证 Ollama 是否可用** 如果尚未安装 Ollama,请先完成安装后再继续。之后可以使用 `ollama` 命令运行模型: ```bash ollama run deepseek-r1:7b ``` 此命令会在后台启动模型实例[^1]。 #### 启动 API 服务 为了通过 API 调用模型,需要编写一个简单的 Python 脚本来提供 HTTP 接口。假设脚本名为 `api_test.py`,以下是其实现方式: ```python from flask import Flask, request, jsonify import subprocess app = Flask(__name__) @app.route('/predict', methods=['POST']) def predict(): data = request.json prompt = data.get('prompt') if not prompt: return jsonify({"error": "No prompt provided"}), 400 try: result = subprocess.run( ['ollama', 'run', 'deepseek-r1:7b', '--interactive=false'], input=prompt, text=True, capture_output=True ) output = result.stdout.strip() return jsonify({"response": output}), 200 except Exception as e: return jsonify({"error": str(e)}), 500 if __name__ == '__main__': app.run(host='0.0.0.0', port=8080) ``` 保存该脚本后,可通过以下命令启动 API 服务: ```bash python api_test.py ``` 此时,API 将监听端口 8080,并允许外部客户端发送 POST 请求以获取预测结果[^2]。 #### 测试 API 功能 测试 API 的功能可借助 `curl` 或 Postman 工具。例如,使用以下命令向服务器提交请求: ```bash curl -X POST http://localhost:8080/predict \ -H "Content-Type: application/json" \ -d '{"prompt":"What is the capital of France?"}' ``` 返回的结果应包含模型生成的回答。 --- ###
评论 10
添加红包

请填写红包祝福语或标题

红包个数最小为10个

红包金额最低5元

当前余额3.43前往充值 >
需支付:10.00
成就一亿技术人!
领取后你会自动成为博主和红包主的粉丝 规则
hope_wisdom
发出的红包
实付
使用余额支付
点击重新获取
扫码支付
钱包余额 0

抵扣说明:

1.余额是钱包充值的虚拟货币,按照1:1的比例进行支付金额的抵扣。
2.余额无法直接购买下载,可以购买VIP、付费专栏及课程。

余额充值