


 这篇博客介绍了如何基于Python和深度学习搭建人脸识别模型。作者使用ORL FACE数据集,通过8个步骤,包括数据集加载、数据预处理、模型搭建、训练和测试,最终得出具有高准确率的模型,并通过混淆矩阵分析了模型效果。
(学习笔记)
内容
- 动搭建卷积神经网络
- 利用数据集训练一个人脸识别分类器
- 通过分类精度和混淆矩阵量化分析实验结果
操作环境
- python 3.6
- tensorflow 2.4.1
- Keras 2.4.3
- pandas 0.24.2
- numpy 1.19.5
- matplotlib 3.3.4
原理及步骤
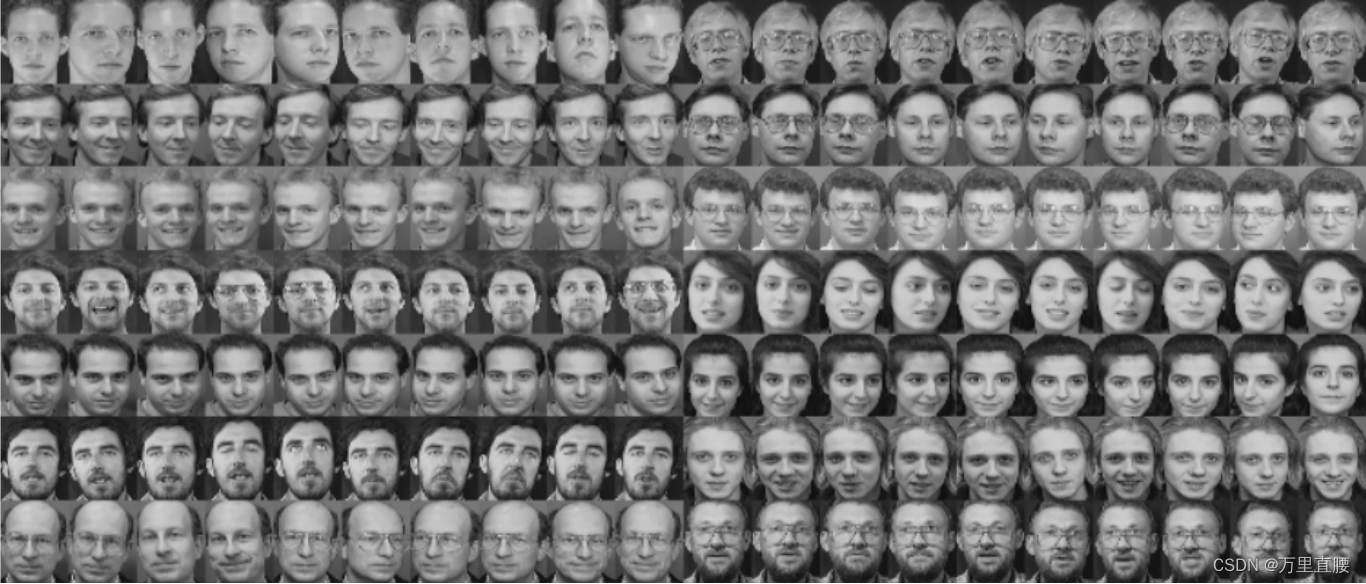
数据集:ORL FACE 数据集
- 本文训练数据集是有20*12张图像组成,即有20个人,每个人拍摄12张,所以其对应label为0至19
- 每张图像为灰度图,性质为:`92 * 112`
- 测试集由`20 * 8`张图像组成,即20个人,每人8张
步骤1:导入模块和包
import keras
from keras.models import Sequential
from keras.layers import Conv2D, MaxPooling2D, Dense, Flatten, Dropout
from keras.optimizers import Adam
from keras.callbacks import TensorBoard
import numpy as np
import pandas as pd
import matplotlib.pyplot as plt
from sklearn.model_selection import train_test_split
from sklearn.metrics import confusion_matrix
from sklearn.metrics import classification_report
from sklearn.metrics import roc_curve, auc
from sklearn.metrics import accuracy_score
from keras.utils import np_utils
import itertools步骤2:加载数据集
- 数据集要进行normalization操作
- 图像是 uint8 的像素矩阵,为了计算,转换为 float 或 double 格式
#load dataset
data = np.load('../Dataset/ORL_faces/ORL_faces.npz')
# load the "Train Images"
x_train = data['trainX']
#normalize every image
x_train = np.array(x_train,dtype='float32')/255
x_test = data['testX']
x_test = np.array(x_test,dtype='float32')/255
# load the Label of Images
y_train= data['trainY']
y_test= data['testY']
# show the train and test Data format
print('x_train : {}'.format(x_train.shape))
print('Y-train shape:{}'.format(y_train.shape))
print('x_test shape: {}'.format(x_test.shape))
数据集形状输出:
x_train : (240, 10304)Y-train shape:(240,)x_test shape: (160, 10304)
- 数据集包括训练集240张,测试集160张
- 如下,训练集包含 20*12 张图像,测试集包含 20*8 张图像
y_train
查看y_train输出:
array([ 0, 0, 0, 0, 0, 0, 0, 0, 0, 0, 0, 0, 1, 1, 1, 1,1,1, 1, 1, 1, 1, 1, 1, 2, 2, 2, 2, 2, 2, 2, 2, 2,2,2, 2, 3, 3, 3, 3, 3, 3, 3, 3, 3, 3, 3, 3, 4, 4,4,4, 4, 4, 4, 4, 4, 4, 4, 4, 5, 5, 5, 5, 5, 5, 5,5,5, 5, 5, 5, 6, 6, 6, 6, 6, 6, 6, 6, 6, 6, 6, 6,7,7, 7, 7, 7, 7, 7, 7, 7, 7, 7, 7, 8, 8, 8, 8, 8,8,8, 8, 8, 8, 8, 8, 9, 9, 9, 9, 9, 9, 9, 9, 9, 9,9,9, 10, 10, 10, 10, 10, 10, 10, 10, 10, 10, 10, 10, 11, 11, 11,11,11, 11, 11, 11, 11, 11, 11, 11, 12, 12, 12, 12, 12, 12, 12, 12,12,12, 12, 12, 13, 13, 13, 13, 13, 13, 13, 13, 13, 13, 13, 13, 14,14,14, 14, 14, 14, 14, 14, 14, 14, 14, 14, 15, 15, 15, 15, 15, 15,15,15, 15, 15, 15, 15, 16, 16, 16, 16, 16, 16, 16, 16, 16, 16, 16,16,17, 17, 17, 17, 17, 17, 17, 17, 17, 17, 17, 17, 18, 18, 18, 18,18,18, 18, 18, 18, 18, 18, 18, 19, 19, 19, 19, 19, 19, 19, 19, 19,19,19, 19], dtype=uint8)
y_test
查看y_test输出:
array([ 0, 0, 0, 0, 0, 0, 0, 0, 1, 1, 1, 1, 1, 1, 1, 1,2,2, 2, 2, 2, 2, 2, 2, 3, 3, 3, 3, 3, 3, 3, 3, 4,4,4, 4, 4, 4, 4, 4, 5, 5, 5, 5, 5, 5, 5, 5, 6, 6,6,6, 6, 6, 6, 6, 7, 7, 7, 7, 7, 7, 7, 7, 8, 8, 8,8,8, 8, 8, 8, 9, 9, 9, 9, 9, 9, 9, 9, 10, 10, 10, 10,10,10, 10, 10, 11, 11, 11, 11, 11, 11, 11, 11, 12, 12, 12, 12, 12,12,12, 12, 13, 13, 13, 13, 13, 13, 13, 13, 14, 14, 14, 14, 14, 14,14,14, 15, 15, 15, 15, 15, 15, 15, 15, 16, 16, 16, 16, 16, 16, 16,16,17, 17, 17, 17, 17, 17, 17, 17, 18, 18, 18, 18, 18, 18, 18, 18,19,19, 19, 19, 19, 19, 19, 19], dtype=uint8)
步骤3:数据集划分
从
sklearn.model_selection
中调用
train_test_split
函数进行训练集和验证集划分
用法:
X_train,X_test, y_train, y_test
=sklearn.model_selection.train_test_split(train_data,train_target,test_size=0.4,
random_state=0,stratify=y_train)
关键参数:
train_data
:所要划分的样本特征集
train_target
:所要划分的样本结果
test_size
:样本占比,如果是整数的话就是样本的数量
random_state
:随机数的种子
stratify
是为了保持
split
前类的分布。如
train_test_split(... test_size=0.25, stratify = y_all),
那么split之后数据如下:
training: 75
个数据,其中
60
个属于
A
类,
15
 最低0.47元/天 解锁文章


 1万+
1万+

 被折叠的 条评论
为什么被折叠?
被折叠的 条评论
为什么被折叠?
 到【灌水乐园】发言


