


目录
一、概述
- 将Mybatis + 通用Mapper + PageHelper升级成 MyBatis Plus
1.1 简介
官网:MyBatis-Plus
MyBatis-Plus(简称 MP)是一个 MyBatis 的增强工具,在 MyBatis 的基础上只做增强不做改变,为简化开发、提高效率而生。
1.2 特点
- 无侵入:只做增强不做改变,引入它不会对现有工程产生影响,如丝般顺滑
- 损耗小:启动即会自动注入基本 CURD,性能基本无损耗,直接面向对象操作
- 强大的 CRUD 操作:内置通用 Mapper、通用 Service,仅仅通过少量配置即可实现单表大部分 CRUD 操作,更有强大的条件构造器,满足各类使用需求
- 支持 Lambda 形式调用:通过 Lambda 表达式,方便的编写各类查询条件,无需再担心字段写错
- 支持多种数据库:支持 MySQL、MariaDB、Oracle、DB2、H2、HSQL、SQLite、Postgre、SQLServer2005、SQLServer 等多种数据库
- 支持主键自动生成:支持多达 4 种主键策略(内含分布式唯一 ID 生成器 - Sequence),可自由配置,完美解决主键问题
- 支持 XML 热加载:Mapper 对应的 XML 支持热加载,对于简单的 CRUD 操作,甚至可以无 XML 启动
- 支持 ActiveRecord 模式:支持 ActiveRecord 形式调用,实体类只需继承 Model 类即可进行强大的 CRUD 操作
- 支持自定义全局通用操作:支持全局通用方法注入( Write once, use anywhere )
- 支持关键词自动转义:支持数据库关键词(order、key......)自动转义,还可自定义关键词
- 内置代码生成器:采用代码或者 Maven 插件可快速生成 Mapper 、 Model 、 Service 、 Controller 层代码,支持模板引擎,更有超多自定义配置等您来使用
- 内置分页插件:基于 MyBatis 物理分页,开发者无需关心具体操作,配置好插件之后,写分页等同于普通 List 查询
- 内置性能分析插件:可输出 Sql 语句以及其执行时间,建议开发测试时启用该功能,能快速揪出慢查询
- 内置全局拦截插件:提供全表 delete 、 update 操作智能分析阻断,也可自定义拦截规则,预防误操作
- 内置 Sql 注入剥离器:支持 Sql 注入剥离,有效预防 Sql 注入攻击
select * from user where username = 'jack' and password = '1234';
-- 将 jack 替换成 jack' #
-- sql注入,用户输入的内容,称为sql语句语法的一部分。
select * from user where username = 'jack' #' and password = '1234';
二、整体介绍

三、入门案例
3.1 环境搭建
步骤:
- 创建项目
- 修改pom.xml文件,添加依赖
<!--确定spring boot的版本-->
<parent>
	<groupId>org.springframework.boot</groupId>
	<artifactId>spring-boot-starter-parent</artifactId>
	<version>2.3.5.RELEASE</version>
</parent>
<dependencies>
<!-- web 开发 -->
<dependency>
<groupId>org.springframework.boot</groupId>
<artifactId>spring-boot-starter-web</artifactId>
</dependency>
<!--MySQL数据库驱动-->
<dependency>
<groupId>mysql</groupId>
<artifactId>mysql-connector-java</artifactId>
</dependency>
<!--支持lombok-->
<dependency>
<groupId>org.projectlombok</groupId>
<artifactId>lombok</artifactId>
</dependency>
<!--测试-->
<dependency>
<groupId>org.springframework.boot</groupId>
<artifactId>spring-boot-starter-test</artifactId>
</dependency>
<!-- https://mvnrepository.com/artifact/com.baomidou/mybatis-plus-boot-starter -->
<dependency>
<groupId>com.baomidou</groupId>
<artifactId>mybatis-plus-boot-starter</artifactId>
<version>3.4.0</version>
</dependency>
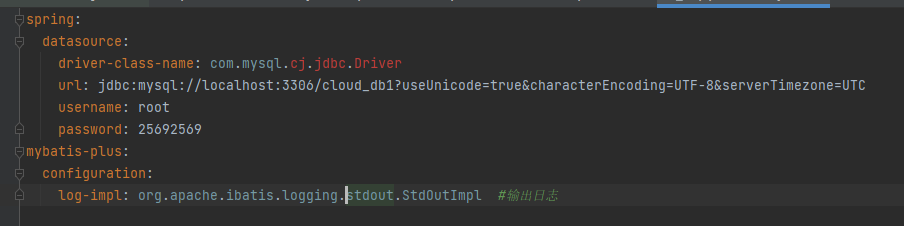
</dependencies>- 创建application.yml文件,配置相关数据库信息
spring:
  datasource:
    driver-class-name: com.mysql.cj.jdbc.Driver
    url: jdbc:mysql://localhost:3306/cloud_db1?useUnicode=true&characterEncoding=UTF-8&serverTimezone=UTC

#此处serverTimezone=UTC 的UTC值可以修改为GMT%2B8 用于修改数据库中时间的时区为东八区 时间+8小时
    username: root
    password: 25692569
mybatis-plus:
  configuration:
    log-impl: org.apache.ibatis.logging.stdout.StdOutImpl  #输出日志
注意:此时cj.jdbc.Driver可能会爆红
报错为Cannot resolve class 'Driver'
如下图:
该原因为上方步骤2中MySQL版本配置错误,可能版本太高,也可能版本太低
我之前设置的是5.1.32版本,然后我换成8.0.13版本就好了,如果该版本还不能解决,可多试几个版本

3.2 数据库和表
CREATE DATABASE cloud_db1;
USE cloud_db1;
CREATE TABLE `tmp_customer` (
  `cid` INT(11) NOT NULL AUTO_INCREMENT,
  `cname` VARCHAR(50) DEFAULT NULL,
  `password` VARCHAR(32) DEFAULT NULL,
  `telephone` VARCHAR(11) DEFAULT NULL,
  `money` DOUBLE DEFAULT NULL,
  `version` INT(11) DEFAULT NULL,
  `create_time` DATE DEFAULT NULL,
  `update_time` DATE DEFAULT NULL,
  PRIMARY KEY (`cid`)
);

INSERT  INTO `tmp_customer`(`cid`,`cname`,`password`,`telephone`,`money`,`version`,`create_time`,`update_time`)
VALUES (1,'jack','1234','110',1000,NULL,'2023-12-07',NULL),(2,'rose','1234','112',1000,NULL,'2023-12-08',NULL),(3,'tom','1234','119',1000,NULL,'2023-12-09',NULL);
3.3 入门案例
项目结构如下:
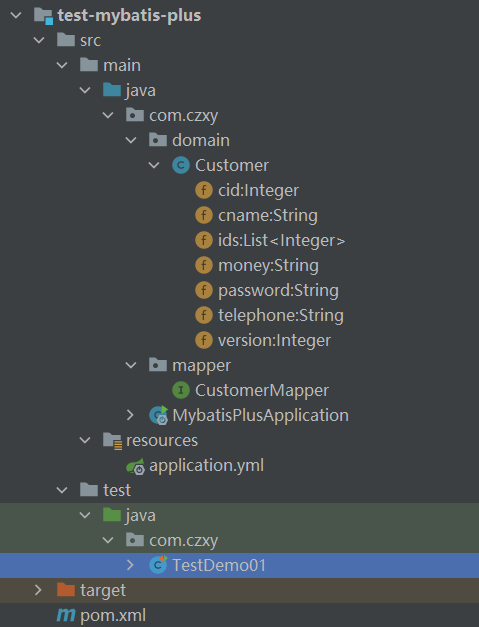
步骤:
- 配置JavaBean,添加MyBatisPlus所对应的注解(表、主键、字段等)
@Data
@TableName(value = "tmp_customer")
public class Customer {
    @TableId(type = IdType.AUTO)
    private Integer cid;
    private String cname;
    private String password;
    private String telephone;
    private Double money;

    private Integer version;

    private Date createTime;
    private Date updateTime;
}
- 编写dao层,并继承BaseMapper接口
@Mapper
public interface CustomerMapper extends BaseMapper<Customer> {
}- 编写启动类
@SpringBootApplication
public class MybatisPlusApplication {
    public static void main(String[] args) {
        SpringApplication.run(MybatisPlusApplication.class, args);
    }
}- 编写测试类
@RunWith(SpringRunner.class)
@SpringBootTest(classes = MybatisPlusApplication.class)
public class TestDemo01 {
    @Resource
    private CustomerMapper customerMapper;
    /*
    * 查询所有
    * */
    @Test
    public void testFindAll() {
        List<Customer> customers = customerMapper.selectList(null);

        customers.forEach(System.out::println);
    }
}
四、基本操作 - BaseMapper
4.1 BaseMapper概述
BaseMapper 接口是基于 MyBatis 框架的通用 Mapper 插件提供的一个接口。该接口定义了一些通用的数据访问方法,用于对数据库进行增删改查操作。BaseMapper 接口使用了泛型来指定实体类的类型,从而实现了对不同实体类的通用操作。
4.2 常用方法
增删改:
| 方法名 | 描述 |
| int insert(T entity) | 插入一条记录,entity 为 实体对象 |
| int delete(Wrapper<T> wrapper) | 根据 entity 条件,删除记录,wrapper 可以为 null |
| int deleteBatchIds(Collection idList) | 根据ID 批量删除 |
| int deleteById(Serializable id) | 根据 ID 删除 |
| int deleteByMap(Map<String, Object> map) | 根据 columnMap 条件,删除记录 |
| int update(T entity, Wrapper<T> updateWrapper) | 根据 whereEntity 条件,更新记录 |
| int updateById(T entity); | 根据 ID 修改 |
查询:
| 方法名 | 描述 |
| T selectById(Serializable id) | 根据 ID 查询 |
| T selectOne(Wrapper<T> queryWrapper) | 根据 entity 条件,查询一条记录 |
| List<T> selectBatchIds(Collection idList) | 根据ID 批量查询 |
| 属性 | 描述 |
| value | 表名 |
| keepGlobalPrefix | 是否保持使用全局的 tablePrefix 的值(如果设置了全局 tablePrefix 且自行设置了 value 的值) |
| List<Object> selectObjs( Wrapper<T> queryWrapper) | 根据 Wrapper 条件,查询全部记录。注意: 只返回第一个字段的值 |
| IPage<T> selectPage(IPage<T> page, Wrapper<T> queryWrapper) | 根据 entity 条件,查询全部记录(并翻页) |
| IPage<Map<String, Object>> selectMapsPage(IPage<T> page, Wrapper<T> queryWrapper) | 根据 Wrapper 条件,查询全部记录(并翻页) |
| Integer selectCount(@Param(Constants.WRAPPER) Wrapper<T> queryWrapper) | 根据 Wrapper 条件,查询总记录数 |
	/*
     * 添加
     * */
    @Test
    public void insert() {
        Customer customer = new Customer();
        customer.setCname("张三");
        customer.setPassword("1234");
        customer.setTelephone("123456789");
        customer.setMoney(1000.0);

        int insert = customerMapper.insert(customer);

        if (insert == 1) {
            System.out.println("添加成功");
        } else {
            System.out.println("添加失败");
        }

        System.out.println(insert);
    }
/*
* 更新
* */
@Test
public void update() {
Customer customer = new Customer();
customer.setCid(4);
customer.setCname("李四");
customer.setPassword("12345");
customer.setTelephone("15963758033");
int update = customerMapper.updateById(customer);
if (update == 1) {
System.out.println("修改成功");
} else {
System.out.println("修改失败");
}
} /*
* 删除
* */
@Test
public void delete() {
int deleteById = customerMapper.deleteById(4);
if (deleteById == 1) {
System.out.println("删除成功");
} else {
System.out.println("删除失败");
}
}五、查询
5.1 wrapper条件
Wrapper 是 MyBatis-Plus 提供的一个条件构造器,用于构建复杂的查询条件。它可以通过链式调用的方式,方便地拼接各种条件,实现灵活的查询功能。
- Wrapper : 条件构造抽象类,最顶端父类
- AbstractWrapper : 用于查询条件封装,生成 sql 的 where 条件
- QueryWrapper : Entity 对象封装操作类,不是用lambda语法
- AbstractLambdaWrapper : Lambda 语法使用 Wrapper统一处理解析 lambda 获取 column。
- UpdateWrapper : Update 条件封装,用于Entity对象更新操作
- LambdaQueryWrapper :看名称也能明白就是用于Lambda语法使用的查询Wrapper
- LambdaUpdateWrapper : Lambda 更新封装Wrapper
- AbstractWrapper : 用于查询条件封装,生成 sql 的 where 条件
如果想进行复杂条件查询,那么需要使用条件构造器 Wapper,涉及到如下方法
| 方法名 | 描述 |
| selectOne | 根据条件查询一个,结果:0或1,如果查询多个异常 |
| selectCount | 查询总条数 |
| selectList | 查询所有 |
| selectMaps | 将一条记录封装到Map中,最后返回List<Map<Sting,Object>> |
| selectObjs | 将一条记录封装到Object中,最后返回List<Object> |
| update | 更新指定条件 |
| delete | 删除指定条件 |
拼凑条件相关关键字
| 查询方式 | 说明 |
| setSqlSelect | 设置 SELECT 查询字段 |
| where | WHERE 语句,拼接 + WHERE 条件 |
| and | AND 语句,拼接 + AND 字段=值 |
| andNew | AND 语句,拼接 + AND (字段=值) |
| or | OR 语句,拼接 + OR 字段=值 |
| orNew | OR 语句,拼接 + OR (字段=值) |
| eq | 等于= |
| allEq | 基于 map 内容等于= |
| ne | 不等于<> |
| gt | 大于> |
| ge | 大于等于>= |
| lt | 小于< |
| le | 小于等于<= |
| like | 模糊查询 LIKE |
| notLike | 模糊查询 NOT LIKE |
| in | IN 查询 |
| notIn | NOT IN 查询 |
| isNull | NULL 值查询 |
| isNotNull | IS NOT NULL |
| groupBy | 分组 GROUP BY |
| having | HAVING 关键词 |
| orderBy | 排序 ORDER BY |
| orderAsc | ASC 排序 ORDER BY |
| orderDesc | DESC 排序 ORDER BY |
| exists | EXISTS 条件语句 |
| notExists | NOT EXISTS 条件语句 |
| between | BETWEEN 条件语句 |
| notBetween | NOT BETWEEN 条件语句 |
| addFilter | 自由拼接 SQL |
| last | 拼接在最后,例如:last(“LIMIT 1”) |
5.2 条件查询
    /*
     * 条件查询
     * */
    @Test
    public void testWrapper() {
        // 拼接条件
        QueryWrapper<Customer> queryWrapper = new QueryWrapper<>();

        // 姓名:查询名字中包含o的数据   模糊查询 --- 参数1:列名, 参数2:查询的值
        queryWrapper.like("cname", "o");

        // 等值查询
        queryWrapper.eq("telephone", "123");

        // 批量查询
        queryWrapper.in("cid", 1, 3);

        // 范围查询
        queryWrapper.ge("create_time", "2023-12-7");
        queryWrapper.le("create_time", "2023-12-7");
        // 查询
        List<Customer> l/dmkist = customerMapper.selectList(queryWrapper);
        customerList.forEach(System.out::println);
    }
@Test
public void testFindCondition() {
Customer customer = new Customer();
customer.setPassword("777");
customer.setCname("888");
customer.setIdList(Arrays.asList(2,3,4));
customer.setCid(3);
//条件查询
QueryWrapper<Customer> queryWrapper = new QueryWrapper<>();
// 1) 等值查询
queryWrapper.eq(customer.getPassword()!=null ,"password", customer.getPassword());
// 2) 模糊查询
queryWrapper.like(customer.getCname() != null , "cname",customer.getCname());
// 3) in语句
queryWrapper.in(customer.getIdList() != null , "cid",customer.getIdList());
// 4) 大于等于
queryWrapper.ge(customer.getCid() != null , "cid" , customer.getCid());
//查询
List<Customer> list = customerMapper.selectList(queryWrapper);
//list.forEach(customer-> System.out.println(customer));
list.forEach(System.out::println);
}5.3 条件更新
    /*
    * 条件更新
    * */
    @Test
    public void testUpdateWrapper() {
        // 待更新数据
        Customer customer = new Customer();
        customer.setVersion(10);

        // 更新条件
        UpdateWrapper<Customer> updateWrapper = new UpdateWrapper<>();
        updateWrapper.in("cid", 1,2);

        // 更新
        int update = customerMapper.update(customer, updateWrapper);

        if(update != 1) {
            System.out.println("更新成功");
        }else {
            System.out.println("更新失败");
        }
    }
六、分页
6.1 内置插件
主体插件: MybatisPlusInterceptor,该插件内部插件集:
- 分页插件: PaginationInnerInterceptor
- 多租户插件: TenantLineInnerInterceptor
- 动态表名插件: DynamicTableNameInnerInterceptor
- 乐观锁插件: OptimisticLockerInnerInterceptor
- sql性能规范插件: IllegalSQLInnerInterceptor
- 防止全表更新与删除插件: BlockAttackInnerInterceptor
6.2 配置类 MybatisPlusConfig
创建/config/MybatisPlusConfig类
import com.baomidou.mybatisplus.annotation.DbType;
import com.baomidou.mybatisplus.autoconfigure.ConfigurationCustomizer;
import com.baomidou.mybatisplus.extension.plugins.MybatisPlusInterceptor;
import com.baomidou.mybatisplus.extension.plugins.inner.PaginationInnerInterceptor;
import org.springframework.context.annotation.Bean;
import org.springframework.context.annotation.Configuration;

@Configuration
public class MybatisPlusConfig {

    /**
     * 配置插件
     * @return
     */
    @Bean
    public MybatisPlusInterceptor mybatisPlusInterceptor(){

        MybatisPlusInterceptor mybatisPlusInterceptor = new MybatisPlusInterceptor();
        // 分页插件
        mybatisPlusInterceptor.addInnerInterceptor(new PaginationInnerInterceptor(DbType.MYSQL));

        return mybatisPlusInterceptor;
    }

    /**
     * 新的分页插件,一缓和二缓遵循mybatis的规则,需要设置 MybatisConfiguration#useDeprecatedExecutor = false 避免缓存出现问题(该属性会在旧插件移除后一同移除)
     * @return
     */
    @Bean
    public ConfigurationCustomizer configurationCustomizer() {
        return configuration -> configuration.setUseDeprecatedExecutor(false);
    }
}
6.3 分页查询
   /*
    * 分页查询
    * */
    @Test
    public void testPage() {
        // 分页条件
        int pageNum = 1;        // 当前页
        int pageSize = 2;       // 当前页所有数据

        // 拼接分页条件
        Page<Customer> page = new Page<>(pageNum, pageSize);
        page.setSearchCount(true);      // 开启总记录数查询

        customerMapper.selectPage(page,null);

        System.out.println("总记录数:" + page.getTotal());
        System.out.println("当前页:" + page.getCurrent());
        System.out.println("查询结果:" + page.getRecords());
        System.out.println("每页显示记录数:" + page.getSize());

        System.out.println("总页数:" + page.getPages());
        System.out.println("是否有下一页:" + page.hasNext());
        System.out.println("是否有上一页:" + page.hasPrevious());
    }
七、常见注解
7.1 表名注解 @TableName
| 属性 | 描述 |
| value | 表名 |
| keepGlobalPrefix | 是否保持使用全局的 tablePrefix 的值(如果设置了全局 tablePrefix 且自行设置了 value 的值) |
7.2 主键注解 @TableId
| 属性 | 描述 |
| value | 主键字段名 |
| type | 主键类型 IdType.ASSIGN_UUID ,分配UUID,MyBatisPlus维护String数据 IdType.ASSIGN_ID ,分配ID(默认使用雪花算法)MyBatisPlus维护Long数据 IdType.AUTO ,自动增长(数据库维护) |
7.3 字段注解(非主键)@TableFiled
| 属性 | 描述 |
| value | 数据库列名 |
| fill | 字段自动填充策略 FieldFill.INSERT 插入时填充字段 FieldFill.UPDATE 更新时填充字段 FieldFill.INSERT_UPDATE 插入和更新时填充字段 |
| exist | 是否存储到数据库(是否是临时数据) |
八、常见配置
mybatis-plus:
  configuration:
    log-impl: org.apache.ibatis.logging.stdout.StdOutImpl  #输出日志
    map-underscore-to-camel-case: true  #驼峰命名
  global-config:
    db-config:
      id-type: auto  #全局配置,id自动增强
      table-prefix: tmp_ #表名前缀
  type-aliases-package: com.czxy.mp.domain #别名包扫描路径
  mapper-locations: classpath*:/mapper/**/*.xml #映射文件位置
// value 表名
// keepGlobalPrefix 用于控制是否保持全局的前缀
// 修改之前
@TableName(value = "tmp_customer")
// 修改之后
@TableName(value = "customer",keepGlobalPrefix = true)
// 如果类名和表名一样,还可简略
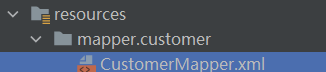
@TableName(keepGlobalPrefix = true)整合xml:
<?xml version="1.0" encoding="UTF-8"?>
<!DOCTYPE mapper
PUBLIC "-//mybatis.org//DTD Mapper 3.0//EN"
"http://mybatis.org/dtd/mybatis-3-mapper.dtd">
<mapper namespace="com.czxy.mp.mapper.CustomerMapper">

  <select id="findAll" resultType="customer">
    select * from tmp_customer
  </select>

</mapper>
CustomerMapper对应的方法:
@Mapper
public interface CustomerMapper extends BaseMapper<Customer> {
    // 自定义查询所有
    public List<Customer> findAll();
}
九、高级(插件机制)
9.1 自动填充
MyBatis-Plus 的自动填充功能是一种方便开发者的特性,它可以在执行插入(insert)或更新(update)操作时,自动为某些字段填充值,从而减少了手动设置这些字段值的需要。
原理:
- 实现元对象处理器接口:
com.baomidou.mybatisplus.core.handlers.MetaObjectHandler,确定填充具体操作 - 注解填充字段:
@TableField(fill = ...)确定字段填充的时机- FieldFill.INSERT:插入填充字段
- FieldFill.UPDATE:更新填充字段
- FieldFill.INSERT_UPDATE:插入和更新填充字段
自动填充通常用于如下场景:
- 创建时间和修改时间:在数据库表中,我们经常需要记录数据的创建时间和最后修改时间。使用自动填充功能,每次插入或更新数据时,MyBatis-Plus 可以自动为这两个字段设置当前时间。
- 创建者或修改者:在多用户系统中,记录数据的创建者或最后修改者是有意义的。通过自动填充功能,可以自动设置这两个字段的值为当前登录的用户ID。
如何使用:
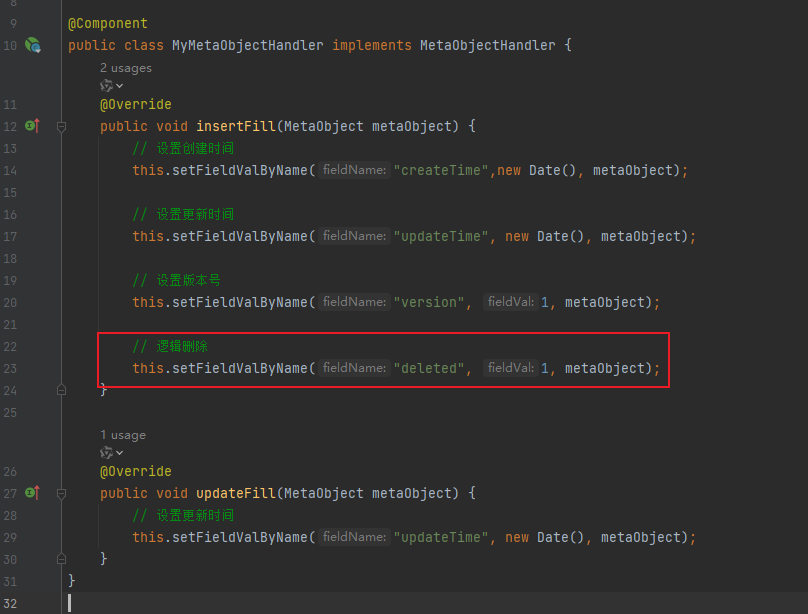
- 定义填充处理器:首先,你需要定义一个实现了 MetaObjectHandler 接口的类,这个类负责为目标字段提供填充的值。
@Component
public class MyMetaObjectHandler implements MetaObjectHandler {
    @Override
    public void insertFill(MetaObject metaObject) {
        // 设置创建时间
        this.setFieldValByName("createTime",new Date(), metaObject);

        // 设置更新时间
        this.setFieldValByName("updateTime", new Date(), metaObject);
    }

    @Override
    public void updateFill(MetaObject metaObject) {
        // 设置更新时间
        this.setFieldValByName("updateTime", new Date(), metaObject);
    }
}
- 在实体类上标注需要自动填充的字段:使用 @TableField 注解标注需要自动填充的字段,并指定填充策略。
@Data
//@TableName(value = "tmp_customer")
@TableName(value = "customer",keepGlobalPrefix = true)
public class Customer {
    @TableId(type = IdType.AUTO)
    private Integer cid;
    private String cname;
    private String password;
    private String telephone;
    private Double money;
    private Integer version;

    @TableField(fill = FieldFill.INSERT)
    private Date createTime;
    @TableField(fill = FieldFill.INSERT_UPDATE)
    private Date updateTime;
}
通过以上步骤,当执行插入或更新操作时,MyBatis-Plus 会自动为指定的字段填充值,从而简化了开发过程。
9.2 乐观锁
MyBatis-Plus 是一个基于 MyBatis 的增强工具,在 MyBatis 的基础上只做增强不做改变,简化开发、提高效率。乐观锁是 MyBatis-Plus 提供的一种乐观锁机制,用于实现数据的版本控制。
- 目的:数据必须同步。当要更新一条记录的时候,希望这条记录没有被别人更新
- 乐观锁实现方式:(万一发生了数据不一致的解决方案)
- 取出记录时,获取当前version
- 更新时,带上这个version
- 执行更新时, set version = newVersion where version = oldVersion
- 如果version不对,就更新失败
实现:
1:修改JavaBean
    @Version
    @TableField(fill = FieldFill.INSERT)
    private Integer version;
2:在MetaObjectHandler 类中添加version的insert默认值 (保证version有数据)
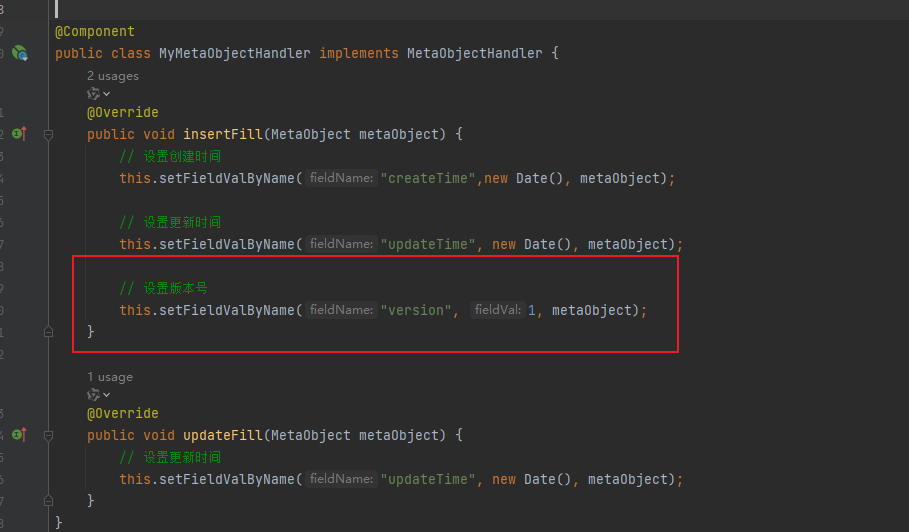
@Component
public class MyMetaObjectHandler implements MetaObjectHandler {
    @Override
    public void insertFill(MetaObject metaObject) {
        // 设置创建时间
        this.setFieldValByName("createTime",new Date(), metaObject);

        // 设置更新时间
        this.setFieldValByName("updateTime", new Date(), metaObject);

        // 设置版本号
        this.setFieldValByName("version", 1, metaObject);
    }

    @Override
    public void updateFill(MetaObject metaObject) {
        // 设置更新时间
        this.setFieldValByName("updateTime", new Date(), metaObject);
    }
}
3:修改MybatisPlusConfig中开启乐观锁
@Configuration
public class MybatisPlusConfig {
     */
    /**
     * 配置插件
     * @return
     */
    @Bean
    public MybatisPlusInterceptor mybatisPlusInterceptor(){

        MybatisPlusInterceptor mybatisPlusInterceptor = new MybatisPlusInterceptor();
        // 分页插件
        mybatisPlusInterceptor.addInnerInterceptor(new PaginationInnerInterceptor(DbType.MYSQL));
        // 乐观锁
        mybatisPlusInterceptor.addInnerInterceptor(new OptimisticLockerInnerInterceptor());

        return mybatisPlusInterceptor;
    }
}
4:更新操作
    /*
     * 更新
     * */
    @Test
    public void update() {
        Customer customer = new Customer();
        customer.setCid(4);
        customer.setCname("李四");
        customer.setPassword("12345");
        customer.setTelephone("15963758033");
        // 与数据库中数据一致,将更新成功,否则返回失败。
        customer.setVersion(0);

        int update = customerMapper.updateById(customer);

        if (update == 1) {
            System.out.println("修改成功");
        } else {
            System.out.println("修改失败");
        }
    }
注意事项:
- 支持的数据类型只有:int、integer、long、Long、Date、Timestamp、LocalDateTime
- 整数类型下 newVersion = oldVersion + 1
- newVersion会写回到entity中
- 仅支持updateById(id)与update(entity, wrapper)方法
- 在update(entity, wrapper)方法下,wrapper不能复用
- 数据库表的version字段,必须有默认值(SQL语句默认值、MyBatisPlus自动填充)
- 在进行更新操作时,必须设置version值,否则无效
9.3 逻辑删除
- 逻辑删除,也称为假删除。就是在表中提供一个字段用于记录是否删除,实际该数据没有被删除。
步骤:
1:在数据库中提供一个字段deleted,默认值为0
alter table tmp_customer add column deleted int default 0;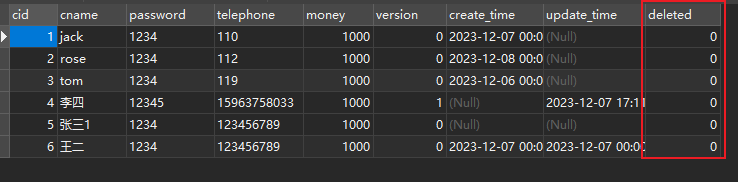
2:在JavaBean中添加deleted,并为其添加@TableField(fill = FieldFill.INSERT)和@TableLogic标识
@TableLogic         // 逻辑删除
@TableField(fill = FieldFill.INSERT)
private Integer deleted;
3:添加数据时,设置默认“逻辑未删除值”
@Component
public class MyMetaObjectHandler implements MetaObjectHandler {
    @Override
    public void insertFill(MetaObject metaObject) {
        // 设置创建时间
        this.setFieldValByName("createTime",new Date(), metaObject);

        // 设置更新时间
        this.setFieldValByName("updateTime", new Date(), metaObject);

        // 设置版本号
        this.setFieldValByName("version", 1, metaObject);

        // 逻辑删除
        this.setFieldValByName("deleted", 1, metaObject);
    }

    @Override
    public void updateFill(MetaObject metaObject) {
        // 设置更新时间
        this.setFieldValByName("updateTime", new Date(), metaObject);
    }
}
4:测试
    @Test
    public void testDelete() {
        // 删除时,必须保证deleted数据为“逻辑未删除值”
        int i = customerMapper.deleteById(12);
        System.out.println(i);
    }
注意:
- 如果使用逻辑删除,将delete语句,修改成了update,条件 where deleted=0
- 同时,查询语句自动追加一个查询条件
WHERE deleted=0。如果查询没有数据,检查deleted字段的值。
全局配置:
如果配置了全局配置可以不使用注解@TableLogic
mybatis-plus:
  global-config:
    db-config:
      logic-delete-field: deleted  # 局逻辑删除的实体字段名
      logic-delete-value: 1  # 逻辑已删除值(默认为 1)
      logic-not-delete-value: 0 # 逻辑未删除值(默认为 0)
恢复:
- 问题:进行逻辑删除后的数据,如何恢复(recovery)?
-
- 需要自己编写SQL语句
- 方案1:使用sql具有,更新deleted=0即可
UPDATE `tmp_customer` SET `deleted`='0' WHERE `cid`='13';方案2:修改Mapper,添加 recoveryById 方法,进行数据恢复。
@Mapper
public interface CustomerMapper extends BaseMapper<Customer> {

    @Update("update tmp_customer set deleted = 0 where cid = #{cid}")
    public void recoveryById(@Param("cid") Integer cid);
}
十、通用service
标准service:接口+实现
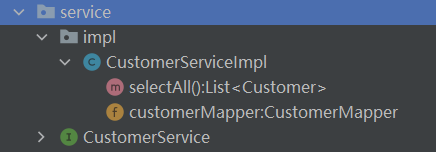
service接口:
public interface CustomerService extends IService<Customer> {
    // 查询所有
    public List<Customer> selectAll();
}
service实现类:
@Service
@Transactional
public class CustomerServiceImpl extends ServiceImpl<CustomerMapper, Customer> implements CustomerService {
    @Resource
    private CustomerMapper customerMapper;

    @Override
    public List<Customer> selectAll() {
        List<Customer> customerList = customerMapper.selectAll();
        return customerList;
    }
}
十一、新功能
11.1 执行SQL分析打印
该功能依赖p6spy组件,完美的输出打印SQL及执行时长
导入p6spy依赖
<dependency>
  <groupId>p6spy</groupId>
  <artifactId>p6spy</artifactId>
  <version>3.9.1</version>
</dependency>
核心yml配置:
spring:
  datasource:
#    driver-class-name: com.mysql.cj.jdbc.Driver
    driver-class-name: com.p6spy.engine.spy.P6SpyDriver
    url: jdbc:mysql://localhost:3306/cloud_db1?useUnicode=true&characterEncoding=UTF-8&serverTimezone=GMT%2B8
    username: root
    password: 25692569
spy.properties配置:
#3.2.1以上使用
modulelist=com.baomidou.mybatisplus.extension.p6spy.MybatisPlusLogFactory,com.p6spy.engine.outage.P6OutageFactory
#3.2.1以下使用或者不配置
#modulelist=com.p6spy.engine.logging.P6LogFactory,com.p6spy.engine.outage.P6OutageFactory
# 自定义日志打印
logMessageFormat=com.baomidou.mybatisplus.extension.p6spy.P6SpyLogger
#日志输出到控制台
appender=com.baomidou.mybatisplus.extension.p6spy.StdoutLogger
# 使用日志系统记录 sql
#appender=com.p6spy.engine.spy.appender.Slf4JLogger
# 设置 p6spy driver 代理
deregisterdrivers=true
# 取消JDBC URL前缀
useprefix=true
# 配置记录 Log 例外,可去掉的结果集有error,info,batch,debug,statement,commit,rollback,result,resultset.
excludecategories=info,debug,result,commit,resultset
# 日期格式
dateformat=yyyy-MM-dd HH:mm:ss
# 实际驱动可多个
#driverlist=org.h2.Driver
# 是否开启慢SQL记录
outagedetection=true
# 慢SQL记录标准 2 秒
outagedetectioninterval=2
11.2 数据安全保护
为了保护数据库配置及数据安全,在一定的程度上控制开发人员流动导致敏感信息泄露
步骤1:使用工具类生成密钥以及对敏感信息进行加密
import com.baomidou.mybatisplus.core.toolkit.AES;
import org.junit.Test;

public class TestAES {
    @Test
    public void testAes() {
        String randomKey = AES.generateRandomKey();

        String url =  "jdbc:p6spy:mysql://localhost:3306/cloud_db1?useUnicode=true&characterEncoding=UTF-8&serverTimezone=GMT%2B8";
        String username = "root";
        String password = "25692569";

        String urlAES = AES.encrypt(url, randomKey);
        String usernameAES = AES.encrypt(username, randomKey);
        String passwordAES = AES.encrypt(password, randomKey);

        System.out.println("--mpw.key=" + randomKey);
        System.out.println("mpw:" + urlAES);
        System.out.println("mpw:" + usernameAES);
        System.out.println("mpw:" + passwordAES);
    }
}
// Jar 启动参数( idea 设置 Program arguments , 服务器可以设置为启动环境变量 )
//--mpw.key=9fb2d1adad680c88
//mpw:ypzCnzkilli+k4juL3slgtkGzc1blEVjkleDdSWYu66q6D49lzjWF1yEK1CmkxLWKOs+kQRZO/LwbJHWs0Y4pEDKmVnUjn2PNbPvkdTojTm9307/dtBddsXpSfgfmRAtM7sRAhQBtrVgAOIq4PjURw==
//mpw:44Q9C/85iTfaPdPilqYe2w==
//mpw:LhIFrlePhMdd30D+sIOrEw==
步骤2:配置加密信息

步骤3:使用密钥启动服务

注意:
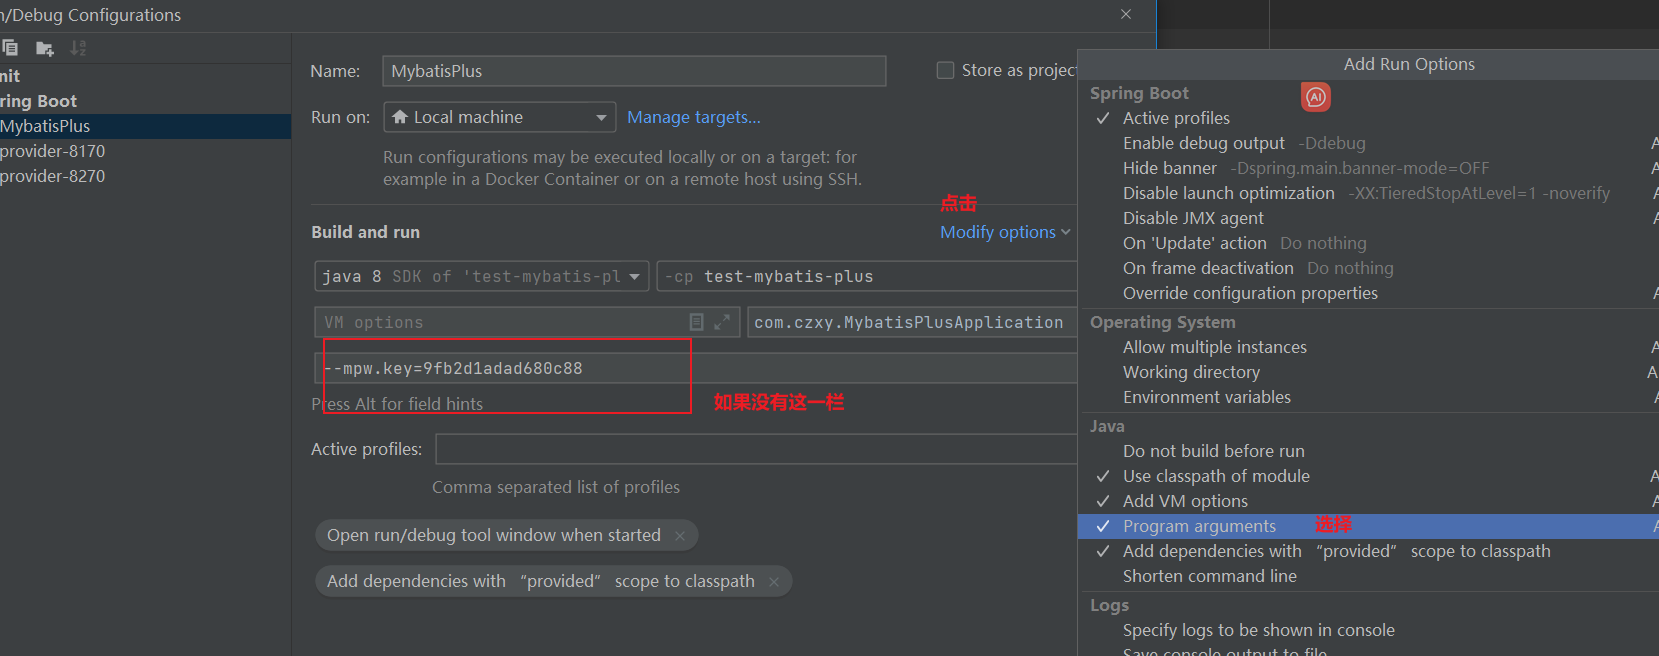
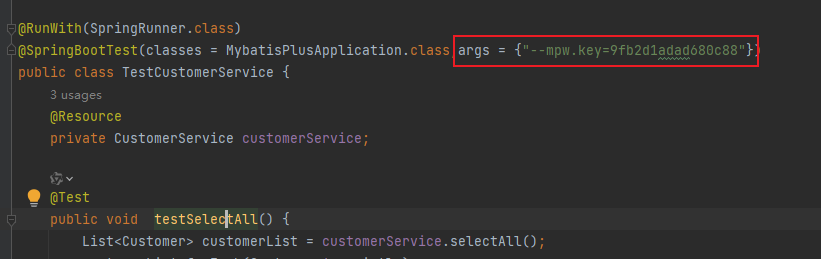
步骤4:如果想在测试文件上使用在@SpringBootTest(classes="启动类",args={"密钥"})
总之,MybatisPlus是一款高效、简洁、易用且功能强大的Mybatis增强工具,适用于各种类型的Java项目。


 1万+
1万+

 被折叠的 条评论
为什么被折叠?
被折叠的 条评论
为什么被折叠?
 到【灌水乐园】发言


