


主要是将服务器的数据渲染到前端页面进行显示。
先创建一台本地服务器。
server.js
const http = require('http');
var url = require('url');
const Modulecode=require('./readercode')
const Modulehtml=require('./readerHtml')

var server = http.createServer(function (req, res) {
    const myUrl=new URL(req.url,'http://127.0.0.1:3000');
    console.log(myUrl);/*定义主机名和主机地址*/

    var pathname=myUrl.pathname;
    console.log(myUrl.searchParams);
    for(var [key,value] of myUrl.searchParams)
    {
        console.log(key,value);
    }

    var urlobj=url.parse(req.url,true);/*可以拿到前端传过来的值*/
    res.writeHead(Modulecode(pathname), {'Content-type': 'text/html;charset=utf-8'});
    res.write(Modulehtml(pathname));
    console.log(urlobj.query);
    res.end("<p>hello world</p>");
});

server.listen('8080', function () {
  console.log((new Date()) + ' Server is start', 8080);
});
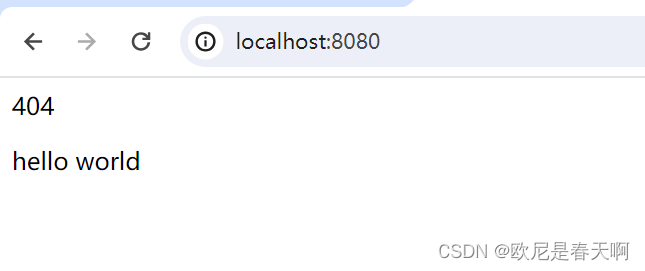
在vscode进行启动,我们可以看到

在浏览器端,输入http://localhost:8080
就可以看到对应的数据了
除此之外,我们不禁思索一个问题,目前我们访问是全部出来了,那我们可以不可以像文件夹一样,对他们进行分类,访问不同地址,就能出现不同内容捏。
那么我们就来看看。
首先我们是是熟悉的先引用http
sever.js文件保持不变
server.js
const http = require('http');
var url = require('url');
const Modulecode=require('./readercode')
const Modulehtml=require('./readerHtml')

var server = http.createServer(function (req, res) {
    const myUrl=new URL(req.url,'http://127.0.0.1:3000');
    console.log(myUrl);/*定义主机名和主机地址*/

    var pathname=myUrl.pathname;
    console.log(myUrl.searchParams);
    for(var [key,value] of myUrl.searchParams)
    {
        console.log(key,value);
    }

    var urlobj=url.parse(req.url,true);/*可以拿到前端传过来的值*/
    res.writeHead(Modulecode(pathname), {'Content-type': 'text/html;charset=utf-8'});
    res.write(Modulehtml(pathname));
    console.log(urlobj.query);
    res.end("<p>hello world</p>");
});

server.listen('3000', function () {
  console.log((new Date()) + ' Server is start', 3000);
});
增添了一个readercode.js
目的:返回的访问状态是否正常,如果不正常我们就返回404,正常我们应该返回200
function readercode(url)
{
    var arr=['/Home','/index'];/*增添了/home /index两个地址*/
    return arr.includes(url)?200:404/*如果读取的地址包含这两个地址就返回200,如果不包含就返回404*/
}

module.exports=readercode;
增添了一个readerhtml.js
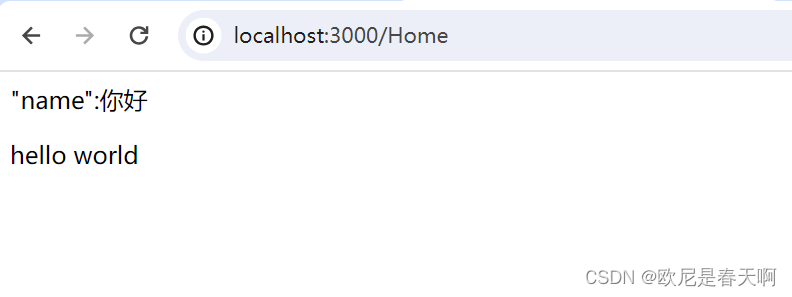
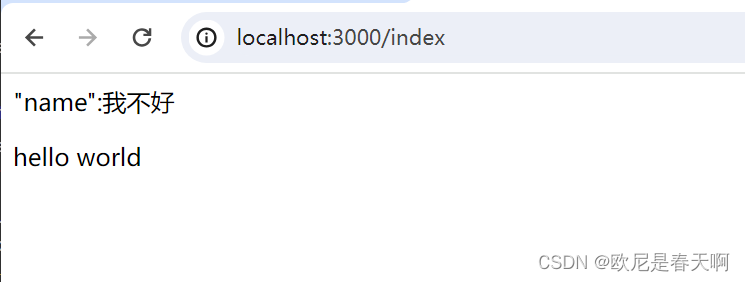
目的:在不同地址访问,写入不同的内容。在浏览器端,就可以访问到不同的内容。
function readerHtml(url)
{
  switch(url)
  {
    case "/Home":
        return `
        <html>
        <div>"name":你好</div>
        </html>
    `
    case "/index":
        return `
        <html>
        <div>"name":我不好</div>
        </html>
    `
    default:
        return `
        <html>
        <div>404</div>
        </html>
    `

  }
}
module.exports=readerHtml;
按照以上方法,我们运行。
我们整个模拟本地环境,渲染到前端拿到数据的过程就完成啦~~


 被折叠的 条评论
为什么被折叠?
被折叠的 条评论
为什么被折叠?
 到【灌水乐园】发言


