


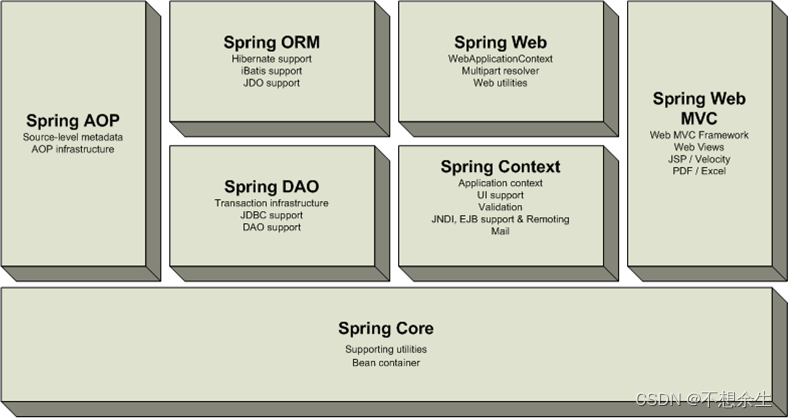
Spring 的概念
Spring是一个开源的框架,由Rod Johnson创建。它是为了解决企业应用开发的复杂性而创建的。
Spring使用基本的JavaBean来完成以前只可能由EJB(EJB是Enterprise Java Beans技术的简称, 又被称为企业Java Beans)完成的事情。
然而,Spring的用途不仅限于服务器端的开发。从简单性、可测试性和松耦合的角度而言,任何Java应用都可以从Spring中受益。
*目的:解决企业应用开发的复杂性
*功能:使用基本的JavaBean代替EJB,并提供了更多的企业应用功能
*范围:任何Java应用
简单来说,Spring是一个轻量级的控制反转(IoC)和面向切面(AOP)的容器框架
IOC(Inversion of Control)/Dl(DI=Dependency Injection)
IOC(控制反转) - 将程序猿实例化对象的操作交给spring去管理
用白话来讲,就是由容器控制程序之间的(依赖)关系,而非传统实现中,由程序代码直接操控。这也就是所谓“控制反转”的概念所在:(依赖)控制权由应用代码中转到了外部容器,控制权的转移,是所谓反转。
IOC还有一个另外的名字:“依赖注入 (DI=Dependency Injection)” ,即由容器动态的将某种依赖关系注入到组件之中
DI (依赖注入) - 将层关系的依赖注入交给spring管理
使用Spring(5.0.1.RELEASE):
1.在pom.xml文件中引入spring-core、spring-context的jar支持
    <!-- https://mvnrepository.com/artifact/org.springframework/spring-core -->
    <dependency>
      <groupId>org.springframework</groupId>
      <artifactId>spring-core</artifactId>
      <version>5.0.10.RELEASE</version>
    </dependency>
    <!-- https://mvnrepository.com/artifact/org.springframework/spring-context -->
    <dependency>
      <groupId>org.springframework</groupId>
      <artifactId>spring-context</artifactId>
      <version>5.0.10.RELEASE</version>
    </dependency>
2.在resources目录右键 New -> Spring -> Spring Bean Configuration File

3.勾选aop、context支持
如何在spring当中定义和配置一个JavaBean(使用无参构造方法+set方法创建一个JavaBean)
-
id:在容器中查找Bean的id(唯一、且不能以/开头)
-
class:bean的完整类名
-
name:在容器中查找Bean的名字(唯一、允许以/开头、允许多个值,多个值之间用逗号或空格隔开)
-
scope:(singleton|prototype)默认是singleton
singleton(单例模式):在每个Spring IoC容器中一个bean定义对应一个对象实例
prototype(原型模式/多例模式):一个bean定义对应多个对象实例
abstract:将一个bean定义成抽象bean(抽象bean是不能实例化的),抽象类一定要定义成抽象bean,非抽象类也可以定义成抽象bean
parent:指定一个父bean(必须要有继承关系才行)
init-method:指定bean的初始化方法
constructor-arg:使用有参数构造方法创建javaBean -
简单属性的配置:
8+1+3
8基础数据+String+3个sql
java.util.Date
java.sql.Date
java.sql.Time
java.sql.Timestamp
通过标签赋值即可 -
复杂属性的配置
5.1 JavaBean
ref bean=“”
5.2 List或数组
5.3 Map
5.4 Properties -
spring与web项目的集成
WEB项目如何读取spring上下文:
通过监听器实现ServletContextListener
contextConfigLocation classpath:spring.xml com.zking.spring01.util.SpringListener
contextConfigLocation:classpath:applicationContext-*.xml
    public class Student extends Person {
    private  String sid;
    private  Integer score;
    private Address addr;
    private Date birthday;
    private List list;
    private String[] arrays;
    private Map map;
    private Properties properties;

    public Student(String sid, Integer score) {
        this.sid = sid;
        this.score = score;
    }public String[] getArrays() {
        return arrays;
    }

    public void setArrays(String[] arrays) {
        this.arrays = arrays;
    }

    public List getList() {
        return list;
    }

    public void setList(List list) {
        this.list = list;
    }

    public Date getBirthday() {
        return birthday;
    }

    public void setBirthday(Date birthday) {
        this.birthday = birthday;
    }

    public void setSid(String sid) {
        this.sid = sid;
    }

    public Integer getScore() {
        return score;
    }

    public void setScore(Integer score) {
        this.score = score;
    }

    public Student() {
    }

    public String getSid() {
        return sid;
    }

    public Address getAddr() {
        return addr;
    }

    public void setAddr(Address addr) {
        this.addr = addr;
    }

    public Map getMap() {
        return map;
    }

    public void setMap(Map map) {
        this.map = map;
    }

    public Properties getProperties() {
        return properties;
    }

    public void setProperties(Properties properties) {
        this.properties = properties;
    }

    @Override
    public String toString() {
        return "Student{" +
                "sid='" + sid + '\'' +
                ", score=" + score +
                ", addr=" + addr +
                ", birthday=" + birthday +
                ", list=" + list +
                ", arrays=" + Arrays.toString(arrays) +
                ", map=" + map +
                ", properties=" + properties +
                '}     ';
    }
	    public void print(){
	        System.out.println("初始化方法");
	    }
    }
<?xml version="1.0" encoding="UTF-8"?>
<beans xmlns="http://www.springframework.org/schema/beans"
       xmlns:xsi="http://www.w3.org/2001/XMLSchema-instance"
       xsi:schemaLocation="http://www.springframework.org/schema/beans http://www.springframework.org/schema/beans/spring-beans.xsd">
    <import resource="sping_a.xml"></import>
<bean id="pig1" name="p g" class="com.zking.spring01.entity.Pig" scope="singleton">
<property name="name">
    <value>花花</value>
</property>
    <property name="sex"><value>公</value></property>

</bean>
    <bean id="person" class="com.zking.spring01.entity.Person" abstract="true">

    <property name="name">
        <value>匿名</value>
    </property>
    </bean>
    <bean id="student" class="com.zking.spring01.entity.Student" parent="person" init-method="print">
        <property name="sid">
            <value>01</value>
        </property>
        <property name="name">
            <value>李四</value>
        </property>
        <property name="score">
            <value>90</value>
        </property>
        <property name="addr" ref="addr">

        </property>
        <property name="birthday">
            <bean factory-bean="dateFormat" factory-method="parse">
                <constructor-arg value="1999-10-12"/>
            </bean>
        </property>
    <property name="list">
        <list>
            <value>zs</value>
            <value>ls</value>
            <value>wu</value>
            <value>by</value>
        </list>
    </property>
        <property name="arrays">
            <array>
                <value>po</value>
                <value>op</value>
                <value>iu</value>
            </array>
        </property>
        <property name="map">
            <map>
                <entry>
                    <key>
                        <value>id</value>

                    </key>
                    <value>1</value>

                </entry>
            </map>
        </property>
        <property name="properties">
            <props><prop key="id">01</prop>
            <prop key="sex">男</prop>
            </props>
        </property>
     <!--   <constructor-arg index="0">
            <value>s00</value>
        </constructor-arg>
        <constructor-arg index="1">
            <value>99</value>
        </constructor-arg>-->
    </bean>
    <!-- 日期格式注入 -->

    <bean id="dateFormat" class="java.text.SimpleDateFormat">
        <constructor-arg value="yyyy-MM-dd" />
    </bean>

</beans>
在登陆时,使用bean的多例模式。
AOP中关键性概念
连接点(Joinpoint):程序执行过程中明确的点,如方法的调用,或者异常的抛出.
目标(Target):被通知(被代理)的对象
注1:完成具体的业务逻辑
通知(Advice):在某个特定的连接点上执行的动作,同时Advice也是程序代码的具体实现,例如一个实现日志记录的代码(通知有些书上也称为处理)
注2:完成切面编程
代理(Proxy):将通知(公共部分的代码,日志记录)应用到目标(具体的业务逻辑方法)对象后创建的对象(代理=目标+通知),
例子:外科医生+护士
注3:只有代理对象才有AOP功能,而AOP的代码是写在通知的方法里面的
切入点(Pointcut):多个连接点的集合,定义了通知应该应用到那些连接点。
(也将Pointcut理解成一个条件 ,此条件决定了容器在什么情况下将通知和目标组合成代理返回给外部程序)
适配器(Advisor):适配器=通知(Advice)+切入点(Pointcut)
如何实现AOP
目标对象只负责业务逻辑代码
通知对象负责AOP代码,这二个对象都没有AOP的功能,只有代理对象才有
-
AOP
即面向切面编程 -
AOP带来的好处
让我们可以 “专心做事”
案例:代理:
目标:具体执行的业务方法doSameBusiness
通知:公共代码,日志记录封装到AOP的通知中:
// 记录日志
log.info(“调用 doSameBusiness方法,参数是:”+lParam);当doSameBusiness被调用时(连接点),将通知(日志记录)应用到doSameBusiness(目标)
通知+目标=代理对象,只有完整的代理对象才具备AOP的特性如果只有目标,则只会去做核心业务逻辑处理,不会收集日志;
如果只有通知,则只会去做日志记录,不会执行核心业务逻辑;
通知应用到目标上才能得到代理对象(通知+目标=代理)
只有完整的代理对象才具备AOP的特性,而AOP的公共代码(日志收集)是写在通知中的!!public void doSameBusiness (long lParam,String sParam){
<------------------- AOP 面向切面(通知)// 输入合法性验证
if (lParam<=0){
throws new IllegalArgumentException(“xx应该大于0”);
}
if (sParam==null || sParam.trim().equals(“”)){
throws new IllegalArgumentException(“xx不能为空”);
}
// 异常处理
try{
… //核心业务逻辑
}catch(…){
}catch(…){
}
// 事务控制
tx.commit();
}例子:病人做手术
外科医生+护士
主刀医生:理解为AOP中的目标,专注具体的业务逻辑操作
麻醉师和护士:理解为AOP中的通知,在某种特定的连接点上执行的动作
上述结合:AOP 代理对象:将通知应用到具体目标对象后创建对象
代理=目标+通知
只有代理对象才有AOP功能。
3 工具类org.springframework.aop.framework.ProxyFactoryBean用来创建一个代理对象,在一般情况下它需要注入以下三个属性:
proxyInterfaces:代理应该实现的接口列表(List)
interceptorNames:需要应用到目标对象上的通知Bean的名字。(List)
target:目标对象 (Object)
- 前置通知(org.springframework.aop.MethodBeforeAdvice):在连接点之前执行的通知()
案例:在购书系统当中使用AOP方式实现日志系统
public class BeforeAdvice implements MethodBeforeAdvice {

    @Override
    public void before(Method method, Object[] objects, Object o) throws Throwable {
        //目标方法 method 参数 objects 目标 o
        String methodName = method.getName();
        String name = o.getClass().getName();
        System.out.println("[前置通知]:"+name+"."+methodName+"方法被调用,参数为"+ Arrays.toString(objects));


    }
}
- 后置通知(org.springframework.aop.AfterReturningAdvice):在连接点正常完成后执行的通知
案例:在线购书系统中,要求不修改BookBizImpl代码的情况下增加如下功能:对买书的用户进行返利:每买本书返利3元。(后置通知)
即:每调用一次buy方法打印:“[销售返利][时间]返利3元。”
public class AfterAdvice implements AfterReturningAdvice {
    @Override
    public void afterReturning(Object o, Method method, Object[] objects, Object o1) throws Throwable {
        //目标方法 method 参数 objects 目标 o
        String methodName = method.getName();
        String name = o1.getClass().getName();
        System.out.println("[后置通知]:[销售返利]["+new Date() +"]返利3元");
        System.out.println("return "+o);
    }
}
- 环绕通知(org.aopalliance.intercept.MethodInterceptor):包围一个连接点的通知,最大特点是可以修改返回值,由于它在方法前后都加入了自己的逻辑代码,因此功能异常强大。
它通过MethodInvocation.proceed()来调用目标方法(甚至可以不调用,这样目标方法就不会执行)
案例:修改日志系统不光要输出参数,还要输出返回值(环绕通知)
public class AroundAdvice implements MethodInterceptor {
    @Override
    public Object invoke(MethodInvocation methodInvocation) throws Throwable {
        String methodname = methodInvocation.getMethod().getName();
        String classname = methodInvocation.getThis().getClass().getName();
        Object[] args = methodInvocation.getArguments();
        System.out.println("[环绕通知前置部分]:"+classname+"."+methodname+"方法被调用,参数为"+ Arrays.toString(args));
        //对目标 放行
        Object proceed = methodInvocation.proceed();
        //后置部分
        System.out.println("[环绕通知后置部分]:proceed="+proceed);
        return proceed ;
    }
}
这个接口里面没有定义方法,我们要求我们的类必须实现afterThrows这个方法
public void afterThrowing( [Method method,] [Object args,] [Object target,] Throwable throwable );
前面三个参数都是可选的,只有第三个参数是必须的,同时我们还可以在同一个类中定义这个方法的多个版本,如:
public void afterThrowing( MyException1 ex ) {}
 public void afterThrowing( MyException2 ex ) {}
具体那个方法被调用则根据具体的Exception来判断,由AOP容器自动识别 执行
7. 异常通知(org.springframework.aop.ThrowsAdvice):这个通知会在方法抛出异常退出时执行
案例: 书本价格为负数时抛出一个异常,通过异常通知取消此订单
public class ExceptionAdvice implements ThrowsAdvice {
    public void afterThrowing( PriceException ex ) {
        System.out.println("价格异常");
    }
}
-
适配器(org.springframework.aop.support.RegexpMethodPointcutAdvisor) 适配器=通知(Advice)+切入点(Pointcut)
案例:通过适配器解决发书评时也返利的问题
.*buy -
请使用接口接收返回的代理对象
<?xml version="1.0" encoding="UTF-8"?>
<beans xmlns="http://www.springframework.org/schema/beans"
       xmlns:xsi="http://www.w3.org/2001/XMLSchema-instance" xmlns:util="http://www.springframework.org/schema/util"
       xsi:schemaLocation="http://www.springframework.org/schema/beans http://www.springframework.org/schema/beans/spring-beans.xsd http://www.springframework.org/schema/util http://www.springframework.org/schema/util/spring-util.xsd">
        <!--目标-->
        <bean id="bookBizImpl" class="com.zking.aop.biz.BookBizImpl"></bean>
      <!--通知-->
        <bean id="beforeAdvice" class="com.zking.aop.advice.BeforeAdvice"></bean>
        <bean id="afterAdvice" class="com.zking.aop.advice.AfterAdvice"></bean>
        <bean id="aroundAdvice" class="com.zking.aop.advice.AroundAdvice"></bean>
        <bean id="exceptionAdvice" class="com.zking.aop.advice.ExceptionAdvice"></bean>
        <!--适配器-->
        <bean id="regexp" class="org.springframework.aop.support.RegexpMethodPointcutAdvisor">
                <!--通知-->
                <property name="advice">
                        <ref bean="afterAdvice"/>
                </property>
                <!--切入点-->
                <property name="pattern">
                        <value>.*buy</value>
                </property>
        </bean>

        <!--代理 =通知+目标-->
        <bean id="proxy" class="org.springframework.aop.framework.ProxyFactoryBean">
                <!--目标-->
                <property name="target" >
                        <ref bean="bookBizImpl"/>
                </property>
                <!--通知-->
                <property name="interceptorNames">
                        <list>
                                <value>beforeAdvice</value>
                                <value>regexp</value>
                                <!--<value>afterAdvice</value>-->
                              <!--  <value>aroundAdvice</value>-->
                                <value>exceptionAdvice</value>
                        </list>
                </property>
                <!--目标实现的接口 代理对象也要实现-->
                <property name="proxyInterfaces">
                        <list>
                                <value>com.zking.aop.biz.IBookBiz</value>
                        </list>
                </property>

        </bean>
</beans>
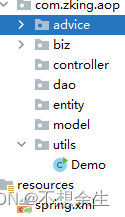
public class Demo {
    public static void main(String[] args) {
        //原始调用
   /*     IBookBiz bookBiz = new BookBizImpl();
        bookBiz.buy("郑志强","《老人与海》",15.9d);
        bookBiz.comment("郑志强","很好");*/
        //通过spring配置文件的bean

        ClassPathXmlApplicationContext cxt = new ClassPathXmlApplicationContext("/spring.xml");
/*
        IBookBiz bookBizImpl =  cxt.getBean("bookBizImpl",BookBizImpl.class);
        bookBizImpl.buy("郑志强","《老人与海》",15.9d);
        bookBizImpl.comment("郑志强","很好");
*/

        //aop 概念
        //连接点 程序执行过程中明确的点 比如方法调用之前 方法调用之后 异常抛出
        //目标 业务逻辑的具体实现方法
        // 通知 在某个特定的连接点(方法调用之前/之后/异常抛出)执行的动作,比如日志,事务提交
        //代理 作用到目标创建的对象 代理=目标+通知 只有代理才犹豫aop功能
        IBookBiz bookBizImpl = (IBookBiz)cxt.getBean("proxy");
        bookBizImpl.buy("郑志强","《老人与海》",15.9d);
        bookBizImpl.comment("郑志强","很好");
    }
}
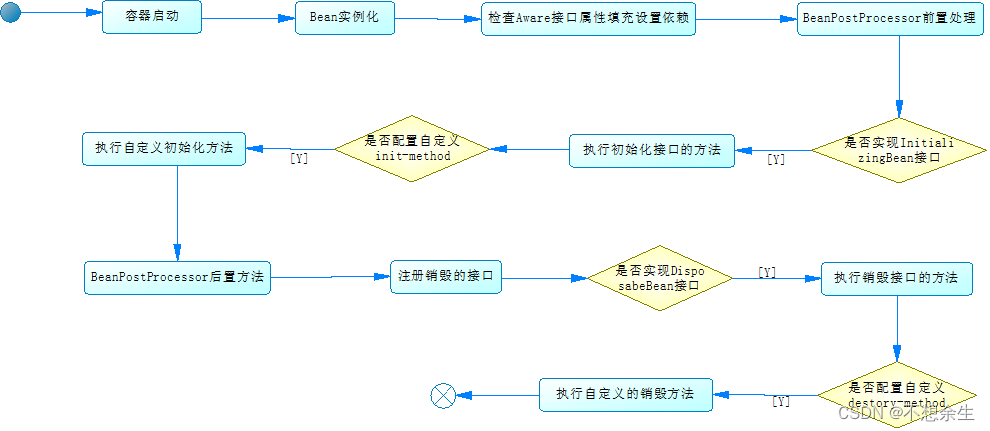
spring生命周期
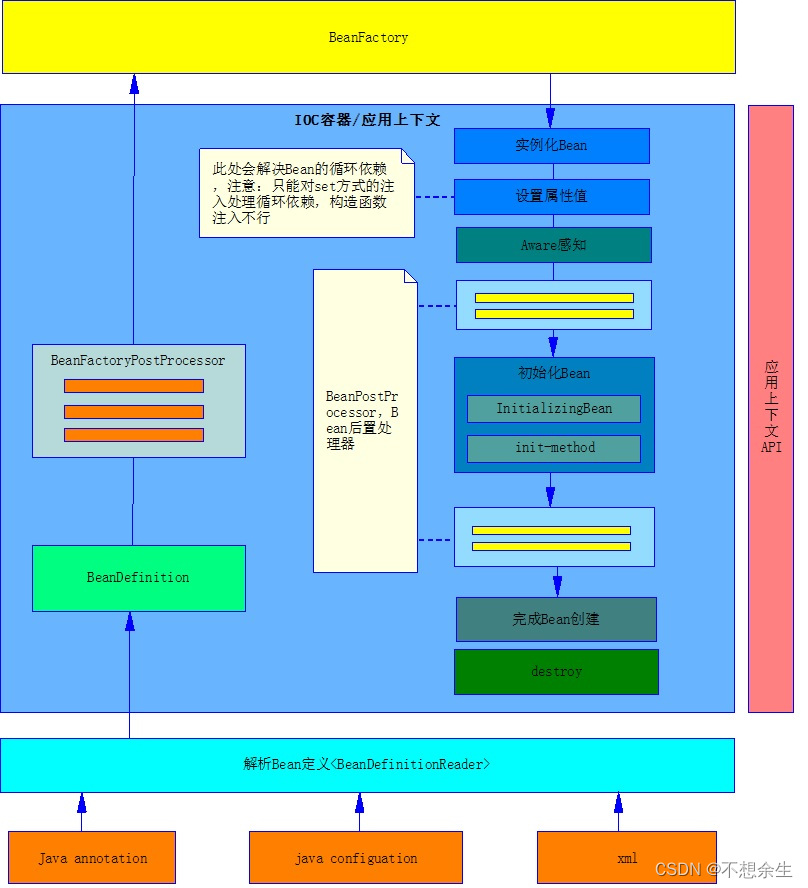
2. 扩展接口介绍
2.1 Aware接口
在spring中Aware接口表示的是感知接口,表示spring框架在Bean实例化过程中以回调的方式将特定在资源注入到Bean中去(如:ApplicationContext, BeanName,BeanFactory等等)。Aware接口本事没有声明任何方法,是一个标记接口,其下有多个子接口,如:BeanNameAware,ApplicationContextAware,BeanFactoryAware等。
每个特定的子接口都会固定一个特定的方法,并注入特定的资源,如BeanFactoryAware接口,定义了setBeanFactory(BeanFactory beanFactory),在spring框架实例化Bean过程中,将回调该接口,并注入BeanFactory对象。再例如:ApplicationContextAware接口,定义了setApplicationContext(ApplicationContext applicationContext) 方法,在spring完成Bean实例化,将回调该接口,并注入ApplicationContext对象(该对象即spring的上下文)。
Aware接口示例(ApplicationContextAware 是 Aware 接口的子接口):
public class ApplicationContextAwareTest implements ApplicationContextAware {

    private static ApplicationContext ctx;

    @Override
    public void setApplicationContext(ApplicationContext applicationContext) throws BeansException {
        ctx = applicationContext;
        System.out.println("---- ApplicationContextAware 示例 -----------");
    }

    public static  <T> T getBean(String beanName) {
        return (T) ctx.getBean(beanName);
    }

}
配置文件:
<bean id="applicationContextAwareTest" class="org.lisen.springstudy.aware.ApplicationContextAwareTest">
</bean>
2.2 BeanPostProcessor接口
Bean在初始化之前会调用该接口的postProcessBeforeInitialization方法,在初始化完成之后会调用
postProcessAfterInitialization方法。
除了我们自己定义的BeanPostProcessor实现外,spring容器也会自动加入几个,如ApplicationContextAwareProcessor、ApplicationListenerDetector,这些都是BeanPostProcessor的实现类。
BeanPostProcessor接口的定义:
public interface BeanPostProcessor {
    Object postProcessBeforeInitialization(Object bean, String beanName) throws BeansException;
    Object postProcessAfterInitialization(Object bean, String beanName) throws BeansException;
}
方法的第一个参数为bean实例,第二个参数为beanName,且返回值类型为Object,所以这给功能扩展留下了很大的空间,比如:我们可以返回bean实例的代理对象。
开发示例:
public class BeanPostProcessorTest implements BeanPostProcessor {

    @Override
    public Object postProcessBeforeInitialization(Object bean, String beanName) throws BeansException {
        System.out.println(beanName + " postProcessBeforeInitialization");
        return bean;
    }

    @Override
    public Object postProcessAfterInitialization(Object bean, String beanName) throws BeansException {
        System.out.println(beanName + " postProcessAfterInitialization");
        return bean;
    }

}
配置文件:
<bean id="beanPostProcessorTest"
class="org.lisen.springstudy.beanpostprocessor.BeanPostProcessorTest"></bean>
2.3 InitializingBean
该接口是Bean初始化过程中提供的扩展接口,接口中只定义了一个afterPropertiesSet方法。如果一个bean实现了InitializingBean接口,则当BeanFactory设置完成所有的Bean属性后,会回调afterPropertiesSet方法,可以在该接口中执行自定义的初始化,或者检查是否设置了所有强制属性等。

也可以通过在配置init-method方法执行自定义的Bean初始化过程。

示例:

```java
public class InitializingBeanTest implements InitializingBean {

    @Override
    public void afterPropertiesSet() throws Exception {
        System.out.println("InitializingBean.afterPropertiesSet() ......");
    }

}
配置文件:
<bean id="initializingBeanTest" class="org.lisen.springstudy.initializingbean.InitializingBeanTest">
</bean>
2.4 DisposableBean
实现了DisposableBean接口的Bean,在该Bean消亡时Spring会调用这个接口中定义的destroy方法。
public class TestService implements DisposableBean {

    public void hello() {
        System.out.println("hello work ... ");
    }

    @Override
    public void destroy() throws Exception {
        System.out.println("TestService destroy ..... ");
    }
}
在Spring的应用上下文关闭时,spring会回调destroy方法, 如果Bean需要自定义清理工作,则可以实现该接口。
除了实现DisposableBean接口外,还可以配置destroy-method方法来实现自定义的清理工作。
2.5 BeanFactoryPostProcessor接口
该接口并没有在上面的流程图上体现出来,因为该接口是在Bean实例化之前调用的(但BeanFactoryPostProcessor接口也是spring容器提供的扩展接口,所以在此处一同列出),如果有实现了BeanFactoryPostProcessor接口,则容器初始化后,并在Bean实例化之前Spring会回调该接口的postProcessorBeanFactory方法,可以在这个方法中获取Bean的定义信息,并执行一些自定义的操作,如属性检查等。
- spring的简化配置
3.1 项目搭建
启用注解,对spring的配置进行简化。
创建一个maven web工程
将web改为web3.1,参考第一次课件
修改pom.xml文件,引入必要的包
<properties>
		<spring.version>5.3.18</spring.version>
		<junit.version>4.12</junit.version>
	</properties>

	<dependencies>

		<dependency>
			<groupId>org.springframework</groupId>
			<artifactId>spring-context</artifactId>
			<version>${spring.version}</version>
		</dependency>

		<dependency>
			<groupId>org.springframework</groupId>
			<artifactId>spring-web</artifactId>
			<version>${spring.version}</version>
		</dependency>

		<dependency>
			<groupId>org.springframework</groupId>
			<artifactId>spring-webmvc</artifactId>
			<version>${spring.version}</version>
		</dependency>

		<dependency>
			<groupId>org.springframework</groupId>
			<artifactId>spring-orm</artifactId>
			<version>${spring.version}</version>
		</dependency>

		<dependency>
			<groupId>org.springframework</groupId>
			<artifactId>spring-aspects</artifactId>
			<version>${spring.version}</version>
		</dependency>

		<dependency>
			<groupId>org.springframework</groupId>
			<artifactId>spring-test</artifactId>
			<version>${spring.version}</version>
		</dependency>

		<!-- junit 测试 -->
		<dependency>
			<groupId>junit</groupId>
			<artifactId>junit</artifactId>
			<version>${junit.version}</version>
			<scope>test</scope>
		</dependency>


	</dependencies>
在resources根目录下添加spring的配置文件 spring.xml
<?xml version="1.0" encoding="UTF-8"?>
 <beans xmlns="http://www.springframework.org/schema/beans"
      xmlns:context="http://www.springframework.org/schema/context"
      xmlns:xsi="http://www.w3.org/2001/XMLSchema-instance"
      xsi:schemaLocation="http://www.springframework.org/schema/beans
      http://www.springframework.org/schema/beans/spring-beans.xsd
      http://www.springframework.org/schema/context
      http://www.springframework.org/schema/context/spring-context.xsd">

	<context:component-scan base-package="com.zking"/>

	<!-- 配置properties文件,与Spring @Value 配合使用   方式一    -->
	<!-- <bean >
		<property name="locations">
			<list>
				<value>classpath:/test.properties</value>
			</list>
		</property>
	</bean>

	<bean >
		<property name="properties" ref="configProp"></property>
	</bean> -->


	<!--
	配置properties文件,与Spring @Value 配合使用   方式二 。
	也可以不使用xml的方式配置,使用程序方式进行配置,可以参考ConfigurationBean  方式三
	-->
	<bean id="propPlaceholder" class="org.springframework.beans.factory.config.PropertyPlaceholderConfigurer">
		<property name="locations">
			<list>
				<value>classpath:/test.properties</value>
			</list>
		</property>
	</bean>

</beans>
程序方式注册如下:
@Configuration
public class ConfigurationBean {

	@Bean
	public static PropertySourcesPlaceholderConfigurer setPropertiesFile() {
		PropertySourcesPlaceholderConfigurer config = new PropertySourcesPlaceholderConfigurer();
		ClassPathResource contextPath = new ClassPathResource("/test.properties");
		config.setLocation(contextPath);
		return config;
	}

}
在resources根目录下新建一个test.properties文件,和spring.xml的配置文件中的配置是相对应的
3.2 Bean的配置和值注入
创建并注册一个Bean
@Component("stu")
public class Student {

	//@Value("#{configProp['stu.name']}")
	@Value("${stu.name}")
	private String name;

	public String getName() {
		return name;
	}

	public void setName(String name) {
		this.name = name;
	}

	@Override
	public String toString() {
		return "Student [name=" + name + "]";
	}

}
通过容器获取Bean
ClassPathXmlApplicationContext ctx = new ClassPathXmlApplicationContext("spring.xml");
Student stu = (Student)ctx.getBean("stu");
//stu.setName("zs");
System.out.println(stu);
3.3 AOP的示例
创建一个切面,记录程序运行时间
@Component
@Aspect
@EnableAspectJAutoProxy
public class ProcessAop {
	//execution(* com.cybx..*.*(..))
	/*@Pointcut("@annotation(com.zking.mavendemo.config.MyAnnotation)")
	public void logPointcut() {
	}*/

	@Around("execution(* com.zking.mavendemo.service..*.hello*(..))")
	public Object around(ProceedingJoinPoint  joinPoint) throws Throwable {

		Class<? extends Signature> signatureClass = joinPoint.getSignature().getClass();
		System.out.println("AOP signatureClass = " + signatureClass);

		Object target = joinPoint.getTarget();
		Class<? extends Object> targetClass = target.getClass();
		System.out.println("AOP targetClass = " + targetClass);

		Object returnValue = joinPoint.proceed(joinPoint.getArgs());

		System.out.println("AOP After ... ");

		return returnValue;
	}

}
创建一个service接口和实现类演示AOP且面
接口:
public interface ITestService {
	void helloAop(String msg);
}
实现类:
@Service("testService")
public class TestService implements ITestService {

	@Override
	public void helloAop(String msg) {
		System.out.println("target obj method: " + msg);
	}

}
测试:
ClassPathXmlApplicationContext ctx = new ClassPathXmlApplicationContext("spring.xml");
ITestService bean = (ITestService)ctx.getBean("testService");
bean.helloAop("fdfdfdfdfdfdfdf");


 被折叠的 条评论
为什么被折叠?
被折叠的 条评论
为什么被折叠?
 到【灌水乐园】发言


