


目录
一、spring整合redis
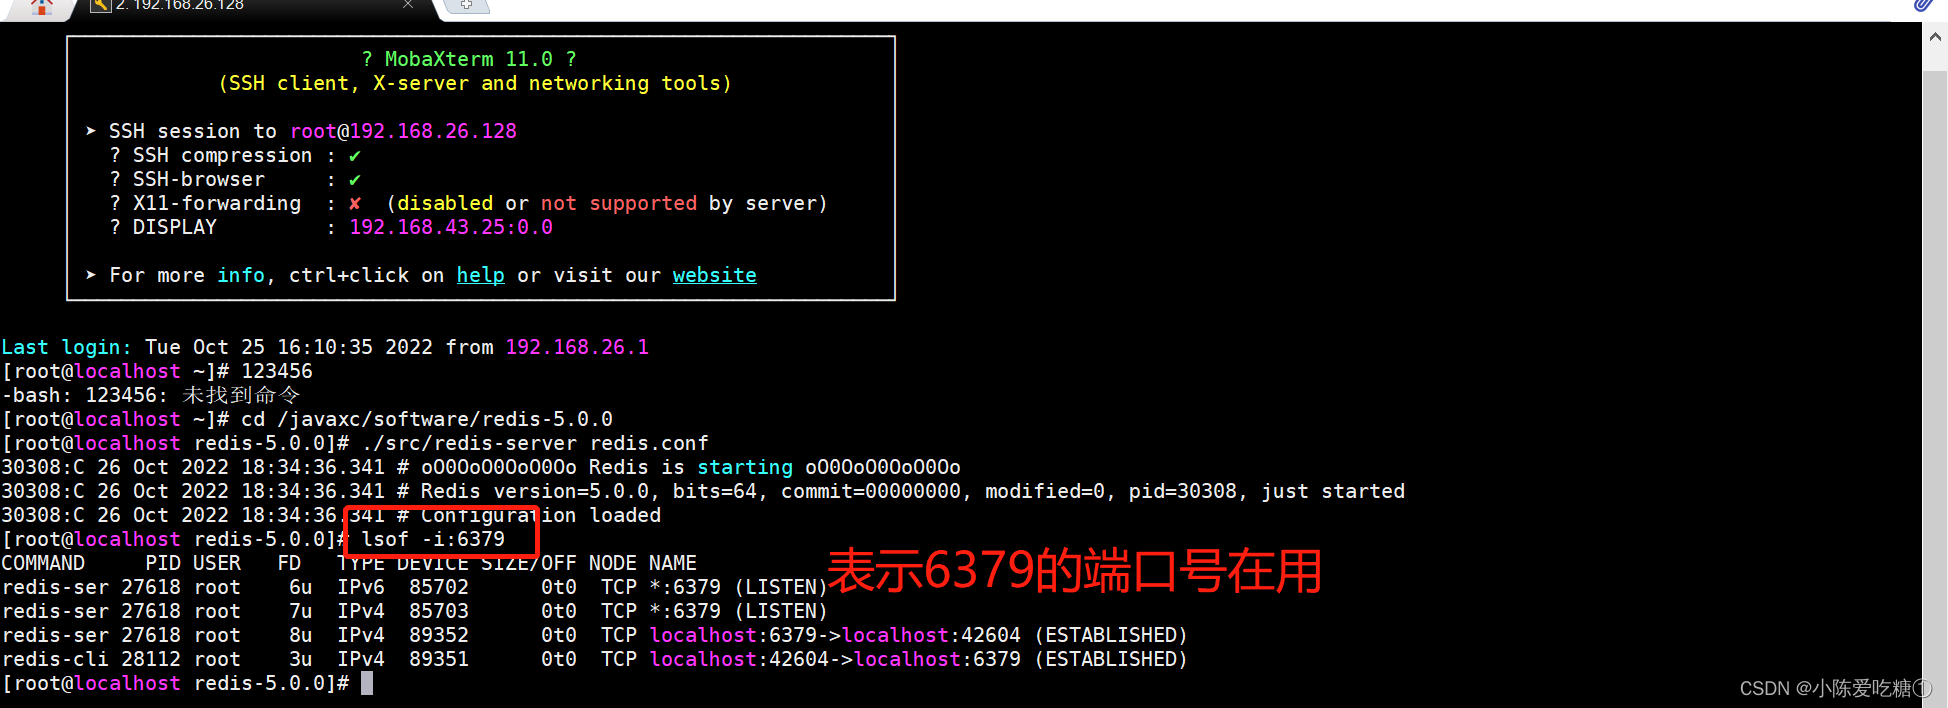
本人没有使用云服务,用的是虚拟机,所以先要将虚拟机启动,再通过Linux客户端(连接工具)启动redis的服务
启动服务
在现有的ssm项目中添加pom依赖、配置文件、spring-redis的整合文件
添加pom依赖
<redis.version>2.9.0</redis.version>
<redis.spring.version>1.7.1.RELEASE</redis.spring.version>

<dependency>
	<groupId>redis.clients</groupId>
	<artifactId>jedis</artifactId>
	<version>${redis.version}</version>
</dependency>
<dependency>
	<groupId>org.springframework.data</groupId>
	<artifactId>spring-data-redis</artifactId>
	<version>${redis.spring.version}</version>
</dependency>
配置文件
redis.properties
redis.hostName=192.168.26.128
redis.port=6379
redis.password=123456
redis.timeout=10000
redis.maxIdle=300
redis.maxTotal=1000
redis.maxWaitMillis=1000
redis.minEvictableIdleTimeMillis=300000
redis.numTestsPerEvictionRun=1024
redis.timeBetweenEvictionRunsMillis=30000
redis.testOnBorrow=true
redis.testWhileIdle=true
redis.expiration=3600
spring-redis.xml
<?xml version="1.0" encoding="UTF-8"?>
<beans xmlns="http://www.springframework.org/schema/beans"
       xmlns:xsi="http://www.w3.org/2001/XMLSchema-instance"
       xmlns:context="http://www.springframework.org/schema/context"
       xmlns:cache="http://www.springframework.org/schema/cache"
       xsi:schemaLocation="http://www.springframework.org/schema/beans
       http://www.springframework.org/schema/beans/spring-beans.xsd
       http://www.springframework.org/schema/context
       http://www.springframework.org/schema/context/spring-context.xsd
       http://www.springframework.org/schema/cache
       http://www.springframework.org/schema/cache/spring-cache.xsd">

    <!-- 1. 引入properties配置文件 -->
    <!--<context:property-placeholder location="classpath:redis.properties" />-->

    <!-- 2. redis连接池配置-->
    <bean id="poolConfig" class="redis.clients.jedis.JedisPoolConfig">
        <!--最大空闲数-->
        <property name="maxIdle" value="${redis.maxIdle}"/>
        <!--连接池的最大数据库连接数  -->
        <property name="maxTotal" value="${redis.maxTotal}"/>
        <!--最大建立连接等待时间-->
        <property name="maxWaitMillis" value="${redis.maxWaitMillis}"/>
        <!--逐出连接的最小空闲时间 默认1800000毫秒(30分钟)-->
        <property name="minEvictableIdleTimeMillis" value="${redis.minEvictableIdleTimeMillis}"/>
        <!--每次逐出检查时 逐出的最大数目 如果为负数就是 : 1/abs(n), 默认3-->
        <property name="numTestsPerEvictionRun" value="${redis.numTestsPerEvictionRun}"/>
        <!--逐出扫描的时间间隔(毫秒) 如果为负数,则不运行逐出线程, 默认-1-->
        <property name="timeBetweenEvictionRunsMillis" value="${redis.timeBetweenEvictionRunsMillis}"/>
        <!--是否在从池中取出连接前进行检验,如果检验失败,则从池中去除连接并尝试取出另一个-->
        <property name="testOnBorrow" value="${redis.testOnBorrow}"/>
        <!--在空闲时检查有效性, 默认false  -->
        <property name="testWhileIdle" value="${redis.testWhileIdle}"/>
    </bean>

    <!-- 3. redis连接工厂 -->
    <bean id="connectionFactory" class="org.springframework.data.redis.connection.jedis.JedisConnectionFactory"
          destroy-method="destroy">
        <property name="poolConfig" ref="poolConfig"/>
        <!--IP地址 -->
        <property name="hostName" value="${redis.hostName}"/>
        <!--端口号  -->
        <property name="port" value="${redis.port}"/>
        <!--如果Redis设置有密码  -->
        <property name="password" value="${redis.password}"/>
        <!--客户端超时时间单位是毫秒  -->
        <property name="timeout" value="${redis.timeout}"/>
    </bean>

    <!-- 4. redis操作模板,使用该对象可以操作redis
        hibernate课程中hibernatetemplete,相当于session,专门操作数据库。
    -->
    <bean id="redisTemplate" class="org.springframework.data.redis.core.RedisTemplate">
        <property name="connectionFactory" ref="connectionFactory"/>
        <!--如果不配置Serializer,那么存储的时候缺省使用String,如果用User类型存储,那么会提示错误User can't cast to String!!  -->
        <property name="keySerializer">
            <bean class="org.springframework.data.redis.serializer.StringRedisSerializer"/>
        </property>
        <property name="valueSerializer">
            <bean class="org.springframework.data.redis.serializer.GenericJackson2JsonRedisSerializer"/>
        </property>
        <property name="hashKeySerializer">
            <bean class="org.springframework.data.redis.serializer.StringRedisSerializer"/>
        </property>
        <property name="hashValueSerializer">
            <bean class="org.springframework.data.redis.serializer.GenericJackson2JsonRedisSerializer"/>
        </property>
        <!--开启事务  -->
        <property name="enableTransactionSupport" value="true"/>
    </bean>

    <!--  5.配置缓存管理器  -->
    <bean id="redisCacheManager" class="org.springframework.data.redis.cache.RedisCacheManager">
        <constructor-arg name="redisOperations" ref="redisTemplate"/>
        <!--redis缓存数据过期时间单位秒-->
        <property name="defaultExpiration" value="${redis.expiration}"/>
        <!--是否使用缓存前缀,与cachePrefix相关-->
        <property name="usePrefix" value="true"/>
        <!--配置缓存前缀名称-->
        <property name="cachePrefix">
            <bean class="org.springframework.data.redis.cache.DefaultRedisCachePrefix">
                <constructor-arg index="0" value="-cache-"/>
            </bean>
        </property>
    </bean>

    <!--6.配置缓存生成键名的生成规则-->
    <bean id="cacheKeyGenerator" class="com.cdl.ssm.redis.CacheKeyGenerator"></bean>

    <!--7.启用缓存注解功能-->
    <cache:annotation-driven cache-manager="redisCacheManager" key-generator="cacheKeyGenerator"/>
</beans>
注意:redis.properties与jdbc.properties在与Spring做整合时会发生冲突;所以引入配置文件的地方要放到SpringContext.xml中
SpringContext.xml
<?xml version="1.0" encoding="UTF-8"?>
<beans xmlns="http://www.springframework.org/schema/beans"
       xmlns:xsi="http://www.w3.org/2001/XMLSchema-instance"
       xsi:schemaLocation="http://www.springframework.org/schema/beans http://www.springframework.org/schema/beans/spring-beans.xsd">

    <!--1. 引入外部多文件方式 -->
    <bean id="propertyConfigurer"
          class="org.springframework.beans.factory.config.PropertyPlaceholderConfigurer">
        <property name="systemPropertiesModeName" value="SYSTEM_PROPERTIES_MODE_OVERRIDE" />
        <property name="ignoreResourceNotFound" value="true" />
        <property name="locations">
            <list>
                <value>classpath:jdbc.properties</value>
                <value>classpath:redis.properties</value>
            </list>
        </property>
    </bean>
    <!--引入mybatis的相关配置文件-->
    <import resource="applicationContext-mybatis.xml"></import>
    <!--spring管理ehcache对应配置文件-->
    <import resource="applicationContext-ehcache.xml"></import>
    <!--spring管理redis对应配置文件-->
    <import resource="applicationContext-redis.xml"></import>
    <import resource="applicationContext-shiro.xml"/>
</beans>
放入了applicationContext.xml中
<?xml version="1.0" encoding="UTF-8"?>
<beans xmlns="http://www.springframework.org/schema/beans"
       xmlns:xsi="http://www.w3.org/2001/XMLSchema-instance"
       xmlns:context="http://www.springframework.org/schema/context" xmlns:tx="http://www.springframework.org/schema/tx"
       xmlns:aop="http://www.springframework.org/schema/aop"
       xsi:schemaLocation="http://www.springframework.org/schema/beans http://www.springframework.org/schema/beans/spring-beans.xsd
       http://www.springframework.org/schema/context http://www.springframework.org/schema/context/spring-context.xsd
       http://www.springframework.org/schema/tx
       http://www.springframework.org/schema/tx/spring-tx.xsd
       http://www.springframework.org/schema/aop
       http://www.springframework.org/schema/aop/spring-aop.xsd">
    <!--1. 引入外部多文件方式 -->
    <bean id="propertyConfigurer"
          class="org.springframework.beans.factory.config.PropertyPlaceholderConfigurer">
        <property name="systemPropertiesModeName" value="SYSTEM_PROPERTIES_MODE_OVERRIDE" />
        <property name="ignoreResourceNotFound" value="true" />
        <property name="locations">
            <list>
                <value>classpath:jdbc.properties</value>
                <value>classpath:redis.properties</value>
            </list>
        </property>
    </bean>
    <!--随着后续:框架越来越多 不能将所有的框架配置放到同一个配置文件 否则不便于管理-->
<!--注入其他配置文件-->
    <import resource="applicationContext-mybatis.xml"></import>
    <import resource="applicationContext-shiro.xml"></import>
    <import resource="spring-redis.xml"></import>
</beans>
CacheKeyGenerator
package com.cdl.ssm.redis;

import lombok.extern.slf4j.Slf4j;
import org.springframework.cache.interceptor.KeyGenerator;
import org.springframework.util.ClassUtils;

import java.lang.reflect.Array;
import java.lang.reflect.Method;

@Slf4j
public class CacheKeyGenerator implements KeyGenerator {
    // custom cache key
    public static final int NO_PARAM_KEY = 0;
    public static final int NULL_PARAM_KEY = 53;

    @Override
    public Object generate(Object target, Method method, Object... params) {
        StringBuilder key = new StringBuilder();
        key.append(target.getClass().getSimpleName()).append(".").append(method.getName()).append(":");
        if (params.length == 0) {
            key.append(NO_PARAM_KEY);
        } else {
            int count = 0;
            for (Object param : params) {
                if (0 != count) {//参数之间用,进行分隔
                    key.append(',');
                }
                if (param == null) {
                    key.append(NULL_PARAM_KEY);
                } else if (ClassUtils.isPrimitiveArray(param.getClass())) {
                    int length = Array.getLength(param);
                    for (int i = 0; i < length; i++) {
                        key.append(Array.get(param, i));
                        key.append(',');
                    }
                } else if (ClassUtils.isPrimitiveOrWrapper(param.getClass()) || param instanceof String) {
                    key.append(param);
                } else {//Java一定要重写hashCode和eqauls
                    key.append(param.hashCode());
                }
                count++;
            }
        }

        String finalKey = key.toString();
//        IEDA要安装lombok插件
        log.debug("using cache key={}", finalKey);
        return finalKey;
    }
}
整合成功
二、redis的注解式开发
@Cacheable 配置在方法或类上,作用:本方法执行后,先去缓存看有没有数据,如果没有,从数据库中查找出来,给缓存中存一份,返回结果, 下次本方法执行,在缓存未过期情况下,先在缓存中查找,有的话直接返回,没有的话从数据库查找
package com.cdl.shiro;

import com.cdl.ssm.biz.ClazzBiz;
import org.junit.Test;
import org.junit.runner.RunWith;
import org.springframework.beans.factory.annotation.Autowired;
import org.springframework.test.context.ContextConfiguration;
import org.springframework.test.context.junit4.SpringJUnit4ClassRunner;

/**
 * @author cdl
 * @site www.cdl.com
 * @create 2022-10-26 19:34
 */
@RunWith(SpringJUnit4ClassRunner.class)
@ContextConfiguration(locations={"classpath:applicationContext.xml"})
public class ClazzBizTest {

    @Autowired
    private ClazzBiz clazzBiz;

    @Test
    public void test1(){
        System.out.println(clazzBiz.selectByPrimaryKey(1));
        System.out.println(clazzBiz.selectByPrimaryKey(1));
    }


}
效果图:SQL语句执行了两次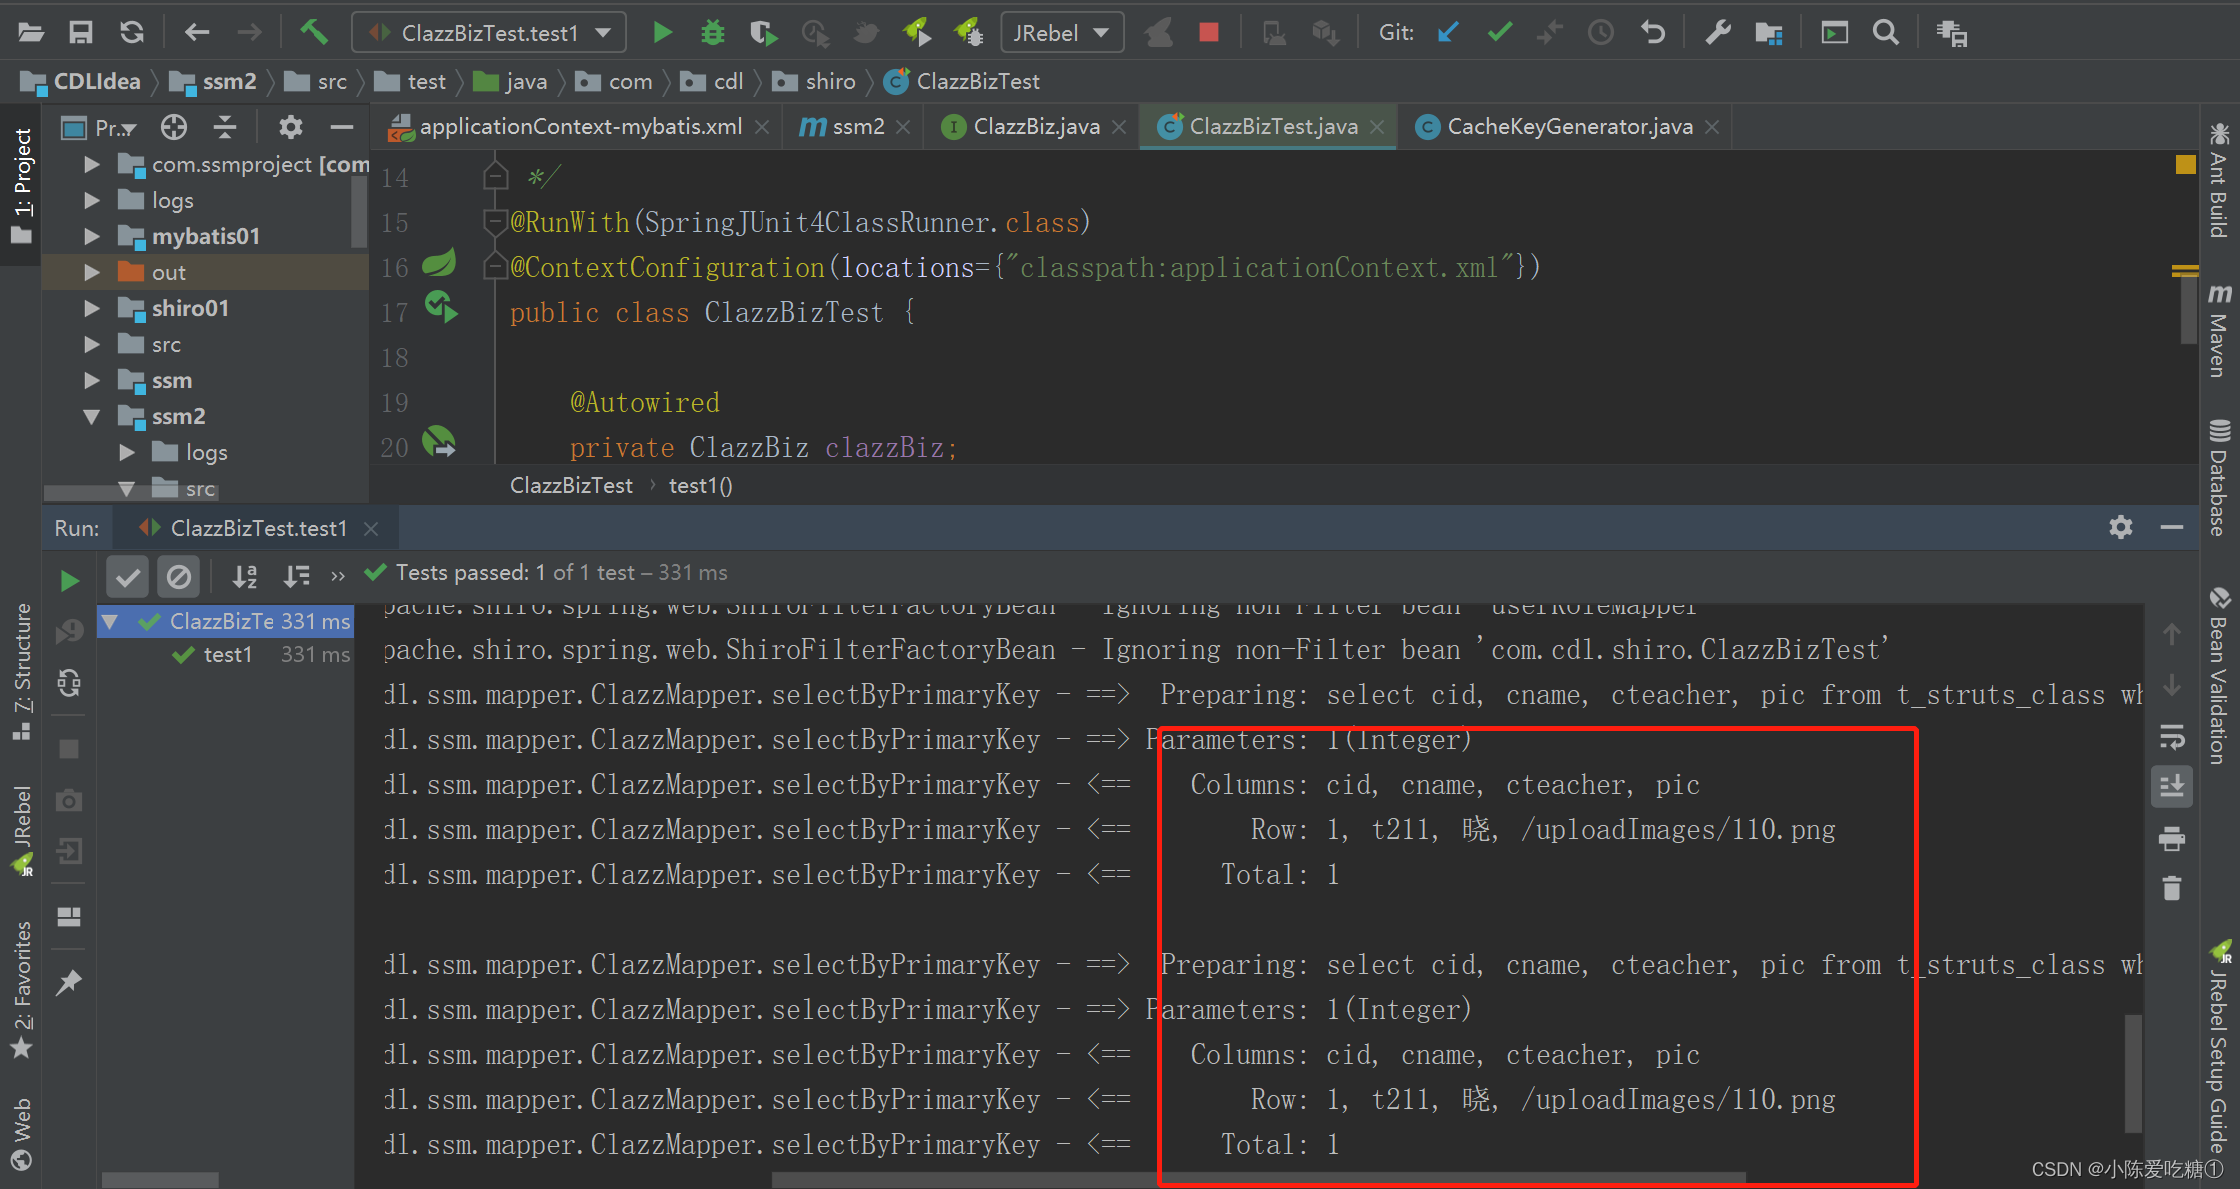
此时的ClazzBiz
package com.cdl.ssm.biz;

import com.cdl.ssm.model.Clazz;
import com.cdl.ssm.util.PageBean;

import java.util.List;
import java.util.Map;

public interface ClazzBiz {
    int deleteByPrimaryKey(Integer cid);

    int insert(Clazz record);

    int insertSelective(Clazz record);


    Clazz selectByPrimaryKey(Integer cid);

    List<Clazz> listPager(Clazz clazz, PageBean pageBean);

    int updateByPrimaryKeySelective(Clazz record);

    int updateByPrimaryKey(Clazz record);


    List<Map> listMapPager(Clazz clazz, PageBean pageBean);


}
修改ClazzBiz 添加一个注释
value:缓存位置的一段名称,不能为空
key:缓存的key,默认为空,表示使用方法的参数类型及参数值作为key,支持SpEL
condition:触发条件,满足条件就加入缓存,默认为空,表示全部都加入缓存,支持SpEL
@Cacheable(value = "xx")
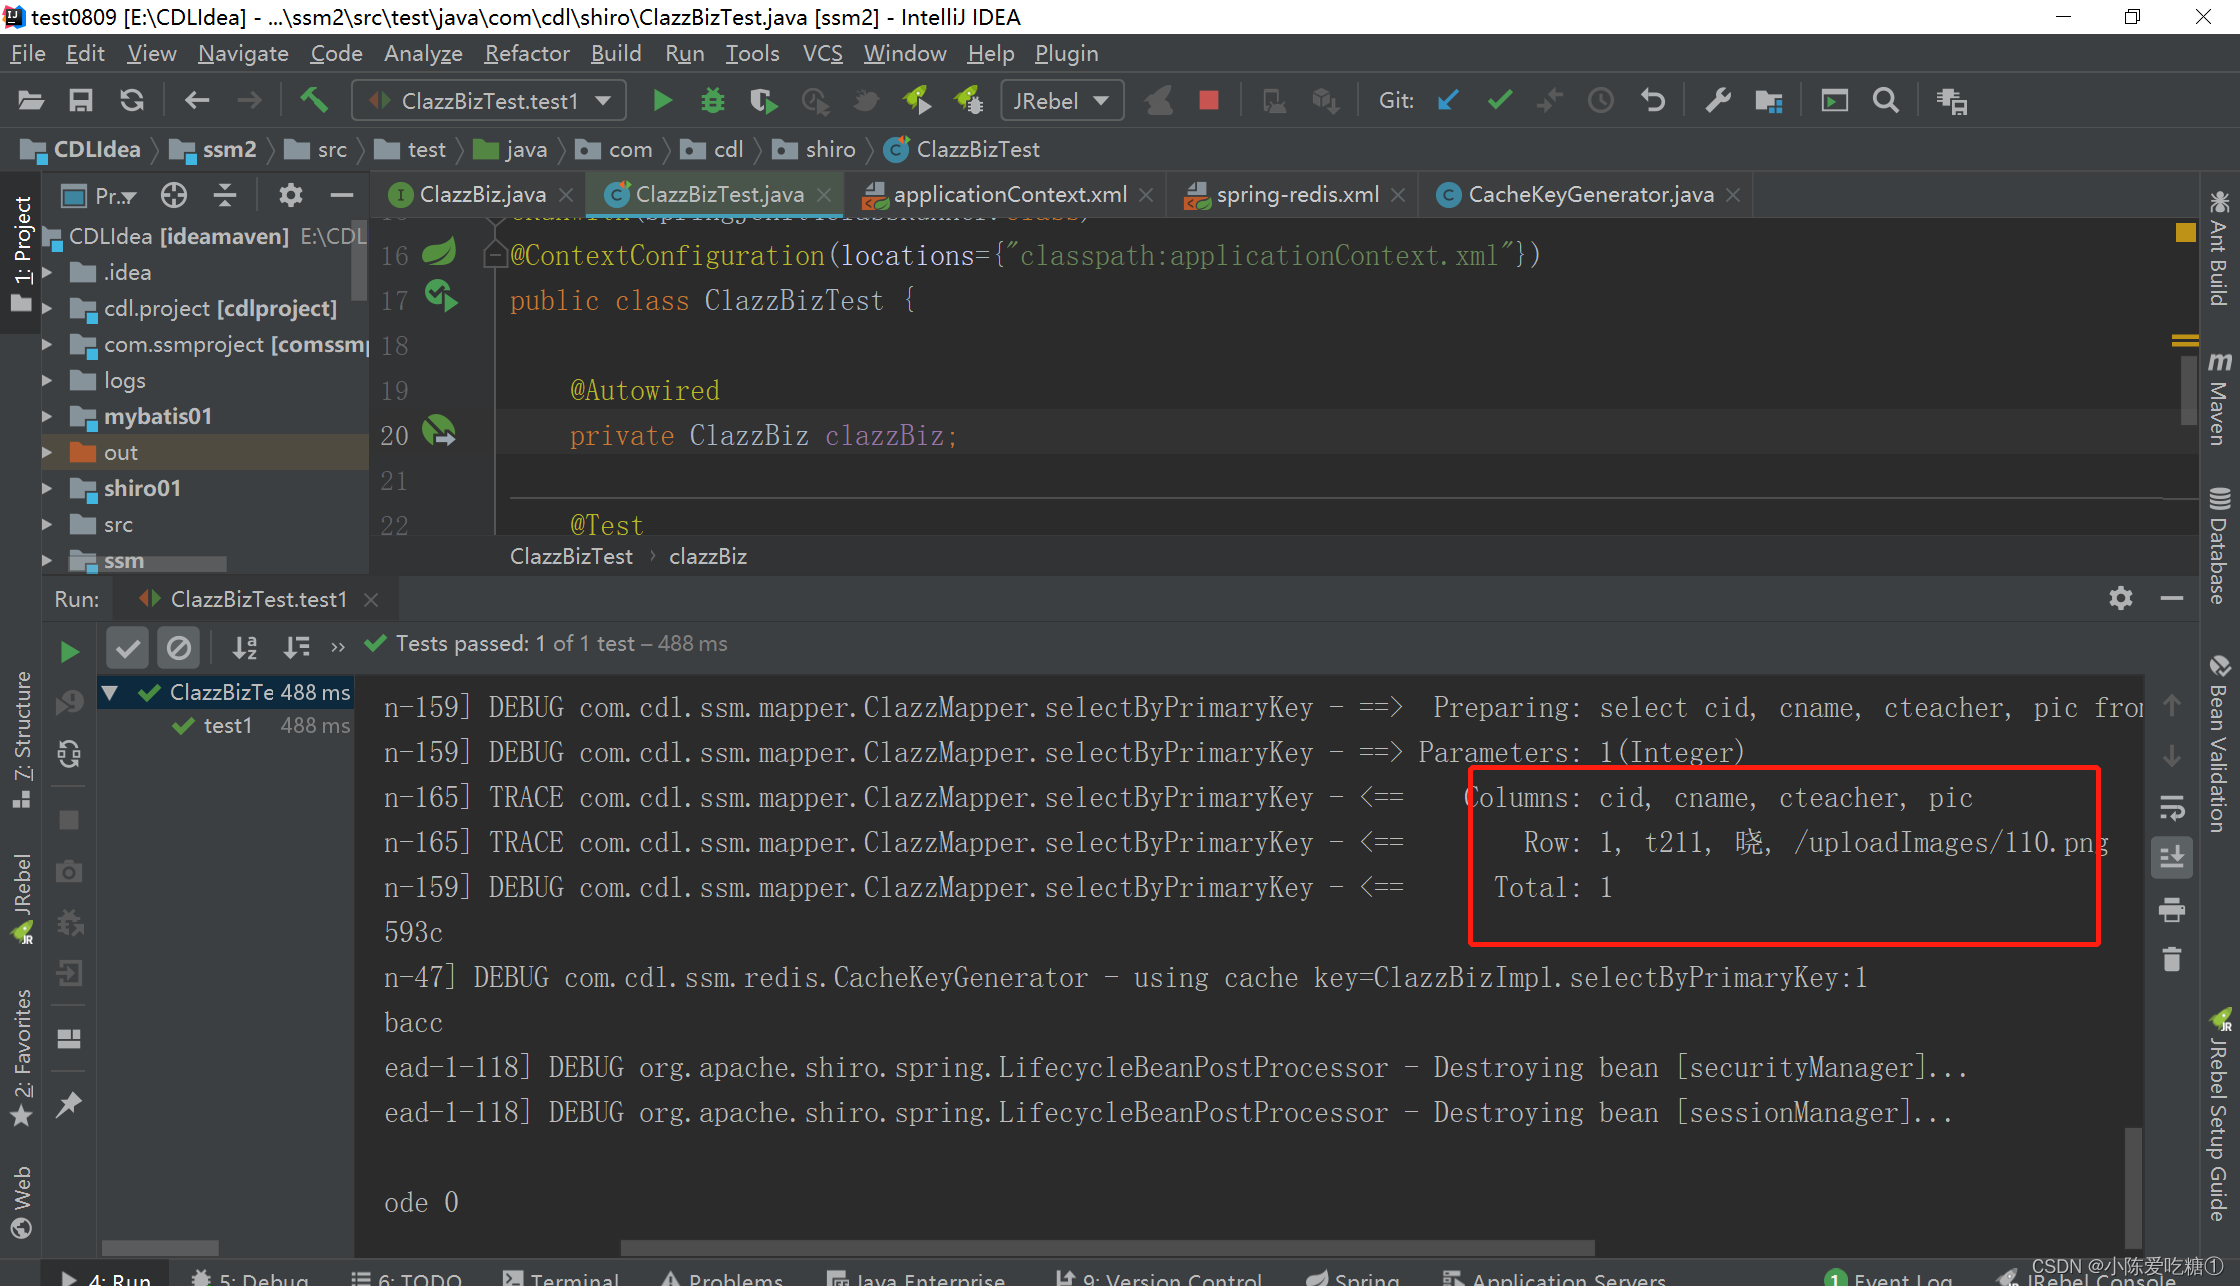
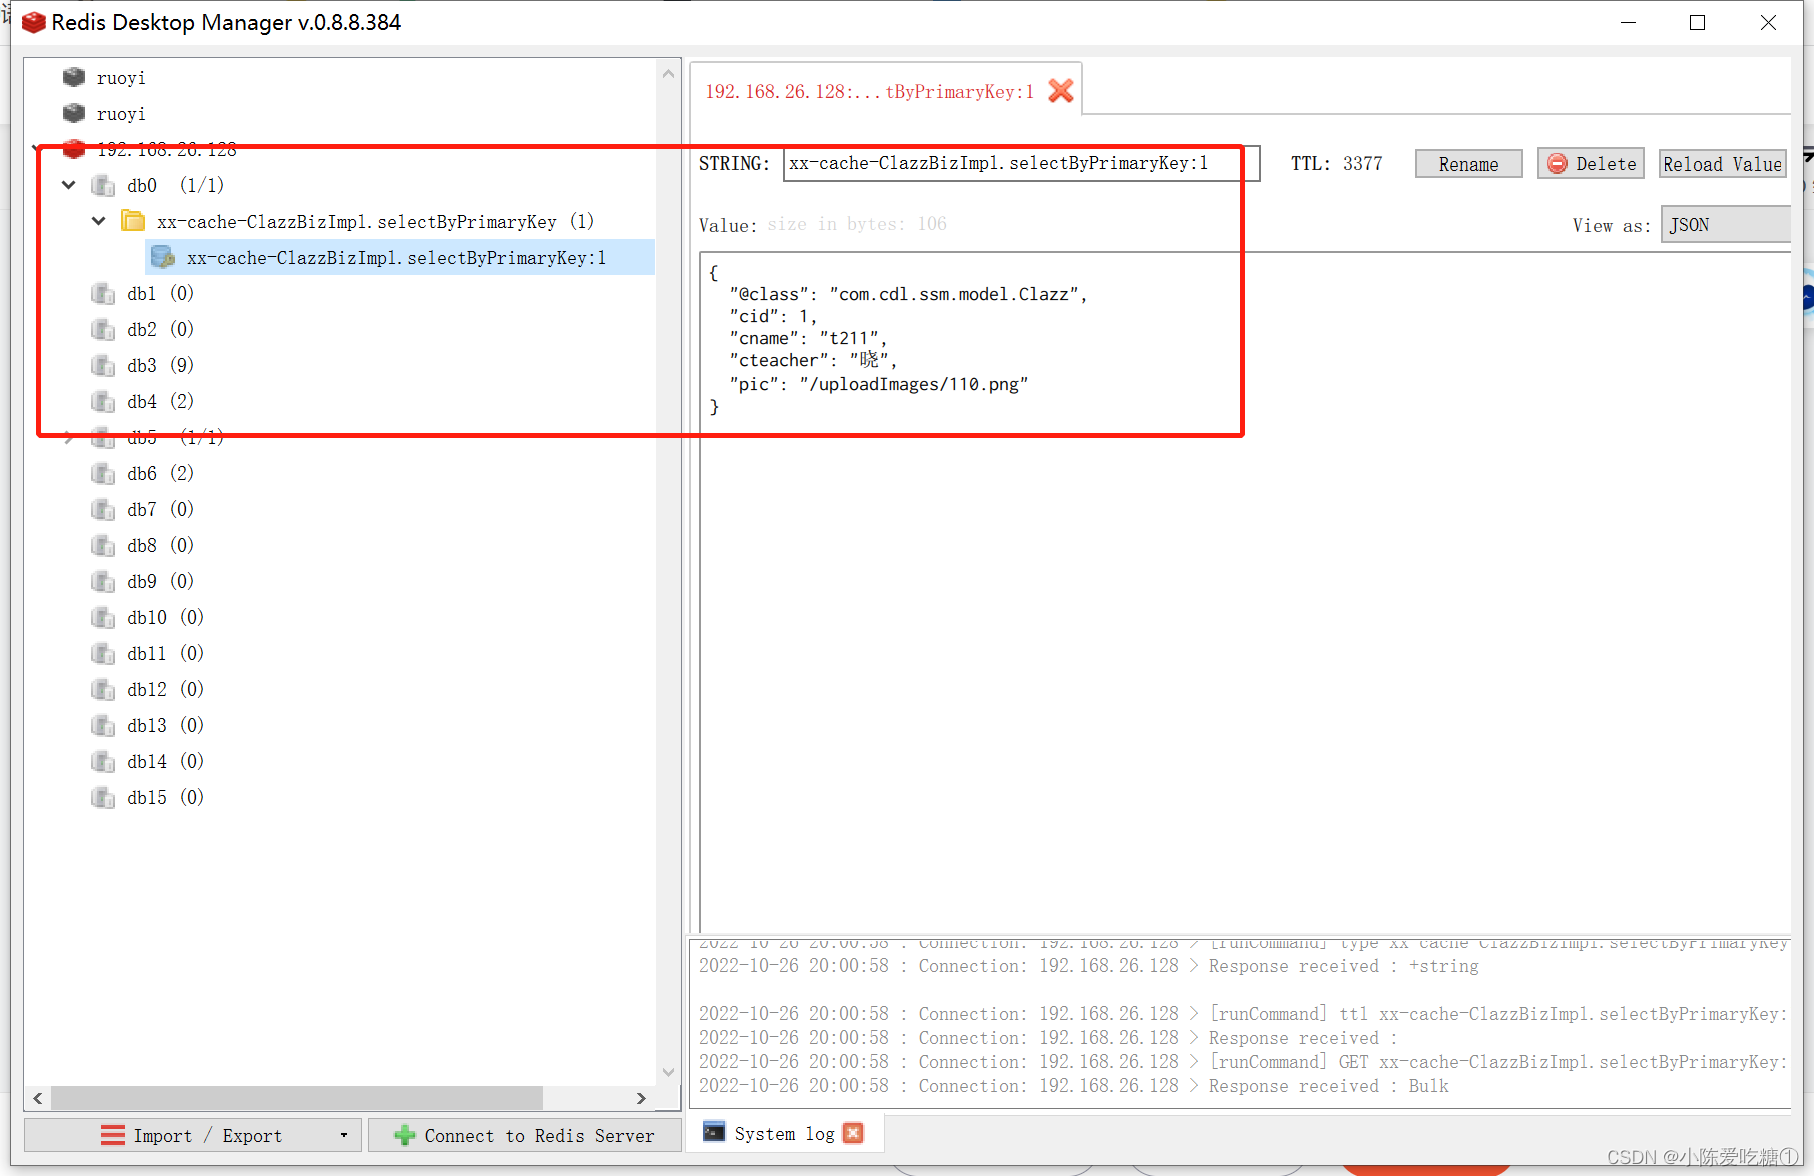
Clazz selectByPrimaryKey(Integer cid);效果:SQL语句只执行了一次 数据从缓存里拿
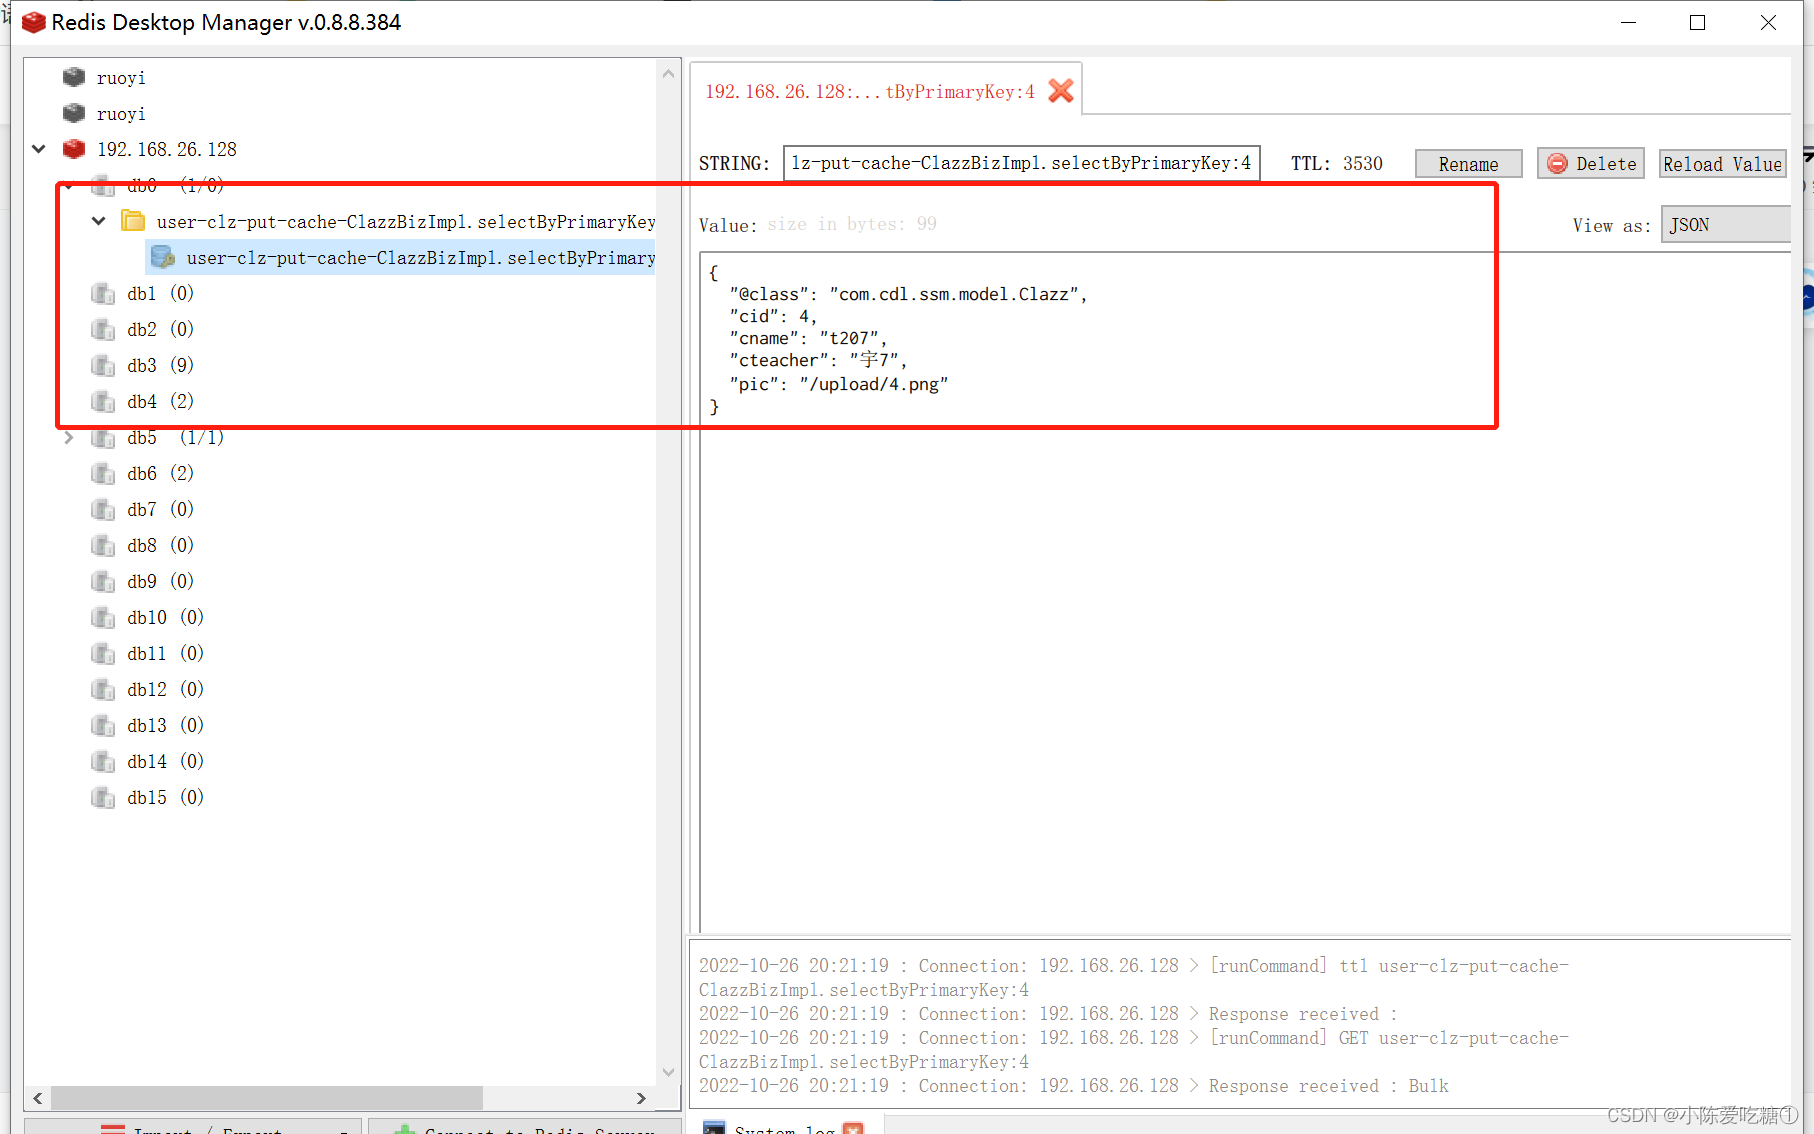
此时redis中
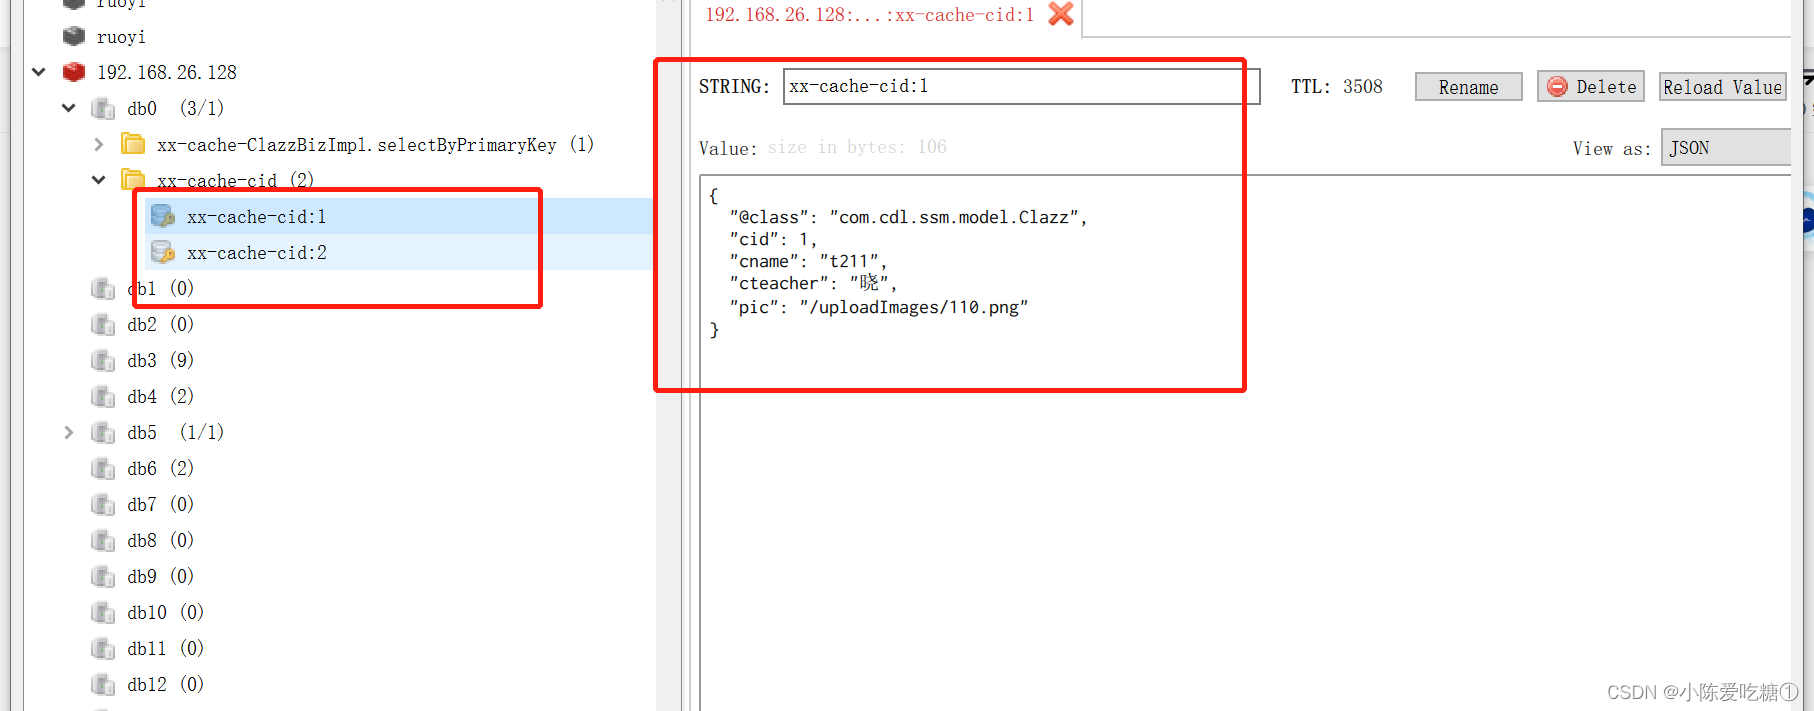
再次修改注释里面的属性 key改变原有的key生成规则
 @Cacheable(value = "xx",key = "'cid:'+#cid")
    Clazz selectByPrimaryKey(Integer cid);
@Test
public void test1(){
System.out.println(clazzBiz.selectByPrimaryKey(2));
System.out.println(clazzBiz.selectByPrimaryKey(2));
}
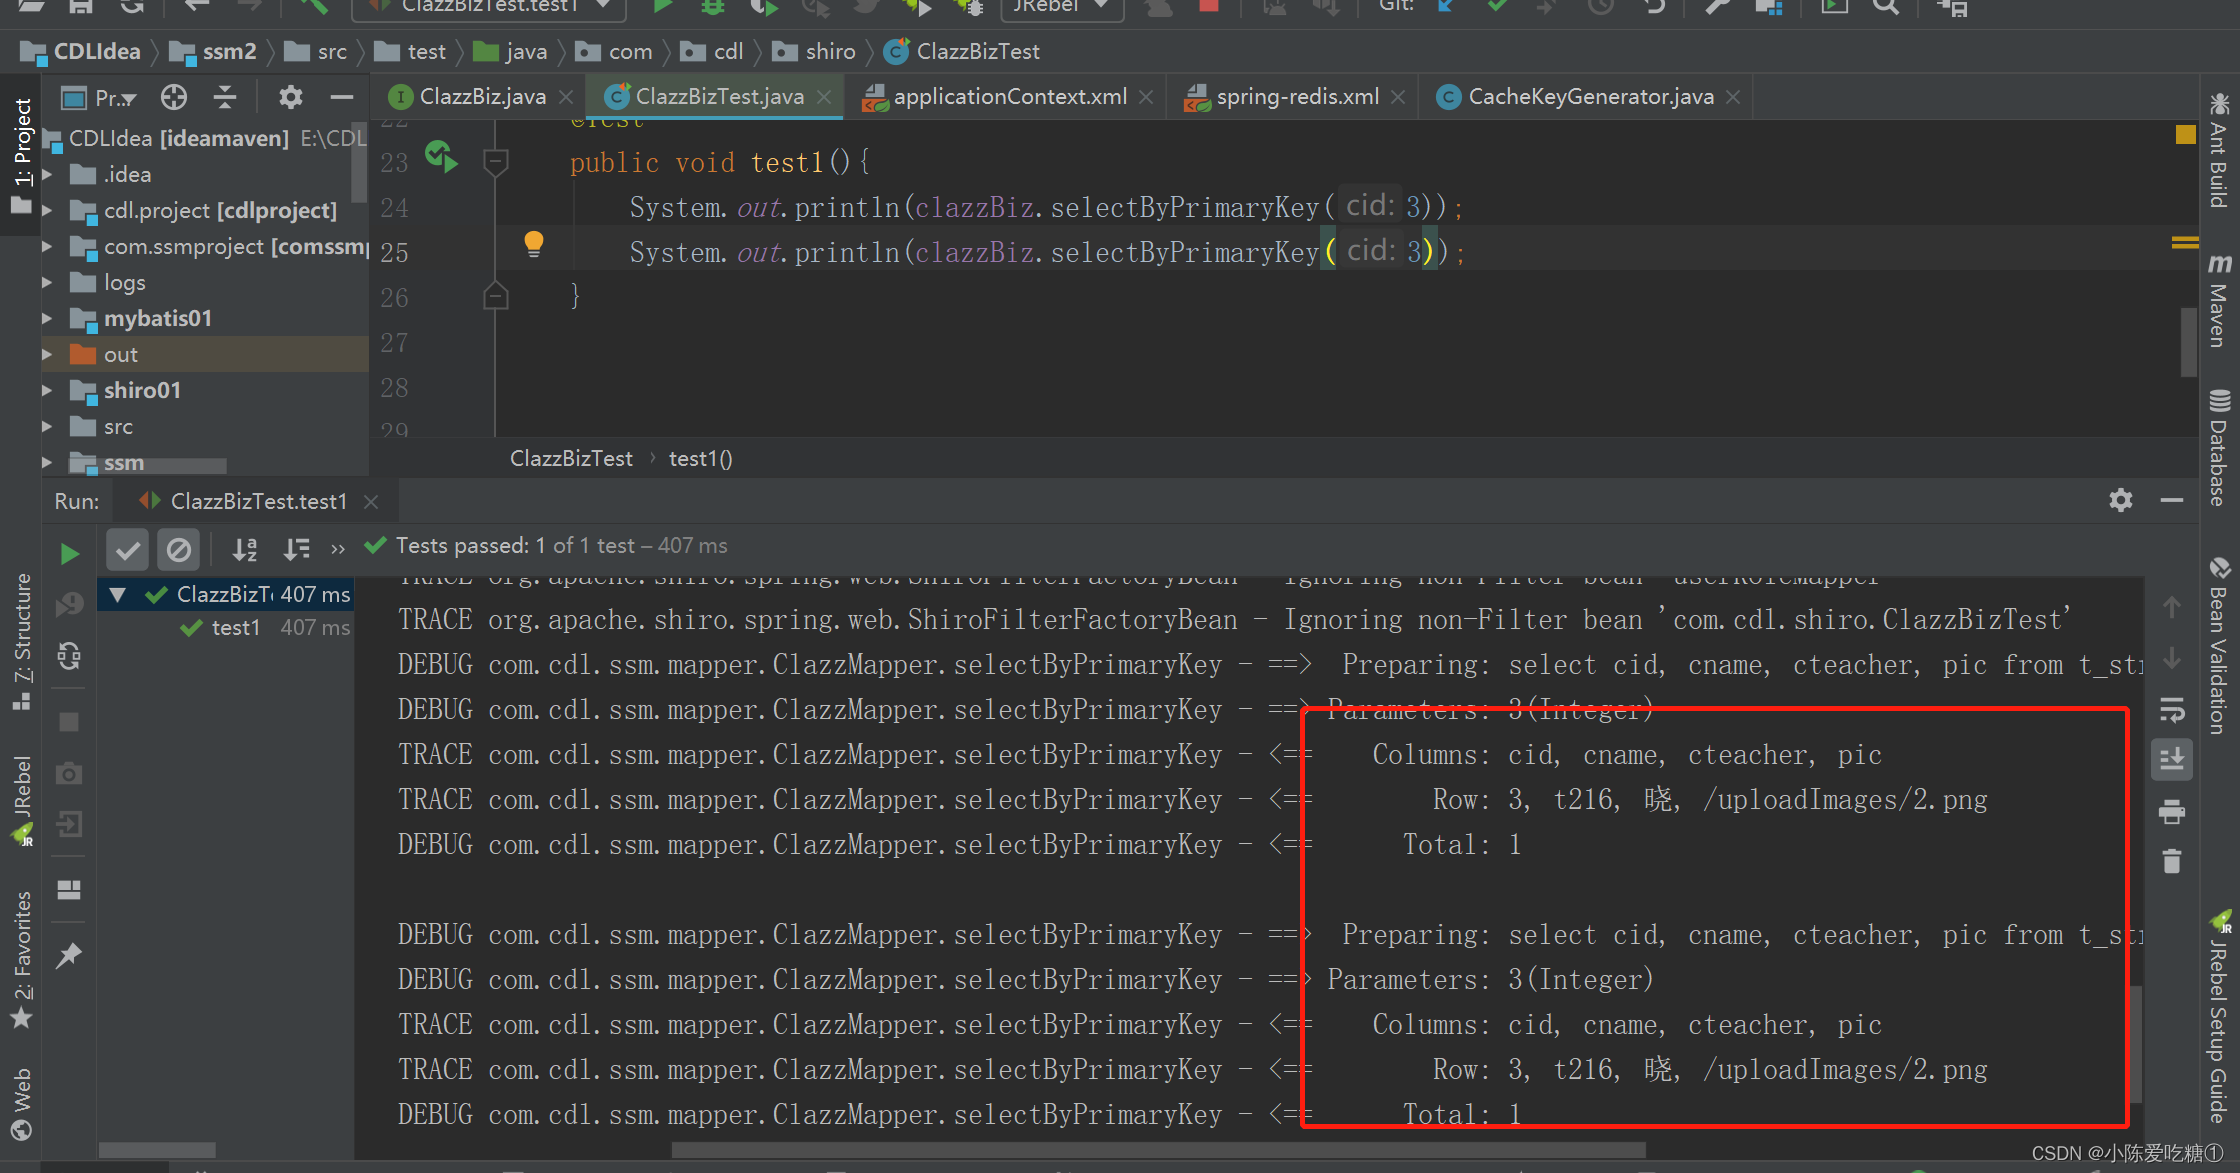
再次修改注释里面的属性 condition判断什么时候修改key属性 将库清空

 @Cacheable(value = "xx",key = "'cid:'+#cid",condition = "#cid > 5")
    Clazz selectByPrimaryKey(Integer cid);
@Test
public void test1(){
System.out.println(clazzBiz.selectByPrimaryKey(3));
System.out.println(clazzBiz.selectByPrimaryKey(3));
}效果:查了两次数据库
@CachePut 类似于更新操作,即每次不管缓存中有没有结果,都从数据库查找结果,并将结果更新到缓存,并返回结果
value 缓存的名称,在 spring 配置文件中定义,必须指定至少一个
key 缓存的 key,可以为空,如果指定要按照 SpEL 表达式编写,如果不指定,则缺省按照方法的所有参数进行组合
condition 缓存的条件,可以为空,使用 SpEL 编写,返回 true 或者 false,只有为 true 才进行缓存
ClazzBiz
package com.cdl.ssm.biz;

import com.cdl.ssm.model.Clazz;
import com.cdl.ssm.util.PageBean;
import org.springframework.cache.annotation.CachePut;

import java.util.List;
import java.util.Map;

public interface ClazzBiz {
    int deleteByPrimaryKey(Integer cid);

    int insert(Clazz record);

    int insertSelective(Clazz record);

//    @Cacheable(value = "xx",key = "'cid:'+#cid",condition = "#cid > 5")
//    Clazz selectByPrimaryKey(Integer cid);

    @CachePut(value = "user-clz-put")
    Clazz selectByPrimaryKey(Integer cid);

    List<Clazz> listPager(Clazz clazz, PageBean pageBean);

    int updateByPrimaryKeySelective(Clazz record);

    int updateByPrimaryKey(Clazz record);


    List<Map> listMapPager(Clazz clazz, PageBean pageBean);


}
ClazzBizTest
package com.cdl.shiro;

import com.cdl.ssm.biz.ClazzBiz;
import org.junit.Test;
import org.junit.runner.RunWith;
import org.springframework.beans.factory.annotation.Autowired;
import org.springframework.test.context.ContextConfiguration;
import org.springframework.test.context.junit4.SpringJUnit4ClassRunner;

/**
 * @author cdl
 * @site www.cdl.com
 * @create 2022-10-26 19:34
 */
@RunWith(SpringJUnit4ClassRunner.class)
@ContextConfiguration(locations={"classpath:applicationContext.xml"})
public class ClazzBizTest {

    @Autowired
    private ClazzBiz clazzBiz;

//    @Test
//    public void test1(){
//        System.out.println(clazzBiz.selectByPrimaryKey(3));
//        System.out.println(clazzBiz.selectByPrimaryKey(3));
//    }


    @Test
    public void test2(){
//        测试 Cacheput 中的 key
        System.out.println(clazzBiz.selectByPrimaryKey(4));
        System.out.println("======================================");
        System.out.println(clazzBiz.selectByPrimaryKey(4));
    }


}
效果图:
实行了两次查询 没有走缓存
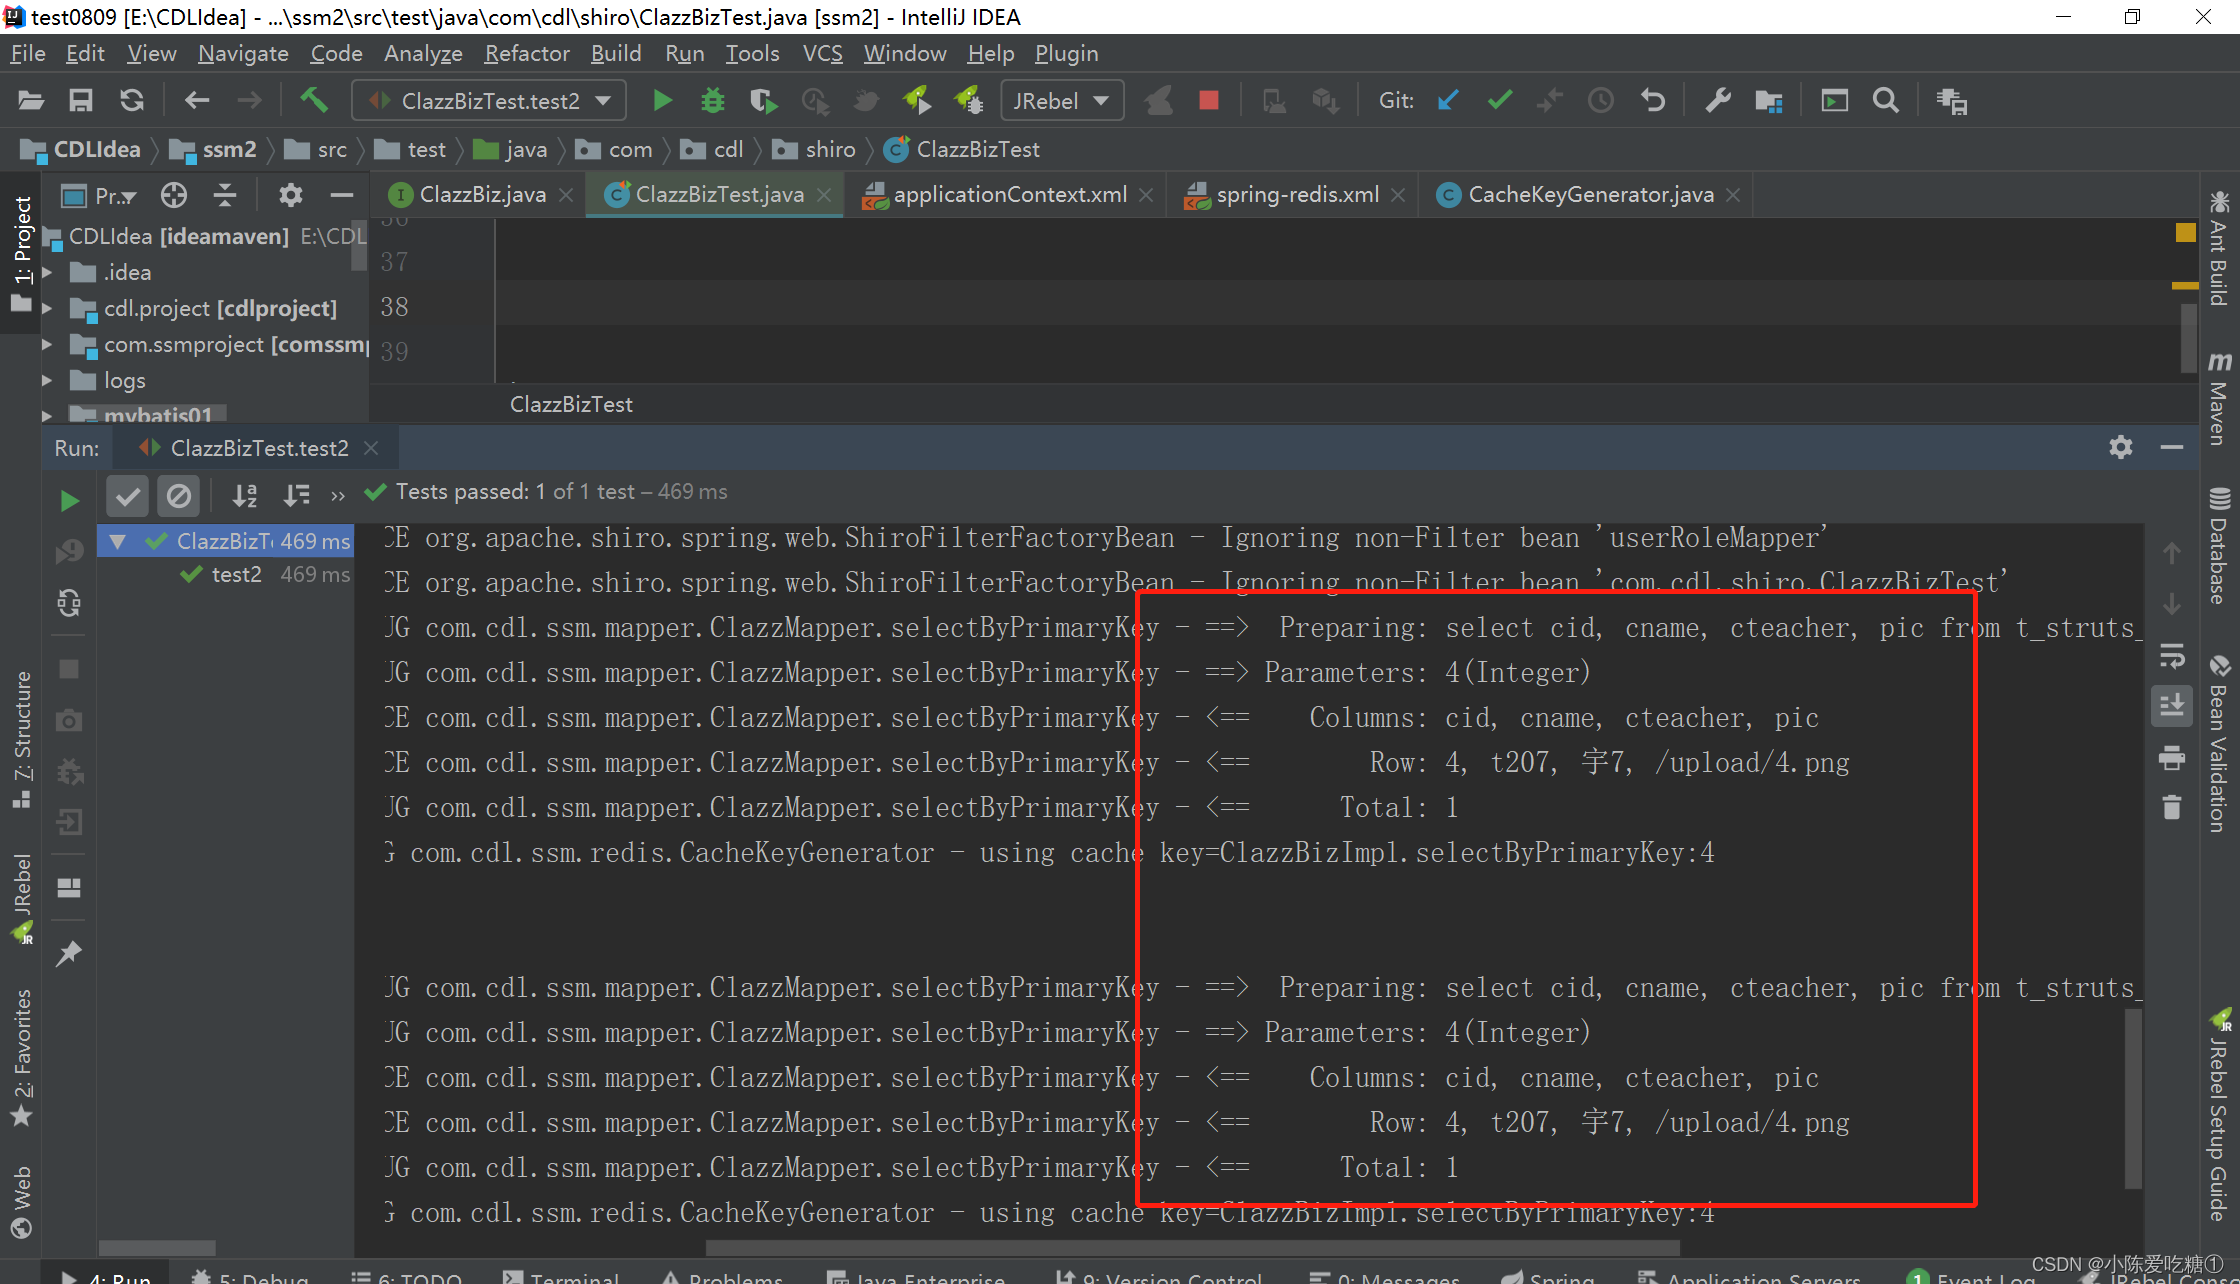
只存不取
@CacheEvict 用来清除用在本方法或者类上的缓存数据(用在哪里清除哪里)
value:缓存位置的一段名称,不能为空
key:缓存的key,默认为空,表示使用方法的参数类型及参数值作为key,支持SpEL
condition:触发条件,满足条件就加入缓存,默认为空,表示全部都加入缓存,支持SpEL
allEntries:true表示清除value中的全部缓存,默认为false
    @CacheEvict(value = "xx",key = "'cid:'+#cid")   //删除指定的缓存数据
  //  @CacheEvict(value = "xx",allEntries = true)   // 删除以 user-clz-put开头的 缓存
    int updateByPrimaryKey(Clazz record);
@Test
public void test3(){
// 测试 CacheEvict 中的 key
clazzBiz.deleteByPrimaryKey(8);
}没有了cid为8的
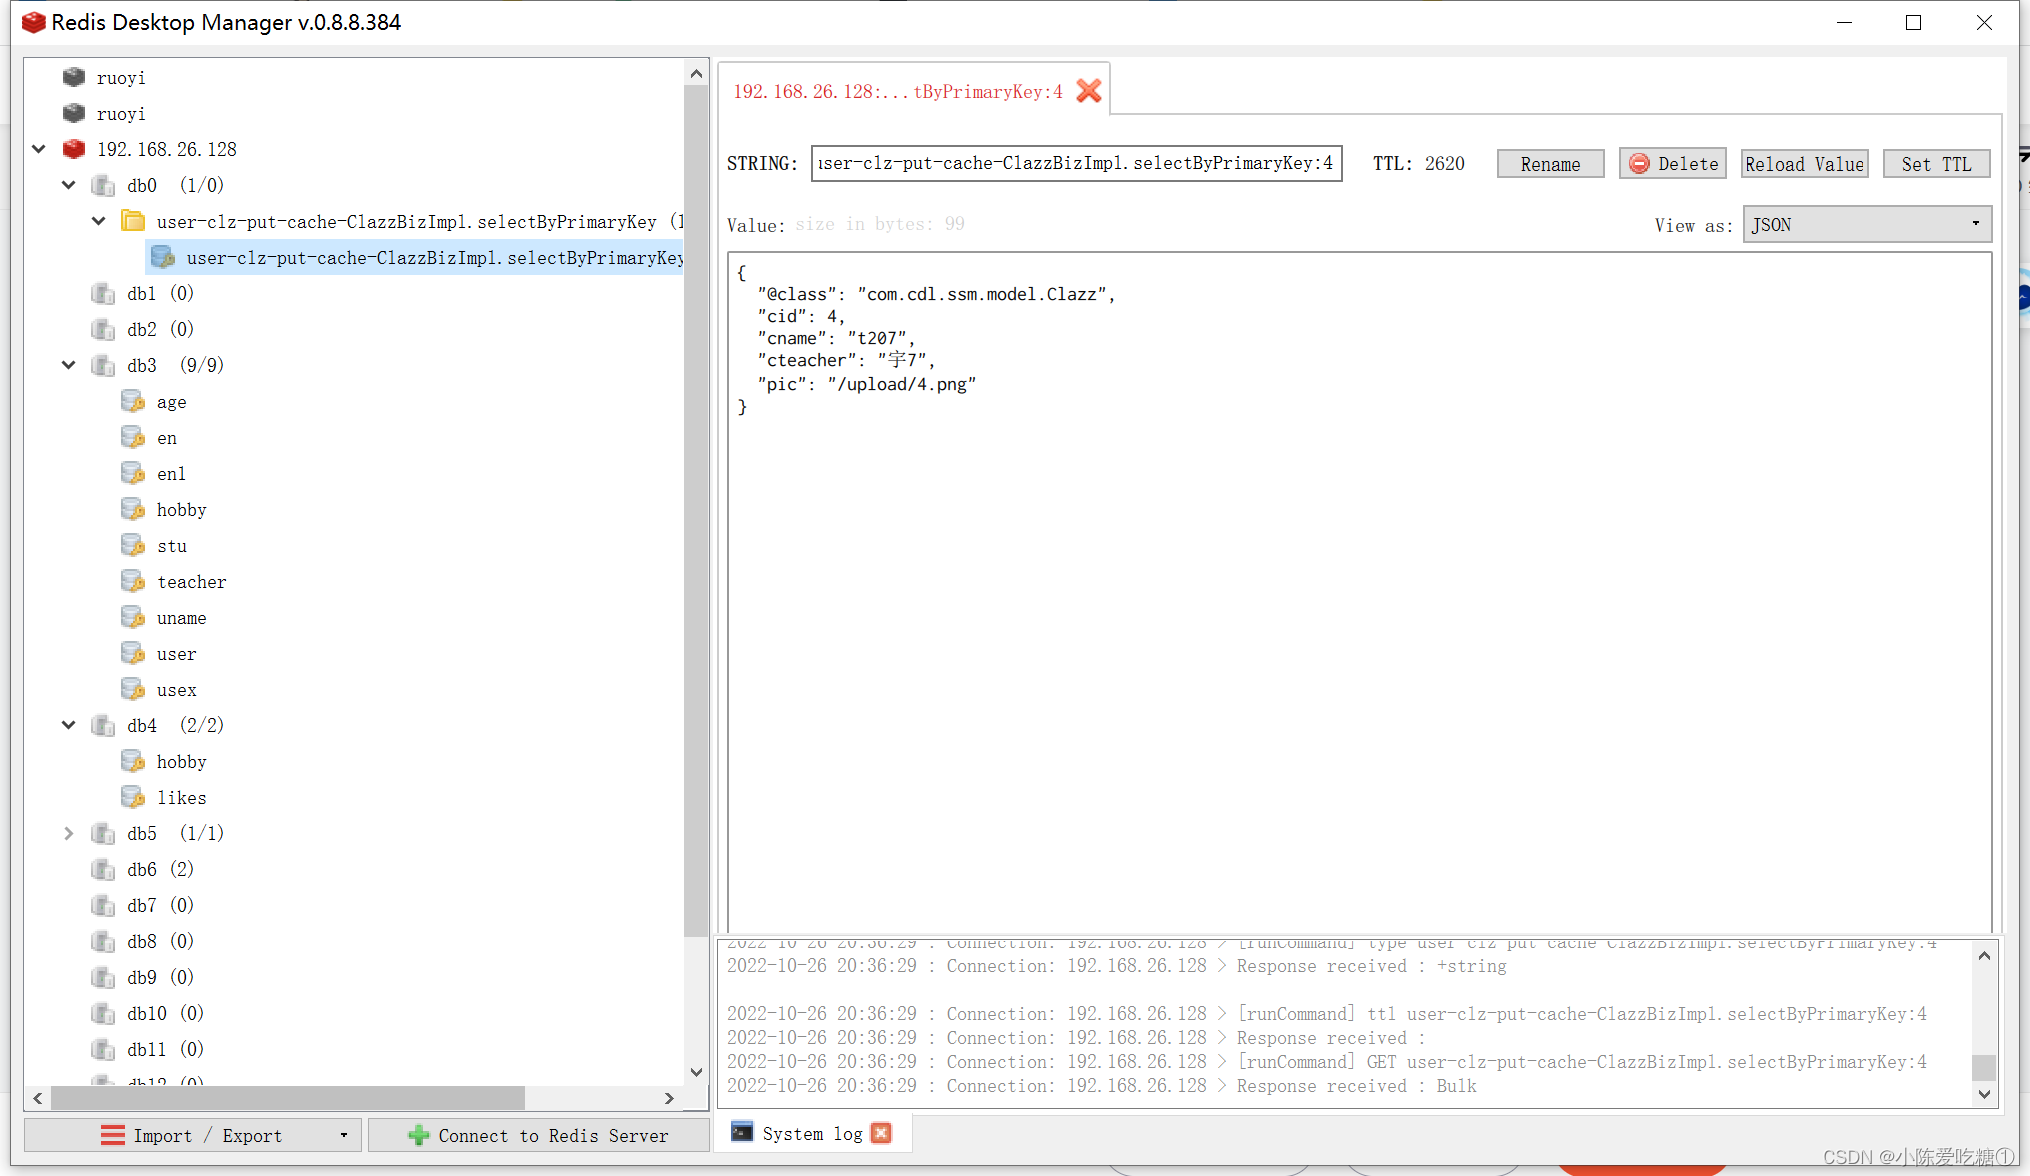
测试结果:可以配置删除指定缓存数据,也可以删除符合规则的所有缓存数据;
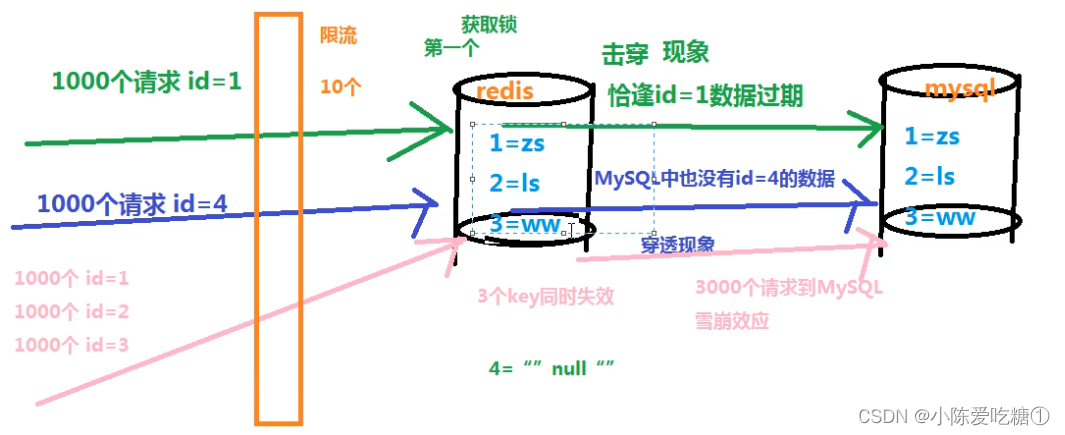
三、redis击穿穿透雪崩
击穿:高并发量的同时key失效,导致请求直接到达数据库;
设置锁
1.获取 Redis 锁,如果没有获取到,则回到任务队列继续排队
2.获取到锁,从数据库拉取数据并放入缓存中
3.释放锁,其他请求从缓存中拿到数据限流:请求redis之前做流量削峰
穿透: 很多请求都在访问数据库一定不存在的数据,造成请求将缓存和数据库都穿透的情况。
规则排除
可以增加一些参数检验。例如数据库数据 id 一般都是递增的,如果请求 id = -10 这种参数,势必绕过Redis。避免这种情况,可以对用户真实性检验等操作。null值填充
当缓存穿透时,redis存入一个类似null的值,下次访问则直接缓存返回空,当数据库中存在该数据的值则需要把redis存在的null值清除并载入新值,此方案不能解决频繁随机不规则的key请求。
雪崩: 雪崩和击穿类似,不同的是击穿是一个热点 Key 某时刻失效,而雪崩是大量的热点 Key 在一瞬间失效 。
给不同的热点key设置不同的缓存策略
图形解释:


 1030
1030

 被折叠的 条评论
为什么被折叠?
被折叠的 条评论
为什么被折叠?
 到【灌水乐园】发言


