


一、Dockerfile是什么?有什么用?常见命令有哪些?
**Dockerfile** 是一个文本文件,用于定义如何构建 Docker 镜像。它包含了一系列指令,通过这些指令可以自动化地构建出一个包含应用程序及其运行环境的 Docker 镜像。Dockerfile 是 Docker 技术的核心组成部分,使得容器化应用的构建和部署变得更加高效和可重复。
---
### **Dockerfile 的作用**
1. **定义镜像内容**:
- 指定基础镜像(如 Ubuntu、Python、Node.js 等)。
- 添加应用程序代码、配置文件等。
- 安装所需的依赖和软件包。
2. **配置运行环境**:
- 设置环境变量(如数据库连接信息)。
- 指定工作目录。
- 配置用户权限。
3. **自动化构建**:
- 通过一条命令(`docker build`)即可构建镜像,无需手动操作。
- 确保每次构建的结果一致,避免人为错误。
4. **可移植性**:
- Dockerfile 可以在任何支持 Docker 的平台上运行,确保开发、测试和生产环境的一致性。
5. **版本控制**:
- Dockerfile 可以纳入版本控制系统(如 Git),便于团队协作和追踪变更。
6. **优化镜像大小和性能**:
- 通过合理的指令顺序和多阶段构建,可以减小镜像体积,提升性能。
---
### **Dockerfile 的基本结构**
一个典型的 Dockerfile 包含以下指令:
- **FROM**:指定基础镜像。
- **RUN**:执行命令(如安装软件包)。
- **COPY** 或 **ADD**:将文件从主机复制到镜像中。
- **WORKDIR**:设置工作目录。
- **ENV**:设置环境变量。
- **EXPOSE**:声明容器运行时监听的端口。
- **CMD** 或 **ENTRYPOINT**:指定容器启动时运行的命令。
---
### **示例 Dockerfile**
```Dockerfile
# 使用官方的 Python 3.9 作为基础镜像
FROM python:3.9-slim
# 设置工作目录
WORKDIR /app
# 复制当前目录下的文件到容器的工作目录
COPY . /app
# 安装依赖
RUN pip install --no-cache-dir -r requirements.txt
# 暴露端口
EXPOSE 80
# 设置环境变量
ENV NAME World
# 运行应用
CMD ["python", "app.py"]
```
二、Dockerfile实战演练
Dockerfile文件,如果不熟的朋友可以自己手动敲一下感受一下
[root@cjr ~]# mkdir nginx
You have new mail in /var/spool/mail/root
[root@cjr ~]# cd nginx/
[root@cjr nginx]# vi Dockerfile
[root@cjr nginx]# cat /etc/resolv.conf
# Generated by NetworkManager
nameserver 192.168.40.2
You have new mail in /var/spool/mail/root
[root@cjr nginx]# cat Dockerfile
FROM docker.io/library/rockylinux:8.9
LABEL maintainer='cjr'
RUN yum install wget -y
RUN yum install nginx -y
EXPOSE 80
ENTRYPOINT ["/usr/sbin/nginx","-g","daemon off;"]
You have new mail in /var/spool/mail/root
[root@cjr nginx]# docker build -f Dockerfile -t mynginx:v1 .
[+] Building 32.3s (7/7) FINISHED docker:default
=> [internal] load .dockerignore 0.0s
=> => transferring context: 2B 0.0s
=> [internal] load build definition from Dockerfile 0.0s
=> => transferring dockerfile: 209B 0.0s
=> [internal] load metadata for docker.io/library/rockylinux:8.9 0.0s
=> [1/3] FROM docker.io/library/rockylinux:8.9 0.0s
=> [2/3] RUN yum install wget -y 19.4s
=> [3/3] RUN yum install nginx -y 12.4s
=> exporting to image 0.4s
=> => exporting layers 0.4s
=> => writing image sha256:6aabb41a1fd6c5de0a73a925b2c97e54bf7e29320ab7fae316288d916230d514 0.0s
=> => naming to docker.io/library/mynginx:v1 0.0s
You have new mail in /var/spool/mail/root
可以基于自己新创建的镜像来启动容器检查一下服务是否成功部署
[root@cjr ~]# docker run -d --name nginx mynginx:v1
90e261ce34ede10af3155d033818c62ed8389d111e6668fd2907a1077bb42597
[root@cjr ~]# docker ps
CONTAINER ID IMAGE COMMAND CREATED STATUS PORTS NAMES
90e261ce34ed mynginx:v1 "/usr/sbin/nginx -g …" 2 seconds ago Up 1 second 80/tcp nginx
[root@cjr ~]# docker exec -it nginx bash
[root@90e261ce34ed /]# curl localhost:80
<!DOCTYPE html PUBLIC "-//W3C//DTD XHTML 1.1//EN" "http://www.w3.org/TR/xhtml11/DTD/xhtml11.dtd">
<html xmlns="http://www.w3.org/1999/xhtml" xml:lang="en">
<head>
<title>Test Page for the Nginx HTTP Server on Rocky Linux</title>
<meta http-equiv="Content-Type" content="text/html; charset=UTF-8" />
<style type="text/css">
/*<![CDATA[*/
body {
background-color: #fff;
color: #000;
font-size: 0.9em;
font-family: sans-serif, helvetica;
margin: 0;
padding: 0;
}
:link {
color: #c00;
}
:visited {
color: #c00;
}
a:hover {
color: #f50;
}
h1 {
text-align: center;
margin: 0;
padding: 0.6em 2em 0.4em;
background-color: #10B981;
color: #fff;
font-weight: normal;
font-size: 1.75em;
border-bottom: 2px solid #000;
}
h1 strong {
font-weight: bold;
font-size: 1.5em;
}
h2 {
text-align: center;
background-color: #10B981;
font-size: 1.1em;
font-weight: bold;
color: #fff;
margin: 0;
padding: 0.5em;
border-bottom: 2px solid #000;
}
hr {
display: none;
}
.content {
padding: 1em 5em;
}
.alert {
border: 2px solid #000;
}
img {
border: 2px solid #fff;
padding: 2px;
margin: 2px;
}
a:hover img {
border: 2px solid #294172;
}
.logos {
margin: 1em;
text-align: center;
}
/*]]>*/
</style>
</head>
<body>
<h1>Welcome to <strong>nginx</strong> on Rocky Linux!</h1>
<div class="content">
<p>
This page is used to test the proper operation of the
<strong>nginx</strong> HTTP server after it has been installed. If you
can read this page, it means that the web server installed at this site
is working properly.
</p>
<div class="alert">
<h2>Website Administrator</h2>
<div class="content">
<p>
This is the default <tt>index.html</tt> page that is distributed
with <strong>nginx</strong> on Rocky Linux. It is located in
<tt>/usr/share/nginx/html</tt>.
</p>
<p>
You should now put your content in a location of your choice and
edit the <tt>root</tt> configuration directive in the
<strong>nginx</strong>
configuration file
<tt>/etc/nginx/nginx.conf</tt>.
</p>
<p>
For information on Rocky Linux, please visit the
<a href="https://www.rockylinux.org/">Rocky Linux website</a>. The
documentation for Rocky Linux is
<a href="https://www.rockylinux.org/"
>available on the Rocky Linux website</a
>.
</p>
</div>
</div>
<div class="logos">
<a href="http://nginx.net/"
><img
src="nginx-logo.png"
alt="[ Powered by nginx ]"
width="121"
height="32"
/></a>
<a href="http://www.rockylinux.org/"><img
src="poweredby.png"
alt="[ Powered by Rocky Linux ]"
width="88" height="31" /></a>
</div>
</div>
</body>
</html>
有默认的前端显示文件,说明我们部署 成功
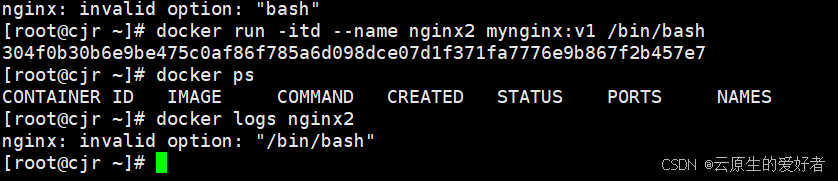
扩展docker的一个命令,可以通过docker logs来查看容器的日志,下文图片就是我故意弄的一个报错,通过logs日志就可以查看报错原因


 565
565

 被折叠的 条评论
为什么被折叠?
被折叠的 条评论
为什么被折叠?
 到【灌水乐园】发言


