


2 Vue3基础
1)技术选型
- Api选择
选项式Api vs 组合式Api
HTML vs 单文件组件 - 语法选择
JS vs TS - 构建工具
@Vue /cli vs vite
前者较为完善 后者构建速度更快 - 路由
Vue router - 共享存储
vuex pinia - 视图组件
ElementUI AntDesignVue
2)用vite构建Vue3项目
首先要安装NodeJS,我们要用到其中的npm命令
- cmd 进入要创建项目的目录
npm init vite@latest - 根据向导提示 完成项目创建 这里具体就是填项目名称,选择开发的框架
- cd 命令进入项目目录
- npm install //完成相关依赖下载
npm run dev //运行项目
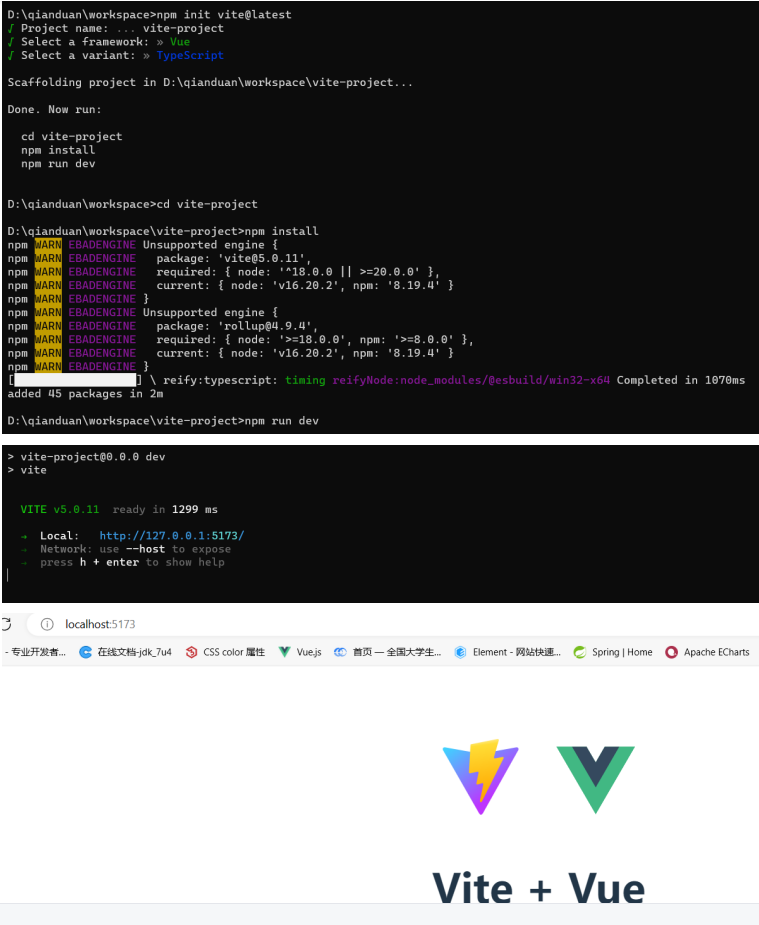
我这里演示基于Vite创建Vue3的基于TypeScript语言开发的项目,它默认监听5173端口,项目结构如下
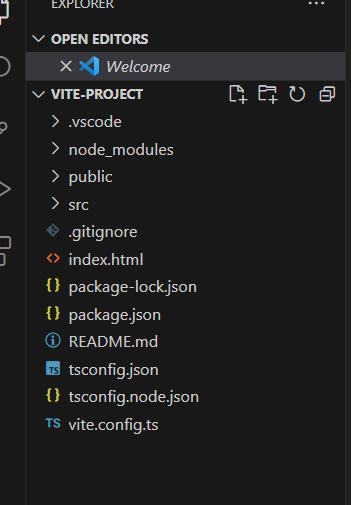
- index.html 为主页面
- package.json npm 配置文件 维护当前项目的有关依赖
- tsconfig.json typescript 配置文件
- vite.config.ts vite 配置文件
- public 静态资源
- src/components 可重用组件
- src/model 模型定义
- src/router 路由
- src/store 共享存储
- src/views 视图组件
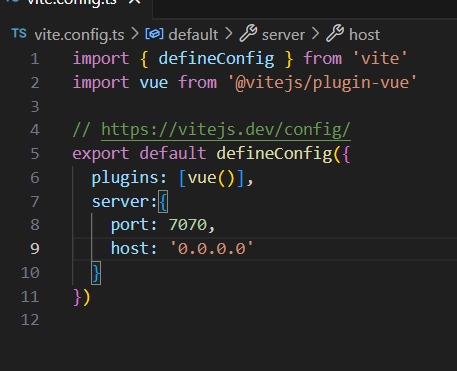
3)配置服务器
- 配置主机与端口
在vite.config.ts文件中,进行对server的配置,按个人需求来,host属性的值是string | boolean, 如果将此设置为 ‘0.0.0.0’ 或者 true 将监听所有地址
- 在前端配置代理
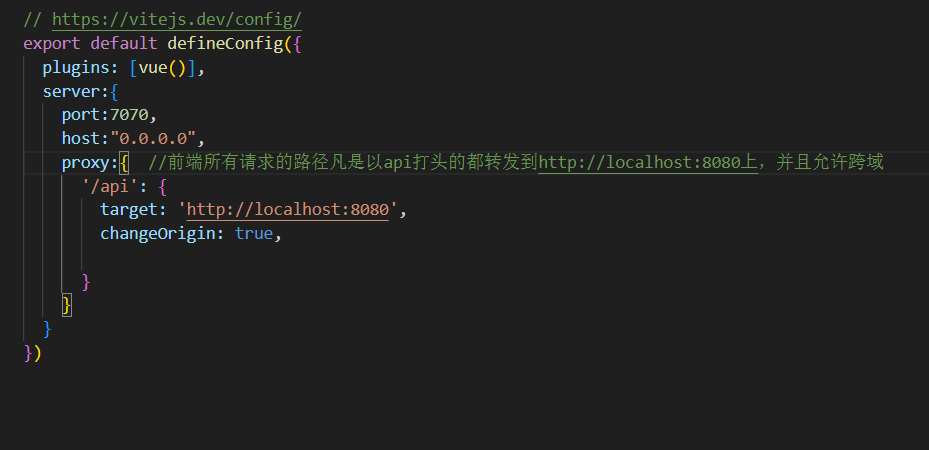
前端配置代理的几个作用:
-
解决跨域问题: 通过代理,前端应用可以将请求发送到同一域下的开发服务器,而实际上这些请求会被代理服务器转发到后端服务器,绕过了同源策略的限制。
-
隐藏后端服务器地址: 代理可以隐藏后端服务器的真实地址,增加了安全性,因为客户端无法直接知道或访问后端服务器的地址。
后端解决跨域
可以在后端对Controller接口层类上加上@CrossOrigin(origins = “http://localhost:7070”)**来解决,origins表示前端的uri,这样当响应到达浏览器时,就会告诉浏览器不要把我的响应给丢弃,从而前端能展示后端响应数据.
或者编写配置类实现WebMvcConfigurer接口然后重写addCorsMappings方法解决跨域问题
@Configuration
public class CorsConfig implements WebMvcConfigurer {
@Override
public void addCorsMappings(CorsRegistry registry) {
    // 允许跨域访问的映射路径,"/**" 表示所有路径
    registry.addMapping("/**")

            // 允许指定的来源进行跨域访问
            .allowedOrigins("http://localhost:7070")

            // 是否允许发送Cookie信息
            .allowCredentials(true)

            // 允许访问的方法,如GET、POST、PUT、DELETE等
            .allowedMethods("GET", "POST", "PUT", "DELETE", "OPTIONS")

            // 预检请求的有效期,单位为秒
            .maxAge(3600);
}
}
当对项目配置进行更改时,不需要去重新启动项目,只需要在编译器上保存自己修改的内容,会自动进行热部署
4)快速上手
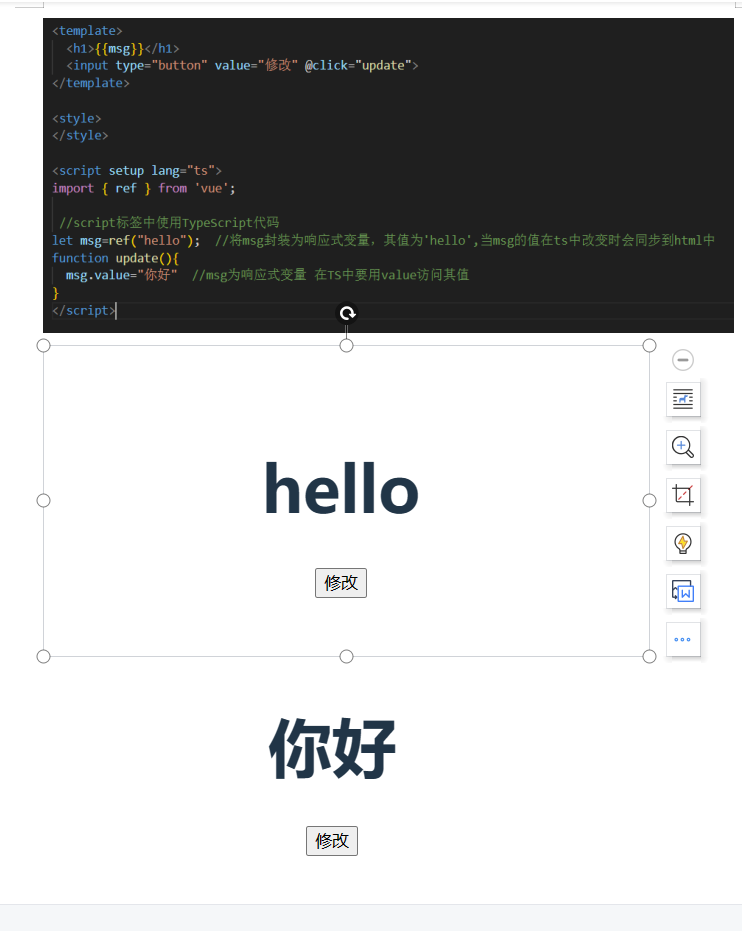
<template>中放html代码,<style>中放css代码,<script>中放js或ts代码,但要在标签中声明所使用的语言- 文本插值:在
<template>中使用{{msg}}可以绑定js中msg的值。 - 要将msg声明为响应式变量,这样才会在ts代码中修改msg的值后同步到html中,即让页面也跟着变化,但在ts中访问变量值不能再使用msg而是要使用msg.value
5)Index.html通过引入main.ts,在main.ts中通过createApp(根组件).mount(要挂载的位置)来使得根组件的html的内容挂在到Index.html的指定的挂载位置中,从而形成了我们看到的主页面
main.ts中有以下两句:
import App from ‘./App.vue’
createApp(App).mount(‘#app’)
//这两部的含义是将App.vue引入并起名为App,以App为根组件创建一个vue程序,并将其html代码挂在到index.html的id为app的标签内
如果我们想使用自己定义的组件为根组件 只需修改以上两句即可
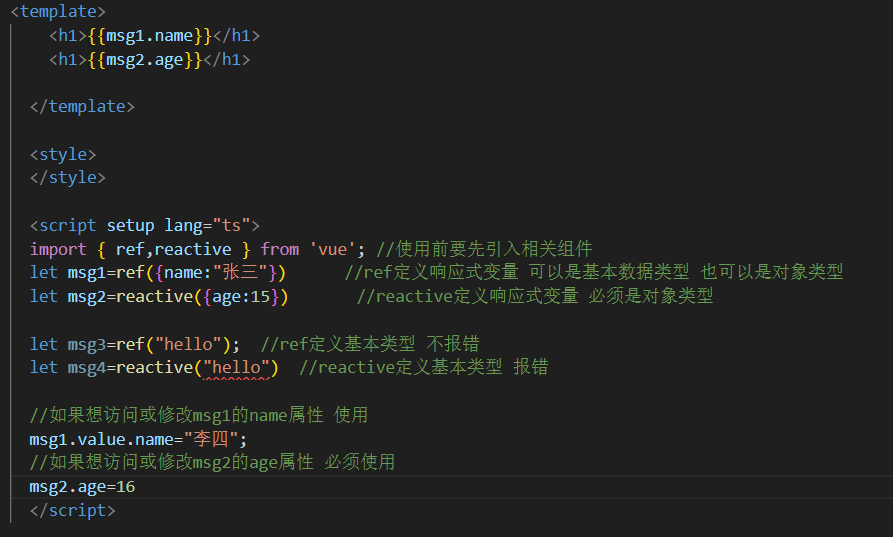
6)ref和reactive的基本使用
使用前要引入 import {ref,reactive} from ‘vue’
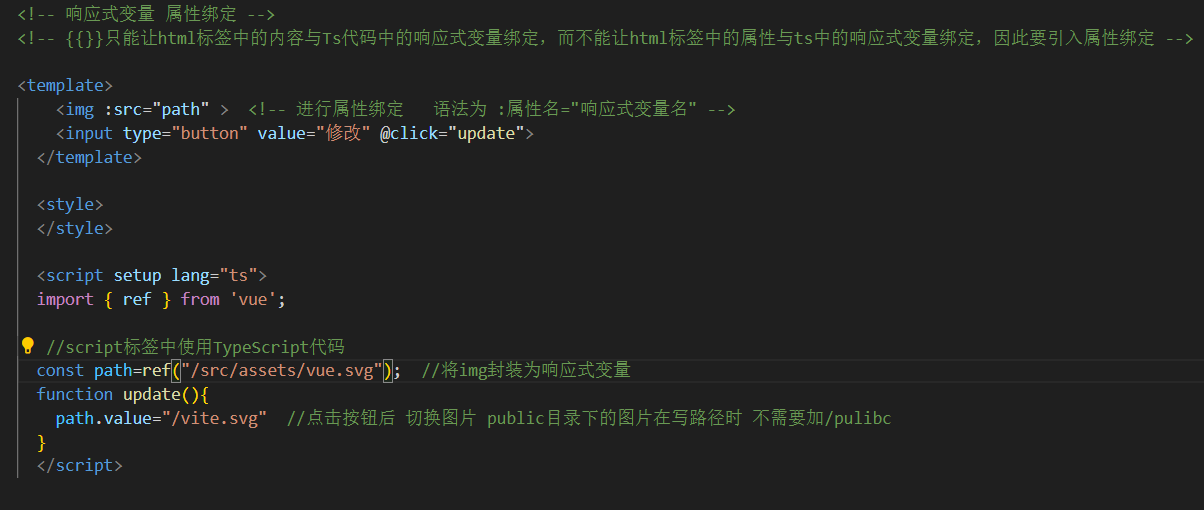
7)属性绑定,事件绑定,表单的双向绑定
- 属性绑定
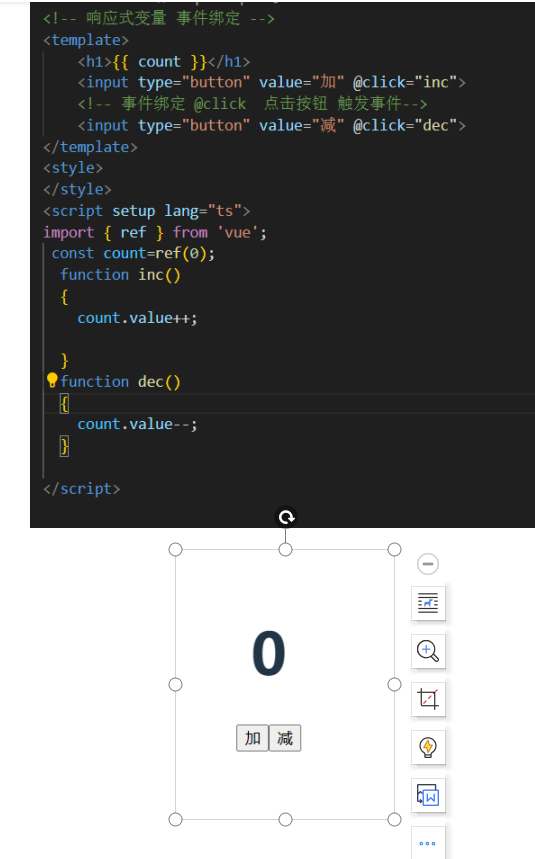
- 事件绑定
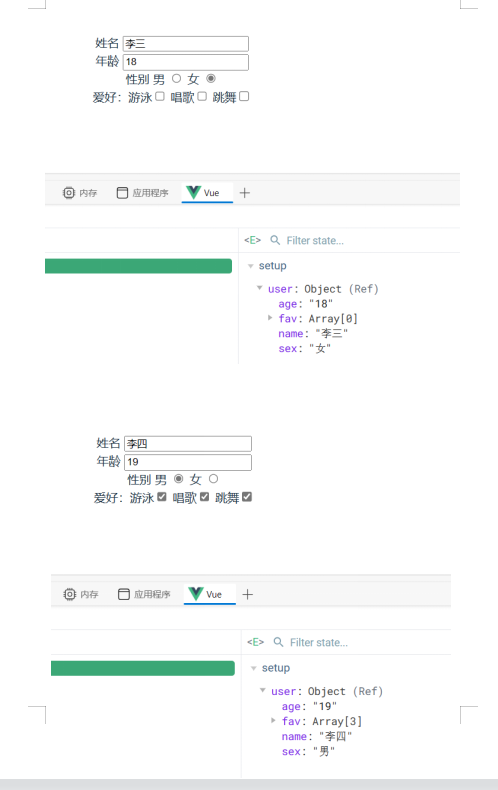
- v-model实现表单双向绑定
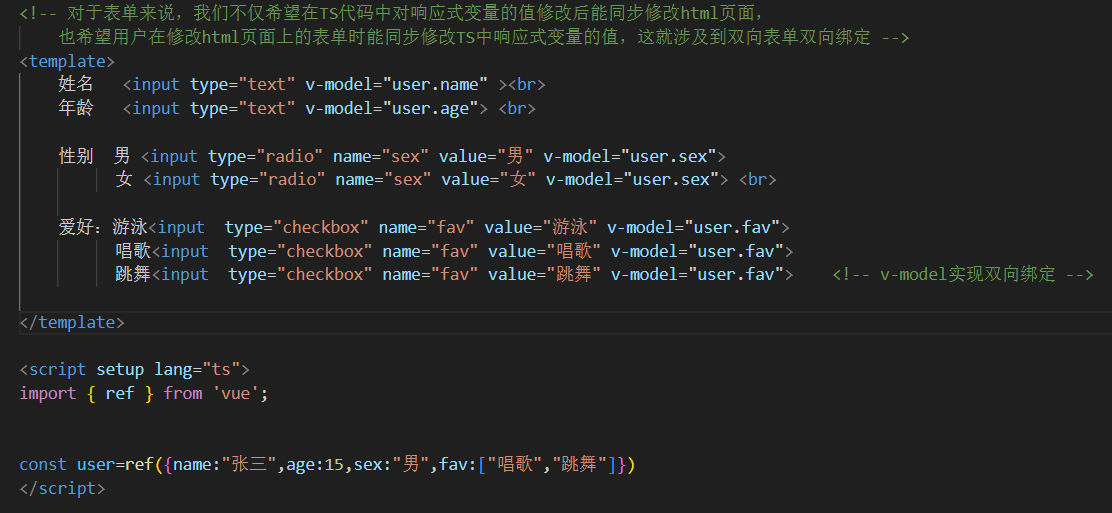
如图不难看出在我修改表单时 对应的响应式变量值也在改变
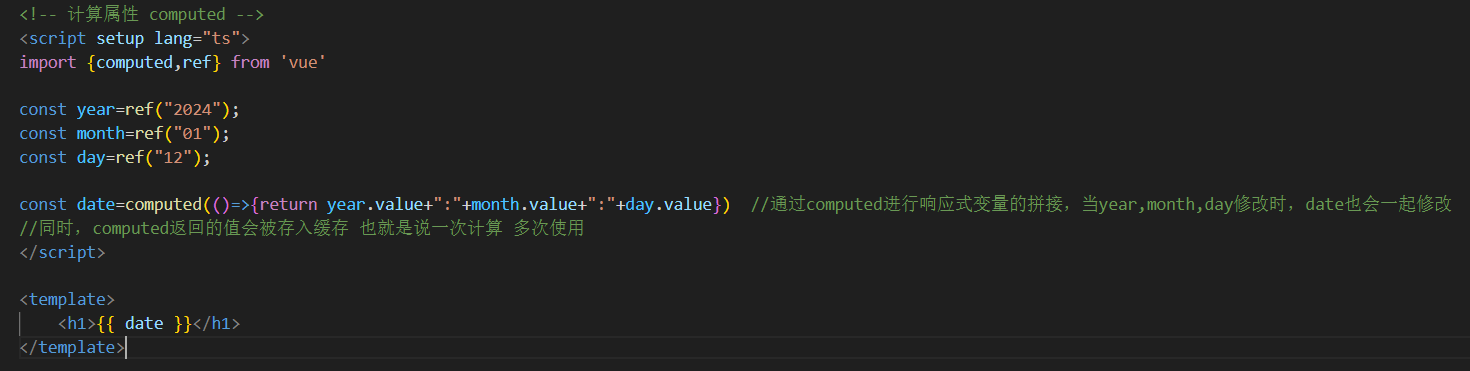
8)计算属性
使用前先引入computed函数 import {computed} from ‘vue’
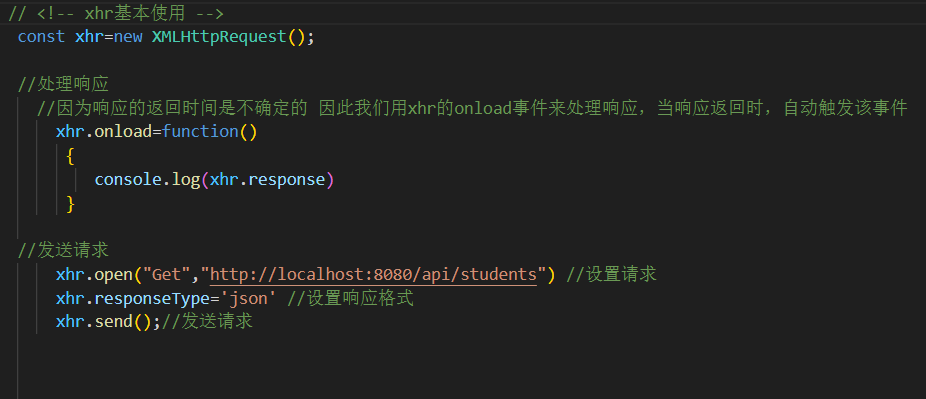
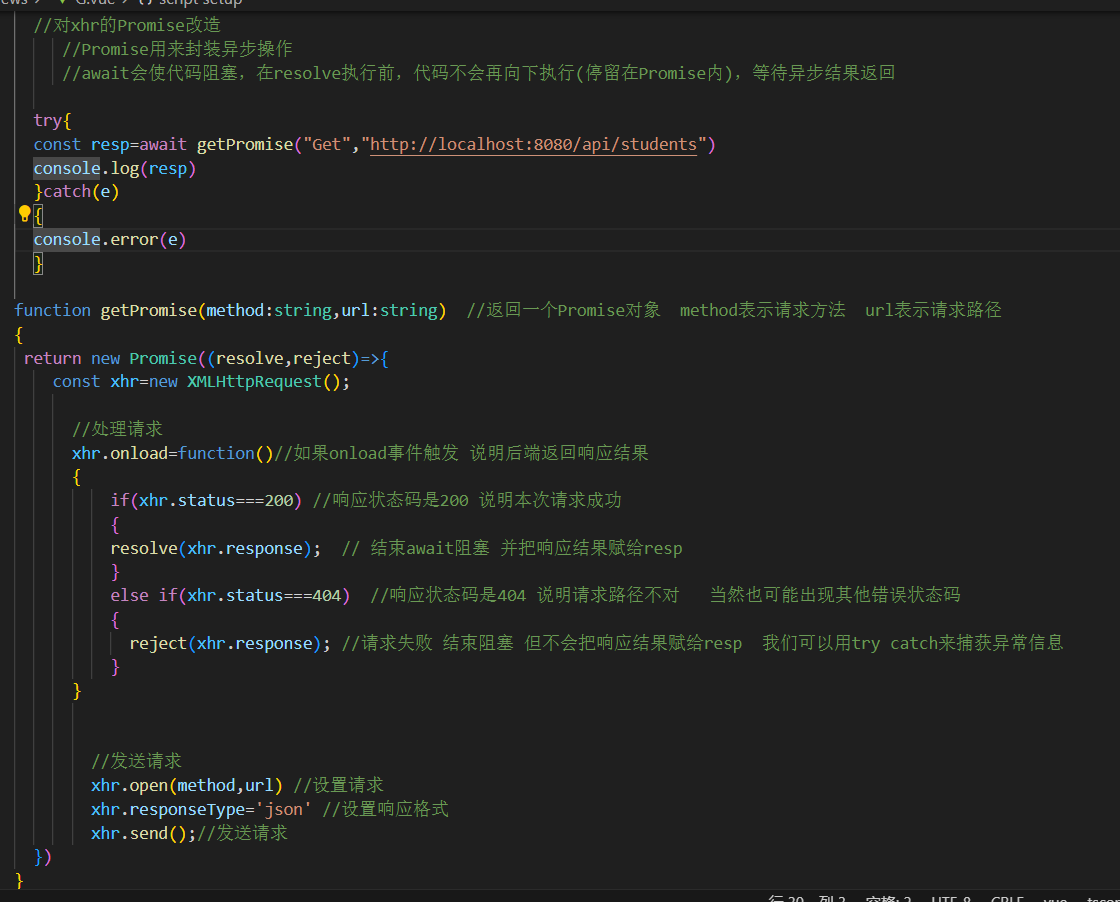
9) xhr的使用
10)axios
- axios下载
npm install axios - axios的基本使用
发送get请求

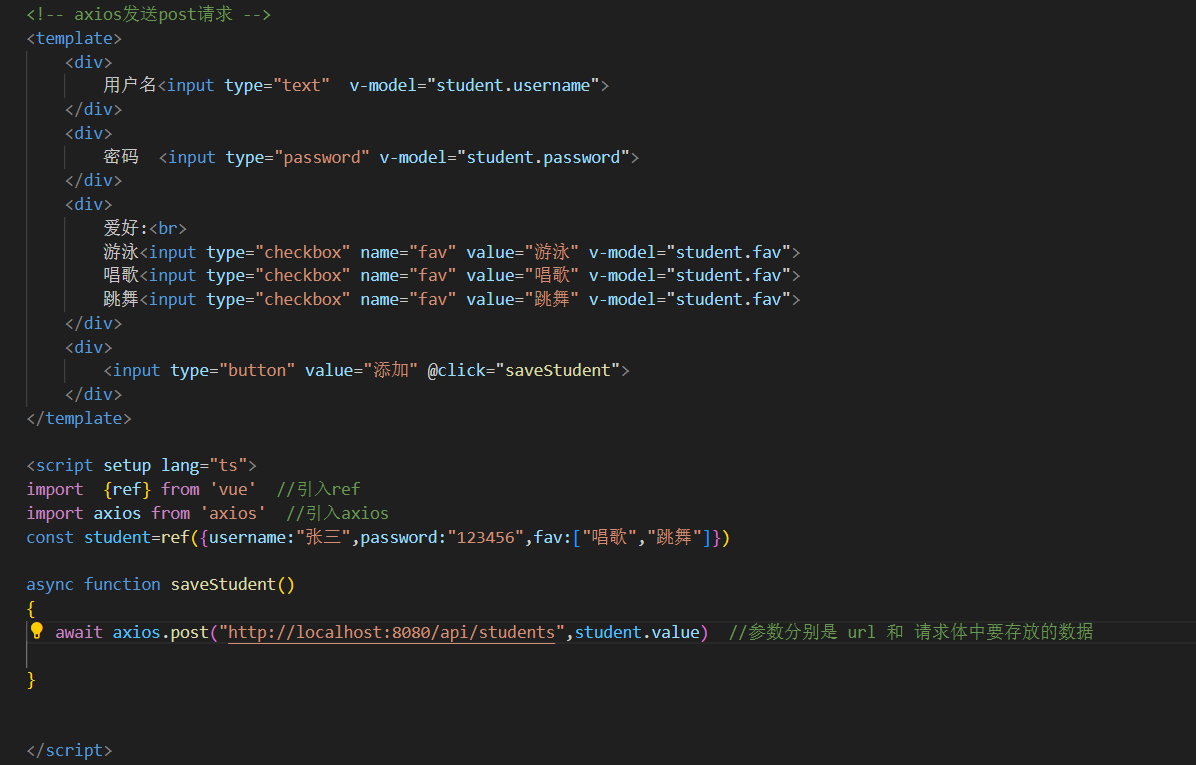
发送post请求
- 多环境问题
设有以下需求:
开发环境下,联调的后端服务器地址是http://localhost:8080,
上线改为生产环境后,后端服务器地址为http://tyust.com
我们可以使用环境变量来解决这个问题.
默认情况下,vite 支持上面两种环境,分别对应根目录下两个配置文件
.env.development - 开发环境
.env.production - 生产环境
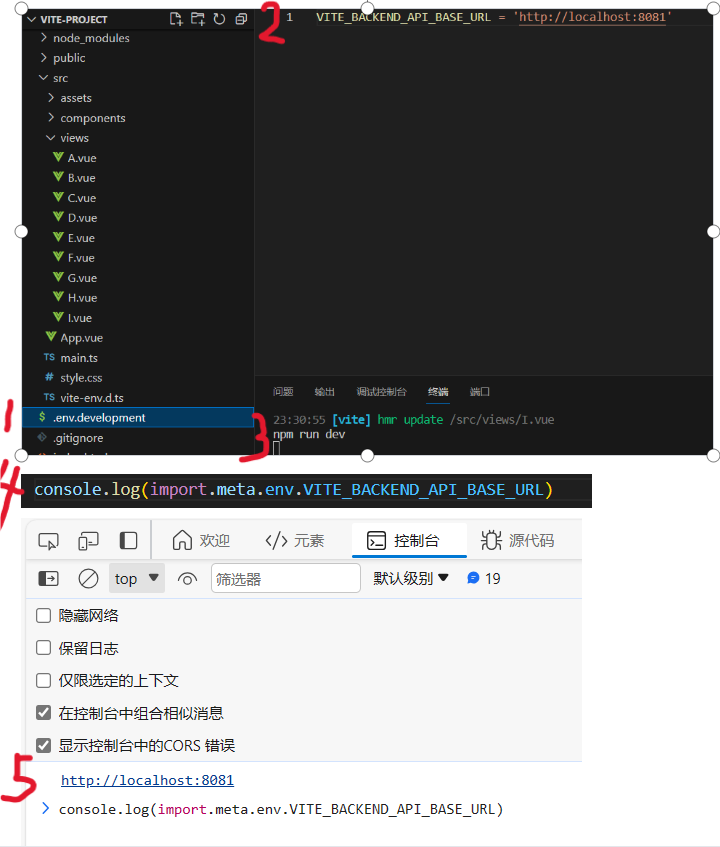
针对以上需求,我们在根目录下创建该上述两个配置文件,然后分别加入以下配置(开发环境文件加第一个,生产环境加第二个)
VITE_BACKEND_API_BASE_URL = ‘http://localhost:8080’
VITE_BACKEND_API_BASE_URL = ‘http://tyust.com’
然后在代码中使用 vite 给我们提供的特殊对象 import.meta.env,就可以获取到 VITE_BACKEND_API_BASE_URL 在不同环境下的值
import.meta.env.VITE_BACKEND_API_BASE_URL
开发环境和生产环境的切换由Vite进行管理,上述演示开发环境示例,生产环境可以按上述步骤配置完成后,执行run npm build命令构建项目,构建完成后会在根目录下产生一个dist文件夹,里面可以查看我们项目中压缩后的js代码,里面可以查看到使用的url地址为’http://tyust.com’
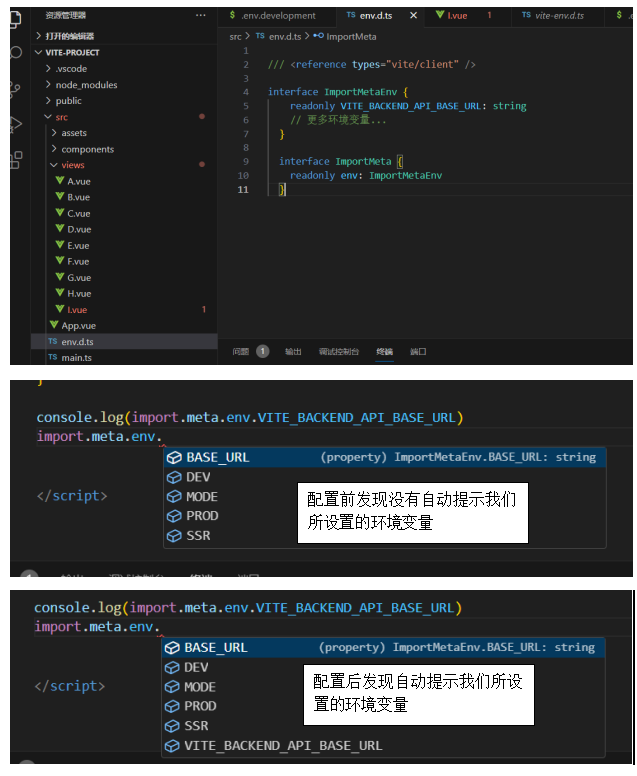
默认情况下,不能智能提示自定义的环境变量,做如下配置:新增文件 src/env.d.ts 并添加如下内容
		/// `<reference types="vite/client">`

		interface ImportMetaEnv {
		  readonly VITE_BACKEND_API_BASE_URL: string
		  // 更多环境变量...
		}

		interface ImportMeta {
		  readonly env: ImportMetaEnv
		}
环境变量定义好后 我们的请求路径就可以修改为如下
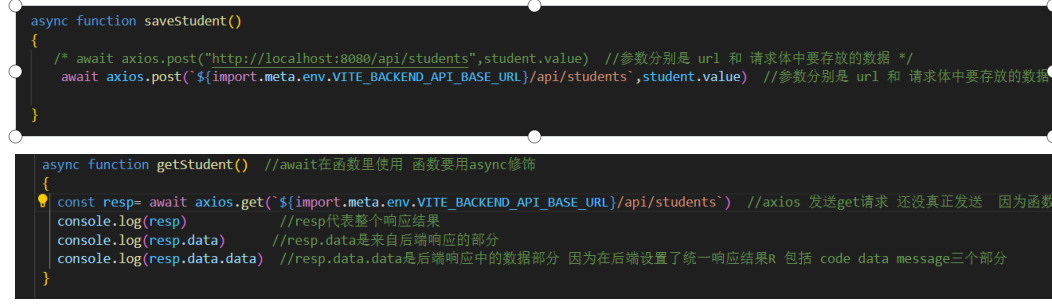
注意把路径的双引号改为反引号
但是这又引出了一个问题,我们每次写路径都要进行拼接,也是很麻烦的一件事。
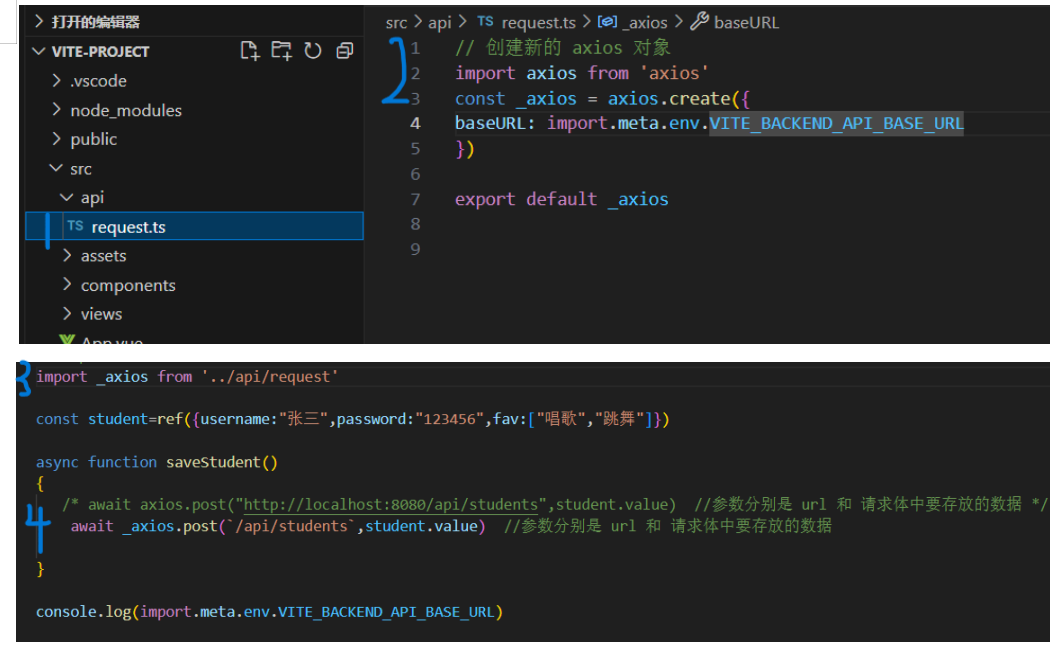
4. baseURL为我们解决了这个问题
可以自己创建一个 axios 对象,方便添加默认设置,新建文件 /src/api/request.ts
	// 创建新的 axios 对象
	import axios from 'axios'
	const _axios = axios.create({
	  baseURL: import.meta.env.VITE_BACKEND_API_BASE_URL
	})

	export default  _axios
我的理解我们自己去配置了一个axios,名字为_axios,然后给它设置了baseURL,以后它发请求时自动会带上我们设置的前缀
然后在其它组件中引用这个 ts 文件,例如 /src/views/E8.vue,就不用自己拼接路径前缀了
	<script setup lang="ts">
	import axios from '../api/request'
	// ...
	await axios.post('/api/students', ...)
	</script>
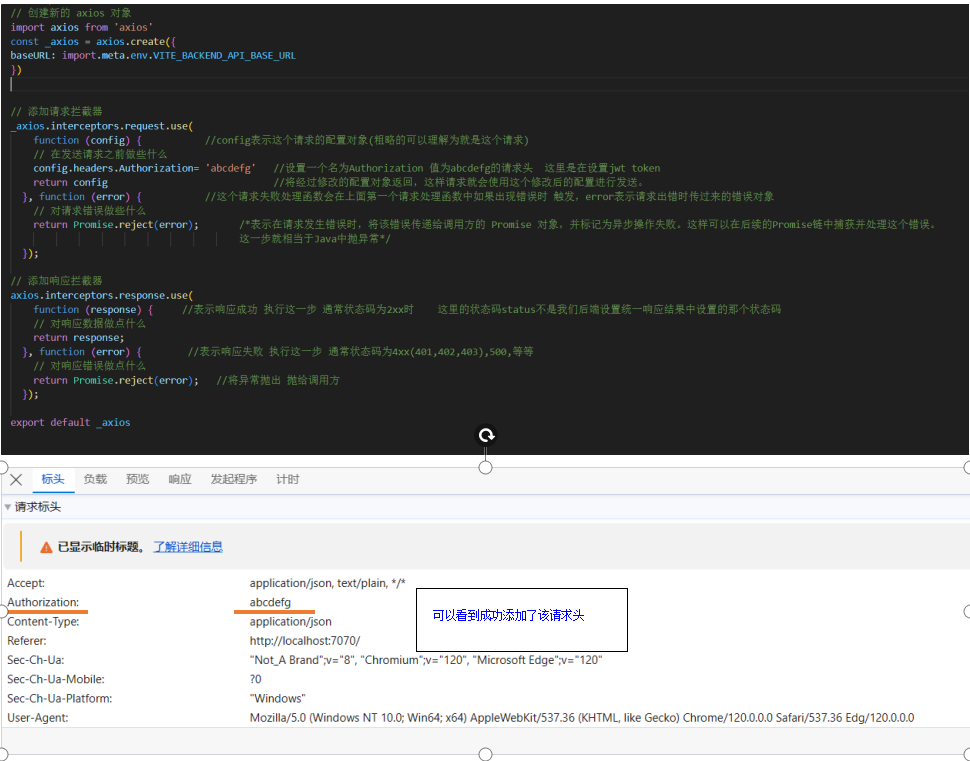
- axios拦截器
我们可以在request.ts中配置axios拦截器可以用来对请求和响应做统一处理,(如为所有请求统一添加jwt token来配合后端实现单点登录功能)
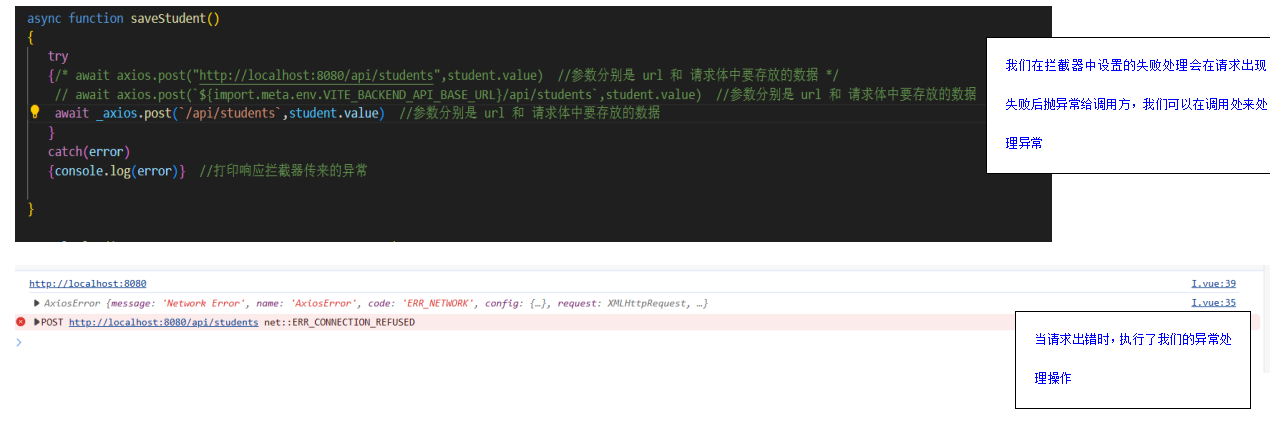
但是我们这样操作我们需要每个请求调用都进行try catch操作,十分麻烦,我们也可以在出错时自己在拦截器中解决,而不抛给调用方
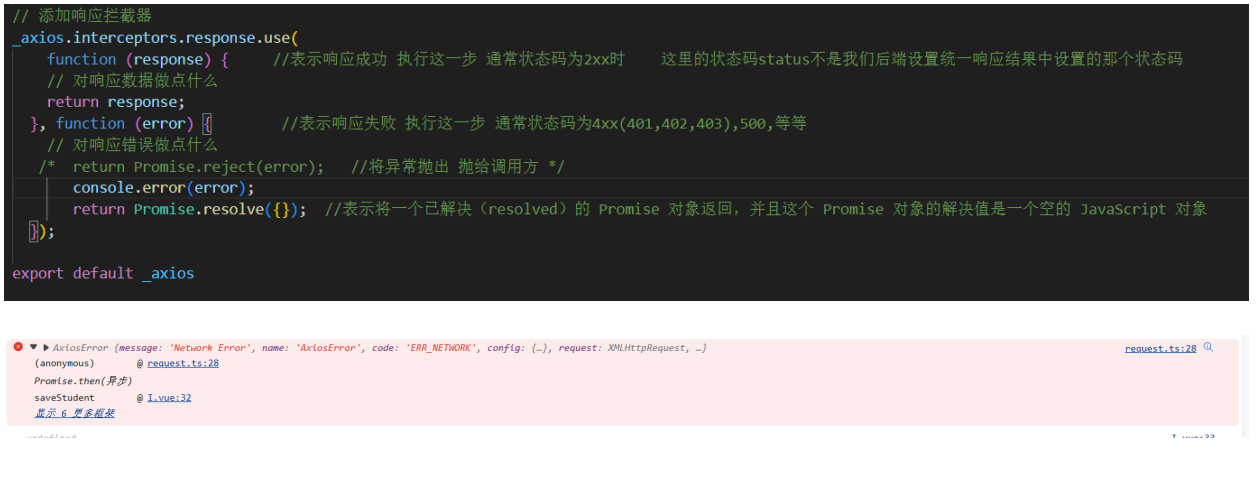
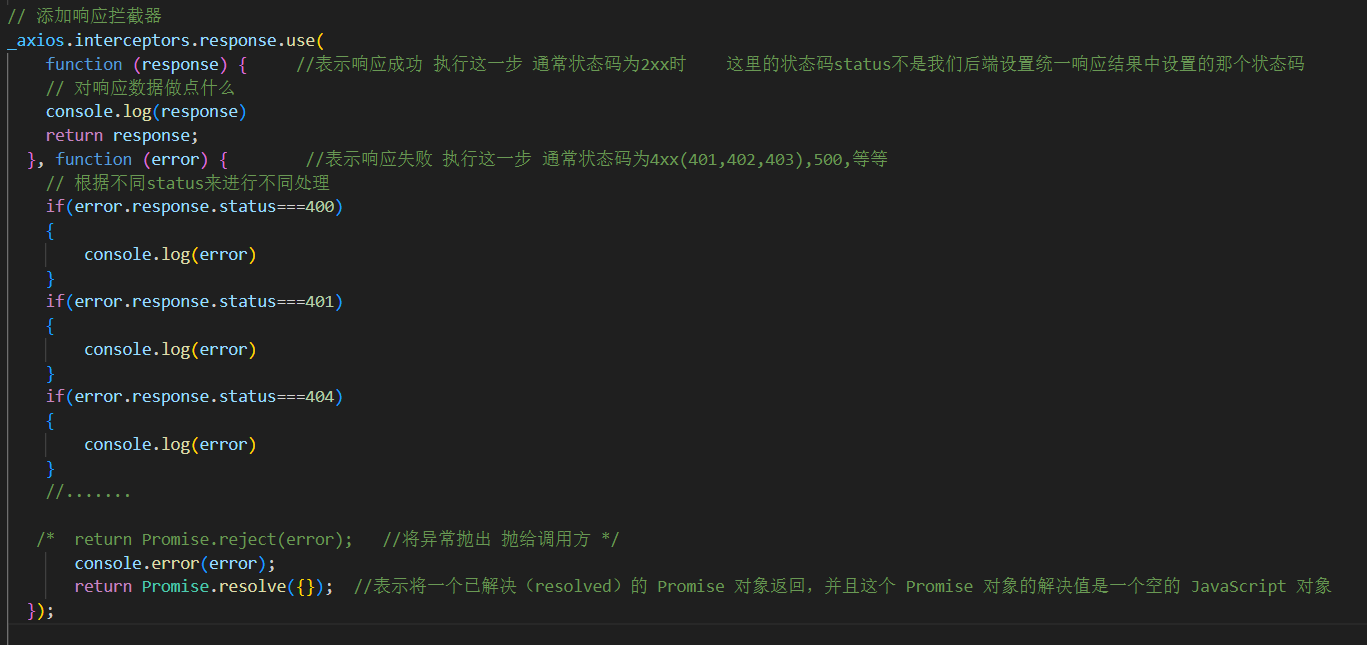
事实上,我们应该根据响应值状态码的不同,去进行不同的处理,这里可以在响应拦截器中用if语句来实现(注意这里的响应状态码status和我们后端设置统一返回结果Result中的code并不一样),status可以在后端中用 @ResponseStatus设置其code属性来指定
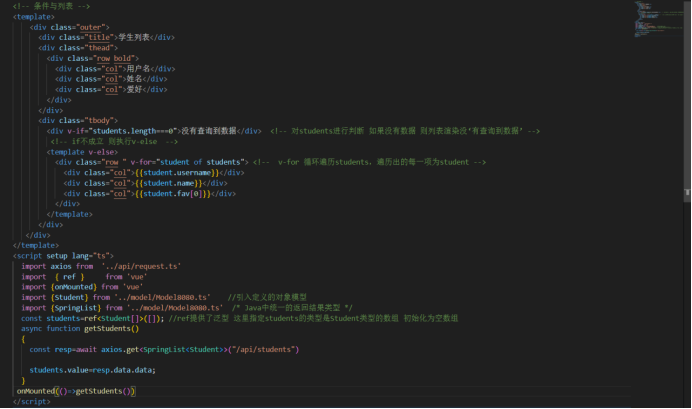
11)条件与列表
首先,新增模型数据 src/model/Model8080.ts //表示从8080端口相关的数据对应的数据模型
// 结果格式
export interface Student0 {
  username: string,
  name: string,
  fav: string[]
}

export interface Student {
  id: number;
  name: string;
  sex: string;
  age: number;
}


// 增、删 dto
export interface StudentSaveDto {
  name: string,
  sex: string,
  age: number
}

// 查询 dto
export interface StudentQueryDto {
  name?: string,
  sex?: string | null,
  age?: string | null, // 18,20
  page: number,
  size: number
}

export interface UserInfoDto {
  username: string,
  name: string,
  sex: string
}

// 如果 spring 错误,返回的对象格式
export interface SpringError {
  timestamp: string,
  status: number,
  error: string,
  message: string,
  path: string
}

// 如果 spring 成功,返回 list 情况
export interface SpringList<T> {
  data: T[],
  message?: string,
  code: number
}

// 如果 spring 成功,返回 page 情况
export interface SpringPage<T> {
  code: number,
  data: { list: T[], total: number },
  message?: string
}

export interface SpringObject<T> {
  code: number,
  data: T,
  message?: string
}

// 如果 spring 成功,返回 string 情况
export interface SpringString {
  data: string,
  message?: string,
  code: number
}

export interface SpringToken {
  data: { token: string },
  message?: string,
  code: number
}

export interface LoginDto {
  username: string,
  password: string
}

export interface Route {
  path: string,
  component: string,
  name: string,
  parentName: string
}

export interface Menu {
  id: number,
  pid: number,
  title: string,
  icon?: string,
  routePath?: string,
  routeComponent?: string,
  routeName?: string,
  routeParentName?: string,
  children?: Menu[]
}

export interface SpringMenuAndRoute {
  data: {
    routeList: Route[],
    menuTree: Menu[]
  },
  message?: string,
  code: number
}

import { AxiosResponse } from 'axios'
export interface AxiosRespError extends AxiosResponse<SpringError> { }
export interface AxiosRespList<T> extends AxiosResponse<SpringList<T>> { }
export interface AxiosRespPage<T> extends AxiosResponse<SpringPage<T>> { }
export interface AxiosRespString extends AxiosResponse<SpringString> { }
export interface AxiosRespToken extends AxiosResponse<SpringToken> { }
export interface AxiosRespMenuAndRoute extends AxiosResponse<SpringMenuAndRoute> { }
export interface AxiosRespObject<T> extends AxiosResponse<SpringObject<T>> { }
其中
-
AxiosRespPage 代表分页时的响应类型
-
AxiosRespList 代表返回集合时的响应类型
-
AxiosRespString 代表返回字符串时的响应类型
-
AxiosRespError 代表 Spring 出错时时的响应类型
-
加入泛型是为了更好的提示
-
v-if 与 v-else 不能和 v-for 处于同一标签
-
template 标签还有一个用途,就是用它少生成一层真正 html 代码
-
可以看到将结果封装为响应式数据还是比较繁琐的,后面会使用 useRequest 改进
12)html5中的Web Storage的两种存储方式
客户端存储数据的两个对象为:
localStorage - 用于长久保存整个网站的数据,保存的数据没有过期时间,直到手动去除。
sessionStorage - 用于临时保存同一窗口(或标签页)的数据,在关闭窗口或标签页之后将会删除这些数据。
在使用 web 存储前,应检查浏览器是否支持 localStorage 和 sessionStorage
不管是 localStorage,还是 sessionStorage,可使用的API都相同,常用的有如下几个(以localStorage为例):
保存数据:localStorage.setItem(key,value);
读取数据:localStorage.getItem(key);
删除单个数据:localStorage.removeItem(key);
删除所有数据:localStorage.clear();
得到某个索引的key:localStorage.key(index);
提示: 键/值对通常以字符串存储,你可以按自己的需要转换该格式。
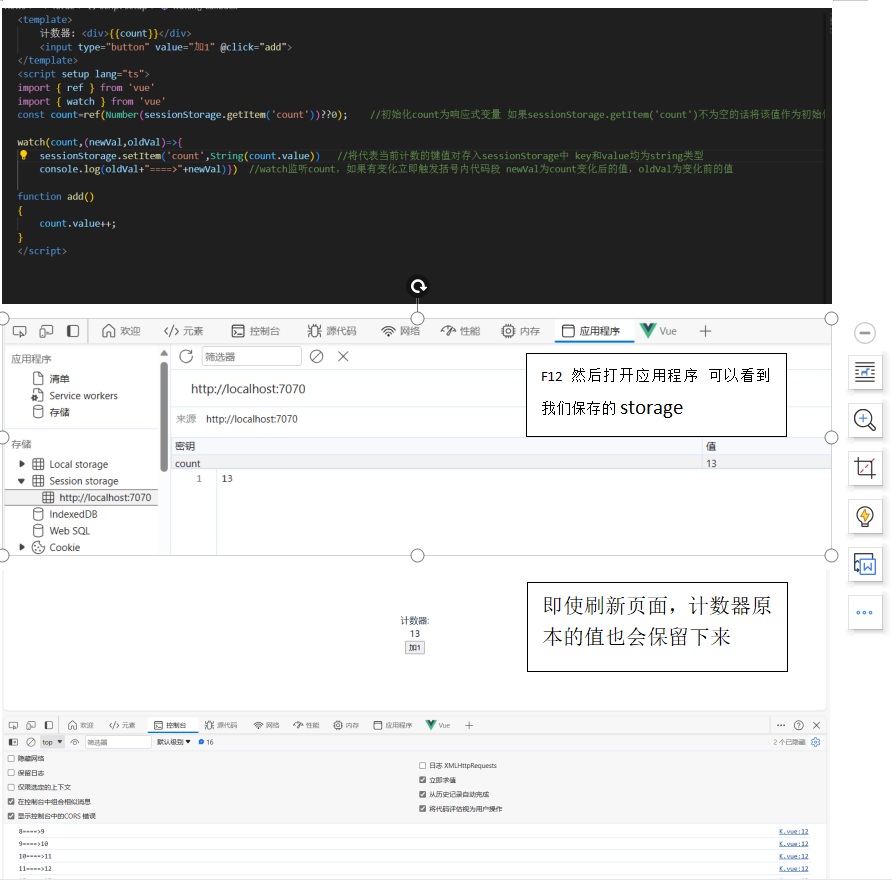
13)watch监听器
watch是一个观察动作.可以侦听指定变量的值(data/computed)的变化,属性值一旦发生变化时就会触发侦听器,然后侦听器执行相应的业务代码.
侦听器一般来说是用来监听数据的变化,默认是在数据发生变化时执行。
监听的数据名放到这里面作为函数名,这个函数里面有两个参数,一个是新值,一个是旧值。
在vue中,使用watch来响应数据的变化
语法:
// newVal: 当前最新值
// oldVal: 上一刻的值
watch(要被监听的变量名,(newVal,oldVal)=>{//发生改变后要执行的业务代码})
- 下面通过是watch和sessionStorage实现的计数器案例
14) VueUse
· 官方网址: https://vueuse.org
· 中文文档:https://www.vueusejs.com
· 作用: VueUse是一个基于 Composition API 实现的基本 Vue 组合实用函数的集合。就相当于一个Vue3的工具库
使用步骤
- 安装
npm i @vueuse/core
- 在js/ts中引入要使用的函数
import {要使用的函数名} from ‘@vueuse/core’
如 import {useStorage} from ‘@vueuse/core’ - 使用函数

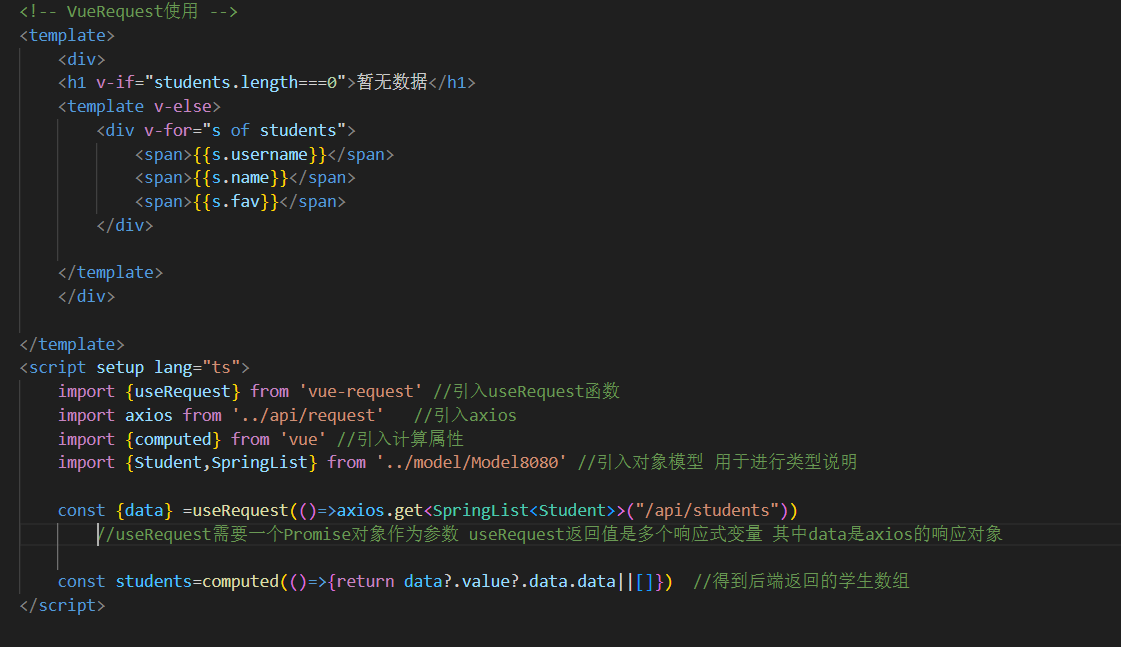
###15)VueRequest
· 官方文档:https://www.attojs.com
· 作用:VueRequest是一个能轻松帮你管理请求状态(支持SWR,轮询,错误重试,缓存,分页等的Vue3的composition API 请求库
在以往的业务项目中,常常被 loading 状态的管理、请求的节流防抖、接口数据的缓存、分页等这些重复的实现所困惑。每当开启一个新项目时,我们都得手动去处理以上这些问题,这将是一个重复性的工作,而且还得确保团队的一致。
VueRequest 旨在为开发者提供便捷、快速的方式来管理接口的状态。在业务开发中省去上述的那些“脏活累活”,只需要简单的配置即可使用,专注于业务核心的开发。
· 使用步骤
-
安装组件库
npm install vue-request -
在js/ts中引入组件库中需要的函数
import {要使用的函数} from ‘vue-request’
如 import {useRequest} from ‘vue-request’ -
使用
1) useRequest的使用
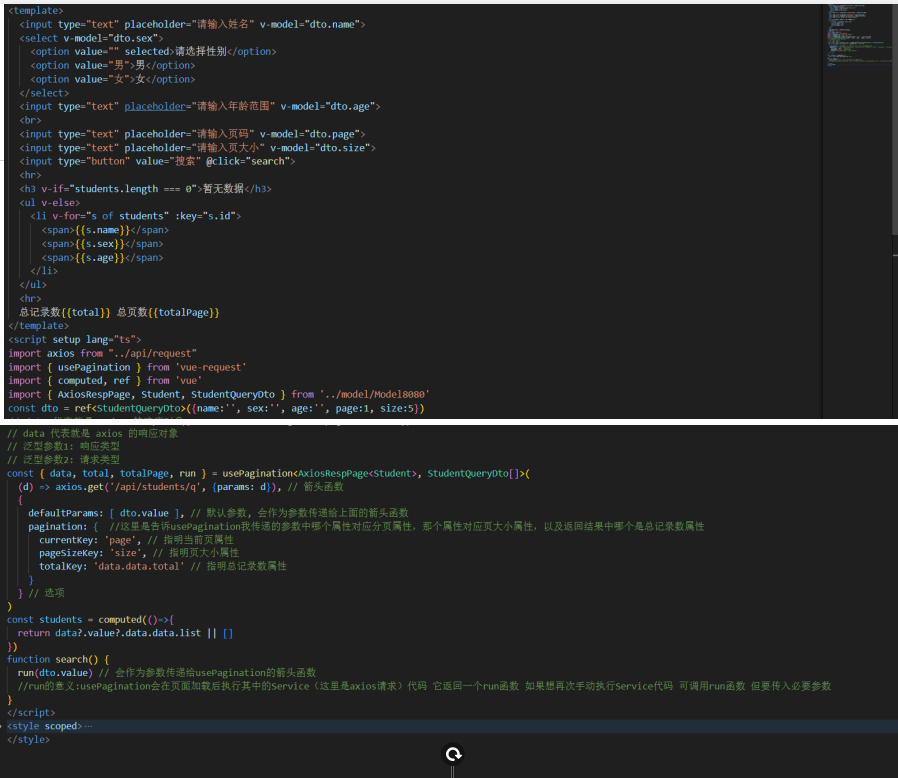
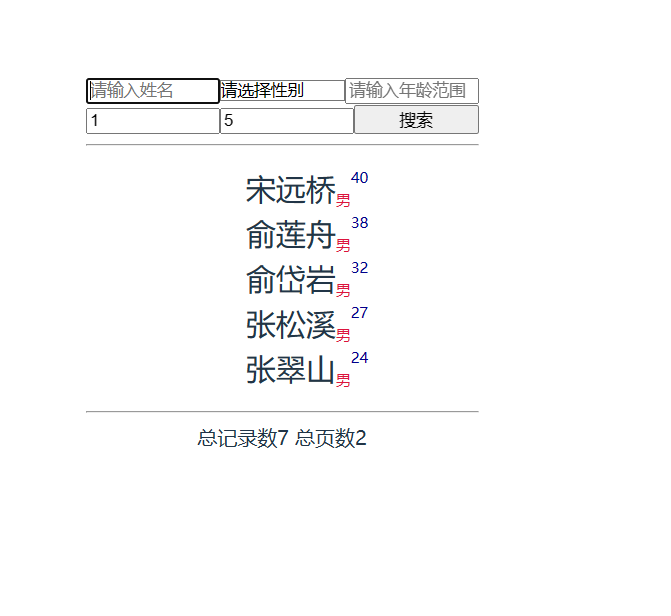
2) usePagination的使用<template> <input type="text" placeholder="请输入姓名" v-model="dto.name"> <select v-model="dto.sex"> <option value="" selected>请选择性别</option> <option value="男">男</option> <option value="女">女</option> </select> <input type="text" placeholder="请输入年龄范围" v-model="dto.age"> <br> <input type="text" placeholder="请输入页码" v-model="dto.page"> <input type="text" placeholder="请输入页大小" v-model="dto.size"> <input type="button" value="搜索" @click="search"> <hr> <h3 v-if="students.length === 0">暂无数据</h3> <ul v-else> <li v-for="s of students" :key="s.id"> <span>{{s.name}}</span> <span>{{s.sex}}</span> <span>{{s.age}}</span> </li> </ul> <hr> 总记录数{{total}} 总页数{{totalPage}} </template> <script setup lang="ts"> import axios from "../api/request" import { usePagination } from 'vue-request' import { computed, ref } from 'vue' import { AxiosRespPage, Student, StudentQueryDto } from '../model/Model8080' const dto = ref<StudentQueryDto>({name:'', sex:'', age:'', page:1, size:5}) // data 代表就是 axios 的响应对象 // 泛型参数1: 响应类型 // 泛型参数2: 请求类型 const { data, total, totalPage, run } = usePagination<AxiosRespPage<Student>, StudentQueryDto[]>( (d) => axios.get('/api/students/q', {params: d}), // 箭头函数 { defaultParams: [ dto.value ], // 默认参数, 会作为参数传递给上面的箭头函数 pagination: { //这里是告诉usePagination我传递的参数中哪个属性对应分页属性,那个属性对应页大小属性,以及返回结果中哪个是总记录数属性 currentKey: 'page', // 指明当前页属性 pageSizeKey: 'size', // 指明页大小属性 totalKey: 'data.data.total' // 指明总记录数属性 } } // 选项 ) const students = computed(()=>{ return data?.value?.data.data.list || [] }) function search() { run(dto.value) // 会作为参数传递给usePagination的箭头函数 //run的意义:usePagination会在页面加载后执行其中的Service(这里是axios请求)代码 它返回一个run函数 如果想再次手动执行Service代码 可调用run函数 但要传入必要参数 } </script> <style scoped> ul li { list-style: none; font-family: "华文行楷"; } li span:nth-child(1) { font-size: 24px; } li span:nth-child(2) { font-size: 12px; color: crimson; vertical-align: bottom; } li span:nth-child(3) { font-size: 12px; color: darkblue; vertical-align: top; } input,select { width: 100px; } </style>
16) Vue组件
-
父组件引用子组件

-
如何从外部获取要给子组件渲染的数据
这里演示从randomuser.me中获取数据
调用randomuser.me的"https://randomuser.me/api/" Api返回的结果类型如下
{"results": [ { "gender": "female", "name": { "title": "Miss", "first": "Jennie", "last": "Nichols" }, "location": { "street": { "number": 8929, "name": "Valwood Pkwy", }, "city": "Billings", "state": "Michigan", "country": "United States", "postcode": "63104", "coordinates": { "latitude": "-69.8246", "longitude": "134.8719" }, "timezone": { "offset": "+9:30", "description": "Adelaide, Darwin" } }, "email": "jennie.nichols@example.com", "login": { "uuid": "7a0eed16-9430-4d68-901f-c0d4c1c3bf00", "username": "yellowpeacock117", "password": "addison", "salt": "sld1yGtd", "md5": "ab54ac4c0be9480ae8fa5e9e2a5196a3", "sha1": "edcf2ce613cbdea349133c52dc2f3b83168dc51b", "sha256": "48df5229235ada28389b91e60a935e4f9b73eb4bdb855ef9258a1751f10bdc5d" }, "dob": { "date": "1992-03-08T15:13:16.688Z", "age": 30 }, "registered": { "date": "2007-07-09T05:51:59.390Z", "age": 14 }, "phone": "(272) 790-0888", "cell": "(489) 330-2385", "id": { "name": "SSN", "value": "405-88-3636" }, "picture": { "large": "https://randomuser.me/api/portraits/men/75.jpg", "medium": "https://randomuser.me/api/portraits/med/men/75.jpg", "thumbnail": "https://randomuser.me/api/portraits/thumb/men/75.jpg" }, "nat": "US" } ], "info": { "seed": "56d27f4a53bd5441", "results": 1, "page": 1, "version": "1.4" } }- 首先添加类型说明 model/ModelRandomUser.ts
- 子组件同例1一致
- 定义父组件 并调用子组件
1)父组件调用https://randomuser.me/api/来获取数据
2)父组件引用子组件 并将数据传入子组件
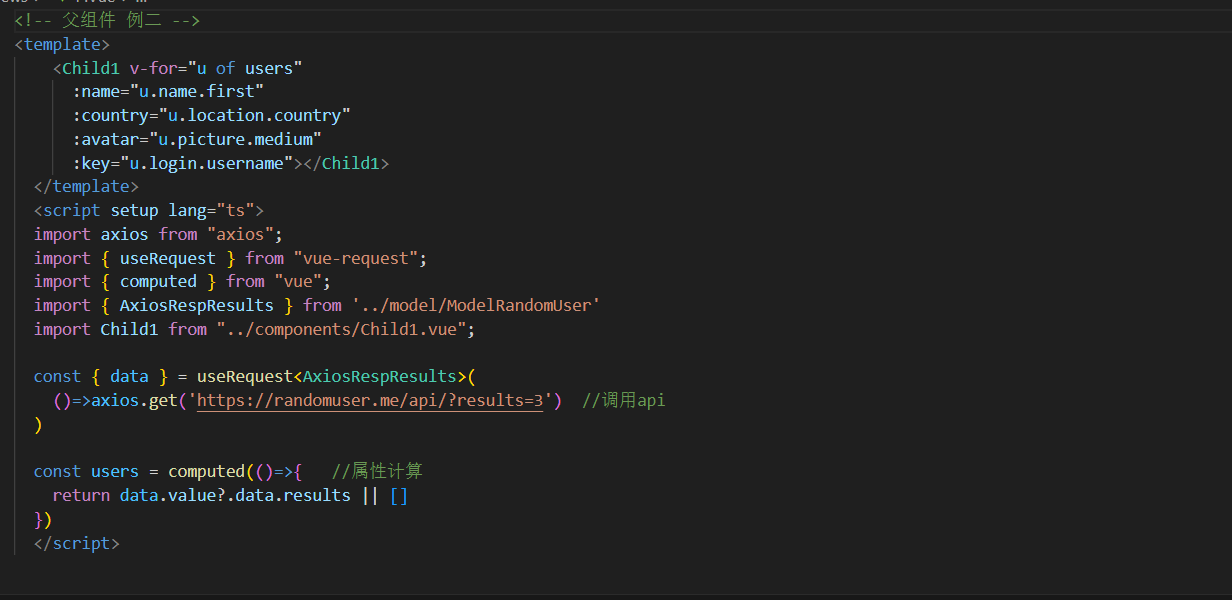
<!-- 父组件 例二 -->
<template>
    <Child1 v-for="u of users"
      :name="u.name.first"
      :country="u.location.country"
      :avatar="u.picture.medium"
      :key="u.login.username"></Child1>
  </template>
  <script setup lang="ts">
  import axios from "axios";
  import { useRequest } from "vue-request";
  import { computed } from "vue";
  import { AxiosRespResults } from '../model/ModelRandomUser'
  import Child1 from "../components/Child1.vue";

  const { data } = useRequest<AxiosRespResults>(
    ()=>axios.get('https://randomuser.me/api/?results=3')  //调用api
  )

  const users = computed(()=>{   //属性计算
    return data.value?.data.results || []
  })
  </script>


 被折叠的 条评论
为什么被折叠?
被折叠的 条评论
为什么被折叠?
 到【灌水乐园】发言


