


如果你想拥有你从未拥有过的东西,那么你必须去做你从未做过的事情
前半个月小屁闭关去搞会话保持,但是一直都报错,在网上查资料有没有结果,足足错了半个月,所以暂时略过会话保持,回归nginx,今天介绍负载均衡的各种玩法,话不多说,直接开干~~~~
目录
1、10.0.04服务器的5555端口转发10.0.0.7的22端口
2、10.0.04服务器的6666端口转发10.0.0.51的3306端口
💬欢迎交流:在学习过程中如果你有任何疑问或想法,欢迎在评论区留言,我们可以共同探讨学习的内容。你的支持是我持续创作的动力!
👍点赞、收藏与推荐:如果你觉得这篇文章对你有所帮助,请不要忘记点赞、收藏,并分享给更多的小伙伴!你们的鼓励是我不断进步的源泉!
🚀推广给更多人:如果你认为这篇文章对你有帮助,欢迎分享给更多对Linux感兴趣的朋友,让我们一起进步,共同提升!
LVS四种模式
四种工作模式:
1.dr:直接路由模式
2.tun:隧道模式
3.nat:路由转发模式
4.fullnat模式
一、四层负载均衡配置
1、10.0.04服务器的5555端口转发10.0.0.7的22端口
1、通过访问负载均衡的5555端口,实际是后端的web01的22端口在提供服务;
准备一台服务器10.0.0.4
1)安装Nginx
[root@lb ~]#scp 172.16.1.5:/etc/yum.repos.d/nginx.repo /etc/yum.repos.d/ #准备搭建下载nginx的环境
[root@lb ~]#yum -y install nginx
2)删除默认的七层配置
[root@lb ~]#cd /etc/nginx/conf.d/
[root@lb conf.d]#ll
total 4-rw-r--r-- 1 root root 1072 Apr 12 2023 default.conf
[root@lb conf.d]#rm -rf default.conf
配置主配置文件在http区块外包含的语句
[root@lb nginx]#grep conf.c nginx.conf
include /etc/nginx/conf.c/*.conf; #nginx.conf配置http区块外面添加
3)创建四层配置文件
[root@lb nginx]#mkdir conf.c
[root@lb nginx]#cd conf.c/
[root@lb conf.c]#cat lb.conf
stream {
upstream web01 {
server 172.16.1.7:22;
}
server {
listen 5555;
proxy_pass web01;
}
}
[root@lb02 ~]#ssh -p 5555 root@10.0.0.4
The authenticity of host '[10.0.0.4]:5555 ([10.0.0.4]:5555)' can't be established.
ECDSA key fingerprint is SHA256:jmpQnc050NrZN+4NNNHah3EfJ3FrJwss5z3/lxaak1I.
Are you sure you want to continue connecting (yes/no/[fingerprint])? yes
Warning: Permanently added '[10.0.0.4]:5555' (ECDSA) to the list of known hosts.
Authorized users only. All activities may be monitored and reported.
root@10.0.0.4's password:
Authorized users only. All activities may be monitored and reported.
Activate the web console with: systemctl enable --now cockpit.socket
Last login: Tue Jan 14 13:59:02 2025 from 10.0.0.1
[root@web01 ~]#
2、10.0.04服务器的6666端口转发10.0.0.51的3306端口
2、通过访问负载均衡的6666端口,实际是后端的mysql的3306端口在提供服务
[root@lb conf.c]#cat lb.conf
stream {
upstream web01 {
server 172.16.1.7:22;
}
upstream db01 {
server 172.16.1.51:3306;
}
server {
listen 6666;
proxy_pass db01;
}
}
web01上远程连接测试:
[root@lb conf.c]#mysql -h 10.0.0.4 -P 6666 -uqy -pqy123.com
Welcome to the MariaDB monitor. Commands end with ; or \g.
Your MariaDB connection id is 12
Server version: 10.3.39-MariaDB MariaDB Server
Copyright (c) 2000, 2018, Oracle, MariaDB Corporation Ab and others.
Type 'help;' or '\h' for help. Type '\c' to clear the current input statement.
MariaDB [(none)]>
10.0.0.4加6666端口是登入db01MySQL二、四层转发七层配置
1.准备LB02
[root@lb02 ~]#scp                       172.16.1.7:/etc/yum.repos.d/nginx.repo  /etc/yum.repos.d/
[root@lb02 ~]#yum -y install nginx
[root@lb02 ~]#scp  172.16.1.5:/etc/nginx/conf.d/* /etc/nginx/conf.d/
[root@lb02 ~]#scp 172.16.1.5:/etc/nginx/proxy_params /etc/nginx/
清理下upstream_check模块,然后再运行nginx
[root@lb02 ~]#nginx -t
nginx: the configuration file /etc/nginx/nginx.conf syntax is ok
nginx: configuration file /etc/nginx/nginx.conf test is successful
[root@lb02 ~]#systemctl start nginx
配置LB四层:
[root@lb conf.c]#cat web.conf
stream {
    upstream webs { #配置地址池(四层转发至七层负载均衡的两个lb服务器)
        server 172.16.1.5:80;
        server 172.16.1.6:80;
}
    server {
        listen 80;
        proxy_pass webs;    #引用地址池
    }
}
访问测试:
hosts解析 10.0.0.4  www.wp.com
三、tomcat图片分离
1、部署tomcat服务
 https://tomcat.apache.org/
# tomcat web服务器的官网
1.web02部署tomcat
下载tomcat包
[root@web02 ~]#wget https://dlcdn.apache.org/tomcat/tomcat-9/v9.0.98/bin/apache-tomcat-9.0.98.tar.gz
[root@web02 ~]#tar xf apache-tomcat-9.0.98.tar.gz -C /usr/local/
[root@web02 ~]#ln -s /usr/local/apache-tomcat-9.0.98/ /usr/local/tomcat
安装tomcat的运行环境:
[root@web02 ~]#yum -y install java
运行java服务
[root@web02 ~]#/usr/local/tomcat/bin/startup.sh
检查端口tomcat 8080
[root@web02 ~]#netstat -tnulp    #检查端口命令java默认的端口:8080
 2.nginx实现代理tomcat进行图片拆分
1)web02配置反向代理到自身的8080端口
[root@web02 conf.d]#cat proxy8080.conf
upstream tom {
    server 172.16.1.8:8080;
}
server {
    listen 80;
     server_name tomcat.yunzhongzi.com;
     location / {
         proxy_pass http://tom;
     }
}
[root@web02 conf.d]#nginx -t
nginx: the configuration file /etc/nginx/nginx.conf syntax is ok
nginx: configuration file /etc/nginx/nginx.conf test is successful
[root@web02 conf.d]#systemctl restart nginx
2)hosts解析测试代理是否成功
10.0.0.8 tomcat.yunzhongzi.com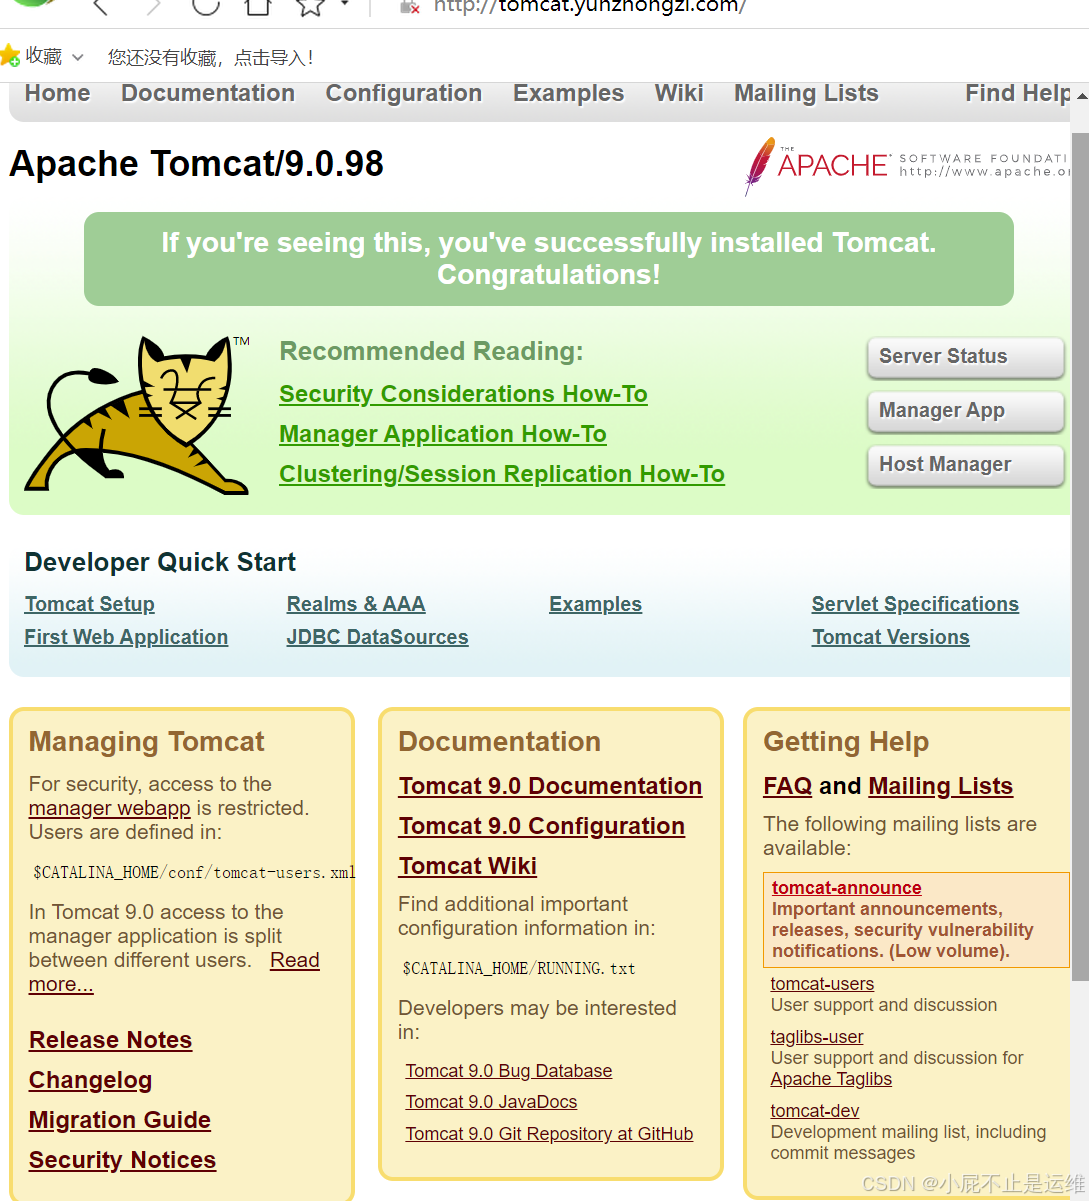
2、tomcat动静分离拆分
通过配置Nginx反向代理的locatoin 将tomcat的图片拆分
[root@web02 conf.d]#vim proxy8080.conf
upstream tom {
server 172.16.1.8:8080;
}
server {
listen 80;
server_name tomcat.yunzhongzi.com;
location / {
proxy_pass http://tom;
}
# 如果访问.png.jpg...结尾的请求,则直接通过/code/images/返回给用户
location ~* \.(png|jpg|svg|mp4|mp3)$ {
root /code/images;
}
}
"proxy8080.conf" 16L, 206C written
[root@web02 conf.d]#nginx -t
nginx: the configuration file /etc/nginx/nginx.conf syntax is ok
nginx: configuration file /etc/nginx/nginx.conf test is successful
[root@web02 conf.d]#systemctl restart nginx
[root@web02 conf.d]#
创建图片目录
[root@web02 conf.d]#mkdir /code/images
[root@web02 conf.d]#cd /code/images
将tomcat所有的图片复制一份到/code/images
[root@web02 ~]#cd /usr/local/tomcat/webapps/ROOT
[root@web02 ROOT]#cp *.svg *.png /code/images/
修改目录的属主属组为nginx的启动用户www
[root@web02 webapps]#chown -R www.www /code/images/
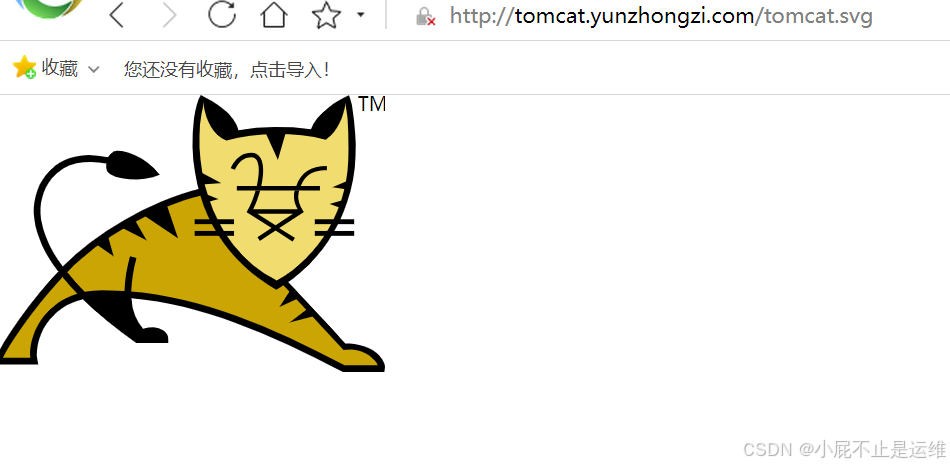
测试访问tomcat.yunzhongzi.com
# 停止TOmcat服务
[root@web02 ROOT]#/usr/local/tomcat/bin/shutdown.sh
#停止之后,网页无法访问但+/图片名可以访问图片暂停tomcat服务单独访问小猫发现可以正常访问

四、通过负载均衡实现动静分离
1.配置WEB01的静态页面
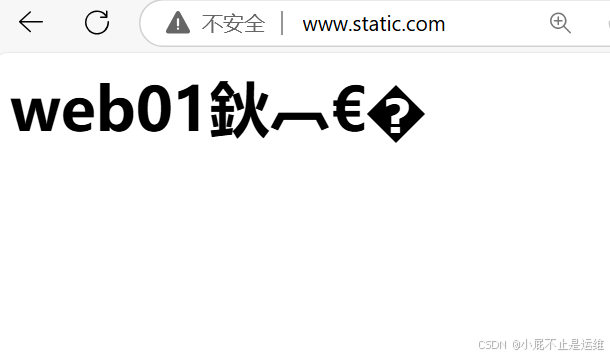
[root@web01 conf.d]#cat static.conf
server {
    listen 80;
    server_name www.static.com;
    location / {
        root /code/test;
        index index.html;
    }
    location ~* .*\.(jpg|png|gif)$ {
        root /code/images;
    }
}
[root@web01 conf.d]#cat /code/test/index.html
web01......
[root@web01 conf.d]#nginx -t
nginx: the configuration file /etc/nginx/nginx.conf syntax is ok
nginx: configuration file /etc/nginx/nginx.conf test is successful
[root@web01 conf.d]#systemctl restart nginx
[root@web01 conf.d]#mkdir /code/images
[root@web01 conf.d]#cd /code/images
自己上传一张图片,命名为a.png
浏览器访问测试: HOSTS解析
http://www.static.com/a.jpg
2.配置WEB02的动态资源
部署Tomcat
[root@web02 ~]#cd /usr/local/tomcat/webapps/ROOT/
[root@web02 ROOT]#cat test.jsp
<%@ page language="java" import="java.util.*" pageEncoding="utf-8"%>
<HTML>
    <HEAD>
        <TITLE>yunzhongzi JSP Page</TITLE>
    </HEAD>
    <BODY>
        <%
            Random rand = new Random();
            out.println("<h1>yunzhongzi随机数:<h1>");
            out.println(rand.nextInt(99)+100);
        %>
    </BODY>
</HTML>
# 如果访问不到页面,需要重启tomcat
#[root@web02 ROOT]#
#[root@web02 ROOT]#/usr/local/tomcat/bin/startup.sh
测试动态页面:
http://10.0.0.8:8080/test.jsp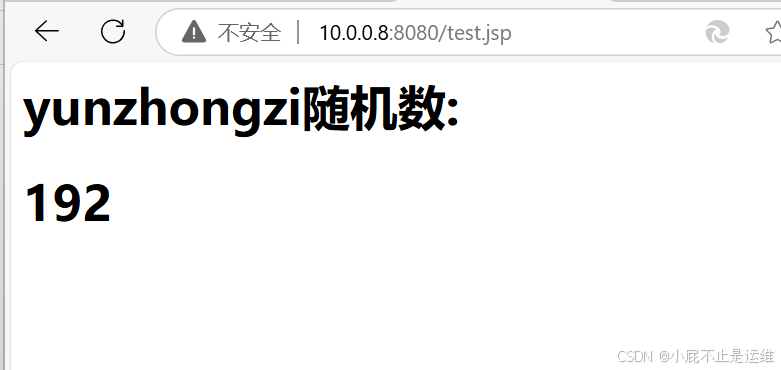
3.负载均衡集成动态和静态页面
[root@lb01 conf.d]#cat test.conf
upstream static {
server 172.16.1.7:80;
}
upstream java {
server 172.16.1.8:8080;
}
server {
listen 80;
server_name www.static.com;
root /code/;
index index.html;
location ~* \.(jpg|png|gif)$ {
proxy_pass http://static;
proxy_set_header Host $http_host;
}
location ~ \.jsp {
proxy_pass http://java;
proxy_set_header Host $http_host;
}
}
创建代码目录:集成动静态数据
[root@lb01 conf.d]#mkdir /code
[root@lb01 conf.d]#cat /code/index.html
<html lang="en">
<head>
<meta charset="UTF-8" />
<title>测试ajax和跨域访问</title>
<script src="http://libs.baidu.com/jquery/2.1.4/jquery.min.js"></script>
</head>
<script type="text/javascript">
$(document).ready(function(){
$.ajax({
type: "GET",
url: "http://www.static.com/test.jsp",
success: function(data){
$("#get_data").html(data)
},
error: function() {
alert("哎呦喂,失败了,回去检查你服务去~");
}
});
});
</script>
<body>
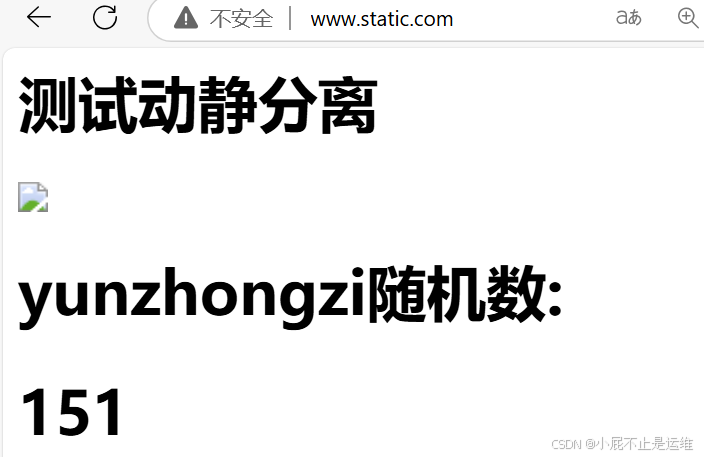
<h1>测试动静分离</h1>
<img src="http://www.static.com/a.jpg">
<div id="get_data"></div>
</body>
</html>
完成后访问: www.static.com 访问首页
测试:
关闭静态 是否影响动态 #web01down机nginx
关闭动态 是否影响静态 #web02服务器/usr/local/tomcat/bin/startup.sh正常访问是这样的~~~

暂停tomcat服务是这样的~~~
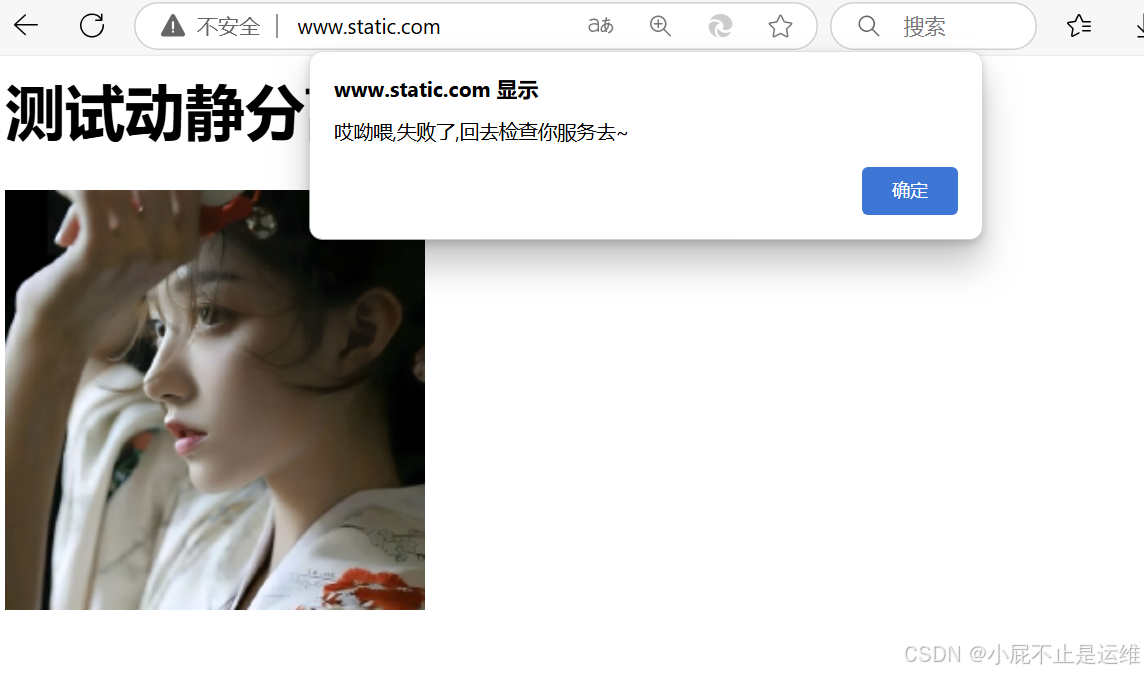
暂停web01的nginx服务是这样的~~~
五、通过客户端信息调度到不同的代码
server {
listen 9090;
location / {
root /code/android;
index index.html;
}
}
server {
listen 9091;
location / {
root /code/iphone;
index index.html;
}
}
server {
listen 9092;
location / {
root /code/pc;
index index.html;
}
}
[root@web01 conf.d]#mkdir /code/{android,iphone,pc}
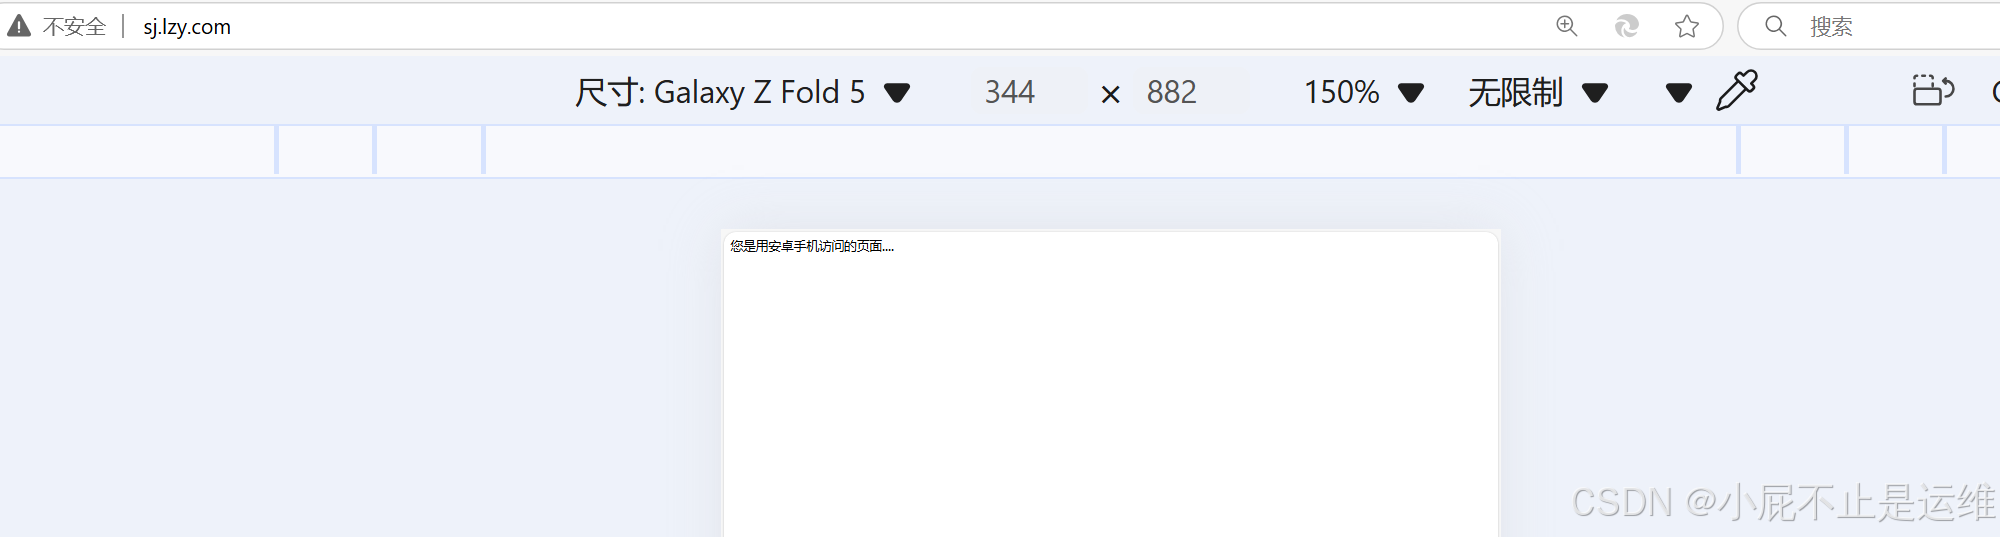
[root@web01 conf.d]#echo 您是用安卓手机访问的页面.... > /code/android/index.html
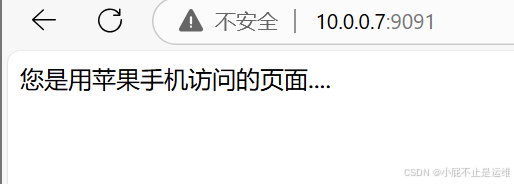
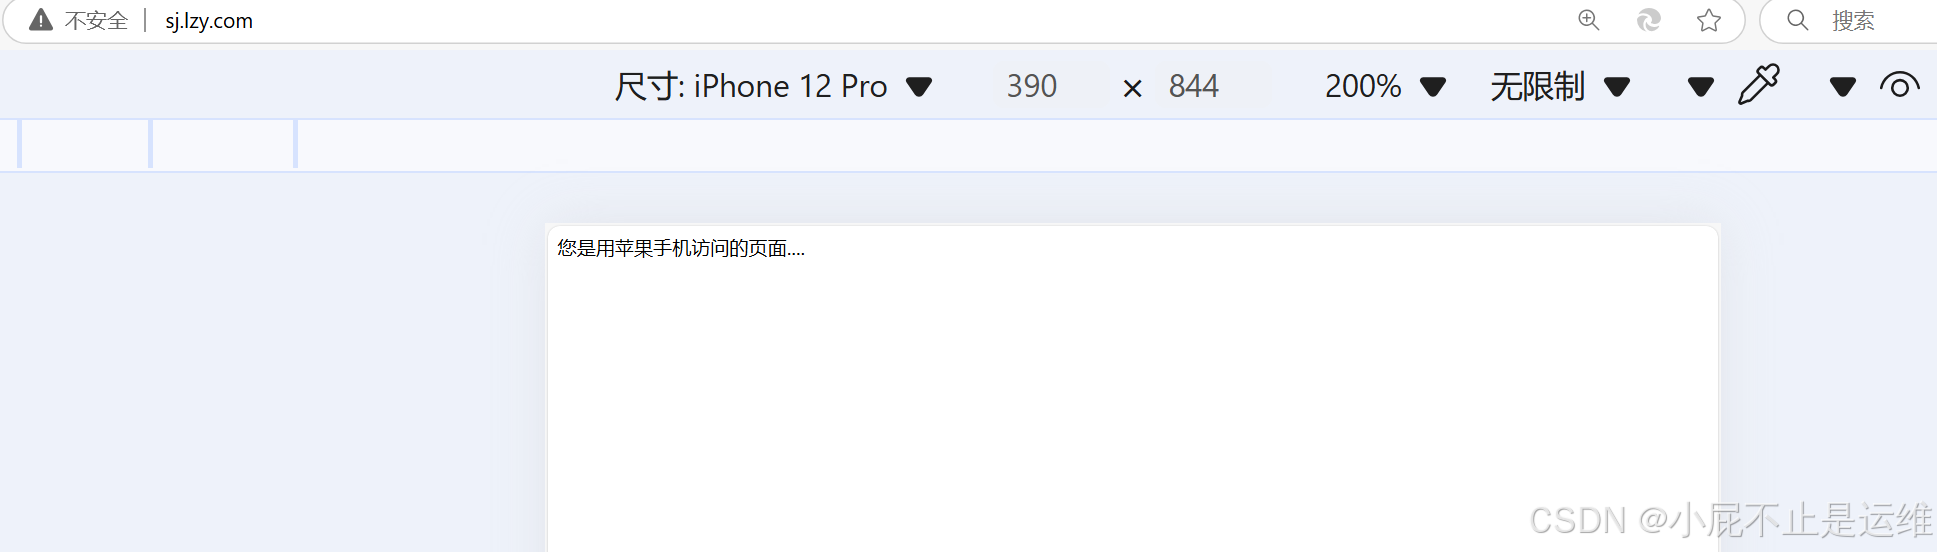
[root@web01 conf.d]#echo 您是用苹果手机访问的页面.... > /code/iphone/index.html
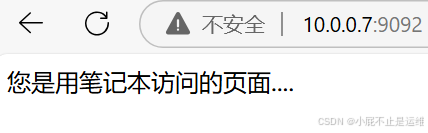
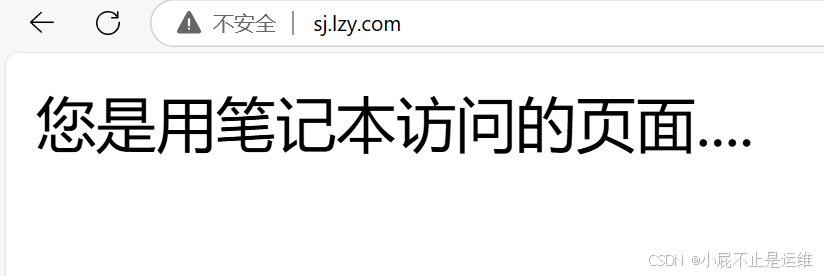
[root@web01 conf.d]#echo 您是用笔记本访问的页面.... > /code/pc/index.html
将charset utf-8,gbk; 写入nginx.conf #字符集解决中文乱码问题
直接访问测试静态页面:
10.0.0.7:9090
10.0.0.7:9091
10.0.0.7:9092
2.负载均衡判断客户来源信息转发到不同的业务
[root@lb01 conf.d]#cat sj.conf
upstream android {
server 172.16.1.7:9090;
}
upstream iphone {
server 172.16.1.7:9091;
}
upstream pc {
server 172.16.1.7:9092;
}
server {
listen 80;
server_name sj.lzy.com;
charset 'utf-8';
location / {
#如果客户端来源是Android则跳转到Android的资源;
if ($http_user_agent ~* "Android") {
proxy_pass http://android;
}
#如果客户端来源是Iphone则跳转到Iphone的资源;
if ($http_user_agent ~* "Iphone") {
proxy_pass http://iphone;
}
#如果客户端是IE浏览器则返回403错误;
if ($http_user_agent ~* "MSIE") {
return 403;
}
#默认跳转pc资源;
proxy_pass http://pc;
}
}
[root@lb01 conf.d]#nginx -t
nginx: the configuration file /etc/nginx/nginx.conf syntax is ok
nginx: configuration file /etc/nginx/nginx.conf test is successful
[root@lb01 conf.d]#systemctl restart nginx
浏览器访问测试:
10.0.0.5 sj.lzy.com #先F12进入开发者模式再选择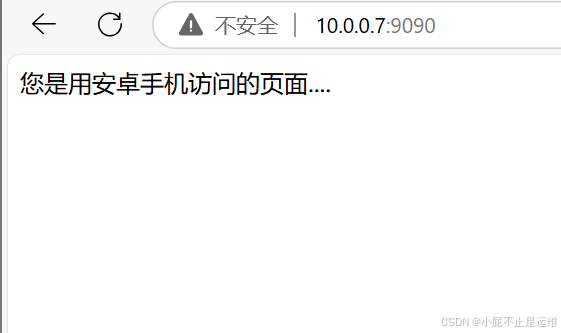
解析到负载均衡服务器切换不同的设备
今天的负载均衡详细玩法就介绍到这里,明天介绍rewrite~~~
想成为大佬,就要从小白开始,从0开始,一点一点的积累,慢慢成长,明天你就是大佬!!想学习更多麒麟操作系统的知识,关注小屁,让你成为运维老鸟~~~~~


 被折叠的 条评论
为什么被折叠?
被折叠的 条评论
为什么被折叠?
 到【灌水乐园】发言


