


 本文档详细介绍了微信小程序中分类页面的实现过程,包括接口数据与页面效果的关联、数据获取、页面渲染、菜单点击事件处理、缓存技术应用、列表置顶功能以及接口代码的优化,旨在提升用户体验和代码效率。
5分类页面
接口文档
5.1接口数据和页面效果的关系
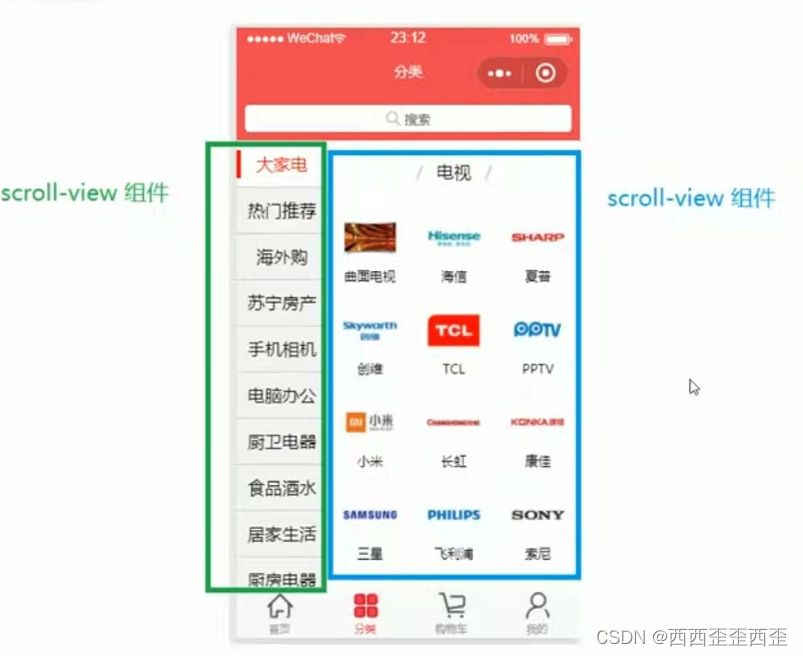
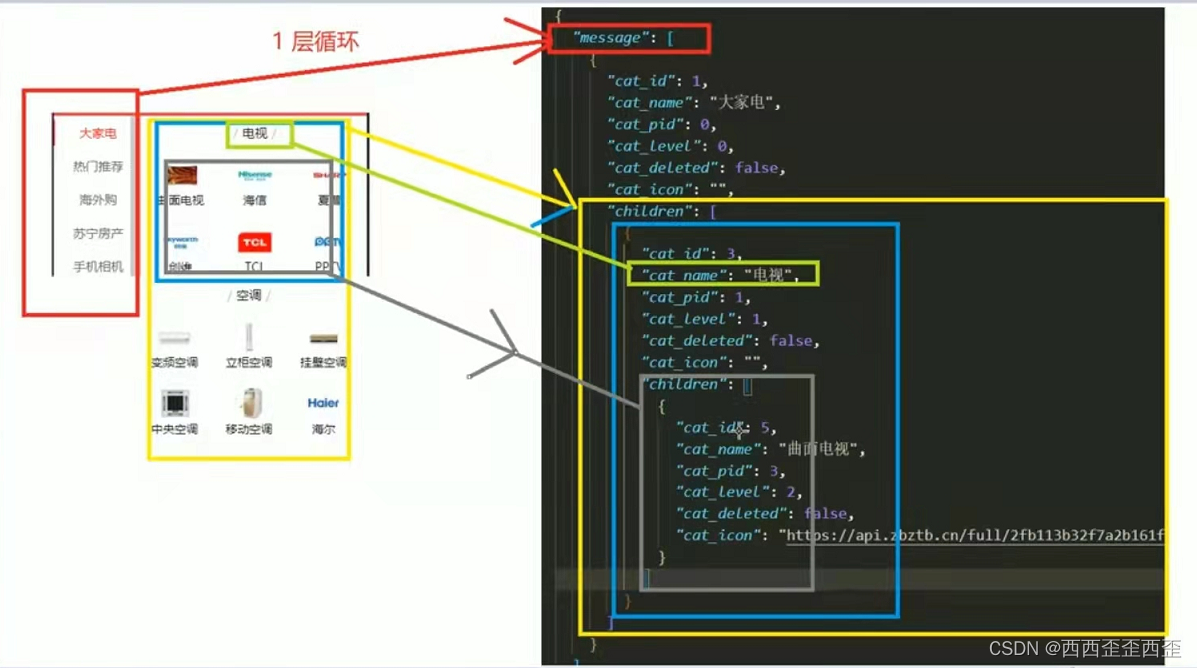
5.2分类页面获取数据
在JSON中
{
  "usingComponents": {
    "Searchlnput":"../../components/Searchlnput/Searchlnput"
  },
  "navigationBarTitleText": "商品分类"
}
在JS中
// pages/category/category.js
// 0 引入用来发送请求的方法
import { request } from "../../request/index";
Page({

  /**
   * 页面的初始数据
   */
  data: {
     // 左侧的菜单数据
     leftMenuList:[],
     // 右侧的商品数据
     rightContent:[]
  },
  // 接口的返回数据
  Cates:[],

  /**
   * 生命周期函数--监听页面加载
   */
  onLoad: function (options) {
    this.getCates();
  },
  // 获取分类数据
  getCates(){
    request({
      url:"https://api-hmugo-web.itheima.net/api/public/v1/categories"
    })
    .then(res=>{
      // console.log(res);
      this.Cates=res.data.message;

      // 构造左侧的大菜单数据
      let  leftMenuList=this.Cates.map(v=>v.cat_name);
      // 构造右侧的商品数据
      let rightContent=this.Cates[0].children
      this.setData({
        leftMenuList,
        rightContent
      })
    })
  }
})
5.3分类页面渲染
在wxml中
<!--pages/category/category.wxml-->
<view class="cates">
  <!-- 搜索框 开始 -->
  <Searchlnput></Searchlnput>
  <!-- 搜索框 结束 -->

  <!-- 商品列表 开始 -->
  <view class="cates_container">
    <!-- 左侧菜单 -->
    <scroll-view scroll-y class="left_menu">
      <view class="menu_item  {
  {index===currentIndex?'active':''}}" wx:for="{
  {leftMenuList}}" wx:key="*this">{
  {item}}</view>
    </scroll-view>
    <!-- 右侧商品内容 -->
    <scroll-view scroll-y class="right_content">
      <view class="goods_group" wx:for="{
  {rightContent}}" wx:for-index="index1" wx:for-item="item1">
        <view class="goods_title">
          <text class="delimiter">/</text>
          <text class="title">{
  {item1.cat_name}}</text>
          <text class="delimiter">/</text>
        </view>
        <view class="goods_list">
          <navigator wx:for="{
  {item1.children}}" wx:for-index="index2" wx:for-item="item2" wx:key&#
最低0.47元/天 解锁文章


 824
824

 被折叠的 条评论
为什么被折叠?
被折叠的 条评论
为什么被折叠?
 到【灌水乐园】发言


