


十六、Spring对事务的支持
16.1 事务概述
- 什么是事务
- 在一个业务流程当中,通常需要多条DML(insert delete update)语句共同联合才能完成,这多条DML语句必须同时成功,或者同时失败,这样才能保证数据的安全。
- 多条DML要么同时成功,要么同时失败,这叫做事务。
- 事务:Transaction(tx)
- 事务的四个处理过程:
- 第一步:开启事务 (start transaction)
- 第二步:执行核心业务代码
- 第三步:提交事务(如果核心业务处理过程中没有出现异常)(commit transaction)
- 第四步:回滚事务(如果核心业务处理过程中出现异常)(rollback transaction)
- 事务的四个特性:
- A 原子性:事务是最小的工作单元,不可再分。
- C 一致性:事务要求要么同时成功,要么同时失败。事务前和事务后的总量不变。
- I 隔离性:事务和事务之间因为有隔离性,才可以保证互不干扰。
- D 持久性:持久性是事务结束的标志。
16.2 引入事务场景
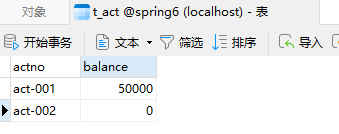
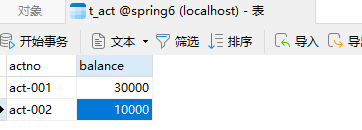
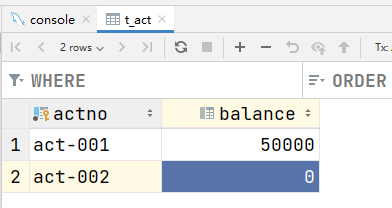
以银行账户转账为例学习事务。两个账户act-001和act-002。act-001账户向act-002账户转账10000,必须同时成功,或者同时失败。(一个减成功,一个加成功, 这两条update语句必须同时成功,或同时失败。)
连接数据库的技术采用Spring框架的JdbcTemplate。
采用三层架构搭建:
模块名:spring6-013-tx-bank(依赖如下)
<?xml version="1.0" encoding="UTF-8"?>
<project xmlns="http://maven.apache.org/POM/4.0.0"
         xmlns:xsi="http://www.w3.org/2001/XMLSchema-instance"
         xsi:schemaLocation="http://maven.apache.org/POM/4.0.0 http://maven.apache.org/xsd/maven-4.0.0.xsd">
    <modelVersion>4.0.0</modelVersion>

    <groupId>com.powernode</groupId>
    <artifactId>spring6-013-tx-bank</artifactId>
    <version>1.0-SNAPSHOT</version>
    <packaging>jar</packaging>

    <!--仓库-->
    <repositories>
        <!--spring里程碑版本的仓库-->
        <repository>
            <id>repository.spring.milestone</id>
            <name>Spring Milestone Repository</name>
            <url>https://repo.spring.io/milestone</url>
        </repository>
    </repositories>

    <!--依赖-->
    <dependencies>
        <!--spring context-->
        <dependency>
            <groupId>org.springframework</groupId>
            <artifactId>spring-context</artifactId>
            <version>6.0.0-M2</version>
        </dependency>
        <!--spring jdbc-->
        <dependency>
            <groupId>org.springframework</groupId>
            <artifactId>spring-jdbc</artifactId>
            <version>6.0.0-M2</version>
        </dependency>
        <!--mysql驱动-->
        <dependency>
            <groupId>mysql</groupId>
            <artifactId>mysql-connector-java</artifactId>
            <version>8.0.30</version>
        </dependency>
      <!--德鲁伊连接池-->
        <dependency>
            <groupId>com.alibaba</groupId>
            <artifactId>druid</artifactId>
            <version>1.2.13</version>
        </dependency>
      <!--@Resource注解-->
        <dependency>
            <groupId>jakarta.annotation</groupId>
            <artifactId>jakarta.annotation-api</artifactId>
            <version>2.1.1</version>
        </dependency>
        <!--junit-->
        <dependency>
            <groupId>junit</groupId>
            <artifactId>junit</artifactId>
            <version>4.13.2</version>
            <scope>test</scope>
        </dependency>
    </dependencies>

    <properties>
        <maven.compiler.source>17</maven.compiler.source>
        <maven.compiler.target>17</maven.compiler.target>
    </properties>

</project>
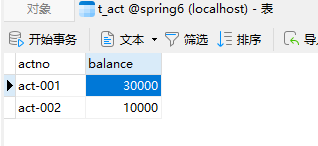
第一步:准备数据库表
表结构: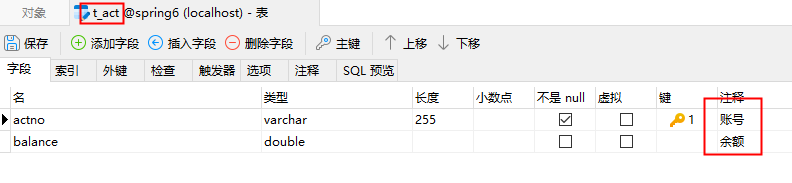
表数据:
第二步:创建包结构
com.powernode.bank.pojo
com.powernode.bank.service
com.powernode.bank.service.impl
com.powernode.bank.dao
com.powernode.bank.dao.impl
第三步:准备POJO类
package com.powernode.bank.pojo;

/**
 * @author 动力节点
 * @version 1.0
 * @className Account
 * @since 1.0
 **/
public class Account {
    private String actno;
    private Double balance;

    @Override
    public String toString() {
        return "Account{" +
                "actno='" + actno + '\'' +
                ", balance=" + balance +
                '}';
    }

    public Account() {
    }

    public Account(String actno, Double balance) {
        this.actno = actno;
        this.balance = balance;
    }

    public String getActno() {
        return actno;
    }

    public void setActno(String actno) {
        this.actno = actno;
    }

    public Double getBalance() {
        return balance;
    }

    public void setBalance(Double balance) {
        this.balance = balance;
    }
}
第四步:编写持久层
package com.powernode.bank.dao;

import com.powernode.bank.pojo.Account;

/**
 * @author 动力节点
 * @version 1.0
 * @className AccountDao
 * @since 1.0
 **/
public interface AccountDao {

    /**
     * 根据账号查询余额
     * @param actno
     * @return
     */
    Account selectByActno(String actno);

    /**
     * 更新账户
     * @param act
     * @return
     */
    int update(Account act);

}
package com.powernode.bank.dao.impl;

import com.powernode.bank.dao.AccountDao;
import com.powernode.bank.pojo.Account;
import jakarta.annotation.Resource;
import org.springframework.jdbc.core.BeanPropertyRowMapper;
import org.springframework.jdbc.core.JdbcTemplate;
import org.springframework.stereotype.Component;

/**
 * @author 动力节点
 * @version 1.0
 * @className AccountDaoImpl
 * @since 1.0
 **/
@Repository("accountDao")
public class AccountDaoImpl implements AccountDao {

    @Resource(name = "jdbcTemplate")
    private JdbcTemplate jdbcTemplate;

    @Override
    public Account selectByActno(String actno) {
        String sql = "select actno, balance from t_act where actno = ?";
        Account account = jdbcTemplate.queryForObject(sql, new BeanPropertyRowMapper<>(Account.class), actno);
        return account;
    }

    @Override
    public int update(Account act) {
        String sql = "update t_act set balance = ? where actno = ?";
        int count = jdbcTemplate.update(sql, act.getBalance(), act.getActno());
        return count;
    }
}
第五步:编写业务层
package com.powernode.bank.service;

/**
 * @author 动力节点
 * @version 1.0
 * @className AccountService
 * @since 1.0
 **/
public interface AccountService {

    /**
     * 转账
     * @param fromActno
     * @param toActno
     * @param money
     */
    void transfer(String fromActno, String toActno, double money);
}
package com.powernode.bank.service.impl;

import com.powernode.bank.dao.AccountDao;
import com.powernode.bank.pojo.Account;
import com.powernode.bank.service.AccountService;
import jakarta.annotation.Resource;
import org.springframework.stereotype.Service;

/**
 * @author 动力节点
 * @version 1.0
 * @className AccountServiceImpl
 * @since 1.0
 **/
@Service("accountService")
public class AccountServiceImpl implements AccountService {

    @Resource(name = "accountDao")
    private AccountDao accountDao;

    @Override
    public void transfer(String fromActno, String toActno, double money) {
        // 查询账户余额是否充足
        Account fromAct = accountDao.selectByActno(fromActno);
        if (fromAct.getBalance() < money) {
            throw new RuntimeException("账户余额不足");
        }
        // 余额充足,开始转账
        Account toAct = accountDao.selectByActno(toActno);
        fromAct.setBalance(fromAct.getBalance() - money);
        toAct.setBalance(toAct.getBalance() + money);
        int count = accountDao.update(fromAct);
        count += accountDao.update(toAct);
        if (count != 2) {
            throw new RuntimeException("转账失败,请联系银行");
        }
    }
}
第六步:编写Spring配置文件
<?xml version="1.0" encoding="UTF-8"?>
<beans xmlns="http://www.springframework.org/schema/beans"
       xmlns:xsi="http://www.w3.org/2001/XMLSchema-instance"
       xmlns:context="http://www.springframework.org/schema/context"
       xsi:schemaLocation="http://www.springframework.org/schema/beans http://www.springframework.org/schema/beans/spring-beans.xsd
                           http://www.springframework.org/schema/context http://www.springframework.org/schema/context/spring-context.xsd">

    <context:component-scan base-package="com.powernode.bank"/>

    <bean id="dataSource" class="com.alibaba.druid.pool.DruidDataSource">
        <property name="driverClassName" value="com.mysql.cj.jdbc.Driver"/>
        <property name="url" value="jdbc:mysql://localhost:3306/spring6"/>
        <property name="username" value="root"/>
        <property name="password" value="root"/>
    </bean>

    <bean id="jdbcTemplate" class="org.springframework.jdbc.core.JdbcTemplate">
        <property name="dataSource" ref="dataSource"/>
    </bean>

</beans>
第七步:编写表示层(测试程序)
package com.powernode.spring6.test;

import com.powernode.bank.service.AccountService;
import org.junit.Test;
import org.springframework.context.ApplicationContext;
import org.springframework.context.support.ClassPathXmlApplicationContext;

/**
 * @author 动力节点
 * @version 1.0
 * @className BankTest
 * @since 1.0
 **/
public class BankTest {
    @Test
    public void testTransfer(){
        ApplicationContext applicationContext = new ClassPathXmlApplicationContext("spring.xml");
        AccountService accountService = applicationContext.getBean("accountService", AccountService.class);
        try {
            accountService.transfer("act-001", "act-002", 10000);
            System.out.println("转账成功");
        } catch (Exception e) {
            e.printStackTrace();
        }

    }
}
执行结果: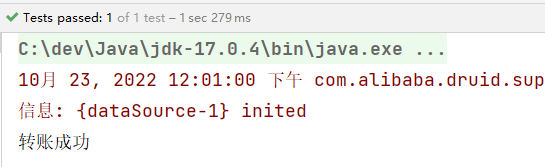
数据变化: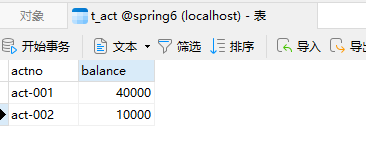
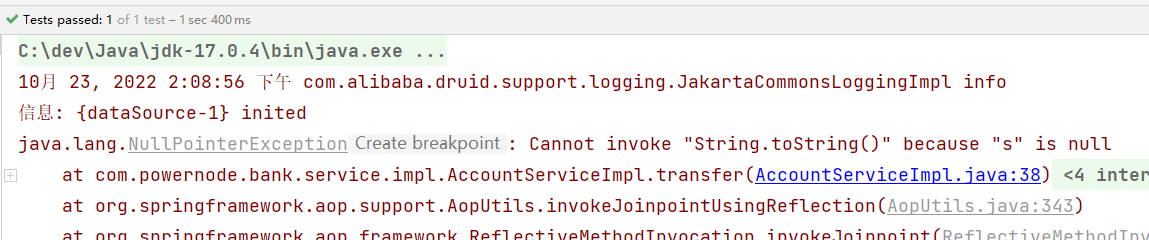
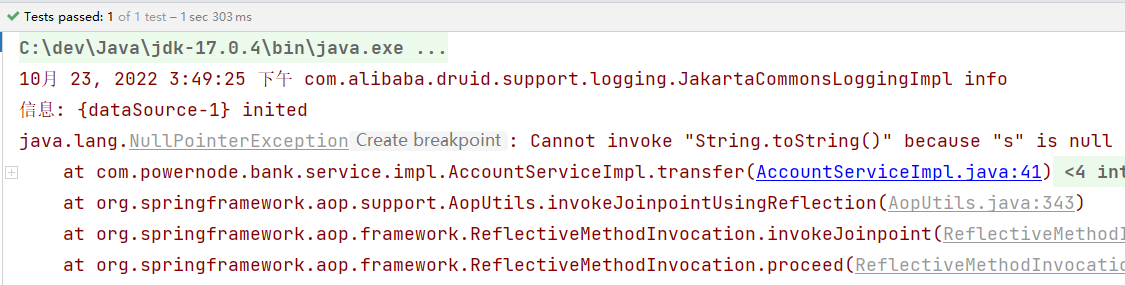
模拟异常
package com.powernode.bank.service.impl;

import com.powernode.bank.dao.AccountDao;
import com.powernode.bank.pojo.Account;
import com.powernode.bank.service.AccountService;
import jakarta.annotation.Resource;
import org.springframework.stereotype.Service;

/**
 * @author 动力节点
 * @version 1.0
 * @className AccountServiceImpl
 * @since 1.0
 **/
@Service("accountService")
public class AccountServiceImpl implements AccountService {

    @Resource(name = "accountDao")
    private AccountDao accountDao;

    @Override
    public void transfer(String fromActno, String toActno, double money) {
        // 查询账户余额是否充足
        Account fromAct = accountDao.selectByActno(fromActno);
        if (fromAct.getBalance() < money) {
            throw new RuntimeException("账户余额不足");
        }
        // 余额充足,开始转账
        Account toAct = accountDao.selectByActno(toActno);
        fromAct.setBalance(fromAct.getBalance() - money);
        toAct.setBalance(toAct.getBalance() + money);
        int count = accountDao.update(fromAct);

        // 模拟异常
        String s = null;
        s.toString();

        count += accountDao.update(toAct);
        if (count != 2) {
            throw new RuntimeException("转账失败,请联系银行");
        }
    }
}
执行结果:
数据库表中数据:

丢了1万。
16.3 Spring对事务的支持
Spring实现事务的两种方式
- 编程式事务
- 通过编写代码的方式来实现事务的管理。
- 声明式事务
- 基于注解方式
- 基于XML配置方式
Spring事务管理API
Spring对事务的管理底层实现方式是基于AOP实现的。采用AOP的方式进行了封装。所以Spring专门针对事务开发了一套API,API的核心接口如下: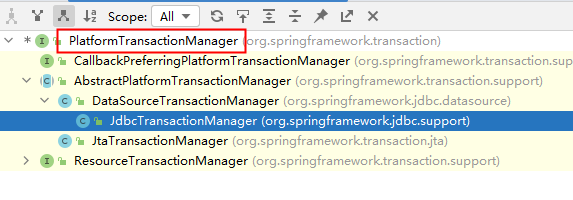
PlatformTransactionManager接口:spring事务管理器的核心接口。在Spring6中它有两个实现:
- DataSourceTransactionManager:支持JdbcTemplate、MyBatis、Hibernate等事务管理。
- JtaTransactionManager:支持分布式事务管理。
如果要在Spring6中使用JdbcTemplate,就要使用DataSourceTransactionManager来管理事务。(Spring内置写好了,可以直接用。)
声明式事务之注解实现方式
- 第一步:在spring配置文件中配置事务管理器。
<bean id="transactionManager" class="org.springframework.jdbc.datasource.DataSourceTransactionManager">
  <property name="dataSource" ref="dataSource"/>
</bean>
- 第二步:在spring配置文件中引入tx命名空间。
<?xml version="1.0" encoding="UTF-8"?>
<beans xmlns="http://www.springframework.org/schema/beans"
       xmlns:xsi="http://www.w3.org/2001/XMLSchema-instance"
       xmlns:context="http://www.springframework.org/schema/context"
       xmlns:tx="http://www.springframework.org/schema/tx"
       xsi:schemaLocation="http://www.springframework.org/schema/beans http://www.springframework.org/schema/beans/spring-beans.xsd
                           http://www.springframework.org/schema/context http://www.springframework.org/schema/context/spring-context.xsd
                           http://www.springframework.org/schema/tx http://www.springframework.org/schema/tx/spring-tx.xsd">
- 第三步:在spring配置文件中配置“事务注解驱动器”,开始注解的方式控制事务。
<tx:annotation-driven transaction-manager="transactionManager"/>
- 第四步:在service类上或方法上添加@Transactional注解
在类上添加该注解,该类中所有的方法都有事务。在某个方法上添加该注解,表示只有这个方法使用事务。
package com.powernode.bank.service.impl;

import com.powernode.bank.dao.AccountDao;
import com.powernode.bank.pojo.Account;
import com.powernode.bank.service.AccountService;
import jakarta.annotation.Resource;
import org.springframework.stereotype.Service;
import org.springframework.transaction.annotation.Transactional;

/**
 * @author 动力节点
 * @version 1.0
 * @className AccountServiceImpl
 * @since 1.0
 **/
@Service("accountService")
@Transactional
public class AccountServiceImpl implements AccountService {

    @Resource(name = "accountDao")
    private AccountDao accountDao;

    @Override
    public void transfer(String fromActno, String toActno, double money) {
        // 查询账户余额是否充足
        Account fromAct = accountDao.selectByActno(fromActno);
        if (fromAct.getBalance() < money) {
            throw new RuntimeException("账户余额不足");
        }
        // 余额充足,开始转账
        Account toAct = accountDao.selectByActno(toActno);
        fromAct.setBalance(fromAct.getBalance() - money);
        toAct.setBalance(toAct.getBalance() + money);
        int count = accountDao.update(fromAct);

        // 模拟异常
        String s = null;
        s.toString();

        count += accountDao.update(toAct);
        if (count != 2) {
            throw new RuntimeException("转账失败,请联系银行");
        }
    }
}
当前数据库表中的数据:
执行测试程序:
虽然出现异常了,再次查看数据库表中数据:

通过测试,发现数据没有变化,事务起作用了。
事务属性
事务属性包括哪些

事务中的重点属性:
- 事务传播行为
- 事务隔离级别
- 事务超时
- 只读事务
- 设置出现哪些异常回滚事务
- 设置出现哪些异常不回滚事务
事务传播行为
什么是事务的传播行为?
在service类中有a()方法和b()方法,a()方法上有事务,b()方法上也有事务,当a()方法执行过程中调用了b()方法,事务是如何传递的?合并到一个事务里?还是开启一个新的事务?这就是事务传播行为。
事务传播行为在spring框架中被定义为枚举类型:
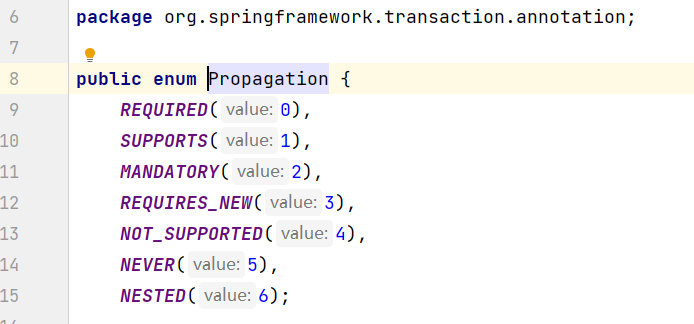
一共有七种传播行为:
- REQUIRED:支持当前事务,如果不存在就新建一个(默认)【没有就新建,有就加入】
- SUPPORTS:支持当前事务,如果当前没有事务,就以非事务方式执行**【有就加入,没有就不管了】**
- MANDATORY:必须运行在一个事务中,如果当前没有事务正在发生,将抛出一个异常**【有就加入,没有就抛异常】**
- REQUIRES_NEW:开启一个新的事务,如果一个事务已经存在,则将这个存在的事务挂起**【不管有没有,直接开启一个新事务,开启的新事务和之前的事务不存在嵌套关系,之前事务被挂起】**
- NOT_SUPPORTED:以非事务方式运行,如果有事务存在,挂起当前事务**【不支持事务,存在就挂起】**
- NEVER:以非事务方式运行,如果有事务存在,抛出异常**【不支持事务,存在就抛异常】**
- NESTED:如果当前正有一个事务在进行中,则该方法应当运行在一个嵌套式事务中。被嵌套的事务可以独立于外层事务进行提交或回滚。如果外层事务不存在,行为就像REQUIRED一样。【有事务的话,就在这个事务里再嵌套一个完全独立的事务,嵌套的事务可以独立的提交和回滚。没有事务就和REQUIRED一样。】
在代码中设置事务的传播行为:
@Transactional(propagation = Propagation.REQUIRED)
可以编写程序测试一下传播行为:
@Transactional(propagation = Propagation.REQUIRED)
public void save(Account act) {

    // 这里调用dao的insert方法。
    accountDao.insert(act); // 保存act-003账户

    // 创建账户对象
    Account act2 = new Account("act-004", 1000.0);
    try {
        accountService.save(act2); // 保存act-004账户
    } catch (Exception e) {

    }
    // 继续往后进行我当前1号事务自己的事儿。
}
@Override
//@Transactional(propagation = Propagation.REQUIRED)
@Transactional(propagation = Propagation.REQUIRES_NEW)
public void save(Account act) {
    accountDao.insert(act);
    // 模拟异常
    String s = null;
    s.toString();

    // 事儿没有处理完,这个大括号当中的后续也许还有其他的DML语句。
}
一定要集成Log4j2日志框架,在日志信息中可以看到更加详细的信息。
事务隔离级别
事务隔离级别类似于教室A和教室B之间的那道墙,隔离级别越高表示墙体越厚。隔音效果越好。
数据库中读取数据存在的三大问题:(三大读问题)
- 脏读:读取到没有提交到数据库的数据,叫做脏读。
- 不可重复读:在同一个事务当中,第一次和第二次读取的数据不一样。
- 幻读:读到的数据是假的。
事务隔离级别包括四个级别:
- 读未提交:READ_UNCOMMITTED
- 这种隔离级别,存在脏读问题,所谓的脏读(dirty read)表示能够读取到其它事务未提交的数据。
- 读提交:READ_COMMITTED
- 解决了脏读问题,其它事务提交之后才能读到,但存在不可重复读问题。
- 可重复读:REPEATABLE_READ
- 解决了不可重复读,可以达到可重复读效果,只要当前事务不结束,读取到的数据一直都是一样的。但存在幻读问题。
- 序列化:SERIALIZABLE
- 解决了幻读问题,事务排队执行。不支持并发。
大家可以通过一个表格来记忆:
| 隔离级别 | 脏读 | 不可重复读 | 幻读 |
|---|---|---|---|
| 读未提交 | 有 | 有 | 有 |
| 读提交 | 无 | 有 | 有 |
| 可重复读 | 无 | 无 | 有 |
| 序列化 | 无 | 无 | 无 |
在Spring代码中如何设置隔离级别?
隔离级别在spring中以枚举类型存在: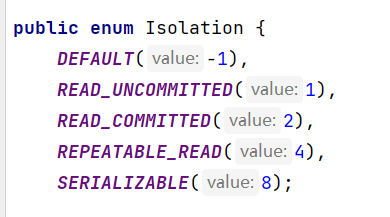
@Transactional(isolation = Isolation.READ_COMMITTED)
测试事务隔离级别:READ_UNCOMMITTED 和 READ_COMMITTED
怎么测试:一个service负责插入,一个service负责查询。负责插入的service要模拟延迟。
package com.powernode.bank.service.impl;

import com.powernode.bank.dao.AccountDao;
import com.powernode.bank.pojo.Account;
import jakarta.annotation.Resource;
import org.springframework.stereotype.Service;
import org.springframework.transaction.annotation.Isolation;
import org.springframework.transaction.annotation.Transactional;

/**
 * @author 动力节点
 * @version 1.0
 * @className IsolationService1
 * @since 1.0
 **/
@Service("i1")
public class IsolationService1 {

    @Resource(name = "accountDao")
    private AccountDao accountDao;

    // 1号
    // 负责查询
    // 当前事务可以读取到别的事务没有提交的数据。
    //@Transactional(isolation = Isolation.READ_UNCOMMITTED)
    // 对方事务提交之后的数据我才能读取到。
    @Transactional(isolation = Isolation.READ_COMMITTED)
    public void getByActno(String actno) {
        Account account = accountDao.selectByActno(actno);
        System.out.println("查询到的账户信息:" + account);
    }

}
package com.powernode.bank.service.impl;

import com.powernode.bank.dao.AccountDao;
import com.powernode.bank.pojo.Account;
import jakarta.annotation.Resource;
import org.springframework.stereotype.Service;
import org.springframework.transaction.annotation.Transactional;

/**
 * @author 动力节点
 * @version 1.0
 * @className IsolationService2
 * @since 1.0
 **/
@Service("i2")
public class IsolationService2 {

    @Resource(name = "accountDao")
    private AccountDao accountDao;

    // 2号
    // 负责insert
    @Transactional
    public void save(Account act) {
        accountDao.insert(act);
        // 睡眠一会
        try {
            Thread.sleep(1000 * 20);
        } catch (InterruptedException e) {
            e.printStackTrace();
        }
    }

}
测试程序
@Test
public void testIsolation1(){
    ApplicationContext applicationContext = new ClassPathXmlApplicationContext("spring.xml");
    IsolationService1 i1 = applicationContext.getBean("i1", IsolationService1.class);
    i1.getByActno("act-004");
}

@Test
public void testIsolation2(){
    ApplicationContext applicationContext = new ClassPathXmlApplicationContext("spring.xml");
    IsolationService2 i2 = applicationContext.getBean("i2", IsolationService2.class);
    Account act = new Account("act-004", 1000.0);
    i2.save(act);
}
通过执行结果可以清晰的看出隔离级别不同,执行效果不同。
事务超时
代码如下:
@Transactional(timeout = 10)
以上代码表示设置事务的超时时间为10秒。
表示超过10秒如果该事务中所有的DML语句还没有执行完毕的话,最终结果会选择回滚。
默认值-1,表示没有时间限制。
这里有个坑,事务的超时时间指的是哪段时间?
在当前事务当中,最后一条DML语句执行之前的时间。如果最后一条DML语句后面很有很多业务逻辑,这些业务代码执行的时间不被计入超时时间。
@Transactional(timeout = 10) // 设置事务超时时间为10秒。
public void save(Account act) {
    accountDao.insert(act);
    // 睡眠一会
    try {
        Thread.sleep(1000 * 15);
    } catch (InterruptedException e) {
        e.printStackTrace();
    }
}
@Transactional(timeout = 10) // 设置事务超时时间为10秒。
public void save(Account act) {
    // 睡眠一会
    try {
        Thread.sleep(1000 * 15);
    } catch (InterruptedException e) {
        e.printStackTrace();
    }
    accountDao.insert(act);
}
当然,如果想让整个方法的所有代码都计入超时时间的话,可以在方法最后一行添加一行无关紧要的DML语句。
只读事务
代码如下:
@Transactional(readOnly = true)
将当前事务设置为只读事务,在该事务执行过程中只允许select语句执行,delete insert update均不可执行。
该特性的作用是:启动spring的优化策略。提高select语句执行效率。
如果该事务中确实没有增删改操作,建议设置为只读事务。
设置哪些异常回滚事务
代码如下:
@Transactional(rollbackFor = RuntimeException.class)
表示只有发生RuntimeException异常或该异常的子类异常才回滚。
设置哪些异常不回滚事务
代码如下:
@Transactional(noRollbackFor = NullPointerException.class)
表示发生NullPointerException或该异常的子类异常不回滚,其他异常则回滚。
事务的全注解式开发
编写一个类来代替配置文件,代码如下:
package com.powernode.bank;

import com.alibaba.druid.pool.DruidDataSource;
import org.springframework.context.annotation.Bean;
import org.springframework.context.annotation.ComponentScan;
import org.springframework.context.annotation.Configuration;
import org.springframework.jdbc.core.JdbcTemplate;
import org.springframework.jdbc.datasource.DataSourceTransactionManager;
import org.springframework.transaction.annotation.EnableTransactionManagement;

import javax.sql.DataSource;

/**
 * @author 动力节点
 * @version 1.0
 * @className Spring6Config
 * @since 1.0
 **/
@Configuration
@ComponentScan("com.powernode.bank")
@EnableTransactionManagement
public class Spring6Config {

    @Bean
    public DataSource getDataSource(){
        DruidDataSource dataSource = new DruidDataSource();
        dataSource.setDriverClassName("com.mysql.cj.jdbc.Driver");
        dataSource.setUrl("jdbc:mysql://localhost:3306/spring6");
        dataSource.setUsername("root");
        dataSource.setPassword("root");
        return dataSource;
    }

    @Bean(name = "jdbcTemplate")
    public JdbcTemplate getJdbcTemplate(DataSource dataSource){
        JdbcTemplate jdbcTemplate = new JdbcTemplate();
        jdbcTemplate.setDataSource(dataSource);
        return jdbcTemplate;
    }

    @Bean
    public DataSourceTransactionManager getDataSourceTransactionManager(DataSource dataSource){
        DataSourceTransactionManager dataSourceTransactionManager = new DataSourceTransactionManager();
        dataSourceTransactionManager.setDataSource(dataSource);
        return dataSourceTransactionManager;
    }

}
测试程序如下:
@Test
public void testNoXml(){
    ApplicationContext applicationContext = new AnnotationConfigApplicationContext(Spring6Config.class);
    AccountService accountService = applicationContext.getBean("accountService", AccountService.class);
    try {
        accountService.transfer("act-001", "act-002", 10000);
        System.out.println("转账成功");
    } catch (Exception e) {
        e.printStackTrace();
    }
}
执行结果:
数据库表中数据:
声明式事务之XML实现方式
配置步骤:
- 第一步:配置事务管理器
- 第二步:配置通知
- 第三步:配置切面
记得添加aspectj的依赖:
<!--aspectj依赖-->
<dependency>
  <groupId>org.springframework</groupId>
  <artifactId>spring-aspects</artifactId>
  <version>6.0.0-M2</version>
</dependency>
Spring配置文件如下:
记得添加aop的命名空间。
<?xml version="1.0" encoding="UTF-8"?>
<beans xmlns="http://www.springframework.org/schema/beans"
       xmlns:xsi="http://www.w3.org/2001/XMLSchema-instance"
       xmlns:context="http://www.springframework.org/schema/context"
       xmlns:tx="http://www.springframework.org/schema/tx"
       xmlns:aop="http://www.springframework.org/schema/aop"
       xsi:schemaLocation="http://www.springframework.org/schema/beans http://www.springframework.org/schema/beans/spring-beans.xsd
                           http://www.springframework.org/schema/context http://www.springframework.org/schema/context/spring-context.xsd
                           http://www.springframework.org/schema/tx http://www.springframework.org/schema/tx/spring-tx.xsd
                           http://www.springframework.org/schema/aop http://www.springframework.org/schema/aop/spring-aop.xsd">

    <context:component-scan base-package="com.powernode.bank"/>

    <bean id="dataSource" class="com.alibaba.druid.pool.DruidDataSource">
        <property name="driverClassName" value="com.mysql.cj.jdbc.Driver"/>
        <property name="url" value="jdbc:mysql://localhost:3306/spring6"/>
        <property name="username" value="root"/>
        <property name="password" value="root"/>
    </bean>

    <bean id="jdbcTemplate" class="org.springframework.jdbc.core.JdbcTemplate">
        <property name="dataSource" ref="dataSource"/>
    </bean>

    <!--配置事务管理器-->
    <bean id="transactionManager" class="org.springframework.jdbc.datasource.DataSourceTransactionManager">
        <property name="dataSource" ref="dataSource"/>
    </bean>

    <!--配置通知-->
    <tx:advice id="txAdvice" transaction-manager="txManager">
        <tx:attributes>
            <tx:method name="save*" propagation="REQUIRED" rollback-for="java.lang.Throwable"/>
            <tx:method name="del*" propagation="REQUIRED" rollback-for="java.lang.Throwable"/>
            <tx:method name="update*" propagation="REQUIRED" rollback-for="java.lang.Throwable"/>
            <tx:method name="transfer*" propagation="REQUIRED" rollback-for="java.lang.Throwable"/>
        </tx:attributes>
    </tx:advice>

    <!--配置切面-->
    <aop:config>
        <aop:pointcut id="txPointcut" expression="execution(* com.powernode.bank.service..*(..))"/>
        <!--切面 = 通知 + 切点-->
        <aop:advisor advice-ref="txAdvice" pointcut-ref="txPointcut"/>
    </aop:config>

</beans>
将AccountServiceImpl类上的@Transactional注解删除。
编写测试程序:
@Test
public void testTransferXml(){
    ApplicationContext applicationContext = new ClassPathXmlApplicationContext("spring2.xml");
    AccountService accountService = applicationContext.getBean("accountService", AccountService.class);
    try {
        accountService.transfer("act-001", "act-002", 10000);
        System.out.println("转账成功");
    } catch (Exception e) {
        e.printStackTrace();
    }
}
执行结果:
数据库表中记录: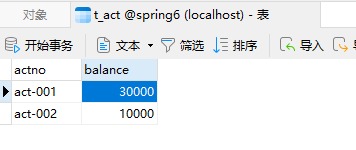
通过测试可以看到配置XML已经起作用了。
十七、Spring6整合JUnit5
17.1 Spring对JUnit4的支持
准备工作:
<?xml version="1.0" encoding="UTF-8"?>
<project xmlns="http://maven.apache.org/POM/4.0.0"
         xmlns:xsi="http://www.w3.org/2001/XMLSchema-instance"
         xsi:schemaLocation="http://maven.apache.org/POM/4.0.0 http://maven.apache.org/xsd/maven-4.0.0.xsd">
    <modelVersion>4.0.0</modelVersion>

    <groupId>com.powernode</groupId>
    <artifactId>spring6-015-junit</artifactId>
    <version>1.0-SNAPSHOT</version>
    <packaging>jar</packaging>

    <!--仓库-->
    <repositories>
        <!--spring里程碑版本的仓库-->
        <repository>
            <id>repository.spring.milestone</id>
            <name>Spring Milestone Repository</name>
            <url>https://repo.spring.io/milestone</url>
        </repository>
    </repositories>

    <dependencies>
        <!--spring context依赖-->
        <dependency>
            <groupId>org.springframework</groupId>
            <artifactId>spring-context</artifactId>
            <version>6.0.0-M2</version>
        </dependency>
        <!--spring对junit的支持相关依赖-->
        <dependency>
            <groupId>org.springframework</groupId>
            <artifactId>spring-test</artifactId>
            <version>6.0.0-M2</version>
        </dependency>
        <!--junit4依赖-->
        <dependency>
            <groupId>junit</groupId>
            <artifactId>junit</artifactId>
            <version>4.13.2</version>
            <scope>test</scope>
        </dependency>
    </dependencies>

    <properties>
        <maven.compiler.source>17</maven.compiler.source>
        <maven.compiler.target>17</maven.compiler.target>
    </properties>

</project>
package com.powernode.spring6.bean;

import org.springframework.beans.factory.annotation.Value;
import org.springframework.stereotype.Component;

/**
 * @author 动力节点
 * @version 1.0
 * @className User
 * @since 1.0
 **/
@Component
public class User {

    @Value("张三")
    private String name;

    @Override
    public String toString() {
        return "User{" +
                "name='" + name + '\'' +
                '}';
    }

    public String getName() {
        return name;
    }

    public void setName(String name) {
        this.name = name;
    }

    public User() {
    }

    public User(String name) {
        this.name = name;
    }
}
<?xml version="1.0" encoding="UTF-8"?>
<beans xmlns="http://www.springframework.org/schema/beans"
       xmlns:xsi="http://www.w3.org/2001/XMLSchema-instance"
       xmlns:context="http://www.springframework.org/schema/context"
       xsi:schemaLocation="http://www.springframework.org/schema/beans http://www.springframework.org/schema/beans/spring-beans.xsd
                           http://www.springframework.org/schema/context http://www.springframework.org/schema/context/spring-context.xsd">
    <context:component-scan base-package="com.powernode.spring6.bean"/>
</beans>
单元测试:
package com.powernode.spring6.test;

import com.powernode.spring6.bean.User;
import org.junit.Test;
import org.junit.runner.RunWith;
import org.springframework.beans.factory.annotation.Autowired;
import org.springframework.test.context.ContextConfiguration;
import org.springframework.test.context.junit4.SpringJUnit4ClassRunner;

/**
 * @author 动力节点
 * @version 1.0
 * @className SpringJUnit4Test
 * @since 1.0
 **/
@RunWith(SpringJUnit4ClassRunner.class)
@ContextConfiguration("classpath:spring.xml")
public class SpringJUnit4Test {

    @Autowired
    private User user;

    @Test
    public void testUser(){
        System.out.println(user.getName());
    }
}
执行结果如下: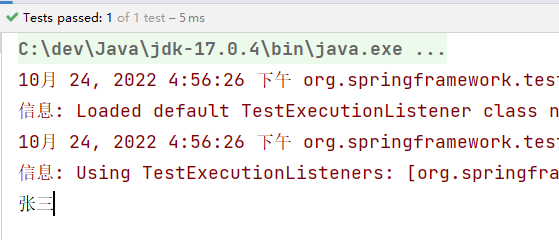
Spring提供的方便主要是这几个注解:
@RunWith(SpringJUnit4ClassRunner.class)
@ContextConfiguration(“classpath:spring.xml”)
在单元测试类上使用这两个注解之后,在单元测试类中的属性上可以使用@Autowired。比较方便。
17.2 Spring对JUnit5的支持
引入JUnit5的依赖,Spring对JUnit支持的依赖还是:spring-test,如下:
<?xml version="1.0" encoding="UTF-8"?>
<project xmlns="http://maven.apache.org/POM/4.0.0"
         xmlns:xsi="http://www.w3.org/2001/XMLSchema-instance"
         xsi:schemaLocation="http://maven.apache.org/POM/4.0.0 http://maven.apache.org/xsd/maven-4.0.0.xsd">
    <modelVersion>4.0.0</modelVersion>

    <groupId>com.powernode</groupId>
    <artifactId>spring6-015-junit</artifactId>
    <version>1.0-SNAPSHOT</version>
    <packaging>jar</packaging>

    <!--仓库-->
    <repositories>
        <!--spring里程碑版本的仓库-->
        <repository>
            <id>repository.spring.milestone</id>
            <name>Spring Milestone Repository</name>
            <url>https://repo.spring.io/milestone</url>
        </repository>
    </repositories>

    <dependencies>
        <!--spring context依赖-->
        <dependency>
            <groupId>org.springframework</groupId>
            <artifactId>spring-context</artifactId>
            <version>6.0.0-M2</version>
        </dependency>
        <!--spring对junit的支持相关依赖-->
        <dependency>
            <groupId>org.springframework</groupId>
            <artifactId>spring-test</artifactId>
            <version>6.0.0-M2</version>
        </dependency>
        <!--junit5依赖-->
        <dependency>
            <groupId>org.junit.jupiter</groupId>
            <artifactId>junit-jupiter</artifactId>
            <version>5.9.0</version>
            <scope>test</scope>
        </dependency>
    </dependencies>

    <properties>
        <maven.compiler.source>17</maven.compiler.source>
        <maven.compiler.target>17</maven.compiler.target>
    </properties>

</project>
package com.powernode.spring6.test;

import com.powernode.spring6.bean.User;
import org.junit.jupiter.api.Test;
import org.junit.jupiter.api.extension.ExtendWith;
import org.springframework.beans.factory.annotation.Autowired;
import org.springframework.test.context.ContextConfiguration;
import org.springframework.test.context.junit.jupiter.SpringExtension;


@ExtendWith(SpringExtension.class)
@ContextConfiguration("classpath:spring.xml")
public class SpringJUnit5Test {

    @Autowired
    private User user;

    @Test
    public void testUser(){
        System.out.println(user.getName());
    }
}
在JUnit5当中,可以使用Spring提供的以下两个注解,标注到单元测试类上,这样在类当中就可以使用@Autowired注解了。
@ExtendWith(SpringExtension.class)
@ContextConfiguration(“classpath:spring.xml”)
十八、Spring6集成MyBatis3.5
18.1 实现步骤
- 第一步:准备数据库表
- 使用t_act表(账户表)
- 第二步:IDEA中创建一个模块,并引入依赖
- spring-context
- spring-jdbc
- mysql驱动
- mybatis
- mybatis-spring:mybatis提供的与spring框架集成的依赖
- 德鲁伊连接池
- junit
- 第三步:基于三层架构实现,所以提前创建好所有的包
- com.powernode.bank.mapper
- com.powernode.bank.service
- com.powernode.bank.service.impl
- com.powernode.bank.pojo
- 第四步:编写pojo
- Account,属性私有化,提供公开的setter getter和toString。
- 第五步:编写mapper接口
- AccountMapper接口,定义方法
- 第六步:编写mapper配置文件
- 在配置文件中配置命名空间,以及每一个方法对应的sql。
- 第七步:编写service接口和service接口实现类
- AccountService
- AccountServiceImpl
- 第八步:编写jdbc.properties配置文件
- 数据库连接池相关信息
- 第九步:编写mybatis-config.xml配置文件
- 该文件可以没有,大部分的配置可以转移到spring配置文件中。
- 如果遇到mybatis相关的系统级配置,还是需要这个文件。
- 第十步:编写spring.xml配置文件
- 组件扫描
- 引入外部的属性文件
- 数据源
- SqlSessionFactoryBean配置
- 注入mybatis核心配置文件路径
- 指定别名包
- 注入数据源
- Mapper扫描配置器
- 指定扫描的包
- 事务管理器DataSourceTransactionManager
- 注入数据源
- 启用事务注解
- 注入事务管理器
- 第十一步:编写测试程序,并添加事务,进行测试
18.2 具体实现
- 第一步:准备数据库表
连接数据库的工具有很多,除了之前我们使用的navicat for mysql之外,也可以使用IDEA工具自带的DataBase插件。可以根据下图提示自行配置: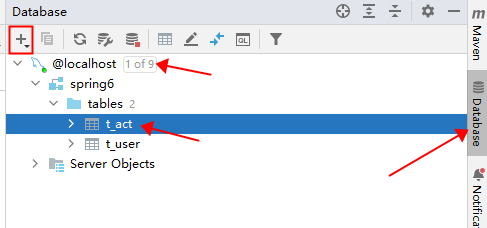
- 第二步:IDEA中创建一个模块,并引入依赖
<?xml version="1.0" encoding="UTF-8"?>
<project xmlns="http://maven.apache.org/POM/4.0.0"
         xmlns:xsi="http://www.w3.org/2001/XMLSchema-instance"
         xsi:schemaLocation="http://maven.apache.org/POM/4.0.0 http://maven.apache.org/xsd/maven-4.0.0.xsd">
    <modelVersion>4.0.0</modelVersion>

    <groupId>com.powernode</groupId>
    <artifactId>spring6-016-sm</artifactId>
    <version>1.0-SNAPSHOT</version>
    <packaging>jar</packaging>

    <!--仓库-->
    <repositories>
        <!--spring里程碑版本的仓库-->
        <repository>
            <id>repository.spring.milestone</id>
            <name>Spring Milestone Repository</name>
            <url>https://repo.spring.io/milestone</url>
        </repository>
    </repositories>

    <dependencies>
        <dependency>
            <groupId>org.springframework</groupId>
            <artifactId>spring-context</artifactId>
            <version>6.0.0-M2</version>
        </dependency>
        <dependency>
            <groupId>org.springframework</groupId>
            <artifactId>spring-jdbc</artifactId>
            <version>6.0.0-M2</version>
        </dependency>
        <dependency>
            <groupId>mysql</groupId>
            <artifactId>mysql-connector-java</artifactId>
            <version>8.0.30</version>
        </dependency>
        <dependency>
            <groupId>org.mybatis</groupId>
            <artifactId>mybatis</artifactId>
            <version>3.5.11</version>
        </dependency>
        <dependency>
            <groupId>org.mybatis</groupId>
            <artifactId>mybatis-spring</artifactId>
            <version>2.0.7</version>
        </dependency>
        <dependency>
            <groupId>com.alibaba</groupId>
            <artifactId>druid</artifactId>
            <version>1.2.13</version>
        </dependency>
        <dependency>
            <groupId>junit</groupId>
            <artifactId>junit</artifactId>
            <version>4.13.2</version>
            <scope>test</scope>
        </dependency>
    </dependencies>

    <properties>
        <maven.compiler.source>17</maven.compiler.source>
        <maven.compiler.target>17</maven.compiler.target>
    </properties>

</project>
-
第三步:基于三层架构实现,所以提前创建好所有的包

-
第四步:编写pojo
package com.powernode.bank.pojo;

/**
 * @author 动力节点
 * @version 1.0
 * @className Account
 * @since 1.0
 **/
public class Account {
    private String actno;
    private Double balance;

    @Override
    public String toString() {
        return "Account{" +
                "actno='" + actno + '\'' +
                ", balance=" + balance +
                '}';
    }

    public Account() {
    }

    public Account(String actno, Double balance) {
        this.actno = actno;
        this.balance = balance;
    }

    public String getActno() {
        return actno;
    }

    public void setActno(String actno) {
        this.actno = actno;
    }

    public Double getBalance() {
        return balance;
    }

    public void setBalance(Double balance) {
        this.balance = balance;
    }
}
- 第五步:编写mapper接口
package com.powernode.bank.mapper;

import com.powernode.bank.pojo.Account;

import java.util.List;

/**
 * @author 动力节点
 * @version 1.0
 * @className AccountMapper
 * @since 1.0
 **/
public interface AccountMapper {

    /**
     * 保存账户
     * @param account
     * @return
     */
    int insert(Account account);

    /**
     * 根据账号删除账户
     * @param actno
     * @return
     */
    int deleteByActno(String actno);

    /**
     * 修改账户
     * @param account
     * @return
     */
    int update(Account account);

    /**
     * 根据账号查询账户
     * @param actno
     * @return
     */
    Account selectByActno(String actno);

    /**
     * 获取所有账户
     * @return
     */
    List<Account> selectAll();
}
- 第六步:编写mapper配置文件
一定要注意,按照下图提示创建这个目录。注意是斜杠不是点儿。在resources目录下新建。并且要和Mapper接口包对应上。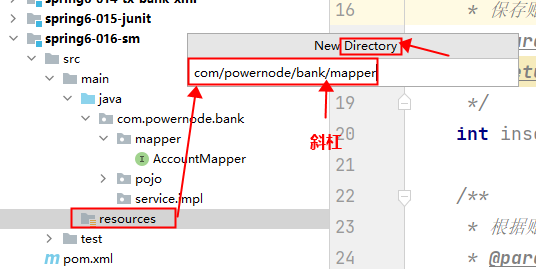
如果接口叫做AccountMapper,配置文件必须是AccountMapper.xml
<?xml version="1.0" encoding="UTF-8" ?>
<!DOCTYPE mapper
        PUBLIC "-//mybatis.org//DTD Mapper 3.0//EN"
        "http://mybatis.org/dtd/mybatis-3-mapper.dtd">
<mapper namespace="com.powernode.bank.mapper.AccountMapper">
    <insert id="insert">
        insert into t_act values(#{actno}, #{balance})
    </insert>
    <delete id="deleteByActno">
        delete from t_act where actno = #{actno}
    </delete>
    <update id="update">
        update t_act set balance = #{balance} where actno = #{actno}
    </update>
    <select id="selectByActno" resultType="Account">
        select * from t_act where actno = #{actno}
    </select>
    <select id="selectAll" resultType="Account">
        select * from t_act
    </select>
</mapper>
- 第七步:编写service接口和service接口实现类
注意编写的service实现类纳入IoC容器管理:
package com.powernode.bank.service;

import com.powernode.bank.pojo.Account;

import java.util.List;

/**
 * @author 动力节点
 * @version 1.0
 * @className AccountService
 * @since 1.0
 **/
public interface AccountService {
    /**
     * 开户
     * @param act
     * @return
     */
    int save(Account act);

    /**
     * 根据账号销户
     * @param actno
     * @return
     */
    int deleteByActno(String actno);

    /**
     * 修改账户
     * @param act
     * @return
     */
    int update(Account act);

    /**
     * 根据账号获取账户
     * @param actno
     * @return
     */
    Account getByActno(String actno);

    /**
     * 获取所有账户
     * @return
     */
    List<Account> getAll();

    /**
     * 转账
     * @param fromActno
     * @param toActno
     * @param money
     */
    void transfer(String fromActno, String toActno, double money);
}
package com.powernode.bank.service.impl;

import com.powernode.bank.mapper.AccountMapper;
import com.powernode.bank.pojo.Account;
import com.powernode.bank.service.AccountService;
import org.springframework.beans.factory.annotation.Autowired;
import org.springframework.stereotype.Service;

import java.util.List;

/**
 * @author 动力节点
 * @version 1.0
 * @className AccountServiceImpl
 * @since 1.0
 **/
@Transactional
@Service("accountService")
public class AccountServiceImpl implements AccountService {

    @Autowired
    private AccountMapper accountMapper;

    @Override
    public int save(Account act) {
        return accountMapper.insert(act);
    }

    @Override
    public int deleteByActno(String actno) {
        return accountMapper.deleteByActno(actno);
    }

    @Override
    public int update(Account act) {
        return accountMapper.update(act);
    }

    @Override
    public Account getByActno(String actno) {
        return accountMapper.selectByActno(actno);
    }

    @Override
    public List<Account> getAll() {
        return accountMapper.selectAll();
    }

    @Override
    public void transfer(String fromActno, String toActno, double money) {
        Account fromAct = accountMapper.selectByActno(fromActno);
        if (fromAct.getBalance() < money) {
            throw new RuntimeException("余额不足");
        }
        Account toAct = accountMapper.selectByActno(toActno);
        fromAct.setBalance(fromAct.getBalance() - money);
        toAct.setBalance(toAct.getBalance() + money);
        int count = accountMapper.update(fromAct);
        count += accountMapper.update(toAct);
        if (count != 2) {
            throw new RuntimeException("转账失败");
        }
    }
}
- 第八步:编写jdbc.properties配置文件
放在类的根路径下
jdbc.driver=com.mysql.cj.jdbc.Driver
jdbc.url=jdbc:mysql://localhost:3306/spring6
jdbc.username=root
jdbc.password=root
- 第九步:编写mybatis-config.xml配置文件
放在类的根路径下,只开启日志,其他配置到spring.xml中。
<?xml version="1.0" encoding="UTF-8" ?>
<!DOCTYPE configuration
        PUBLIC "-//mybatis.org//DTD Config 3.0//EN"
        "http://mybatis.org/dtd/mybatis-3-config.dtd">
<configuration>
    <settings>
        <setting name="logImpl" value="STDOUT_LOGGING"/>
    </settings>
</configuration>
- 第十步:编写spring.xml配置文件
注意:当你在spring.xml文件中直接写标签内容时,IDEA会自动给你添加命名空间
<?xml version="1.0" encoding="UTF-8"?>
<beans xmlns="http://www.springframework.org/schema/beans"
       xmlns:xsi="http://www.w3.org/2001/XMLSchema-instance"
       xmlns:context="http://www.springframework.org/schema/context" xmlns:tx="http://www.springframework.org/schema/tx"
       xsi:schemaLocation="http://www.springframework.org/schema/beans http://www.springframework.org/schema/beans/spring-beans.xsd http://www.springframework.org/schema/context https://www.springframework.org/schema/context/spring-context.xsd http://www.springframework.org/schema/tx http://www.springframework.org/schema/tx/spring-tx.xsd">

    <!--组件扫描-->
    <context:component-scan base-package="com.powernode.bank"/>

    <!--外部属性配置文件-->
    <context:property-placeholder location="jdbc.properties"/>

    <!--数据源-->
    <bean id="dataSource" class="com.alibaba.druid.pool.DruidDataSource">
        <property name="driverClassName" value="${jdbc.driver}"/>
        <property name="url" value="${jdbc.url}"/>
        <property name="username" value="${jdbc.username}"/>
        <property name="password" value="${jdbc.password}"/>
    </bean>

    <!--SqlSessionFactoryBean-->
    <bean class="org.mybatis.spring.SqlSessionFactoryBean">
        <!--mybatis核心配置文件路径-->
        <property name="configLocation" value="mybatis-config.xml"/>
        <!--注入数据源-->
        <property name="dataSource" ref="dataSource"/>
        <!--起别名-->
        <property name="typeAliasesPackage" value="com.powernode.bank.pojo"/>
    </bean>

    <!--Mapper扫描器-->
    <bean class="org.mybatis.spring.mapper.MapperScannerConfigurer">
        <property name="basePackage" value="com.powernode.bank.mapper"/>
    </bean>

    <!--事务管理器-->
    <bean id="txManager" class="org.springframework.jdbc.datasource.DataSourceTransactionManager">
        <property name="dataSource" ref="dataSource"/>
    </bean>

    <!--开启事务注解-->
    <tx:annotation-driven transaction-manager="txManager"/>

</beans>
- 第十一步:编写测试程序,并添加事务,进行测试
package com.powernode.spring6.test;

import com.powernode.bank.service.AccountService;
import org.junit.Test;
import org.springframework.context.ApplicationContext;
import org.springframework.context.support.ClassPathXmlApplicationContext;

/**
 * @author 动力节点
 * @version 1.0
 * @className SMTest
 * @since 1.0
 **/
public class SMTest {

    @Test
    public void testSM(){
        ApplicationContext applicationContext = new ClassPathXmlApplicationContext("spring.xml");
        AccountService accountService = applicationContext.getBean("accountService", AccountService.class);
        try {
            accountService.transfer("act-001", "act-002", 10000.0);
            System.out.println("转账成功");
        } catch (Exception e) {
            e.printStackTrace();
            System.out.println("转账失败");
        }
    }

}
最后大家别忘了测试事务!!!!
18.3 Spring配置文件的import
spring配置文件有多个,并且可以在spring的核心配置文件中使用import进行引入,我们可以将组件扫描单独定义到一个配置文件中,如下:
<?xml version="1.0" encoding="UTF-8"?>
<beans xmlns="http://www.springframework.org/schema/beans"
       xmlns:xsi="http://www.w3.org/2001/XMLSchema-instance"
       xmlns:context="http://www.springframework.org/schema/context"
       xsi:schemaLocation="http://www.springframework.org/schema/beans http://www.springframework.org/schema/beans/spring-beans.xsd http://www.springframework.org/schema/context https://www.springframework.org/schema/context/spring-context.xsd">

    <!--组件扫描-->
    <context:component-scan base-package="com.powernode.bank"/>

</beans>
然后在核心配置文件中引入:
<?xml version="1.0" encoding="UTF-8"?>
<beans xmlns="http://www.springframework.org/schema/beans"
       xmlns:xsi="http://www.w3.org/2001/XMLSchema-instance"
       xmlns:context="http://www.springframework.org/schema/context" xmlns:tx="http://www.springframework.org/schema/tx"
       xsi:schemaLocation="http://www.springframework.org/schema/beans http://www.springframework.org/schema/beans/spring-beans.xsd http://www.springframework.org/schema/context https://www.springframework.org/schema/context/spring-context.xsd http://www.springframework.org/schema/tx http://www.springframework.org/schema/tx/spring-tx.xsd">

    <!--引入其他的spring配置文件-->
    <import resource="common.xml"/>

</beans>
注意:在实际开发中,service单独配置到一个文件中,dao单独配置到一个文件中,然后在核心配置文件中引入,养成好习惯。
十九、Spring中的八大模式
19.1 简单工厂模式
BeanFactory的getBean()方法,通过唯一标识来获取Bean对象。是典型的简单工厂模式(静态工厂模式);
19.2 工厂方法模式
FactoryBean是典型的工厂方法模式。在配置文件中通过factory-method属性来指定工厂方法,该方法是一个实例方法。
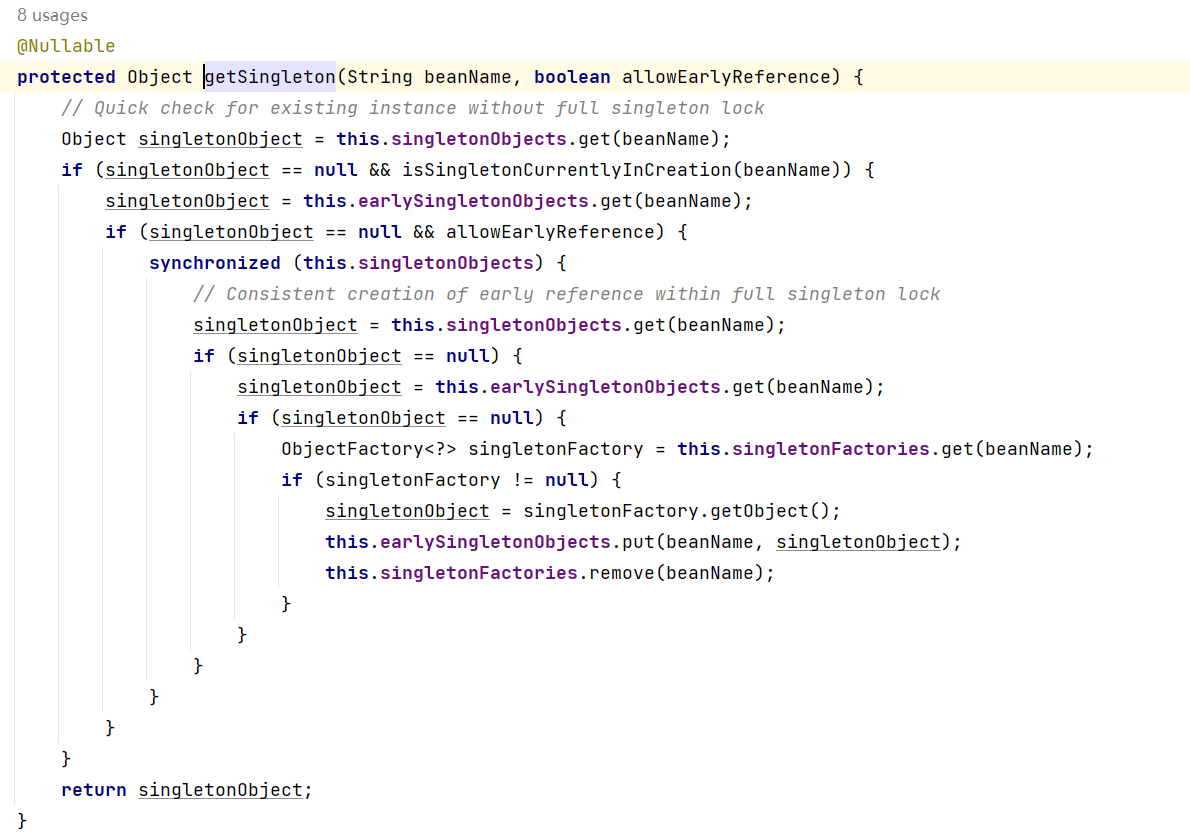
19.3 单例模式
Spring用的是双重判断加锁的单例模式。请看下面代码,我们之前讲解Bean的循环依赖的时候见过:
19.4 代理模式
Spring的AOP就是使用了动态代理实现的。
19.5 装饰器模式
JavaSE中的IO流是非常典型的装饰器模式。
Spring 中配置 DataSource 的时候,这些dataSource可能是各种不同类型的,比如不同的数据库:Oracle、SQL Server、MySQL等,也可能是不同的数据源:比如apache 提供的org.apache.commons.dbcp.BasicDataSource、spring提供的org.springframework.jndi.JndiObjectFactoryBean等。
这时,能否在尽可能少修改原有类代码下的情况下,做到动态切换不同的数据源?此时就可以用到装饰者模式。
Spring根据每次请求的不同,将dataSource属性设置成不同的数据源,以到达切换数据源的目的。
Spring中类名中带有:Decorator和Wrapper单词的类,都是装饰器模式。
19.6 观察者模式
定义对象间的一对多的关系,当一个对象的状态发生改变时,所有依赖于它的对象都得到通知并自动更新。Spring中观察者模式一般用在listener的实现。
Spring中的事件编程模型就是观察者模式的实现。在Spring中定义了一个ApplicationListener接口,用来监听Application的事件,Application其实就是ApplicationContext,ApplicationContext内置了几个事件,其中比较容易理解的是:ContextRefreshedEvent、ContextStartedEvent、ContextStoppedEvent、ContextClosedEvent
19.7 策略模式
策略模式是行为性模式,调用不同的方法,适应行为的变化 ,强调父类的调用子类的特性 。
getHandler是HandlerMapping接口中的唯一方法,用于根据请求找到匹配的处理器。
比如我们自己写了AccountDao接口,然后这个接口下有不同的实现类:AccountDaoForMySQL,AccountDaoForOracle。对于service来说不需要关心底层具体的实现,只需要面向AccountDao接口调用,底层可以灵活切换实现,这就是策略模式。
19.8 模板方法模式
Spring中的JdbcTemplate类就是一个模板类。它就是一个模板方法设计模式的体现。在模板类的模板方法execute中编写核心算法,具体的实现步骤在子类中完成。


 11万+
11万+

 被折叠的 条评论
为什么被折叠?
被折叠的 条评论
为什么被折叠?
 到【灌水乐园】发言


