


 本文深入探讨React组件的生命周期,从旧版到新版的变化,包括核心的生命周期阶段如挂载、更新和卸载。详细讲解了render、componentDidMount、componentWillUnmount等关键钩子函数的使用,并通过实例分析了如何处理定时器、组件更新和强制更新。同时,讨论了getDerivedStateFromProps和getSnapshotBeforeUpdate等新生命周期方法,以及它们在实际应用中的作用。
生命周期-核心
一 引出生命周期
需要理解的概念有:
-
React生命周期的版本
-
React新旧生命周期的主要内容大体印象
-
生命周期钩子函数
-
一定执行的生命周期钩子函数
render生命周期钩子函数的必须调用与执行1次
1.render生命周期钩子函数的必须调用与执行1次
	<div id="test"></div>
	<script type="text/babel">
		class Demo extends React.Component {
			// 不写render钩子函数将报错
			// render钩子函数必定会先执行1次
			render() {
				console.log('---render---') //初始阶段执行一次
				return (
					<div>
						<h2>分手了,怎么办?</h2>
						<button>不活了</button>
					</div>
				)
			}
		}
		ReactDOM.render(<Demo />, document.getElementById('test'))
	</script>
2.render生命周期钩子函数的重复执行(注意死循环,设备性能卡顿)
不断产生新的定时器对象,又没有被清除,造成内存的大量占用,性能卡顿(利用软媒系统雷达软件可以检测系统情况)
	<div id="test"></div>
	<script type="text/babel">
		//如何才能实现组件的更新?
    	//1 修改state,那么就会再次执行render
		class Demo extends React.Component {
			state = { opacity: 1 } //初始化状态
			render() {
				console.log('---render---')
				//从state中获取透明度
				const { opacity } = this.state
                //定时器操作
				setInterval(() => {
					let { opacity } = this.state
					opacity -= 0.1
					if (opacity <= 0) opacity = 1//边界处理
					this.setState({ opacity })
				}, 2000)
				return (
					<div>
						<h2 style={{ opacity }}>分手了,怎么办?</h2>
						<button>不活了</button>
					</div>
				)
			}
		}
		ReactDOM.render(<Demo />, document.getElementById('test'))
	</script>
二 完成透明度变化案例
需要理解的概念有:
1 如何解决只设置一个定时器对象
放到componentDidMount里,完成组件的挂载
2 如何将定时器对象挂载到组件实例对象上
在componentDidMount里开启定时器
3 如何清除定时器
利用按钮点击事件触发清除定时器与销毁组件
4 在什么阶段进行定时器对象的清除
可以将清除定时器操作前移至将销毁阶段,在组件将要卸载componentWillUnmount()
1.利用挂载完成阶段实现一次性设置定时器操作
	<div id="test"></div>
	<script type="text/babel">
		class Demo extends React.Component {
			state = { opacity: 1 } //初始化状态
			render() {
				console.log('---render---')
				//从state中获取透明度
				const { opacity } = this.state
				return (
					<div>
						<h2 style={{ opacity }}>分手了,怎么办?</h2>
						<button>不活了</button>
					</div>
				)
			}
			//组件完成挂载 ---- 只是在组件挂载完毕后执行一次
			componentDidMount() {
				console.log('---componentDidMount---') //一次
				//开启定时器,更新透明度
				setInterval(() => {
					let { opacity } = this.state //获取原来的透明度
					opacity -= 0.1 //透明度减小
					if (opacity <= 0) opacity = 1 //重置透明度
					this.setState({ opacity }) //更新state
				}, 200);
			}
		}
		ReactDOM.render(<Demo />, document.getElementById('test'))
	</script>
2.利用按钮点击事件触发清除定时器与销毁组件
	<div id="test"></div>
	<script type="text/babel">
		class Demo extends React.Component {
			state = { opacity: 1 } //初始化状态
			render() {
				console.log('---render---')
				//从state中获取透明度
				const { opacity } = this.state
				return (
					<div>
						<h2 style={{ opacity }}>分手了,怎么办?</h2>
						<button onClick={this.death}>不活了</button>
					</div>
				)
			}
			//组件完成挂载 ---- 只是在组件挂载完毕后执行一次 钩子函数
			componentDidMount() {
				console.log('---componentDidMount---')
				//将定时器挂载到实例对象上 let timer = null在此处不可取
				this.timer = setInterval(() => {
					let { opacity } = this.state //获取原来的透明度
					opacity -= 0.1 //透明度减小
					if (opacity <= 0) opacity = 1 //重置透明度
					this.setState({ opacity }) //更新state
				}, 200);
			}
			//“不活了”按钮的回调函数
			death = () => {
				clearInterval(this.timer) //定时器清除
                let timer = null
				//卸载组件
				ReactDOM.unmountComponentAtNode(document.getElementById('test'))
                console.log(this)  Demo组件实例
			}
		}
		ReactDOM.render(<Demo />, document.getElementById('test'))
	</script>
3.可以将清除定时器操作前移至将销毁阶段
	<div id="test"></div>
	<script type="text/babel">
		class Demo extends React.Component {
			state = { opacity: 1 } //初始化状态
			render() {
				console.log('---render---')
				//从state中获取透明度
				const { opacity } = this.state
				return (
					<div>
						<h2 style={{ opacity }}>分手了,怎么办?</h2>
						<button onClick={this.death}>不活了</button>
					</div>
				)
			}
			//组件完成挂载 ---- 只是在组件挂载完毕后执行一次
			componentDidMount() {
				console.log('---componentDidMount---')
				//开启定时器,更新透明度
				this.timer = setInterval(() => {
					let { opacity } = this.state //获取原来的透明度
					opacity -= 0.1 //透明度减小
					if (opacity <= 0) opacity = 1 //重置透明度
					this.setState({ opacity }) //更新state
				}, 200);
			}
			//组件将要卸载 ---- 只是在组件将要卸载时执行一次
			componentWillUnmount() {
				console.log('---componentWillUnmount---')
				clearInterval(this.timer)
			}
			//“不活了”按钮的回调
			death = () => {
				//卸载组件
				ReactDOM.unmountComponentAtNode(document.getElementById('test'))
			}
		}
		ReactDOM.render(<Demo />, document.getElementById('test'))
	</script>
三 分析生命周期-挂载流程
需要理解的概念有:
- 挂载流程的生命周期钩子函数主要有几个 4个
- 每个钩子函数的执行次数为多少次 render执行1+n次,其他都是1次
- 生命周期钩子函数在程序里的顺序是否会影响触发的顺序 不会
	<div id="test"></div>
	<script type="text/babel">
		//生命周期回调函数 <=> 生命周期函数 <=> 生命周期钩子
		class Demo extends React.Component {
			constructor() {
				console.log('---1 constructor---')
				super()
				this.state = { sum: 0 } //初始化状态
			}
			//组件将要挂载 ------ 只执行一次
			componentWillMount() {
				console.log('---2 componentWillMount---')
			}
			render() {
				console.log('---3 render---')   //1+n(初始+点击)
				return (
					<div>
						<h1>当前求和为:{this.state.sum}</h1>
						<button onClick={this.add}>+</button>
						<button onClick={this.death}>销毁组件</button>
					</div>
				)
			}
			//组件挂在完毕 ----- 只执行一次
			componentDidMount() {
				console.log('---4 componentDidMount---')
			}
			//组件将要卸载 ---- 只是在组件将要卸载时执行一次
			componentWillUnmount() {
				console.log('---2 componentWillUnmount---')
			}
			death = () => {
				//卸载组件
				ReactDOM.unmountComponentAtNode(document.getElementById('test'))
			}
			//事件的回调--程序员根据业务逻辑写的
			add = () => {
				const { sum } = this.state //获取原状态
				this.setState({ sum: sum + 1 }) //更新状态
			}
		}
		ReactDOM.render(<Demo />, document.getElementById('test'))
	</script>
四 分析生命周期-更新流程
需要理解的概念有:
-
确认是否更新的“阀门”作用
shouldComponentUpdate:疑问句,控制组件更新的“阀门”
必须要有一个返回值,类型为布尔值,以确认是否更新 return true
确认是否更新的“阀门”作用
	<div id="test"></div>
	<script type="text/babel">
		//生命周期回调函数 <=> 生命周期函数 <=> 生命周期钩子
		class Demo extends React.Component {
			constructor() {
				console.log('---1 constructor---') //一次
				super()
				this.state = { sum: 0 } //初始化状态
			}
			//组件将要挂载 ------ 只执行一次
			componentWillMount() {
				console.log('---2 componentWillMount---')
			}
			render() {
				console.log('---3 render---')
				return (
					<div>
						<h1>当前求和为:{this.state.sum}</h1>
						<button onClick={this.add}>+</button>
						<button onClick={this.death}>销毁组件</button>
					</div>
				)
			}
			//组件挂在完毕 ----- 只执行一次
			componentDidMount() {
				console.log('---4componentDidMount---')
			}
			//组件将要卸载 ---- 只是在组件将要卸载时执行一次
			componentWillUnmount() {
				console.log('---componentWillUnmount---')
			}
			// 疑问句,控制组件更新的“阀门”,
			// 必须要有一个返回值,类型为布尔值,以确认是否更新
			// 不写return、return true、return false的差异不同
			shouldComponentUpdate(x,y,c) {
                console.log(x,y,c)  //只有y有值,是state
				return true;
			}
			death = () => {
				//卸载组件
				ReactDOM.unmountComponentAtNode(document.getElementById('test'))
			}

			//事件的回调--程序员根据业务逻辑写的
			add = () => {
				const { sum } = this.state //获取原状态
				this.setState({ sum: sum + 1 }) //更新状态
			}
		}
		ReactDOM.render(<Demo />, document.getElementById('test'))
	</script>
五 分析生命周期-强制更新流程
需要理解的概念有:
-
强制更新是否会考虑state状态的因素
不会
-
强制更新与shouldComponentUpdate的返回值关系 return false
shouldComponentUpdate已显示,但是没渲染,强制更新的结果不会渲染出来
1.强制更新是否会考虑state状态的因素,不会
	<div id="test"></div>
	<script type="text/babel">
		//生命周期回调函数 <=> 生命周期函数 <=> 生命周期钩子
		class Demo extends React.Component {
			constructor() {
				console.log('---constructor---')
				super()
				this.state = { sum: 0 } //初始化状态
			}
			//组件将要挂载 ------ 只执行一次
			componentWillMount() {
				console.log('---componentWillMount---')
			}
			render() {
				console.log('---render---')
				return (
					<div>
						<h1>当前求和为:{this.state.sum}</h1>
						<button onClick={this.add}>+</button>
						<button onClick={this.death}>销毁组件</button>
						<button onClick={this.qiang}>强制更新</button>
					</div>
				)
			}
			//组件挂在完毕 ----- 只执行一次
			componentDidMount() {
				console.log('---componentDidMount---')
			}
			//组件将要卸载 ---- 只是在组件将要卸载时执行一次
			componentWillUnmount() {
				console.log('---componentWillUnmount---')
			}
			// 控制组件更新的“阀门”,
			// 必须要有一个返回值,类型为布尔值,以确认是否更新
			shouldComponentUpdate() {
				return false;
			}
			death = () => {
				//卸载组件
				ReactDOM.unmountComponentAtNode(document.getElementById('test'))
			}
			qiang = () => {//强制更新shouldComponentUpdate
				//this.forceUpdate(); // 可以没参数,但不能是对象参数,是回调函数参数
                this.forceUpdate() => {

                } //shouldComponentUpdate已显示,但是没渲染,强制更新的结果不会渲染出来
			}

			add = () => {
				const { sum } = this.state //获取原状态
				this.setState({ sum: sum + 1 }) //更新状态
			}
		}
		ReactDOM.render(<Demo />, document.getElementById('test'))
	</script>
2.强制更新与shouldComponentUpdate的返回值关系,会
	<div id="test"></div>
	<script type="text/babel">
		//生命周期回调函数 <=> 生命周期函数 <=> 生命周期钩子
		class Demo extends React.Component {
			constructor() {
				console.log('---constructor---')
				super()
				this.state = { sum: 0 } //初始化状态
			}
			//组件将要挂载 ------ 只执行一次
			componentWillMount() {
				console.log('---componentWillMount---')
			}
			render() {
				console.log('---render---')
				return (
					<div>
						<h1>当前求和为:{this.state.sum}</h1>
						<button onClick={this.add}>+</button>
						<button onClick={this.death}>销毁组件</button>
						<button onClick={this.qiang}>强制更新</button>
					</div>
				)
			}
			//组件挂在完毕 ----- 只执行一次
			componentDidMount() {
				console.log('---componentDidMount---')
			}
			//组件将要卸载 ---- 只是在组件将要卸载时执行一次
			componentWillUnmount() {
				console.log('---componentWillUnmount---')
			}
			// 控制组件更新的“阀门”,
			// 必须要有一个返回值,类型为布尔值,以确认是否更新
			shouldComponentUpdate() {
				return false;
			}
			death = () => {
				//卸载组件
				ReactDOM.unmountComponentAtNode(document.getElementById('test'))
			}
			qiang = () => {
				this.forceUpdate(() => {
					// shouldComponentUpdate不同返回的render操作比较
					this.setState({ sum: 100 })
				});
			}
			//事件的回调--程序员根据业务逻辑写的
			add = () => {
				const { sum } = this.state //获取原状态
				this.setState({ sum: sum + 1 }) //更新状态
			}
		}
		ReactDOM.render(<Demo />, document.getElementById('test'))
	</script>
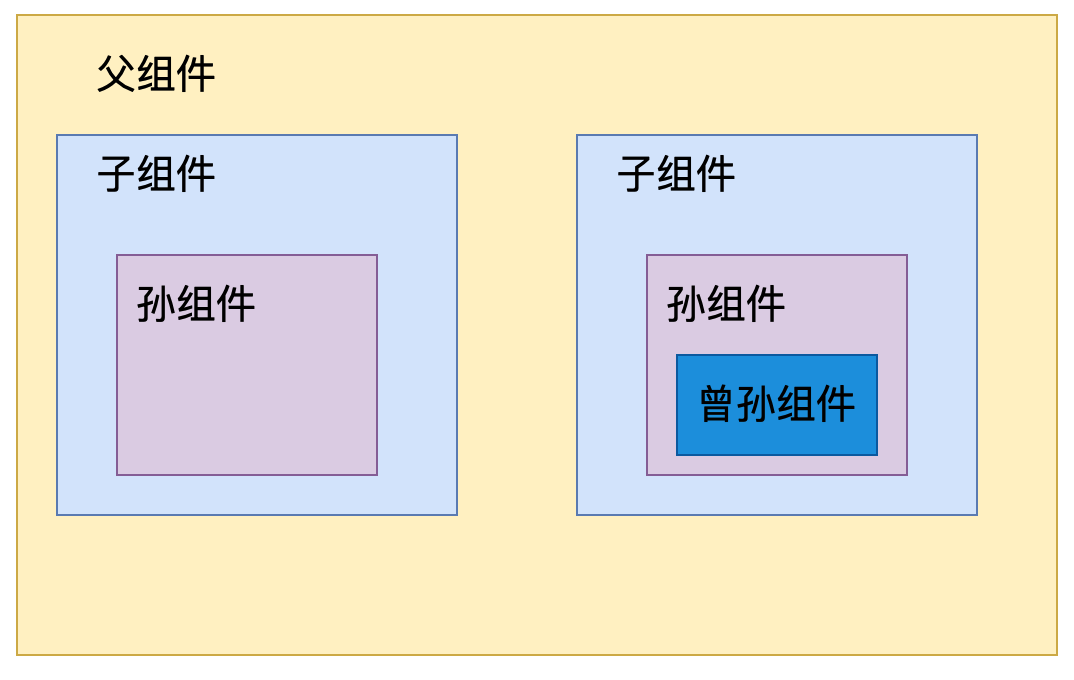
六 分析生命周期-父组件 render 流程
需要理解的概念有:
-
每个组件都是自己完整的生命周期,也有每个生命周期中的钩子函数
-
组件之间是会存在嵌套的关系的(在内存中,不会存在性能低)
-
组件之间可存在数据传递
-
包含嵌套组件之间会触发不同的生命周期钩子函数
初始阶段4个
更新阶段5个
销毁阶段1个
父子等嵌套关系是否会有影响关系?
	<style>
		.a {
			background-color: orange;
			padding: 10px;
		}
		.b {
			background-color: skyblue;
			padding: 10px;
		}
	</style>
<body>
	<div id="test"></div>
	<script type="text/babel">
		class A extends React.Component {
			state = { car: '奥拓' }
			render() {
				return (
					<div className="a">
						<h3>我是A组件,我的座驾是:{this.state.car}</h3>
						<button onClick={this.changeCar}>赚钱了,换车</button>
                        //父组件中包含了子组件,父组件可以传递数据给字组件
						<B car={this.state.car} />  //标签组件的属性形式给到B
					</div>
				)
			}
            //修改父组件内容,子组件也改变了
			changeCar = () => {
				this.setState({ car: '奔驰' })
			}
		}
		class B extends React.Component {
			constructor() {   //挂载的初始阶段
				console.log('---B---constructor')
				super()
			}
			componentWillMount() {
				console.log('---B---componentWillMount')
			}
            render() {
				console.log('---B---render')
				return (
					<div className="b">   //获取父组件的车
						<h3>我是B组件,我父亲(A)给我的车是:{this.props.car}</h3>
					</div>
				)
			}
			componentDidMount() {
				console.log('---B---componentDidMount')
			}
            //更新阶段  嵌套关系
            componentWillReceiveProps() {
				console.log('---B---componentWillReceiveProps---')
			}
			shouldComponentUpdate() {
				console.log('---B---shouldComponentUpdate---')
				return false
			}
			componentWillUpdate() {
				console.log('---B---componentWillUpdate---')
			}

			componentDidUpdate() {
				console.log('---B---componentDidUpdate')
			}

		}
		ReactDOM.render(<A />, document.getElementById('test'))
	</script>
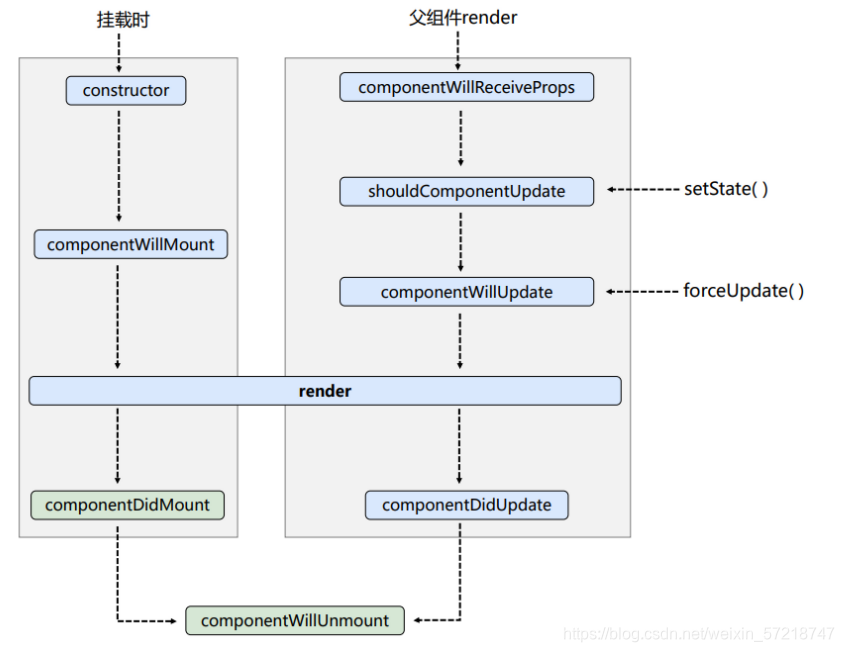
七 总结生命周期-旧
需要理解的概念有: 生命周期的三个阶段(旧)
-
初始化阶段:由ReactDOM.render()触发—初次渲染
- constructor() 定时器最早可以设置constructor,但是定时器不能有任何的DOM处理
- componentWillMount() 定时器也可以设置在这里,但是也没有DOM处理
- render() => 重要
- componentDidMount() => 做初始化的事:开启定时器、发送ajax请求、订阅消息等等…
-
更新阶段:由组件内部this.setSate()或父组件重新render触发
1.componentWillReceiveProps
2.shouldComponentUpdate()
3.componentWillUpdate()
4.render() => 重要
5.componentDidUpdate()
-
卸载组件:由ReactDOM.unmountComponentAtNode()触发
componentWillUnmount() => 做收尾的事:关闭定时器、取消订阅消息、关闭数据库连接、等等…
八 旧的生命周期前缀
需要理解的概念有:
1 哪些生命周期为UNSAFE生命周期钩子函数
旧版本:componentWillMount() componentWillUpdate() componentWillReceiveProps()
2 UNSAFE并不是不安全 而是表示使用这些声明周期的代码,在react未来的版本中可能会出现bug,尤其是在启动异步渲染后
https://zh-hans.reactjs.org/blog/2018/03/27/update-on-async-rendering.html
	<div id="test"></div>
	<script type="text/babel">
		//生命周期回调函数 <=> 生命周期函数 <=> 生命周期钩子
		class Demo extends React.Component {
			constructor() {
				console.log('---constructor---')
				super()
				this.state = { sum: 0 } //初始化状态
			}
			// UNSAFE_前缀不带时的警告,组件将要挂载 ------ 只执行一次
			UNSAFE_componentWillMount() {
				console.log('---componentWillMount---')
			}
			render() {
				console.log('---render---')
				return (
					<div>
						<h1>当前求和为:{this.state.sum}</h1>
						<button onClick={this.add}>+</button>
						<button onClick={this.qiang}>点我强制更新</button>
					</div>
				)
			}
			//组件挂在完毕 ----- 只执行一次
			componentDidMount() {
				console.log('---componentDidMount---')
			}
			//控制组件更新的“阀门”
			shouldComponentUpdate() {
				console.log('---shouldComponentUpdate---')
				return true
			}
			// UNSAFE_前缀不带时的警告,组件将要更新
			UNSAFE_componentWillUpdate() {
				console.log('---componentWillUpdate---')
			}
			//组件完成更新
			componentDidUpdate() {
				console.log('---componentDidUpdate---')
			}
			// UNSAFE_前缀不带时的警告,组件将接收传递参数
			UNSAFE_componentWillReceiveProps() {

			}
			componentWillUnmount() {

			}
			//事件的回调--程序员根据业务逻辑写的
			add = () => {
				const { sum } = this.state //获取原状态
				this.setState({ sum: sum + 1 }) //更新状态
			}
			//强制更新按钮的回调
			qiang = () => {
				this.forceUpdate()
			}
		}
		ReactDOM.render(<Demo />, document.getElementById('test'))
	</script>
九 对比新旧生命周期
需要理解的概念有:
1 挂载时只有componentWillMount与getDreividStateFromProps的区别
2 更新时:
- componentWillReceiveProps与getDreividStateFromProps
- shouldComponentUpdate+componentWillUpdate与shouldComponentUpdate的区别
- getSnapshopBeforeUpdate的增设
3 卸载时:一样
十 getDerivedStateFromProps
需要理解的概念有:
1 getDerivedStateFromProps的类型
2 getDerivedStateFromProps的返回值
① getDerivedStateFromProps是静态方法,如果不写static则报错
② getDerivedStateFromProps必须有返回值,没有返回值会报错,如果返回是null,state更新不会有任何影响
3 getDerivedStateFromProps返回值的渲染
如果返回的是固定的对象内容,那么state将会直接被影响,无法被修改。初始与更新结果state就是返回对象的值
static getDerivedStateFromProps(){
				return {sum:100}
			}
4 getDerivedStateFromProps的属性
props是属性
state为状态
5 getDerivedStateFromProps属性与返回值对页面的影响
根据接收到的属性与状态可以进行指定的判断与返回值操作
6 getDerivedStateFromProps的作用
简单的说:state 的值在任何时候都取决于 props
详细的说:
① 直接复制 props 到 state 上;
② 经过一些逻辑比较了props和state,然后决定是否去更新state
	<div id="test"></div>
	<script type="text/babel">
		class Demo extends React.Component {

			constructor(props) {
				console.log('---constructor---')
				super(props)
				this.state = { sum: 50 }
			}

			render() {
				console.log('---render---')
				return (
					<div>
						<h2>当前求和为:{this.state.sum}</h2>
						<button onClick={this.add}>+</button>
					</div>
				)
			}

			componentDidMount() {
				console.log('---componentDidMount---')
			}
			static getDerivedStateFromProps(props, state) {
				console.log('---getDerivedStateFromProps---', props, state)
				const { n } = props
				const { sum } = state
				if (sum + n === 250) return { sum: 0 }
				else return null
			}

			add = () => {
				const { sum } = this.state
				this.setState({ sum: sum + 1 })
			}
		}

		ReactDOM.render(<Demo n={200} />, document.getElementById('test'))
	</script>
十一 getSnapshotBeforeUpdate
需要理解的概念有:
1 getSnapshotBeforeUpdate概念的理解,拍摄一份快照
2 getSnapshotBeforeUpdate获取的参数是之前的属性与状态
3 getSnapshotBeforeUpdate需要与componentDidUpdate配置使用
4 componentDidUpdate将获取getSnapshotBeforeUpdate返回的装个快照内容
一个叫before一个是did,所以before的返回值可以在did中进行使用
	<div id="test"></div>
	<script type="text/babel">
		class Demo extends React.Component {
			constructor(props) {
				console.log('---constructor---')
				super(props)
				this.state = { sum: 0 }
			}
			render() {
				console.log('---render---')
				return (
					<div>
						<h2>当前求和为:{this.state.sum}</h2>
						<h3 ref="title">
							当前求和+1-3*100后的结果是:
							{(this.state.sum + 1 - 3) * 100}
						</h3>
						<button onClick={this.add}>+</button>
					</div>
				)
			}
			getSnapshotBeforeUpdate(prevProps, prevState) {
				const title = this.refs.title
				console.log('---getSnapshotBeforeUpdate--',
					title.innerText)
				return title.innerText  //返回文本内容
			}
			componentDidUpdate(preProps, preState, snapshot) {
				const title = this.refs.title //通过ref字符串设置形式,获取虚拟DOM对象
				console.log('---componentDidUpdate---',
					preProps, preState, snapshot,
					title.innerText)
			}
			add = () => {
				const { sum } = this.state
				this.setState({ sum: sum + 1 })
			}
		}
		ReactDOM.render(<Demo x="尚硅谷" />, document.getElementById('test'))
	</script>
十二getSnapshotBeforeUpdate 举例
需要理解的概念有:
-
展开式数组与数组对象的合并实现 (…)
-
获取列表的scrollTop位置
- 网页可见区域宽:document.body.clientWidth
- 网页可见区域高:document.body.clientHeight
- 网页可见区域宽:document.body.offsetWidth (包括边线的宽)
- 网页可见区域高:document.body.offsetHeight (包括边线的宽)
- 网页正文全文宽:document.body.scrollWidth
- 网页正文全文高:document.body.scrollHeight
- 网页被卷去的高:document.body.scrollTop
- 网页被卷去的左:document.body.scrollLeft
- 网页正文部分上:window.screenTop
- 网页正文部分左:window.screenLeft
- 屏幕分辨率的高:window.screen.height
- 屏幕分辨率的宽:window.screen.width
- 屏幕可用工作区高度:window.screen.availHeight
- 屏幕可用工作区宽度:window.screen.availWidth
-
getSnapshotBeforeUpdate返回快照信息
-
componentDidUpdate根据快照信息进行滚动条的位置控制
之前的数据给之后使用 用在UI上
	<style>
		.list {
			width: 200px;
			height: 150px;
			background-color: orange;
			overflow: auto;
		}

		.news {
			height: 30px;
			background-color: skyblue;
			line-height: 30px;
		}
	</style>
<body>
	<div id="test"></div>
	<script type="text/babel">
		class Demo extends React.Component {
			state = {
				newsArr: []
			}
			componentDidMount() {
				setInterval(() => {
					//获取原来的新闻
					const { newsArr } = this.state
					//更新新闻
					this.setState({  //数组的浅拷贝
						newsArr: ['新闻' + (newsArr.length + 1), ...newsArr]
					})
				}, 1000);
			}
			getSnapshotBeforeUpdate() {
				return this.refs.list.scrollHeight
			}
			componentDidUpdate(prevProps, prevState, snapshot) {
				// 默认就是查看最上面的列表内容
				// 用户滑动以后则查看目标位置的内容,
				// 设置>=30,就是需要控制一条记录高的范围
               //this.ref.list.scoreTop = this.ref.scoreTop+30
				const x = this.refs.list.scrollHeight - snapshot
				if (this.refs.list.scrollTop >= 30) this.refs.list.scrollTop += x
			}
			render() {
				return (
					<div className="list" ref="list">
						{
							this.state.newsArr.map((item, index) => {
								return <div
									className="news"
									key={index}>{item}
								</div>
							})
						}
					</div>
				)
			}
		}
		ReactDOM.render(<Demo />, document.getElementById('test'))
	</script>
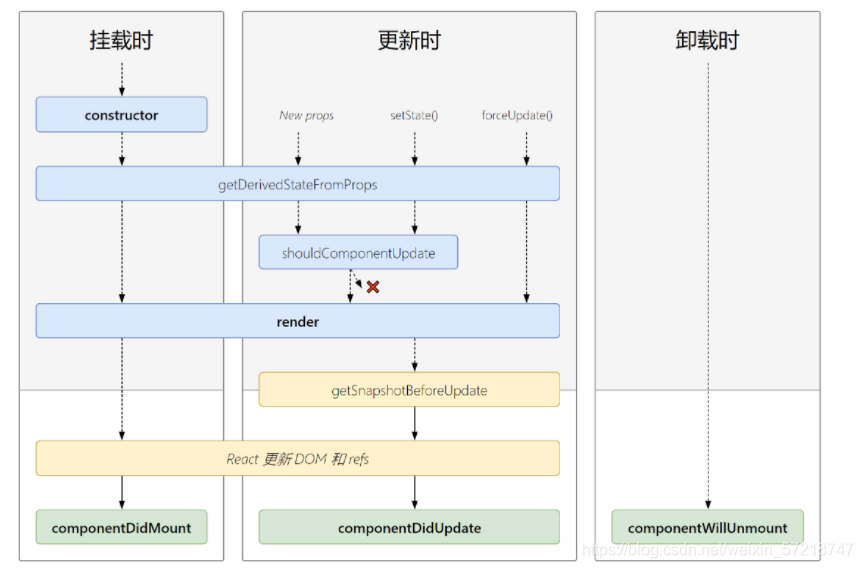
十三 总结生命周期-新
需要理解的概念有:
生命周期的三个阶段(新)
- 初始化阶段: 由 ReactDOM.render()触发—初次渲染
1.constructor()
2.getDerivedStateFromProps
3.render()
4.componentDidMount() - 更新阶段: 由组件内部 this.setSate()或父组件重新 render 触发
1.getDerivedStateFromProps
2.shouldComponentUpdate()
3.render()
4.getSnapshotBeforeUpdate 没有真实DOM的渲染,在更新之前
5.componentDidUpdate() 虚拟DOM转为真实DOM - 卸载组件: 由 ReactDOM.unmountComponentAtNode()触发
1.componentWillUnmount()
十四 引出 key 相关的问题
需要理解的概念有:
1 列表循环需要有一个key的属性设置
2 设置key并不会在真实DOM显示对应属性
3 key的作用是虚拟DOM进行内部标识所用
	<div id="test"></div>
	<script type="text/babel">
		class Person extends React.Component {
			state = {
				users: [
					{ id: '001', name: '老刘', age: 18 },
					{ id: '002', name: '海峰', age: 12 },
					{ id: '003', name: '伟东', age: 20 },
				]
			}
			render() {
				return (
					<div>
						<h2>下面的列表使用了index(索引值)作为key</h2>
						<ul>
							{
								this.state.users.map((p, index) => {
									return (
										<li>
											{p.name}---{p.age}
										</li>
									)
								})
							}
						</ul>
					</div>
				)
			}
		}
		ReactDOM.render(<Person />, document.getElementById('test'))
	</script>
十五 Diffing 算法的原理
如果只是普通的列表算法,那么index与唯一值基本不会有太大的影响
1 虚拟DOM中key的作用:
1). 简单的说: key是虚拟DOM对象的标识, 在更新显示时key起着极其重要的作用。
2). 详细的说: 当状态中的数据发生变化时,react会根据【新数据】生成【新的虚拟DOM】,
随后React进行【新虚拟DOM】与【旧虚拟DOM】的diff比较,比较规则如下:
a. 旧虚拟DOM中找到了与新虚拟DOM相同的key:
	(1).若虚拟DOM中内容没变, 直接使用之前的真实DOM
	(2).若虚拟DOM中内容变了, 则生成新的真实DOM,随后替换掉页面中之前的真实DOM
b. 旧虚拟DOM中未找到与新虚拟DOM相同的key
	根据数据创建新的真实DOM,随后渲染到到页面
2 用index作为key可能会引发的问题:
    1. 若对数据进行:逆序添加、逆序删除等破坏顺序操作:
    会产生没有必要的真实DOM更新 ==> 界面效果没问题, 但效率低。

    2. 如果结构中还包含输入类的DOM:
    会产生错误DOM更新 ==> 界面有问题。

    3. 注意!如果不存在对数据的逆序添加、逆序删除等破坏顺序操作,
    仅用于渲染列表用于展示,使用index作为key是没有问题的。
3 开发中如何选择key:(请你简单的聊聊DOM的Diffing算法?)
    1.最好使用每条数据的唯一标识作为key, 比如id、手机号、身份证号、学号等唯一值。
    2.如果确定只是简单的展示数据,用index也是可以的。
4 慢动作回放(以index作为key):
一、初次挂载
  1.初始化的数据:
    {id:'001',name:'老刘',age:18},
    {id:'002',name:'海峰',age:19},
    {id:'003',name:'伟东',age:20},
  2.初始化的虚拟DOM:
    <li key=0>老刘---18 <input type="text"/> </li>
    <li key=1>海峰---19 <input type="text"/> </li>
    <li key=2>伟东---20 <input type="text"/> </li>

二、更新过程
1.更新后的数据:
  {id:'004',name:'老王',age:21},
  {id:'001',name:'老刘',age:18},
  {id:'002',name:'海峰',age:19},
  {id:'003',name:'伟东',age:20},
2.更新后的虚拟DOM:
  <li key=0>老王---21 <input type="text"/> </li>
  <li key=1>老刘---18 <input type="text"/> </li>
  <li key=2>海峰---19 <input type="text"/> </li>
  <li key=3>伟东---20 <input type="text"/> </li>
4 慢动作回放(以id作为key):
1.初始化的数据:
  {id:'001',name:'老刘',age:18},
  {id:'002',name:'海峰',age:19},
  {id:'003',name:'伟东',age:20},
2.初始化的虚拟DOM:
  <li key='001'>老刘---18 <input type="text"/> </li>
  <li key='002'>海峰---19 <input type="text"/> </li>
  <li key='003'>伟东---20 <input type="text"/> </li>

二、更新过程
1.更新后的数据:
  {id:'004',name:'老王',age:21},
  {id:'001',name:'老刘',age:18},
  {id:'002',name:'海峰',age:19},
  {id:'003',name:'伟东',age:20},
2.更新后的虚拟DOM
  <li key='004'>老王---21 <input type="text"/> </li>
  <li key='001'>老刘---18 <input type="text"/> </li>
  <li key='002'>海峰---19 <input type="text"/> </li>
  <li key='003'>伟东---20 <input type="text"/> </li>
<div id="test"></div>
	<script type="text/babel">
		class Person extends React.Component {
			state = {
				users: [
					{ id: '001', name: '老刘', age: 18 },
					{ id: '002', name: '海峰', age: 12 },
					{ id: '003', name: '伟东', age: 20 },
				]
			}
			render() {
				return (
					<div>
						<button onClick={this.sort}>排序</button>
						<button onClick={this.addWang}>添加一个老王</button>
						<h2>下面的列表使用了index(索引值)作为key</h2>
						<ul>
							{
								this.state.users.map((p, index) => {
									return (
										<li key={index}>
										{p.name}---{p.age}
										<input type="text" /></li>
									)
								})
							}
						</ul>
						<hr />
						<h2>下面的列表使用了id(数据的唯一标识)作为key</h2>
						<ul>
							{
								this.state.users.map(p => {
									return (
										<li key={p.id}>
											{p.name}---{p.age}
											<input type="text" />
										</li>
									)
								})
							}
						</ul>
					</div>
				)
			}
			addWang = () => {
				const wang = { id: '004', name: '老王', age: 21 }
				const { users } = this.state
				this.setState({ users: [wang, ...users] })
			}
			sort = () => {
				const sortData = this.state.users.sort((p1, p2) =>
				p1.age - p2.age);
				this.setState({
					users: sortData
				})
			}
		}
		ReactDOM.render(<Person />, document.getElementById('test'))
	</script>
十六 补充-语法
1 react中的语法之条件语句
1)JSX中使用三元运算表达式
2)在render与return之间可以进行变量与条件语句操作
3)将条件操作代码块封装成函数,然后在JSX中执行,记得写返回值(建议)
2 react中的语法之循环语句
1)JSX中使用map循环
2)在render与return之间可以进行变量与循环语句操作 可以用forEach
			{
							this.state.users.map((p, index) => {
								return (
									<li key={index}>
									{p.name}---{p.age}
									<input type="text" /></li>
								)
							})
						}
					</ul>
					<hr />
					<h2>下面的列表使用了id(数据的唯一标识)作为key</h2>
					<ul>
						{
							this.state.users.map(p => {
								return (
									<li key={p.id}>
										{p.name}---{p.age}
										<input type="text" />
									</li>
								)
							})
						}
					</ul>
				</div>
			)
		}
		addWang = () => {
			const wang = { id: '004', name: '老王', age: 21 }
			const { users } = this.state
			this.setState({ users: [wang, ...users] })
		}
		sort = () => {
			const sortData = this.state.users.sort((p1, p2) =>
			p1.age - p2.age);
			this.setState({
				users: sortData
			})
		}
	}
	ReactDOM.render(<Person />, document.getElementById('test'))
</script>
# 十六 补充-语法

## 1 react中的语法之条件语句

1)JSX中使用三元运算表达式

2)在render与return之间可以进行变量与条件语句操作

3)将条件操作代码块封装成函数,然后在JSX中执行,记得写返回值(建议)

## 2 react中的语法之循环语句

1)JSX中使用map循环

2)在render与return之间可以进行变量与循环语句操作   可以用forEach

3)将循环操作代码块封装成函数,然后在JSX中执行 ,可以用for


 被折叠的 条评论
为什么被折叠?
被折叠的 条评论
为什么被折叠?
 到【灌水乐园】发言


