


本节涉及的全部代码见以下链接,欢迎参考指正!
list · 王哲/practice - 码云 - 开源中国 (gitee.com)
list介绍【简单了解即可】
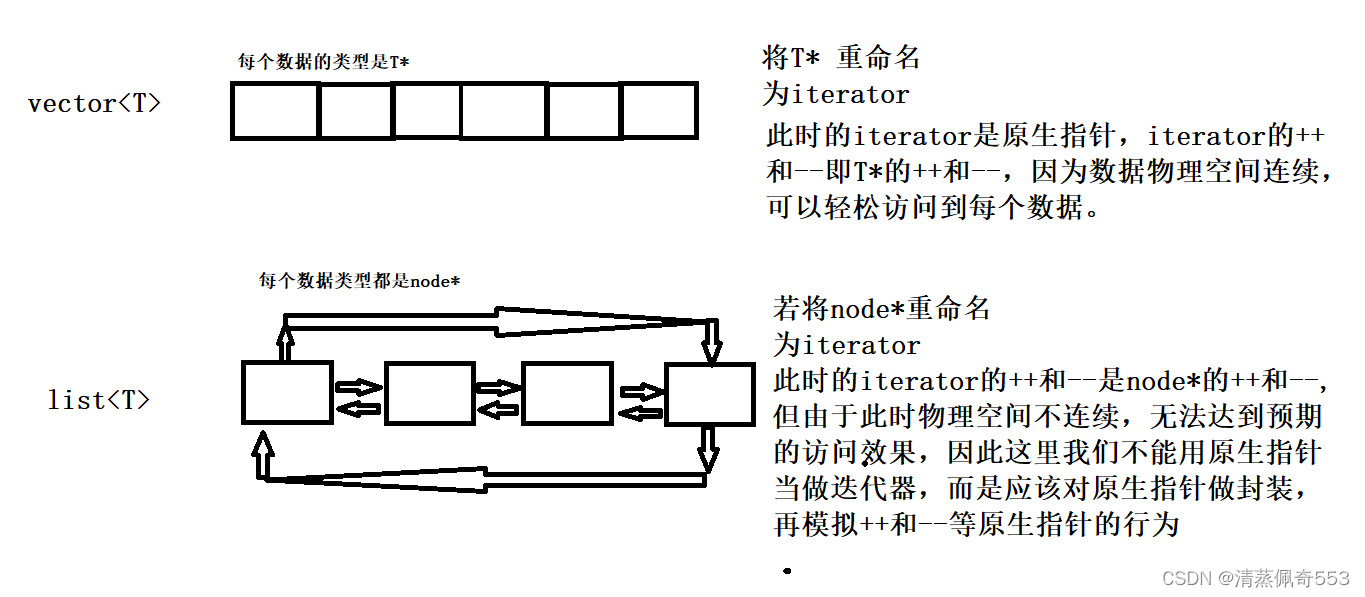
1. list是可以在其任意位置进行插入和删除的序列式容器,并且该容器可以前后双向迭代。2. list的底层是双向链表结构,双向链表中每个元素存储在互不相关的独立节点中,在节点中通过指针指向其前一个元素和后一个元素。3. list与forward_list非常相似:最主要的不同在于forward_list是单链表,只能朝前迭代,以让其更简单高效。4. 与其他的序列式容器相比(array,vector,deque),list通常在任意位置进行插入、移除元素的执行效率更好。5. 与其他序列式容器相比,list和forward_list最大的缺陷是不支持任意位置的随机访问,比如:要访问list的第6个元素,必须从已知的位置(比如头部或者尾部)迭代到该位置,在这段位置上迭代需要线性的时间开销;list还需要一些额外的空间,以保存每个节点的相关联信息(对于存储类型较小元素的大list来说这可能是一个重要的因素)。
list的使用
其实有了前面string和vector的使用介绍,我们很容易上手使用list,首先就是通过文档学习常用接口的使用方法,然后再加以练习,这里就不一 一列举了,只做简单的演示和注释,一些新出现的接口也会简单提一下,重要的是后续的模拟实现,有很多内容到时候会详细总结【重点】。
list文档链接如下:https://cplusplus.com/reference/list/list/?kw=list
1.构造函数的使用和链表数据的访问及修改方式
测试代码:
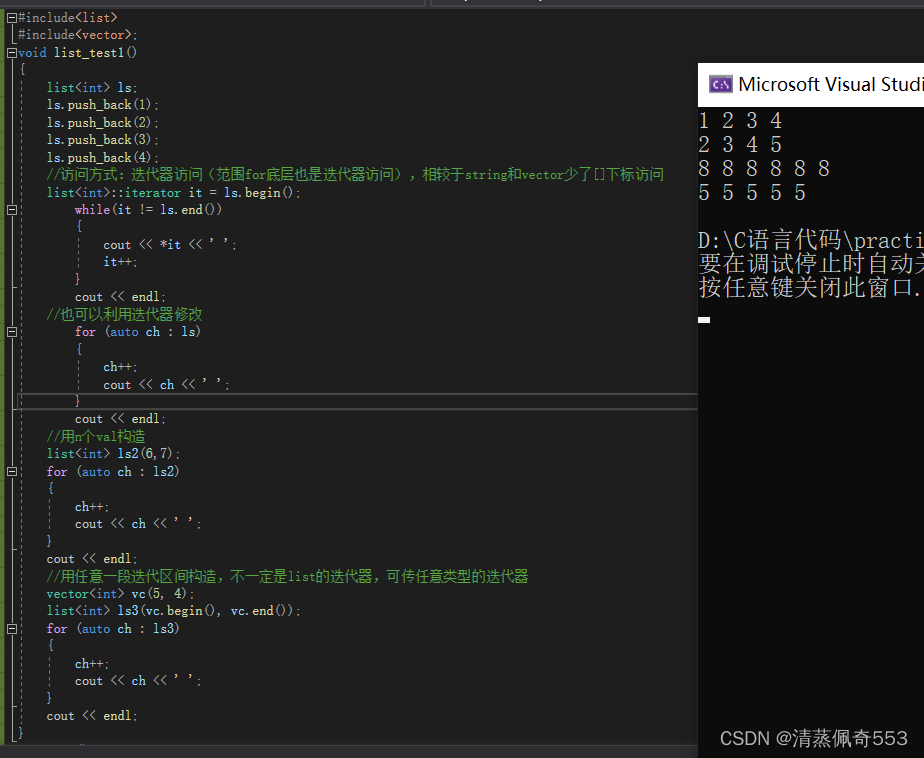
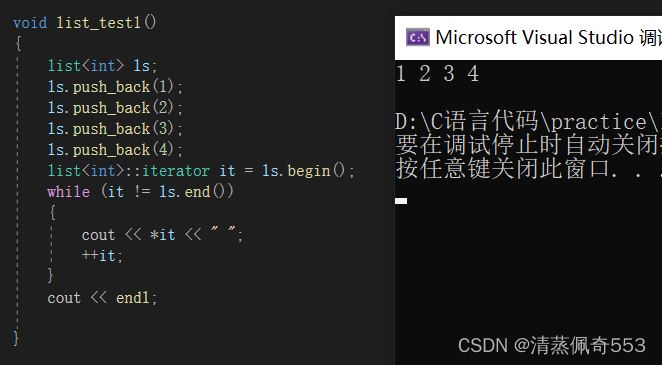
void list_test1()
{
	list<int> ls;
	ls.push_back(1);
	ls.push_back(2);
	ls.push_back(3);
	ls.push_back(4);
	//访问方式:迭代器访问(范围for底层也是迭代器访问),相较于string和vector少了[]下标访问
	list<int>::iterator it = ls.begin();
		while(it != ls.end())
		{
			cout << *it << ' ';
			it++;
		}
		cout << endl;
	//也可以利用迭代器修改
		for (auto ch : ls)
		{
			ch++;
			cout << ch << ' ';
		}
		cout << endl;
	//用n个val构造
	list<int> ls2(6,7);
	for (auto ch : ls2)
	{
		ch++;
		cout << ch << ' ';
	}
	cout << endl;
	//用任意一段迭代区间构造,不一定是list的迭代器,可传任意类型的迭代器
	vector<int> vc(5, 4);
	list<int> ls3(vc.begin(), vc.end());
	for (auto ch : ls3)
	{
		ch++;
		cout << ch << ' ';
	}
	cout << endl;
}
小结:这里我们也就可以知道迭代器才是我们通用的容器访问方式,每种容器一定有其对应的迭代器,而方括号下标只适用于特殊容器。
运行结果如下:
2.插入删除
这里主要演示任意位置的插入删除方法
代码如下:
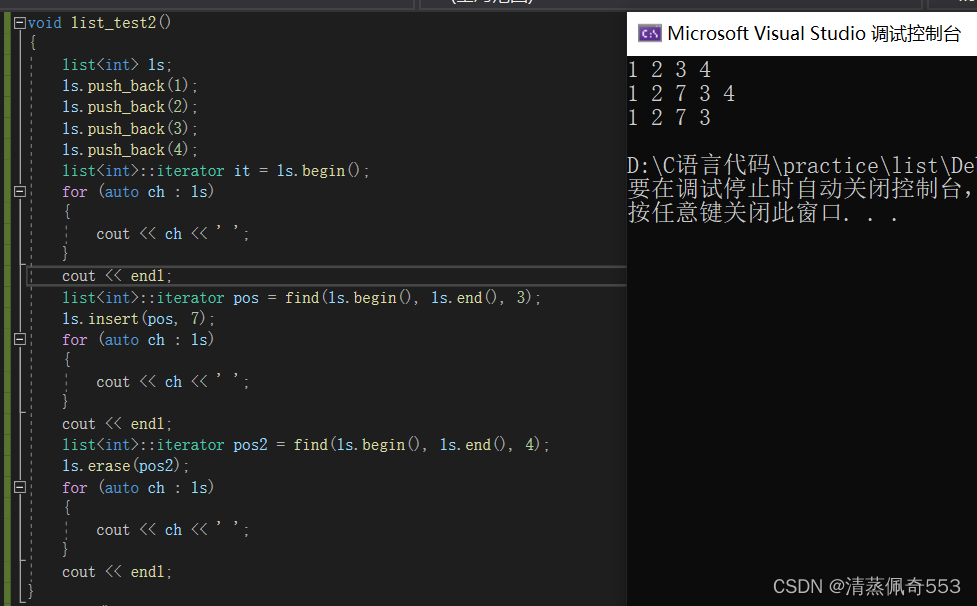
void list_test2()
{
	list<int> ls;
	ls.push_back(1);
	ls.push_back(2);
	ls.push_back(3);
	ls.push_back(4);
	list<int>::iterator it = ls.begin();
	for (auto ch : ls)
	{
		cout << ch << ' ';
	}
	cout << endl;
	list<int>::iterator pos = find(ls.begin(), ls.end(), 3);
	ls.insert(pos, 7);
	for (auto ch : ls)
	{
		cout << ch << ' ';
	}
	cout << endl;
	list<int>::iterator pos2 = find(ls.begin(), ls.end(), 4);
	ls.erase(pos2);
	for (auto ch : ls)
	{
		cout << ch << ' ';
	}
	cout << endl;
}
小结:和vector一样,任意位置的插入删除需要先用库中的算法find(),利用迭代器找到了才返回相应迭代器,再对相应位置进行操作。
运行结果如下:
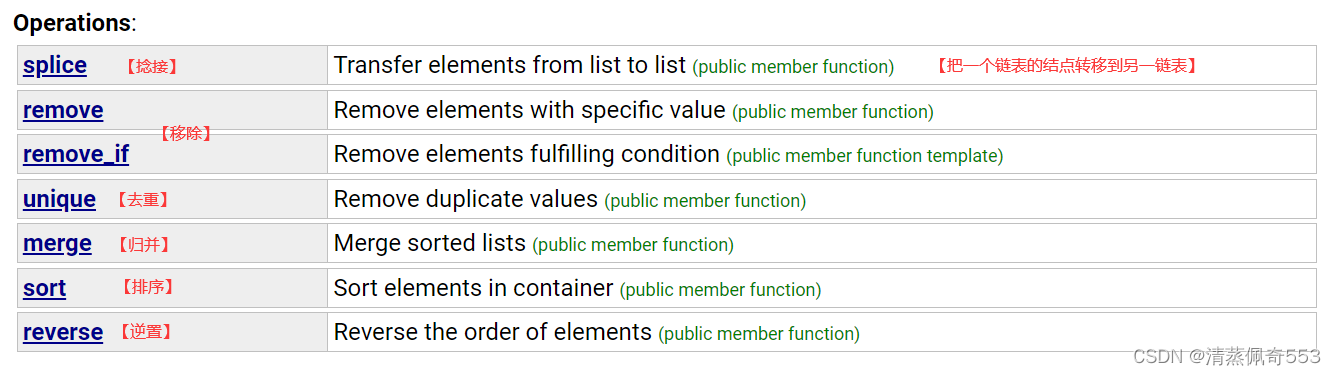
3.一些特殊接口
这些接口,看一下相关的文档描述就很容易学会使用了,这里我们要特殊说明一下sort()这个接口,我们知道算法库中也为我们提供了sort(),那为什么我们这里不像vector一样用库里面的sort()?原因如下:
因此,list的sort要单独实现,但实际上我们很少用此接口,原因是它的效率极低,见下例:
事实上我们在实际用的时候通常会把数据拷贝到vector中用库中的sort()排好序,然后再将排好序的数据拷回链表 经过测试,虽然经过了两次拷贝,但其效率大多仍高于list中自己的sort()。

list的模拟实现【重点理解迭代器的实现】
基本结构的搭建
#pragma once
namespace wz
{
	template<class T>
	//定义结点结构体
	struct list_node
	{
		list_node<T>* _next;
		list_node<T>* _prve;
		T _data;

		//提供默认构造
		list_node(const T& x=T())
			:_next(nullptr)
			,_prve(nullptr)
			,_data(x)
		{}
	};

	template<class T>
	class list
	{
		typedef list_node<T> node;
	public:
		//空链表的创建以及初始化
		void empty_init()
		{
			_head = new node;
			_head->_next = _head;
			_head->_prve = _head;
		}
		//构造函数的实现
		list()
		{
	      //创建一个空链表
			empty_init();
		}
	private:
		node* _head;//成员变量为头结点指针
	};

	void list_test1()
	{
		list<int> ls;
	}
}
上述定义了链表的基本结构以及结点的基本结构,并且实现了链表的默认构造,试着创建一个空链表,结果如下,表示创建成功了:

尾插
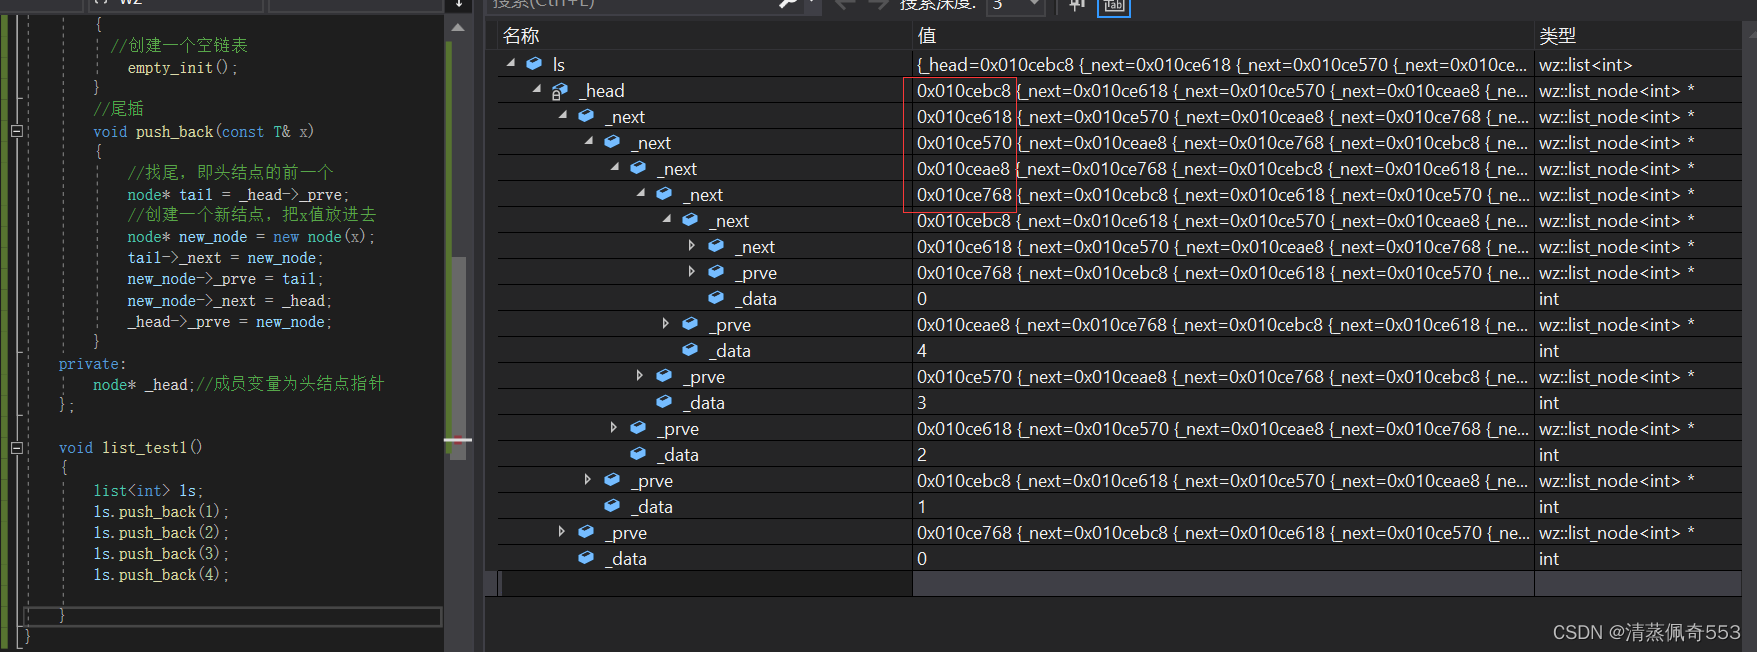
//尾插
		void push_back(const T& x)
		{
			//找尾,即头结点的前一个
			node* tail = _head->_prve;
			//创建一个新结点,把x值放进去
			node* new_node = new node(x);
			tail->_next = new_node;
			new_node->_prve = tail;
			new_node->_next = _head;
			_head->_prve = new_node;
		}

//测试代码
void list_test1()
	{
		list<int> ls;
		ls.push_back(1);
		ls.push_back(2);
		ls.push_back(3);
		ls.push_back(4);

	}
试着插入几个值并调出监视窗口观察是否符合要求,如下即为尾插成功:
以上是通过监视窗口的调用知晓结果,那如何来打印链表以便更直观的观察呢?这里就涉及到链表的访问及遍历方式,list是容器,当然要实现通用的迭代器,只要实现了迭代器,任意位置的访问和遍历就都不是问题了,那实现链表的迭代器和string和vector是一样的吗?我们通过下文分析实现。
迭代器的实现
分析list迭代器与string和vector迭代器的不同之处:
我们先根据上述分析来定义list_iterator如下:
template<class T>
	struct list_iterator
	{
		typedef list_node<T> node;
		typedef list_iterator<T> self;
		node* _node;
		//默认构造
		list_iterator(node* n)
			:_node(n)
		{}
		//重载*
		T& operator *()
		{
			return _node->_data;
		}
		//重载++
		self& operator++()
		{
		   _node=_node->_next;
		   return *this;
		}
		//重载!=
		bool operator!=(const self& s)
		{
			return _node != s._node;
		}
据此在list内定义begin()和end()如下:
typedef list_iterator<T> iterator;
		iterator begin()
		{
			return iterator(_head->_next);
		}
		iterator end()
		{
			return iterator(_head);
		}
遍历打印一个链表测试功能,如下:
上述测试用例足以说明我们目前实现的iterator的功能正确!
经观察我们发现定义it时应该要调用拷贝构造,我们并没有实现拷贝构造就会调用编译器默认生成的浅拷贝,浅拷贝两指针指向同一块空间,这里的浅拷贝为什么不会报错呢?主要原因是我们没有实现析构函数,没有同一空间析构两次的问题,事实上我们也并没有析构结点的权限,这是链表内部需要完成的工作,因此此处编译器默认的浅拷贝就够用了,内部就不再实现,为了其功能的完整,我们将iterator内容完善如下:
template<class T>
	struct list_iterator
	{
		typedef list_node<T> node;
		typedef list_iterator<T> self;
		node* _node;
		//默认构造
		list_iterator(node* n)
			:_node(n)
		{}
		//重载*
		T& operator *()
		{
			return _node->_data;
		}
		//重载前置++
		self& operator++()
		{
		   _node=_node->_next;
		   return *this;
		}
		//重载后置++
		self operator++(int)
		{
			self tmp(*this);
			_node = _node->_next;
			return tmp;
		}
		//重载前置--
		self& operator--()
		{
			_node = _node->_prve;
			return *this;
		}
		//重载后置--
		self operator--(int)
		{
			self tmp(*this);
			_node = _node->_prve;
			return tmp;
		}
		//重载!=
		bool operator!=(const self& s)
		{
			return _node != s._node;
		}
		//重载==
		bool operator==(const self& s)
		{
			return _node == s._node;
		}
	};
const迭代器如何实现
当我们想实现一个链表打印函数,要求该函数中只能打印链表值,但不能修改链表值,此时就要实现一个const迭代器const_iterator
void list_print()const
		{
			list<int>::const_iterator it = begin();
			while (it != end())
			{
				cout << *it << " ";
				it++;
			}
			cout << endl;
		}
如何定义const_iterator迭代器呢?
可以直接如下吗?
typedef const list_iterator<T> const_iterator;
//这里相当于是 T* const  const修饰指针本身,即指针本身就不能改变
//而我们要实现的是const T*
不可以!!这里const修饰的迭代器,若如此,迭代器本身都不能实现++和--又谈何遍历,我们不变的是迭代器指向的内容,而非迭代器本身,因此,const迭代器不能像上面这样简单粗暴的定义,而要重新实现一份const迭代器版本,正确定义如下:
template<class T>
	struct list_const_iterator
	{
		typedef list_node<T> node;
		typedef list_const_iterator<T> self;
		node* _node;
		//默认构造
		list_const_iterator(node* n)
			:_node(n)
		{}
		//重载*
		const T& operator *()
		{
			return _node->_data;
		}
		//重载前置++
		self& operator++()const
		{
			_node = _node->_next;
			return *this;
		}
		//重载后置++
		self operator++(int)
		{
			self tmp(*this);
			_node = _node->_next;
			return tmp;
		}
		//重载前置--
		self& operator--()
		{
			_node = _node->_prve;
			return *this;
		}
		//重载后置--
		self operator--(int)
		{
			self tmp(*this);
			_node = _node->_prve;
			return tmp;
		}
		//重载!=
		bool operator!=(const self& s)
		{
			return _node != s._node;
		}
		//重载==
		bool operator==(const self& s)
		{
			return _node == s._node;
		}
	};
进而定义相应的begin()和end()如下:
const_iterator begin()const
{
	return const_iterator(_head->_next);
}
const_iterator end()const
{
	return const_iterator(_head);
}
迭代器综合实现
通过上述观察,我们其实观察到,const迭代器和普通迭代器实现起来只有一个返回值不同,其它代码均相同,此时如果实现两份,就会有大量的代码冗余,STL库中一定不会有这么挫的代码出现,参考源码我们发现,库中通过给迭代器实现时增加一个模板参数Ref,表示解引用后的返回值来解决,此时,根据传过来的参数,将自动实例化出相应的迭代器,代码如下:
template<class T,class Ref>
struct list_iterator
{
	typedef list_node<T> node;
	typedef list_iterator<T,Ref> self;
	node* _node;
	//默认构造
	list_iterator(node* n)
		:_node(n)
	{}
	//重载*
	Ref& operator *()
	{
		return _node->_data;
	}
	//重载前置++
	self& operator++()
	{
		_node = _node->_next;
		return *this;
	}
	//重载后置++
	self operator++(int)
	{
		self tmp(*this);
		_node = _node->_next;
		return tmp;
	}
	//重载前置--
	self& operator--()
	{
		_node = _node->_prve;
		return *this;
	}
	//重载后置--
	self operator--(int)
	{
		self tmp(*this);
		_node = _node->_prve;
		return tmp;
	}
	//重载!=
	bool operator!=(const self& s)
	{
		return _node != s._node;
	}
	//重载==
	bool operator==(const self& s)
	{
		return _node == s._node;
	}
};
typedef list_iterator<T,T&> iterator; typedef list_iterator<T,const T&> const_iterator;由此,通过增加一个模板参数,就能轻松实现代码的复用,这里就能看出模板参数的牛逼之处!!!
迭代器实现中重载->
我们在参考源码时,发现迭代器实现时,类模板参数实际上有三个,除了T和Ref还有一个Ptr,那这个模板参数又有何作用,我们接下来来一起探讨。以上举例为了方便,我们在实例化链表时是list<int>,即链表中存的都是整数,那么在打印链表时,cout<<*it是没有问题的,因为本质会被解析成打印内置类型int*指向的内容,但如果T是自定义类型,如下:
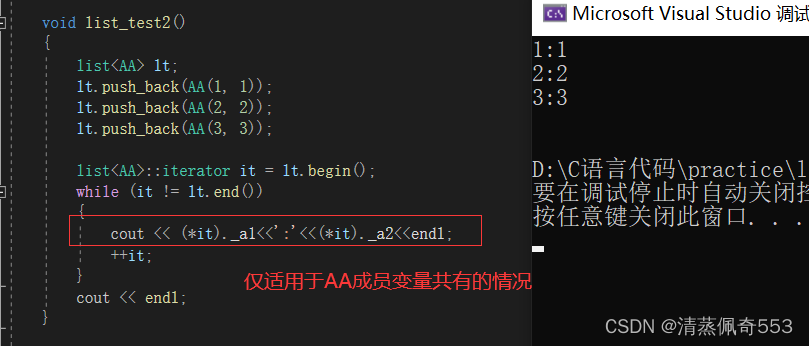
struct AA
	{
		int _a1;
		int _a2;

		AA(int a1 = 0, int a2 = 0)
			:_a1(a1)
			, _a2(a2)
		{}
	};

	void test_list2()
	{
		list<AA> lt;
		lt.push_back(AA(1, 1));
		lt.push_back(AA(2, 2));
		lt.push_back(AA(3, 3));

		list<AA>::iterator it = lt.begin();
		while (it != lt.end())
		{
			cout << *it << ;
			++it;
		}
		cout << endl;
	}
会出现如下报错:
即AA类中没有重载<<就不能实现如上操作,那么在AA类成员变量共有情况下,除了重载流提取,我们还可以用如下方式打印:
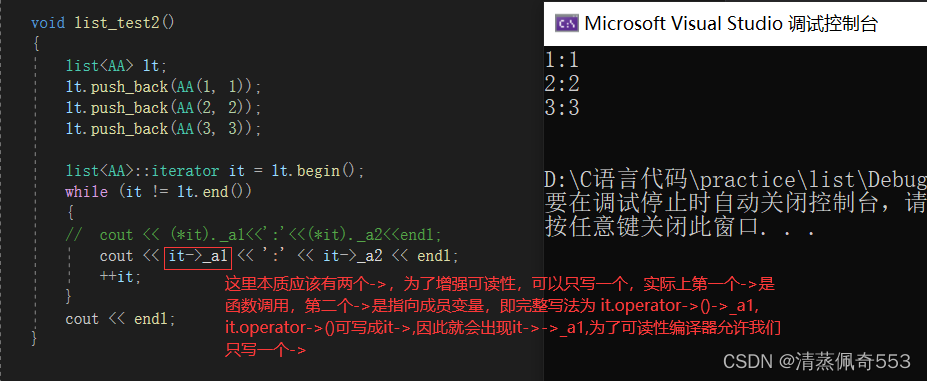
但我们一般有一个类/结构体的指针,不会先将其解引用再用.来访问成员,一般直接使用指针加->进行成员变量的访问,因此我们给迭代器重载->,如下:
//重载->
T* operator -> ()
{
 return &_node->_data;
}
则可支持如下代码运行:
那如果是const迭代器呢?返回值就要是const T*,这就解释了STL源码中迭代器类模板参数的第三个模板参数Ptr的作用,这里的Ptr就是此处返回值的模板参数,综上我们实现的完整迭代器如下:
template<class T,class Ref,class Ptr>
struct list_iterator
{
	typedef list_node<T> node;
	typedef list_iterator<T,Ref,Ptr> self;
	node* _node;
	//默认构造
	list_iterator(node* n)
		:_node(n)
	{}
	//重载*
	Ref& operator *()
	{
		return _node->_data;
	}
	//重载前置++
	self& operator++()
	{
		_node = _node->_next;
		return *this;
	}
	//重载后置++
	self operator++(int)
	{
		self tmp(*this);
		_node = _node->_next;
		return tmp;
	}
	//重载前置--
	self& operator--()
	{
		_node = _node->_prve;
		return *this;
	}
	//重载后置--
	self operator--(int)
	{
		self tmp(*this);
		_node = _node->_prve;
		return tmp;
	}
	//重载->
	Ptr operator -> ()
	{
		return &_node->_data;
	}
	//重载!=
	bool operator!=(const self& s)
	{
		return _node != s._node;
	}
	//重载==
	bool operator==(const self& s)
	{
		return _node == s._node;
	}
};
typedef list_iterator<T,T&,T*> iterator; typedef list_iterator<T,const T&,const T*> const_iterator;

综上,我们把链表中的迭代器循序渐进的构造完成,记下来就是继续实现其它的核心接口。
任意位置的插入删除
有了之前的基础,我们其实知道链表中实现头插头删并不是重点,任意位置的插入删除才是重点,实现了insert()和erase(),头插头删复用一下即可,代码如下:
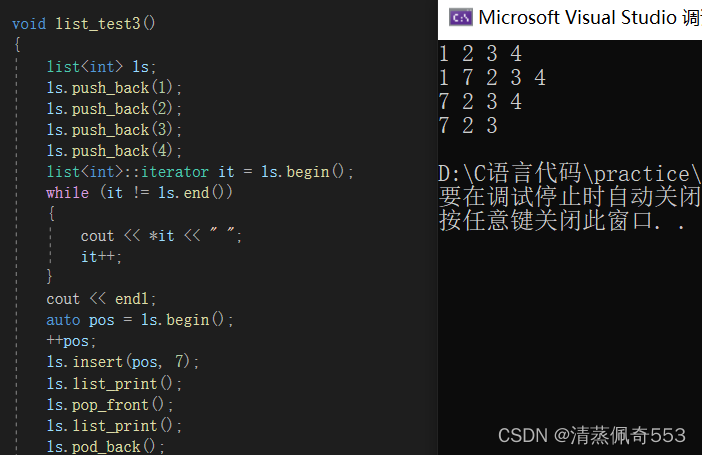
//任意位置的插入
		void insert(iterator pos, const T& x)
		{
			node* cur = pos._node;
			node* prve = cur->_prve;

			node* new_node = new node(x);

			prve->_next = new_node;
			new_node->_prve = prve;
			new_node->_next = cur;
			cur->_prve = new_node;
		}
		//头插
		void push_front(const T& x)
		{
			insert(begin(), x);
		}
		//尾插
		void push_back(const T& x)
		{
			insert(end(), x);
		}
		//任意位置的删除
		void erase(iterator pos)
		{
			assert(pos != end());
			node* prve = pos._node->_prve;
			node* next = pos._node->_next;
			prve->_next = next;
			next->_prve = prve;
			delete pos._node;//这里会有迭代器失效的问题
		}
		//尾删
		void pod_back()
		{
			erase(--end());
		}
		//头删
		void pop_front()
		{
			erase(begin());
		}
测试代码如下:
void list_test3()
	{
		list<int> ls;
		ls.push_back(1);
		ls.push_back(2);
		ls.push_back(3);
		ls.push_back(4);
		list<int>::iterator it = ls.begin();
		while (it != ls.end())
		{
			cout << *it << " ";
			it++;
		}
		cout << endl;
		auto pos = ls.begin();
		++pos;
		ls.insert(pos, 7);
		ls.list_print();
		ls.pop_front();
		ls.list_print();
		ls.pod_back();
		ls.list_print();

	}
测试结果如下:
析构函数和清除函数
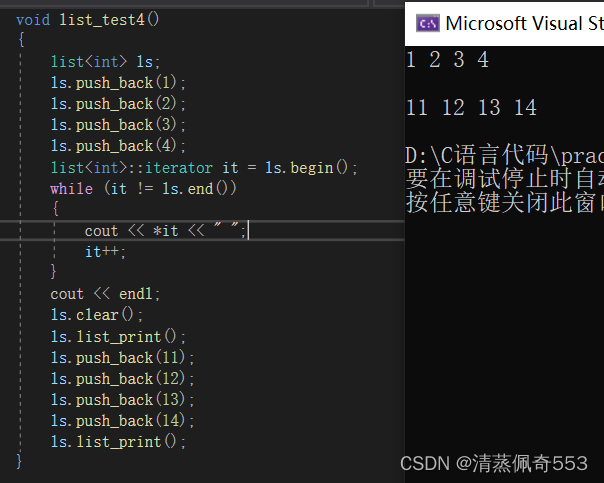
//清除函数
void clear()
{
	iterator it = begin();
	while (it != end())
	{
		erase(it++);//这里迭代器不失效的原因是,后置++,返回的this的拷贝,delete的也是this的拷贝
		//也可以像之前那样给erase设置一个返回值
	}
}
//析构函数,不仅要清除全部有效结点,还要清除头结点
~list()
{
	clear;
	delete _head;
	_head = nullptr;
}
测试代码如下:
void list_test4()
	{
		list<int> ls;
		ls.push_back(1);
		ls.push_back(2);
		ls.push_back(3);
		ls.push_back(4);
		list<int>::iterator it = ls.begin();
		while (it != ls.end())
		{
			cout << *it << " ";
			it++;
		}
		cout << endl;
		ls.clear();
		ls.list_print();
		ls.push_back(11);
		ls.push_back(12);
		ls.push_back(13);
		ls.push_back(14);
		ls.list_print();
	}
测试结果如下:
迭代器区间构造及拷贝构造
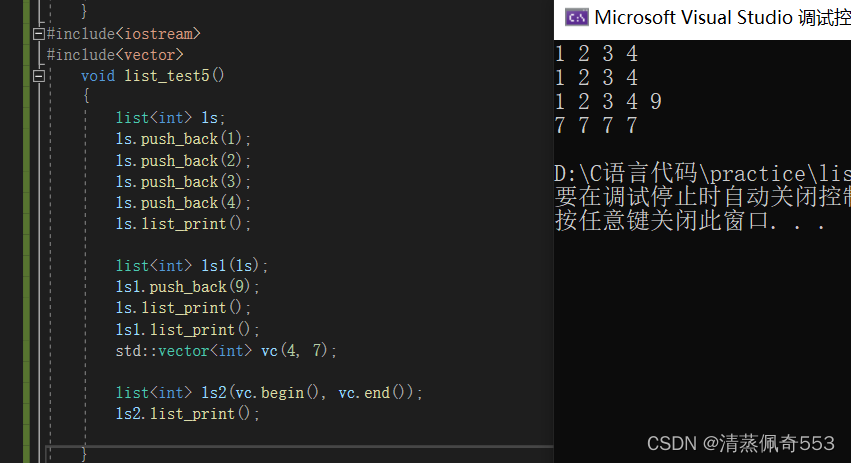
//迭代器区间构造
template<class Iterator>
list(Iterator first, Iterator last)
{
	empty_init();
	while (first != last)
	{
		push_back(*first);
		first++;
	}
}
//拷贝构造
list(const list<T>& it)
{
	empty_init();
	for (auto ch : it)
	{
		push_back(ch);
	}
}
测试代码如下:
#include<iostream>
#include<vector>
	void list_test5()
	{
		list<int> ls;
		ls.push_back(1);
		ls.push_back(2);
		ls.push_back(3);
		ls.push_back(4);
		ls.list_print();

		list<int> ls1(ls);
		ls1.push_back(9);
		ls.list_print();
		ls1.list_print();
		std::vector<int> vc(4, 7);

		list<int> ls2(vc.begin(), vc.end());
		ls2.list_print();

	}
测试结果如下:
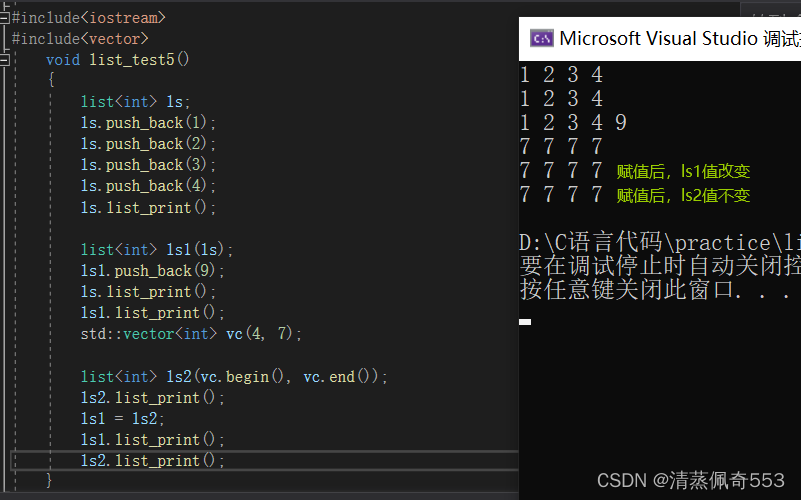
拷贝构造和赋值重载现代写法
void swap(list<T>& tmp)
{
	std::swap(_head, tmp._head);
}
//现代写法,老板思维
list(const list<T>& it)
{
	empty_init();
	list<T> tmp(it.begin(), it.end());
	swap(tmp);
}
//赋值重载
list<T>& operator =(list<T> it)//这里参数不能用引用,以防把用于赋值的链表改变造成后续使用错误
{
	swap(it);
	return *this;
}
测试结果如下:
到此,关于list和核心内容,我们基本总结到位了,本课最重要的是对迭代器底层实现的理解,反复分析后,体会类和模板的强大功能,加深对其的理解与应用!
本节涉及的全部代码见以下链接,欢迎参考指正!
list · 王哲/practice - 码云 - 开源中国 (gitee.com)


 被折叠的 条评论
为什么被折叠?
被折叠的 条评论
为什么被折叠?
 到【灌水乐园】发言


