


重生之 SpringBoot3 入门保姆级学习(09、第二章:相关特性合集)
2、相关特性
2.1 包扫描
-
默认包扫描规则:
-
@SpringBootApplication 标注的就是主程序
-
SpringBoot 只会扫描主程序下面的包 自动的 component-scan 功能
-
在 @SpringBootApplication 添加参数可以增加包扫描范围 如:@SpringBootApplication(scanBasePackages = “com.zhong”)
-
在 @SpringBootApplication 直接使用注解 @ComponentScan(“com.zhong”) 指定扫描路径
-
-
开始可以正常访问
- 当 controller 包移动到 com.zhong 下面 不能正常访问

- 解决办法:在 Boot302DemoApplication 上注解参数为 scanBasePackages = “com.zhong” 也就是你想要扫描的包的位置
package com.zhong.boot302demo;

import org.springframework.boot.SpringApplication;
import org.springframework.boot.autoconfigure.SpringBootApplication;

@SpringBootApplication(scanBasePackages = "com.zhong") // 添加包扫描位置
// @ComponentScan("com.zhong")     // 直接指定扫描路径
public class Boot302DemoApplication {

    public static void main(String[] args) {
        SpringApplication.run(Boot302DemoApplication.class, args);
    }

}
- 重启 SpringBoot 后再次访问
2.2 Bean 装配
- 新建 User 类
package com.zhong.boot302demo.bean;

import lombok.AllArgsConstructor;
import lombok.Data;
import lombok.NoArgsConstructor;

/**
 * @ClassName : User
 * @Description :
 * @Author : zhx
 * @Date: 2024-05-23 12:56
 */
@Data
@AllArgsConstructor
@NoArgsConstructor
public class User {
    private String id;
    private String name;
}
- 新建 Cat 类
package com.zhong.boot302demo.bean;

import lombok.Data;

/**
 * @ClassName : Cat
 * @Description :
 * @Author : zhx
 * @Date: 2024-05-23 12:56
 */
@Data
public class Cat {
    private String id;
    private String name;
}
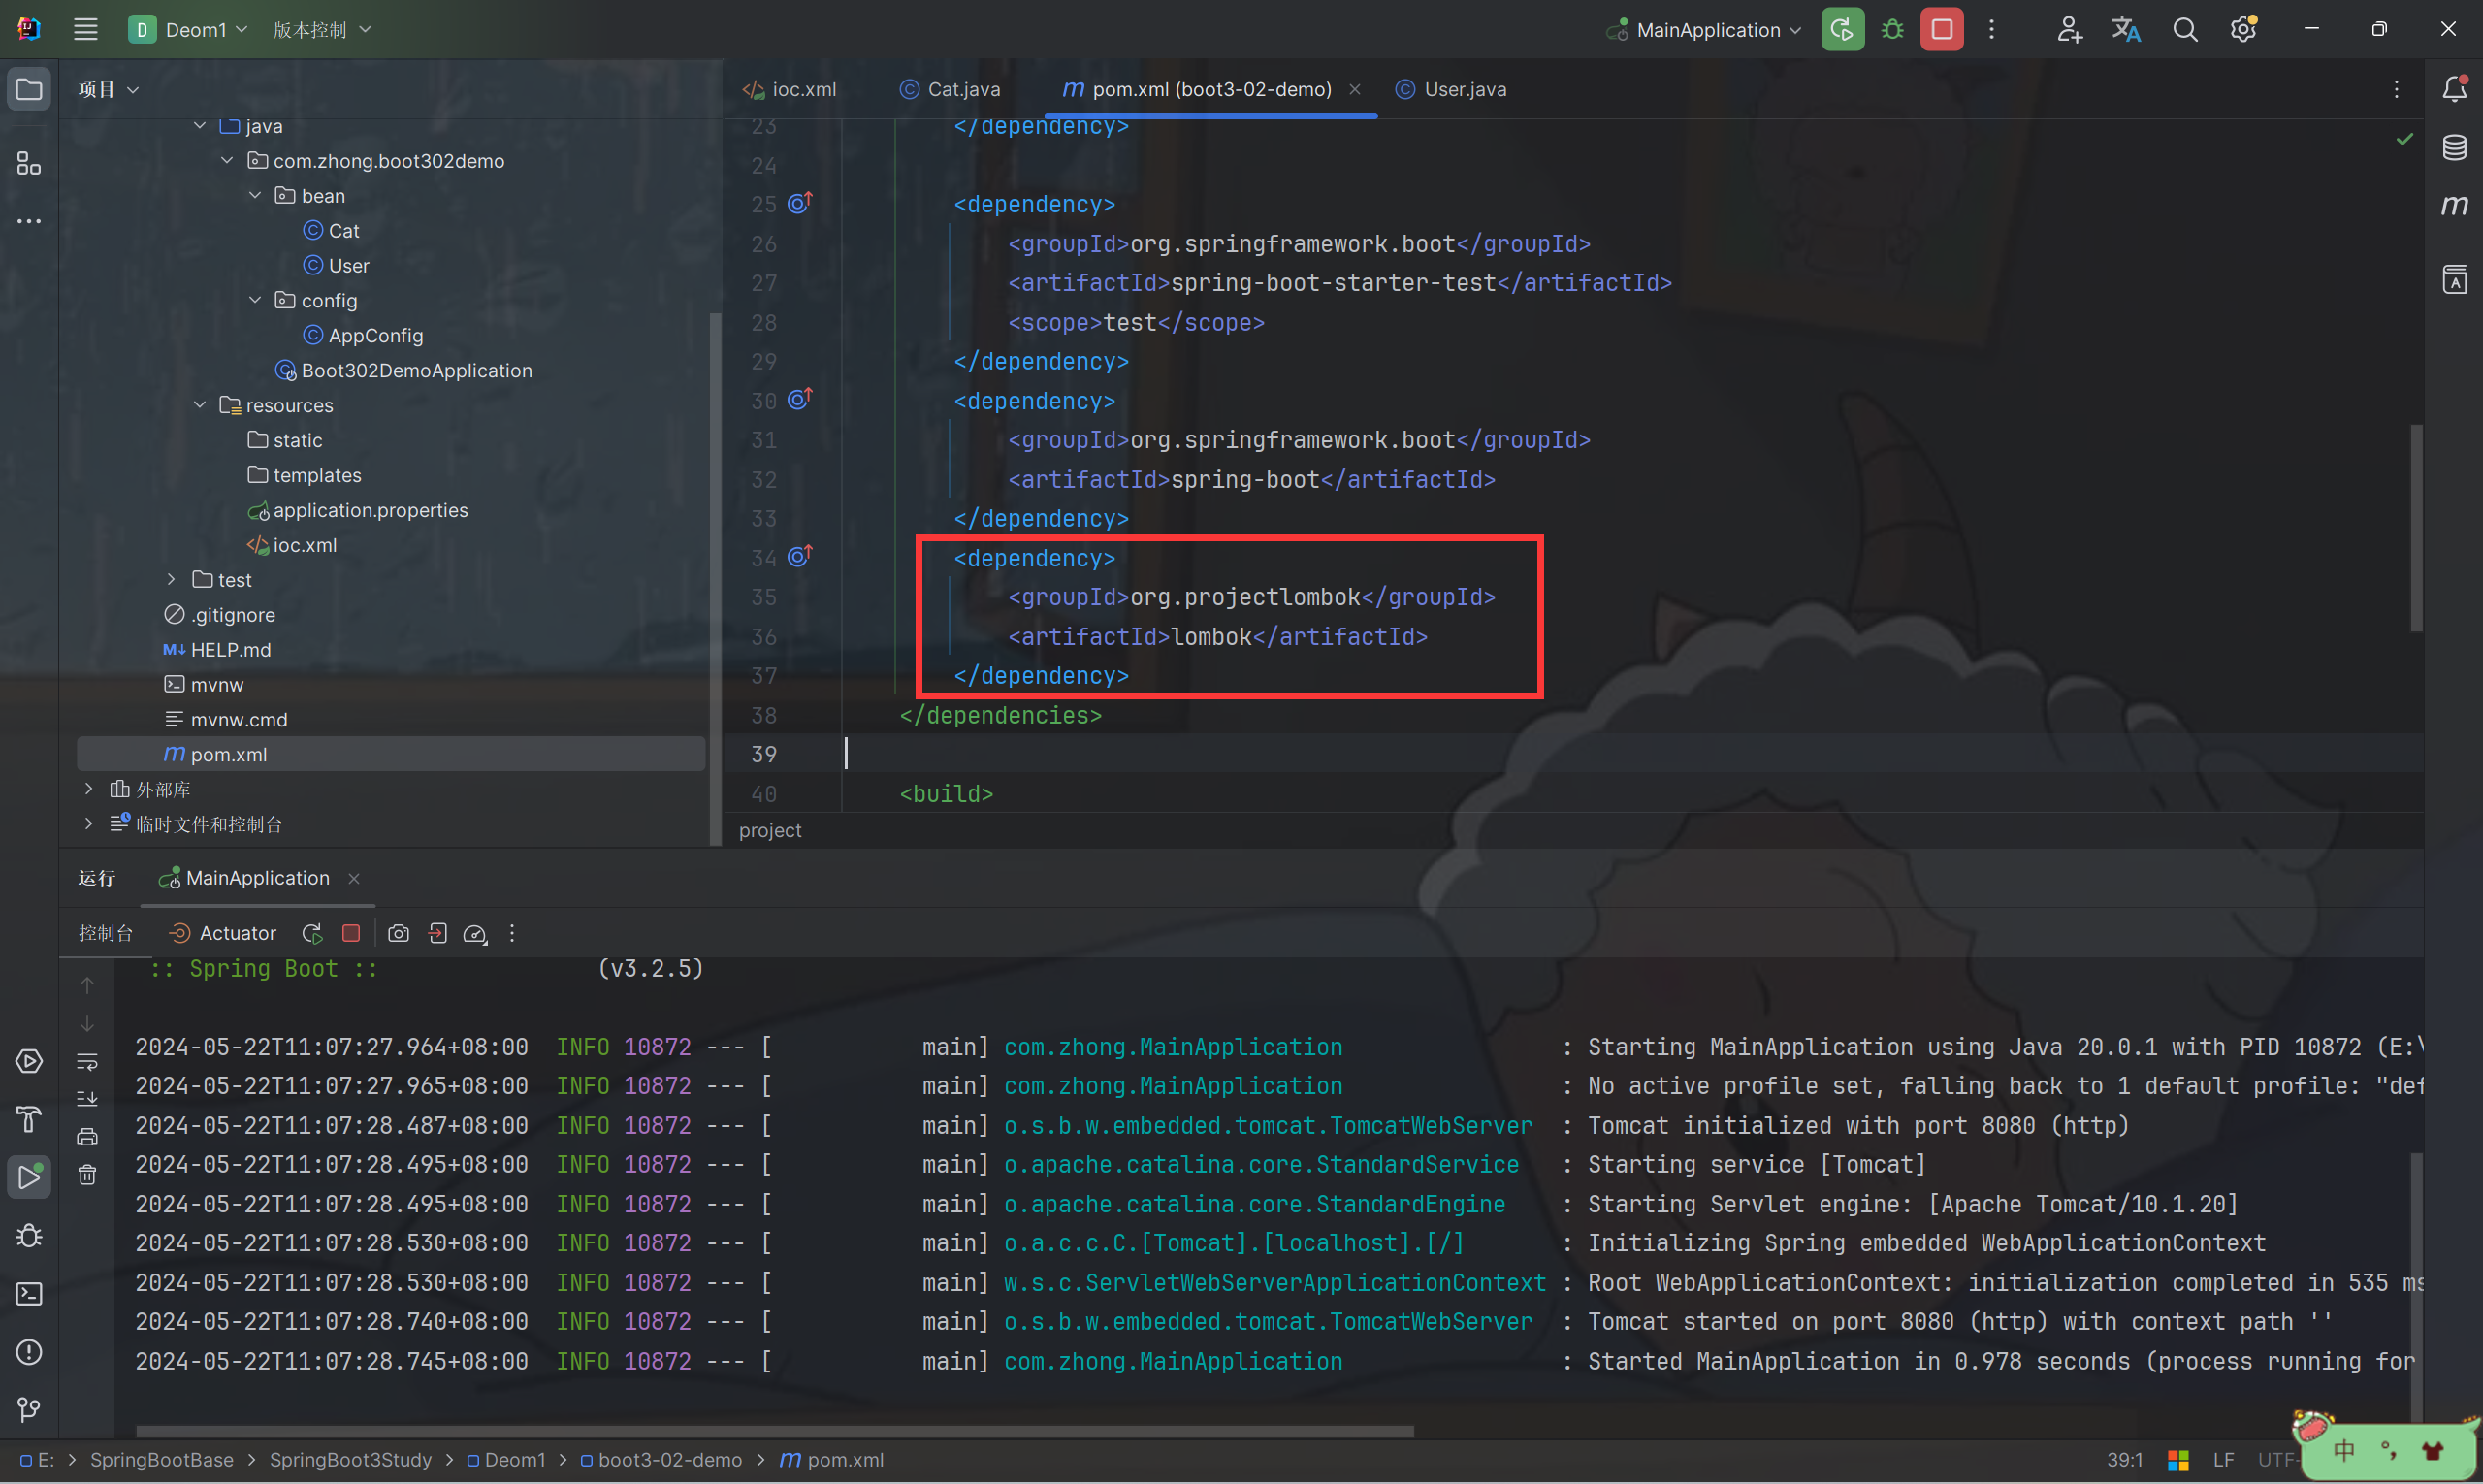
- 若 @Data 爆红可以添加依赖
<dependency>
    <groupId>org.projectlombok</groupId>
    <artifactId>lombok</artifactId>
</dependency>
2.2.1 通过 ioc.xml 文件配置
- 新建 ioc.xml
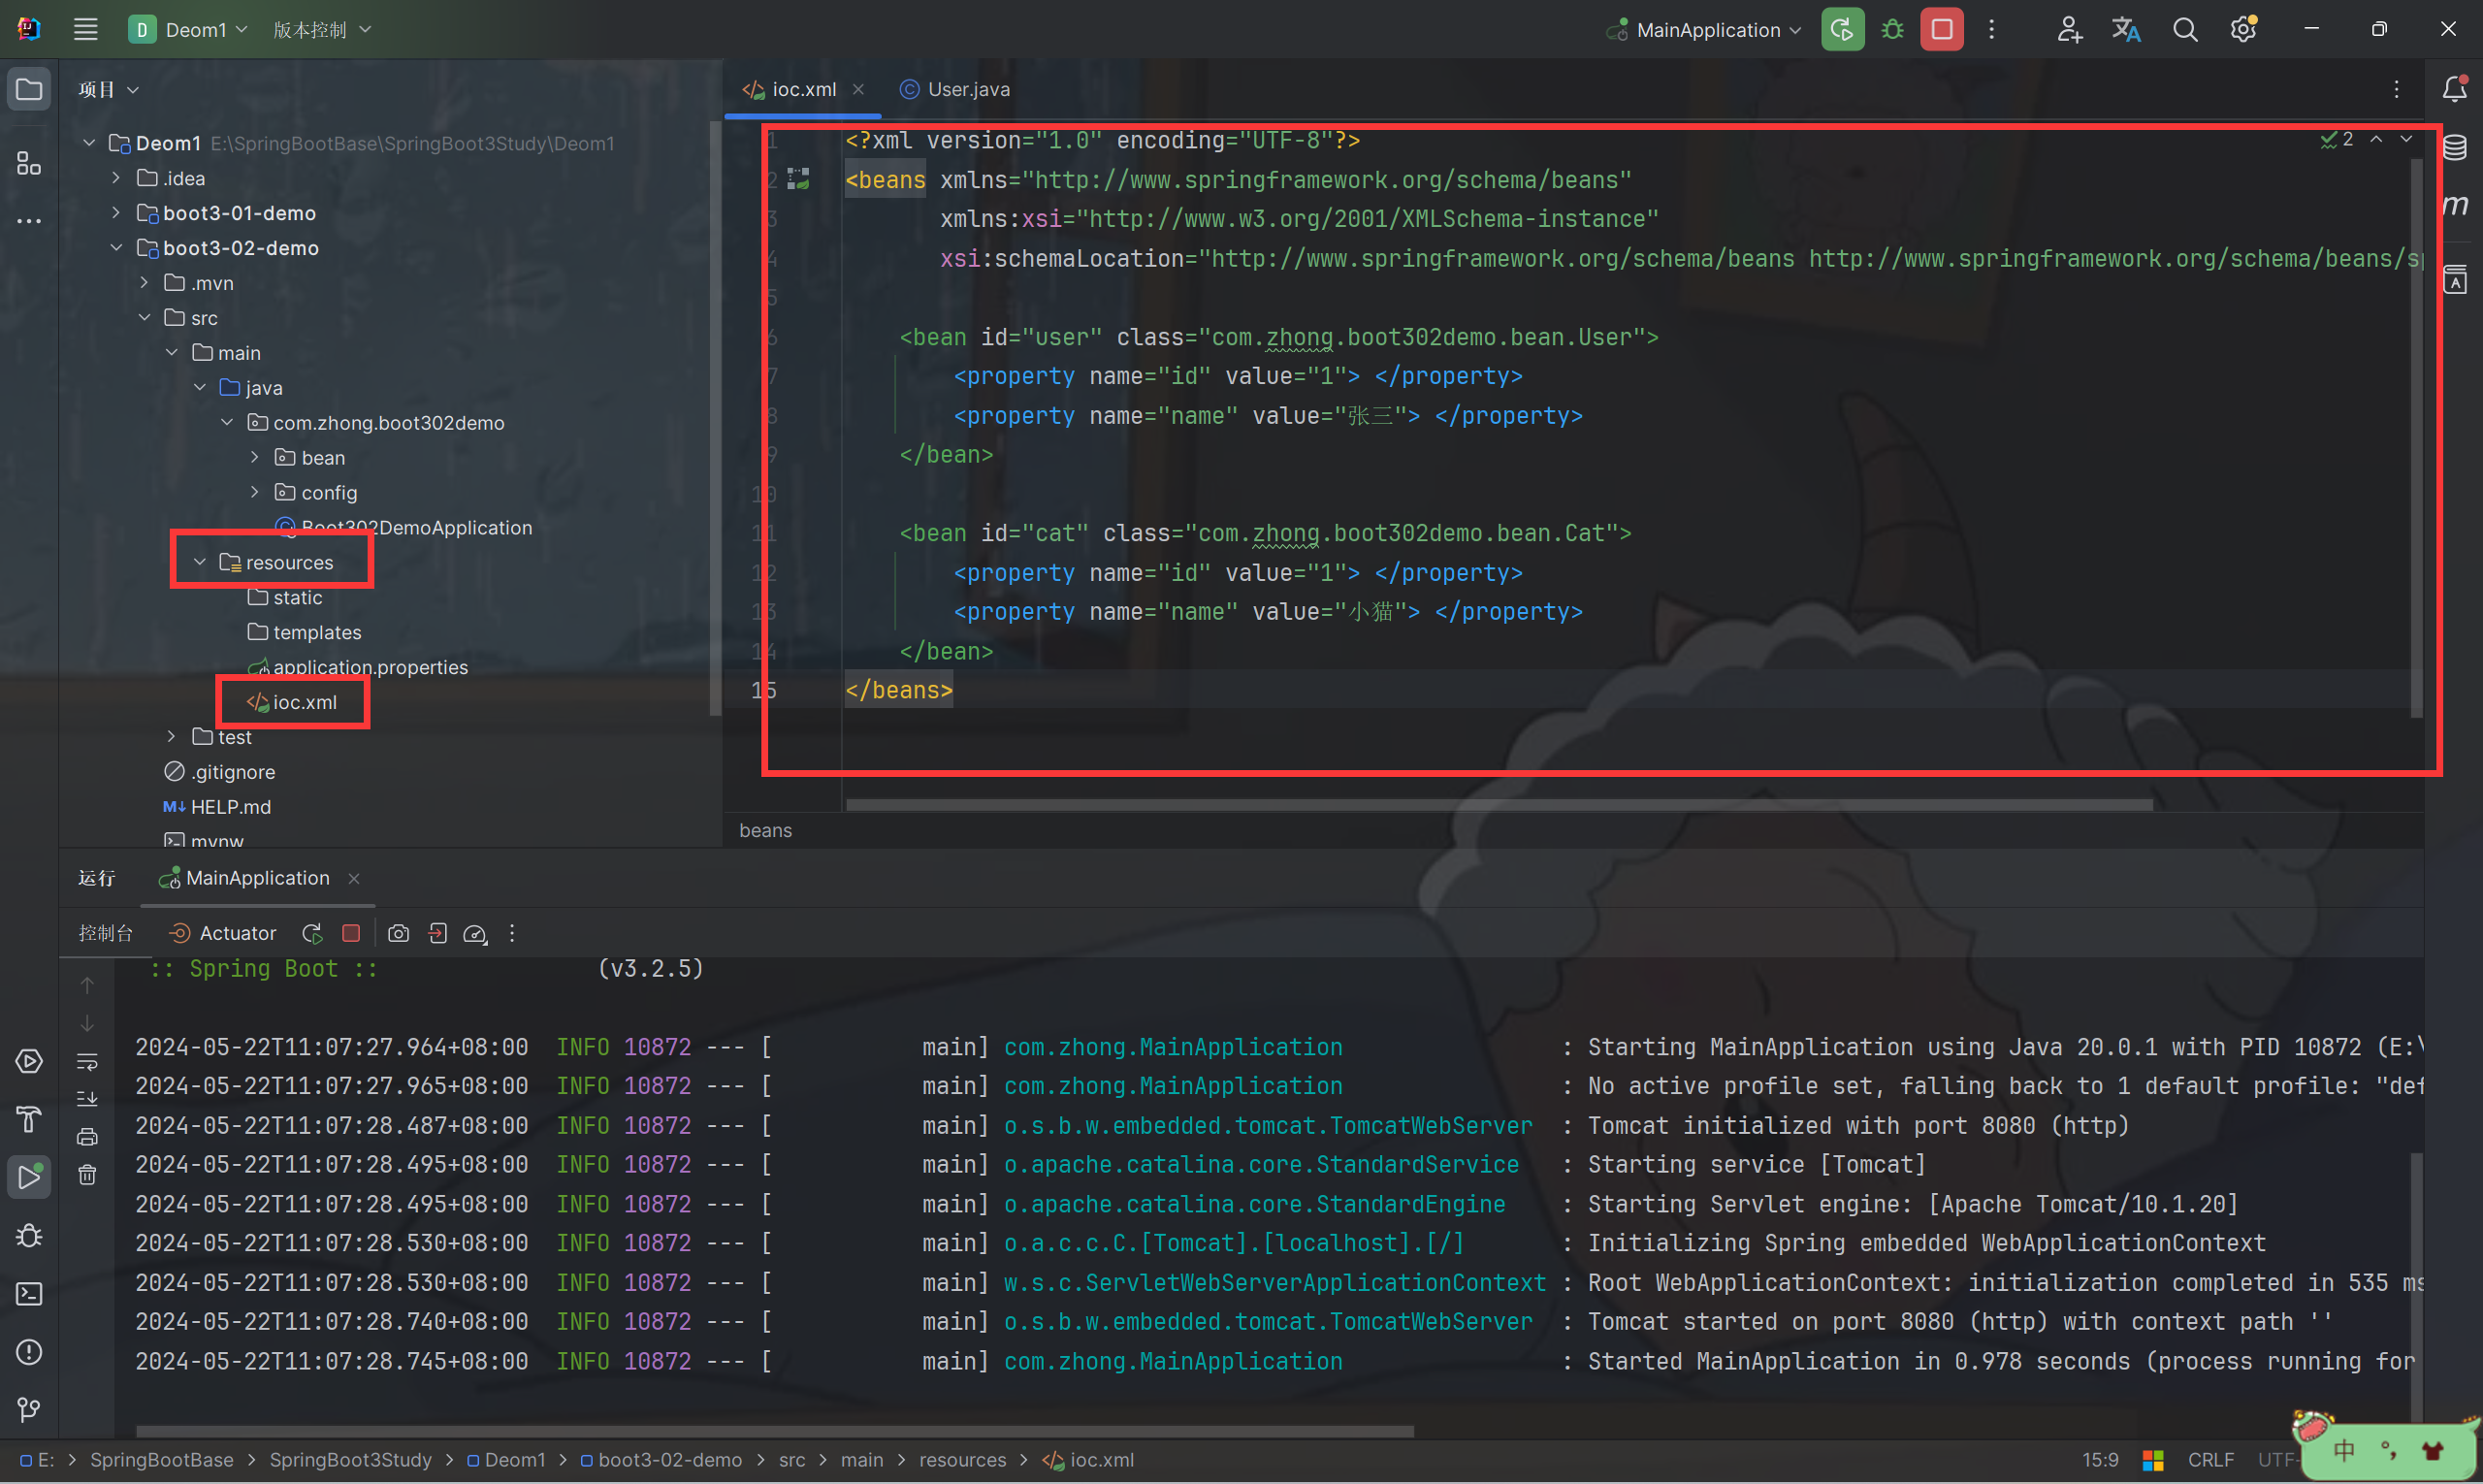
- 配置 bean
<?xml version="1.0" encoding="UTF-8"?>
<beans xmlns="http://www.springframework.org/schema/beans"
       xmlns:xsi="http://www.w3.org/2001/XMLSchema-instance"
       xsi:schemaLocation="http://www.springframework.org/schema/beans http://www.springframework.org/schema/beans/spring-beans.xsd">

    <bean id="user" class="com.zhong.boot302demo.bean.User">
        <property name="id" value="1"> </property>
        <property name="name" value="张三"> </property>
    </bean>

    <bean id="cat" class="com.zhong.boot302demo.bean.Cat">
        <property name="id" value="1"> </property>
        <property name="name" value="小猫"> </property>
    </bean>
</beans>
2.1.2 通过 @Configuration 注解配置
- 在包下新建 config 文件夹 在 config 文件夹内新建 AppConfig 并标识为 @Configuration
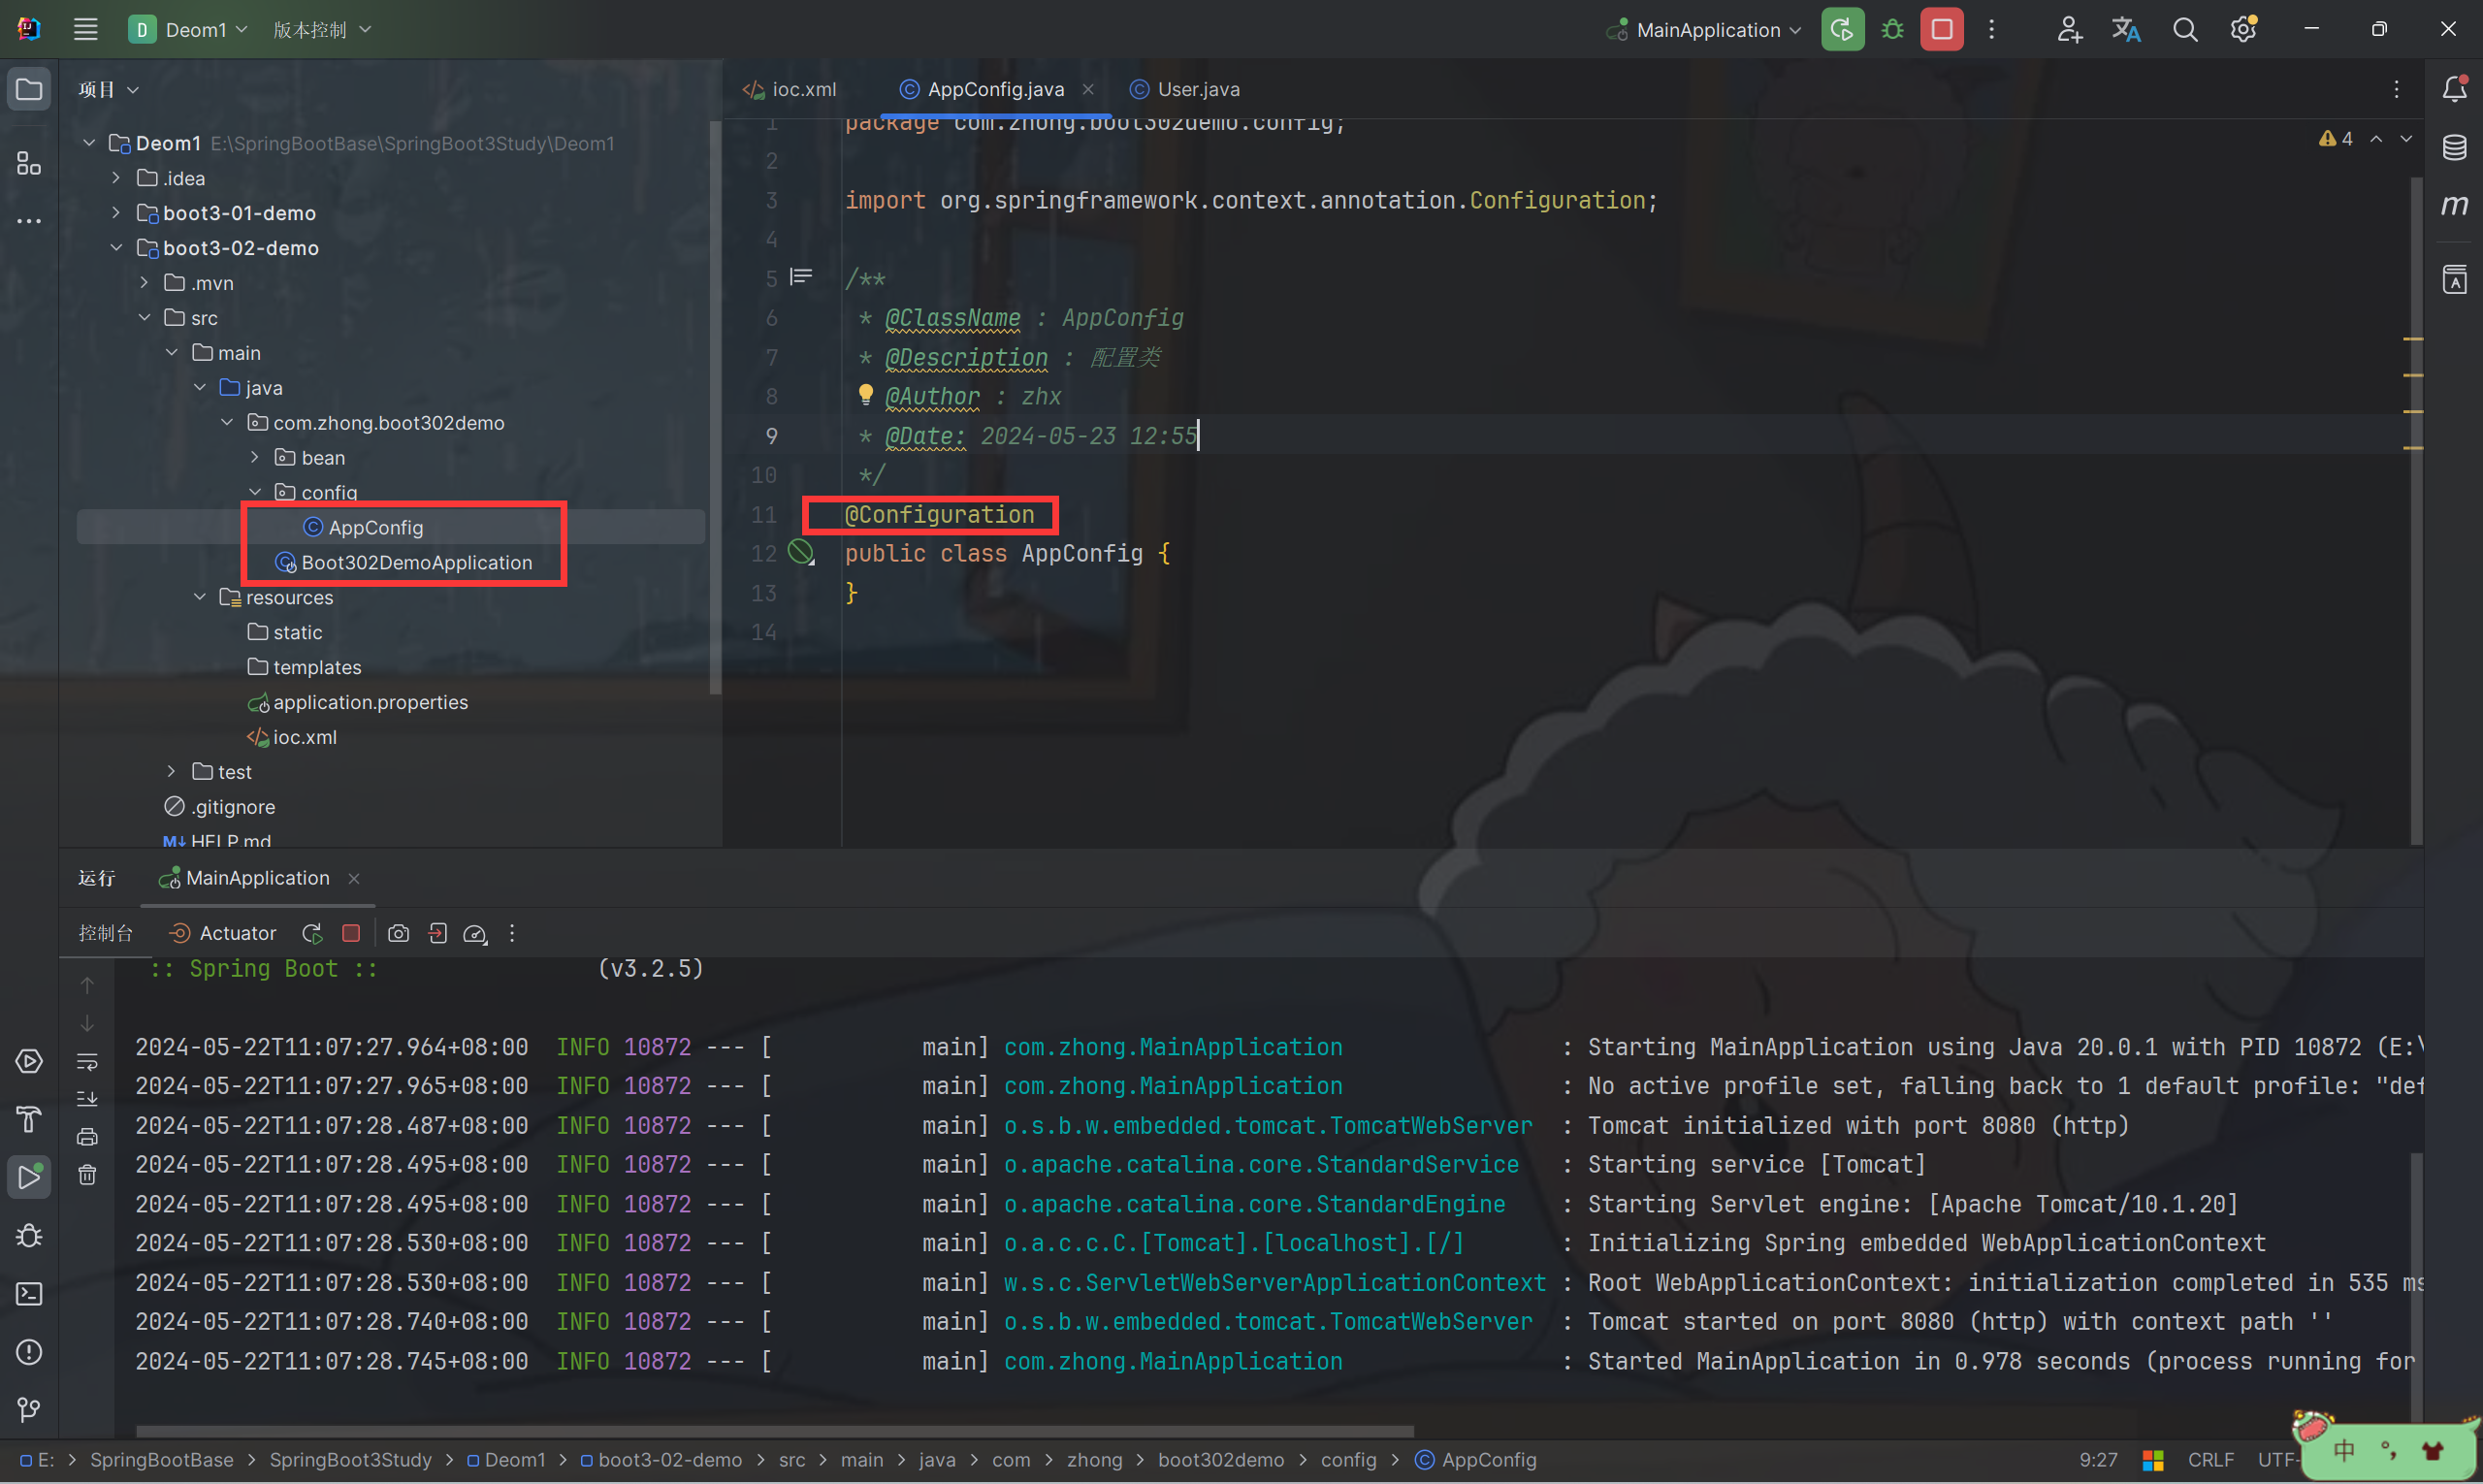
- 配置代码
package com.zhong.boot302demo.config;

import com.zhong.boot302demo.bean.User;
import org.springframework.context.annotation.Bean;
import org.springframework.context.annotation.Configuration;

/**
 * @ClassName : AppConfig
 * @Description : 配置类
 * @Author : zhx
 * @Date: 2024-05-23 12:55
 */
@Configuration
public class AppConfig {

    @Bean   // 替代以前的 ioc.xml 方式配置 Bean。组件在容器中的名字是方法名。可以直接修改默认值 @Bean("user01")
    public User user() {
        User user = new User();
        user.setId("1");
        user.setName("张三");
        return user;
    }
}
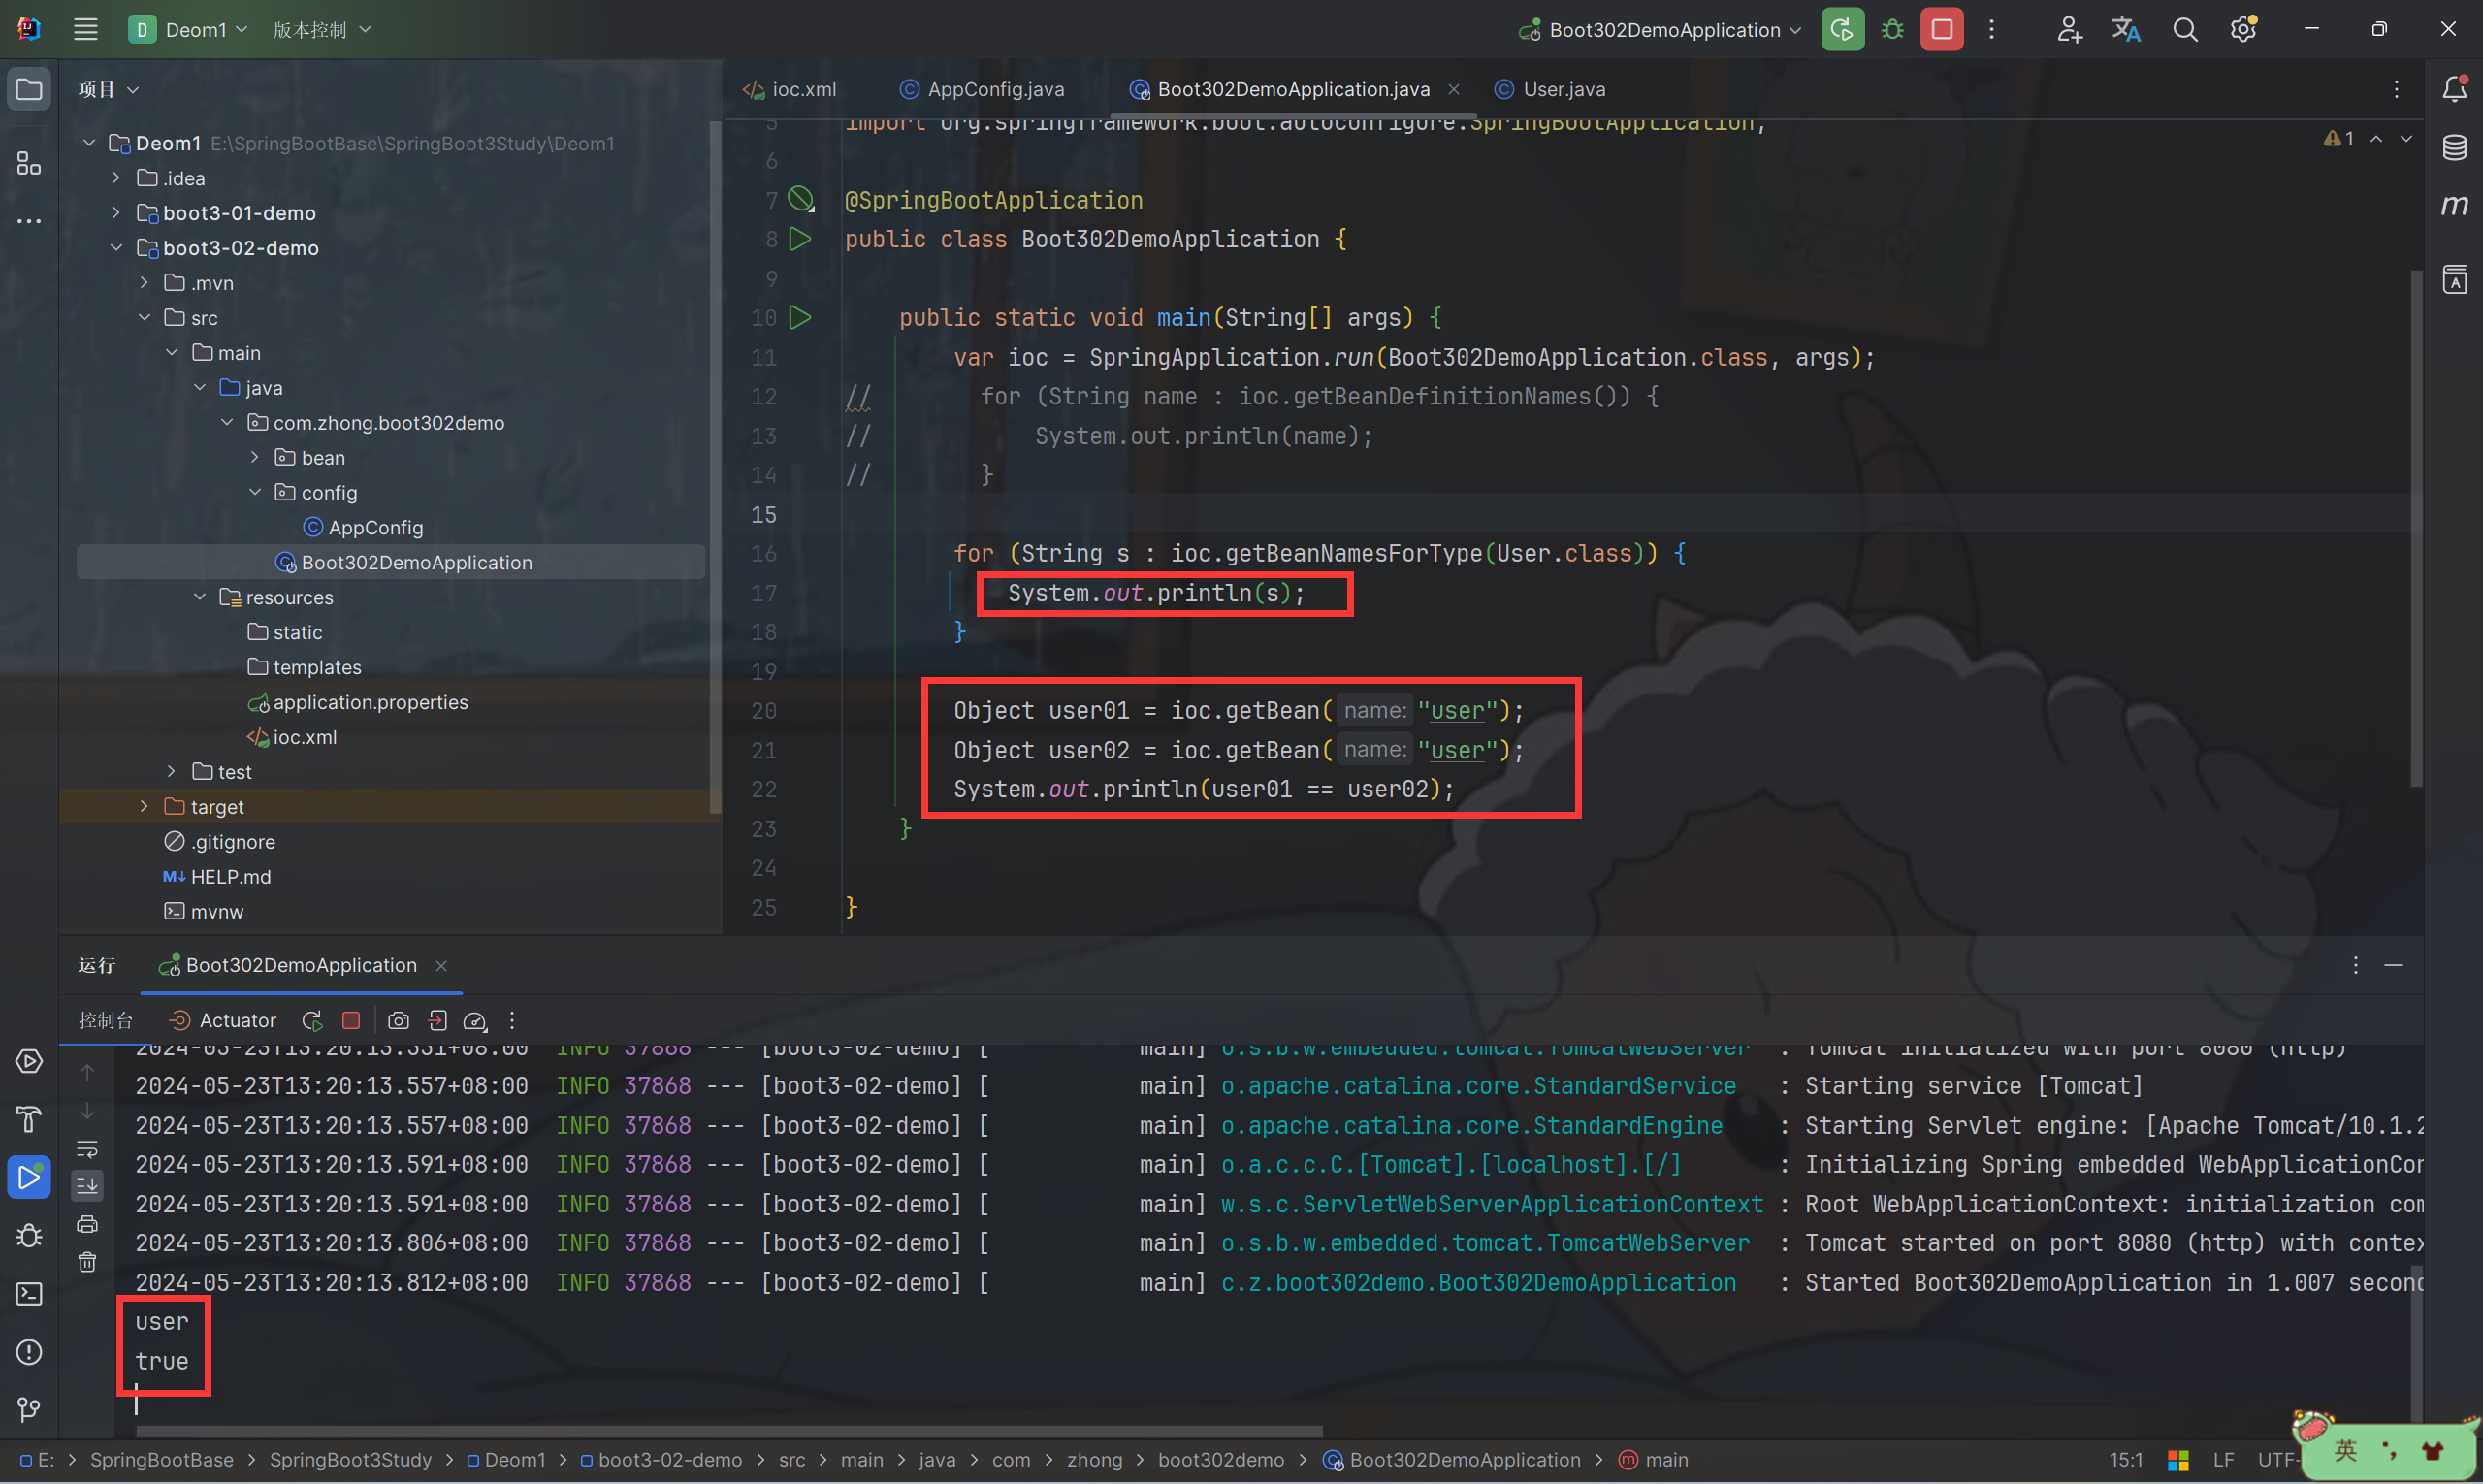
- 组件默认单实例的,在 Boot302DemoApplication 建立测试代码
package com.zhong.boot302demo;

import com.zhong.boot302demo.bean.User;
import org.springframework.boot.SpringApplication;
import org.springframework.boot.autoconfigure.SpringBootApplication;

@SpringBootApplication
public class Boot302DemoApplication {

    public static void main(String[] args) {
        var ioc = SpringApplication.run(Boot302DemoApplication.class, args);

        for (String s : ioc.getBeanNamesForType(User.class)) {
            System.out.println(s);
        }

        Object user01 = ioc.getBean("user");
        Object user02 = ioc.getBean("user");
        System.out.println(user01 == user02);
    }

}
- 通过 @Scope(“prototype”) 修改为多实例
package com.zhong.boot302demo.config;

import com.zhong.boot302demo.bean.User;
import org.springframework.context.annotation.Bean;
import org.springframework.context.annotation.Configuration;
import org.springframework.context.annotation.Scope;

/**
 * @ClassName : AppConfig
 * @Description : 配置类
 * @Author : zhx
 * @Date: 2024-05-23 12:55
 */
@Configuration
public class AppConfig {

    /**
     * 1、组件默认单实例的
     * 2、通过 @Scope("prototype") 修改为多实例
     * @return user
     */
    @Scope("prototype")
    @Bean   // 替代以前的 ioc.xml 方式配置 Bean。组件在容器中的名字是方法名。可以直接修改默认值 @Bean("user01")
    public User user() {
        User user = new User();
        user.setId("1");
        user.setName("张三");
        return user;
    }
}
- 再次运行

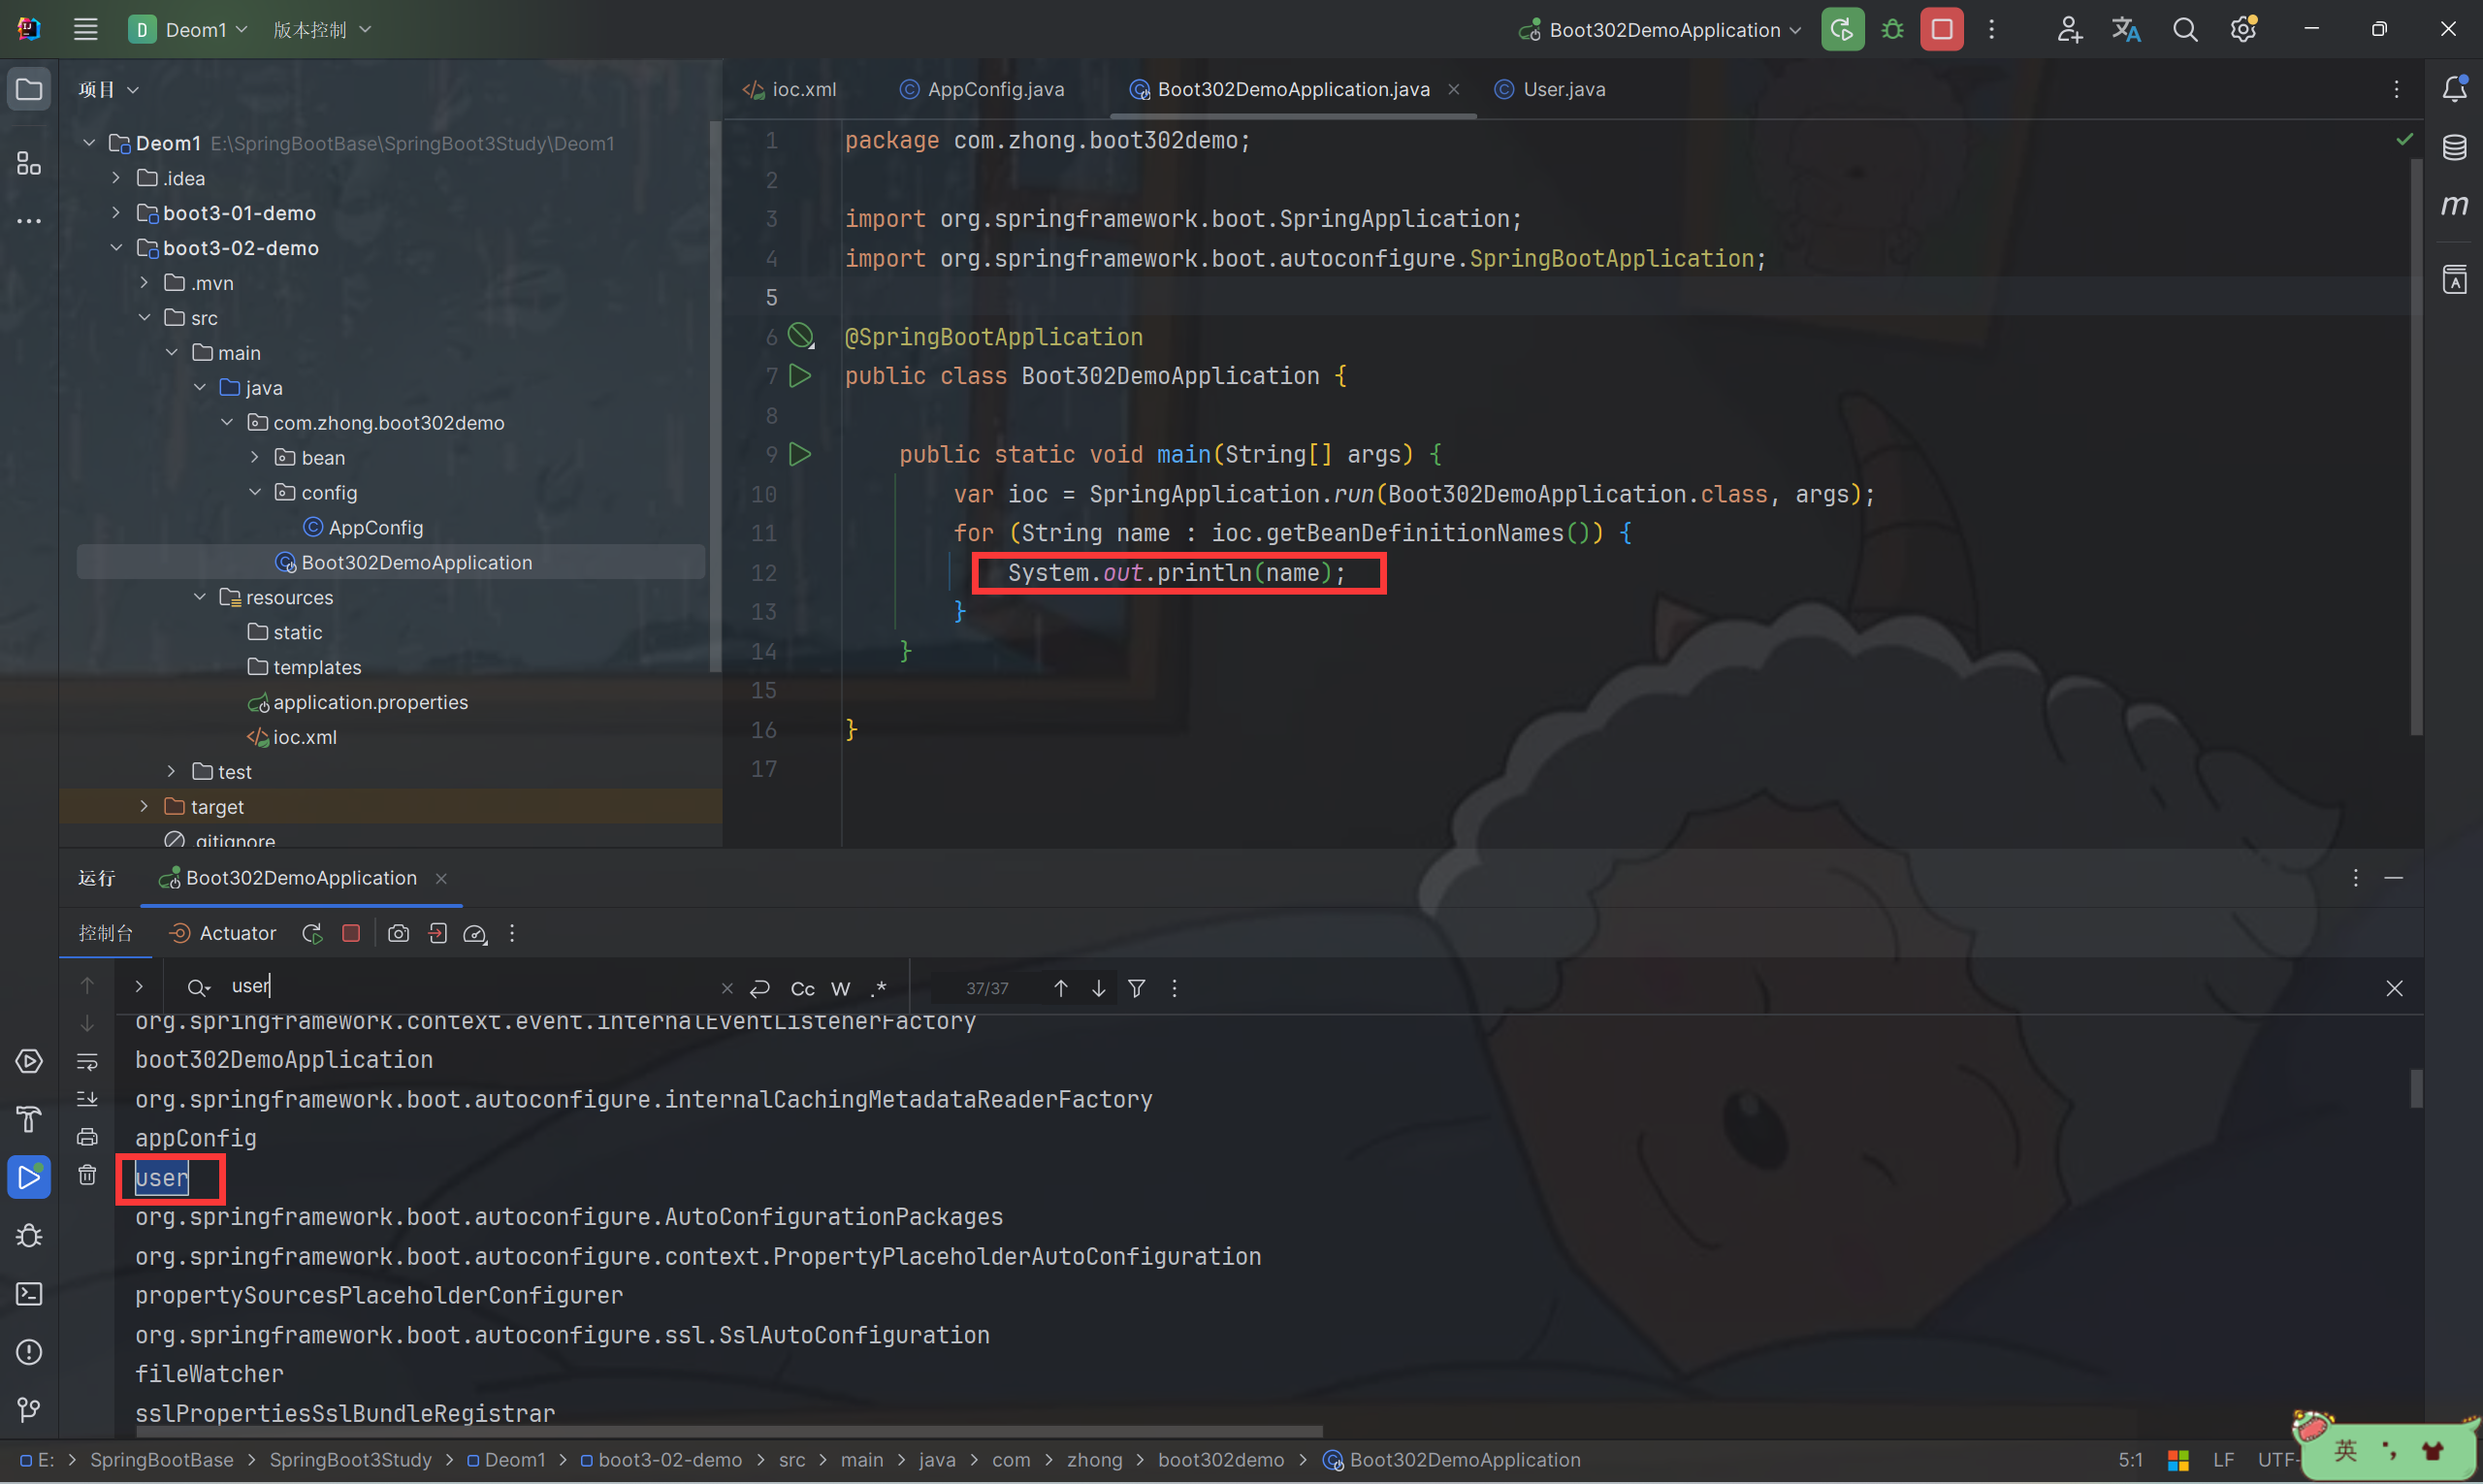
2.2.4 测试 Bean 是否生效
- 修改 Boot302DemoApplication 代码查看已经注册的 Bean
package com.zhong.boot302demo;

import org.springframework.boot.SpringApplication;
import org.springframework.boot.autoconfigure.SpringBootApplication;

@SpringBootApplication
public class Boot302DemoApplication {

    public static void main(String[] args) {
        var ioc = SpringApplication.run(Boot302DemoApplication.class, args);
        for (String name : ioc.getBeanDefinitionNames()) {
            System.out.println(name);
        }
    }
}
2.3 属性绑定
2.3.1 使用 @ConfigurationProperties
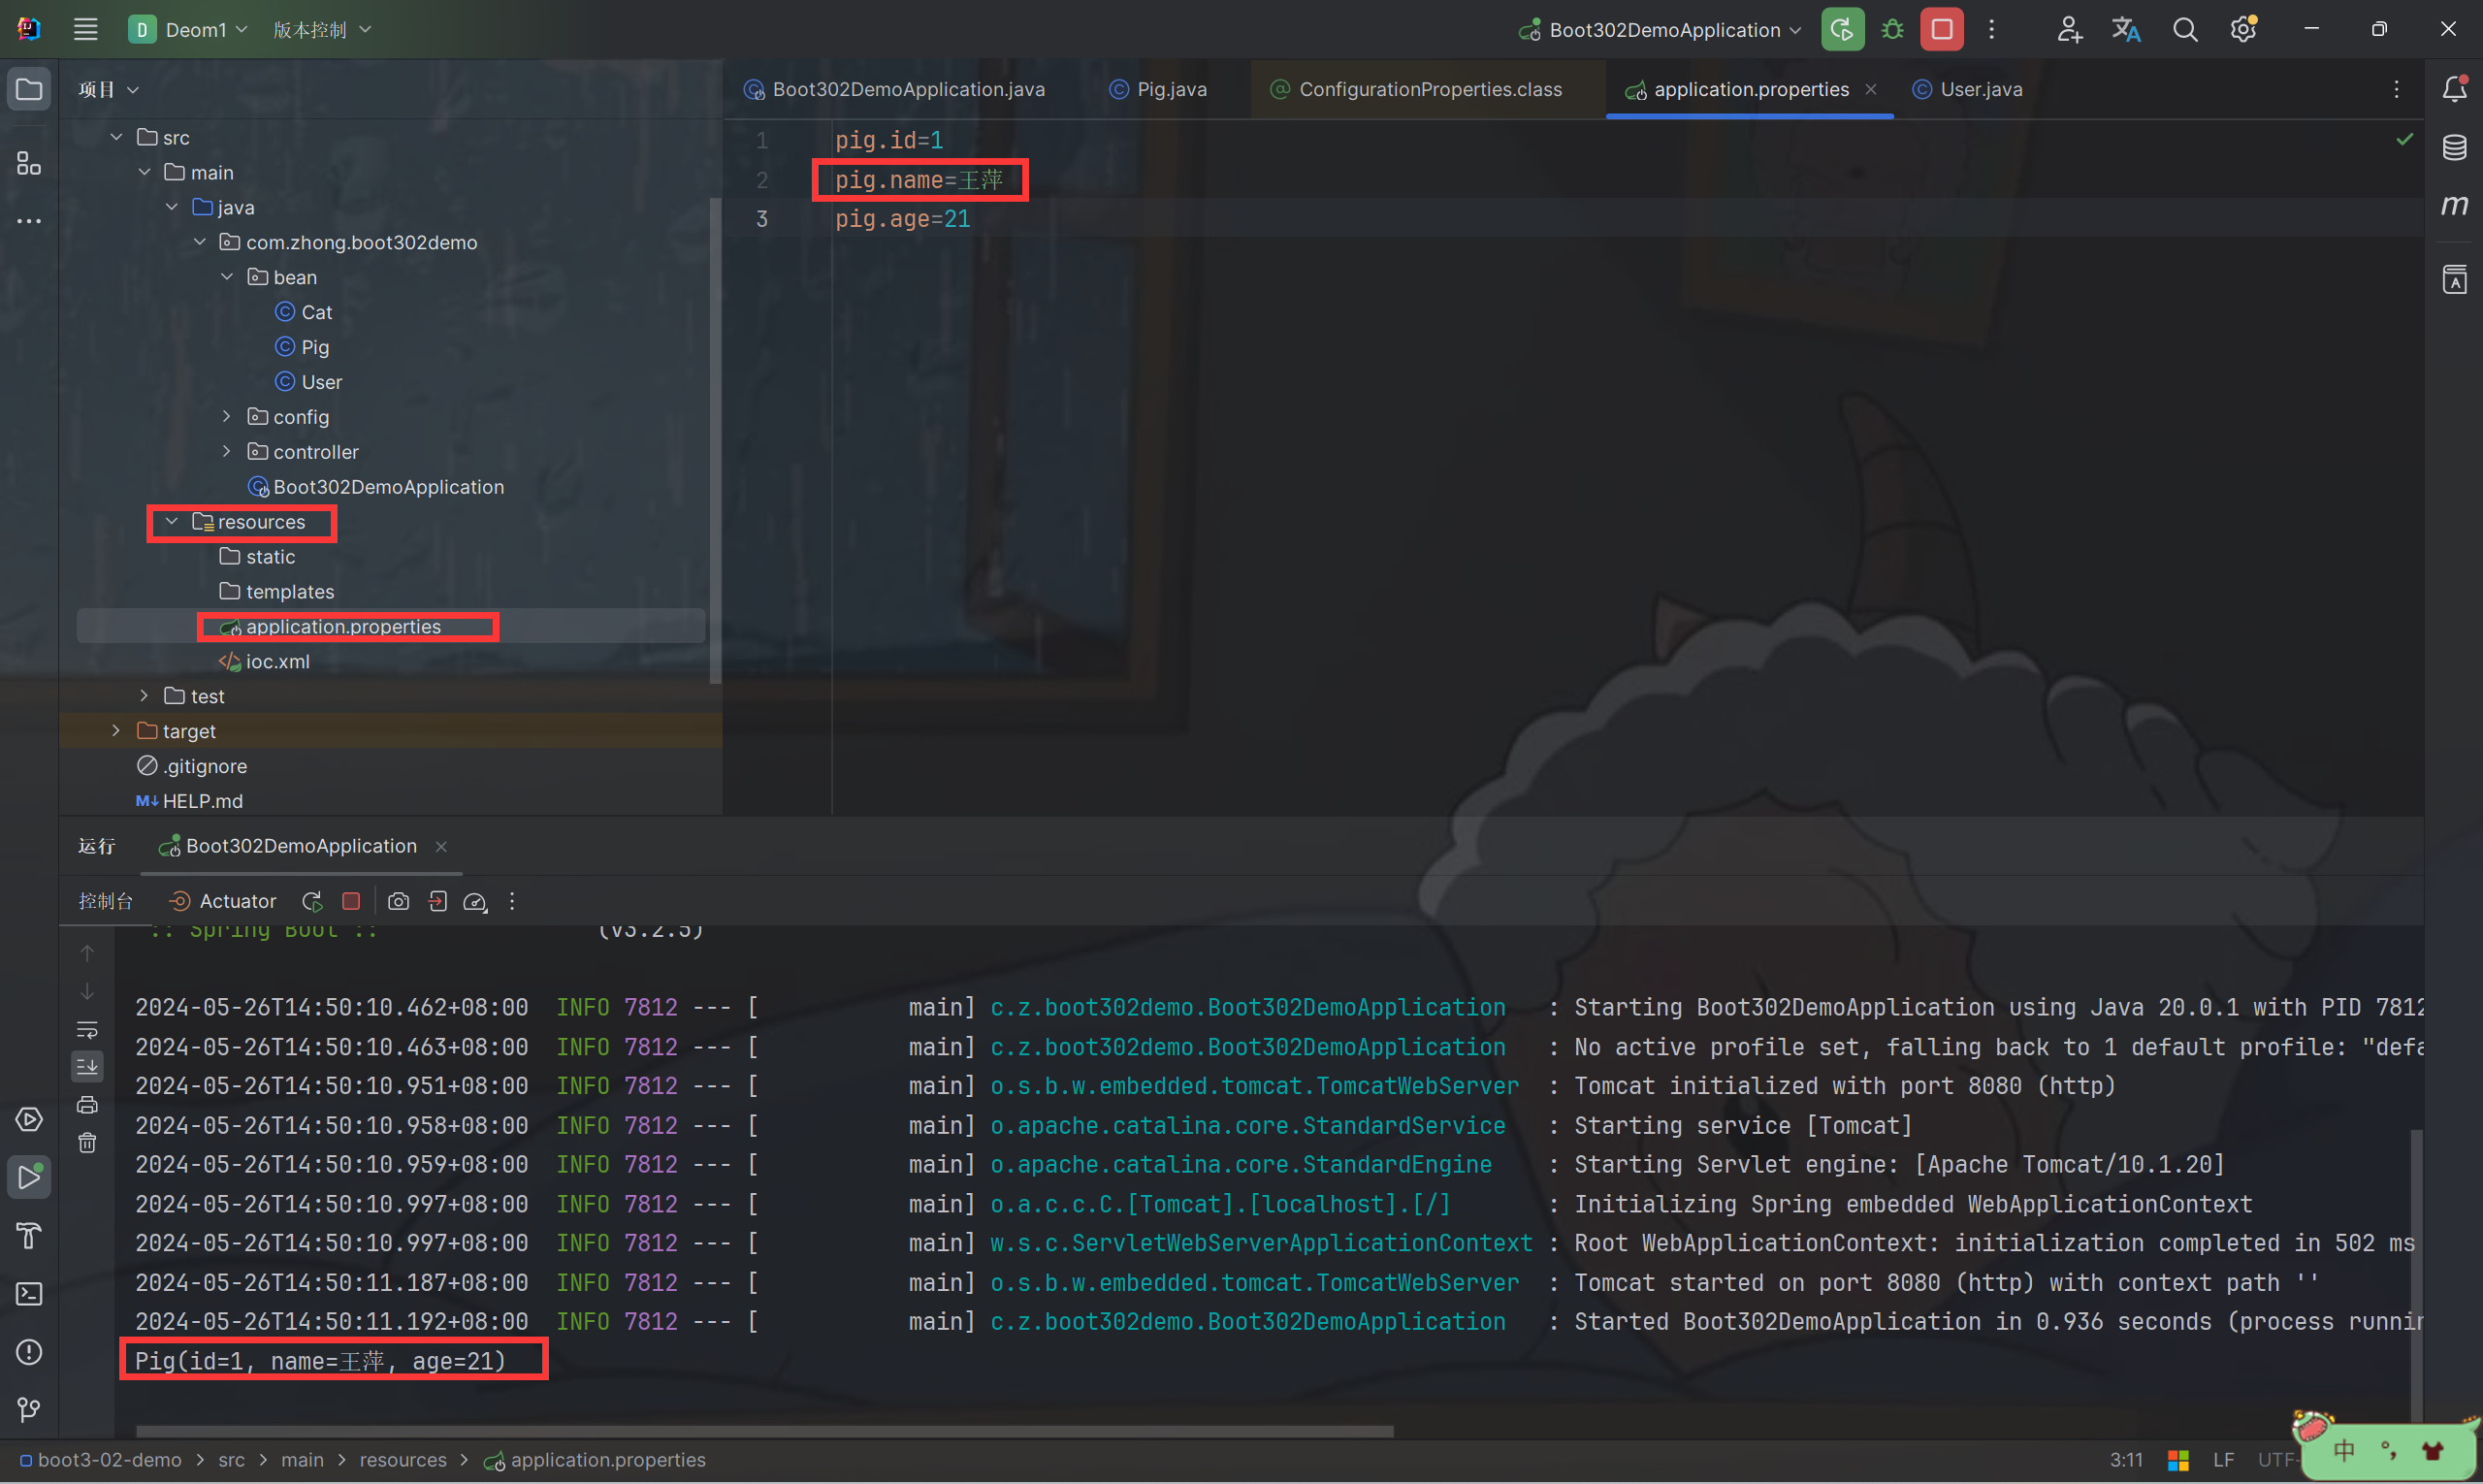
- application.properties 文件书写相关配置
pig.id=1
pig.name=王萍
pig.age=21
- 方法一:新建 Pig 类属性绑定到 application.properties 的 pig
package com.zhong.boot302demo.bean;
import lombok.AllArgsConstructor;
import lombok.Data;
import lombok.NoArgsConstructor;
import org.springframework.boot.context.properties.ConfigurationProperties;
import org.springframework.stereotype.Component;
/**
* @ClassName : pig
* @Description : 读取配置文件
* @Author : zhx
* @Date: 2024-05-26 14:39
*/
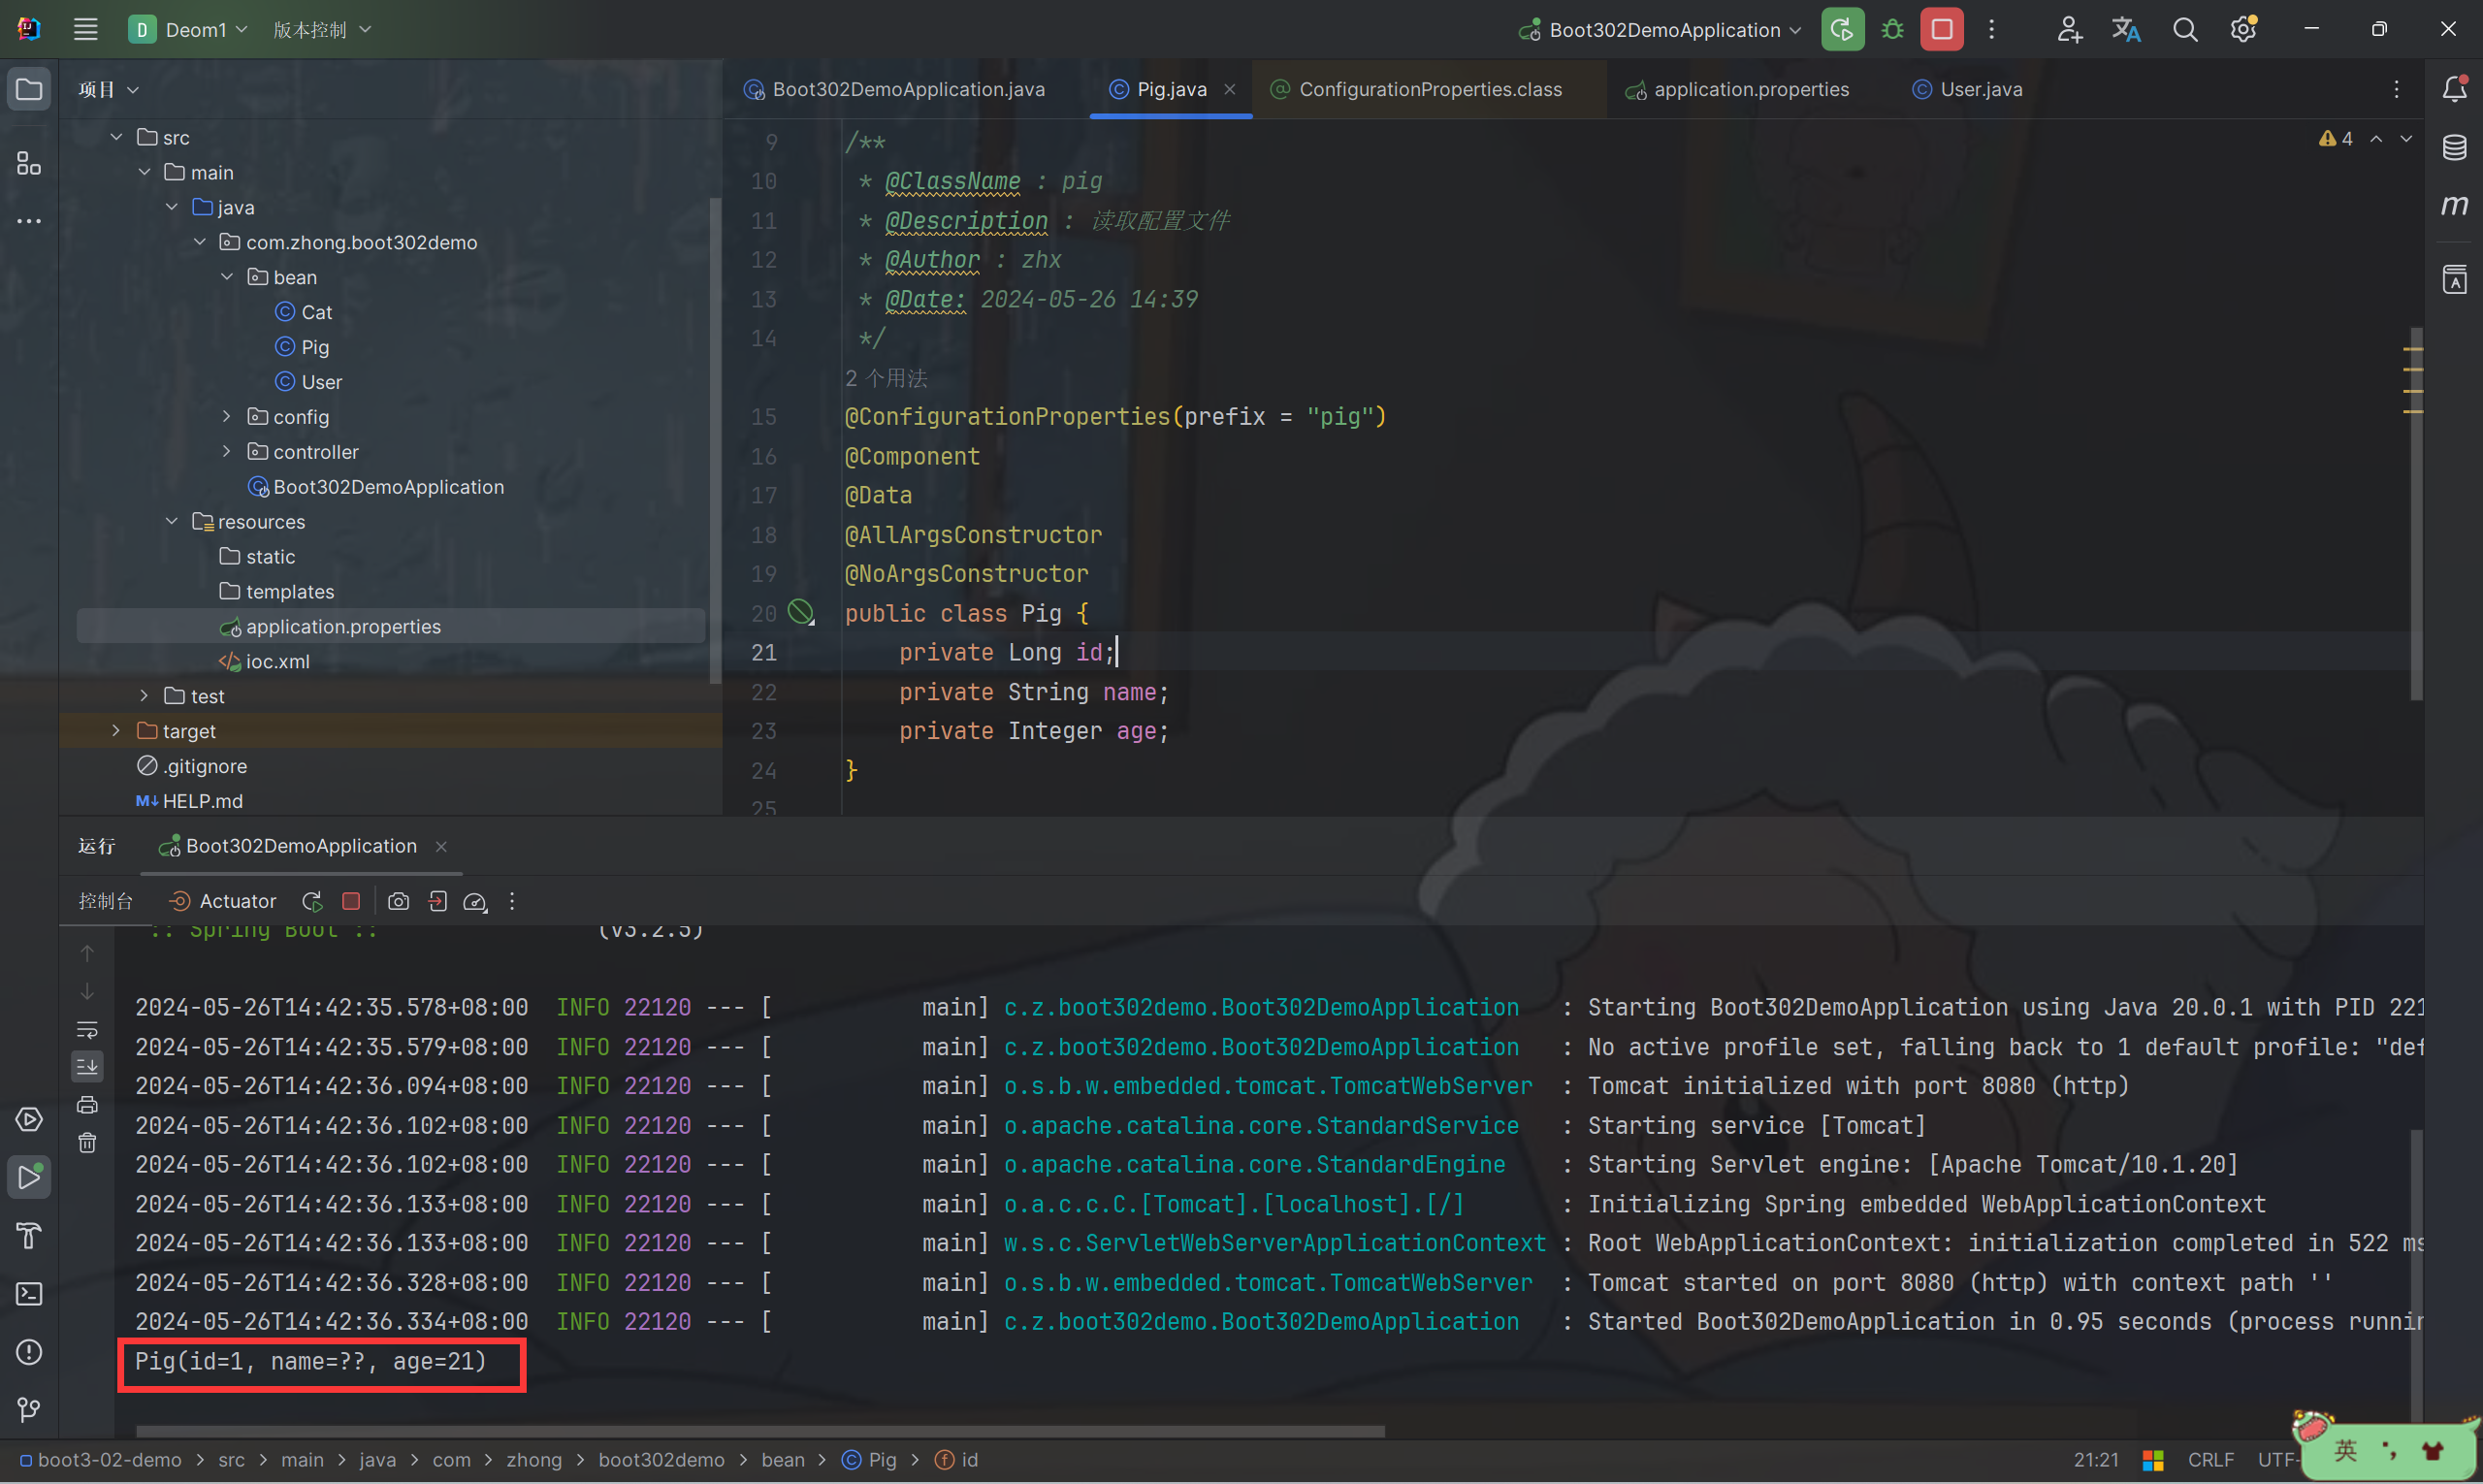
@ConfigurationProperties(prefix = "pig") // 读取配置信息前缀为 pig 的
@Component // 注入到容器
@Data
@AllArgsConstructor
@NoArgsConstructor
public class Pig {
private Long id;
private String name;
private Integer age;
}
- 打印查看结果
package com.zhong.boot302demo;

import com.zhong.boot302demo.bean.Pig;
import org.springframework.boot.SpringApplication;
import org.springframework.boot.autoconfigure.SpringBootApplication;
import org.springframework.context.ConfigurableApplicationContext;

@SpringBootApplication
public class Boot302DemoApplication {

    public static void main(String[] args) {
        var ioc = SpringApplication.run(Boot302DemoApplication.class, args);
        System.out.println(ioc.getBean(Pig.class));

    }

}
- 读取配置成功 但是出现乱码
-
解决方法:
汉化:找到 编辑器 -> 文件编码 进行修改
非汉化:搜索 File Encodings 进行修改
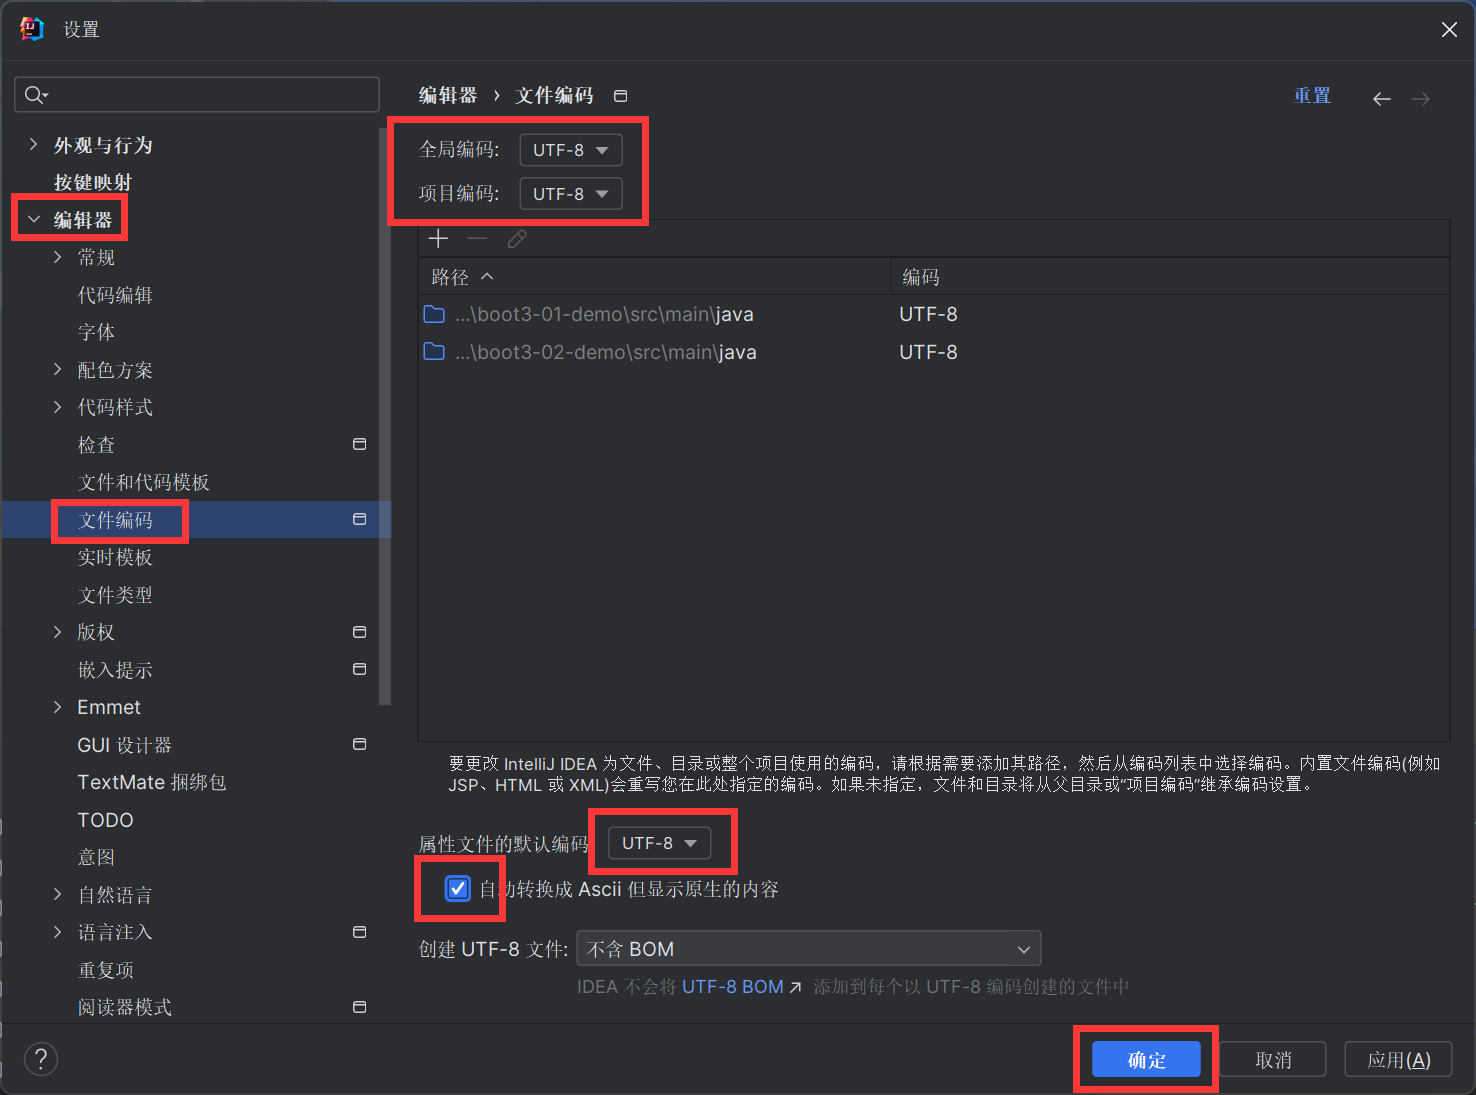
- 修改完后 重新在 application.properties 写入配置
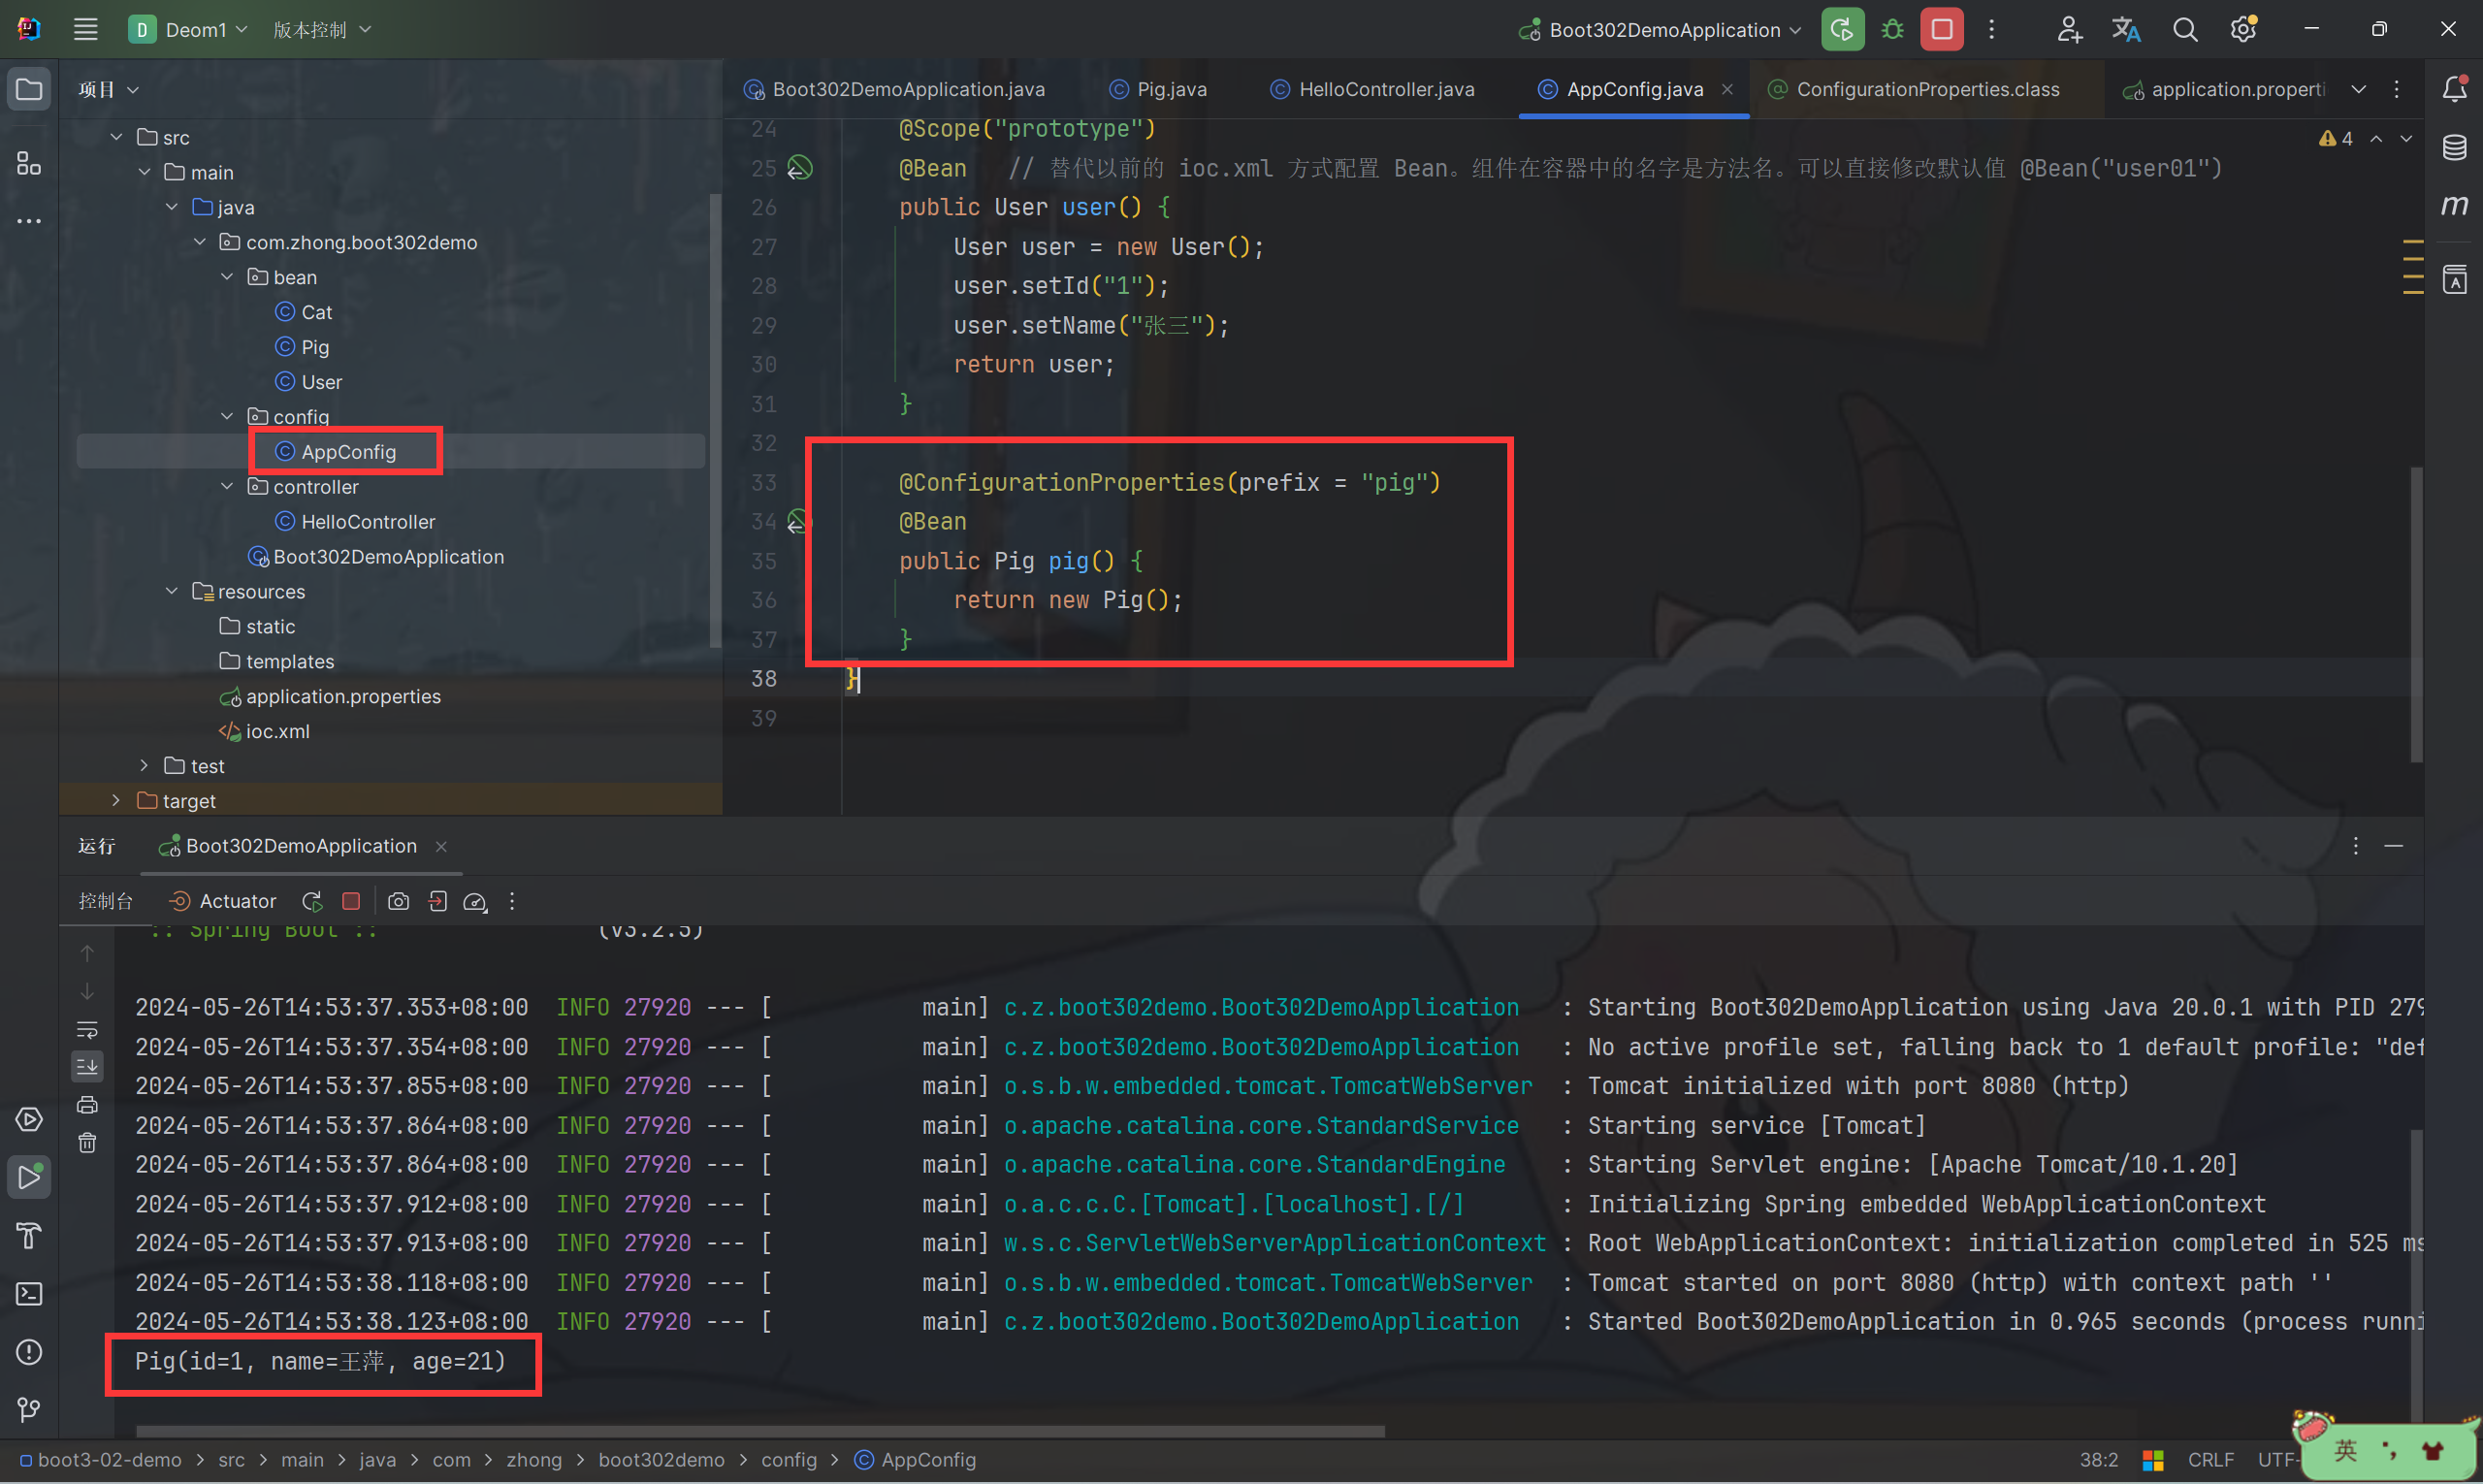
- 方法二:将 @ConfigurationProperties(prefix = “pig”) 放到方法上 并为方法添加 @Bean 注解使其注入容器
2.3.2 使用 @EnableConfigurationProperties
- application.properties 文件书写相关配置
sheep.id=2
sheep.name=钟宏雄
sheep.age=23
- 新建 Sheep 类并指定读取 application.properties 文件中 sheep 属性
package com.zhong.boot302demo.bean;

import lombok.AllArgsConstructor;
import lombok.Data;
import lombok.NoArgsConstructor;
import org.springframework.boot.context.properties.ConfigurationProperties;

/**
 * @ClassName : Sheep
 * @Description :
 * @Author : zhx
 * @Date: 2024-05-26 14:59
 */
@Data
@AllArgsConstructor
@NoArgsConstructor
@ConfigurationProperties(prefix = "sheep")
public class Sheep {
    private Long id;
    private String name;
    private Integer age;
}
- 新增 config 注解 @EnableConfigurationProperties(Sheep.class)
package com.zhong.boot302demo.config;

import com.zhong.boot302demo.bean.Pig;
import com.zhong.boot302demo.bean.Sheep;
import com.zhong.boot302demo.bean.User;
import org.springframework.boot.context.properties.ConfigurationProperties;
import org.springframework.boot.context.properties.EnableConfigurationProperties;
import org.springframework.context.annotation.Bean;
import org.springframework.context.annotation.Configuration;
import org.springframework.context.annotation.Scope;

/**
 * @ClassName : AppConfig
 * @Description : 配置类
 * @Author : zhx
 * @Date: 2024-05-23 12:55
 */

/**
 * EnableConfigurationProperties(Sheep.class)
 * 1、开启 Sheep 组件的属性绑定
 * 2、默认会把这个组件自己放到容器中
 * 3、一般用于导入第三方写好的组件进行数据绑定
 * 注意: SpringBoot 默认只扫描自己主程序所在的包。如果导入第三方包,
 *      即使组件上标注了 @Component、@ConfigurationProperties 注解
 *      也没用,因为组件都扫描不进来。
 */
@EnableConfigurationProperties(Sheep.class)
@Configuration
public class AppConfig {

    /**
     * 1、组件默认单实例的
     * 2、通过 @Scope("prototype") 修改为多实例
     * @return user
     */
    @Scope("prototype")
    @Bean   // 替代以前的 ioc.xml 方式配置 Bean。组件在容器中的名字是方法名。可以直接修改默认值 @Bean("user01")
    public User user() {
        User user = new User();
        user.setId("1");
        user.setName("张三");
        return user;
    }

    @ConfigurationProperties(prefix = "pig")
    @Bean
    public Pig pig() {
        return new Pig();
    }
}
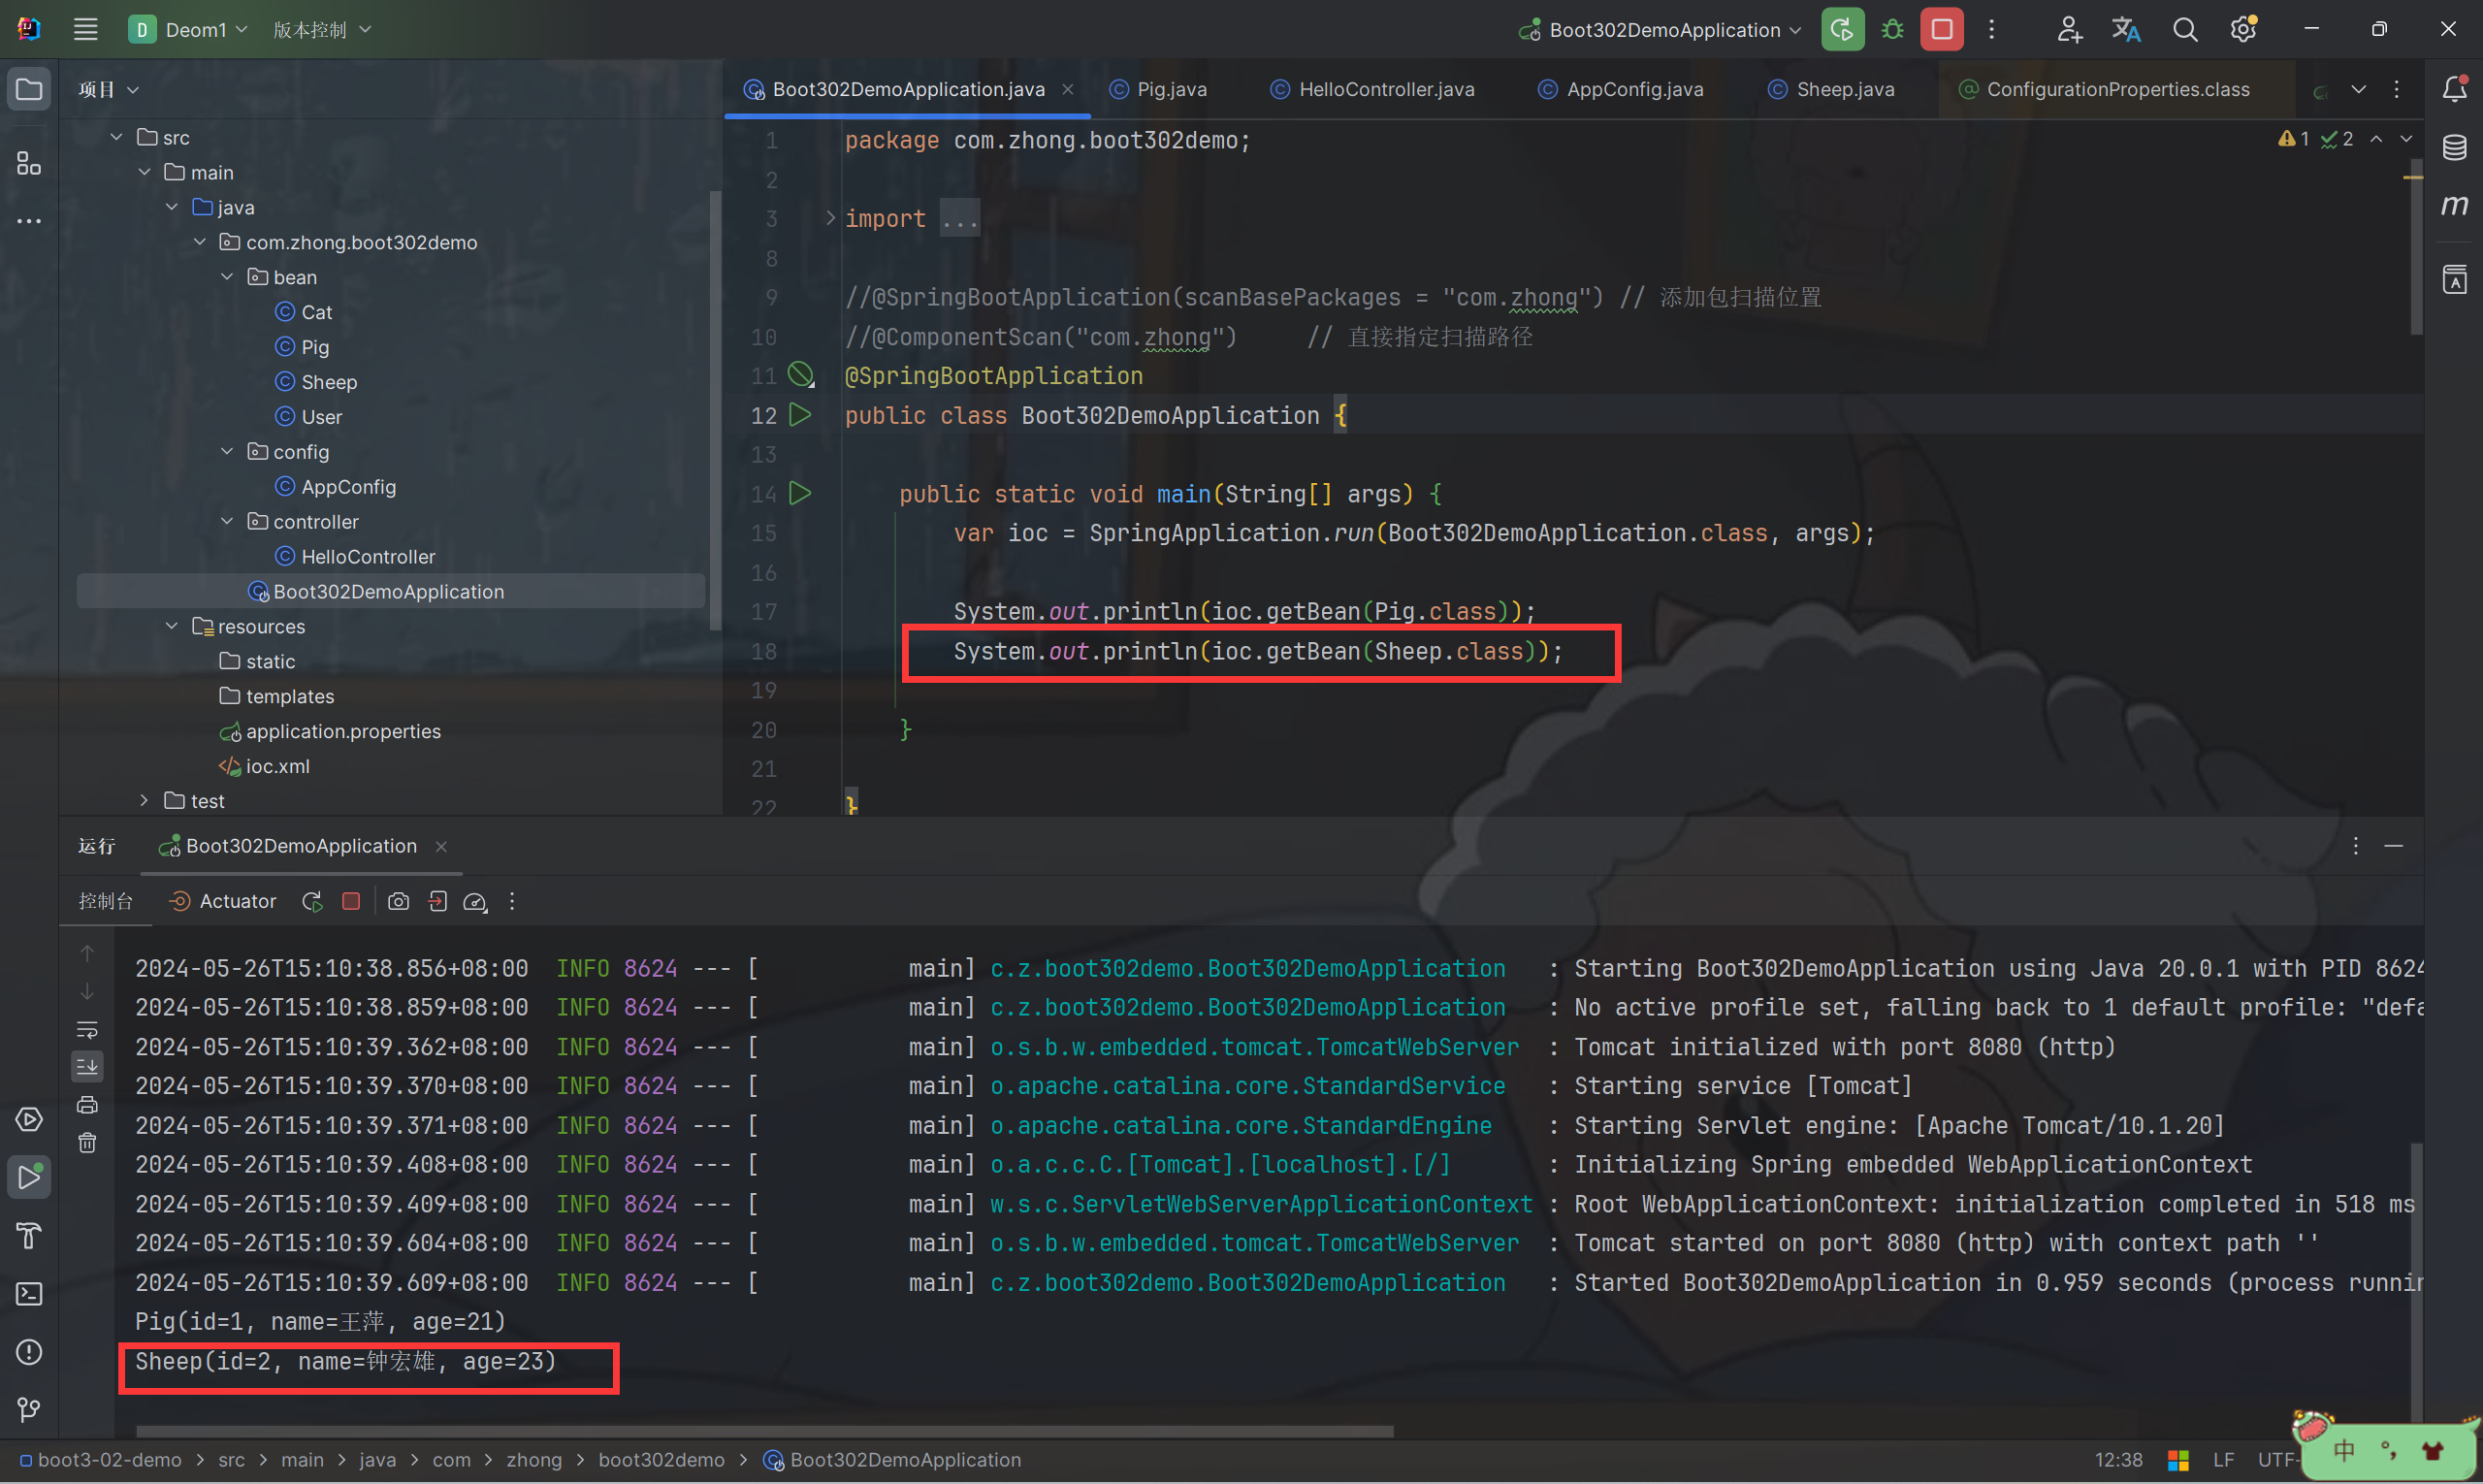
- 新增输入语句 测试是否生效
package com.zhong.boot302demo;

import com.zhong.boot302demo.bean.Pig;
import com.zhong.boot302demo.bean.Sheep;
import org.springframework.boot.SpringApplication;
import org.springframework.boot.autoconfigure.SpringBootApplication;
import org.springframework.context.ConfigurableApplicationContext;

@SpringBootApplication
public class Boot302DemoApplication {

    public static void main(String[] args) {
        var ioc = SpringApplication.run(Boot302DemoApplication.class, args);

        System.out.println(ioc.getBean(Pig.class));
        System.out.println(ioc.getBean(Sheep.class));

    }
}
- 成功绑定属性
2.4 整合 Redis 案例
- 导入 Maven 依赖并刷新 Maven
<dependencies>
    <!--springboot3 Web 依赖-->
    <dependency>
        <groupId>org.springframework.boot</groupId>
        <artifactId>spring-boot-starter-web</artifactId>
    </dependency>

    <!--redis starter 依赖-->
    <dependency>
        <groupId>org.springframework.boot</groupId>
        <artifactId>spring-boot-starter-data-redis</artifactId>
    </dependency>
</dependencies>
- 查看相关可改写的配置
1、按两下 shift 键输入 redisA 下面则有提示 然后我们点击进入
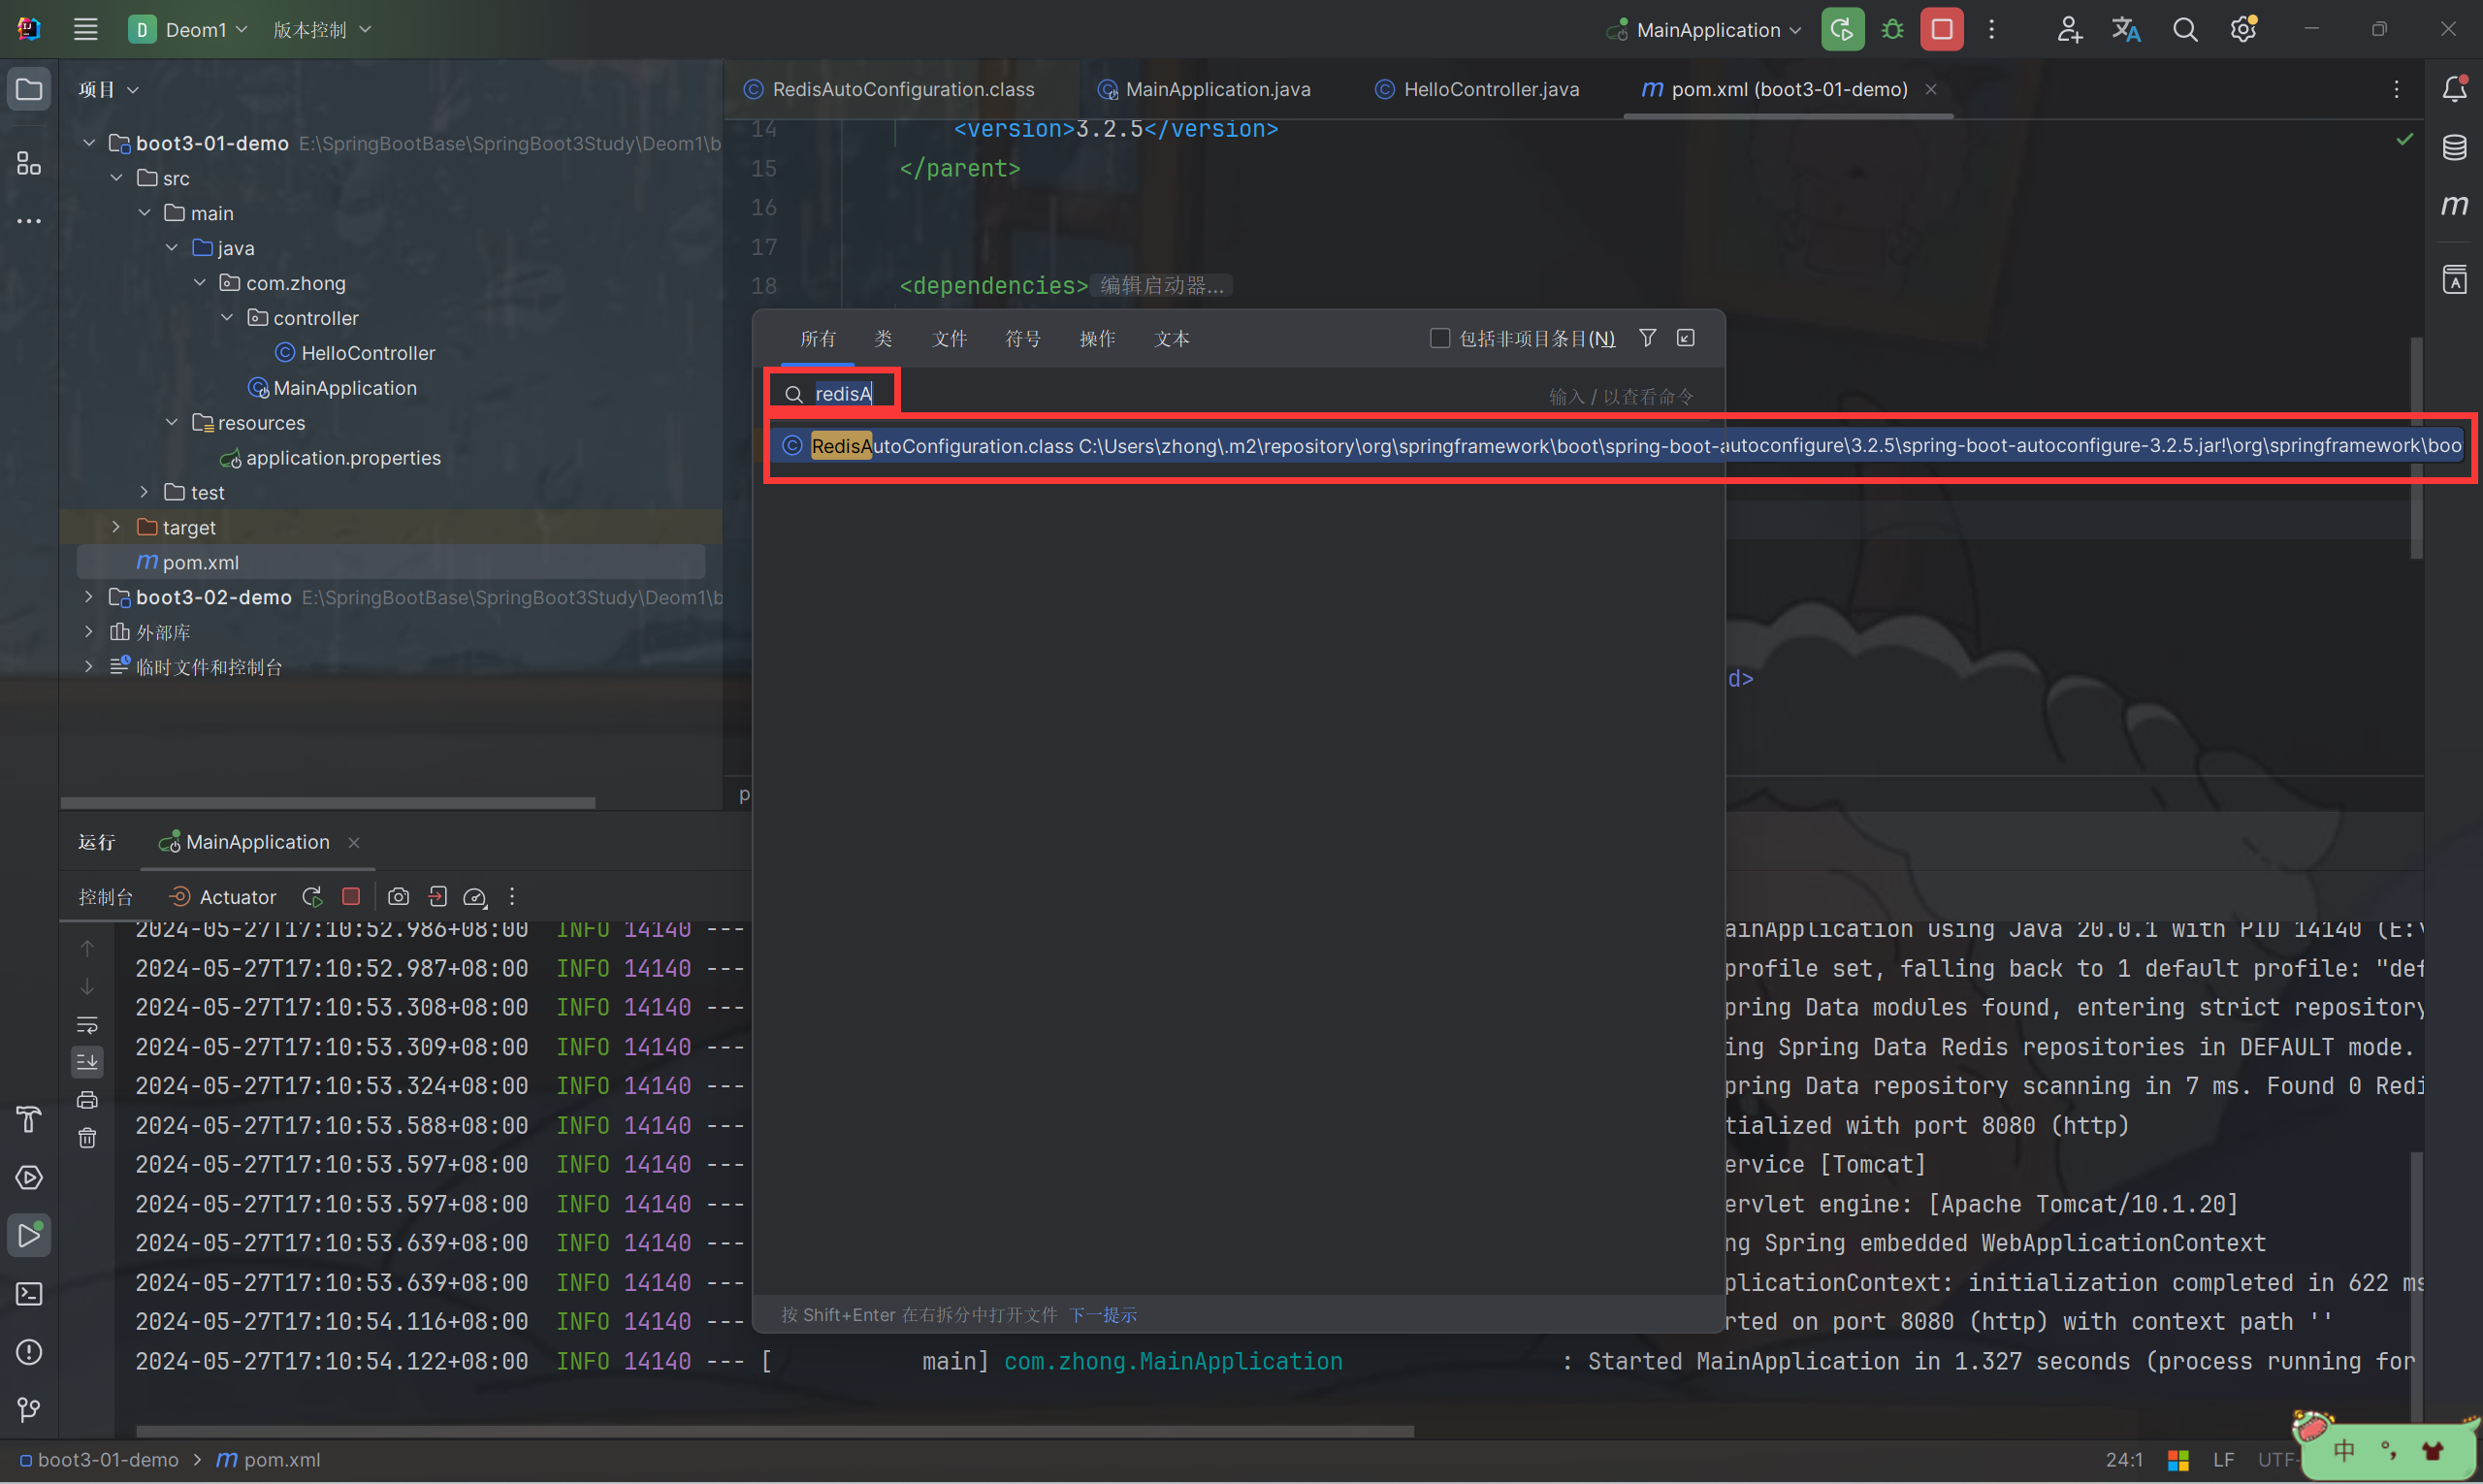
2、找到 @EnableConfigurationProperties 注解里面的类 按住 Ctrl 键点击查看配置项
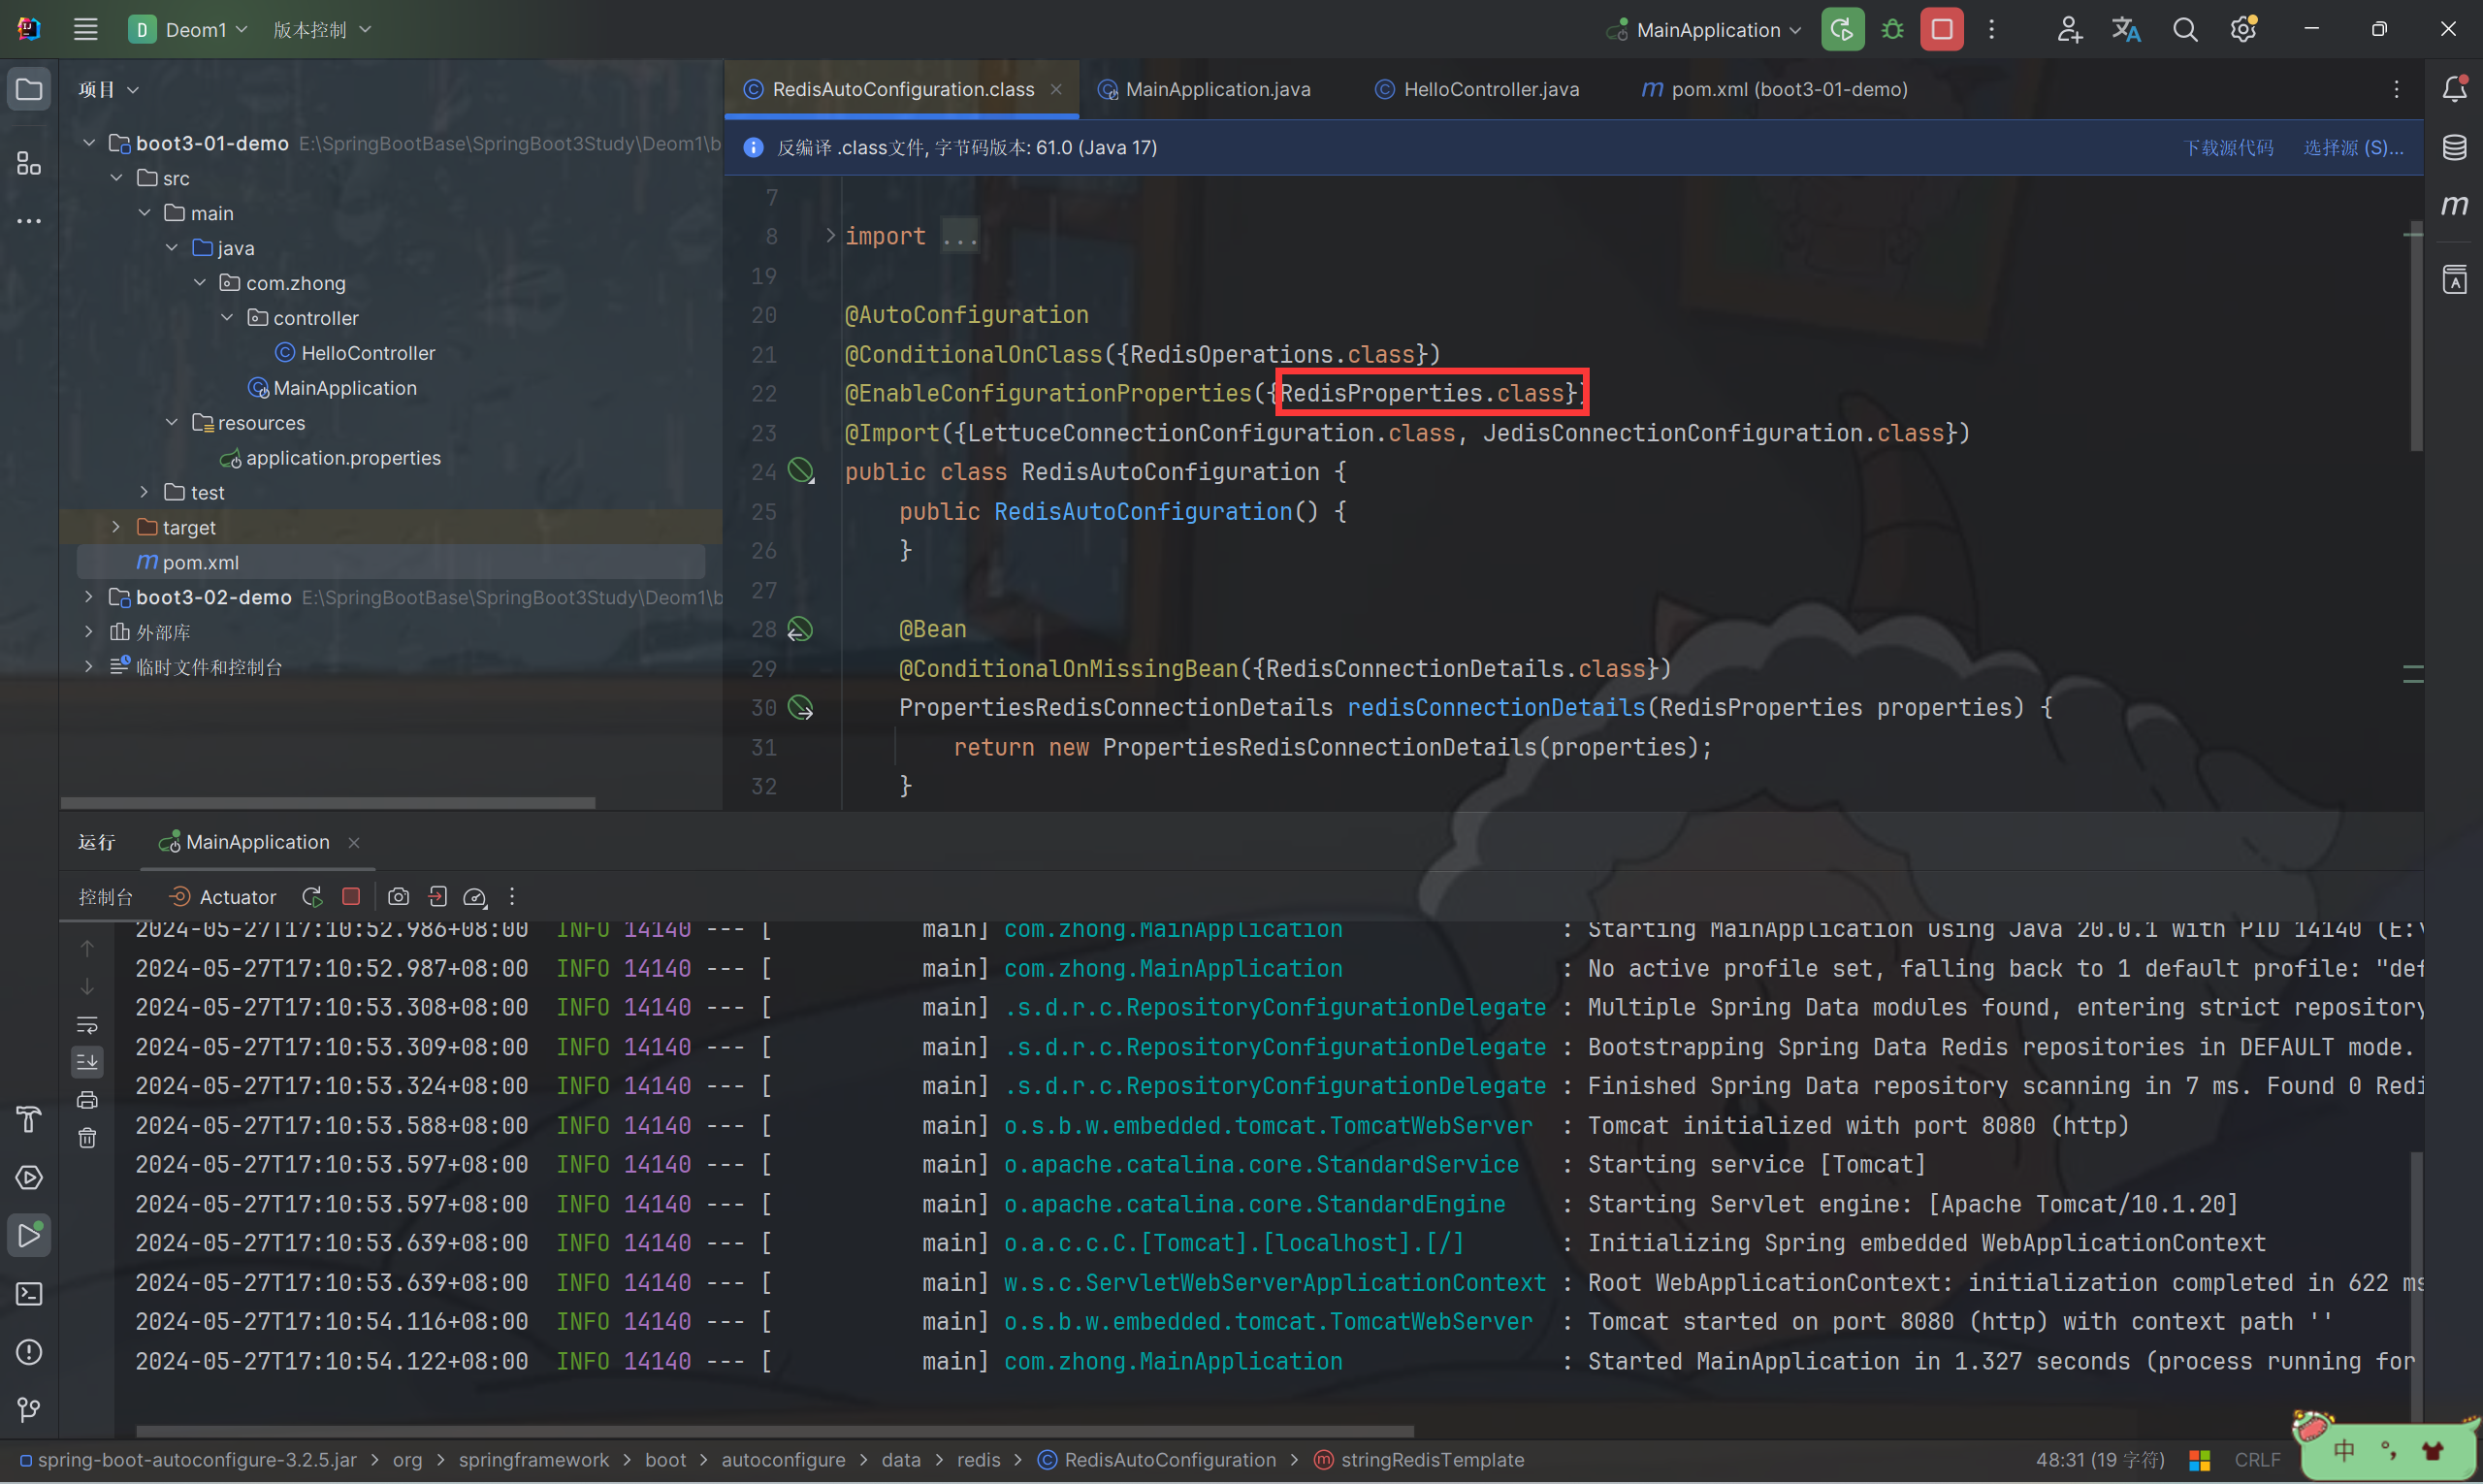
3、可以看到 Redis 是基于 spring.data.redis.xxxx 进行配置的 以及 RedisProperties 的一些默认配置
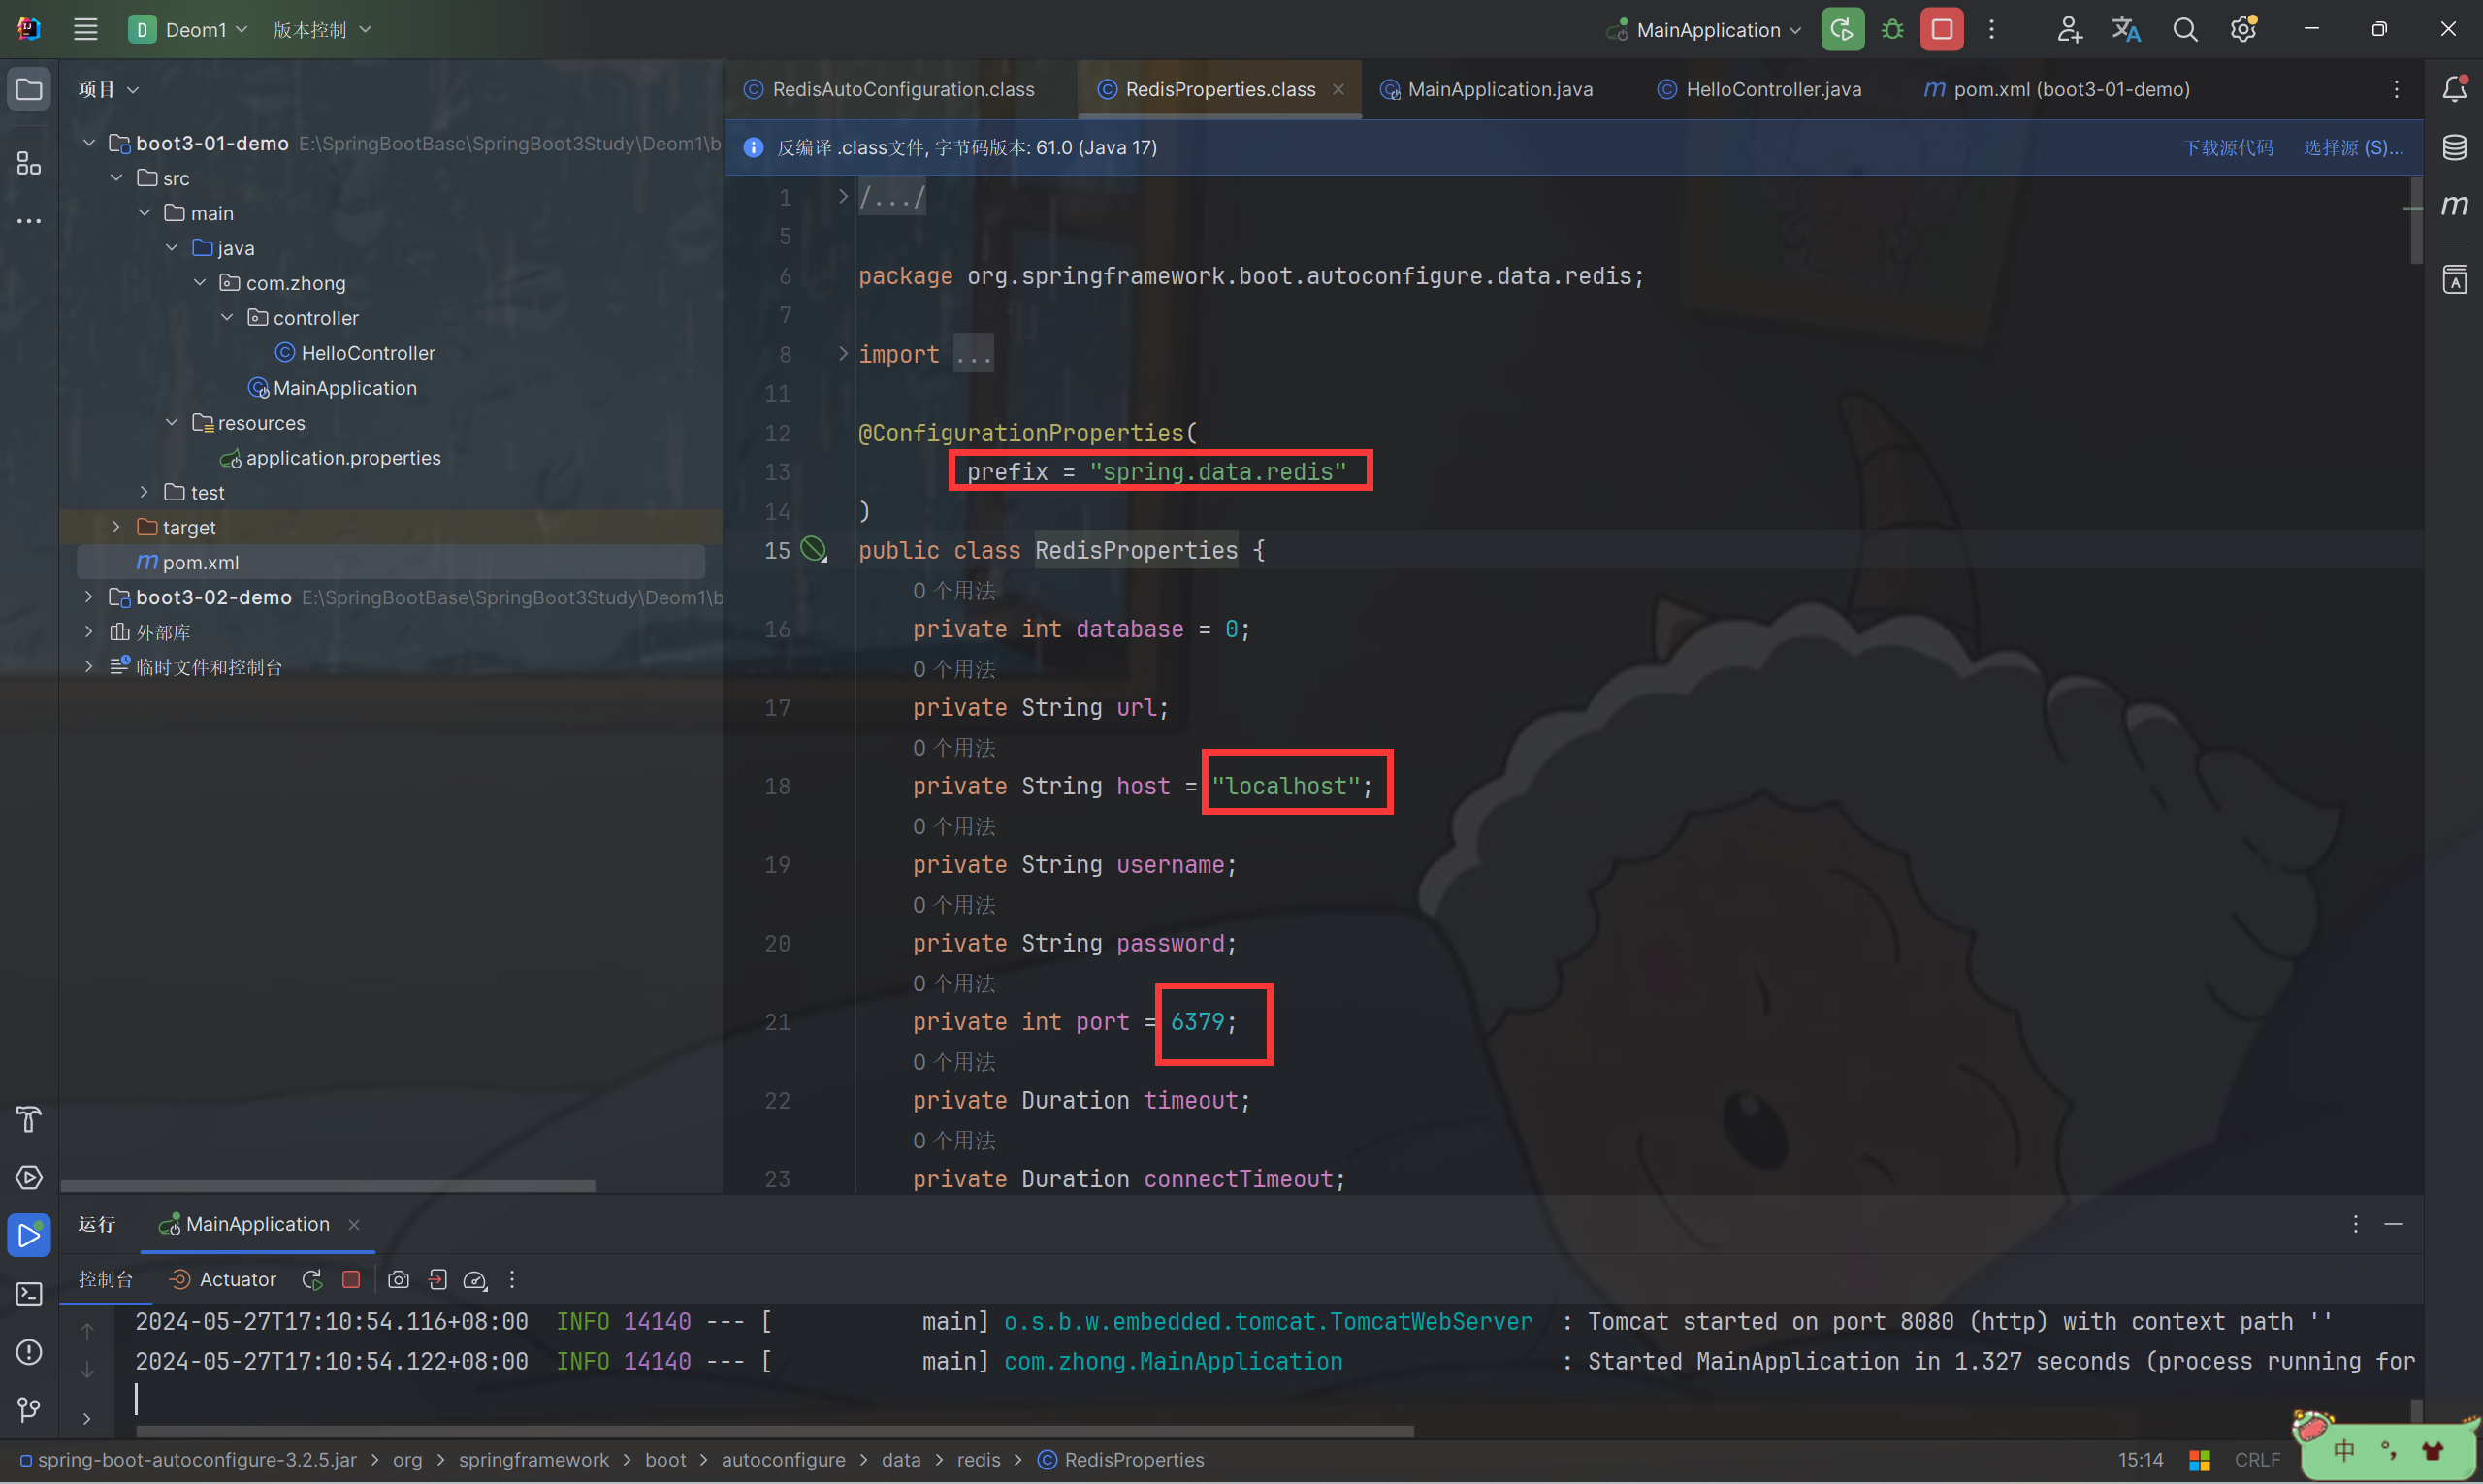
4、在 application.properties 编写相关配置
# 此配置项仅为演示与默认配置相同 可根据自己项目进行更改地址或者端口号以及其他配置
spring.data.redis.host=localhost
spring.data.redis.port=6379
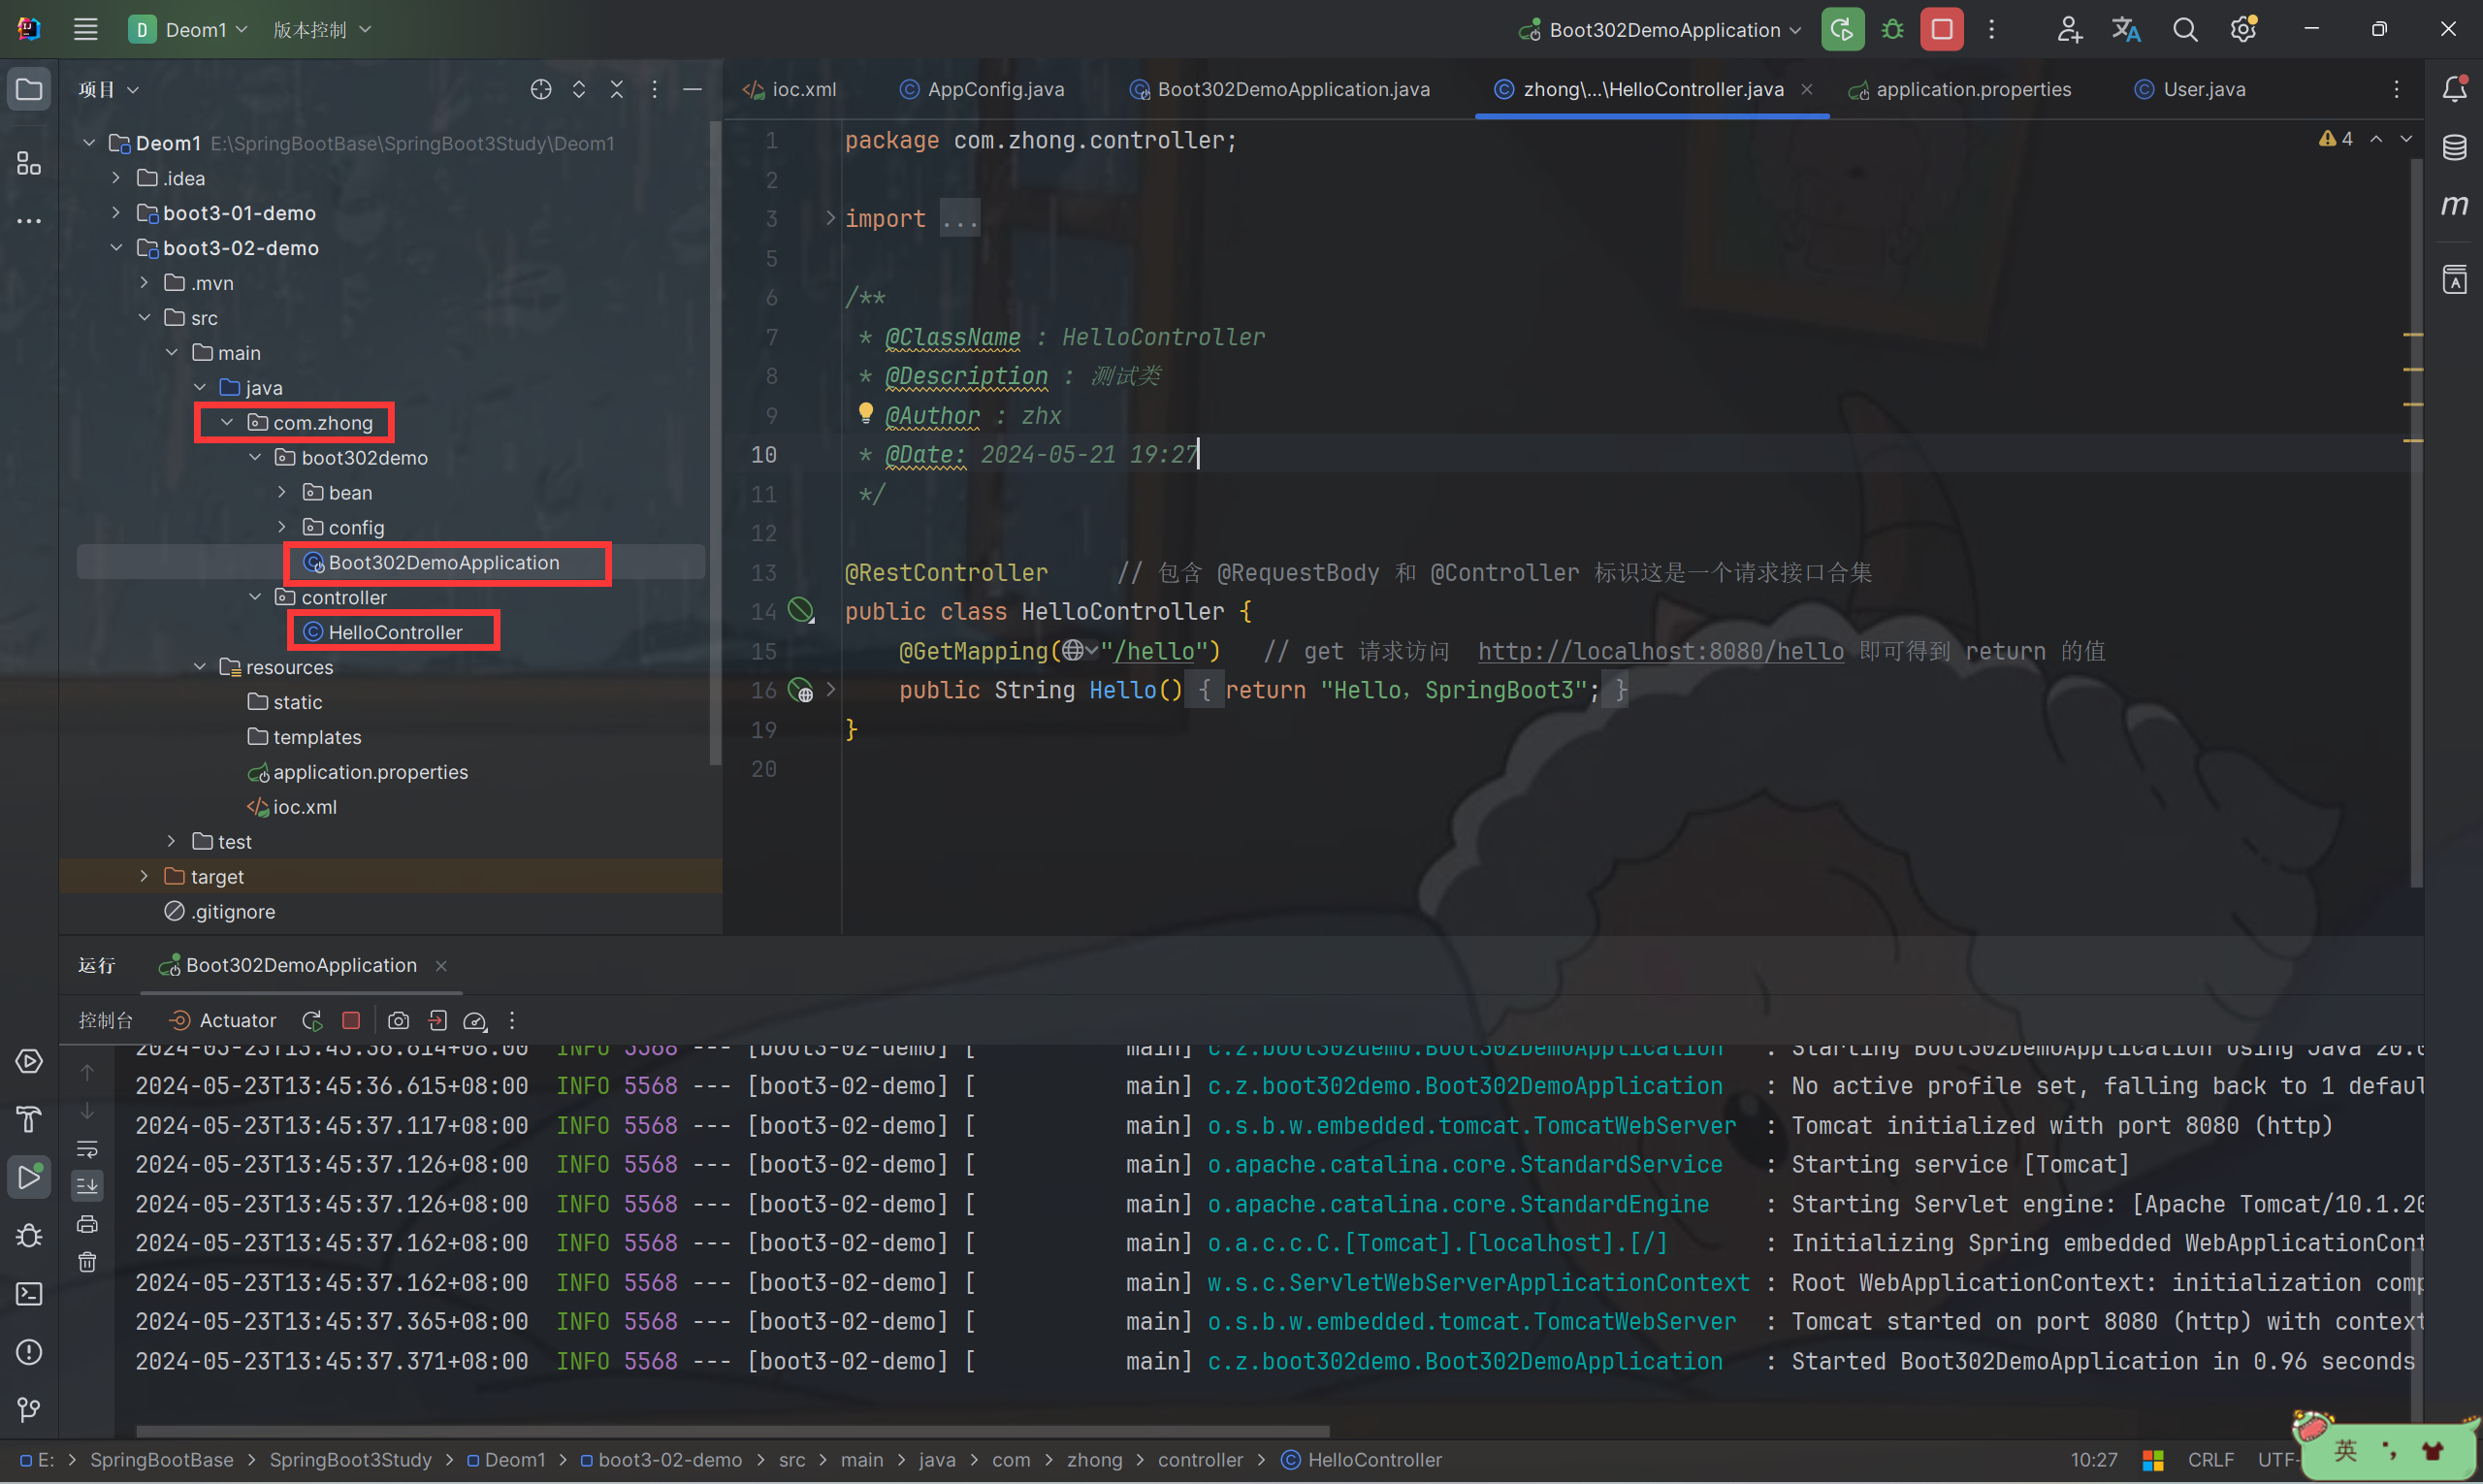
- 编写相关逻辑
package com.zhong.controller;
import org.springframework.beans.factory.annotation.Autowired;
import org.springframework.data.redis.core.StringRedisTemplate;
import org.springframework.stereotype.Controller;
import org.springframework.web.bind.annotation.GetMapping;
import org.springframework.web.bind.annotation.RequestBody;
import org.springframework.web.bind.annotation.RestController;
/**
* @ClassName : HelloController
* @Description : 测试类
* @Author : zhx
* @Date: 2024-05-21 19:27
*/
@RestController // 包含 @RequestBody 和 @Controller 标识这是一个请求接口合集
public class HelloController {
@Autowired
StringRedisTemplate redisTemplate; // 自动注入 redis 的相关操作
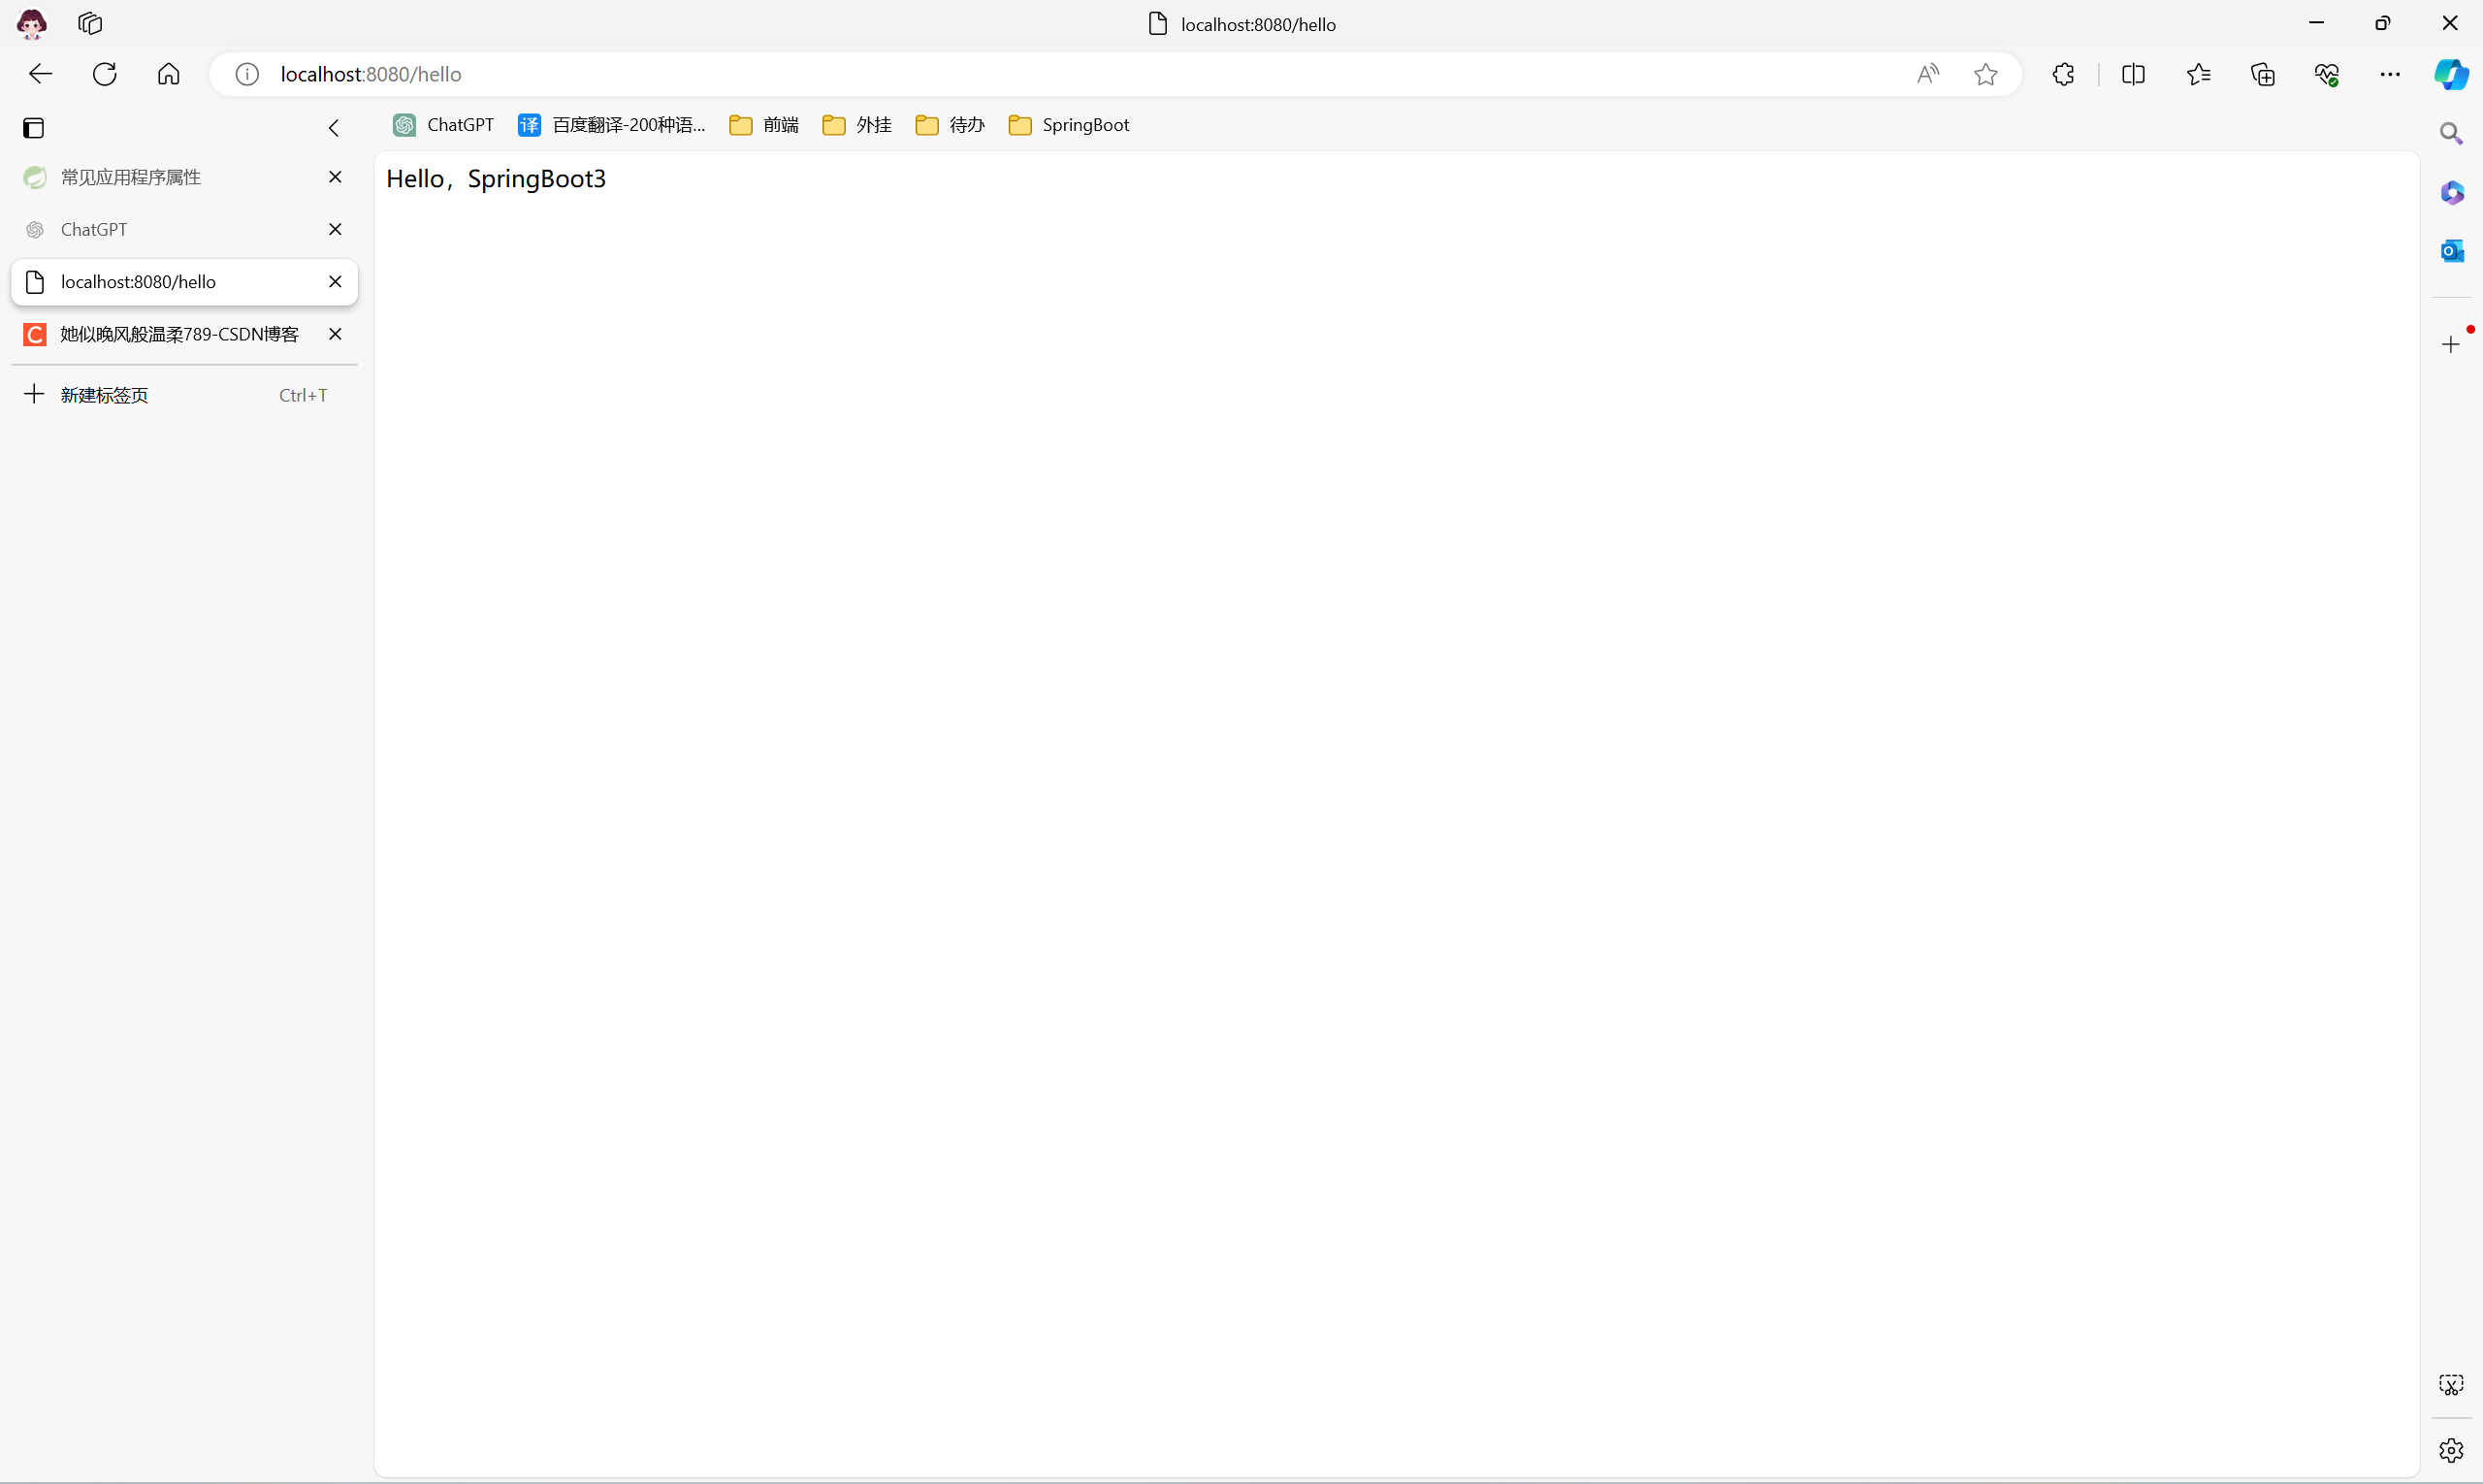
@GetMapping("/hello") // get 请求访问 http://localhost:8080/hello 即可得到 return 的值
public String Hello() {
return "Hello,SpringBoot3";
}
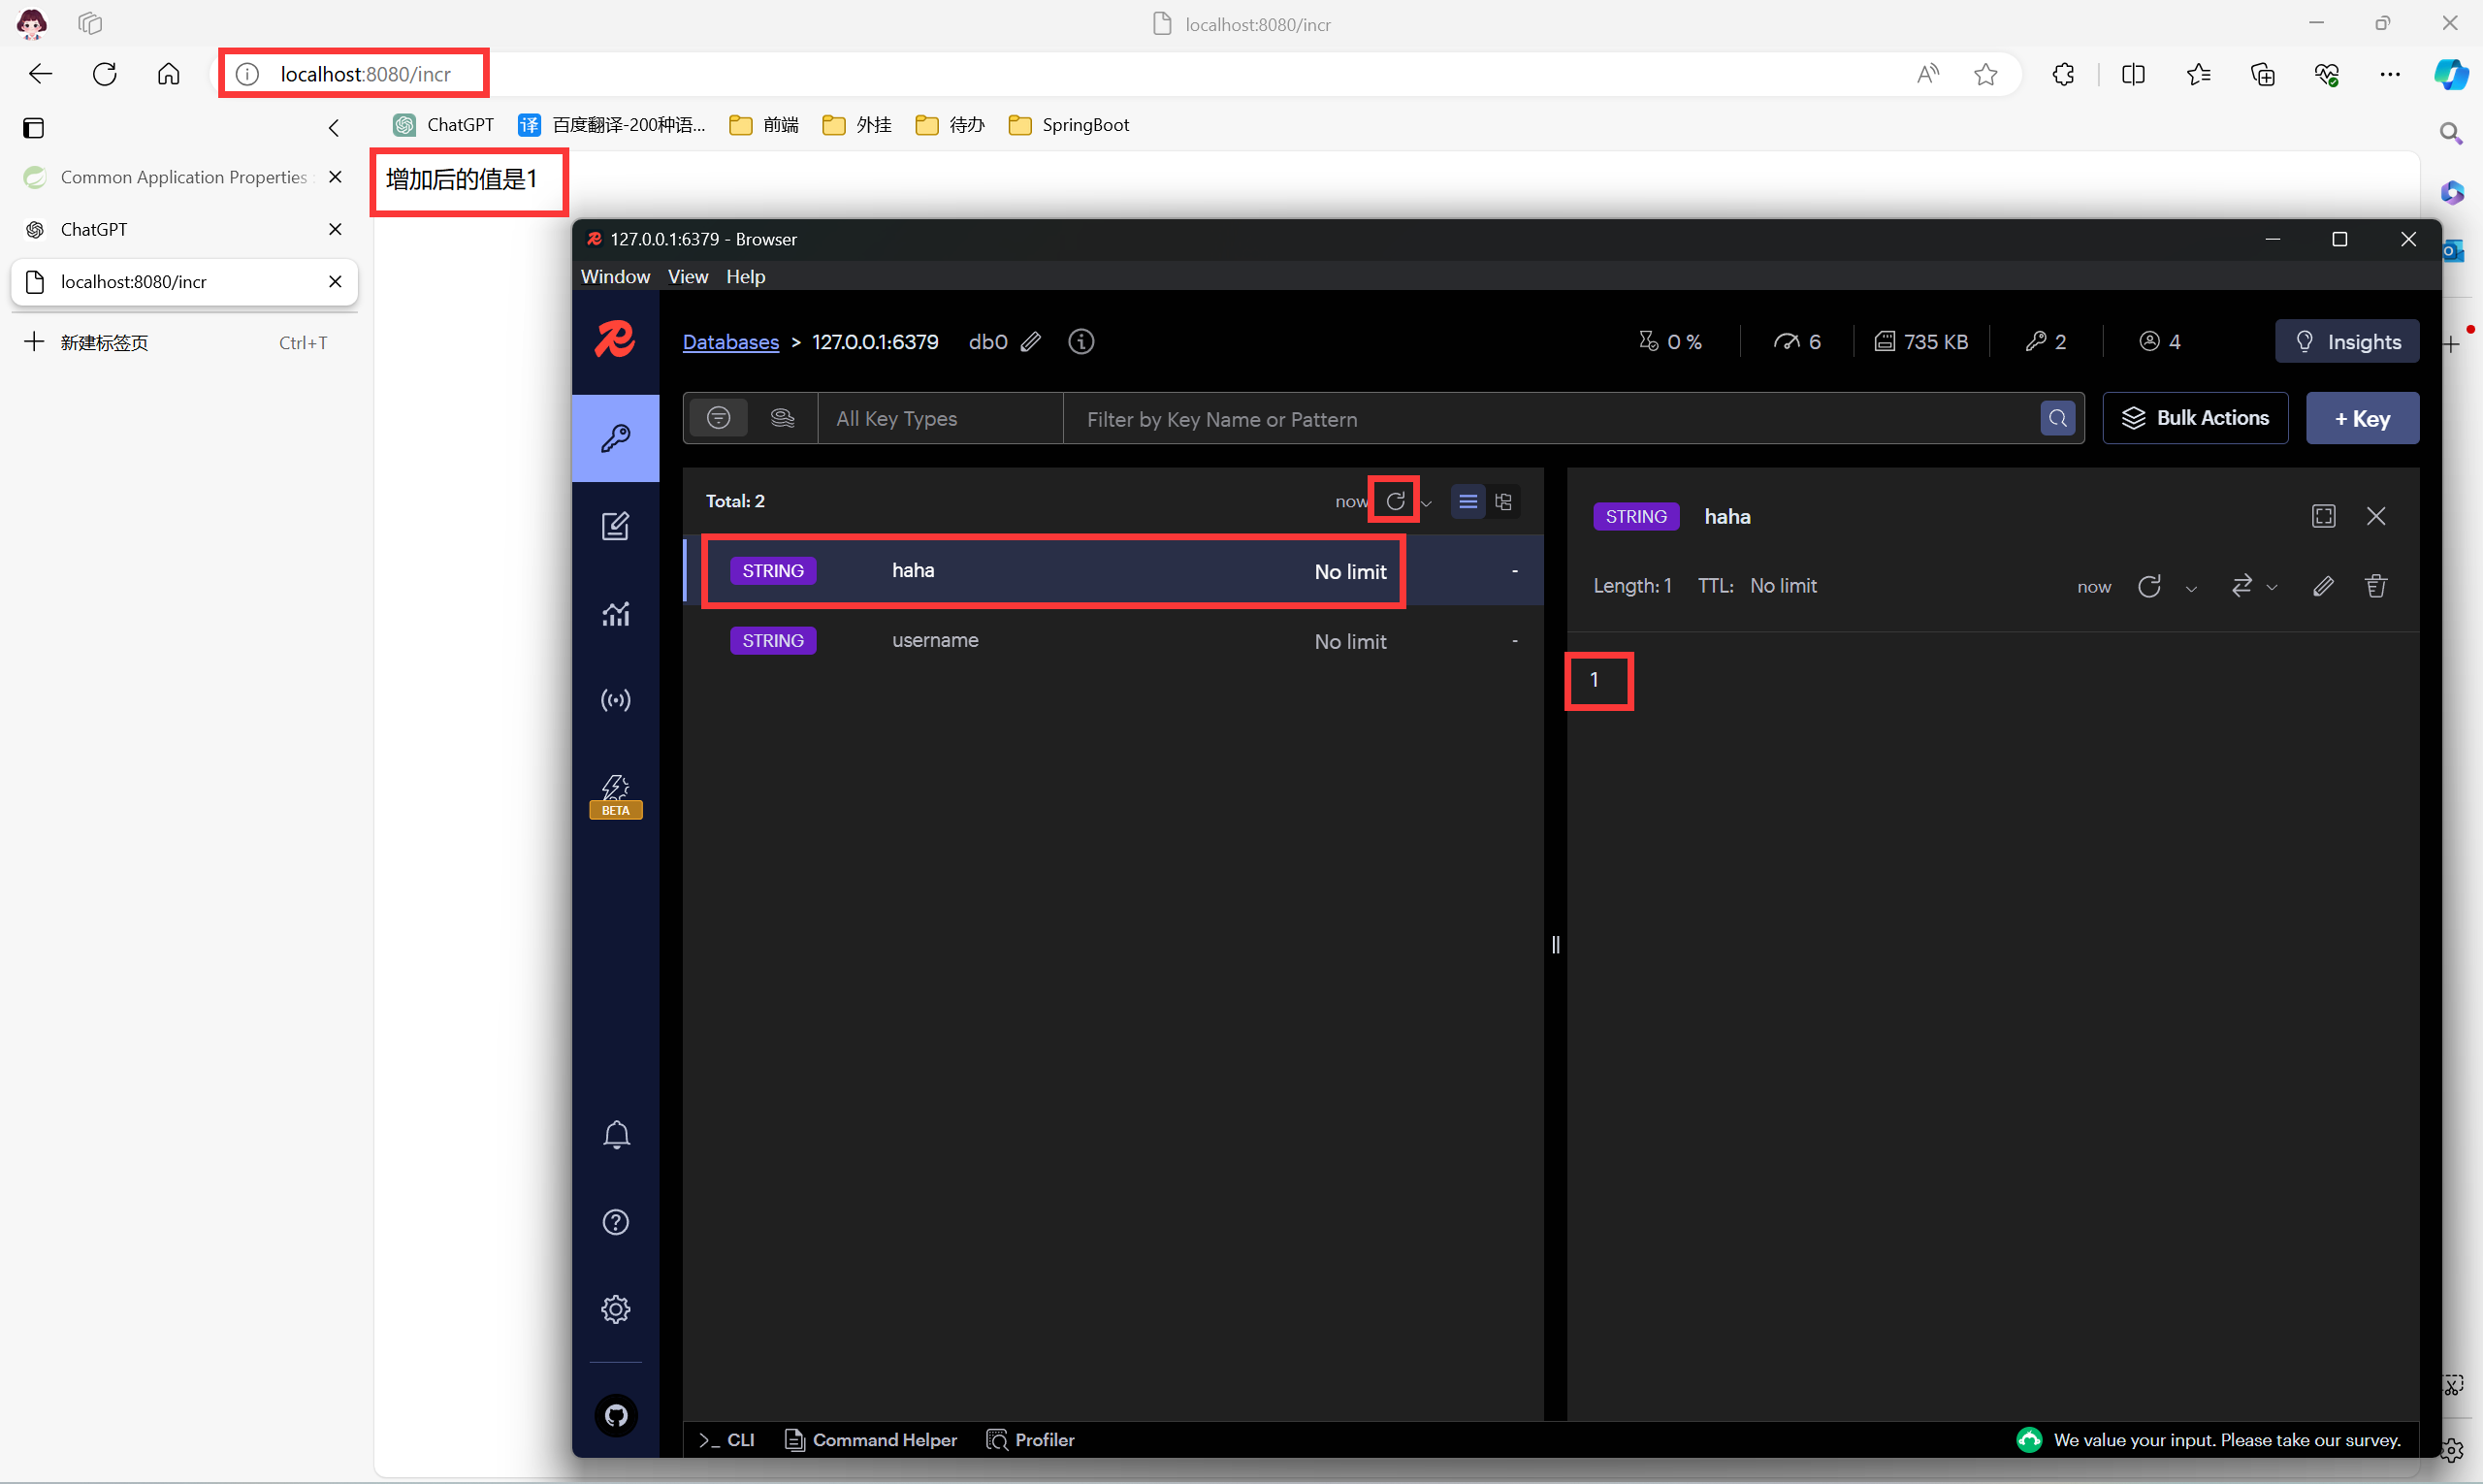
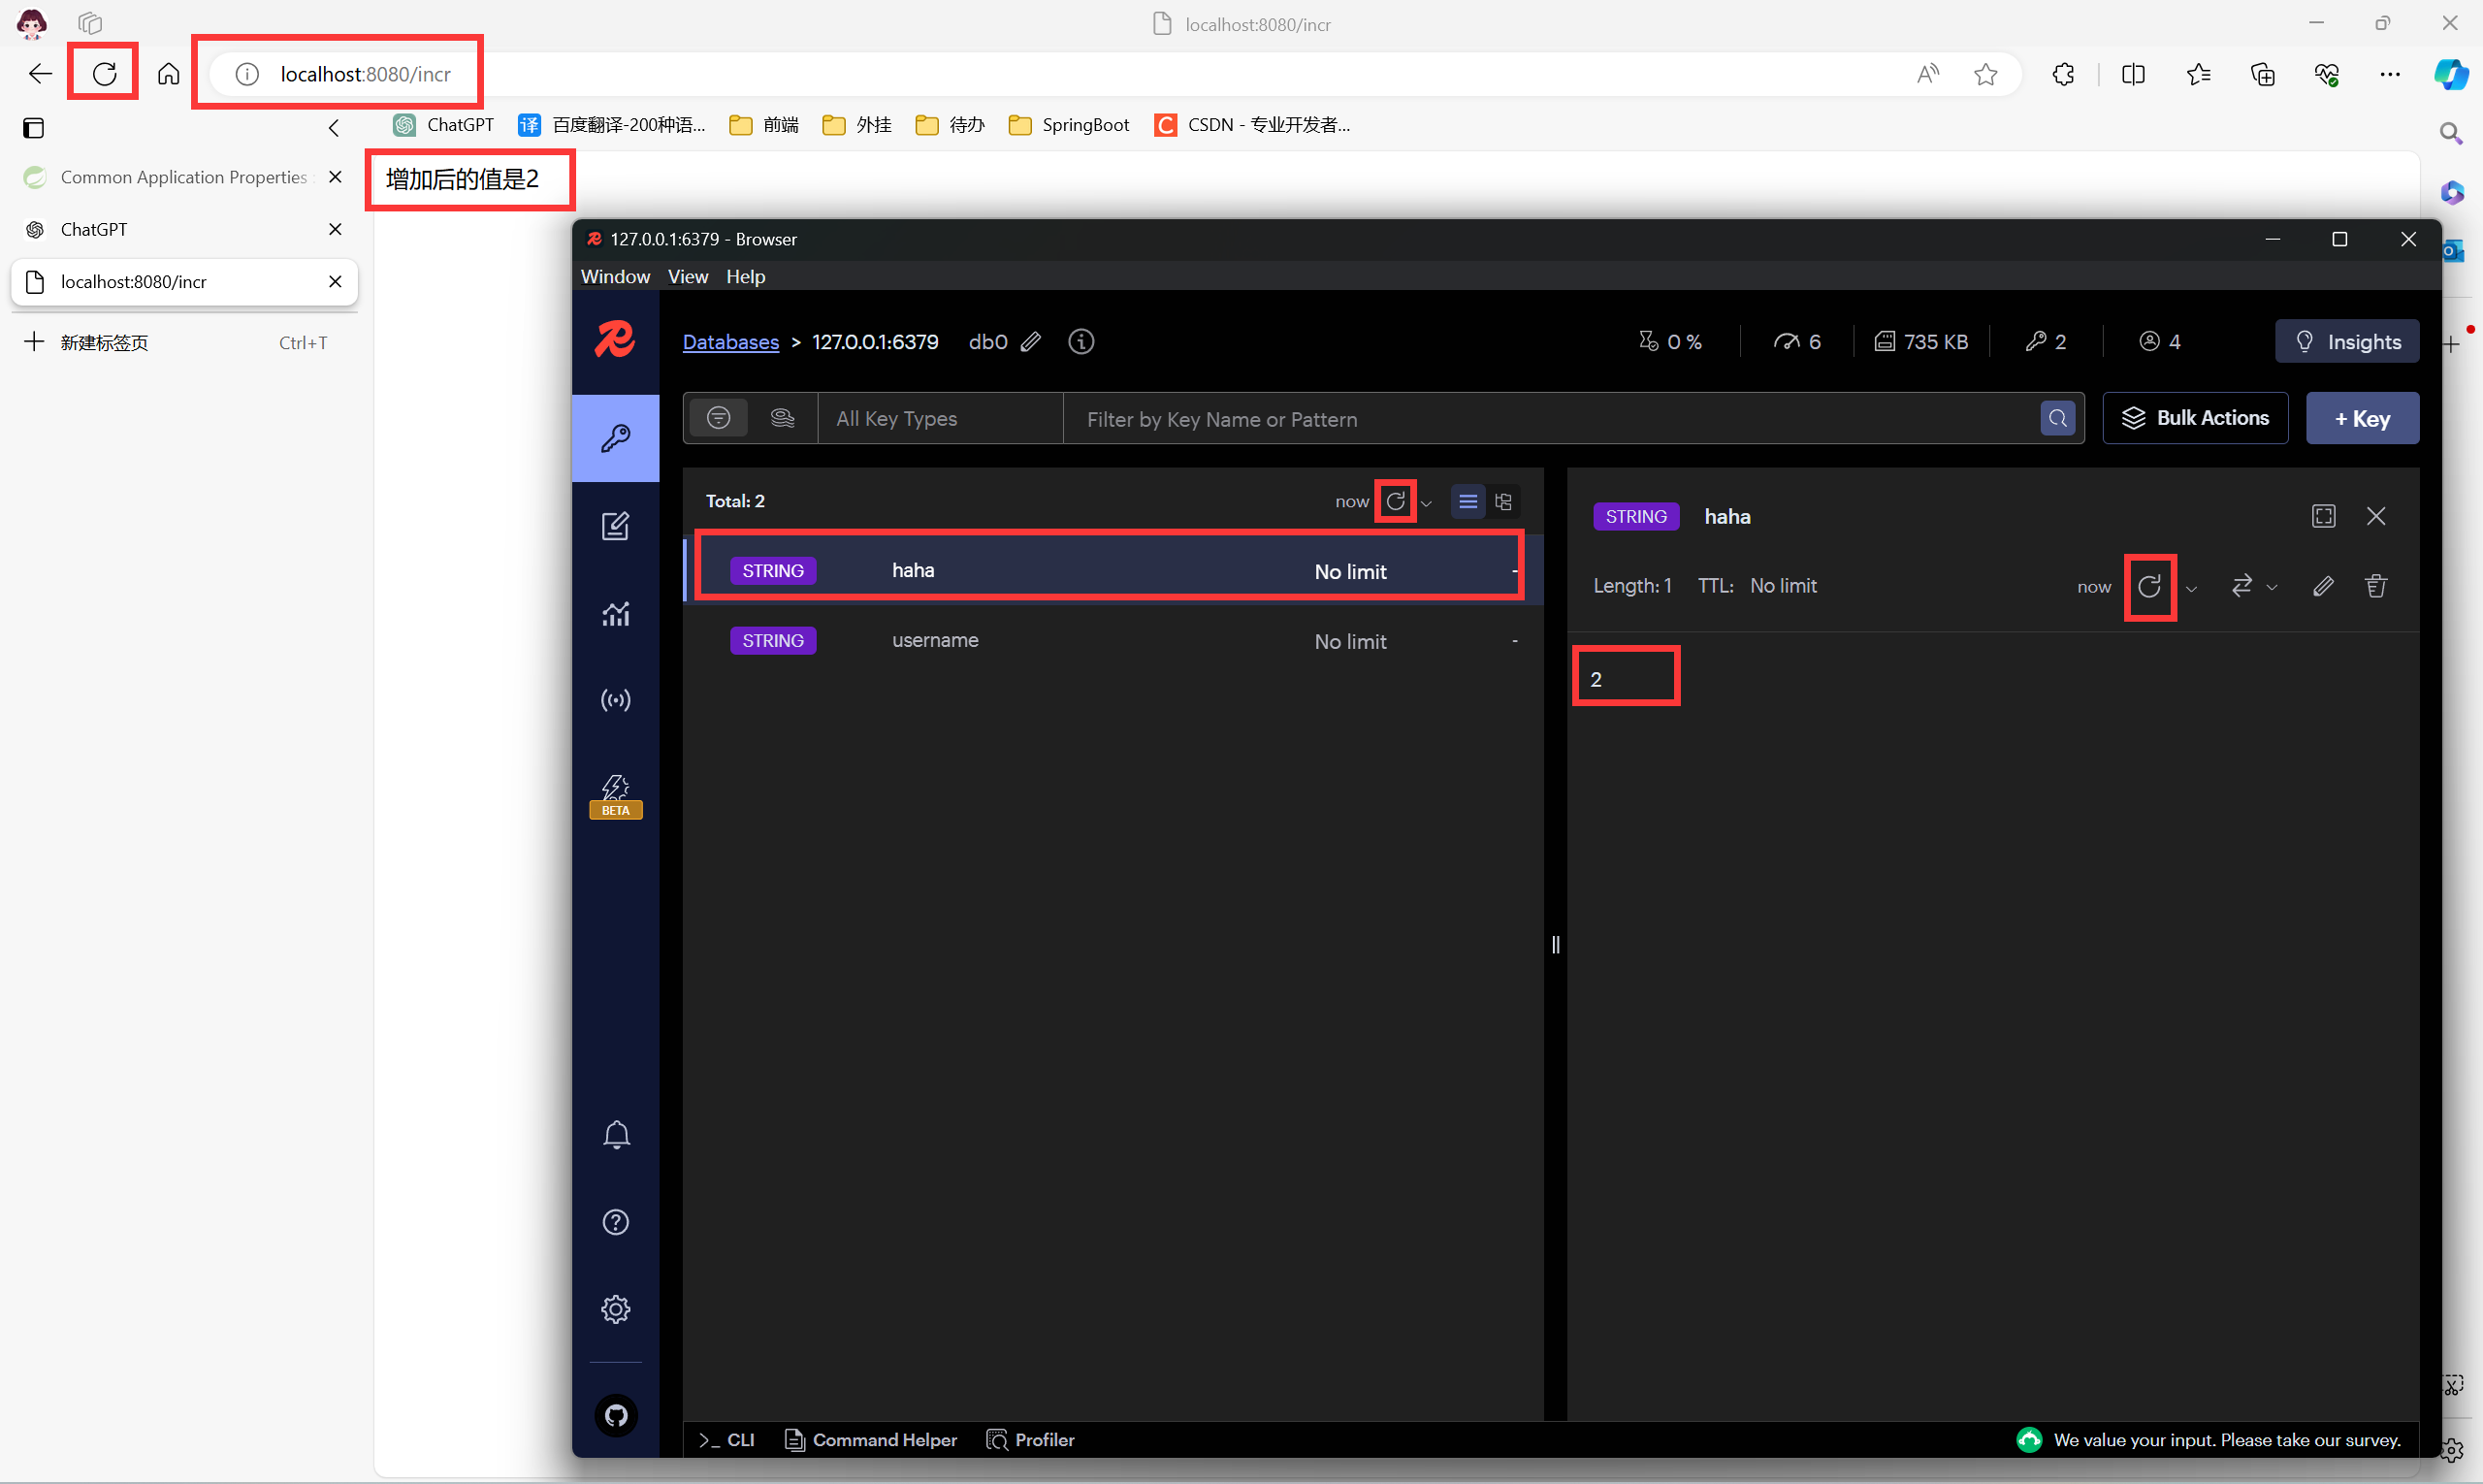
@GetMapping("/incr")
public String incr() {
// 每次请求这个地址 key 为 haha 的 value 自动 +1
Long haha = redisTemplate.opsForValue().increment("haha");
return "增加后的值是" + haha;
}
}
- 重新运行后访问 localhost:8080/incr
http://localhost:8080/incr
如果 Redis 可视化工具 RedisInsight 没有出现 haha 点击刷新
RedisInsight 的安装可以参考我的这篇博客 Redis 可视化工具 RedisInsight 的保姆级安装以及使用(最新)-优快云博客
- 再次刷新浏览器
2.5 yml 配置文件
- application.properties 配置文件书写形式
server.port=9999

spring.data.redis.host=localhost
spring.data.redis.port=6379
- application.yml 配置文件书写形式
server:
  port: 9999

spring:
  data:
    redis:
      host: localhost
      port: 6379
application.yml 的区别:
1、k: v 构成 k: 后面必须有空格,k: 是固定的
2、属性之间有层级关系,相同层级属性空格相同
2.6 复杂对象用 properties 表示
- 在 pom.xml 中引用 lombok 刷新后 并 使用 lombok 插件生成 getter、setter、有参构造、无参构造。
- @data 生成 getter、setter
- @AllArgsConstructor 有参构造
- @NoArgsConstructor 无参构造
    <dependencies>
        <!--springboot3 Web 依赖-->
        <dependency>
            <groupId>org.springframework.boot</groupId>
            <artifactId>spring-boot-starter-web</artifactId>
        </dependency>

        <!--redis starter 依赖-->
        <dependency>
            <groupId>org.springframework.boot</groupId>
            <artifactId>spring-boot-starter-data-redis</artifactId>
        </dependency>

		<!--lombok 依赖-->
        <dependency>
            <groupId>org.projectlombok</groupId>
            <artifactId>lombok</artifactId>
        </dependency>
    </dependencies>
- 创建 Cat 类
package com.zhong.dao;

import lombok.Data;

/**
 * @ClassName : Cat
 * @Description :
 * @Author : zhx
 * @Date: 2024-05-27 20:42
 */
@Data
public class Cat {
    private String name;
    private Integer age;
}
- 创建 Dog 类
package com.zhong.dao;

import lombok.Data;

/**
 * @ClassName : Dog
 * @Description :
 * @Author : zhx
 * @Date: 2024-05-27 20:42
 */
@Data
public class Dog {
    private String name;
    private Integer age;
}
- 创建 Child 类
package com.zhong.dao;

import lombok.Data;

import java.util.Date;
import java.util.List;

/**
 * @ClassName : Child
 * @Description :
 * @Author : zhx
 * @Date: 2024-05-27 20:40
 */
@Data
public class Child {
    private String name;
    private Integer age;
    private Date birthDay;
    private List<String> text;
}
- 创建 Person 类
package com.zhong.dao;

import lombok.Data;
import org.springframework.boot.context.properties.ConfigurationProperties;
import org.springframework.stereotype.Component;

import java.util.Date;
import java.util.List;
import java.util.Map;

/**
 * @ClassName : Person
 * @Description :
 * @Author : zhx
 * @Date: 2024-05-27 20:38
 */
@Component
@ConfigurationProperties(prefix = "person")
@Data
public class Person {
    private String name;
    private Integer age;
    private Date brithDay;
    private Boolean like;
    private Child child; // 嵌套对象
    private List<Dog> dogs; // 数组里面嵌套对象
    private Map<String, Cat> cats;  // Map 里面嵌套对象

    @Override
    public String toString() {
        return "Person{" +
                "\n\tname='" + name + '\'' +
                ", age=" + age +
                ", brithDay=" + brithDay +
                ", like=" + like +
                ", \n\tchild=" + child +
                ", \n\tdogs=" + dogs +
                ", \n\tcats=" + cats +
                "\n}";
    }
}
- application.properties
person.name=钟宏雄
person.age=23
person.brith-day=2024/05/27 21:06:06
person.like=true
person.child.name=小猫
person.child.age=10
person.child.brith-day=2014/05/27 21:06:06
person.child.text[0]=abc
person.child.text[1]=xyz
person.dogs[0].name=小黑
person.dogs[0].age=8
person.dogs[1].name=小白
person.dogs[1].age=6
person.cats.c1.name=小蓝
person.cats.c1.age=10
person.cats.c2.name=小灰
person.cats.c2.age=20
- 输出程序 MainApplication
package com.zhong;

import com.zhong.dao.Person;
import org.springframework.boot.SpringApplication;
import org.springframework.boot.autoconfigure.SpringBootApplication;

/**
 * @ClassName : MainApplication
 * @Description : 启动 SpringBoot 项目的入口程序
 * @Author : zhx
 * @Date: 2024-05-20 16:20
 */
@SpringBootApplication  // 标识这是一个 SpringBoot 应用
public class MainApplication {
    public static void main(String[] args) {
        var ioc = SpringApplication.run(MainApplication.class, args);
        Person bean = ioc.getBean(Person.class);
        System.out.println(bean);
    }
}
- 输出结果
Person{
	name='钟宏雄', age=23, brithDay=Mon May 27 21:06:06 CST 2024, like=true,
	child=Child(name=小猫, age=10, birthDay=null, text=[abc, xyz]),
	dogs=[Dog(name=小黑, age=8), Dog(name=小白, age=6)],
	cats={c1=Cat(name=小蓝, age=10), c2=Cat(name=小灰, age=20)}
}
2.7 复杂对象用 yml 表示
注释掉 application.properties 的内容
- application.yml(对比 application.properties 的写法)
person:
  name: 王萍
  age: 21
  brith-day: 2024/05/27 21:06:06
  like: true
  child:
    name: 小狗
    age: 10
    birthDay: 2024/05/27 21:06:06
    text[0]: def
    text[1]: uvw
  dogs[0]:
    name: 小绿
    age: 10
  dogs[1]:
    name: 小黄
    age: 20
  cats.c1:
    name: 小橙
    age: 10
  cats.c2:
    name: 小青
    age: 20
- 标准写法
person:
  name: 王萍
  age: 21
  brith-day: 2024/05/27 21:06:06
  like: true
  child:
    name: 小狗
    age: 10
    birthDay: 2024/05/27 21:06:06
    #    text: ["def", "uvw"]
    text:
      - def
      - uvw
  dogs:
    - name: 小绿
      age: 10
    - name: 小黄
      age: 20
  cats:
    c1:
      name: 小橙
      age: 10
    c2: {name:小青, age: 2}   # 对象也可以使用 {key:value} 表示
- 输出结果
Person{
	name='王萍', age=21, brithDay=Mon May 27 21:06:06 CST 2024, like=true,
	child=Child(name=小狗, age=10, birthDay=Mon May 27 21:06:06 CST 2024, text=[def, uvw]),
	dogs=[Dog(name=小绿, age=10), Dog(name=小黄, age=20)],
	cats={c1=Cat(name=小橙, age=10), c2=Cat(name=小青, age=20)}
}
语法细节
- birthDay 推荐写为 birth-day
- 文本:
- 单引号不会转义( \n 则为普通字符显示)
- 双引号会转义 ( \n 则为换行)
- 大文本:
- | 开头,大文本写在下层,保留文本格式,换行符正确显示
- > 开头,大文本写在下层,折叠换行符
- 多文档合并
- 使用 — 可以把多个 yaml 文档合并在一个文档中,每个文档区依然认为内容独立


 被折叠的 条评论
为什么被折叠?
被折叠的 条评论
为什么被折叠?
 到【灌水乐园】发言


