


准备工作:
1.windows:安装vivado 2017.4,xilinx sdk 2017.4
2.ubuntu16.04:安装petalinux 2017
3.黑金ax7020
1.Petalinux配置
Petalinux使用教程-优快云博客非常详细,可以参考
1.通过 Vivado 创建硬件平台,得到 hdf 硬件描述文件,将*.sdk 文件夹复制到 ubuntu 系统下,给 petalinux 使用。;


2. 运行 source <petalinux 安装路径>/settings.sh,设置 Petalinux 运行环境
source /opt/pkg/petalinux/2018.3/settings.sh3. 通过 petalinux-create -t project 创建 petalinux 工程;
petalinux-create -t project --template zynq -n <proj_name><proj_name>改成工程名
4. 将 hdf 文件导入到 petalinux 工程当中并配置 petalinux 工程;
petalinux-config --get-hw-description <hdf文件路径>5. 配置 Linux 内核;
petalinux-config -c kernel 6. 配置 Linux 根文件系统;
petalinux-config -c rootfs7. 配置设备树文件;

我的是黑金AX7020开发板,修改四个网口:
/include/ "system-conf.dtsi"
/ {
model = "Zynq ALINX Development Board";
compatible = "alinx,axi eth", "xlnx,zynq-7000";
usb_phy0: usb_phy@0 {
compatible = "ulpi-phy";
#phy-cells = <0>;
reg = <0xe0002000 0x1000>;
view-port = <0x0170>;
drv-vbus;
};
};
&usb0 {
usb-phy = <&usb_phy0>;
};
&sdhci0 {
u-boot,dm-pre-reloc;
};
&uart1 {
u-boot,dm-pre-reloc;
};
&flash0 {
compatible = "micron,m25p80", "w25q256", "spi-flash";
};
&gem0 {
phy-handle = <ðernet_phy>;
ethernet_phy: ethernet-phy@1 {
reg = <1>;
device_type = "ethernet-phy";
};
};
&axi_ethernet_0 {
local-mac-address = [00 0a 35 00 03 22];
phy-handle = <&phy1>;
xlnx,has-mdio = <0x1>;
phy-mode = "rgmii";
mdio {
phy1: phy@1 {
device_type = "ethernet-phy";
reg = <1>;
};
};
};
&axi_ethernet_1 {
local-mac-address = [00 0a 35 00 03 23];
phy-handle = <&phy2>;
xlnx,has-mdio = <0x1>;
phy-mode = "rgmii";
mdio {
phy2: phy@1 {
device_type = "ethernet-phy";
reg = <1>;
};
};
};
&axi_ethernet_2 {
local-mac-address = [00 0a 35 00 03 24];
phy-handle = <&phy3>;
xlnx,has-mdio = <0x1>;
phy-mode = "rgmii";
mdio {
phy3: phy@1 {
device_type = "ethernet-phy";
reg = <1>;
};
};
};
&axi_ethernet_3 {
local-mac-address = [00 0a 35 00 03 25];
phy-handle = <&phy4>;
xlnx,has-mdio = <0x1>;
phy-mode = "rgmii";
mdio {
phy4: phy@1 {
device_type = "ethernet-phy";
reg = <1>;
};
};
};
8. 编译整个工程;
petalinux-build 该命令将生成设备树 DTB 文件、fsbl 文件、U-Boot 文件,Linux 内核和根文件系统映像。
编译完成后,生成的映像将位于工程的 images 目录下。
9. 使用 petalinux-package --boot 制作 BOOT.BIN 启动文件;
petalinux-package --boot --fsbl --fpga --u-boot --force若出现fsbl后找不到文件,添加/images/linux下的fsbl文件
2.生成BOOT.BIN
将boot.bin和image.ub存入SD卡,将Zynq设置为SD卡启动模式,PUTTY连接串口COM,输入用户名和密码
3.使能PL网口
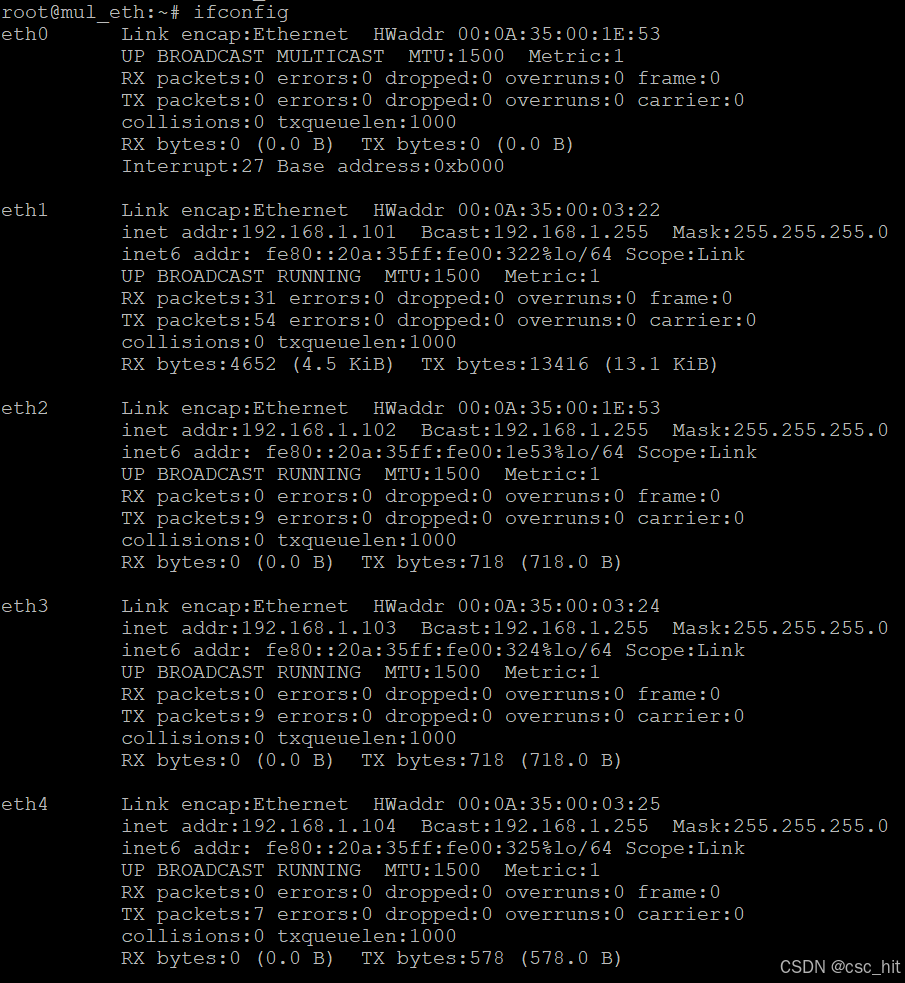
ifconfig eth1 192.168.1.101 netmask 255.255.255.0 up
ifconfig eth2 192.168.1.102 netmask 255.255.255.0 up
ifconfig eth3 192.168.1.103 netmask 255.255.255.0 up
ifconfig eth4 192.168.1.104 netmask 255.255.255.0 up
之后ifconfig可以查看到对应网卡信息
4.ping通测试
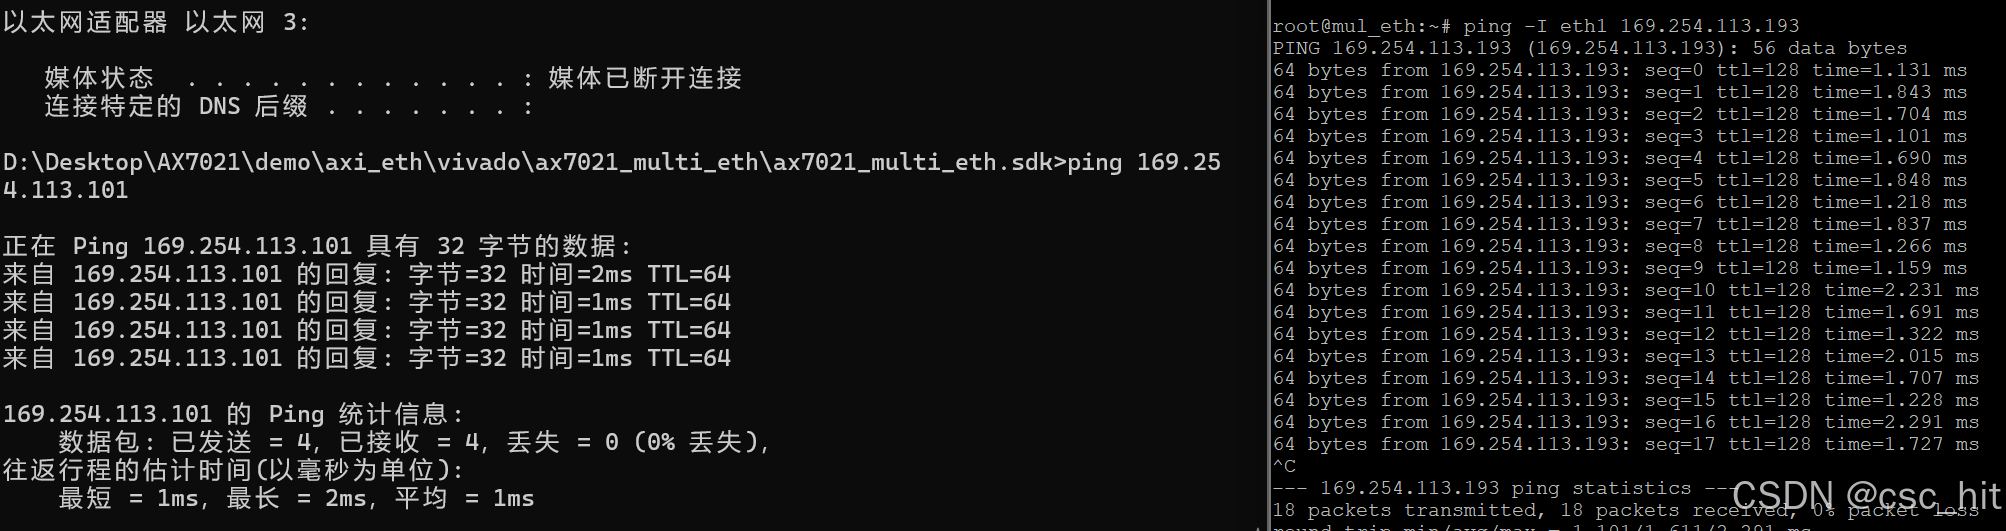
连接PL网口eth1到PC的网口,要确保两者IP在同一局域网内,例如子网掩码都为255.255.255.0时,设置的eth1的IP为192.168.1.101,PC的IP应为192.168.1.x;若主机IP不是192.168.1.x,修改eth1的IP:
ifconfig eth1 192.168.1.101 netmask 255.255.255.0 down
ifconfig eth1 <PC同一局域网> netmask 255.255.255.0 up
ping通效果,PCping开发板,开发板pingPC
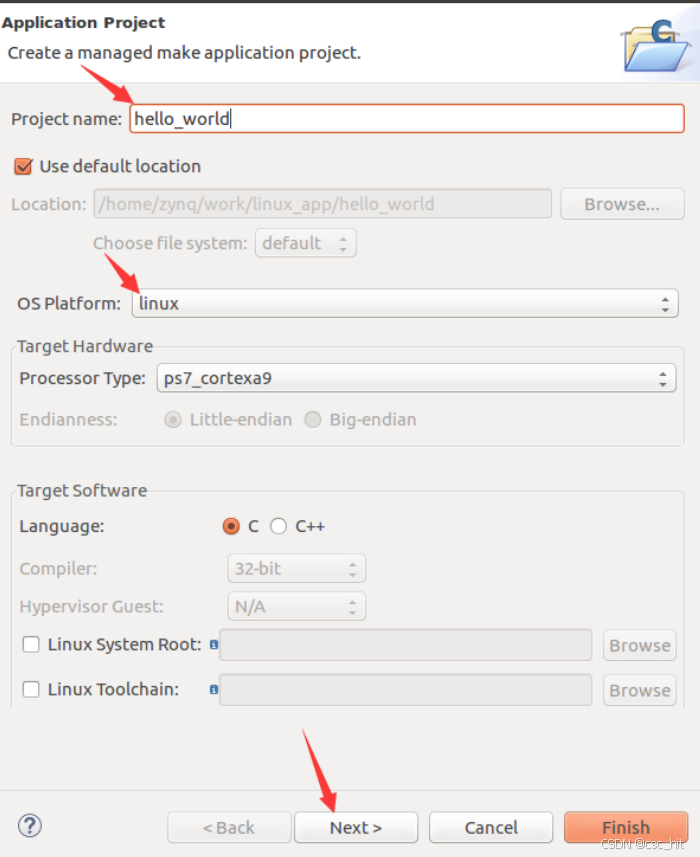
5.windows的sdk开发
在sdk开发选择linux平台应用,导入模板工程
以下代码实现了TCP服务器,自动绑定套接字到“eth1”网口
#include <stdio.h>
#include <stdlib.h>
#include <string.h>
#include <unistd.h>
#include <arpa/inet.h>
#include <sys/socket.h>
#include <ifaddrs.h>

#define PORT 12345
#define BUFFER_SIZE 1024

// 获取eth1的IP地址
const char* get_eth1_ip() {
    struct ifaddrs *ifaddr, *ifa;
    char *ip = NULL;

    // 获取网络接口列表
    if (getifaddrs(&ifaddr) == -1) {
        perror("getifaddrs failed");
        return NULL;
    }

    // 遍历所有网络接口
    for (ifa = ifaddr; ifa != NULL; ifa = ifa->ifa_next) {
        // 查找eth1接口
        if (ifa->ifa_addr->sa_family == AF_INET && strcmp(ifa->ifa_name, "eth1") == 0) {
            ip = inet_ntoa(((struct sockaddr_in *)ifa->ifa_addr)->sin_addr);
            break;
        }
    }

    freeifaddrs(ifaddr);
    return ip;
}

int main() {
    int server_fd, client_fd;
    struct sockaddr_in server_addr, client_addr;
    socklen_t client_len = sizeof(client_addr);
    char buffer[BUFFER_SIZE];

    // 获取eth1的IP地址
    const char* eth1_ip = get_eth1_ip();
    if (eth1_ip == NULL) {
        perror("Failed to get IP address for eth1");
        return -1;
    }

    printf("eth1 IP address: %s\n", eth1_ip);

    // 创建套接字
    server_fd = socket(AF_INET, SOCK_STREAM, 0);
    if (server_fd == -1) {
        perror("Socket creation failed");
        return -1;
    }

    // 设置服务器地址
    memset(&server_addr, 0, sizeof(server_addr));
    server_addr.sin_family = AF_INET;
    server_addr.sin_addr.s_addr = inet_addr(eth1_ip);  // 使用eth1的IP地址
    server_addr.sin_port = htons(PORT);

    // 绑定套接字到端口
    if (bind(server_fd, (struct sockaddr*)&server_addr, sizeof(server_addr)) == -1) {
        perror("Bind failed");
        close(server_fd);
        return -1;
    }

    // 监听连接
    if (listen(server_fd, 5) == -1) {
        perror("Listen failed");
        close(server_fd);
        return -1;
    }

    printf("Server is listening on %s:%d...\n", eth1_ip, PORT);

    // 接受客户端连接
    client_fd = accept(server_fd, (struct sockaddr*)&client_addr, &client_len);
    if (client_fd == -1) {
        perror("Accept failed");
        close(server_fd);
        return -1;
    }

    printf("Client connected\n");

    // 接收客户端数据并返回
    while (1) {
        memset(buffer, 0, sizeof(buffer)); // 清空缓冲区
        int bytes_received = recv(client_fd, buffer, sizeof(buffer) - 1, 0);
        if (bytes_received == -1) {
            perror("Recv failed");
            break;
        } else if (bytes_received == 0) {
            printf("Client disconnected\n");
            break;
        }

        printf("Received from client: %s\n", buffer);

        // 发送相同的数据回客户端
        send(client_fd, buffer, bytes_received, 0);
    }

    // 关闭客户端和服务器套接字
    close(client_fd);
    close(server_fd);

    return 0;
}
6.ssh将elf传输到Zynq运行
找到Debug目录下编译生成的elf文件,
scp -o HostKeyAlgorithms=+ssh-rsa -o PubkeyAcceptedAlgorithms=+ssh-rsa <elf文件路径> root@<PL网卡IP>:/home/root
传输成功
![]()
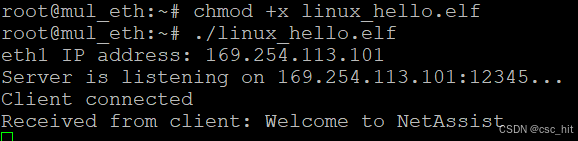
在Zynq的Linux系统运行
查看权限,添加权限,执行
chmod +x ./linux_hello.elf
chmod -x ./linux_hello.elf./linux_hello.elfZynq的Linux效果:
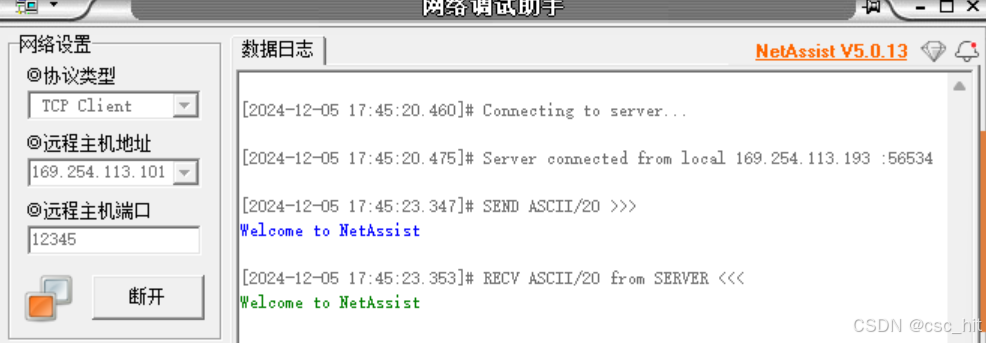
PC端使用网络调试助手作为TCP客户端效果:


 被折叠的 条评论
为什么被折叠?
被折叠的 条评论
为什么被折叠?
 到【灌水乐园】发言


