


1.0网络
1.1ip
启动网卡
[root@localhost ~]# ifup ens33网卡配置
进入网卡配置文件
[root@localhost ~]# vim /etc/sysconfig/network-scripts/ifcfg-ens33
TYPE=Ethernet
PROXY_METHOD=none
BROWSER_ONLY=no
BOOTPROTO=dhcp #IP获取 DHCP自动获取 改为静态static
DEFROUTE=yes
IPV4_FAILURE_FATAL=no
IPV6INIT=yes
IPV6_AUTOCONF=yes
IPV6_DEFROUTE=yes
IPV6_FAILURE_FATAL=no
IPV6_ADDR_GEN_MODE=stable-privacy
NAME=ens33  #网卡名称
UUID=b7060f7d-553e-4e54-a3b9-389338b36da2
DEVICE=ens33 #网卡设备名称
ONBOOT=no #开机自启 改为 yes


#添加以下内容
IPADDR=192.168.137.110 #静态IP
GATEWAY=192.168.137.2 #默认网关
NETMASK=255.255.255.0 #子网掩码
DNS1=218.4.4.4
DNS2=8.8.8.8 #DNS 配置
关于添加的内容具体的ip地址填写,参考此博客 centos7配置ip地址和网关
重启网卡,或者重启网卡服务
systemctl restart network #重启网卡
service network restart   #重启网卡network服务
此时就是静态IP
查询IP地址就是192.168.137.110
查看是否成功
[root@localhost ~]# ip a
2: ens33: <BROADCAST,MULTICAST,UP,LOWER_UP> mtu 1500 qdisc pfifo_fast state UP group default qlen 1000
    link/ether 00:0c:29:cb:78:0c brd ff:ff:ff:ff:ff:ff
 #查看此列   inet 192.168.137.110/24 brd 192.168.137.255 scope global ens33
       valid_lft forever preferred_lft forever
IP地址已经成功修改!
1.2selinux
系统安装完之后直接关闭Selinux,避免出现问题。修改==SELINUX==参数
[root@localhost ~]# vim  /etc/selinux/config
# This file controls the state of SELinux on the system.
# SELINUX= can take one of these three values:
#     enforcing - SELinux security policy is enforced.
#     permissive - SELinux prints warnings instead of enforcing.
#     disabled - No SELinux policy is loaded.
SELINUX=enforcing  # enforcing 开启状态  修改为 disable 关闭状态
# SELINUXTYPE= can take one of three two values:
#     targeted - Targeted processes are protected,
#     minimum - Modification of targeted policy. Only selected processes are protected.
#     mls - Multi Level Security protection.
SELINUXTYPE=targeted
使的配置生效
方法一 执行命令 setenforce 0
方法二 重启服务器 reboot
推荐方法一,重启服务器太麻烦,效率低
1.3firewall
firewall在学习阶段建议关闭。很多实验都会受到防火墙的影响
常用命令
systemctl status firewalld 查看状态
出现Active: active (running)切高亮显示则表示是启动状态。
出现 Active: inactive (dead)灰色表示停止,看单词也行。
systemctl start firewalld 开启
systemctl stop firewalld 关闭
systemctl restart firewalld重启
systemctl enable firewalld 开机自启动
systemctl disable firewall 开机不自启动
查看防火墙开机启动是否成功
systemctl is-enabled firewalld;echo $?
enabled 0 为设置成功
1.4NetworkManage
在使用centos 系统时偶尔会遇到配置都正确但network启动不了的问题,这问题经常是由NetworkManage引起的,关闭NetworkManage并取消开机启动network就能正常启动。
NetworkManage提供了nmctl命令行管理、nmtui伪图形界面两个工具
一般选择直接关闭NetworkManage
临时关闭
etc/init.d/NetworkManager stopcemtos6
cenos7
systemctl stop NetworkManager永久关闭
chkconfig NetworkManager offcentos6
centos7
systemctl disable NetworkManager
有更加详细的关于networkmanager的介绍
2.0系统配置
2.1PS1
命令提示符格式
centos 6 设置命令符字体为黄色
PS1="\[\e[1;33m\] [\u@\h \W]\\$\[\e[0m\]"centos7设命令符颜色为绿色
PS1="\[\e[1;32m\] [\u@\h \W]\\$\[\e[0m\]"参数 | 含义 |
\e | \033 I |
\u | 当前用户 |
\h | 主机名简称 |
\H | 主机名 |
\w | 当前工作目录 |
\W | 当前工作目录基名 |
\t | 24小时时间格式 |
\T | 12小时时间格式 |
\! | 命令历史数/ |
# | 开机后命令历史数 |
临时修改PS1
centos 6 设置命令符字体为黄色
PS1="\[\e[1;33m\] [\u@\h \W]\\$\[\e[0m\]"centos7设命令符颜色为绿色
PS1="\[\e[1;32m\] [\u@\h \W]\\$\[\e[0m\]"永久修改
#vim /etc/profile.d/env.sh生效
1 永久修改之后重启之后才会生效,可以先临时修改一下
2.2hostname
2.2.1 centos6
1.修改配置文件/etc/sysconfig/network
[root@localhost ~]# vim /etc/sysconfig/network
NETWORKING=yes
HOSTNAME=centos6
2.修改/etc/hosts在127.0.0.1后添加主机名
[root@localhost ~]# vim /etc/hosts
127.0.0.1   localhost localhost.localdomain localhost4 localhost4.localdomain4 centos6
::1         localhost localhost.localdomain localhost6 localhost6.localdomain6
3.若要使主机名临时有效可以使用hostname HOSTNAME 来修改,但此命令执行后命令提示符所显示的不会马上生效
[root@localhost ~]# hostname centos64.若要使其立即生效可以使用exec bash 命令
[root@localhost ~]# exec bash
[root@centos6 ~]#
2.2.2 centos7
永久修改
使用命令 hostnamectl set-hostname [要设置的主机名]
[root@localhost ~]#hostnamectl set-hostname centos7临时修改
hostname [要临时修改的主机名字]
[root@localhost ~]#hostname centos7立即生效
[root@localhost ~]#exec bash
[root@centos7-5 ~]#
2.3date
date命令查看的时间与真实时间不一致,可以通过同步工具解决
时区修改为上海
timedatectl set-timezone Asia/Shanghai安装ntpdate工具
yum -y install ntp重启,设为开机。nepdata服务
systemctl start ntpdsystemctl enable ntpd修改配置文件
 vim /etc/ntp.conf
      /manycastserver#命令模式下搜索 manycastserver
         server 4.ntp.aliyun.com iburst  #添加此行
        #broadcast 192.168.1.255 autokey        # broadcast server
        #broadcastclient                        # broadcast client
        #broadcast 224.0.1.1 autokey            # multicast server
        #multicastclient 224.0.1.1              # multicast client
        #manycastserver 239.255.254.254         # manycast serve
重启服务
systemctl restart ntpd3.0安全
3.1sudo
般在服务器安装完成之后,建议不管管理员也好,开发人员也好,测试人员也好,都不建议给sudo用户登录,也就是禁止登录。我们会建一个普通用户来登录系统,然后我们有时候会做一些管理员的工作,这时候就关系到授权用户,包括权限提升,类似于sudo操作。
增加sudoers文件的权限
这个文件比较重要,防止其他普通用户通过修改这个文件来登陆root账号
chmod 700 /etc/sudoers编辑文件
vim /etc/sudoers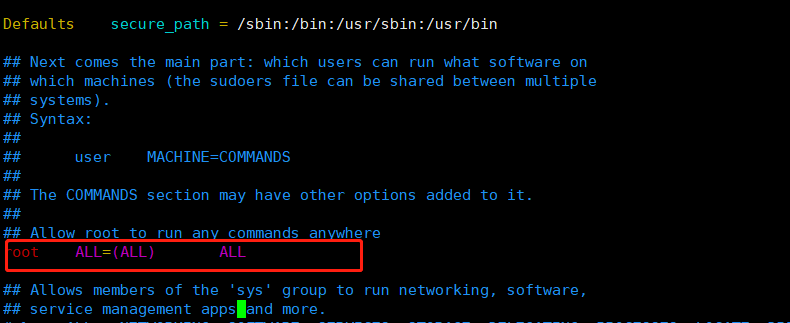
在此行下按照格式填写用户权限
3.2ssh
备份ssh配置文件
cp /etc/ssh/sshd_config sshd_config_bak修改配置文件
vim /etc/ssh/sshd_config#SSH链接默认端口
port=22
#不使用DNS反查,可提高ssh连接速度
UseDNS no(是否使用DNS反查)
#关闭GSSAPI验证,可提高ssh连接速度
GSSAPIAuthentication no(没有太大作用,建议关闭掉)
#禁止root账号登陆
PermitRootLogin no(默认是yes,我们把它改成no就可以)可以提高安全程度4.0repo
4.1tree
把多级目录以文件树的方式展现出来,很好用命令
安装tree
yum install tree -y效果
 [root@centos7 ~]#tree
.
├── anaconda-ks.cfg
├── Desktop
├── Documents
├── Downloads
├── initial-setup-ks.cfg
├── Music
├── Pictures
├── Public
├── Templates
└── Videos

8 directories, 2 files
4.2wget
下载网络文件,默认下载到当前目录
安装 wget
yum -y install wget效果
wget http://cn.wordpress.org/wordpress-4.9.4-zh_CN.tar.gz4.3Development Tools
初学建议安装这个开发包,包含很多开发工具。
以后在使用的时候逐一安装也可以,
查看所有包组
yum grouplist找到开发包组 Development Tools
安装开发包组
yum -y groupinstall 'Development Tools'4.4Network source
配置网络仓库源,系统光盘的工具有很多都是很旧的版本,而且有一些软件都没有
建议配置网络仓库前先把开发包组安装,网络下载很慢
epel源: https://fedoraproject.org/wiki/EPEL点开一直往下拉,就能找到需要的yum源,有5的版本到7的版本
优点:软件更新非常快。东西非常的多,都非常的新
特点:更新非常慢
进入yum仓库
cd /etc/yum.repos.d/建立一个 bak 文件夹
nkdir bak把所有以.repo结尾的文本移动到此文件
mv *.repo bak添加一个文本 epel.repo
touch epel.repo编辑文本
vim epel.repo添加内容
[epel]
name=Extra Packages for Enterprise Linux 7 - $basearch
baseurl=http://mirrors.aliyun.com/epel/7/$basearch
failovermethod=priority
enabled=1
gpgcheck=0
gpgkey=file:///etc/pki/rpm-gpg/RPM-GPG-KEY-EPEL-7

[epel-debuginfo]
name=Extra Packages for Enterprise Linux 7 - $basearch - Debug
baseurl=http://mirrors.aliyun.com/epel/7/$basearch/debug
failovermethod=priority
enabled=0
gpgkey=file:///etc/pki/rpm-gpg/RPM-GPG-KEY-EPEL-7
gpgcheck=0

[epel-source]
name=Extra Packages for Enterprise Linux 7 - $basearch - Source
baseurl=http://mirrors.aliyun.com/epel/7/SRPMS
failovermethod=priority
enabled=0
gpgkey=file:///etc/pki/rpm-gpg/RPM-GPG-KEY-EPEL-7
gpgcheck=0
保存退出
查看仓库是否建立
yum repolist出现以下内容表示建立成功
Loaded plugins: fastestmirror, langpacks
Loading mirror speeds from cached hostfile
repo id                                   repo name                              status
repo                                      epel                                   13,740
repolist: 13,740
清除缓存
yum clean all构建缓存
yum makecache


 被折叠的 条评论
为什么被折叠?
被折叠的 条评论
为什么被折叠?
 到【灌水乐园】发言


