


 本文档详述了如何使用Android Studio创建一个简单的微信聊天界面。通过布局设计,包括顶部(top)和底部(bottom)两个部分,实现了类似微信的导航栏。在顶部设置了文字和图片,底部则包含了消息、联系人、朋友圈和我的四个选项卡。通过Fragment实现界面切换,为每个LinearLayout设置点击监听,实现在点击时展示相应的Fragment内容。代码中展示了如何初始化Fragment并处理点击事件,完成界面的动态展示。
移动开发技术作业一:android studio开发微信界面
**功能说明:**主要是做微信的简单的聊天界面,利用Fragment,进行微信界面的跳转。
(一)界面的设计
在界面的设计中主要包括两个部分:top和botton。以下是两个部分的code和design。
1.top部分
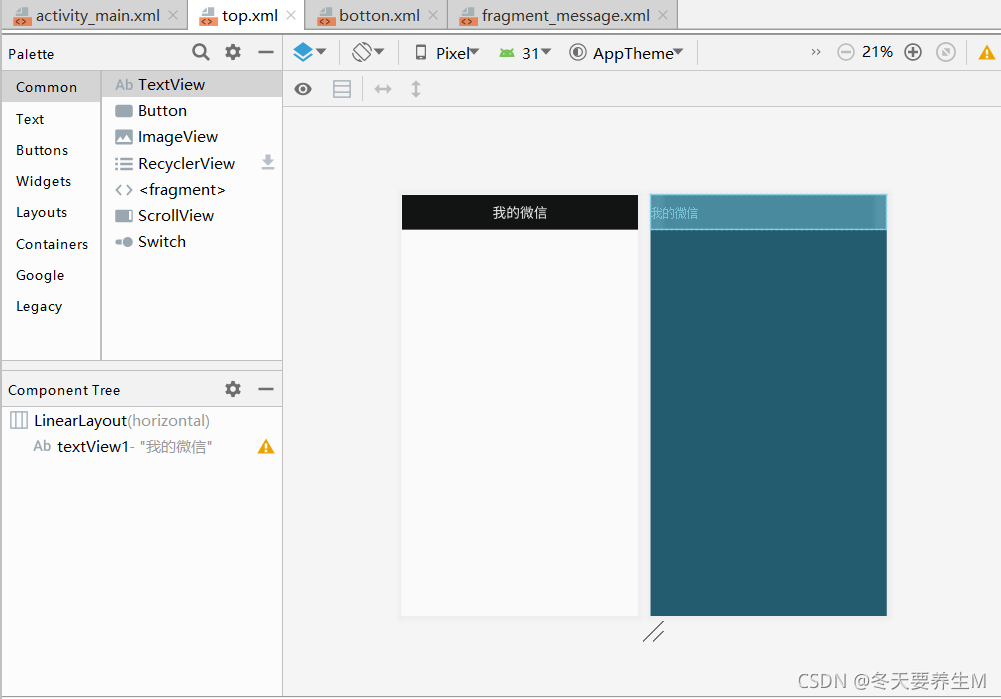
<TextView
        android:id="@+id/textView1"
        android:layout_width="wrap_content"
        android:layout_height="match_parent"
        android:layout_weight="1"
        android:gravity="center"
        android:text="我的微信"
        android:textColor="#F1F3F3"
        android:textSize="24sp" />
2.botton部分
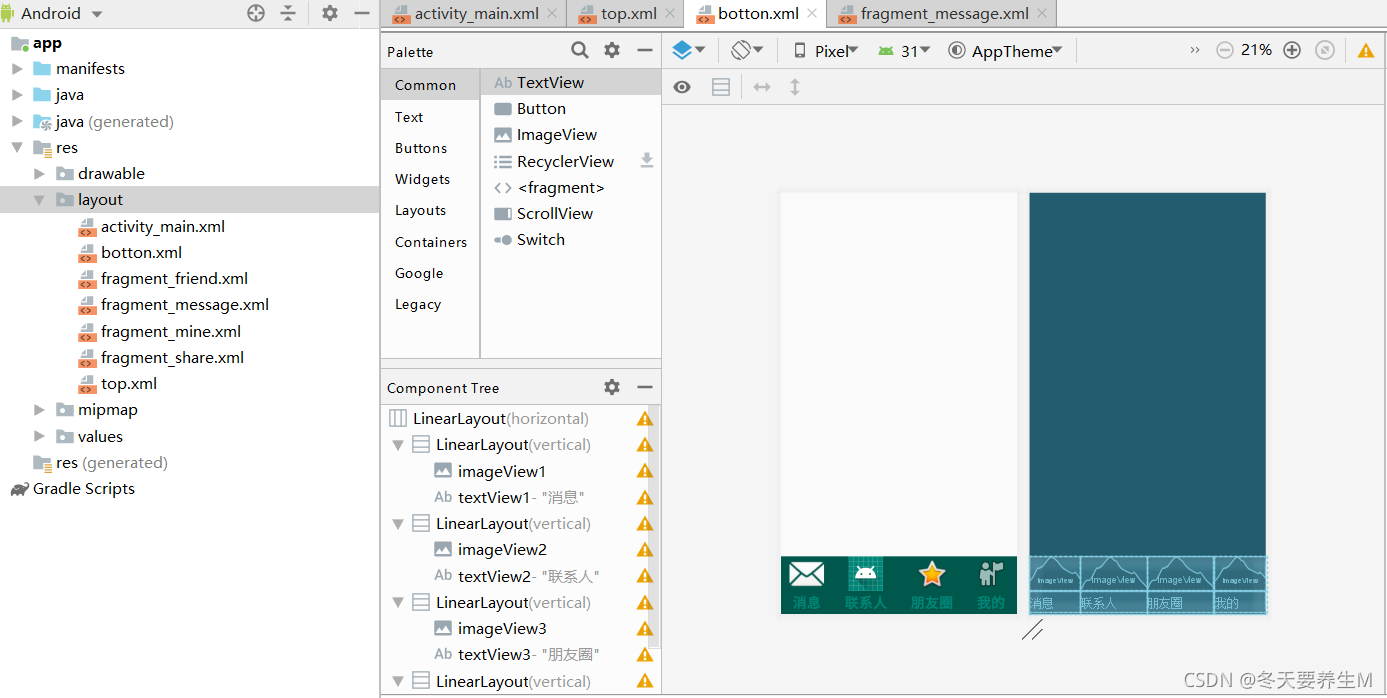
 <LinearLayout
        android:layout_width="wrap_content"
        android:layout_height="match_parent"
        android:layout_weight="1"
        android:orientation="vertical">

        <ImageView
            android:id="@+id/imageView1"
            android:layout_width="match_parent"
            android:layout_height="60dp"
            app:srcCompat="@android:drawable/ic_dialog_email"
            />

        <TextView
            android:id="@+id/textView1"
            android:layout_width="match_parent"
            android:layout_height="40dp"
            android:text="消息"
            android:textSize="24dp"
            android:textColor="@color/colorPrimary"
            android:gravity="center"
            android:textStyle="bold"/>
    </LinearLayout>

    <LinearLayout
        android:layout_width="wrap_content"
        android:layout_height="match_parent"
        android:layout_weight="1"
        android:orientation="vertical">

        <ImageView
            android:id="@+id/imageView2"
            android:layout_width="match_parent"
            android:layout_height="60dp"
            app:srcCompat="@android:drawable/ic_dialog_email"
            tools:srcCompat="@mipmap/ic_launcher" />

        <TextView
            android:id="@+id/textView2"
            android:layout_width="match_parent"

            android:layout_height="40dp"
            android:text="联系人"
            android:textSize="24dp"
            android:textColor="@color/colorPrimary"
            android:gravity="center"
            android:textStyle="bold"/>
    </LinearLayout>

    <LinearLayout
        android:layout_width="wrap_content"
        android:layout_height="match_parent"
        android:layout_weight="1"
        android:orientation="vertical">

        <ImageView
            android:id="@+id/imageView3"
            android:layout_width="match_parent"
            android:layout_height="60dp"
            app:srcCompat="@android:drawable/ic_dialog_email"
            tools:srcCompat="@android:drawablen_star_big_on" />

        <TextView
            android:id="@+id/textView3"
            android:layout_width="match_parent"
            android:layout_height="40dp"
            android:text="朋友圈"
            android:textSize="24dp"
            android:textColor="@color/colorPrimary"
            android:gravity="center"
            android:textStyle="bold" />
    </LinearLayout>

    <LinearLayout
        android:layout_width="wrap_content"
        android:layout_height="match_parent"
        android:layout_weight="1"
        android:orientation="vertical">

        <ImageView
            android:id="@+id/imageView4"
            android:layout_width="match_parent"
            android:layout_height="60dp"
            app:srcCompat="@android:drawable/ic_dialog_email"
            tools:srcCompat="@android:drawable/ic_menu_myplaces" />

        <TextView
            android:id="@+id/textView4"
            android:layout_width="match_parent"
            android:layout_height="40dp"
            android:text="我的"
            android:textSize="24dp"
            android:textColor="@color/colorPrimary"
            android:gravity="center"
            android:textStyle="bold" />
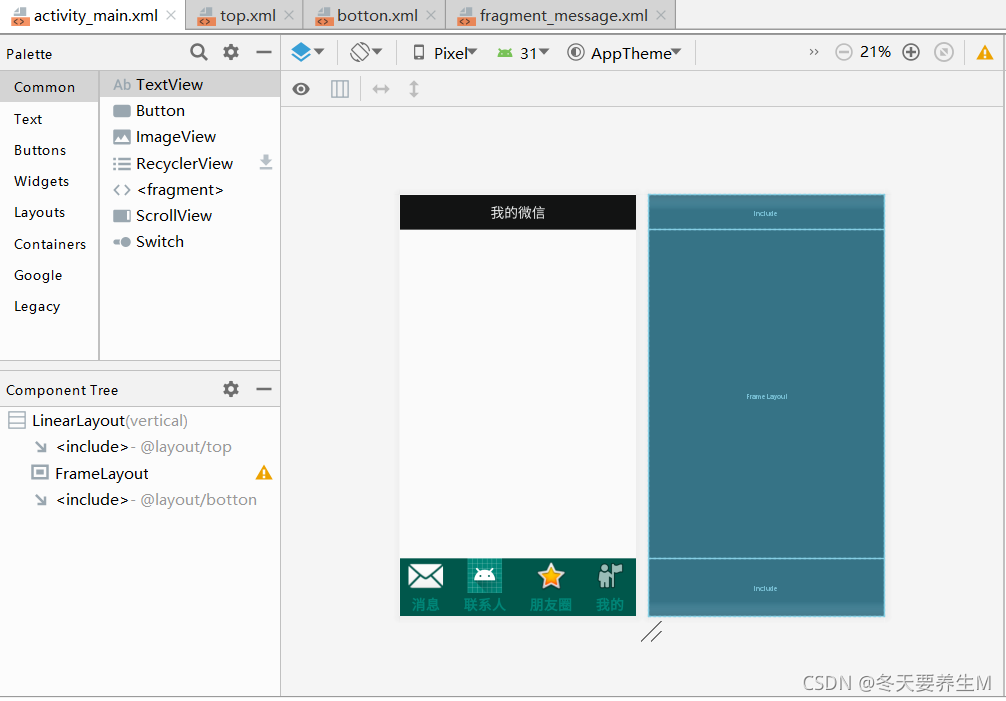
在完成这两个部分的操作后就要到main里面写code了。首先要把top和botton这两个部分都搬进来,然后还有一个重要的部分,这两个部分的中间是隔开的,所以需要一个代码来处理。(如果没有这一代码这两个部分就是连起来的,同学告诉我的这段代码,嘿嘿嘿)
<include
        layout="@layout/top">

    </include>
    <FrameLayout
        android:layout_width="match_parent"
        android:layout_height="0dp"
        android:layout_weight="1"></FrameLayout>
    <include
        layout="@layout/botton">
这样你就会得到一个较为完美的界面:
(二)使用布局(layouts)和分段(fragment),对控件进行点击监听
最后,也是我认为这次实验最难的一部分,我们需要在main里面进行编程对控件进行点击监听。代码如下:
package com.example.wechat;

import android.graphics.Color;
import android.os.Bundle;
import android.view.View;
import android.view.Window;
import android.widget.ImageButton;
import android.widget.ImageView;
import android.widget.LinearLayout;
import android.widget.NumberPicker;
import android.widget.TextView;

import androidx.appcompat.app.AppCompatActivity;
import androidx.fragment.app.Fragment;
import androidx.fragment.app.FragmentManager;
import androidx.fragment.app.FragmentTransaction;

public class MainActivity extends AppCompatActivity  {
    private Fragment wexinFragment=new wexinFragment();
    private Fragment myFragment=new myFragment();
    private Fragment worldFragment=new worldFragment();
    private Fragment friendFragment=new friendFragment();
    private FragmentManager fm;
    private LinearLayout linearLayout1,linearLayout2,linearLayout3,linearLayout4;
    private TextView textView1,textView2,textView3,textView4;

    @Override
    protected void onCreate(Bundle savedInstanceState) {
        super.onCreate(savedInstanceState);
        supportRequestWindowFeature(Window.FEATURE_NO_TITLE);
        setContentView(R.layout.activity_main);
        linearLayout1 = findViewById(R.id.LinearLayout_wexin);
        linearLayout2 = findViewById(R.id.LinearLayout_friend);
        linearLayout3 = findViewById(R.id.LinearLayout_world);
        linearLayout4 = findViewById(R.id.LinearLayout_my);
        linearLayout1.setOnClickListener(this::onClick);
        linearLayout2.setOnClickListener(this::onClick);
        linearLayout3.setOnClickListener(this::onClick);
        linearLayout4.setOnClickListener(this::onClick);
        initFragment();
        showfragment(0);

    }
    private void initFragment(){
        fm=getSupportFragmentManager();
        FragmentTransaction transaction=fm.beginTransaction();
        transaction.add(R.id.container,myFragment);
        transaction.add(R.id.container,wexinFragment);
        transaction.add(R.id.container,worldFragment);
        transaction.add(R.id.container,friendFragment);
        transaction.commit();
    }
    private void hideFragment(FragmentTransaction transaction){
        transaction.hide(wexinFragment);
        transaction.hide(friendFragment);
        transaction.hide(myFragment);
        transaction.hide(worldFragment);
    }
    public void onClick(View v){
        switch (v.getId()){
            case R.id.LinearLayout_wexin:
                showfragment(0);
                break;
            case R.id.LinearLayout_friend:
                showfragment(1);

                break;
            case R.id.LinearLayout_world:
                showfragment(2);

                break;
            case R.id.LinearLayout_my:
                showfragment(3);

                break;
        }
    }
    private void showfragment(int i){//加图标颜色切换
        FragmentTransaction transaction= fm.beginTransaction();
        hideFragment(transaction);

        switch (i){
            case 0:
                transaction.show(wexinFragment);
                break;
            case 1:
                transaction.show(friendFragment);
                break;
            case 2:
                transaction.show(worldFragment);
                break;
            case 3:
                transaction.show(myFragment);
                break;
            default:
                break;
        }
        transaction.commit();
    }
}


 被折叠的 条评论
为什么被折叠?
被折叠的 条评论
为什么被折叠?
 到【灌水乐园】发言


