


8.Product商品服务
1.查询--递归树形结构数据获取
@RequestMapping("/list/tree")
public R list(@RequestParam Map<String, Object> params){
    List<CategoryEntity> categoryEntityList =categoryService.listWithTree();
    return R.ok().put("data", categoryEntityList);
}
package com.atguigu.gulimall.product.service.impl;

import com.atguigu.gulimall.product.dao.CategoryDao;
import com.atguigu.gulimall.product.entity.CategoryEntity;
import com.atguigu.gulimall.product.service.CategoryService;
import org.springframework.stereotype.Service;

import java.util.List;
import java.util.Map;
import java.util.stream.Collectors;
import java.util.stream.Stream;

import com.baomidou.mybatisplus.core.conditions.query.QueryWrapper;
import com.baomidou.mybatisplus.core.metadata.IPage;
import com.baomidou.mybatisplus.extension.service.impl.ServiceImpl;
import com.atguigu.common.utils.PageUtils;
import com.atguigu.common.utils.Query;


@Service("categoryService")
public class CategoryServiceImpl extends ServiceImpl<CategoryDao, CategoryEntity> implements CategoryService {

    @Override
    public PageUtils queryPage(Map<String, Object> params) {
        IPage<CategoryEntity> page = this.page(
                new Query<CategoryEntity>().getPage(params),
                new QueryWrapper<CategoryEntity>()
        );

        return new PageUtils(page);
    }

    @Override
    public List<CategoryEntity> listWithTree() {
        // 1.获取全部分类数据
        List<CategoryEntity> categoryEntities = baseMapper.selectList(null);

        // 2.转换成树形数据返回
        // 2.1获取一级分类,找到ategoryEntity.getParentCid() == 0 父Id为0的返回列表
        List<CategoryEntity> level1Menus = categoryEntities.stream().filter(
                categoryEntity -> categoryEntity.getParentCid() == 0).map((menu)->{
                    // 递归,将当前分类和总分类传入getChildren方法
            menu.setChildren(getChildren(menu, categoryEntities));
            return menu;
        }).collect(Collectors.toList());

        return level1Menus;
    }

    /**
     * 递归,获取孩子节点
     */
    private List<CategoryEntity> getChildren(CategoryEntity root, List<CategoryEntity> all) {
        // root表示当前节点 all表示总分类
        List<CategoryEntity> children = all.stream().filter(categoryEntity -> {
            // 找到当前节点的子节点
            // 如果递归节点的父节点为当前节点的分类节点
            // 说明构成父子节点
            return categoryEntity.getParentCid() == root.getCatId();
        }).map(categoryEntity -> {
            // 继续给该节点设置孩子节点
            categoryEntity.setChildren(getChildren(categoryEntity, all));
            // 返回当前节点
            return categoryEntity;
            // 递归结束条件
        }).collect(Collectors.toList());

        return children;
    }

}
2.配置网关路由与路径重写
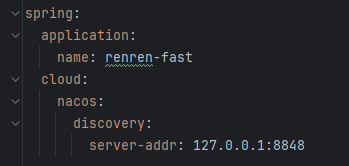
将 renren-fast注册为注册中心,同时添加依赖
引入负载均衡
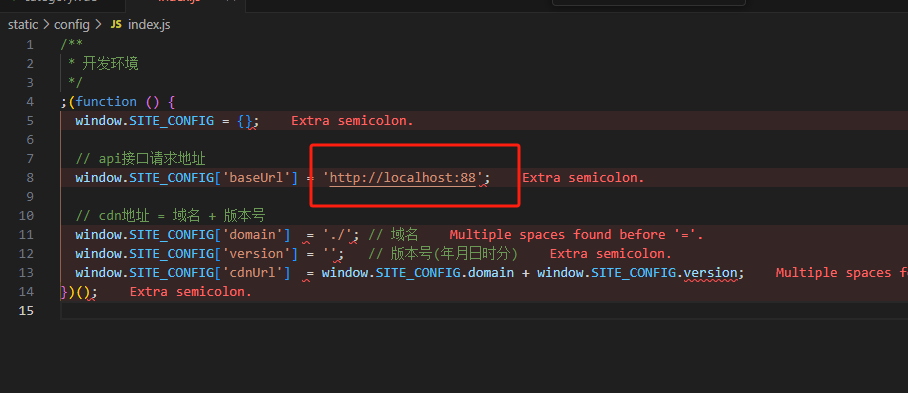
前端直接给网关localhost:88发送请求
为网关配置负载均衡
# lb表示负载均衡 前端访问api会通过网关负载均衡到renren-fast后端服务,同时通过路径重写
# 将/api/product/category/list/tree重写为/renren-fast/product/category/list/tree
# 规则:/(?<segment>.*)代替/renren-fast/$\{segment},同时删掉/api


  ## 前端项目,/api
## http://localhost:88/api/captcha.jpg   http://localhost:8080/renren-fast/captcha.jpg
## http://localhost:88/api/product/category/list/tree http://localhost:10000/product/category/list/tree
- id: admin_route
uri: lb://renren-fast
predicates:
- Path=/api/**
filters:
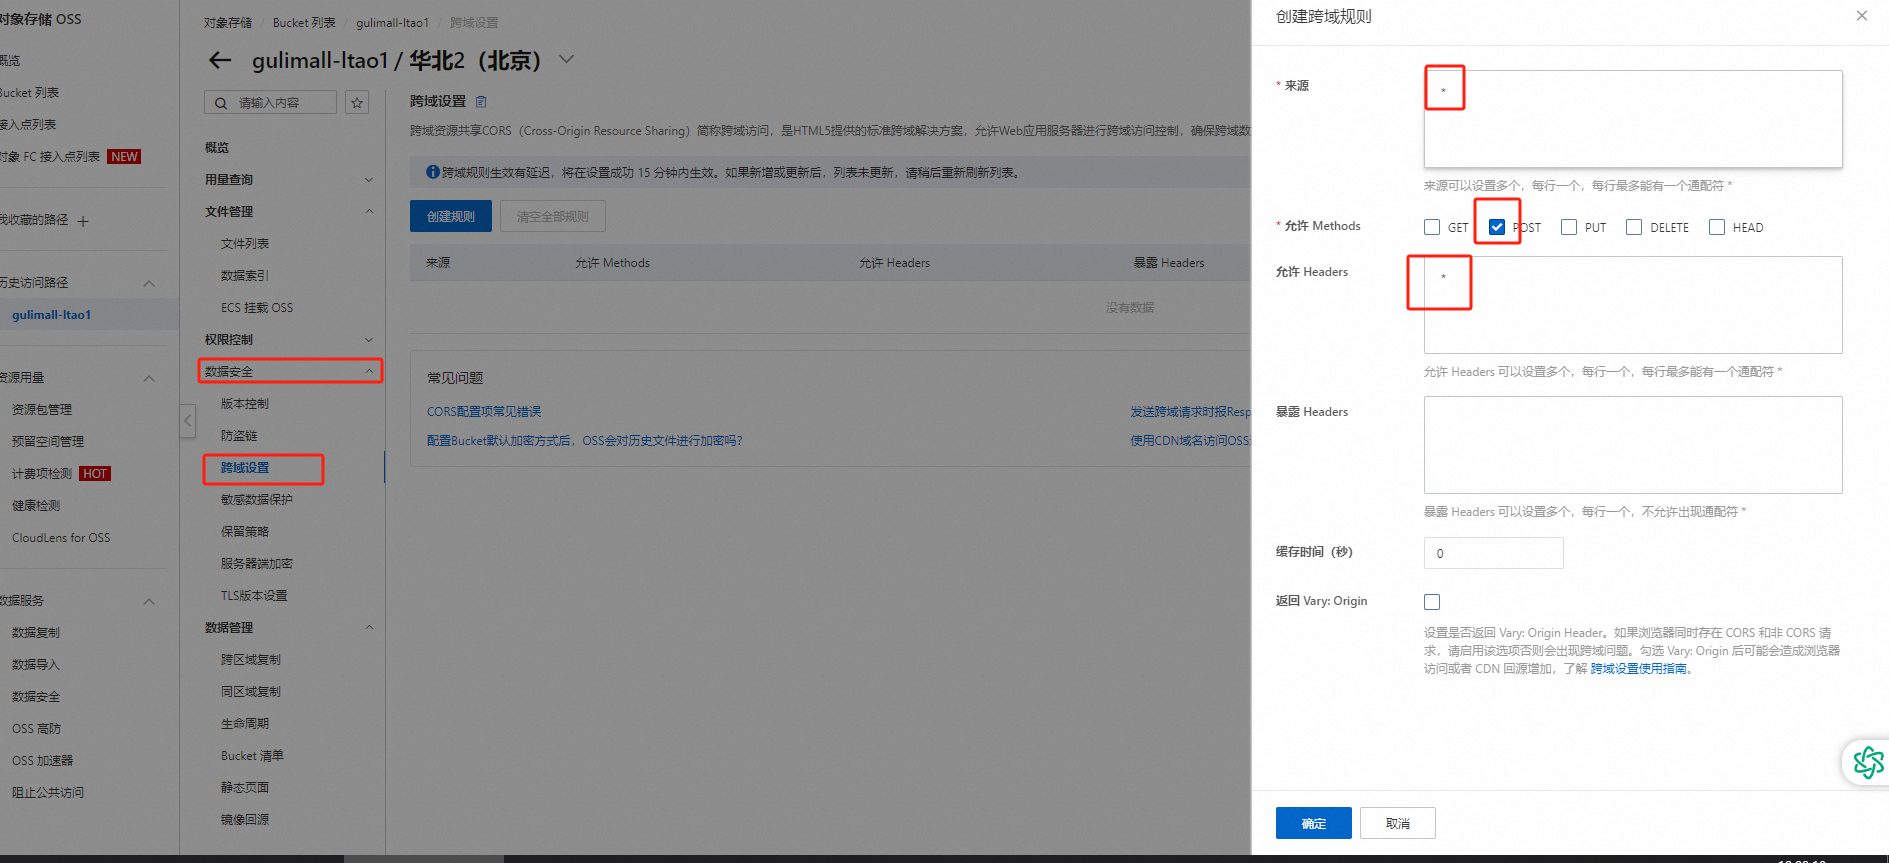
- RewritePath=/api/(?<segment>.*),/renren-fast/$\{segment}3.网关统一配置跨域
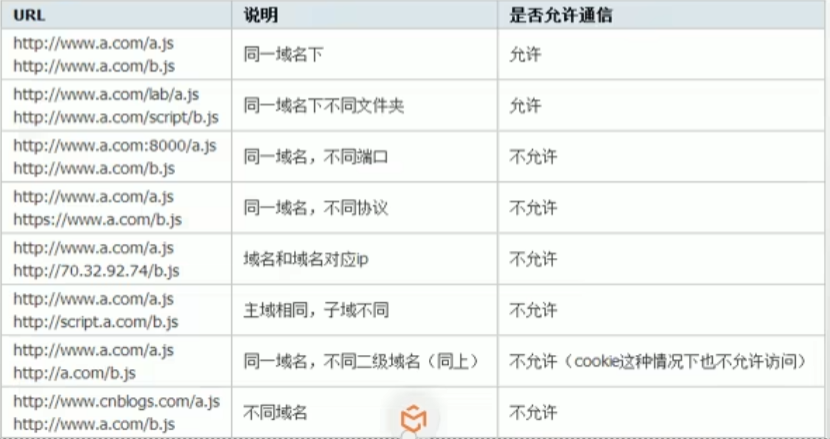
跨域:指的是浏览器不能执行其他网站的脚本。它是由浏览器的同源策略造成的,是浏览器对javascript施加的安全限制。
同源策略:是指协议,域名,端口都要相同,其中有一个不同都会产生跨域。
跨域流程
https://developer.mozilla.org/zh-CN/docs/Web/HTTP/CORS
简单请求
- GET
- HEAD
- POST
- Content-Type 标头所指定的媒体类型的值仅限于下列三者之一:
-
text/plainmultipart/form-dataapplication/x-www-form-urlencoded
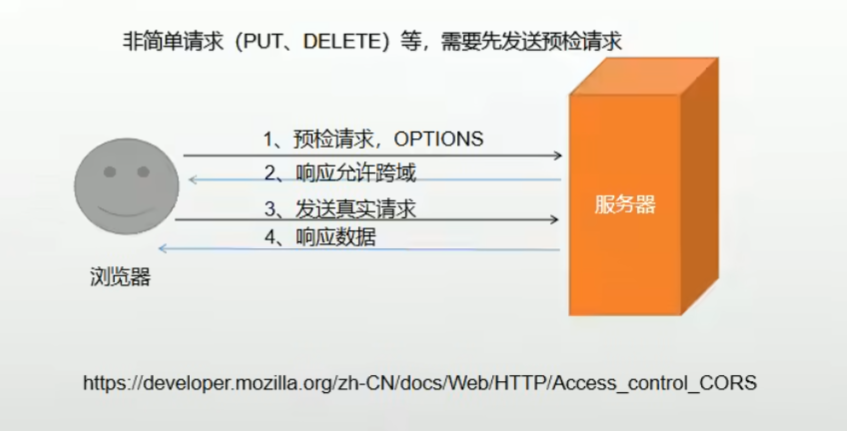
预检请求
与简单请求不同,“需预检的请求”要求必须首先使用 OPTIONS 方法发起一个预检请求到服务器,以获知服务器是否允许该实际请求。"预检请求“的使用,可以避免跨域请求对服务器的用户数据产生未预期的影响。
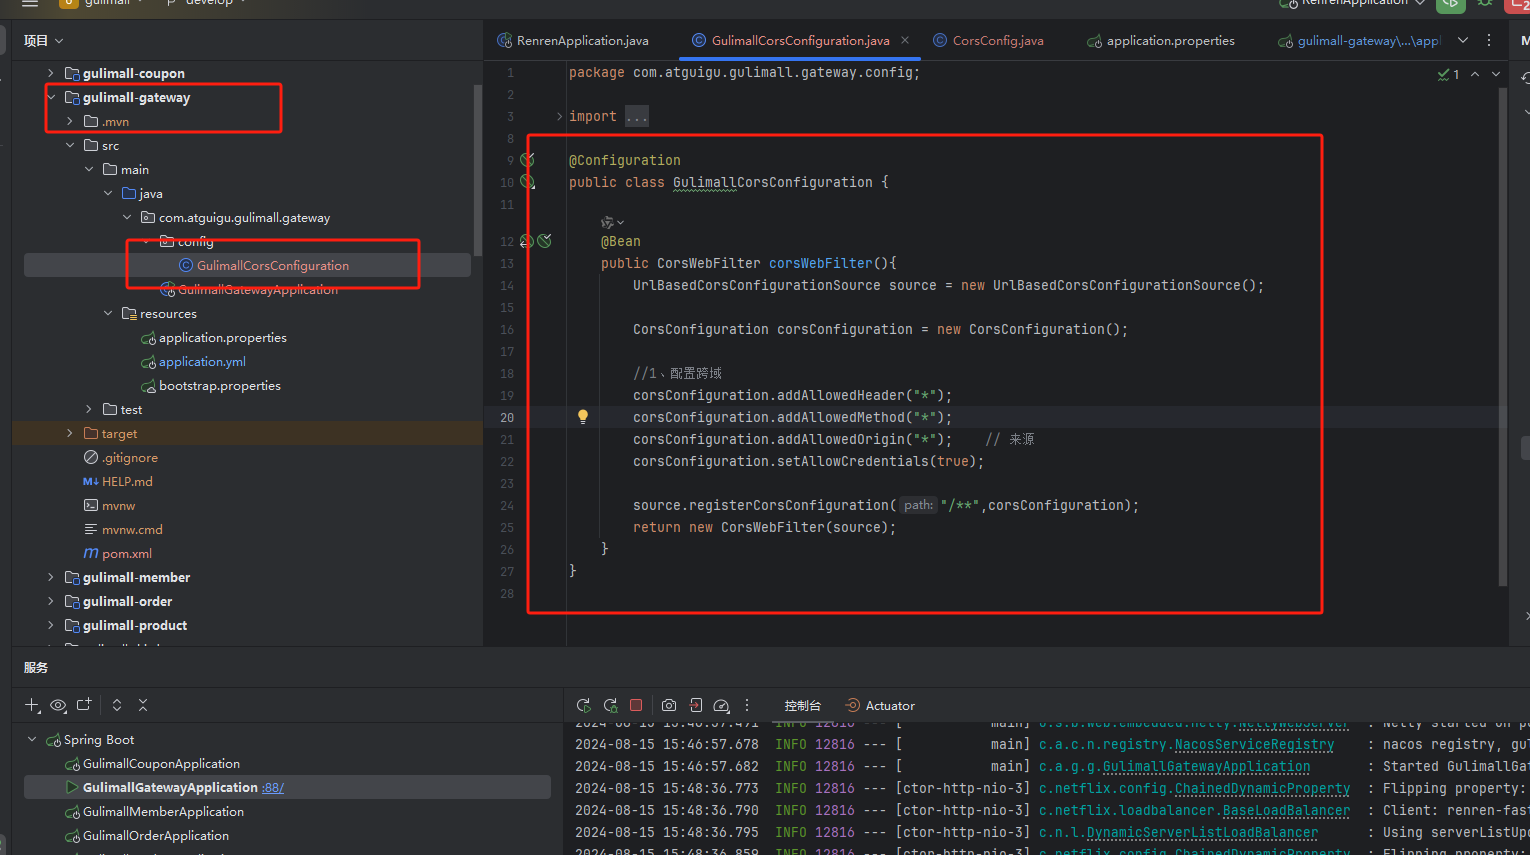
解决跨域
网关设置跨域,renren-fast 注销跨域,否则出现冲突
package com.atguigu.gulimall.gateway.config;

import org.springframework.context.annotation.Bean;
import org.springframework.context.annotation.Configuration;
import org.springframework.web.cors.CorsConfiguration;
import org.springframework.web.cors.reactive.CorsWebFilter;
import org.springframework.web.cors.reactive.UrlBasedCorsConfigurationSource;

@Configuration
public class GulimallCorsConfiguration {

    @Bean
    public CorsWebFilter corsWebFilter(){
        UrlBasedCorsConfigurationSource source = new UrlBasedCorsConfigurationSource();

        CorsConfiguration corsConfiguration = new CorsConfiguration();

        //1、配置跨域
        corsConfiguration.addAllowedHeader("*");
        corsConfiguration.addAllowedMethod("*");
        corsConfiguration.addAllowedOrigin("*");    // 来源
        corsConfiguration.setAllowCredentials(true);

        source.registerCorsConfiguration("/**",corsConfiguration);
        return new CorsWebFilter(source);
    }
}
将product单独写负载均衡规则,同时注册为注册中心和配置中心中心
 注意路由规则优先级


        - id: product_route
          uri: lb://gulimall-product
          predicates:
            - Path=/api/product/**
          filters:
            - RewritePath=/api/(?<segment>.*),/$\{segment}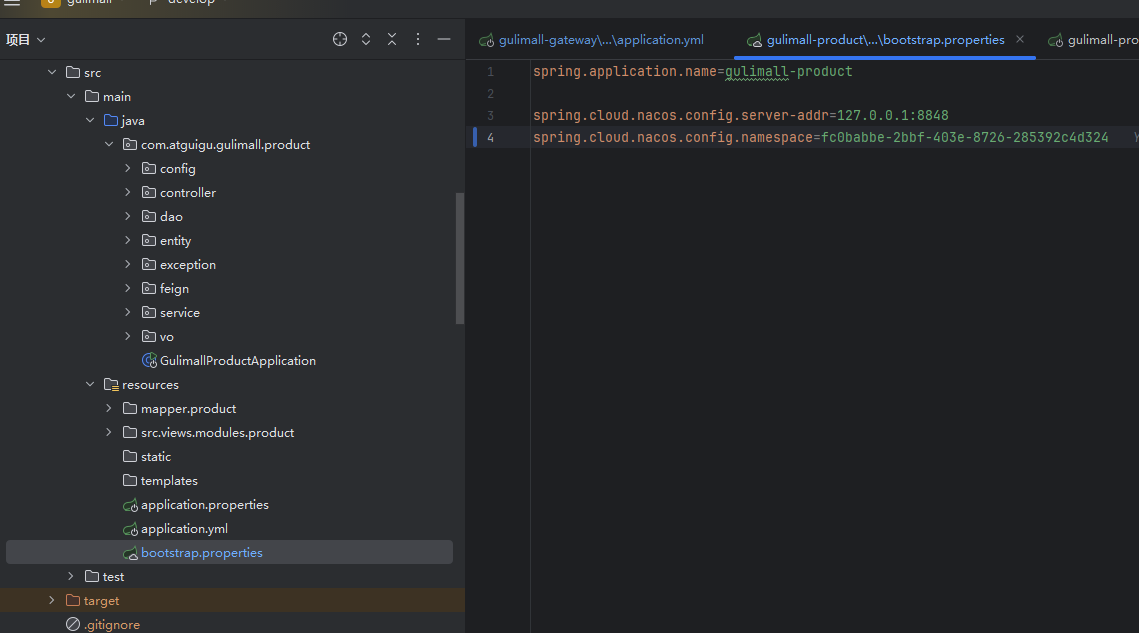
http://localhost:88/api/product/category/list/tree 转到 http://localhost:10001/product/category/list/tree
4.三级分类
@RequestBody:代表请求体,需要发送Post请求,Json对象。
编辑删除逻辑
通过product数据库字段 show_status
4.1配置全局的逻辑删除规则
mybatis-plus:
  mapper-locations: classpath:/mapper/**/*.xml
  global-config:
    db-config:
      id-type: auto
      logic-delete-value: 1         		#删除
      logic-not-delete-value: 0					#不删除
4.2给Bean加上逻辑删除注解@TableLogic
	/**
	 * 是否显示[0-不显示,1显示]
	 */

@TableLogic(value = "1",delval = "0")
private Integer showStatus;
4.3删除执行的代码(将show_status设置为0)

拖拽功能(待实现)
//TODO
求树的最大深度
5.品牌管理
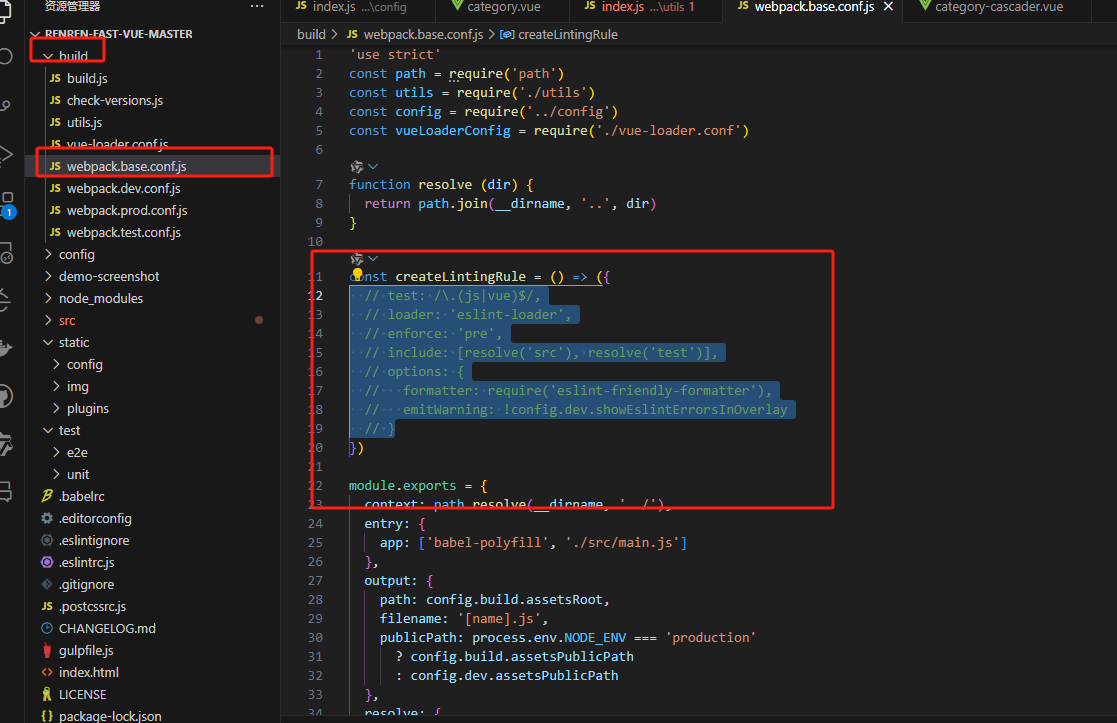
关闭ESlint
文件存储(aliyun存储)OSS
从单体项目和分布式项目同时考虑
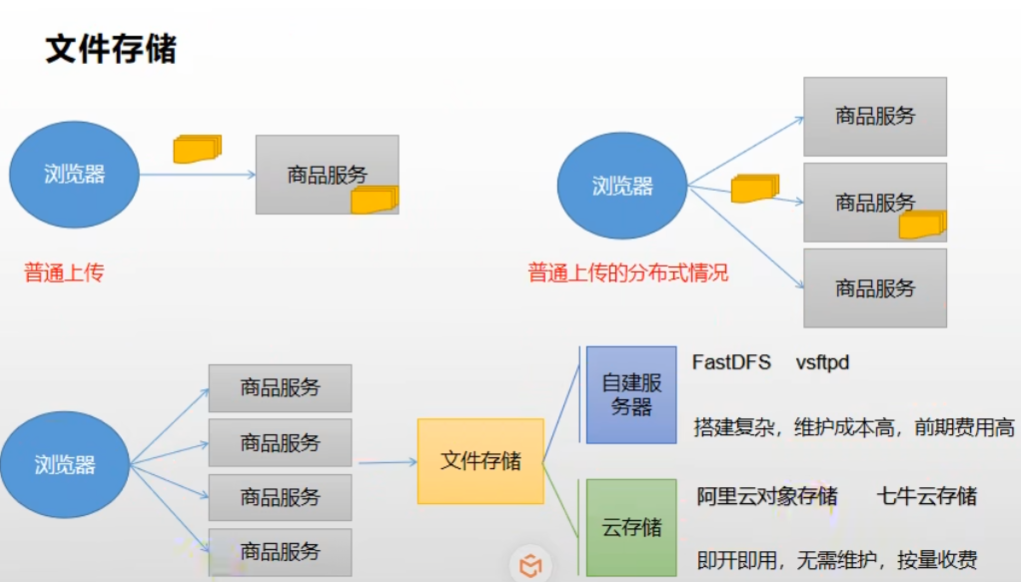
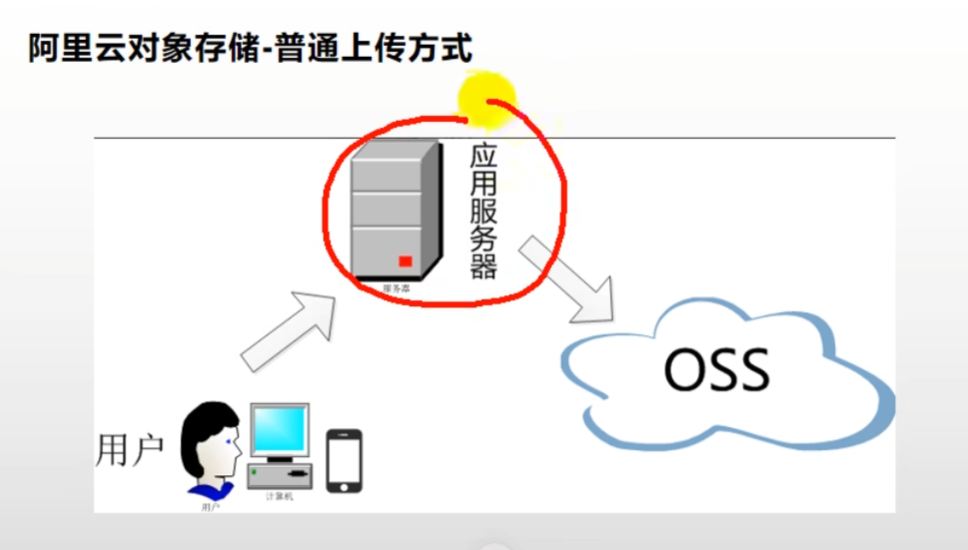
推荐方法:服务器找OSS要签名,签名传给服务器,服务器打包给客户端,客户端传给OSS,OSS进行签名解析

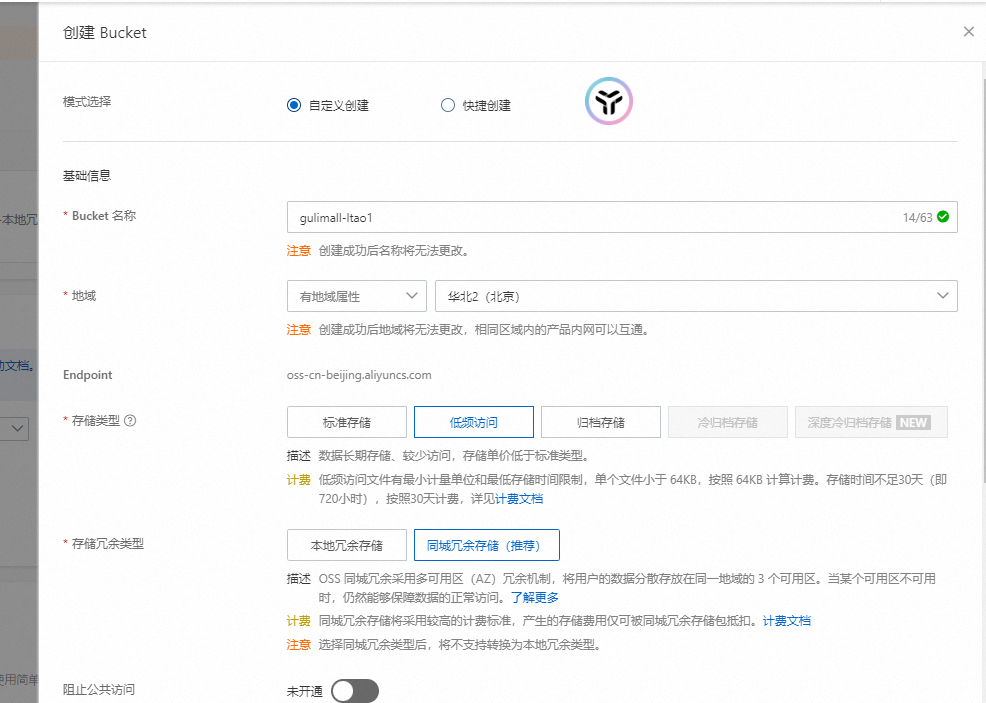
创建bucket
配置跨域
导入依赖
<!--        <dependency>-->
<!--            <groupId>com.aliyun.oss</groupId>-->
<!--            <artifactId>aliyun-sdk-oss</artifactId>-->
<!--            <version>3.5.0</version>-->
<!--        </dependency>-->
AccessKey ID:LTAIxxxxx

AccessKey Secret:Yilxxxxxxxx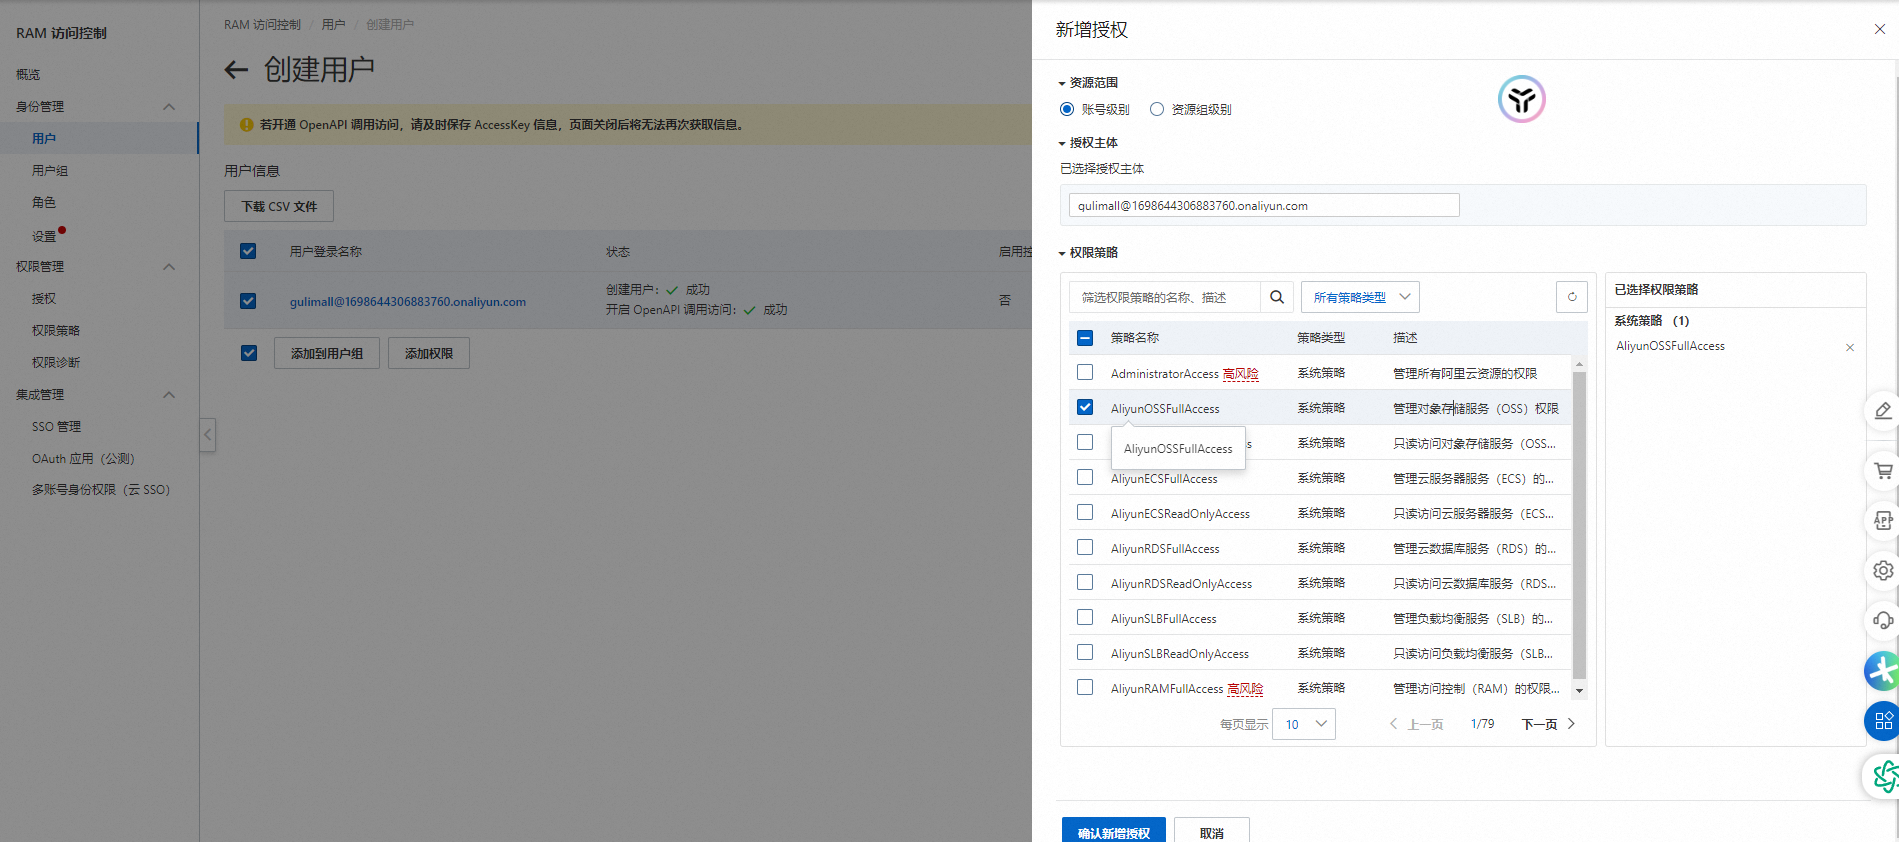
直接在gulimall-common导入springCloudAlibaba的oss
        <dependency>
            <groupId>com.alibaba.cloud</groupId>
            <artifactId>spring-cloud-starter-alicloud-oss</artifactId>
        </dependency>
整合gulimall-third-party第三方服务
pom
<?xml version="1.0" encoding="UTF-8"?>
<project xmlns="http://maven.apache.org/POM/4.0.0" xmlns:xsi="http://www.w3.org/2001/XMLSchema-instance"
         xsi:schemaLocation="http://maven.apache.org/POM/4.0.0 https://maven.apache.org/xsd/maven-4.0.0.xsd">
    <modelVersion>4.0.0</modelVersion>
    <parent>
        <groupId>org.springframework.boot</groupId>
        <artifactId>spring-boot-starter-parent</artifactId>
        <version>2.2.1.RELEASE</version>
        <relativePath/> <!-- lookup parent from repository -->
    </parent>
    <groupId>com.atguigu.gulimall</groupId>
    <artifactId>gulimall-third-party</artifactId>
    <version>0.0.1-SNAPSHOT</version>
    <name>gulimall-third-party</name>
    <description>第三方服务</description>

    <properties>
        <java.version>1.8</java.version>
        <spring-cloud.version>Hoxton.RC1</spring-cloud.version>
    </properties>

    <dependencies>
        <dependency>
            <groupId>com.atguigu.gulimall</groupId>
            <artifactId>gulimall-common</artifactId>
            <version>0.0.1-SNAPSHOT</version>
            <exclusions>
                <exclusion>
                    <groupId>com.baomidou</groupId>
                    <artifactId>mybatis-plus-boot-starter</artifactId>
                </exclusion>
            </exclusions>
        </dependency>
        <dependency>
            <groupId>org.springframework.boot</groupId>
            <artifactId>spring-boot-starter-web</artifactId>
        </dependency>
        <dependency>
            <groupId>org.springframework.cloud</groupId>
            <artifactId>spring-cloud-starter-openfeign</artifactId>
        </dependency>
        <dependency>
            <groupId>com.alibaba.cloud</groupId>
            <artifactId>spring-cloud-starter-alicloud-oss</artifactId>
        </dependency>

        <dependency>
            <groupId>org.springframework.boot</groupId>
            <artifactId>spring-boot-starter-test</artifactId>
            <scope>test</scope>
            <exclusions>
                <exclusion>
                    <groupId>org.junit.vintage</groupId>
                    <artifactId>junit-vintage-engine</artifactId>
                </exclusion>
            </exclusions>
        </dependency>
    </dependencies>

    <dependencyManagement>
        <dependencies>
            <dependency>
                <groupId>org.springframework.cloud</groupId>
                <artifactId>spring-cloud-dependencies</artifactId>
                <version>${spring-cloud.version}</version>
                <type>pom</type>
                <scope>import</scope>
            </dependency>
                <dependency>
                    <groupId>com.alibaba.cloud</groupId>
                    <artifactId>spring-cloud-alibaba-dependencies</artifactId>
                    <version>2.1.0.RELEASE</version>
                    <type>pom</type>
                    <scope>import</scope>
                </dependency>
        </dependencies>
    </dependencyManagement>

    <build>
        <plugins>
            <plugin>
                <groupId>org.springframework.boot</groupId>
                <artifactId>spring-boot-maven-plugin</artifactId>
            </plugin>
        </plugins>
    </build>

    <repositories>
        <repository>
            <id>spring-milestones</id>
            <name>Spring Milestones</name>
            <url>https://repo.spring.io/milestone</url>
        </repository>
    </repositories>

</project>
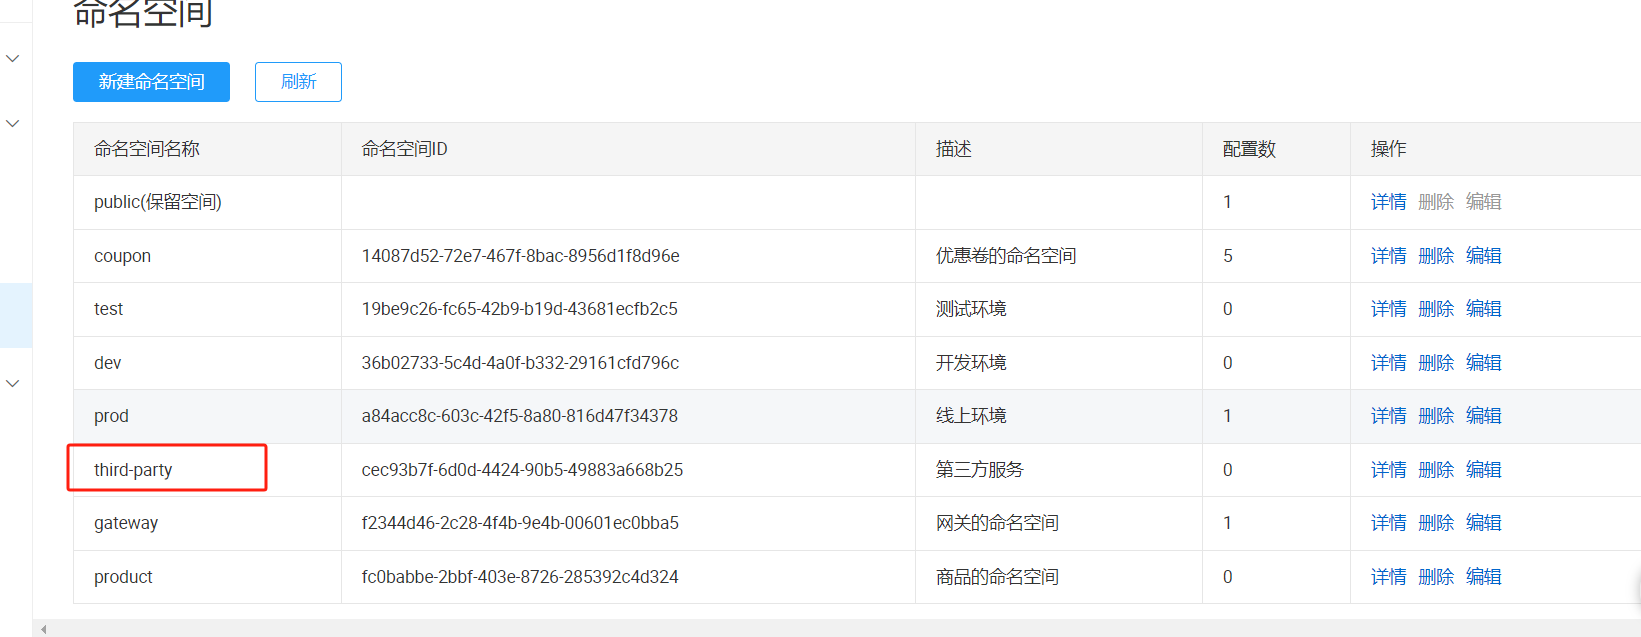
创建命名空间
spring:
    cloud:
        alicloud:
            access-key: LTAI5xxxxtMCxxxxx
            secret-key: Yilkxxxxxx
            oss:
                endpoint: oss-cn-beijing.aliyuncs.com
                bucket: gulimall-ltao1
注册中心
spring:
  cloud:
    nacos:
      # 注册中心
      discovery:
        server-addr: 127.0.0.1:8848
    alicloud:
      access-key: LTxxxxxx
      secret-key: Yilxxxxxxx
      oss:
        endpoint: oss-cn-beijing.aliyuncs.com
        bucket: gulimall-ltao1

  application:
    name: gulimall-third-party

server:
  port: 30000
配置中心
# 配置中心
spring.application.name=gulimall-third-party
spring.cloud.nacos.config.server-addr=127.0.0.1:8848
spring.cloud.nacos.config.namespace=cec93b7f-6d0d-4424-90b5-49883a668b25


spring.cloud.nacos.config.ext-config[0].data-id=oss.yml
spring.cloud.nacos.config.ext-config[0].group=DEFAULT_GROUP
spring.cloud.nacos.config.ext-config[0].refresh=true
ossController
package com.atguigu.gulimall.thirdparty.controller;

import com.aliyun.oss.OSS;
import com.aliyun.oss.common.utils.BinaryUtil;
import com.aliyun.oss.model.MatchMode;
import com.aliyun.oss.model.PolicyConditions;
import com.atguigu.common.utils.R;
import org.springframework.beans.factory.annotation.Autowired;
import org.springframework.beans.factory.annotation.Value;
import org.springframework.web.bind.annotation.RequestMapping;
import org.springframework.web.bind.annotation.RestController;

import java.text.SimpleDateFormat;
import java.util.Date;
import java.util.LinkedHashMap;
import java.util.Map;

@RestController
public class OssController {

    @Autowired
    OSS ossClient;

    @Value("${spring.cloud.alicloud.oss.endpoint}")
    private String endpoint;
    @Value("${spring.cloud.alicloud.oss.bucket}")
    private String bucket;

    @Value("${spring.cloud.alicloud.access-key}")
    private String accessId;


    // 签名
    @RequestMapping("/oss/policy")
    public R policy() {


        //https://gulimall-hello.oss-cn-beijing.aliyuncs.com/hahaha.jpg

        String host = "https://" + bucket + "." + endpoint; // host的格式为 bucketname.endpoint
        // callbackUrl为 上传回调服务器的URL,请将下面的IP和Port配置为您自己的真实信息。
//        String callbackUrl = "http://88.88.88.88:8888";
        // 以日期分割
        String format = new SimpleDateFormat("yyyy-MM-dd").format(new Date());
        String dir = format + "/"; // 用户上传文件时指定的前缀。

        Map<String, String> respMap = null;
        try {
            long expireTime = 30;
            long expireEndTime = System.currentTimeMillis() + expireTime * 1000;
            Date expiration = new Date(expireEndTime);
            PolicyConditions policyConds = new PolicyConditions();
            policyConds.addConditionItem(PolicyConditions.COND_CONTENT_LENGTH_RANGE, 0, 1048576000);
            policyConds.addConditionItem(MatchMode.StartWith, PolicyConditions.COND_KEY, dir);

            String postPolicy = ossClient.generatePostPolicy(expiration, policyConds);
            byte[] binaryData = postPolicy.getBytes("utf-8");
            String encodedPolicy = BinaryUtil.toBase64String(binaryData);
            String postSignature = ossClient.calculatePostSignature(postPolicy);

            respMap = new LinkedHashMap<String, String>();
            respMap.put("accessid", accessId);
            respMap.put("policy", encodedPolicy);
            respMap.put("signature", postSignature);
            respMap.put("dir", dir);
            respMap.put("host", host);
            respMap.put("expire", String.valueOf(expireEndTime / 1000));
            // respMap.put("expire", formatISO8601Date(expiration));


        } catch (Exception e) {
            // Assert.fail(e.getMessage());
            System.out.println(e.getMessage());
        }

        return R.ok().put("data",respMap);
    }
}
整合网关
http://localhost:88/api/thirdparty/oss/policy
        - id: third_party_route
          uri: lb://gulimall-third-party
          predicates:
            - Path=/api/thirdparty/**
          filters:
            - RewritePath=/api/thirdparty/(?<segment>.*),/$\{segment}
前端代码
<el-upload
      action="http://gulimall-ltao1.oss-cn-beijing.aliyuncs.com"
      :data="dataObj"
      list-type="picture"
      :multiple="false" :show-file-list="showFileList"
      :file-list="fileList"
      :before-upload="beforeUpload"
      :on-remove="handleRemove"
      :on-success="handleUploadSuccess"
      :on-preview="handlePreview">
      <el-button size="small" type="primary">点击上传</el-button>
      <div slot="tip" class="el-upload__tip">只能上传jpg/png文件,且不超过10MB</div>
    </el-upload>

import http from '@/utils/httpRequest.js'
export function policy() {
   return  new Promise((resolve,reject)=>{
        http({
            url: http.adornUrl("/thirdparty/oss/policy"),
            method: "get",
            params: http.adornParams({})
        }).then(({ data }) => {
            resolve(data);
        })
    });


  beforeUpload 先向服务端(policy)获取签名
  将获取到的签名数据放到dataObj,
  向oss(http://gulimall-ltao1.oss-cn-beijing.aliyuncs.com)
  发送请求,存放图片。
JSR303校验注解
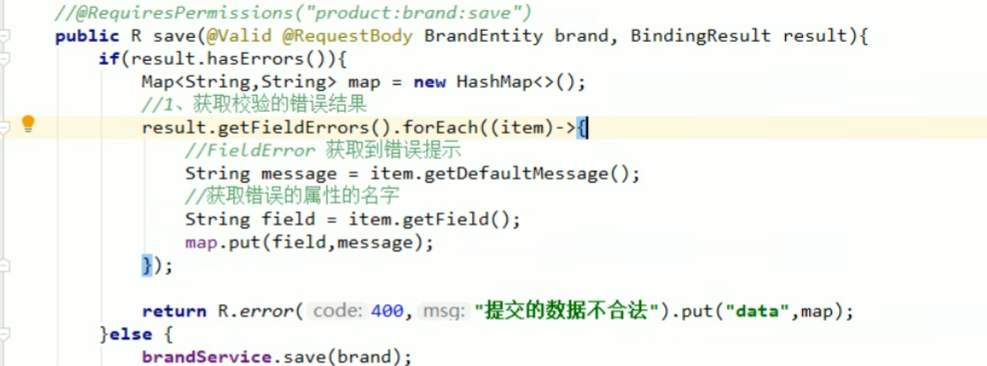
*   1)、给Bean添加校验注解:javax.validation.constraints,并定义自己的message提示
*   2)、开启校验功能@Valid
*      效果:校验错误以后会有默认的响应;
*   3)、给校验的bean后紧跟一个BindingResult,就可以获取到校验的结果
*   4)、分组校验(多场景的复杂校验)
*         1)、   @NotBlank(message = "品牌名必须提交",groups = {AddGroup.class,UpdateGroup.class})
*          给校验注解标注什么情况需要进行校验
*         2)、@Validated({AddGroup.class})
*         3)、默认没有指定分组的校验注解@NotBlank,在分组校验情况@Validated({AddGroup.class})下不生效,只会在@Validated生效;
*
*   5)、自定义校验
*      1)、编写一个自定义的校验注解
*      2)、编写一个自定义的校验器 ConstraintValidator
*      3)、关联自定义的校验器和自定义的校验注解
        *      @Documented
        * @Constraint(validatedBy = { ListValueConstraintValidator.class【可以指定多个不同的校验器,适配不同类型的校验】 })
        * @Target({ METHOD, FIELD, ANNOTATION_TYPE, CONSTRUCTOR, PARAMETER, TYPE_USE })
        * @Retention(RUNTIME)
        * public @interface ListValue {
分组检验
考虑新增和删除时不同的校验(新增不需要id,修改需要id)
 *   4)、分组校验(多场景的复杂校验)
 *         1)、	@NotBlank(message = "品牌名必须提交",groups = {AddGroup.class,UpdateGroup.class})
 *          给校验注解标注什么情况需要进行校验
 *         2)、@Validated({AddGroup.class})
 *         3)、默认没有指定分组的校验注解@NotBlank,在分组校验情况@Validated({AddGroup.class})下不生效,只会在@Validated生效;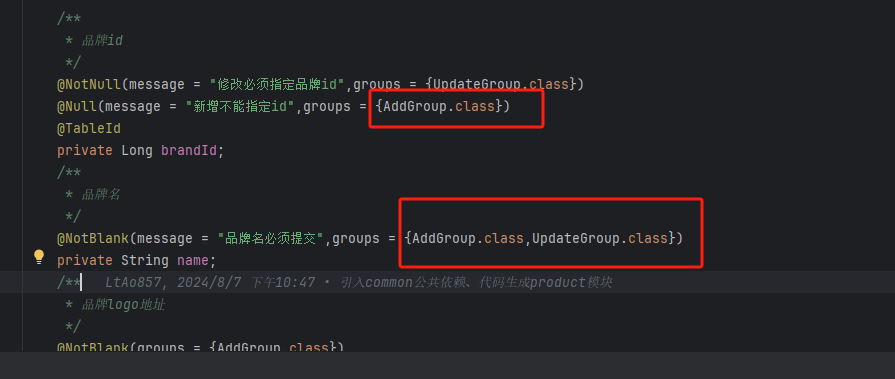

自定义校验(待开发)
TODO
统一异常处理
BizCodeEnume 业务错误枚举状态码和信息
package com.atguigu.common.exception;

/***
 * 错误码和错误信息定义类
 * 1. 错误码定义规则为5为数字
 * 2. 前两位表示业务场景,最后三位表示错误码。例如:100001。10:通用 001:系统未知异常
 * 3. 维护错误码后需要维护错误描述,将他们定义为枚举形式
 * 错误码列表:
 *  10: 通用
 *      001:参数格式校验
 *  11: 商品
 *  12: 订单
 *  13: 购物车
 *  14: 物流
 *
 *
 */
public enum BizCodeEnume {
    UNKNOW_EXCEPTION(10000,"系统未知异常"),
    VAILD_EXCEPTION(10001,"参数格式校验失败");

    private int code;
    private String msg;
    BizCodeEnume(int code,String msg){
        this.code = code;
        this.msg = msg;
    }

    public int getCode() {
        return code;
    }

    public String getMsg() {
        return msg;
    }
}
集中处理所有异常
@ControllerAdvice
@ResponseBody
@RestControllerAdvice(basePackages ="com.atguigu.gulimall.product.controller")
 * 4、统一的异常处理
 * @ControllerAdvice
 *  1)、编写异常处理类,使用@ControllerAdvice。
 *  2)、使用@ExceptionHandler标注方法可以处理的异常。


package com.atguigu.gulimall.product.exception;

import com.atguigu.common.exception.BizCodeEnume;
import com.atguigu.common.utils.R;
import lombok.extern.slf4j.Slf4j;
import org.springframework.validation.BindingResult;
import org.springframework.web.bind.MethodArgumentNotValidException;
import org.springframework.web.bind.annotation.ControllerAdvice;
import org.springframework.web.bind.annotation.ExceptionHandler;
import org.springframework.web.bind.annotation.ResponseBody;
import org.springframework.web.bind.annotation.RestControllerAdvice;
import org.springframework.web.servlet.ModelAndView;

import java.util.HashMap;
import java.util.Map;

/**
 * 集中处理所有异常
 * BizCodeEnume 业务错误枚举状态码
 */
@Slf4j
//@ResponseBody
//@ControllerAdvice(basePackages = "com.atguigu.gulimall.product.controller")
@RestControllerAdvice(basePackages = "com.atguigu.gulimall.product.controller")
public class GulimallExceptionControllerAdvice {


    /**
     * 校验的异常
     * @param e
     * @return
     */
    @ExceptionHandler(value= MethodArgumentNotValidException.class)
    public R handleVaildException(MethodArgumentNotValidException e){
        log.error("数据校验出现问题{},异常类型:{}",e.getMessage(),e.getClass());
        // 获取错误的结果getBindingResult
        BindingResult bindingResult = e.getBindingResult();

        Map<String,String> errorMap = new HashMap<>();
        bindingResult.getFieldErrors().forEach((fieldError)->{
            errorMap.put(fieldError.getField(),fieldError.getDefaultMessage());
        });
        return R.error(BizCodeEnume.VAILD_EXCEPTION.getCode(),BizCodeEnume.VAILD_EXCEPTION.getMsg()).put("data",errorMap);
    }

    /**
     * 任意类型的异常
     * @param throwable
     * @return
     */

    @ExceptionHandler(value = Throwable.class)
    public R handleException(Throwable throwable){

        log.error("错误:",throwable);
        return R.error(BizCodeEnume.UNKNOW_EXCEPTION.getCode(),BizCodeEnume.UNKNOW_EXCEPTION.getMsg());
    }


}
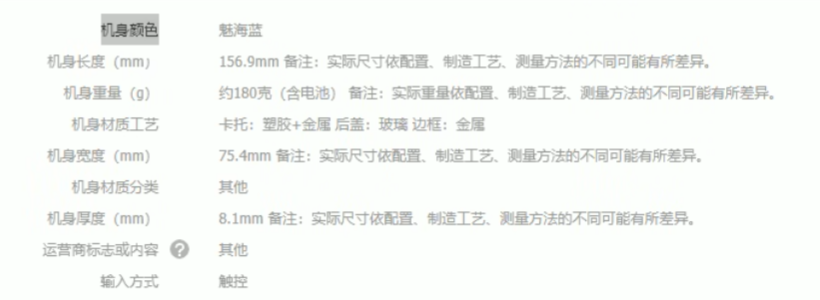
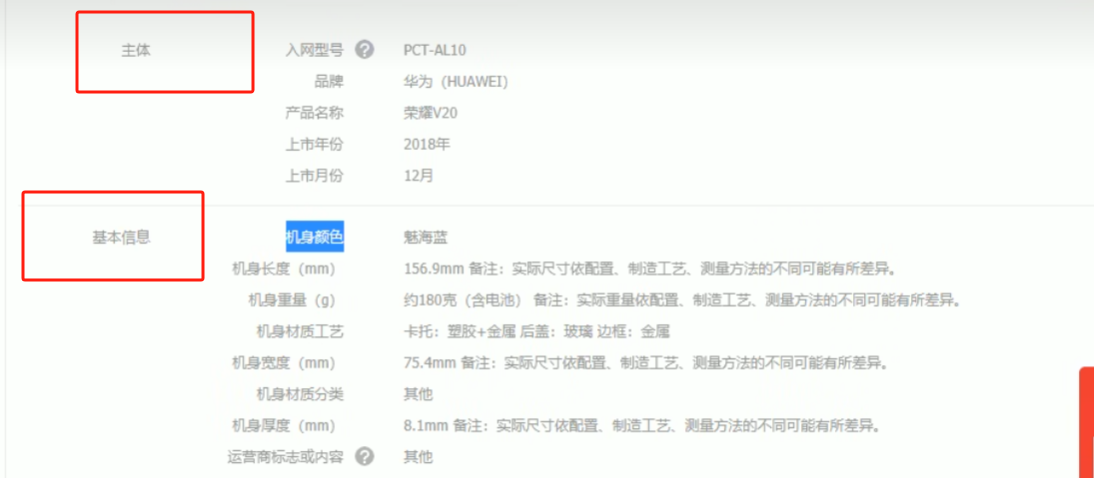
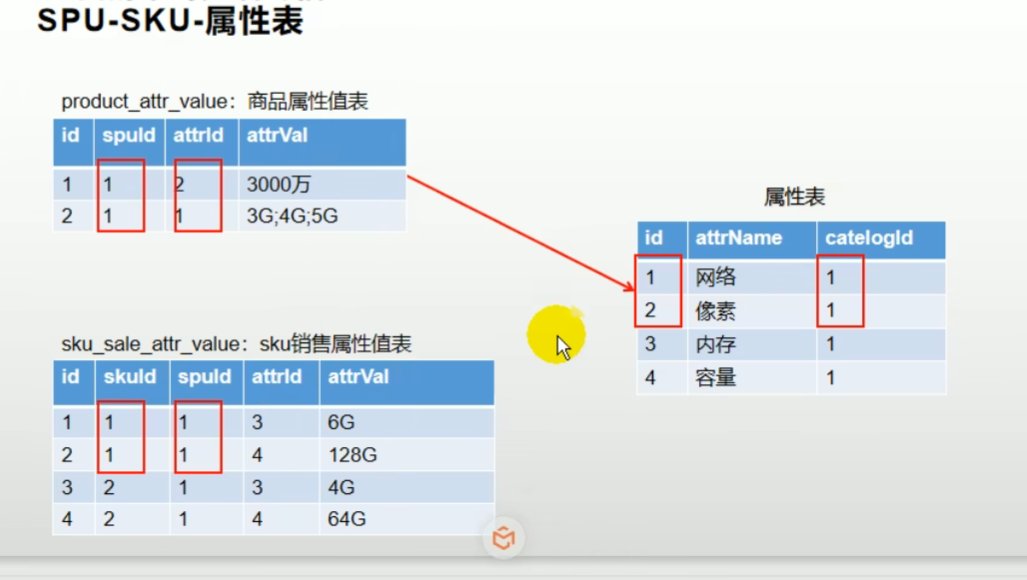
SPU和SKU
SPU:Standard Product Unit (标准产品单位) ,一组具有共同属性的商品集
SKU:Stock Keeping Unit(库存量单位),SPU商品集因具体特性不同而细分的每个商品
以图为例来看:
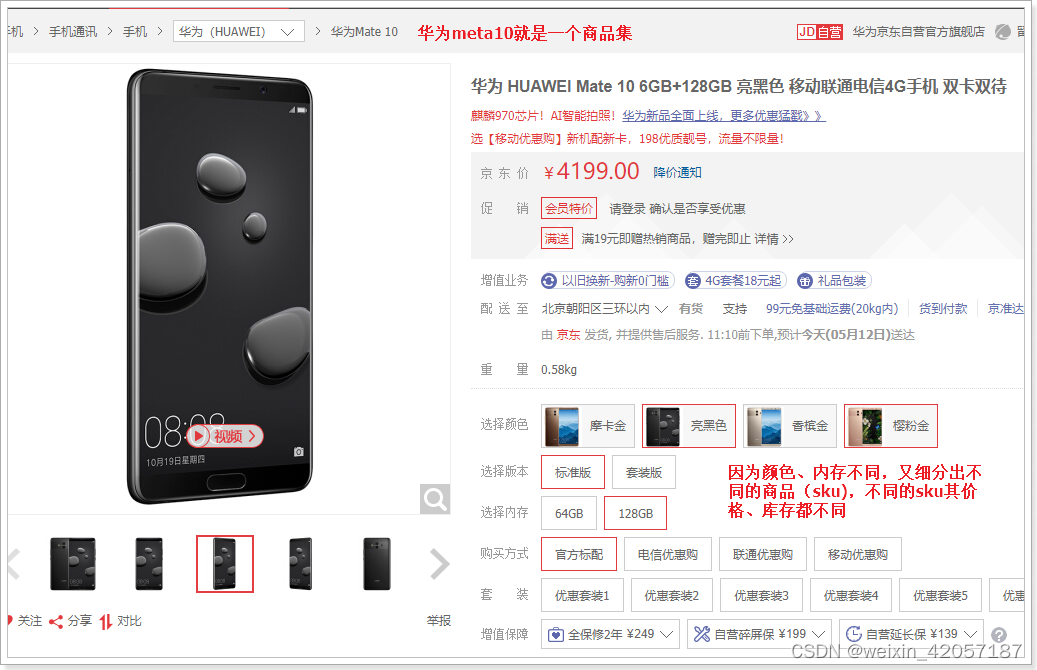
本页的 华为Mate10 就是一个商品集(SPU)
因为颜色、内存等不同,而细分出不同的Mate10,如亮黑色128G版。(SKU)
可以看出:
SPU是一个抽象的商品集概念,为了方便后台的管理。 ==》基本属性(共同属性:主体,基本信息,主芯片。。。。 )
SKU才是具体要销售的商品,每一个SKU的价格、库存可能会不一样,用户购买的是SKU而不是SPU.==》销售属性
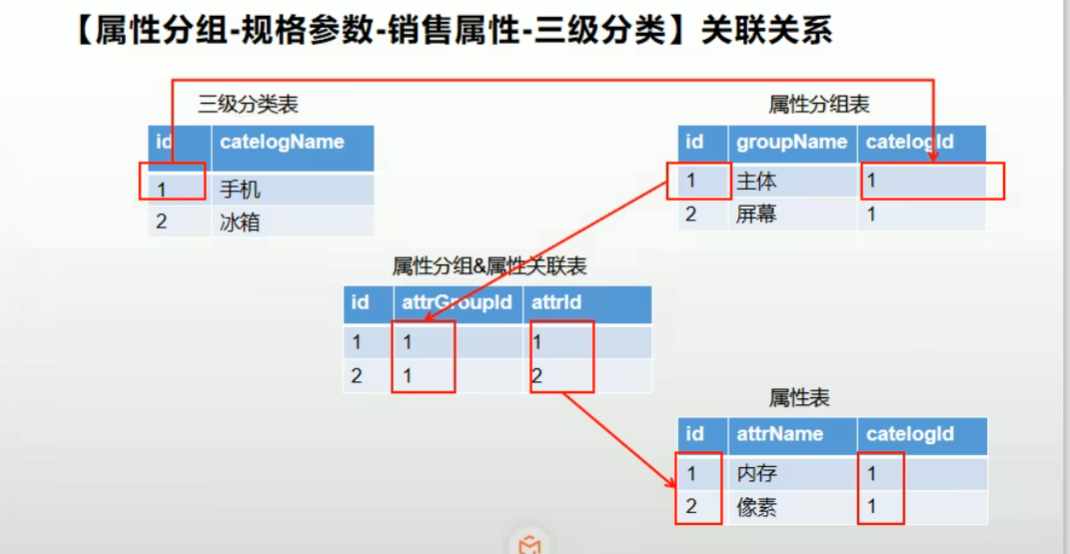
属性是以三级分类组织起来的
规格参数中有些是可以提供检索的
规格参数也是基本属性,他们具有自己的分组
属性的分组也是以三级分类组织起来的
属性名确定的,但是值是每一个商品不同来决定的
spu决定规格参数,sku决定销售属性(颜色,内存)
pms_attr:属性表(属性名,属性类型,所属的三级分类id【区别手机还是电视等等】,是否可检索)
pms_attr_group:属性分组表()

pms_attr_attrgroup_relation:(属性以及属性分组的关联表)

psm_product_attr_value:商品属性表
pms_spu_info:商品spu信息表

pms_sku_info:商品型号表

pms_sku_images:商品型号图片
pms_sku_sale_attr_value:商品销售属性
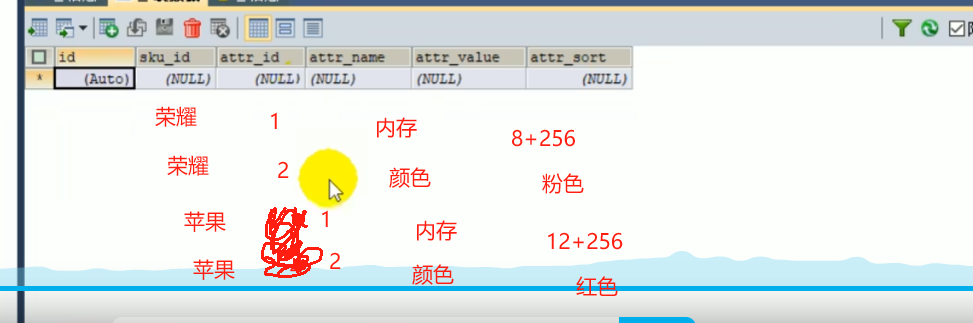
关联关系
导入sys_menu数据库
前端组件收取&父子组件传参
通过事件传参
子组件:this.$emit(事件名称,参数....)
父组件 @事件名称=方法名称
function 方法名称(参数){
  获取参数
}
通过分类id获取属性分组
/**
     * 列表
     * catelogId为路径变量,获取时需要加入  @PathVariable("catelogId")
     *通过分类id获取
     /
    @RequestMapping("/list/{catelogId}")
    //@RequiresPermissions("product:attrgroup:list")
    public R list(@RequestParam Map<String, Object> params,
                  @PathVariable("catelogId") Long catelogId){
//        PageUtils page = attrGroupService.queryPage(params);

        PageUtils page = attrGroupService.queryPage(params,catelogId);

        return R.ok().put("page", page);
    }
实现
    /**
     * 根据分类id和参数查出对应的属性分组信息(分页后的)
     * @param params
     * @param catelogId
     * @return
     */
    @Override
    public PageUtils queryPage(Map<String, Object> params, Long catelogId) {
        // 获取检索条件
        // attr_group_id 组id或者attr_group_name组名

        String key = (String) params.get("key");

        QueryWrapper<AttrGroupEntity> wrapper = new QueryWrapper<AttrGroupEntity>();
        // key不为空
        if(!StringUtils.isEmpty(key)){
            wrapper.and((obj)->{
                // 参数拼接
                obj.eq("attr_group_id",key).or().like("attr_group_name",key);
                //select * from pms_attr_group where catelog_id=? and (attr_group_id=key or attr_group_name like %key%)
            });
        }

        // catelogId=0 查询全部
        if( catelogId == 0){
            IPage<AttrGroupEntity> page = this.page(new Query<AttrGroupEntity>().getPage(params),
                    wrapper);
            return new PageUtils(page);
        }else {
            // 按照分类查询
            wrapper.eq("catelog_id",catelogId);
            IPage<AttrGroupEntity> page = this.page(new Query<AttrGroupEntity>().getPage(params),
                    wrapper);
            return new PageUtils(page);
        }

    }
@JsonInclude(JsonInclude.Include.NON_EMPTY)
返回字段若为空,则不返回
@Data
@TableName("pms_category")
public class CategoryEntity implements Serializable {

	@JsonInclude(JsonInclude.Include.NON_EMPTY)
	@TableField(exist=false)
	private List<CategoryEntity> children;
}
回显三级分类
实现思路
联级选择器:[1,2,3]    // 需要的格式

后端生成一个catelogPath( 完整路径)。通过三级分类id递归查找它的最高父级。


serviceImpl

    @Override
    public Long[] findCatelogPath(Long catelogId) {
        List<Long> paths = new ArrayList<>();
        List<Long> parentPath = findParentPath(catelogId, paths);

        // 逆序反转
        Collections.reverse(parentPath);


        return parentPath.toArray(new Long[parentPath.size()]);
    }

        //225,25,2
    private List<Long> findParentPath(Long catelogId,List<Long> paths){
        //1、收集当前节点id
        paths.add(catelogId);
        CategoryEntity byId = this.getById(catelogId);
        if(byId.getParentCid()!=0){
            findParentPath(byId.getParentCid(),paths);
        }
        return paths;

    }
MyBatisConfig
MyBatisPlus引入分页插件
package com.atguigu.gulimall.product.config;

import com.baomidou.mybatisplus.extension.plugins.PaginationInterceptor;
import org.mybatis.spring.annotation.MapperScan;
import org.springframework.context.annotation.Bean;
import org.springframework.context.annotation.Configuration;
import org.springframework.transaction.annotation.EnableTransactionManagement;

@Configuration
@EnableTransactionManagement //开启事务
@MapperScan("com.atguigu.gulimall.product.dao")
public class MyBatisConfig {

    //引入分页插件
    @Bean
    public PaginationInterceptor paginationInterceptor() {
        PaginationInterceptor paginationInterceptor = new PaginationInterceptor();
        // 设置请求的页面大于最大页后操作, true调回到首页,false 继续请求  默认false
         paginationInterceptor.setOverflow(true);
        // 设置最大单页限制数量,默认 500 条,-1 不受限制
        paginationInterceptor.setLimit(1000);
        return paginationInterceptor;
    }
}
品牌分类关联和级联更新
创建中间表pms__category_brand_relation(要保证冗余数据的同步更新)
更新品牌关联表的数据
    @Transactional
    @Override
    public void updateDetail(BrandEntity brand) {
        //保证冗余字段的数据一致
        this.updateById(brand);
        if(!StringUtils.isEmpty(brand.getName())){
            //同步更新其他关联表中的数据
            categoryBrandRelationService.updateBrand(brand.getBrandId(),brand.getName());

            //TODO 更新其他关联
        }
    }


    /**
     * 通过品牌id在关联表中更新品牌名字
     * @param brandId
     * @param name
     */
    @Override
    public void updateBrand(Long brandId, String name) {
        CategoryBrandRelationEntity relationEntity = new CategoryBrandRelationEntity();
        relationEntity.setBrandId(brandId);
        relationEntity.setBrandName(name);
        this.update(relationEntity,new UpdateWrapper<CategoryBrandRelationEntity>().eq("brand_id",brandId));
    }

        /**
     * 级联更新所有关联的数据
     * @param category
     */
    @Transactional
    @Override
    public void updateCascade(CategoryEntity category) {
        this.updateById(category);
        categoryBrandRelationService.updateCategory(category.getCatId(),category.getName());
    }


xml
   <update id="updateCategory">
        UPDATE `pms_category_brand_relation` SET catelog_name=#{name} WHERE catelog_id=#{catId}
    </update>
将某个品牌和属性关联

sql
/*
 Navicat Premium Data Transfer

 Source Server         : 本地
 Source Server Type    : MySQL
 Source Server Version : 80026
 Source Host           : localhost:3306
 Source Schema         : gulimall_pms

 Target Server Type    : MySQL
 Target Server Version : 80026
 File Encoding         : 65001

 Date: 24/08/2024 17:55:03
*/

SET NAMES utf8mb4;
SET FOREIGN_KEY_CHECKS = 0;

-- ----------------------------
-- Table structure for pms_category_brand_relation
-- ----------------------------
DROP TABLE IF EXISTS `pms_category_brand_relation`;
CREATE TABLE `pms_category_brand_relation`  (
  `id` bigint(0) NOT NULL AUTO_INCREMENT COMMENT '关联表id',
  `brand_id` bigint(0) NOT NULL COMMENT '品牌Id\r\n',
  `catelog_id` bigint(0) NOT NULL COMMENT '类型Id',
  `brand_name` varchar(255) CHARACTER SET utf8mb4 COLLATE utf8mb4_0900_ai_ci NULL DEFAULT NULL COMMENT '\r\n品牌名称',
  `catelog_name` varchar(255) CHARACTER SET utf8mb4 COLLATE utf8mb4_0900_ai_ci NULL DEFAULT NULL COMMENT '分类名称',
  PRIMARY KEY (`id`) USING BTREE
) ENGINE = InnoDB CHARACTER SET = utf8mb4 COLLATE = utf8mb4_0900_ai_ci ROW_FORMAT = Dynamic;

-- ----------------------------
-- Records of pms_category_brand_relation
-- ----------------------------

SET FOREIGN_KEY_CHECKS = 1;
实现方法
/**
* 自己封装关联关系的保存方法
* 为减少查询数据库的次数,保存时将name也存进去
* @param categoryBrandRelation
*/
@Override
public void saveDetail(CategoryBrandRelationEntity categoryBrandRelation) {
Long brandId = categoryBrandRelation.getBrandId();
Long catelogId = categoryBrandRelation.getCatelogId();
//1、查询详细名字
BrandEntity brandEntity = brandDao.selectById(brandId);
CategoryEntity categoryEntity = categoryDao.selectById(catelogId);
categoryBrandRelation.setBrandName(brandEntity.getName());
categoryBrandRelation.setCatelogName(categoryEntity.getName());
this.save(categoryBrandRelation);
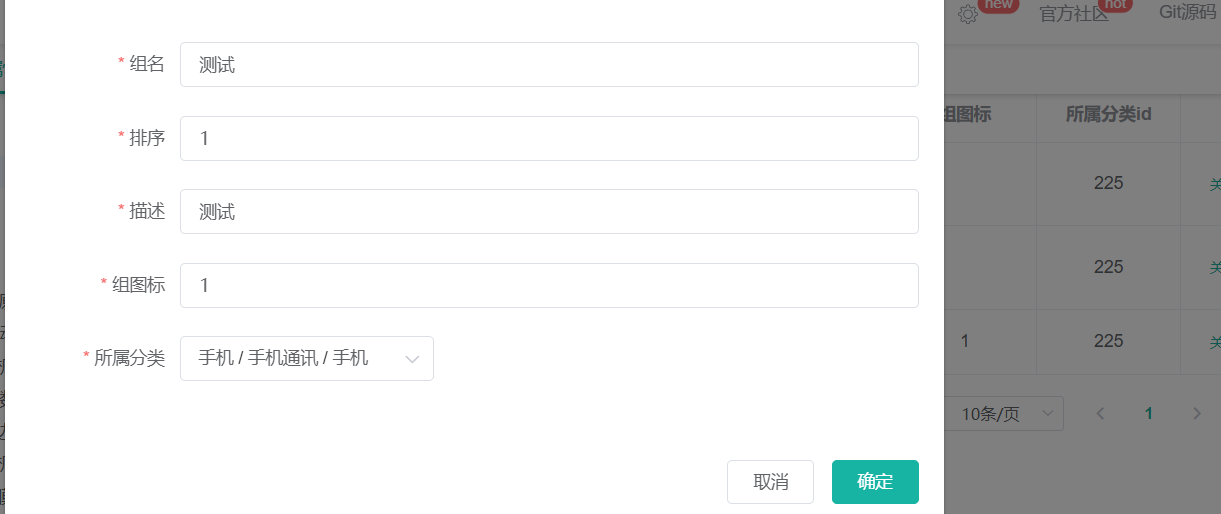
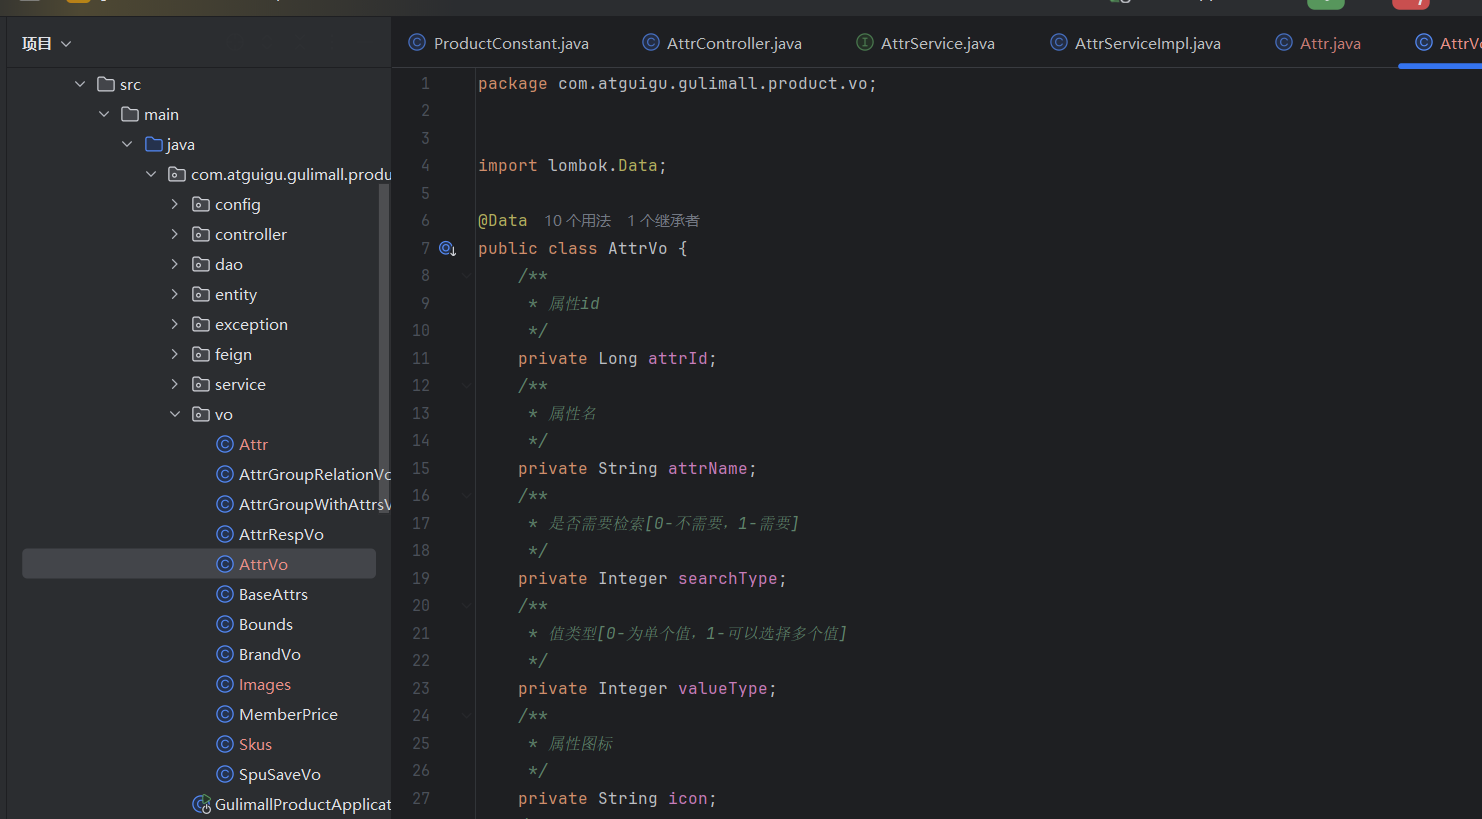
}规格参数新增和VO
初始生成的规格新增没有对应到attr和attr_group的数据库,所以要在相应的数据库中插入数据,进行改造。
比较规范的做法是,新建一个vo文件夹,将每种不同的对象,按照它的功能进行了划分。在java中,Object划分涉及到了这几种类型
1.PO(persistant object) 持久对象
PO 就是对应数据库中某个表中的一条记录,多个记录可以用 PO 的集合。 PO 中应该不包含任何对数据库的操作。
2.DO(Domain Object)领域对象
就是从现实世界中抽象出来的有形或无形的业务实体。
3.TO(Transfer Object) ,数据传输对象
不同的应用程序之间传输的对象
4.DTO(Data Transfer Object)数据传输对象
这个概念来源于 J2EE 的设计模式,原来的目的是为了 EJB 的分布式应用提供粗粒度的数据实体,以减少分布式调用的次数,从而提高分布式调用的性能和降低网络负载,但在这里,泛指用于展示层与服务层之间的数据传输对象。
5.VO(value object) 值对象
通常用于业务层之间的数据传递,和 PO 一样也是仅仅包含数据而已。但应是抽象出的业务对象 , 可以和表对应 , 也可以不 , 这根据业务的需要 。用 new 关键字创建,由GC 回收的。
View object:视图对象;
接受页面传递来的数据,封装对象
将业务处理完成的对象,封装成页面要用的数据
6.BO(business object) 业务对象
从业务模型的角度看 , 见 UML 元件领域模型中的领域对象。封装业务逻辑的 java 对象 , 通过调用 DAO 方法 , 结合 PO,VO 进行业务操作。business object: 业务对象 主要作用是把业务逻辑封装为一个对象。这个对象可以包括一个或多个其它的对象。 比如一个简历,有教育经历、工作经历、社会关系等等。 我们可以把教育经历对应一个 PO ,工作经历对应一个 PO ,社会关系对应一个 PO 。 建立一个对应简历的 BO 对象处理简历,每个 BO 包含这些 PO 。 这样处理业务逻辑时,我们就可以针对 BO 去处理。
7.POJO(plain ordinary java object) 简单无规则 java 对象
传统意义的 java 对象。就是说在一些 Object/Relation Mapping 工具中,能够做到维护数据库表记录的 persisent object 完全是一个符合 Java Bean 规范的纯 Java 对象,没有增加别的属性和方法。我的理解就是最基本的 java Bean ,只有属性字段及 setter 和 getter方法!。
POJO 是 DO/DTO/BO/VO 的统称。
8.DAO(data access object) 数据访问对象
是一个 sun 的一个标准 j2ee 设计模式, 这个模式中有个接口就是 DAO ,它负持久 层的操作。为业务层提供接口。此对象用于访问数据库。通常和 PO 结合使用, DAO 中包含了各种数据库的操作方法。通过它的方法 , 结合 PO 对数据库进行相关的操作。夹在业务逻辑与数据库资源中间。配合 VO, 提供数据库的 CRUD 操作.
Request URL: http://localhost:88/api/product/attr/save,现在的情况是,它在保存的时候,只是保存了attr,并没有保存attrgroup,为了解决这个问题,我们新建了一个vo/AttrVo,在原AttrEntity基础上增加了attrGroupId字段,使得保存新增数据的时候,也保存了它们之间的关系。
@Transactional
@Override
public void saveAttr(AttrVo attr) {
AttrEntity attrEntity = new AttrEntity();
// attrEntity.setAttrName(attr.getAttrName());
BeanUtils.copyProperties(attr,attrEntity);
//1、保存基本数据
// mb-plus在save后,attrEntity会自动回显生成的ID @TableId
this.save(attrEntity);
//2、保存关联关系
if(attr.getAttrType() == ProductConstant.AttrEnum.ATTR_TYPE_BASE.getCode() && attr.getAttrGroupId()!=null){
AttrAttrgroupRelationEntity relationEntity = new AttrAttrgroupRelationEntity();
relationEntity.setAttrGroupId(attr.getAttrGroupId());
relationEntity.setAttrId(attrEntity.getAttrId());
relationDao.insert(relationEntity);
}
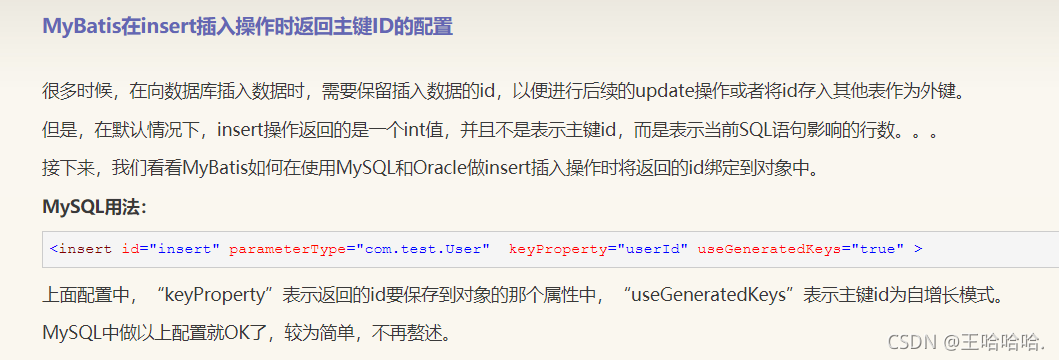
}save中最后执行的是baseMapper中的insert方法,insert方法执行完后,会返回一个主键并且自动封装到插入的实体类中@TableId!!
也就是我们突然有了值的attrId字段
规格参数列表和修改
展示的基础上展示对应的分组和分类
    @Override
    public PageUtils queryBaseAttrPage(Map<String, Object> params, Long catelogId, String type) {
        // 先查询type是sale还是base
        QueryWrapper<AttrEntity> queryWrapper = new QueryWrapper<AttrEntity>().eq("attr_type","base".equalsIgnoreCase(type)?ProductConstant.AttrEnum.ATTR_TYPE_BASE.getCode():ProductConstant.AttrEnum.ATTR_TYPE_SALE.getCode());

        if(catelogId != 0){
            queryWrapper.eq("catelog_id",catelogId);
        }

        String key = (String) params.get("key");
        if(!StringUtils.isEmpty(key)){
            //attr_id  attr_name
            queryWrapper.and((wrapper)->{
                wrapper.eq("attr_id",key).or().like("attr_name",key);
        });
        }

        IPage<AttrEntity> page = this.page(
                new Query<AttrEntity>().getPage(params),
                queryWrapper
        );

        PageUtils pageUtils = new PageUtils(page);
        // 获取分页的数据
        List<AttrEntity> records = page.getRecords();
        // 流式处理数据
        List<AttrRespVo> respVos = records.stream().map((attrEntity) -> {
            AttrRespVo attrRespVo = new AttrRespVo();
            BeanUtils.copyProperties(attrEntity, attrRespVo);

            //1、在规格参数中设置分类和分组的名字
            //1.1实现思路:
            //    先通过参数attr_id查询到关联表的信息,
            //    关联表存在且存在组Id
            //    通过GroupId获取到attrGroupEntity实体
            //    最后设置返回信息
            if("base".equalsIgnoreCase(type)){
                AttrAttrgroupRelationEntity relationEntity = relationDao.selectOne(new QueryWrapper<AttrAttrgroupRelationEntity>().eq("attr_id", attrEntity.getAttrId()));
                if (relationEntity != null && relationEntity.getAttrGroupId()!=null) {
                    AttrGroupEntity attrGroupEntity = attrGroupDao.selectById(relationEntity.getAttrGroupId());
                    attrRespVo.setGroupName(attrGroupEntity.getAttrGroupName());
                }

            }


            // 获取分类的名称
            CategoryEntity categoryEntity = categoryDao.selectById(attrEntity.getCatelogId());
            if (categoryEntity != null) {
                attrRespVo.setCatelogName(categoryEntity.getName());
            }
            return attrRespVo;
        }).collect(Collectors.toList());

        pageUtils.setList(respVos);
        return pageUtils;
    }
销售属性维护
注意:
只有基本属性存在分组信息
销售属性不存在分组信息,所以对应的分组不需要展示,同时也不需要存入到关联数据库中。
创建商品常量
package com.atguigu.common.constant;

import lombok.Data;

public class ProductConstant {


    public enum  AttrEnum{
        ATTR_TYPE_BASE(1,"基本属性"),ATTR_TYPE_SALE(0,"销售属性");
        private int code;
        private String msg;

        AttrEnum(int code,String msg){
            this.code = code;
            this.msg = msg;
        }

        public int getCode() {
            return code;
        }

        public String getMsg() {
            return msg;
        }
    }
}
判断条件
if(attr.getAttrType() == ProductConstant.AttrEnum.ATTR_TYPE_BASE.getCode() && attr.getAttrGroupId()!=null){}
注意只有在添加基本属性的时候,才添加数据库、、、、、、
@Transactional
@Override
public void saveAttr(AttrVo attr) {
AttrEntity attrEntity = new AttrEntity();
// attrEntity.setAttrName(attr.getAttrName());
BeanUtils.copyProperties(attr,attrEntity);
//1、保存基本数据
// mb-plus在save后,attrEntity会自动回显生成的ID @TableId
this.save(attrEntity);
//2、保存关联关系
if(attr.getAttrType() == ProductConstant.AttrEnum.ATTR_TYPE_BASE.getCode() && attr.getAttrGroupId()!=null){
AttrAttrgroupRelationEntity relationEntity = new AttrAttrgroupRelationEntity();
relationEntity.setAttrGroupId(attr.getAttrGroupId());
relationEntity.setAttrId(attrEntity.getAttrId());
relationDao.insert(relationEntity);
}
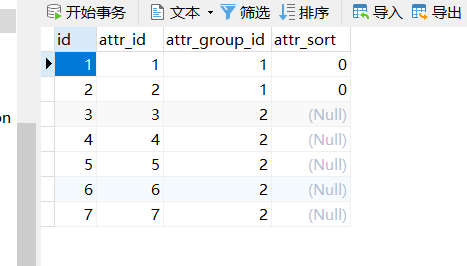
}分组关联规格参数
获取当前分组的所有属性
通过groupId查询relation表,查询出所有的attrid对应的数据
删除分组关联的信息
public interface AttrAttrgroupRelationDao extends BaseMapper<AttrAttrgroupRelationEntity> {

    void deleteBatchRelation(@Param("entities") List<AttrAttrgroupRelationEntity> entities);

}
使用动态sql
// entities为集合,item为遍历的每条具体的数据,
// separator为分隔符,因为是批量删除多个,所以使用or
<delete id="deleteBatchRelation">

// entities为集合,item为遍历的每条具体的数据,
// separator为分隔符,因为是批量删除多个,所以使用or
    DELETE FROM `pms_attr_attrgroup_relation` WHERE
    <foreach collection="entities" item="item" separator=" OR ">
        (attr_id=#{item.attrId} AND attr_group_id=#{item.attrGroupId})
    </foreach>
</delete>
查询分组未关联的属性
思路:
    1.通过分组查询到自己所属的分类id
    2.再通过分类id查询到其他的分组信息(同时groupId不能是当前所选的)
    3.通过分组信息,获取所有的规格属性(只能选择其他分组没有引用的属性)
    4.排除有的,获取没有的
/**
* 获取当前分组没有关联的所有属性
* @param params
* @param attrgroupId
* @return
*/
@Override
public PageUtils getNoRelationAttr(Map<String, Object> params, Long attrgroupId) {
//1、当前分组只能关联自己所属的分类里面的所有属性
AttrGroupEntity attrGroupEntity = attrGroupDao.selectById(attrgroupId);
Long catelogId = attrGroupEntity.getCatelogId();
//2、当前分组只能关联别的分组没有引用的属性
//2.1)、当前分类下的其他分组
List<AttrGroupEntity> group = attrGroupDao.selectList(new QueryWrapper<AttrGroupEntity>().eq("catelog_id", catelogId));
List<Long> collect = group.stream().map(item -> {
return item.getAttrGroupId();
}).collect(Collectors.toList());
//2.2)、这些分组关联的属性
List<AttrAttrgroupRelationEntity> groupId = relationDao.selectList(new QueryWrapper<AttrAttrgroupRelationEntity>().in("attr_group_id", collect));
List<Long> attrIds = groupId.stream().map(item -> {
return item.getAttrId();
}).collect(Collectors.toList());
//2.3)、从当前分类的所有属性中移除这些属性;
// catelog_id必修是当前分类下的catelog_id
// 关联分组只能是基本属性,不涉及销售属性
QueryWrapper<AttrEntity> wrapper = new QueryWrapper<AttrEntity>().eq("catelog_id", catelogId).eq("attr_type",ProductConstant.AttrEnum.ATTR_TYPE_BASE.getCode());
if(attrIds!=null && attrIds.size()>0){
// 同时、又不包括刚刚通过relation表的groupId查询到的attrs
wrapper.notIn("attr_id", attrIds);
}
// 检索
String key = (String) params.get("key");
if(!StringUtils.isEmpty(key)){
wrapper.and((w)->{
w.eq("attr_id",key).or().like("attr_name",key);
});
}
// 分页查询
IPage<AttrEntity> page = this.page(new Query<AttrEntity>().getPage(params), wrapper);
PageUtils pageUtils = new PageUtils(page);
return pageUtils;
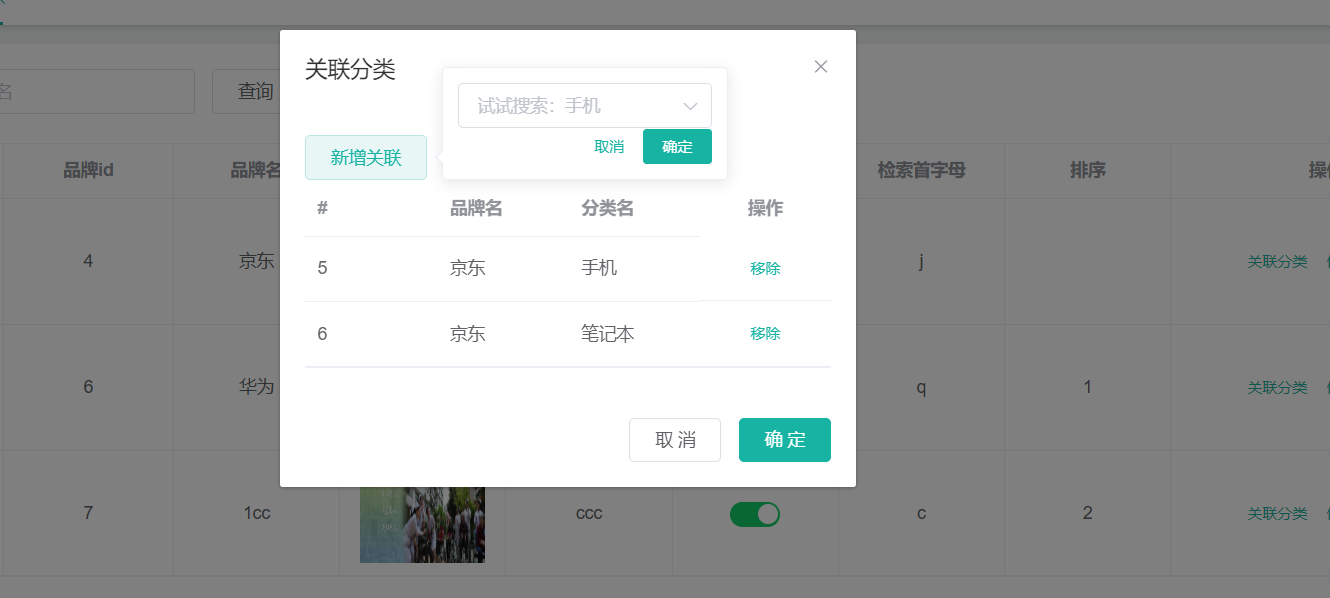
}获取分类关联的所有品牌
@Override
public List<BrandEntity> getBrandsByCatId(Long catId) {

    List<CategoryBrandRelationEntity> categoryBrandRelationEntity = relationDao.selectList(new QueryWrapper<CategoryBrandRelationEntity>().eq("catelog_id", catId));
    return categoryBrandRelationEntity.stream().map(item -> {
        Long brandId = item.getBrandId();
        return brandService.getById(brandId);
    }).collect(Collectors.toList());
}
import pubsub from 'pubsub-js'
pubsub用来接收分类Id
获取分类下所有分组&关联属性
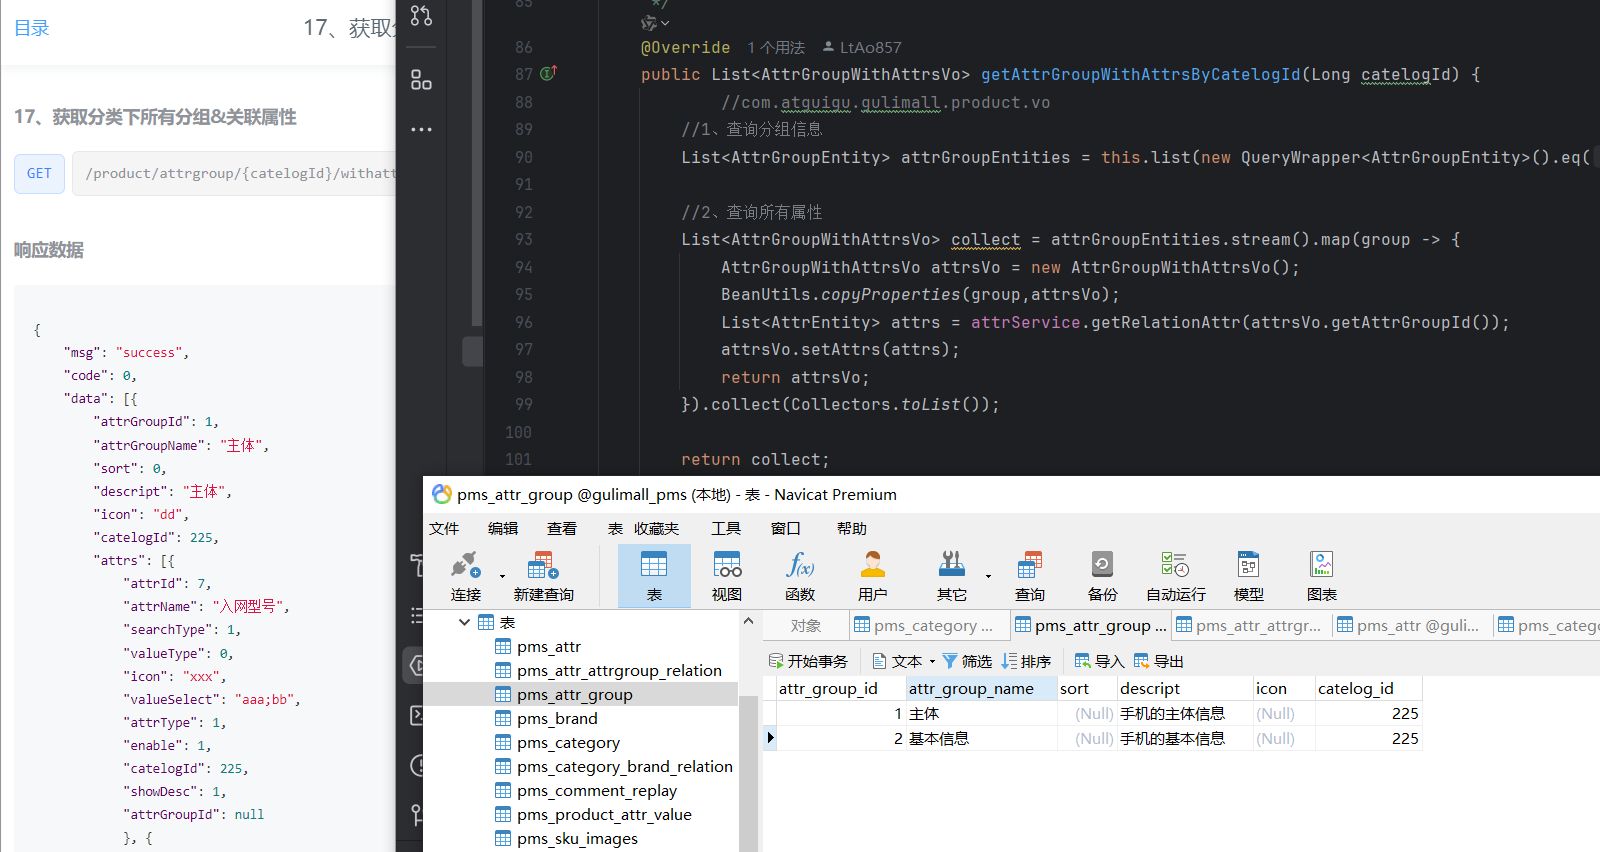
商品新增功能Vo
逆向生成class类
{
"spuName": "Apple XR",
"spuDescription": "Apple XR",
"catalogId": 225,
"brandId": 12,
"weight": 0.048,
"publishStatus": 0,
"decript": ["https://gulimall-hello.oss-cn-beijing.aliyuncs.com/2019-11-22//66d30b3f-e02f-48b1-8574-e18fdf454a32_f205d9c99a2b4b01.jpg"],
"images": ["https://gulimall-hello.oss-cn-beijing.aliyuncs.com/2019-11-22//dcfcaec3-06d8-459b-8759-dbefc247845e_5b5e74d0978360a1.jpg", "https://gulimall-hello.oss-cn-beijing.aliyuncs.com/2019-11-22//5b15e90a-a161-44ff-8e1c-9e2e09929803_749d8efdff062fb0.jpg"],
"bounds": {
"buyBounds": 500,
"growBounds": 6000
},
"baseAttrs": [{
"attrId": 7,
"attrValues": "aaa;bb",
"showDesc": 1
}, {
"attrId": 8,
"attrValues": "2019",
"showDesc": 0
}],
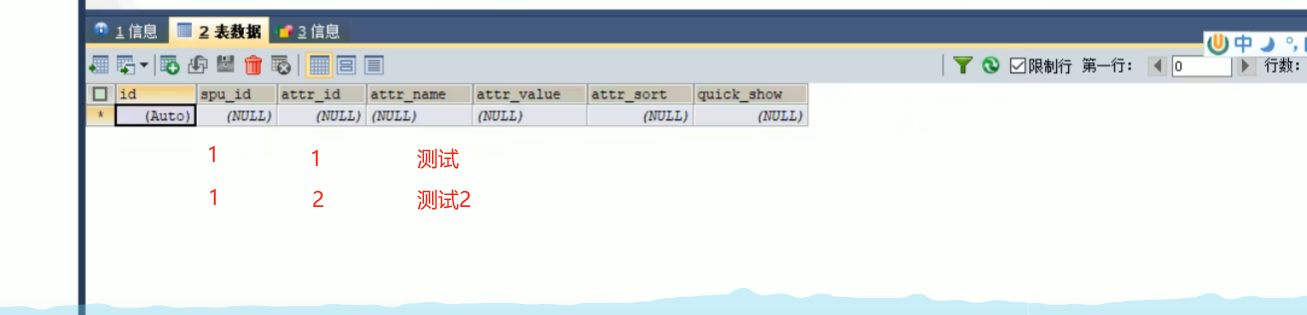
"skus": [{
"attr": [{
"attrId": 9,
"attrName": "颜色",
"attrValue": "黑色"
}, {
"attrId": 10,
"attrName": "内存",
"attrValue": "6GB"
}],
"skuName": "Apple XR 黑色 6GB",
"price": "1999",
"skuTitle": "Apple XR 黑色 6GB",
"skuSubtitle": "Apple XR 黑色 6GB",
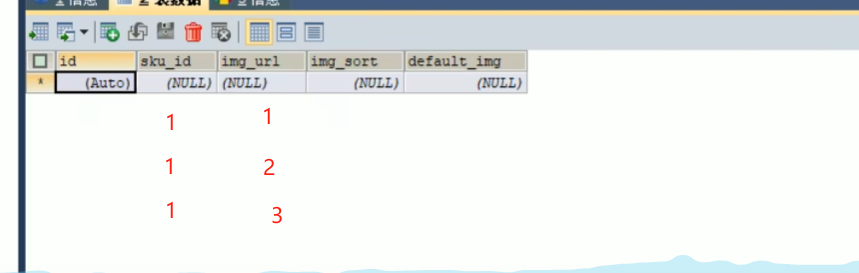
"images": [{
"imgUrl": "https://gulimall-hello.oss-cn-beijing.aliyuncs.com/2019-11-22//dcfcaec3-06d8-459b-8759-dbefc247845e_5b5e74d0978360a1.jpg",
"defaultImg": 1
}, {
"imgUrl": "https://gulimall-hello.oss-cn-beijing.aliyuncs.com/2019-11-22//5b15e90a-a161-44ff-8e1c-9e2e09929803_749d8efdff062fb0.jpg",
"defaultImg": 0
}],
"descar": ["黑色", "6GB"],
"fullCount": 5,
"discount": 0.98,
"countStatus": 1,
"fullPrice": 1000,
"reducePrice": 10,
"priceStatus": 0,
"memberPrice": [{
"id": 1,
"name": "aaa",
"price": 1998.99
}]
}, {
"attr": [{
"attrId": 9,
"attrName": "颜色",
"attrValue": "黑色"
}, {
"attrId": 10,
"attrName": "内存",
"attrValue": "12GB"
}],
"skuName": "Apple XR 黑色 12GB",
"price": "2999",
"skuTitle": "Apple XR 黑色 12GB",
"skuSubtitle": "Apple XR 黑色 6GB",
"images": [{
"imgUrl": "",
"defaultImg": 0
}, {
"imgUrl": "",
"defaultImg": 0
}],
"descar": ["黑色", "12GB"],
"fullCount": 0,
"discount": 0,
"countStatus": 0,
"fullPrice": 0,
"reducePrice": 0,
"priceStatus": 0,
"memberPrice": [{
"id": 1,
"name": "aaa",
"price": 1998.99
}]
}, {
"attr": [{
"attrId": 9,
"attrName": "颜色",
"attrValue": "白色"
}, {
"attrId": 10,
"attrName": "内存",
"attrValue": "6GB"
}],
"skuName": "Apple XR 白色 6GB",
"price": "1998",
"skuTitle": "Apple XR 白色 6GB",
"skuSubtitle": "Apple XR 黑色 6GB",
"images": [{
"imgUrl": "",
"defaultImg": 0
}, {
"imgUrl": "",
"defaultImg": 0
}],
"descar": ["白色", "6GB"],
"fullCount": 0,
"discount": 0,
"countStatus": 0,
"fullPrice": 0,
"reducePrice": 0,
"priceStatus": 0,
"memberPrice": [{
"id": 1,
"name": "aaa",
"price": 1998.99
}]
}, {
"attr": [{
"attrId": 9,
"attrName": "颜色",
"attrValue": "白色"
}, {
"attrId": 10,
"attrName": "内存",
"attrValue": "12GB"
}],
"skuName": "Apple XR 白色 12GB",
"price": "2998",
"skuTitle": "Apple XR 白色 12GB",
"skuSubtitle": "Apple XR 黑色 6GB",
"images": [{
"imgUrl": "",
"defaultImg": 0
}, {
"imgUrl": "",
"defaultImg": 0
}],
"descar": ["白色", "12GB"],
"fullCount": 0,
"discount": 0,
"countStatus": 0,
"fullPrice": 0,
"reducePrice": 0,
"priceStatus": 0,
"memberPrice": [{
"id": 1,
"name": "aaa",
"price": 1998.99
}]
}]
}修改参数类型
对于积分使用BigDecimal
private BigDecimal buyBounds;
private BigDecimal growBounds;
public class SpuSaveVo {
private String spuName;
private String spuDescription;
private Long catalogId;
private Long brandId;
private BigDecimal weight;
private int publishStatus;
private List<String> decript;
private List<String> images;
private Bounds bounds;
private List<BaseAttrs> baseAttrs;
private List<Skus> skus;
}调用远程服务保存优惠信息
1.开启coupon优惠卷
@EnableDiscoveryClient
@SpringBootApplication
配置中心
spring.application.name=gulimall-coupon

spring.cloud.nacos.config.server-addr=127.0.0.1:8848
spring.cloud.nacos.config.namespace=14087d52-72e7-467f-8bac-8956d1f8d96e
spring.cloud.nacos.config.group=prod

spring.cloud.nacos.config.ext-config[0].data-id=datasource.yml
spring.cloud.nacos.config.ext-config[0].group=dev
spring.cloud.nacos.config.ext-config[0].refresh=true

spring.cloud.nacos.config.ext-config[1].data-id=mybatis.yml
spring.cloud.nacos.config.ext-config[1].group=dev
spring.cloud.nacos.config.ext-config[1].refresh=true

spring.cloud.nacos.config.ext-config[2].data-id=other.yml
spring.cloud.nacos.config.ext-config[2].group=dev
spring.cloud.nacos.config.ext-config[2].refresh=true
2.开启Feign
product开启feign
@EnableFeignClients(basePackages = "com.atguigu.gulimall.product.feign")
@EnableFeignClients(basePackages = "com.atguigu.gulimall.product.feign")
@EnableDiscoveryClient
@MapperScan("com.atguigu.gulimall.product.dao")
@SpringBootApplication
public class GulimallProductApplication {

    public static void main(String[] args) {
        SpringApplication.run(GulimallProductApplication.class, args);
    }

}
对应coupon的controller
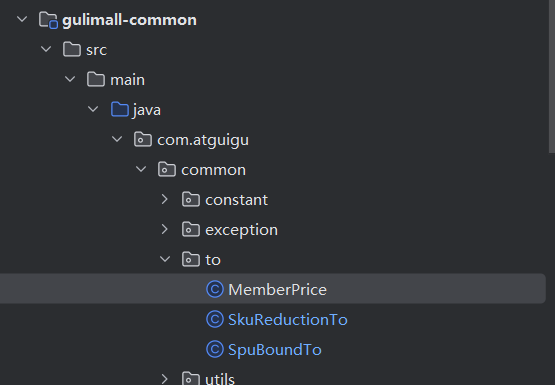
package com.atguigu.gulimall.product.feign;

import com.atguigu.common.to.SkuReductionTo;
import com.atguigu.common.to.SpuBoundTo;
import com.atguigu.common.utils.R;
import org.springframework.cloud.openfeign.FeignClient;
import org.springframework.web.bind.annotation.PostMapping;
import org.springframework.web.bind.annotation.RequestBody;

@FeignClient("gulimall-coupon")
public interface CouponFeignService {


    /**
     * 1、CouponFeignService.saveSpuBounds(spuBoundTo);
     *      1)、@RequestBody将这个对象转为json。
     *      2)、找到gulimall-coupon服务,给/coupon/spubounds/save发送请求。
     *          将上一步转的json放在请求体位置,发送请求;
     *      3)、对方服务收到请求。请求体里有json数据。
     *          (@RequestBody SpuBoundsEntity spuBounds);将请求体的json转为SpuBoundsEntity;
     * 只要json数据模型是兼容的。双方服务无需使用同一个to
     * @param spuBoundTo
     * @return
     */
    @PostMapping("/coupon/spubounds/save")
    R saveSpuBounds(@RequestBody SpuBoundTo spuBoundTo);


    @PostMapping("/coupon/skufullreduction/saveinfo")
    R saveSkuReduction(@RequestBody SkuReductionTo skuReductionTo);
}
创建To数据传输对象
调试
设置MySQL隔离机制Mysql事务隔离级别-操作版_set session transaction isolation level-优快云博客
补充数据库字段
pms_sku_info表的sale_count字段

pms_spu_info表的weight字段
![]()
mybatis-plus的wrapper拼接
对于有or查询条件的数据
  QueryWrapper<XXXEntity> wrapper = new QueryWrapper<>();
有or的:
//  wrapper.and这样写是为了避免查询条件层级出错
// brandId=1 and (id=1 or spu_name like xxx)
  wrapper.and((w)->{
                w.eq("id",key).or().like("spu_name",key);
            });
无or的:
  wrapper.eq("brand_id",brandId);
返回值时间格式化
spring:
  jackson:    # 时间格式化
    date-format: yyyy-MM-dd HH:mm:ss
QueryWrapper常用方法列表
| 函数 | 说明 | 例子 |
| eq | 等于(=) | queryWrapper.eq(“user_name”, “张三”); //user_name=“张三” |
| ne | 不等于(<>) | queryWrapper.ne(“user_name”, “张三”); //user_name<>“张三” |
| gt | 大于(>) | queryWrapper.gt(“level”, 1); //level>1 |
| ge | 大于等于(>=) | queryWrapper.ge(“level”, 1); //level>=1 |
| lt | 小于(<) | queryWrapper.lt(“level”, 1); //level<1 |
| le | 小于等于(<=) | queryWrapper.le(“level”, 1); //level<=1 |
| between | 值1和值2之间 | queryWrapper.between(“level”, 1,10); //level>=1 and level <=10 |
| notBetween | 不在值1和值2之间 | queryWrapper.notBetween(“level”, 1,10);//level<1 or level >10 |
| like | 模糊匹配 like %值% | queryWrapper.like(“user_name”, “张三”); //user_name like “%张三%” |
| not like | 不模糊匹配 not like %值% | queryWrapper.notLike(“user_name”, “张三”); //user_name not like “%张三%” |
| likeLeft | 左模糊匹配 like %值 | queryWrapper.likeLeft(“user_name”, “张三”); //user_name like “%张三” |
| likeRight | 右模糊匹配 like 值% | queryWrapper.likeRight(“user_name”, “张三”); //user_name like “张三%” |
| isNull | 字段 为空 | queryWrapper.isNull(“user_name”);//user_name is null |
| isNotNull | 字段 不为空 | queryWrapper.isNotNull(“user_name”);//user_name is not null |
| in | 字段 in (v0,v1,…) | queryWrapper.in(“user_name”, {“张三”,“李四”,“王五”}); // user_name in (“张三”,“李四”,“王五”) |
| notIn | 字段 not in (v0,vl,…) | queryWrapper.notIn(“user_name”, {“张三”,“李四”,“王五”}); // user_name not in (“张三”,“李四”,“王五”) |
| inSql | 字段 in ( sql语句) | queryWrapper.in(“user_name”, (select name from student where age< 23)); // user_name in (select name from student where age< 23) |
| notInSql | 字段 not in ( sql语句) | queryWrapper.notIn(“user_name”, (select name from student where age< 23)); // user_name not in (select name from student where age< 23) |
| groupBy | 分组:GROUP BY 字段 | queryWrapper.groupBy(“user_name”);//group by user_name |
| orderByAsc | 排序:ORDER BY 字段 ASC | queryWrapper.orderByAsc(“createTime”);//order by createTime asc |
| orderByDesc | 排序:ORDER BY 字段 DESC | queryWrapper.orderByDesc(“createTime”);//order by createTime desc |
| orderBy | 排序:ORDER BY 字段 | queryWrapper.orderBy(true, true, “createTime”);//order by createTime asc |
| or | 拼接 OR | 说明:主动调用or表示紧接着下一个方法不是用and连接!(不调用or则默认为使用and连接);queryWrapper.eq(“id”, “1”).or().eq(“user_name”, “张三”); //id = 1 or name =‘张三’ |
| and | 拼接 AND | queryWrapper.eq(“id”, “1”).and(i->i.eq(“user_name”, “张三”)); //id = 1 and name =‘张三’ |
| apply | 拼接 sql | 说明: 该方法可用于数据库函数动态入参的params;queryWrapper.eq(“id”, user.getId()).apply(“date_format(‘createTime’,‘%Y-%m-%d’) = {0}”,“2023-07-25”);//date_format(‘createTime’,'%Y-%m-%d) =‘2023-07-25’") |
| last | 无视优化规则直接拼接到 sql 的最后 | 说明:只能调用一次,多次调用以最后一次为准 有sq1注入的风险,请谨慎使用queryWrapper.last(" limit 1");// limit 1 |
| exists | 拼接 EXISTS(sql语句) | queryWrapper.exists(“SELECT id FROM Student WHERE User.id = Student.userId”);// exists (“SELECT id FROM Student WHERE User.id = Student.userId”) |
| notExists | 拼接 NOT EXISTS (sg1语句) | queryWrapper.notExists(“SELECT id FROM Student WHERE User.id = Student.userId”);// not exists (“SELECT id FROM Student WHERE User.id = Student.userId”) |
| nested | 正常嵌套不带 AND或者 OR | queryWrapper.nested(i->i.eq(“id”,“1”).eq(“user_name”,“张三”));// id = 1 and user_name=“张三” |
| having | having ( sql语句) | queryWrapper.having(“sum(age) > {0}”,10);//having sum(age) > 10; |


 1567
1567

 被折叠的 条评论
为什么被折叠?
被折叠的 条评论
为什么被折叠?
 到【灌水乐园】发言


